da Vinci’s Workshop#
Download the Dataset#
In order to follow this guide, the first thing to do is download the USD dataset.
Introduction#
The da Vinci Workshop dataset has been put together as an example of using OpenUSD in a filmmaking-like production process. The da Vinci Workshop dataset includes individual 3D assets which adhere to a consistent, well defined Asset structure. The dataset also includes Sequence and Shot structures which utilize OpenUSD to enable an efficient, non-destructive, collaborative workflow for the team.
Goals#
The goals that the creative team established for this project were as follows:
Provide practical examples of production ready USD Structures.
Illustrate the utility of various OpenUSD composition arcs; specifically SubLayers, References, Payloads and Variant Sets.
Demonstrate an OpenUSD pipeline that supports sequential data propagation and concurrent, non-destructive refinement across a medium sized creative team.
Browsing the Dataset#
In order to open the dataset, a user first needs to have an Omniverse Kit application installed (e.g. Kit App Template, IsaacSim, etc.).
You can find instructions to download and build your own Omniverse Kit App Template in the Kit App Template setup instructions.
Download the da Vinci Workshop dataset using the link above and extract its contents to your local hard drive.
Install an Omniverse Kit application (e.g. USD Composer, IsaacSim, etc.).
Once you have a Kit application installed, launch it and go to the Content tab in the UI.
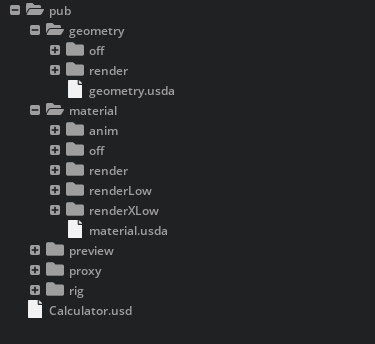
Navigate to the folder location you unzipped the Distributable_2023_Davinci dataset. Within this folder, you will see an /asset and a /shot sub-folder.
Individual assets are organized under the /asset folder while the linear content is organized under the /shot folder.
To view the animated shot, simply navigate to the /shot/rt/rt_010/ folder. Then open the rt_010_base.usda file by right-click->Open or double-click. Given the size of the file, if you want to curate which content loads, right-click and choose Open With Payloads Disabled. Then you can manually turn on the various Payloads within the stage window.
In order to play back the animation, inside of your Omniverse Kit application, enable the Timeline by going to Window -> Animation -> Timeline. Pressing play on the timeline will play back the animation.
To view a single asset, simply navigate to the /asset/props folder, then within any of the sub-folders there, select the USD file within it (e.g. within the /asset/prop/AirScrew folder, select the AirScrew.usd file)
Incorporating external file sources#
For this project, the creative team chose to organize their data based on two production processes:
Individual 3D Asset authoring
Shot production
This decision was reflected in the folder structure that was selected and enforced for the entirety of the production.
DaVinci/asset/prop/asset_name
DaVinci/shot/sequence_name
DaVinci/shot/sequence_name/shot_name
The OpenUSD files stored within these structures consisted of clearly named Asset Interface Layers and their supporting Contributions (User Workstreams). To ensure navigability, the initial structures are template-based with informative names and standardized Entrypoint Prims. Anchored asset paths are used exclusively.
In general, the ordering and naming of Contributions within an Asset Interface mirrors the associated production process steps, e.g., model, surface, rig or assemble, animate, and light.
In this example dataset, you will find files utilizing the usd, usdc, and usda file extensions. Lightweight files (typically Asset Interface Layers like files) were stored as usda to enable direct inspection by the team. Larger data files were stored as usdc for efficiency and as an indication to all team members that they should not be viewed or edited in a text editor. Essentially, the different file suffixes acted as a secondary strategy to help inform team members on which files were editable, and which should be left alone. The root/base Asset files used the simple usd extension as a matter of best practice.
Asset Composition Arcs#
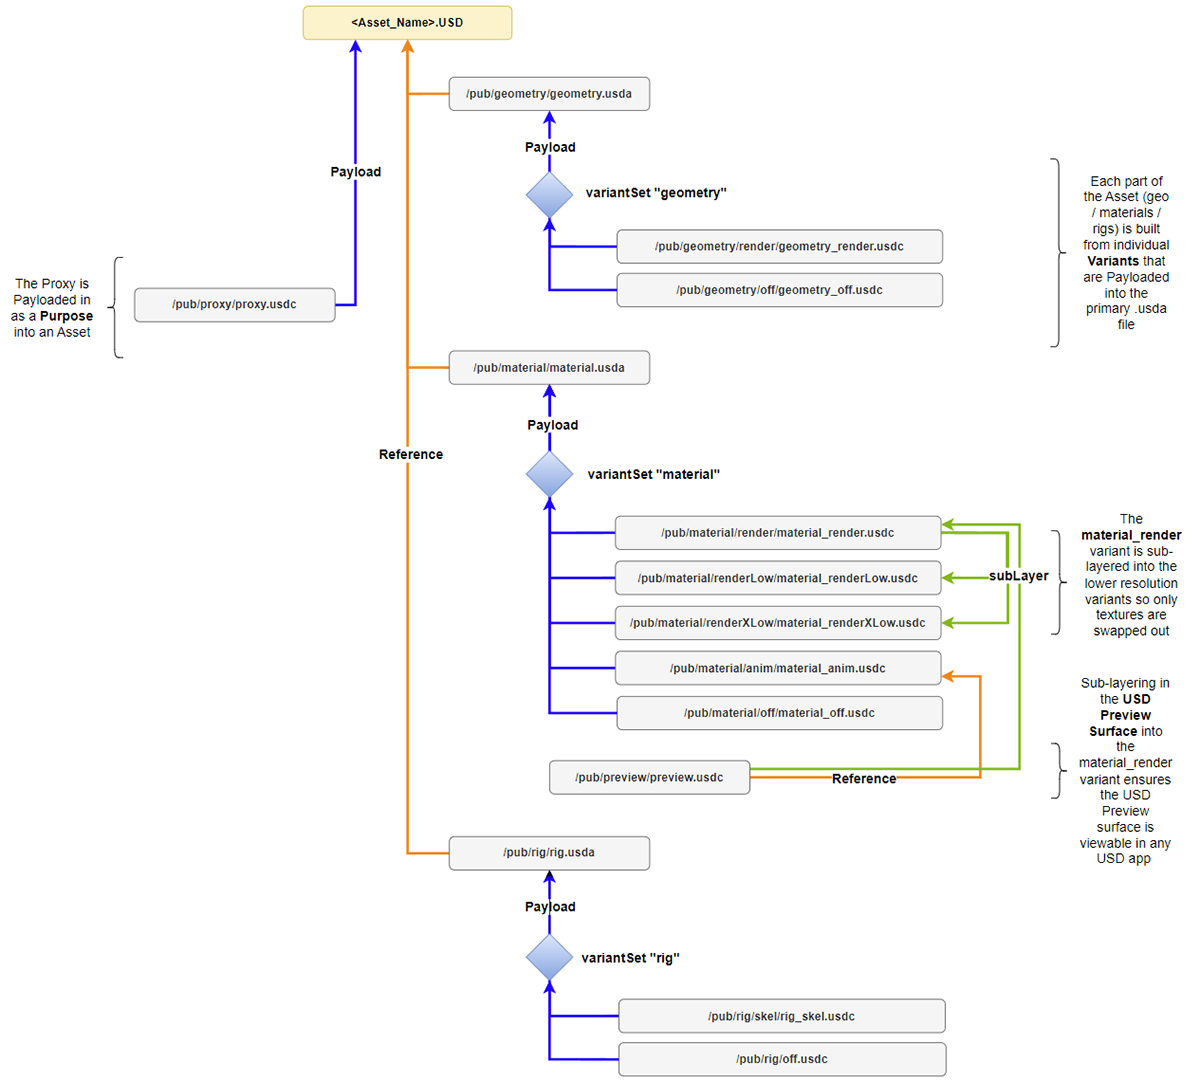
The da Vinci Workshop dataset utilizes several different OpenUSD composition arcs. The diagram above showcases the Asset structure as deployed by the creative team for any given 3D model that was provided as part of the production.
The Asset structure was composed of multiple contributing USD files which followed this pattern:
<asset_name>.usd
pub/<contribution>/<contribution>.usd[a,c]
pub/<contribution>/<variant>/<contribution>_<variant>.usdc
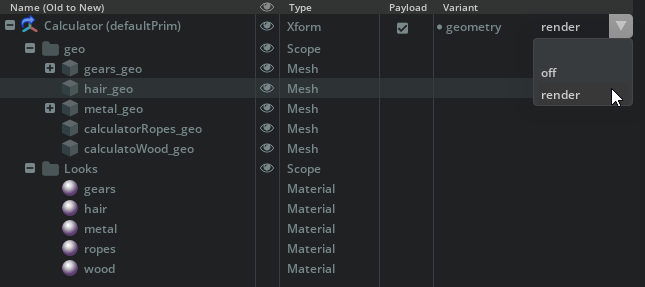
The <contribution> sub-folder naming convention was reflective of what part of the Asset it represented (e.g. geometry / material / preview / proxy / rig, etc.). The USD file at the top of these various contribution folders were often composition arcs themselves that composed multiple variant sets for that aspect of the Asset. For example, the pub/geometry/ contribution folder contained a geometry.usda file, which composed the geometry variants located within the sub-folders /render and /off. That geometry.usda file was then composed into the primary asset interface (in the example image, the Calculator.usd) which resolved all of the different <contribution> information.
The Asset structure contained the following OpenUSD Layers.
<asset_name>.usd
This file represented the Asset Interface for the entire Asset and contained a combination of payloads and references to manage the composition all of its contributions. It utilized the references composition arc for the rig, material, and geometry Contributions (with each of those contributions driven by their own payload composition arc), and it composed simple payloads for its Proxy contribution. Each of these arcs will be described in more detail below.
It is important to note that the construction of and use of the payloads and references within this main file enabled users so they could load in an Asset with the payloads disabled (meaning the Asset wouldn’t populate within the current stage), while still maintaining access to the variant sets within it to configure as needed before loading. This allowed for superior management of their stages and scene assembly as their scenes encompassed hundreds or thousands of individual USDs that would have been problematic to deal with from both a memory and performance perspective.
Asset Geometry#
The decision was made to allow the team to turn the high-resolution geometry on or off, as well as see a bounding box presentation when needed. Given that thinking, here’s how the team chose to manage the geometry for an individual Asset.
pub/geometry/geometry.usda
This file defined the ‘geometry’ variant set on the Entrypoint prim for the Asset. Variant selections that controlled the OpenUSD Layer were payloaded in. For this production, the team included two variants (the geometry_render and geometry_off USD files), both of which are described below.
pub/geometry/render/geometry_render.usdc
The ‘render’ geometry variant contained the hero/canonical renderable geometry along with all materials and material bindings to the various geometry elements. This was the default geometry variant.
pub/geometry/off/geometry_off.usdc
The ‘off’ geometry variant contained only the Entrypoint prim with no geometry or materials and material bindings. Selecting this as the geometry variant removed all geometry and typed material definitions from the scene.
pub/proxy/proxy.usdc
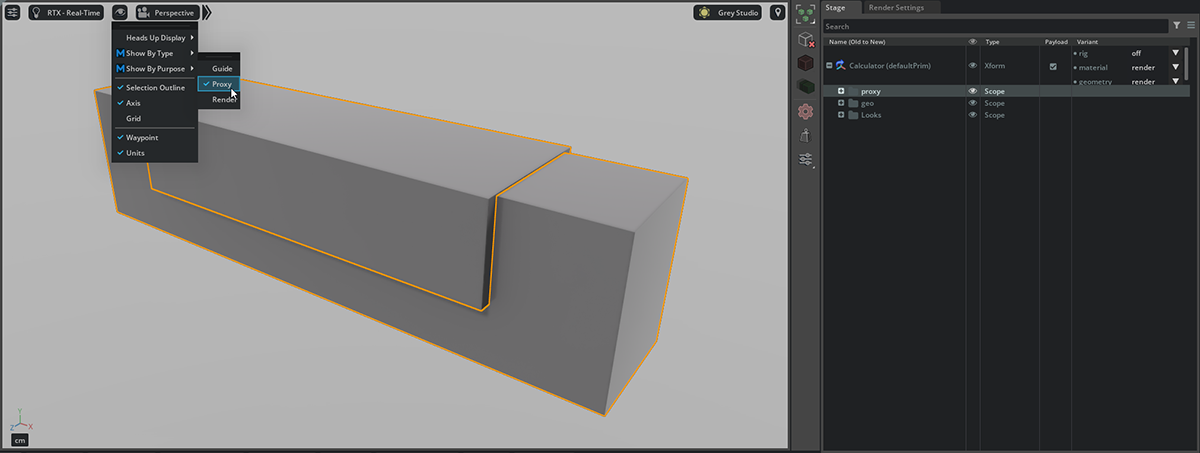
The proxy contribution was built as geometry containing a simple Cube prim aligned to the bounding box of every gprim contained in the ‘geometry_render’ geometry variant. Instead of making it another geometry variant, the proxy was set as a Purpose to help the team quickly toggle the display of a lightweight scene representation while still having the full scene description loaded. The proxy file was payloaded into the primary Asset interface file. By switching the Purpose from Render to Proxy inside of any app that reads the USD Purpose, the team could hide all of the higher resolution geometry in the scene for speed and focus.
Asset Materials#
Here’s how the creative team chose to manage the materials for an individual Asset. It was important that the team be able to see materials in a number of resolutions as well as turn them off entirely if desired to keep performance up.
pub/material/material.usda
This file defined the ‘material’ variant set on the Entrypoint prim. Variant selections that controlled the OpenUSD Layer were payloaded in. For this production, the team included five variants (the material_render, material_renderLow, material_renderXLow, material_anim and material_off USD files), as well as a USD Preview Surface preview.usdc file, all of which are described below to provide flexibility when viewing the materials applied to the Assets.
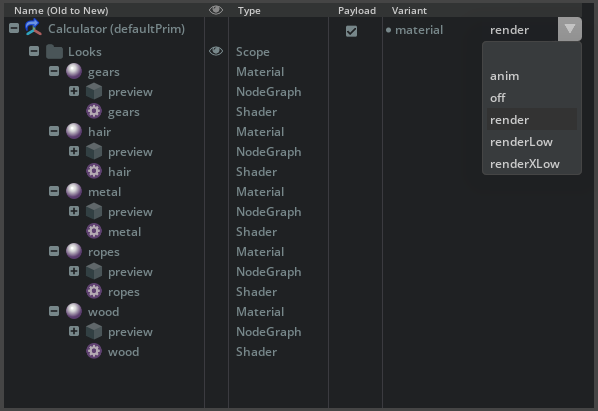
pub/material/render/material_render.usdc
The ‘render’ material variant contained the hero/canonical shading networks along with supporting high-resolution texture and mdl files. Texture resolutions were capped at 4k square. MDL shaders and texture maps were stored as sidecar files. The preview contribution was also sub-layered into this file. This was the default material variant.
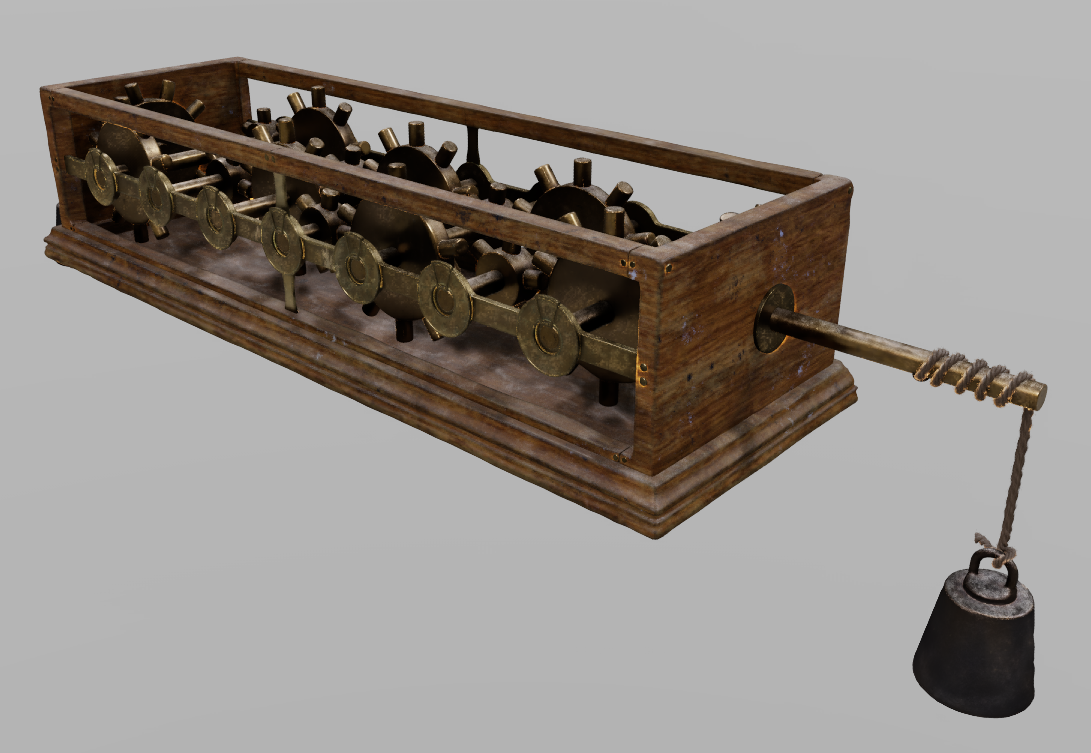
Default Render Material Variant (4k textures)#
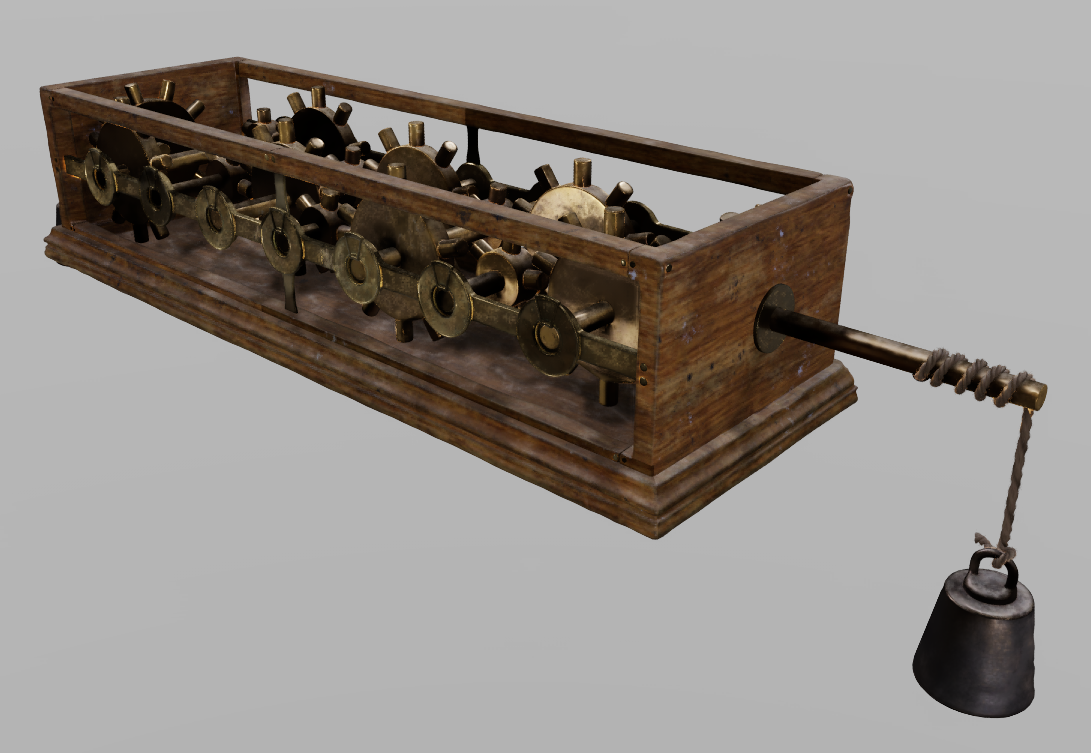
pub/material/renderLow/material_renderLow.usdc
The ‘renderLow’ material variant subLayers in the ‘material_render’ variant and overrides texture and MDL material asset paths with local, lower-resolution copies of the same bitmap textures. For the renderLow materials, texture resolution was capped at 1k square. MDL shaders and texture maps were stored as sidecar files. The preview contribution traveled as a sub-layer within the ‘material_render’ into this file.

Render Low Material Variant (1k textures)#
pub/material/renderXLow/material_renderXLow.usdc
The ‘renderXLow’ material variant subLayers in the ‘material_render’ variant and overrides texture and MDL material asset paths with local, very low-resolution copies of the same bitmap textures. For the renderXLow materials, texture resolution was capped at 256px square. MDL shaders and texture maps were stored as sidecar files. The preview contribution traveled as a sub-layer within the ‘material_render’ into this file.

Render XLow Material Variant (256px textures)#
pub/material/anim/material_anim.usdc
The ‘anim’ material variant references in the preview contribution only.
Anim Material Variant (uses Preview texture resolution)#
pub/material/off/material_off.usdc
The ‘off’ material variant contains only the Entrypoint prim. Selecting this removed all shaders (including preview shaders) from the stage.
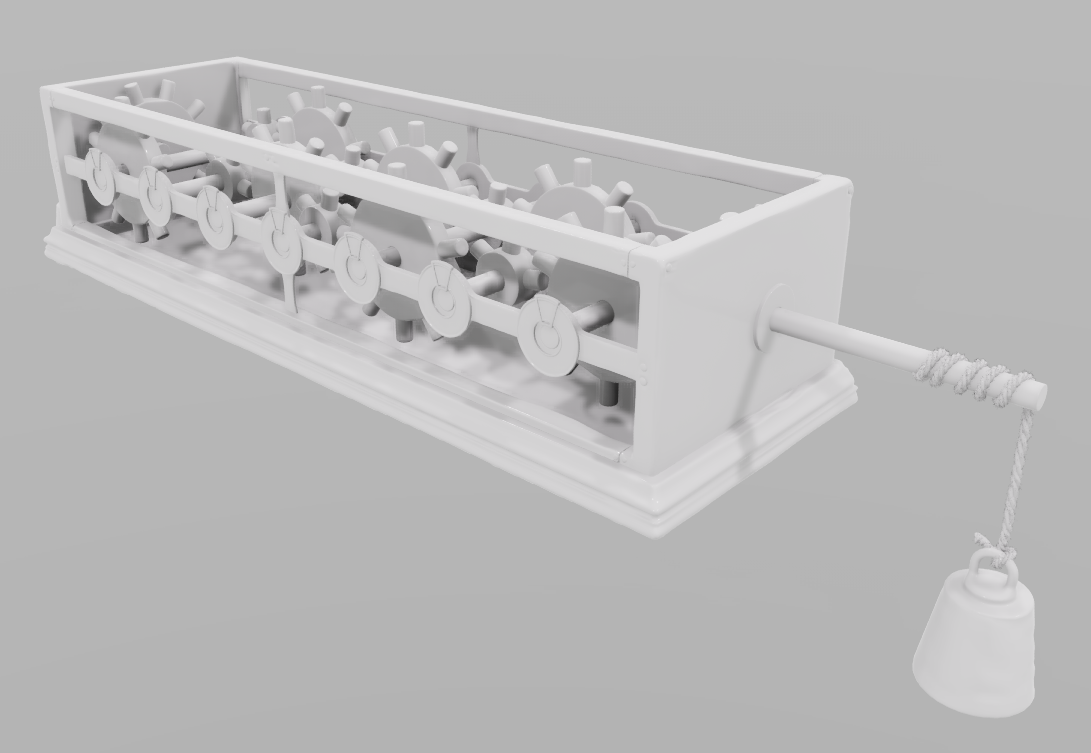
Off Material Variant#
pub/preview/preview.usdc
The ‘preview’ contribution was built to contain a UsdPreviewSurface for every material defined in the material_render material variant. Anchored asset paths were used by the team to ‘borrow’ textures from the material_renderLow material variant (1k texture resolution). This ensured that the individual Assets would be viewable in any application that supported USD and USD Preview Surface and since it was sub-layered into the other material variant files, it would be visible regardless of which variant was displayed. This made it valuable as the team moved between their DCC apps and Omniverse as they didn’t have to worry about materials and textures showing up.
USD Preview Surface#
Asset Rigs#
Here’s how the creative team chose to manage the rigging for an individual Asset. It’s important to note that if an Asset didn’t contain a rig, the team’s process and workflow pipeline still created the proper <contribution> folders for it as well as generated properly named and configured USD files that matched the asset interface. But in these cases, each of the rig variants would simply be empty. The team chose this as a way to maintain absolute consistency across their entire asset creation workflow as well as to provide flexibility in the case that they had to go back later and add a rig to an Asset.
pub/rig/rig.usda
This file defined the ‘rig’ variant set on the Entrypoint prim where selections controlled the OpenUSD Layer that is payloaded in. It also defined the ‘rigLocation’ assetInfo metadata which optionally holds the path to a sidecar (Maya) rig.
pub/rig/skel/rig_skel.usdc
The ‘skel’ rig variant was used as a place-holder for UsdSkel data. It defined the /AssetName/skeleton Scope and sets the Entrypoint prim type to SkelRoot.
pub/rig/off/rig_off.usdc
This file represented the default rig variant. The ‘off’ rig variant contained only the Entrypoint prim. Selecting this removed all skeleton data from the scene.
Shots & Sequences Composition Arcs#

The Shot and Sequence structures worked in concert to enable efficient, non-destructive, collaboration in parallel between the various team members. They shared the same compositional patterns and conventions as the Assets did, and that provided a clear, consistent and stable interface for artists, their workflows and tools.
You will notice that the OpenUSD Layers in the structures adhered to the following pattern:
<context>_base.usd
pub/<contribution>/<context>_<contribution>_delta.usda
In this format, <context> referred to a shot or sequence name and <contribution> was defined as a descriptive/meaningful name for a unit of data/work (e.g. anim, camera, assembly). It is important to note that data organization and composition under the contribution could be modified at an artist’s discretion. The initial structure was established as a guide, but production complexity and objectives influenced the ultimate composition.
The diagram above illustrates the OpenUSD structure of an initial/idealized Shot and Sequence structure that the team used. Note that the diagram is shot-focused in strength order. To properly read the diagram in chronological order, you should start at the bottom.
Sequences#
The initial Sequence structure contained the following OpenUSD Layers:
<sequence>_base.usd
The file was the primary Asset Interface Layer for the Sequence. It utilized subLayers to aggregate opinions in Production-Process/WorkFlow order.
pub/assembly/<sequence>_assembly_delta.usda
Assets are referenced (ideally), instanced (occasionally), and included within this composition arc. Artists could include additional composition arcs in this Layer, particularly for scene partitioning in large settings. This _delta.usda composed an additional file:
<sequence>_assembly_install.usd - This is where all asset references and positioning were authored for the sequence.
pub/finish/<sequence>_finish_delta.usda
This file contained opinions related to look, lighting, and efficiency of the sequence. Artists could include additional composition arcs in this Layer as needed. It composes two additional files:
<sequence>_finish_light.usd - Sequence lighting was authored in this file.
<sequence>_finish_remove.usd - Any prims that are not desired for a sequence are removed or disabled within this file.
pub/OVERRIDE/<sequence>_OVERRIDE_delta.usda
This file was rarely used, but the OVERRIDE contribution could be added as the strongest subLayer to allow its opinions to supersede all others within a sequence composition.
Shots#

The initial Shot structure (in composition order) contained the following OpenUSD Layers to compose the shot from multiple _delta.usda files that defined its various aspects.
<shot>_base.usd
This file represented the primary Asset interface Layer for a given Shot. It utilized subLayers to aggregate opinions in Production-Process/WorkFlow order, which made it easy for the team to contribute in a non-destructive manner. Also worth noting is that all of the shot’s render settings are stored in a Dictionary within the CustomLayerData of this file.
pub/assembly/<shot>_assembly_delta.usda
Assets are referenced (ideally), instanced (occasionally), and included within this composition arc. Artists could include additional composition arcs in this Layer, particularly for scene partitioning in large settings. It’s worth noting that within this production, this _delta.usda file composed two additional files:
<shot>_assembly_create.usd - This file included prims created directly for a shot were defined here
<shot>_assembly_install.usd - Asset references and positioning for a shot were defined here
pub/camera/<shot>_camera_delta.usda
As the name suggests, this file was used as the entrypoint for defining the scene camera for a given shot. It also composed an additional file:
<shot>_camera_create.usd - The camera was defined in its entirety within this file
pub/anim/<shot>_anim_delta.usda
This file provided an entrypoint for opinions related to deformations and transformations of Assets. Artists included additional composition arcs in this Layer, particularly for cache inclusion.
pub/finish/<shot>_finish_delta.usda
Like its Sequence counterpart, this file contained opinions related to look, lighting, and efficiency of the shot. Artists could include additional composition arcs in this Layer as needed. There are a number of files that are composed within the <shot>_finish_delta.usda:
<shot>_finish_audio.usd - All audio was installed through this file.
<shot>_finish_finalnotes.usd - Any last minute tweaks desired by the team were authored here.
<shot>_finish_light.usd - Shot lighting was authored in this layer.
<shot>_finish_material.usd - Material tweaks for a shot were authored in this layer.
<shot>_finish_remove.usd - Any assets not needed or desired for a shot were removed/hidden in this layer.
<shot>_finish_sky.usd - The skydome environment for the shot was defined here.
pub/OVERRIDE/<sequence>_OVERRIDE_delta.usda
As was the case within the Sequence, this file was rarely used, but the OVERRIDE contribution could be added as the strongest subLayer to allow its opinions to supersede all others within a sequence composition.
Why did the team choose to use these USD Arcs?#
The hierarchy and organization of the da Vinci Workshop dataset represented a common organization found in Animation and VFX. The steps required to accomplish a project from concept to delivery informed the mental model of participants in the process. There was a beginning, a middle, and an end (model, surface, rig OR track, anim. light), and the team wanted to capture these different aspects of the production in a consistent manner.
The makeup of the creative team also helped inform how the project was structured, so that individual artists knew how and where their work slotted into the overall pipeline. As such, the composition of the structures found in this project generally align with how the process was assigned, and delivered.
The subLayer composition arc was used so that artists could express (and override) opinions in a conventional order. It was simple and intuitive for them to non-destructively make changes inside of Omniverse for the rest of the team to review. Anything that was rejected could simply have its subLayer turned off or removed without having to refactor the rest of the composition.
The payload and reference arcs allowed for efficiency, control, and asset reuse. This became particularly important for bigger elements that consumed lots of memory as well as when other common entourage Assets needed to be duplicated multiple times within the scene (e.g., Bowl_asset, Bowl_asset_01, Bowl_asset_02, …)
Asset Parameterization (for LOD and skeletons) was also cleanly enabled via the variant composition arc, allowing the team to quickly configure their Assets based on the desired workflow. They could turn on and off geometry, set material resolutions and view only proxy geometry as needed.
Conclusion#
The da Vinci Workshop dataset is an example of how to structure a collaborative workflow for linear content in a typical production pipeline. This dataset shows the power of simple concepts at scale and can help content creators develop their own patterns for project organization as well as data creation and aggregation. Just look at the output that is possible utilizing the power of OpenUSD.