Uploading to NGC and Publishing#
Overview#
This document details how developers request an Omniverse Cloud PaaS deployment of an application. At the end of this process, customers will have the containerized Omniverse application deployed within their Omniverse Cloud PaaS subscription so they can launch a session that streams the application natively to the user’s browser.
The documentation below describes the following:
How applications are deployed to Omniverse Cloud PaaS
Pushing application container images to NGC
Managing which application versions are ‘live’ with a deployment action request
Next steps and notification
Note
Before proceeding through the steps, ensure you have cleanly built and tested your application container and have access to the Private Registry of your NGC Organization.
How Applications are Deployed to Omniverse Cloud PaaS#
All applications in Omniverse Cloud PaaS are Linux-based container images and they operate as containers within your Omniverse Cloud PaaS tenant. Below is the high-level overview:
Registration with NVIDIA’s NGC: This container image is logged with NVIDIA’s NGC registry. While NVIDIA’s core applications are publicly registered, each organization’s custom applications are listed in a private registry. This private registry is managed by the customer team, however, access to the NVIDIA Enterprise Support team needs to be provided as described here.
Application Service Registration: Applications and their versions deployed to an Omniverse Cloud PaaS instance are registered with an application service within that instance. We use information from the URL of the container image to add a new application version. Post-registration, the application version becomes accessible via the Omniverse Cloud PaaS example portal.
Portal Interaction: The Omniverse Cloud PaaS Portal for a given instance communicates with the application services public API. This determines the available application versions for user access. Consequently, the customer-developed applications are displayed in the Portal and can be launched by the end-user.
Having understood the broader deployment process, let us dive into the specifics of deploying your custom application.
Pushing Application Container Images to NGC#
Your custom container image is pushed to your organization’s NGC Private Registry using docker push from your workstation.
You can find additional information in the NGC User Guide.
Warning
When packaging and uploading your application container to NGC, ensure your container abides by the file size requirements as published in the Private Registry Quotas and Limits section here.
Log Into NGC using docker login#
Log into the NVIDIA Docker repository using the following commands:
docker login nvcr.io
Username: $oauthtoken
Password: <paste your personal access key here>
Note
If your NGC account contains multiple organization structures, you must create the personal access key under the organization that contains the private registry you wish to push the container.
If you logged in successfully, a similar message will be displayed:
WARNING! Your password will be stored unencrypted in /home/horde/.docker/config.json.
Configure a credential helper to remove this warning. See
https://docs.docker.com/engine/reference/commandline/login/#credentials-store
Tagging and Uploading your Container Image#
Tag the container image you wish to push and the documentation for this process can be found here. Once the image is tagged, issue the docker push command to upload the Docker image to your private registry. The <organization_id> can be found under your username menu in the upper right portion of the NGC Dashboard page. Click the down carrot and then select Organization.
docker tag <image_name:version> nvcr.io/<organization id>/<image_name:version>
docker push nvcr.io/<organization_id>/<image_name:version>
The output with ascii progress bars will be displayed, indicating that the container image is being uploaded. This process could take a few minutes depending on the size of your application.
Once finished, a similar message should be displayed:
0.1: digest: sha256:33263c1cb27d3ad8417581c4b3448b792baf03eb4a890a87bf1f6e2642ddc4a7 size: 7196
If you would like to see a CLI output listing the container images that have been tagged for upload via docker push, you should see something similar to the following by using the docker image list command:
REPOSITORY                                  TAG             IMAGE ID        CREATED         SIZE
my_usd_explorer                             0.1             d6099a819edd   21 hours ago     15.2GB
nvcr.io/c12dbd4carxf/ovc/my_usd_explorer    0.1             d6099a819edd   21 hours ago     15.2GB
ubuntu                                      latest          bf3dc08bfed0   3 weeks ago      76.2MB
linux_exporter                              latest          c7b733c8d82b   7 weeks ago      135MB
python                                      3.10-slim       af6a90a1d65e   2 months ago     128MB
hello-world                                 latest          d2c94e258dc
Note
Containers are compressed after upload and the sizes in the NGC Private Registry may appear smaller than on your local file system.
Your application is now ready to be deployed in your Omniverse Cloud PaaS tenant. Applications uploaded to NGC do NOT automatically go live, and any developers or end-users of your application will not yet be able to use your new version until the application has been deployed as described in the following section of this guide. Previously deployed applications are not affected by newly pushed versions, and will continue to be available.
Managing which Applications are ‘live’ with a Deployment Action Request#
Deployment Action Request#
The NGC Private Registry acts as a library of your application containers; however, by default, the application containers are not ‘live’.
To change which application containers are ‘live’ (i.e., accessible to your users via a browser), you must coordinate with the NVIDIA Enterprise Experience (NVEX) Team by raising a support case with the details of your request. This allows a clear record of changes to deployments and an opportunity for request details to be carefully verified to avoid mistakes.
The actions you may want to coordinate are listed below:
Deploying a new application to appear in your Omniverse Cloud PaaS Portal.
Deploying a new version of an existing application.
Removing a single version of an existing application.
Removing an application and all of its versions so it is no longer ‘live’ on the Omniverse Cloud PaaS Portal.
You can have multiple versions of every application ‘live’ on your instance. If the total number of versions exceeds 100, this may cause slower application load times, so you may wish to remove older versions once they are no longer in use.
Note
A ‘live’ application version cannot be made unavailable by removing it from the NGC Private Registry; to deactivate an application or version the ‘remove’ deployment action below must be followed. Deleting it from NGC Private Registry without making a ‘remove’ deployment request may result in undefined behavior.
Information Required for your Deployment Request#
Before placing your request, please gather the following information:
- Application Name
This will be visible to users in the Omniverse Cloud PaaS Portal.
This does not need to match your container name, but must be consistent every time you make a deployment request related to this application.
- Semantic Application version
This must match a version tag on an application container that exists in your NGC Private Registry (you will have to set the version tag on the container previously, using the docker push command).
This must be a string that does not contain any spaces (e.g.,
2024.0.1,2.0,3.2-beta).This will be visible to users in the Omniverse Cloud PaaS portal’s version selector for this application.
- NGC Container URL
This is only required when adding a new application or new version of an existing application.
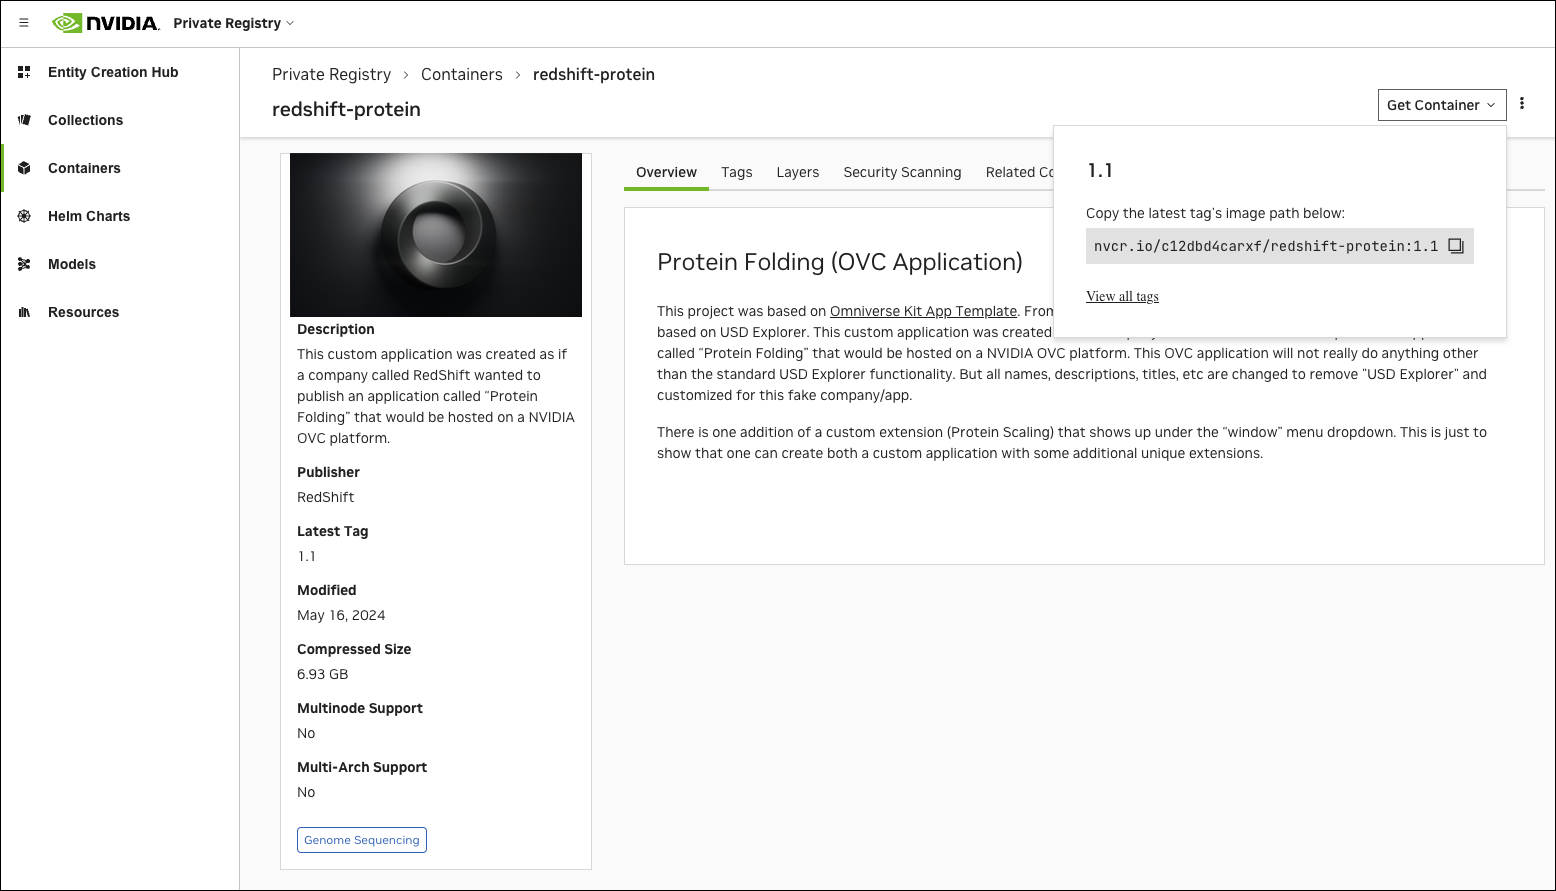
The URL can be retrieved by logging into ngc.nvidia.com and navigating to the Private Registry, then clicking on the name of the container and copying the subsequent URL from your browser’s navigation bar.
The same URL is used for all versions of a single application.
See the screenshot below for an example of how the page may appear when you copy the URL.
An example of the URL is: nvcr.io/c12dbd4carxf/redshift-app:1.2.
- Version of Kit used to build the Application
The version of Kit used must be specified in the request. (i.e., 105.1.2, 106.4.0)
NGC Container URL Example#
This is an example of a URL: nvcr.io/c12dbd4carxf/redshift-app:1.2
NGC Org ID: c12dbd4carxf
Container Name: redshift-app
Tag/Version: 1.2
If you are using a specific team in your NGC Org (i.e., not the “No Team” space), you may have a URL similar to: nvcr.io/c12dbd4carxf/ovc/redshift-app:1.2
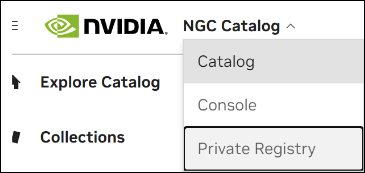
The following screenshot shows the Private Registry option in the NGC interface, under the NGC Catalog drop-down menu:
The following screenshot shows an example of the NGC Private Registry after clicking on a specific container. The URL from this page is used as the ‘NGC Container URL’.
Creating a Deployment Request via the Enterprise Support Portal#
Note
While you can have several container versions in your Private Registry in NGC, we highly suggest testing and validating your application before creating the deployment request support case. This ensures your containerized application is working as expected locally, and reduces potential lengthy debugging back and forth with the NVIDIA Enterprise Support team.
The Enterprise Support Portal allows you to file a support case containing information on your application deployment request. The deployment actions section below outlines the information needed for each request.
The process flow is as follows:
Log into the Enterprise Support Portal.
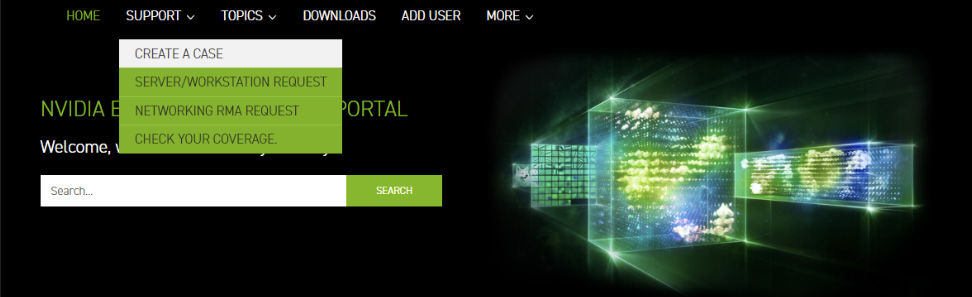
Click Support.
Click Create Case.
Populate with information following the guidelines below for your desired deployment action.
Click Submit.
Review any support case responses you may receive from the NVIDIA team as they may include requests for missing details, information on a failed deployment, or confirmation the request has been successfully handled.
You can view all support cases you and your team raised via the Enterprise Support Portal, including the thread of communication with the NVEX Team in the ‘Comments’ section of the support case user interface.
Note
Additional information and help for the Enterprise Support Portal can be found within the Enterprise Support Portal Guide.
Each deployment requires different information for the ‘Subject’, ‘Description’ and ‘Upload File’ fields, which you can see in the sections below. For all other fields, use the following values:
Subject: See explanation below.
Description: See explanation below.
Severity: Severity 3 - Standard Request
Product Type: Cloud Services
Product Category: Omniverse Cloud
Entitlement: When logged into the Enterprise Support Portal you can click this field to autofill your organization’s support entitlement.
How would you like to be contacted: Email (if you want to receive email and comment responses) or Comment if you want ESP comments only (i.e., no email responses).
Upload File: See explanation below.
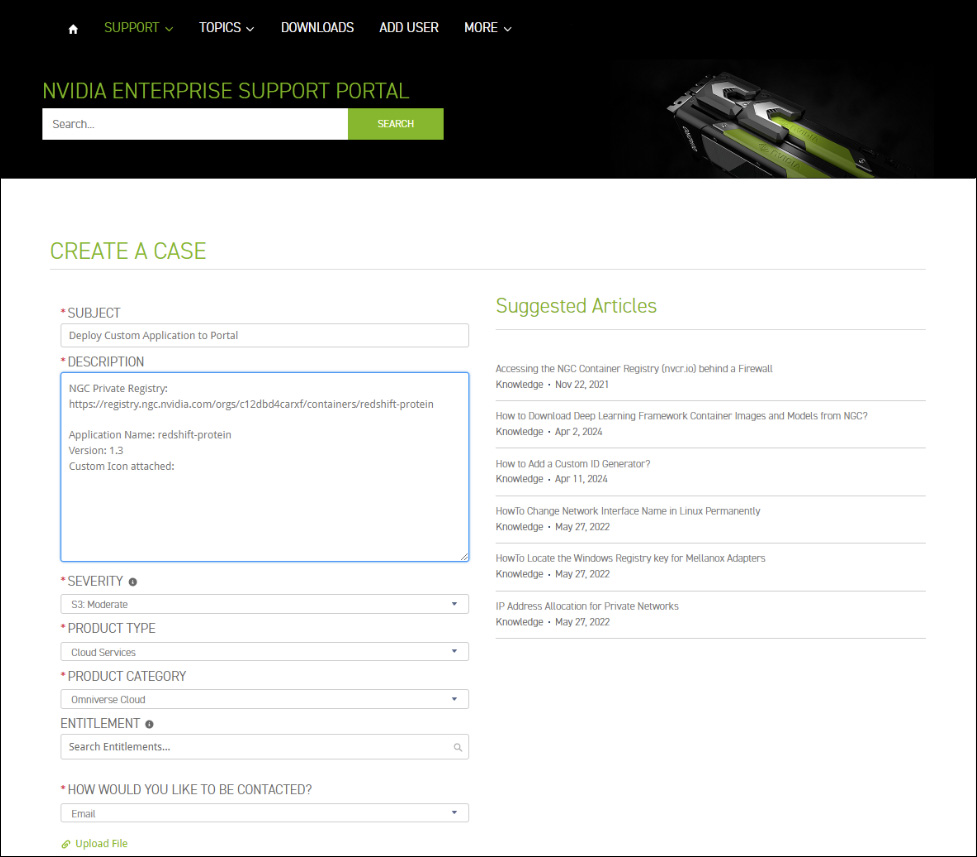
The screenshot below shows the ‘Create a Case’ option with the Enterprise Support Portal:
The screenshot below shows an example of creating a case within the Enterprise Support Portal:
Deployment Action Request: Adding a New Application#
Note
It is important to take note of the exact version of Kit your application is using. The Kit version used for your container is referenced within the Dockerfile of Kit App Template. (/kit-app-template/tools/containers/Dockerfile.j2)
For example:
# Utilize Kit Kernel 106.4.0
FROM nvcr.io/nvidia/omniverse/ov-kit-kernel:106.4.0-release.156974.9321c814
A new application will appear as a separate tile in your Omniverse Cloud PaaS Portal. Each Launcher Tile includes a version selector that allows the user to choose which of the ‘live’ versions they prefer, including when only one version is available.
The following fields require specific content when filing this type of request:
- Subject:
Add Application - [App Name]
- Description:
Name - [App Name]
Version - [App version]
NGC Container URL - [URL]
Kit version used to build the Application (i.e., 105.1.2, 106.4.0)
Deployment Action Request: Adding a New Version of an Existing Application#
The version selector for an existing application in the Omniverse Cloud PaaS Portal will provide an additional version option. Previously listed versions can still be launched using the version selector.
The following fields require specific content when filing this type of request:
- Subject:
Add Application - [App Name]
- Description:
Name - [App Name]
Version - [App version]
NGC Container URL - [URL]
Version of Kit used to build the Application (i.e., 105.1.2, 106.4.0)
Deployment Action Request: Removing a Version from an Existing Application#
An application version that previously appeared in the Omniverse Cloud PaaS Portal version selector for this application will no longer appear. Other versions of the application are not affected.
- Subject:
Remove Application Version - [App Name]
- Description:
Name - [App Name]
Version - [App version]
Remove Container: Yes/No
Note
Removing the containers means that the application will require a new deployment. Keeping the containers means we simply need to register them, which is a much simpler and faster process.
Deployment Action Request: Removing an Existing Application Completely (all versions)#
The following fields require specific content when filing this type of request:
- Subject:
Remove Application Version - [App Name]
- Description:
Name - [App Name]
Version - [App version]
Remove Container: Yes/No
Note
Removing the containers means that the application will require a new deployment. Keeping the containers means we simply need to register them, which is a much simpler and faster process.
What if I don’t have access to the Enterprise Support Portal?#
Omniverse Cloud PaaS customers have different internal policies regarding who they allow to create support cases within the portal. If you currently do not have access, you can request access from the person in your company responsible for working with NVIDIA support; otherwise, they or someone else they have given portal access to will have to do the following on your behalf.
Next Steps and Notification#
Once your request has been submitted, the request will go through several steps outlined below. The NVEX Team will always be your primary point of contact and can provide updates as required. They can also update your request based on certain milestones.
Application service registration#
Every Omniverse Cloud PaaS instance has an application service that tracks available applications and versions. After creating the application container image, NVIDIA integrates the details you provided and info from the package to register the application with the application service. Subsequently, the Omniverse Cloud PaaS Portal employs this service to ascertain which apps and versions to display. Once integrated, you can see and access the custom application via the Omniverse Cloud PaaS Portal.
Deployment notifications#
- Deployment Success
If the deployment is successful, the NVEX Team will update your support case with relevant details, including confirmation of the application name and version and details about the container image. This serves as your official notification of deployment. The case can be concluded after you validate the deployment. If there are any deployment issues, notify us immediately. Further updates to this application, such as adding a new version, should be handled by filing a new support case for the deployment request.
- Problems due to infrastructure issues
If the deployment fails due to an infrastructure issue on NVIDIA’s part, our team will create an internal incident response process to restore service as quickly as possible. If we believe the deployment of your application will be delayed due to these issues, we will notify you via the support case.
- Problems due to application or container issues
Problems with containerizing your application or within the application itself, may cause it to fail to launch, although it was successfully deployed. As NVIDIA cannot validate your application, we require it to be tested immediately following a deployment.
If a deployment fails due to issues with the containerized application, the NVEX Team will share any logs that may be helpful via the original support case.
If your application fails to launch, please contact us using the original deployment support case for additional assistance. Include any/all details, timings (including time zone), browser logs, and screenshots that may help further diagnose the problem. The NVEX Team will consult with the Omniverse Cloud PaaS Operations Team to retrieve logs and/or other information that may help troubleshoot your application’s issues.