Application Streaming#
Interactive Kit SDK applications that use the RTX Renderer inside the viewport require an NVIDIA RTX GPU at runtime. By enabling application streaming, the intensive rendering-related workload stays on an RTX-enabled host and anyone with a modern Chromium-based browser can use the application as designed.
This tutorial guides developers through a workflow that prepares a Kit application for streaming, from the first run on your machine to a cloud-ready container:
Local streaming – Start with the Base Editor template, enable streaming through an Application Layer, and verify the capability in a browser session on the same machine.
Message round-trip – Add a lightweight Python extension that listens for a custom message from the browser and updates the scene, demonstrating the control path between browser and application.
Cloud preparation – Package the application to prepare it for deployment on RTX-enabled servers or NVIDIA’s managed application-streaming service.
Prerequisites#
The following prerequisites are required to complete this tutorial:
Clone the kit-app-template repository from GitHub
-or-
Download the Omniverse Kit SDK package from NVIDIA NGC for your operating system.
Clone the web-viewer-sample repository.
Follow the Prerequisites section in README.md to install the required minimum Node.js and npm versions before continuing.
A development machine with an NVIDIA RTX GPU and latest drivers installed.
(Optional) Install Docker and the NVIDIA Container Toolkit on Linux if you plan to follow the containerization section.
Important Note: Installation and Configuring Docker steps are required for NVIDIA Container Toolkit.
Tutorial#
In this tutorial you will create a streaming application starting from the Base Editor Template, add a lightweight Python messaging extension to enable browser based controls, and verify success by rotating a prim within the application from the browser. The completed build will run locally and be ready for containerization and cloud deployment.
1. Clone the Web Viewer sample#
The front-end web client for this tutorial is provided by the web-viewer-sample repository. It is a React + TypeScript project that contains the NVIDIA WebRTC streaming library and a starter UI layout. You will add a single control component to this viewer later in the tutorial. Start by cloning the repository and installing its dependencies:
git clone https://github.com/NVIDIA-Omniverse/web-viewer-sample.git
cd web-viewer-sample
npm install
cd ..
With the viewer cloned and its dependencies installed, you are ready to generate a stream-ready Kit application.
2. Generate a Stream-Ready Application#
In this section, you will use the Kit SDK tooling to generate a streaming‑enabled .kit file and then write a Python extension that adds turntable functionality to a selected OpenUSD prim.
2a - Create a Kit SDK application with a streaming enabled Application Layer#
Application Layers allow you to add optional functionality to an existing Kit application. In this section, you’ll create a streaming Application Layer that inherits the Base Editor Template application’s .kit file, adds the required streaming extensions and settings, and produces an additional _streaming.kit file. Follow the steps below to generate both the base application and the relevant Application Layer.
In your Kit project, run the template new tool:
Linux
./repo.sh template new
Windows
.\repo.bat template new
Follow the prompt instructions and make these selections:
? Select what you want to create with arrow keys ↑↓: Application
? Select desired template with arrow keys ↑↓: Kit Base Editor
? Enter name of application .kit file [name-spaced, lowercase, alphanumeric]: my_demo.my_editor
? Enter application_display_name: Turntable Demo
? Enter version: 0.1.0
? Do you want to add application layers? Yes
? Browse layers with arrow keys ↑↓: [SPACE to toggle selection, ENTER to confirm slection(s)] Omniverse Kit App Streaming (Default)
The tool generates two files:
source/apps/
├─ my_demo.my_editor.kit
└─ my_demo.my_editor_streaming.kit
my_demo.my_editor.kit defines the core editor application, while my_demo.my_editor_streaming.kit inherits that base file and appends the extensions:
[dependencies]
"my_demo.my_editor" = {}
"omni.kit.livestream.app" = {}
Kit activates extensions listed under [dependencies] in the application’s .kit file. In my_demo.my_editor_streaming.kit, we see a new dependency. The omni.kit.livestream.app extension enables streaming of the entire application framebuffer in Omniverse Kit applications. It captures rendered frames and streams them to remote clients using the streaming implementations provided by the omni.kit.livestream.webrtc extension.
Before we create the turntable extension, we may test the application to ensure that streaming layer is correctly configured and is ready for streaming:
In your Kit project, build the Kit application:
Linux
./repo.sh build
Windows
.\repo.bat build
Next, launch the application with no-window flag:
Linux
./repo.sh launch -- --no-window
Windows
.\repo.bat launch -- --no-window
Choose my_demo.my_editor_streaming.kit when prompted.
The --no-window flag keeps the editor UI hidden while still running the WebRTC stream.
Leave this terminal open and wait until the console prints “RTX Ready” which signals the WebRTC stream is active.
Next, start the Web Viewer in another terminal:
cd web-viewer-sample
npm run dev
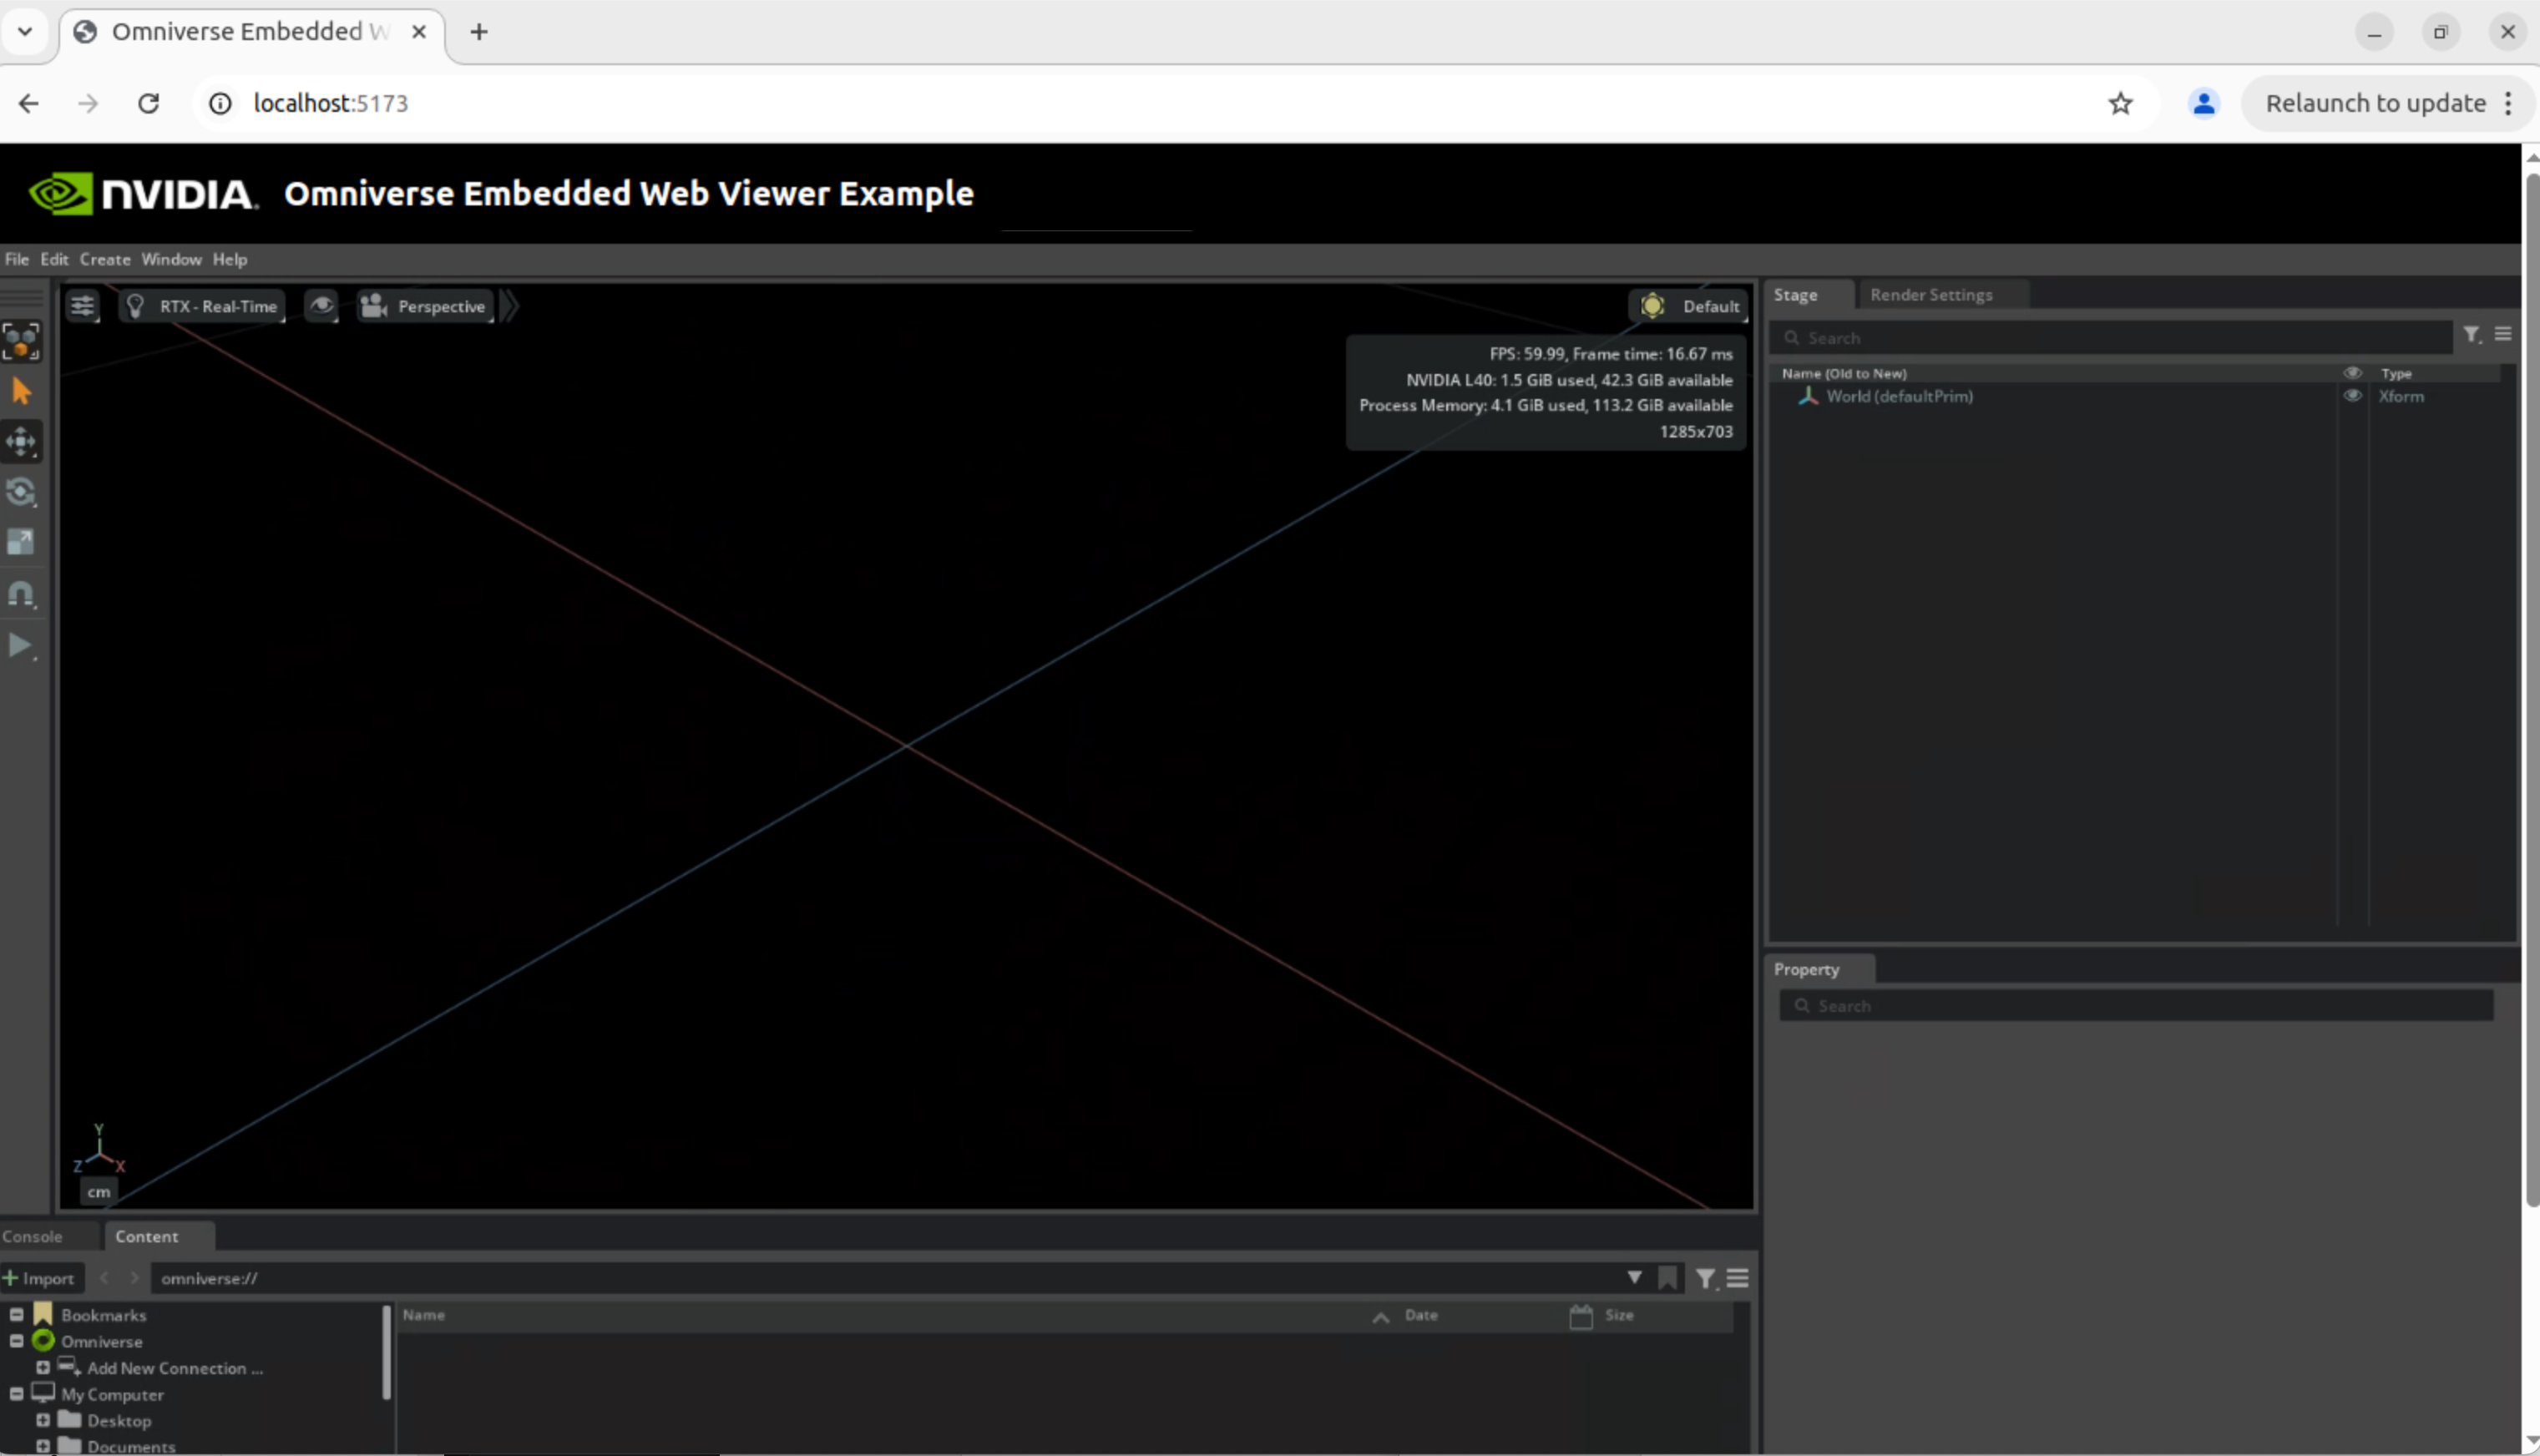
Vite prints a local URL (for example, http://localhost:5173). Copy that address into a Chromium browser.
In the browser, choose UI for any streaming app and connect.
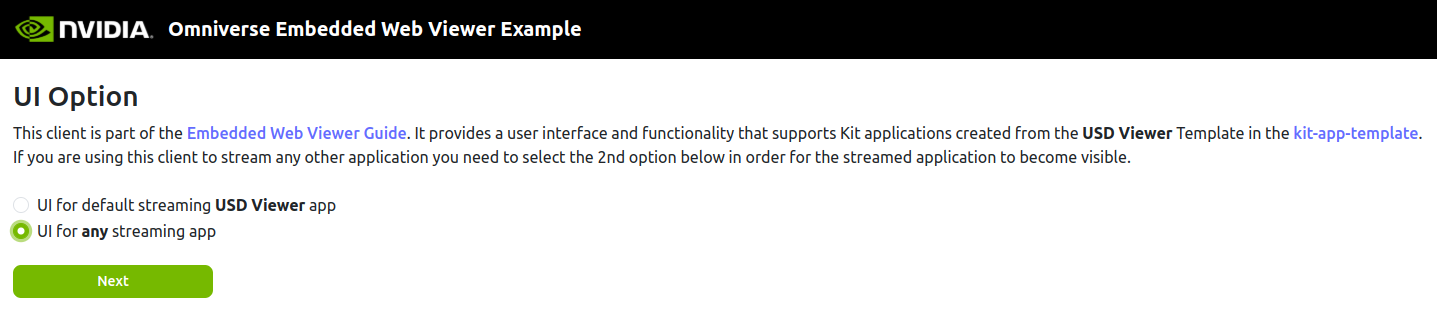
Your browser should now display the streamed application UI from the headless Kit application.
To quit the test run, press Ctrl+C in the terminal running npm run dev to stop the Web Viewer, then press Ctrl +C in the terminal that launched my_demo.my_editor_streaming.kit to shut down the headless Kit process.
You’ll restart both after adding the turntable extension in the next steps.
2b - Add Required Extension Dependencies#
Before we create the turntable extension, we will add the required dependency to the base application .kit file.
Open your new application’s .kit streaming layer (apps/my_demo.my_editor_streaming.kit) and enable omni.kit.livestream.messaging under [dependencies]:
[dependencies]
"my_demo.my_editor"          = {}
"omni.kit.livestream.webrtc" = {}
"omni.kit.livestream.messaging"  = {} # new
omni.kit.livestream.webrtc handles the pixel stream, while
omni.kit.livestream.messaging carries browser-sent data to an event bus for application extensions to act on.
2c - Create the Turntable Extension#
Now we introduce a turntable extension to demonstrate how event-driven behaviors can animate scene objects. This extension will listen for a specific rotation event and applies incremental transforms to a target OpenUSD prim, effectively rotating it around a fixed axis. By emitting these events on a timed loop, we can create a smooth, continuous turntable effect.
Create a basic Python extension:
Linux
./repo.sh template new
Windows
.\repo.bat template new
Follow the prompt instructions and make these selections:
? Select what you want to create with arrow keys ↑↓: Extension
? Select desired template with arrow keys ↑↓: Basic Python Extension
? Enter name of extension [name-spaced, lowercase, alphanumeric]: my_demo.extension
? Enter extension_display_name: Turntable Demo Extension
? Enter version: 0.1.0
The tool creates a new folder structure like this:
source/
├─ apps/
│  ├─ my_demo.my_editor.kit
│  └─ my_demo.my_editor_streaming.kit
└─ extensions/my_demo.extension
   ├─ config
   ├─ data
   ├─ docs
   └─ my_demo/extension
      ├─ tests
      ├─ __init__.py
      └─ extension.py
Replace the content of extension.py with the following code:
import carb.events, omni.ext, omni.kit.app, omni.usd
from pxr import Gf, Usd

ROTATE_SPEED_DEG = 30.0

def _get_selected_prim() -> Usd.Prim | None:
    """Return the first selected prim, or None if nothing is selected."""
    ctx = omni.usd.get_context()
    sel = ctx.get_selection().get_selected_prim_paths()
    return ctx.get_stage().GetPrimAtPath(sel[0]) if sel else None

class TurntableExt(omni.ext.IExt):
    def on_startup(self, _ext_id):
        self._mode, self._elapsed, self._base_deg = "stop", 0.0, 0.0
        app = omni.kit.app.get_app()
        bus = app.get_message_bus_event_stream()
        evt = carb.events.type_from_string("rotate_request")
        self._sub_evt  = bus.create_subscription_to_pop_by_type(evt, self._on_rotate_request)
        self._sub_tick = app.get_update_event_stream().create_subscription_to_pop(self._on_update)
        print("[Turntable] startup")

    def _on_rotate_request(self, event) -> None:
        mode = (dict(event.payload.get_dict()).get("mode") or "").lower()
        if mode == "continuous":
            prim = _get_selected_prim()
            if prim and prim.IsValid():
                attr = prim.GetAttribute("xformOp:rotateXYZ")
                if attr:
                    self._base_deg = attr.Get()[1] % 360.0
            self._elapsed = 0.0
            self._mode    = "continuous"
        else:
            self._mode = "stop"
        print(f"[Turntable] mode={self._mode}")

    def _on_update(self, event) -> None:
        if self._mode != "continuous":
            return
        self._elapsed += dict(event.payload.get_dict())["dt"]
        prim = _get_selected_prim()
        if prim and prim.IsValid():
            deg = (self._base_deg + self._elapsed * ROTATE_SPEED_DEG) % 360.0
            prim.GetAttribute("xformOp:rotateXYZ").Set(Gf.Vec3f(0, deg, 0))

    def on_shutdown(self):
        if self._sub_evt is not None:
            self._sub_evt.unsubscribe()
            self._sub_evt = None
        if self._sub_tick is not None:
            self._sub_tick.unsubscribe()
            self._sub_tick = None
        print("[Turntable] shutdown - subscriptions released")
The Turntable extension listens for rotate_request messages delivered by the streaming-messaging layer and, when the payload’s mode is "continuous" or "stop", starts or stops rotation of the selected prim. When rotation begins, application update adds ROTATE_SPEED_DEG (currently 30 degrees per second) to that starting angle and writes the updated value back to the prim, producing a smooth rotation effect.
2d - Add the Turntable Extension to Your Application#
Before we proceed to the next section, we need to add the extension we just created to the application. Open your new application’s .kit file (apps/my_demo.my_editor.kit) and, under [dependencies], add:
[dependencies]
"my_demo.extension" = {}   # new
...
This registers the extension with your application. Later, you can return to the same place to adjust which extensions your application loads.
3. Edit the Web Viewer#
The viewer is a React application that connects to a streaming-enabled Kit application.
You’ll add a control component that sends rotate_request messages to the streaming Kit application.
3a - Create a Control Component#
First, create a TurntableControl.tsx file that will hold our React control component, the folder structure of web-viewer-sample is like this:
web-viewer-sample/
├─ node_modules/
├─ readme-assets
└─ src
   ├─ assets
   ├─ App.css
   ├─ App.tsx
   ...
   └─ TurntableControl.tsx
Paste the following code into TurntableControl.tsx:
import React, { useState } from "react";
import AppStream from "./AppStream";

interface Props {
  enabled: boolean;
}
export default function TurntableControl({ enabled }: Props) {
  const [rotating, setRotating] = useState(false);
  const handleClick = () => {
    if (!enabled) return;
    const msg = {
      event_type: "rotate_request",
      payload: { mode: rotating ? "stop" : "continuous" },
    };
    AppStream.sendMessage(JSON.stringify(msg));
    setRotating(!rotating);
    console.log("sent ->", msg);
  };
  return (
    <button
      style={{ padding: 8, fontSize: 16 }}
      disabled={!enabled}
      onClick={handleClick}
    >
      {rotating ? "Stop" : "Start Rotation"}
    </button>
  );
}
TurntableControl.tsx is a React component that renders a “Start / Stop Rotation” button in the Web Viewer and, when clicked, sends a rotation command to the Kit application over the existing WebRTC data channel via AppStream.sendMessage.
3b - Add the Control to the Web Viewer Layout#
Next, the new button will be added to the viewer layout so users can trigger rotation while watching the result of streaming application.
Open web-viewer-sample/src/App.tsx and:
import TurntableControl:
import TurntableControl from "./TurntableControl";
Locate the block that renders
<StreamOnlyWindow />for the Stream Form, overlay the button by inserting an absolutely-positioned<div>right after<StreamOnlyWindow />:{ /* Stream without UI Form */} {(this.state.currentForm === Forms.Stream) && (!this.state.useWebUI) && ( <> <StreamOnlyWindow sessionId={this.state.sessionId} backendUrl={this.state.backendUrl} signalingserver={this.state.signalingserver} signalingport={this.state.signalingport} mediaserver={this.state.mediaserver} mediaport={this.state.mediaport} accessToken={this.state.accessToken} onStreamFailed={this._resetStream} /> {/* new: overlay button to control rotation */} <div style={{ position: "absolute", top: 10, left: 600, zIndex: 10 }}> <TurntableControl enabled={true} /> </div> </> )}
The extra
<div>positions “Start / Stop Rotation” button above the streamed application UI without altering the existing layout.
The viewer now includes a “Start Rotation / Stop” button that sends a message to your Kit application over the WebRTC data channel.
4. Re-build, Launch and Test#
With the code in place, the next step is to build the application, start the headless streaming server, and open the Web Viewer so you can verify the Turntable workflow end-to-end. Follow the sequence below to bring everything online.
4a - Re-build and Launch the Kit Application#
In your Kit project, rebuild the Kit application:
Linux
./repo.sh build
Windows
.\repo.bat build
Next, launch the application with no-window flag:
Linux
./repo.sh launch -- --no-window
Windows
.\repo.bat launch -- --no-window
Choose my_demo.my_editor_streaming.kit when prompted.
Leave this terminal open and wait until the console prints “RTX Ready” which signals the WebRTC stream is active.
Next, start the Web Viewer in another terminal:
cd web-viewer-sample
npm run dev
Vite prints a local URL (for example http://localhost:5173). Copy that address into a Chromium browser.
Your browser should now display the application from the headless Kit application.
4b - Test in the Web Viewer#
Follow the following steps to test the functionality:
In the viewer, choose UI for any streaming app and connect.
In the Kit menu bar (inside the streamed application UI) select Create → Shape → Cube.
Click the cube so it highlights orange.
At this stage, you can also see the “Start Rotation” button is sucessfully rendered.
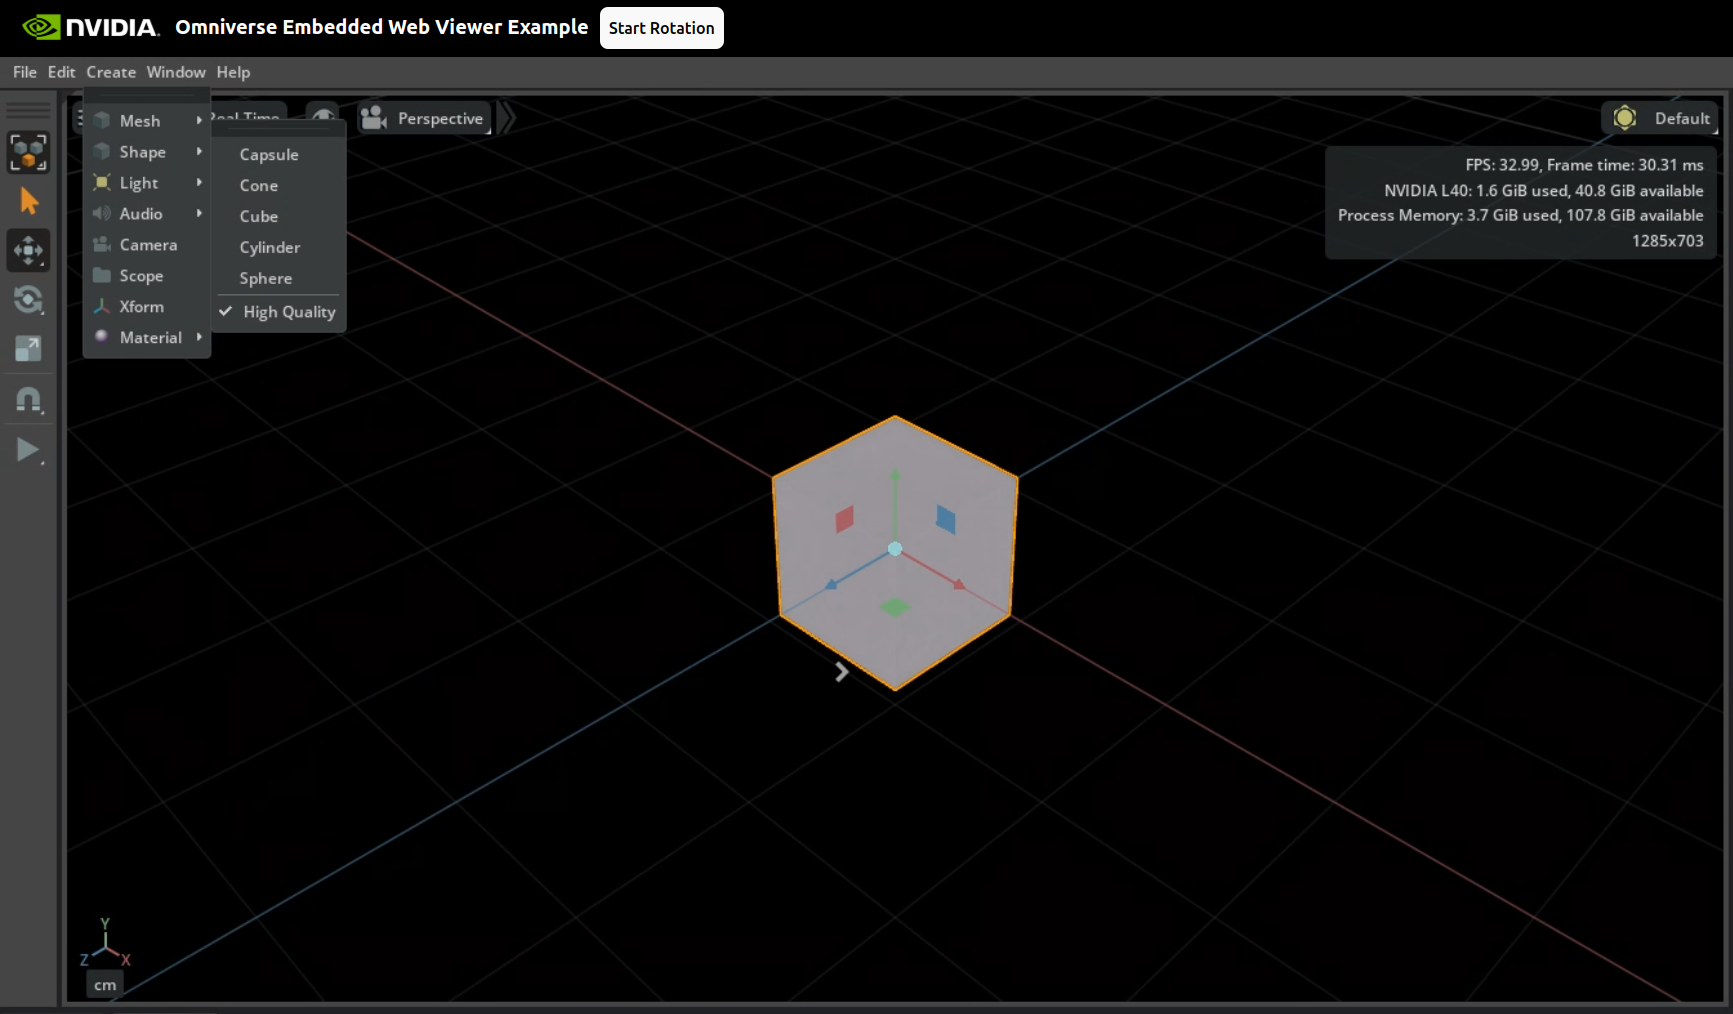
Click Start Rotation: The prim begins to spin.
Click Stop: Rotation halts.
Click Start Rotation again: Spinning resumes.
We’ve now taken the project from a basic application template suitable for high end workstations to messaging enabled streaming application ready for browser based interactions. This represents the basic development workflow for streaming application development with the Omniverse Kit SDK.
With development complete, we can now prepare the application for deployment. Next we will containerize the application (optional) so it can run on any RTX-Enabled server or on NVIDIA’s managed streaming service.
5. Optional: Containerize the application (Linux Only)#
Containerization creates a portable container image that can run on NVIDIA RTX GPU enabled servers or be registered with NVIDIA‑managed streaming services.
Important Note: Please install Docker and the NVIDIA Container Toolkit before you start.
5a - Containerize the Application#
The Kit SDK includes the package tool for distributing your applications. Run it by itself to create a fat package (zip archive), or add the --container flag to produce a container artifact. Here we will package as a container.
./repo.sh package --container --name turntable-demo
Important: When the packaging tooling prompts for which .kit file to include, select my_demo.my_editor_streaming.kit. Choosing the base application .kit file will omit the streaming layer and the Turntable extension.
Note the exact _streaming.kit file you choose will depend on your deployment target. For example, the NVIDIA managed application streaming service requires the use of the NVCF‑specific streaming Application Layer for use on DGX Cloud.
The resulting container bundles the Kit runtime (executable, core libraries, and extensions), your streaming‑enabled application, and the Turntable extension with all of its dependencies.
5b - Launch the Containerized Application#
We’ll run the new container to verify that it operates correctly before deployment (e.g., to a container registry, cloud service, or on‑premises cluster).
This can be done in two ways:
Option 1: Kit SDK launch tooling
If running from within the development repository applications packaged as containers can be launched using the launch command:
./repo.sh launch --container
If only a single container image exists, it will launch automatically. If multiple container images exist, you will be prompted to select the desired container image to launch.
Option 2: Image only (standard Docker)
If running from outside the development repository, applications packaged as container images can be launched using the conventional docker run command. As with local development this requires the NVIDIA Container Toolkit to be installed on your system:
docker run --gpus all --env OM_KIT_VERBOSE=1 \
  --env NVDA_KIT_ARGS="" --env NVDA_KIT_NUCLEUS="" \
  --mount type=volume,src=omniverse_shader_cache,dst=/home/ubuntu/.cache/ov,volume-driver=local \
  --mount type=volume,src=omniverse_extension_cache,dst=/home/ubuntu/.local/share/ov,volume-driver=local \
  --network=host \
  turntable-demo
The container will start the headless Kit process and the WebRTC streaming server.
Please leave it running, and wait for the log line “RTX Ready” (which confirms the stream is fully initialized) before opening the web viewer.
5c - Quick Verification#
Verify that the container streams correctly. This validation step ensures that the package created locally is ready for deployment.
In another terminal, start the web‑viewer sample so your browser can connect to the streaming session:
cd ../web-viewer-sample
npm run dev
Open the viewer URL, drop a cube, and click Start Rotation / Stop. The cube spins exactly as it did in the desktop run, proving the containerized build works.
You now have a portable image ready to push to a registry or deploy with Kubernetes/Helm.
6. From Local to Cloud – Streaming Deployment Paths#
Congratulations! We’ve now verified that the Turntable demo streams from your local workstation and responds to browser‑side rotation commands. The same build can also run in the cloud with the Helm orchestration layer based on Kubernetes Custom Resource Definitions (CRDs). The key differences are who runs the control plane and where the GPUs live.
6a - Orchestration layer#
The orchestration layer is the middle tier that converts a browser request into a usable GPU session. It comprises three core components:
Deployment records (Custom Resource Definitions, CRDs):
Three resources work together—Applicationnames the logical app,ApplicationVersionpins the container image and tag, andApplicationProfiledefines runtime settings such as GPU quota and Kit CLI options.Session scheduler:
A controller continuously monitors these records for new session requests. When a viewer opens your URL, the scheduler reads the matching CRDs, starts a fresh Kit pod on an available GPU node, and removes that pod as soon as the viewer closes the tab. This on‑demand pattern keeps idle costs low.Embedded WebRTC transport:
Each Kit pod already includes the WebRTC extension, so the browser connects through the same signalling and media channels you used locally. No additional media server is required.
Together these components form a workflow: the CRDs define the session, the scheduler starts the Kit pod, and the embedded WebRTC layer delivers the stream to the browser.
6b - Deployment options#
When you move from local testing to production, you must decide where the GPU sessions will run and who will operate the streaming control plane. Omniverse offers two service models:
Fully managed by NVIDIA:
NVIDIA operates both the control plane and the GPUs, so you only provide your container image while NVIDIA manages infrastructure, scaling, and maintenance.
Important: If you packaged your app withomni.kit.livestream.appfor local testing, swap to the NVCF streaming layer before uploading to the fully managed service, otherwise the deployment will fail.Self-managed: You operate the control plane on your own infrastructure. Two common paths are supported:
Azure Marketplace deployment – launch the ready‑made Omniverse Kit App Streaming template from Microsoft Azure Marketplace to install the streaming control plane and attach RTX‑capable GPUs in just a few clicks.
Helm charts on any Kubernetes cluster – use the Kit‑App‑Streaming Helm charts from NGC , push your container image, and apply the CRDs in your cloud or on‑premises Kubernetes cluster.
Why it matters: Choose the fully managed option when you want an upload‑and‑go workflow with minimal operational overhead. Choose self‑managed when you need to run close to existing data, satisfy specific security requirements, or utilize your own GPU capacity.
7. Cleanup#
Before continuing to the next section, it is recommended to clean up the applications, extensions, and any other repository changes that were created during this exploration.
Either revert all local changes or remove your existing repository/project entirely. Then, recreate it by cloning the repository again or by running the new project script from the Kit SDK.
Typical cleanup steps include:
Stop the dev server for the web‑viewer sample (press
Ctrl +Cin the terminal runningnpm run dev). You can remove the viewer folder once testing is complete.Revert changes to top level
premake5.luafileRevert changes to
repo.tomlDelete the
source/directoryDelete the
_build/directory, or run./repo.sh build -cor\.\repo.bat build -c
Additional Resources#
Guide: Embedded Web Viewer: Offers detailed guidance on how clients can control a streamed Kit application from the browser and receive data and notifications.
Omniverse Kit SDK - Application Streaming on NGC: Offers a container image that bundles the Kit runtime, WebRTC stream server, and core streaming components, providing a starting point for deploying RTX-rendered applications.
Omniverse Kit SDK Manual: Offers detailed insights into the Kit SDK’s architecture, components, and capabilities.
omni.kit.livestream.webrtc: The extension that that streams your Kit application’s full UI to a browser over WebRTC.
omni.kit.livestream.messaging: The extension that lets your streamed application and the browser pass JSON messages back and forth.
omni.kit.livestream.app: The extension enables streaming of the entire application framebuffer in Omniverse Kit applications. It captures rendered frames and streams them to remote clients using the streaming implementations provided by the omni.kit.livestream.webrtc extension.
Kit‑App‑Streaming Helm charts from NGC: Offers a curated bundle of container images, Helm charts, and sample assets to help deploy NVIDIA Omniverse Kit applications as cloud‑hosted sessions on Kubernetes.
Kit App Streaming on Azure Marketplace: Offers a ready‑made Omniverse Kit App Streaming template on Microsoft Azure Marketplace that installs the streaming control plane and assigns RTX‑capable GPUs with just a few clicks.