The Omniverse Kit SDK#

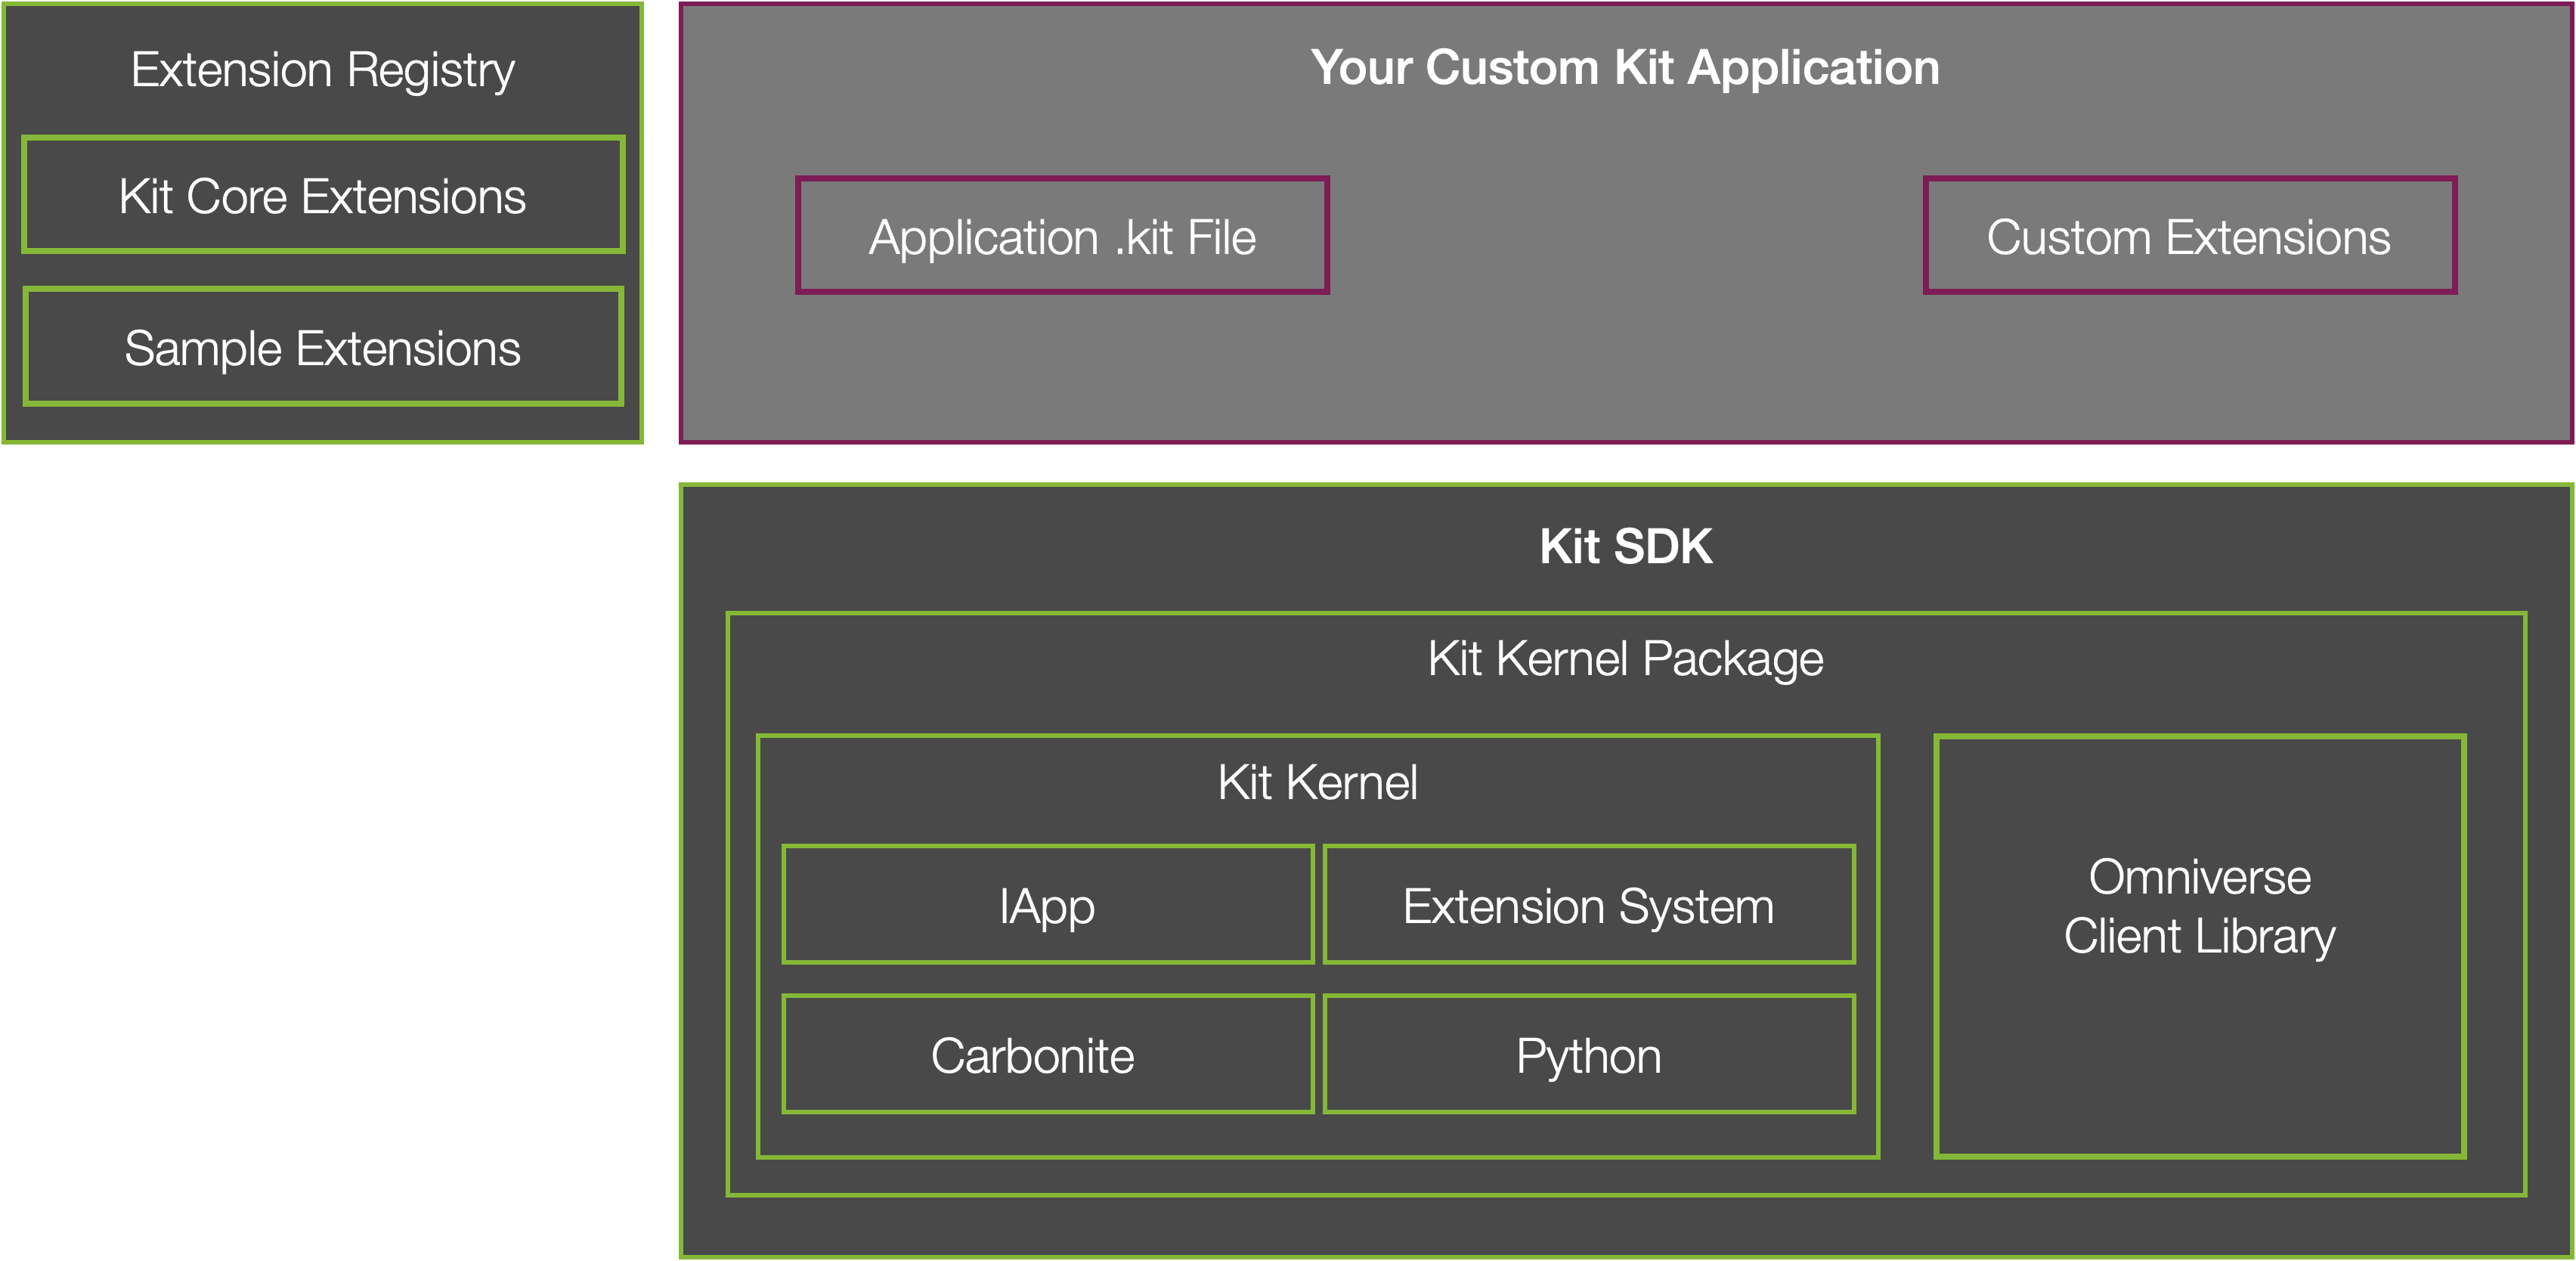
At its core, the Omniverse Kit SDK is a framework for efficiently managing extensions and plugins. It provides the tooling necessary for developers to assemble a blend of NVIDIA-provided and custom-developed extensions to create rich, full-featured applications.

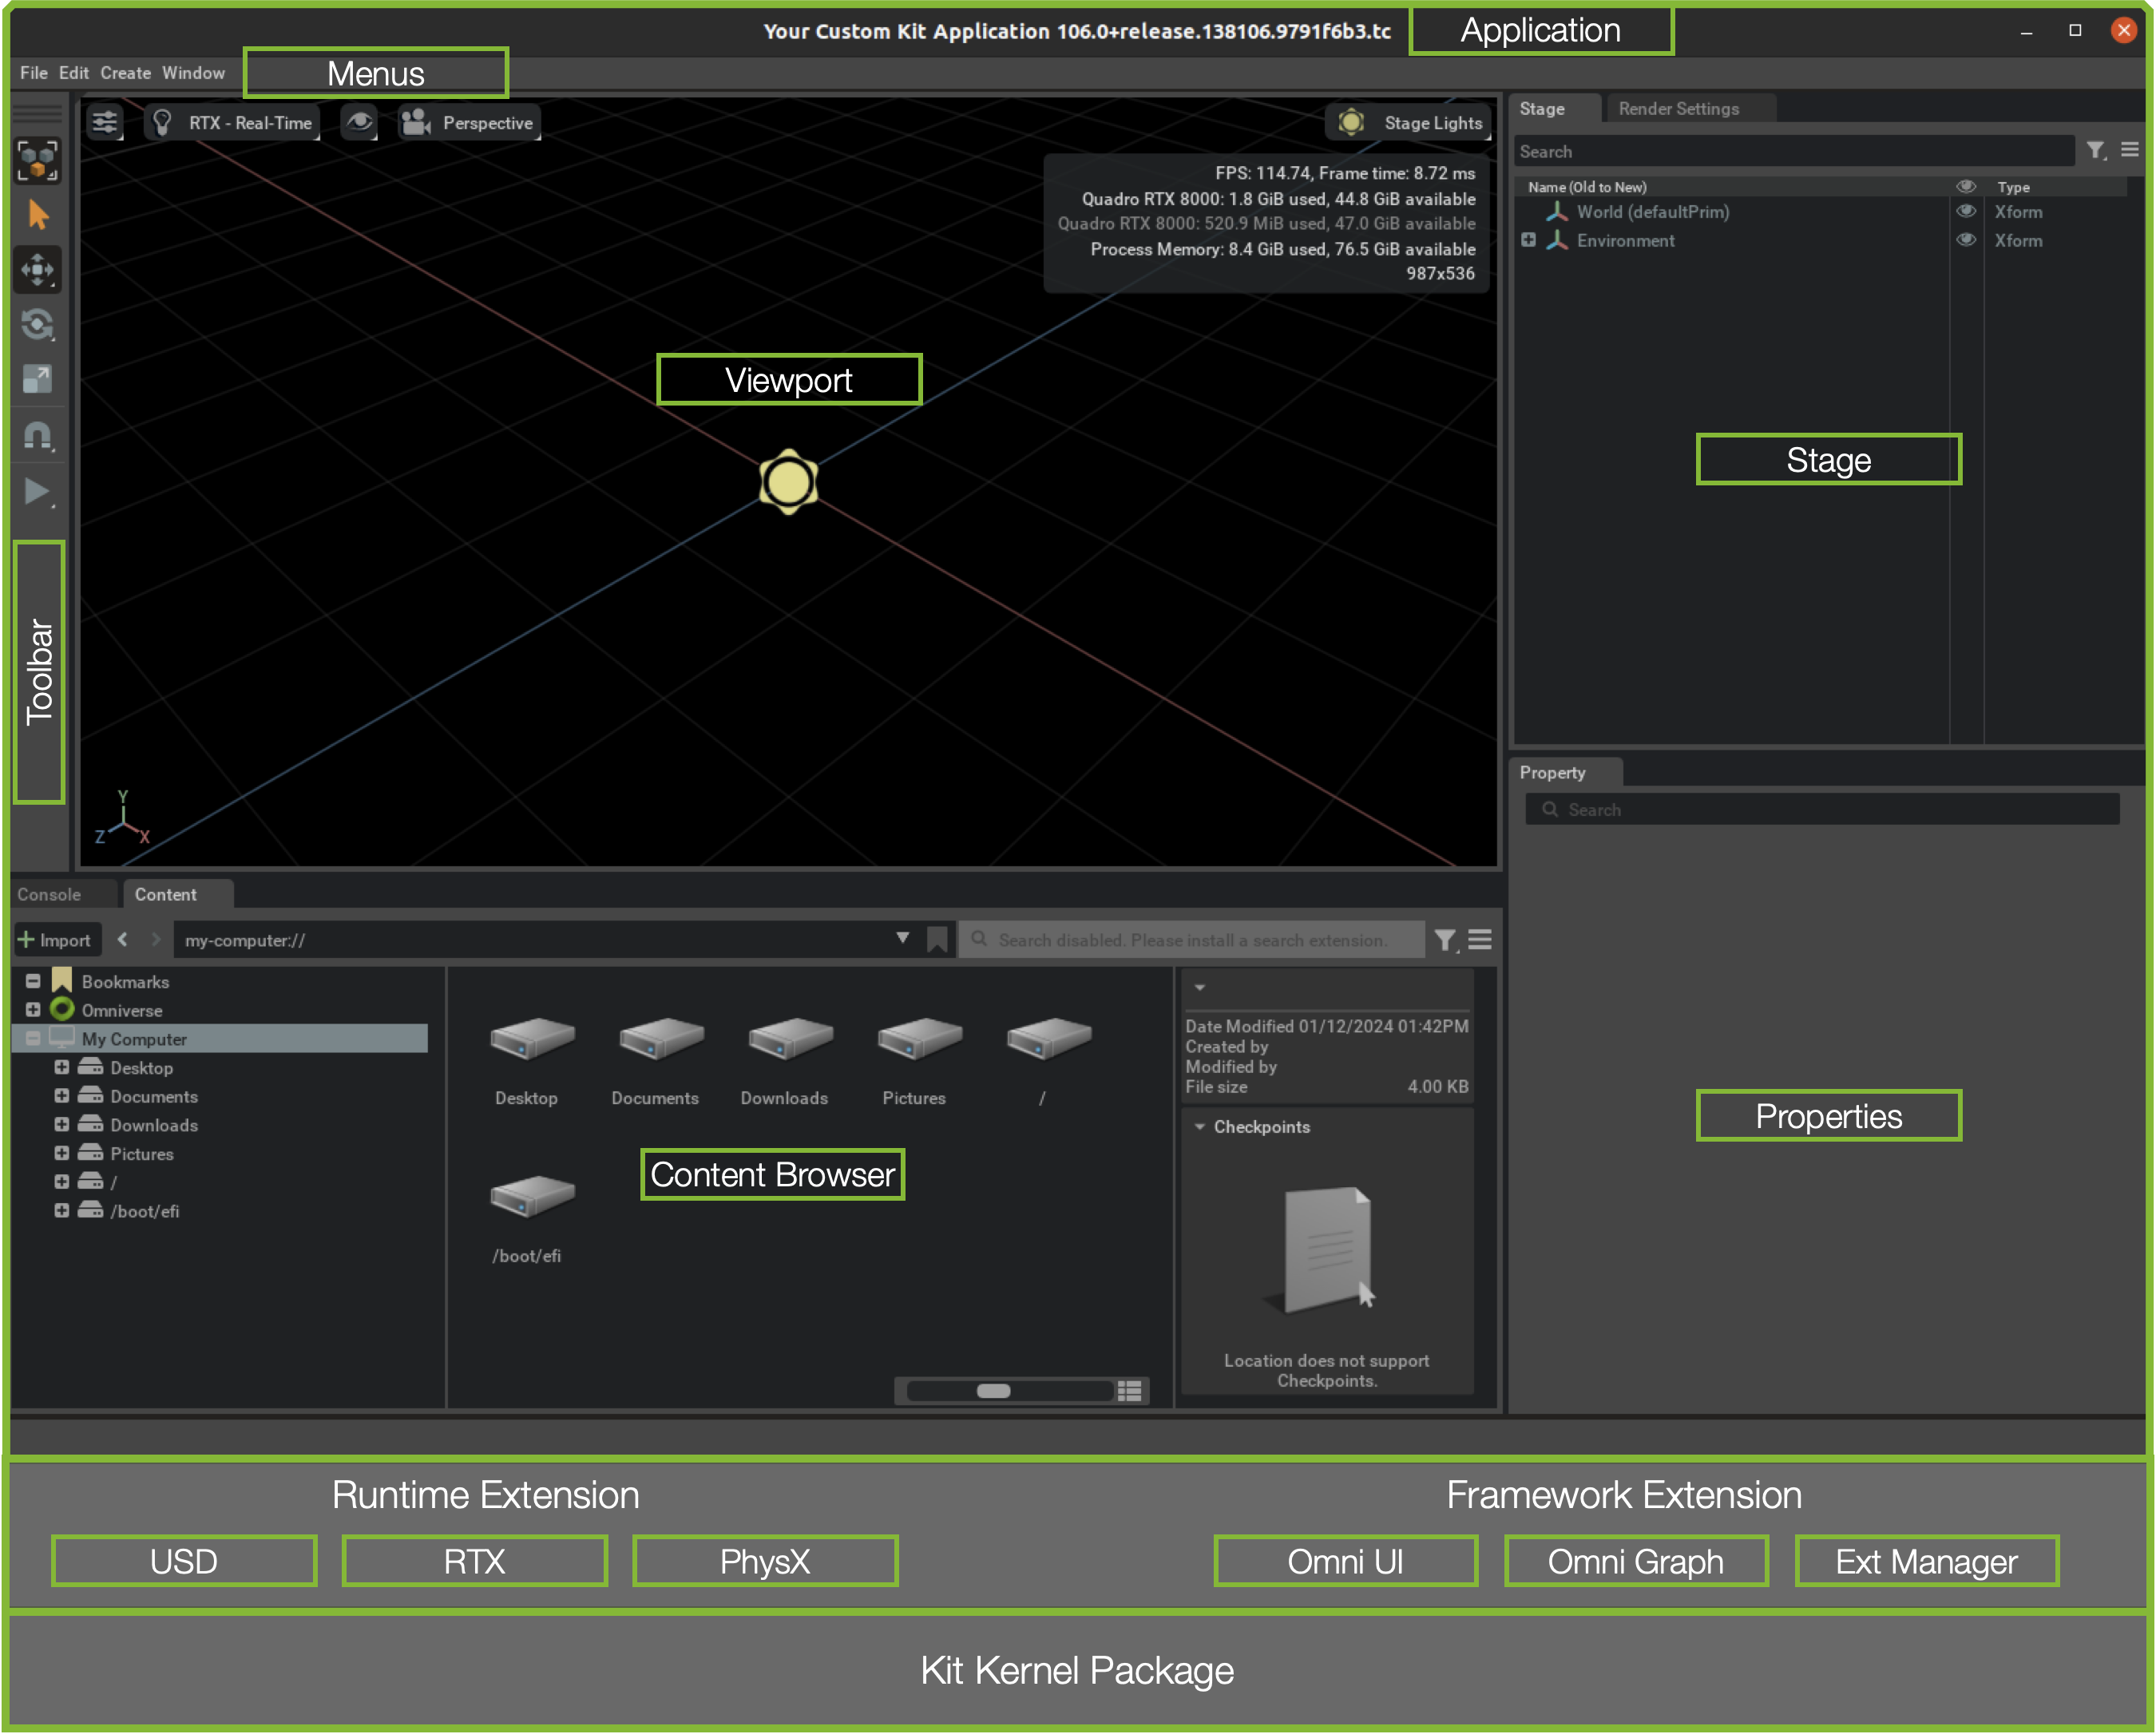
The image above illustrates one example of how components can be assembled, showcasing the interplay between the Kit Kernel and extensions to create interactive applications.
Components of Kit SDK#
Kit Kernel Package#
Central to the SDK, the Kit Kernel Package manages the execution lifecycle of extensions within a given application and facilitates client-server interactions with the Kit framework.
Key Features
Extension System: Manages the extension lifecycle process.
Event System: Manages communication between application components.
Update Loop: Ensures all required components are updated appropriately throughout the application lifecycle.
Kit SDK Extensions#
The Kit SDK comes with a set of foundational extensions for rendering, asset management, UI development, and more, acting as the foundational toolkit for application creation.
Highlighted Extensions
omni.usd: Provides synchronous/asynchronous interfaces to manage UsdContext and query state.
omni.kit.commands: Used to register and execute Commands
omni.kit.viewport.window: Manages the HydraEngine viewport and its interactions.
omni.ui: The Omniverse UI framework
Building with Kit SDK#
The Omniverse Kit SDK is a framework designed to accelerate the development of applications based on OpenUSD for a wide variety of use cases. At the heart of this development process are the concepts of extensions and applications.
Extensions#
The Kit platform is highly modular; everything is an extension. Extensions are uniquely named and versioned packages, loaded at runtime, and can include Python code, shared libraries, along with C++ or Python APIs, and more. Extensions can be developed independently and can depend on other extensions, offering a high degree of flexibility. They serve as the fundamental building blocks for creating a wide range of applications, from fully-fledged graphical editors to headless services for processing OpenUSD scenes. Developers can develop their own extensions or leverage extensions provided by NVIDIA via the Kit SDK or an NVIDIA managed extension registry.
Structure and Usage:
Each extension consists of a dedicated folder containing its source code, assets/data, and a configuration (extension.toml) file.
[extensions-folder]
└── sample.extension
    ├── config
    │   └── extension.toml
    ├── data
    │   ├── icon.png
    │   └── preview.png
    ├── docs
    │   ├── CHANGELOG.md
    │   └── README.md
    ├── sample
    |   └── extension
    |       ├── __init__.py
    |       └── extension.py
    └── premake5.lua
The structure example above illustrates the typical setup for a Python-based extension with dependencies and configuration details declared within the extension.toml file and any custom functionality defined within extension.py. The premake5.lua file defines information for the build system as to where to find specific extension assets. Additional information on configuration details will be shared in a later section.
Applications#
Applications essentially assemble selected extensions defined within a .kit file. The .kit file can be viewed as a single-file extension and acts as a manifest, outlining the necessary extensions and their configuration to provide a specific set of application-level functionality.
Building an application is straightforward - specify the extensions it includes, and set default configurations.
[package]
title = "Sample Service"
version = "0.1.0"
description = "This Simple application shows you how to make a Kit Service."
keywords = ["app"]

[dependencies]
"my_company.my_service.setup" = {}

[settings]
folders.'++' = ["${app}/../exts", "${app}/../extscache/"]
The sample .kit file above shows a configuration for a simple service. It defines the application package details, its dependencies, along with any required settings (e.g. local extension search paths). Additional information on configuration details will be shared in a later section.
Dependency Management:
An application is the endpoint of a dependency chain and, therefore, requires careful selection of extension versions. Kit facilitates this by resolving and enabling the latest compatible versions of each extension, allowing for dynamic updates while maintaining a stable environment. We will examine how tooling can help with this in the hands-on section below.
More Information:
For more information on building with The Omniverse Kit SDK, refer to the Omniverse Kit SDK Manual
Hands-on Exploration#
This segment walks you through a practical exploration of the Kit SDK, highlighting its core function and capabilities. This hands-on approach will underscore the inherently modular nature of Kit SDK, emphasizing its design as an extension-driven framework.
1. Setup#
Our first step is to create a basic application using the kit-app-template tooling. This is primarily done to ensure that an instance of the kit SDK is available in a common location for further exploration. From within the kit-app-template directory, perform the following setup:
Create an Application:
Linux:
./repo.sh template new
Windows:
.\repo.bat template new
Follow the prompt instructions:
? Select what you want to create with arrow keys ↑↓: Application
? Select desired template with arrow keys ↑↓: Kit Base Editor
? Enter name of application .kit file [name-spaced, lowercase, alphanumeric]: accept default
? Enter application_display_name: accept default
? Enter version: accept default
Build your application:
Linux:
./repo.sh build
Windows:
.\repo.bat build
2. Just Kit#
To understand what Kit is at its core, let’s attempt to run Kit without any arguments. This operation reveals Kit’s primary role – an SDK framework for managing extensions and plugins.
Linux
./_build/linux-x86_64/release/kit/kit
Windows
.\_build\windows-x86_64\release\kit\kit.exe
When we run the above commands, we are greeted with the following help message:
kit Usage:
 kit [APP_CONFIG] [--exec SCRIPT ARGS...] [--</path/to/key>=<value>] [--enable EXT_ID] [--ext-folder PATH]

[APP_CONFIG]: Pass to app configuration file.
--help, -h: this help message
--info, -v: show info log output in console
--verbose, -vv: show verbose log output in console
--merge-config, -m=<file>: merge configuration file.
--enable EXT_ID: Enable extension (short hand to add extension to enabled list).
--ext-folder PATH: Add extension folder to look extensions in.
--ext-path PATH: Add direct extension path (allows adding single extension).
--publish EXT_ID: Publish extension to the registry and quit.
--publish-overwrite: Allow overwriting extension in registry when publishing.
--unpublish EXT_ID: Unpublish extension from the registry and quit.
--update-exts: Look for latest versions in extension registry and update for all enabled extensions.
--list-exts: List all local extensions and quit.
--list-registry-exts: List all registry extensions and quit.
--disable-ext-startup: Do not startup any extensions, only load them.
--ext-precache-mode: Only resolve and download all extensions, exit right after.
--portable: Enable portable mode. Portable root defaults to ${kit} path.
--portable-root PATH: Enable portable mode and place data/cache/logs folders there.
--reset-user: Do not load persistent settings from user.config file.
--clear-data: Clear $data folder before starting.
--clear-cache: Clear $cache folder before starting.
--exec SCRIPT ARGS..., -e SCRIPT ARGS...: execute a console command on startup
--</path/to/key>=<value>: instruct to supersede configuration key with given value.
--allow-root: do not exit when kit is run as root (or set envvar: OMNI_KIT_ALLOW_ROOT=1).
--wait-debugger, -d: Suspend execution and wait for debugger to attach.

Usage hints:
	use --/ syntax to override any setting. For instance use: --/app/printConfig=true to print startup configuration.

Kit Version: 106.0+release.150019.4245f321.tc
Press any key to continue...
At first, this may seem counter-intuitive. However, Kit at its core is merely a framework for loading and managing extensions/plugins provided by the user. Without any arguments, we’ve effectively launched the framework itself, but haven’t actually enabled any extensions yet.
At this stage, it’s crucial to grasp the concept that Kit is fundamentally about orchestrating extensions.
3. Enabling Extensions#
Next, we investigate the extensions packaged with Kit and how to enable an extension.
Kit SDK Extensions
To list extensions included with Kit, execute:
Linux
./_build/linux-x86_64/release/kit/kit --list-exts
Windows
.\_build\windows-x86_64\release\kit\kit.exe --list-exts
The resulting list will include extensions bundled with the Kit SDK. These extensions can be enabled without any additional installation steps. If extensions are enabled that do not appear on this list, Kit will look to local extension search paths and/or the public extension registry for the most recent (or specified) version.
Let’s launch Kit with an extension
Linux
./_build/linux-x86_64/release/kit/kit --enable omni.usd
Windows
.\_build\windows-x86_64\release\kit\kit.exe --enable omni.usd
This will result in a set of extensions being started up and subsequently shutdown. The ordering of this startup and shutdown is consistent with the dependencies specified in each extension. That is, if Extension A depends on Extension B, then B will be started up before A and A will be shutdown before B.
As a follow up, consider
Linux
./_build/linux-x86_64/release/kit/kit --enable omni.kit.mainwindow
Windows
.\_build\windows-x86_64\release\kit\kit.exe --enable omni.kit.mainwindow
This will launch an empty graphical Kit application window. In addition, it will initialize the Kit runtime loop which will keep the window open until the user exits the application.
To Exit: Ctrl+C
In some cases, it may be useful to exit the runtime loop after a specified number of frames. This can be done using the --/app/quitAfter option. For example, to exit after 100 frames:
Linux
./_build/linux-x86_64/release/kit/kit --enable omni.kit.mainwindow --/app/quitAfter=100
Windows
.\_build\windows-x86_64\release\kit\kit.exe --enable omni.kit.mainwindow --/app/quitAfter=100
Conclusion and Guidelines
These examples demonstrate the importance of having a modular, sparse, and semantically consistent set of dependencies in our extensions. For example, if we are developing a headless Kit based service, we want to make sure that omni.kit.mainwindow is not (directly or indirectly) listed as a dependency as it would unnecessarily launch a graphical application window for a headless application. In contrast, if the application requires the ability to query and manipulate USD scenes, we would most likely want to include omni.usd as a dependency or rely on a higher-level extension that includes it.
When considering whether to include a dependency, ask yourself the following question
Do I need the application-level functionality provided by this dependency?
4. Launching an Application#
As mentioned previously applications are defined through a .kit file, which can be viewed as a single-file extension and acts as a manifest for the necessary extensions and their configuration. Let’s launch the application we created earlier.
Linux
./_build/linux-x86_64/release/kit/kit _build/linux-x86_64/release/apps/my_company.my_editor.kit
Windows
.\_build\windows-x86_64\release\kit\kit.exe _build\windows-x86_64\release\apps\my_company.my_editor.kit
This will bring up the base editor application we created during setup.
Note: If this is the first time you are launching a graphical application, it may take 5-8 minutes as shaders compile for the first time
With all of this in mind we can now take a look at how some of the tooling provided by the kit-app-template works to provide convenience and consistency in the development process. For example, the repo launch tool is essentially a convenient wrapper around the command we have seen above. It is also able to enable a predefined set of extensions currently defined as the dev-bundle. Adding this flag to the launch command merely uses the --enable flag to add the extension omni.kit.developer.bundle to the command line call for the Kit SDK. The following are equivalent
Linux
./repo.sh launch --dev-bundle
Windows
.\repo.bat launch --dev-bundle
Is equivalent to:
Linux
./_build/linux-x86_64/release/kit/kit _build/linux-x86_64/release/apps/my_company.my_editor.kit --enable omni.kit.developer.bundle
Windows
.\_build\windows-x86_64\release\kit\kit.exe _build\windows-x86_64\release/apps/my_company.my_editor.kit --enable omni.kit.developer.bundle
5. Cleanup#
Before continuing to the next section, it is recommended to clean up the applications, extensions, and any other repository changes that were created during this exploration.
Either revert all local changes or remove your existing repository/project entirely. Then, recreate it by cloning the repository again or by running the new project script from the Kit SDK.
Typical cleanup steps include:
Revert changes to top level
premake5.luafileRevert changes to
repo.tomlDelete the
source/directoryDelete the
_build/directory, or run./repo.sh build -cor.\repo.bat build -c
Additional Resources#
Omniverse Kit SDK Manual: Offers detailed insights into the Kit SDK’s architecture, components, and capabilities.
Omniverse Carbonite SDK: Provides cross platform stable interfaces with system components for input, audio, and more. Carbonite is a key component of the Kit Kernel.
Omniverse Client Library : Handles communication between Omniverse clients and Omniverse servers. Omniverse Client Library is a key component of the Kit Kernel.
Omniverse Kit Core IApp Interface : A plugin that defines the minimal set of functionality that Kit Core provides, extension management, a general message bus, and more. The Core IApp Interface is a key component of the Kit Kernel.