Extending Services#
This tutorial section demonstrates the process of extending the Kit Service template provided by the kit-app-template repository to create a more complex OpenUSD scene. This tutorial is meant to be a generic representation of one common use case for Kit SDK based services - USD scene generation.
Prerequisites#
The following prerequisites are required to complete this tutorial:
Have cloned the
kit-app-templaterepository from GitHub-or-
Have downloaded the Omniverse Kit SDK Resource from NGC for your chosen operating system.
A development machine with an NVIDIA RTX GPU and latest drivers installed.
(recommended) Familiarity with Python and RESTful API development.
Tutorial#
By default the Service Template generates a single cube of a user specified scale. In this tutorial we will extend the service application to handle additional primitives and enable additional control over specific scene parameters.
1. Create A New Service#
Start by creating a new service application.
1a - Create a New Service Application#
From a new project or a fresh clone of the kit-app-template repository, create a new service application using the template new tooling:
Linux
./repo.sh template new
Windows
.\repo.bat template new
Follow the prompt instructions, and make the followings selections/entries:
? Select what you want to create with arrow keys ↑↓: Application
? Select desired template with arrow keys ↑↓: Kit Service
? Enter name of application .kit file [name-spaced, lowercase, alphanumeric]: tutorial.service
? Enter application_display_name: Tutorial Scene Generation Service
? Enter version: 0.1.0
The application template you have selected requires a setup extension. Setup Extension -> kit_service_setup
? Enter name of extension [name-spaced, lowercase, alphanumeric]: tutorial.service.setup
? Enter extension_display_name: Tutorial Scene Generation Service Setup
? Enter version: 0.1.0
1b - Build and Launch the Service#
With the new service application created, we are now able to build:
Linux
./repo.sh build
Windows
.\repo.bat build
After the build is complete, we can launch to observe the default service behavior:
Linux
./repo.sh launch
Windows
.\repo.bat launch
The launch tool will prompt you to select an application .kit file to launch. Select tutorial.service.kit
Once the service application has started, live documentation will be available at http://localhost:8011/docs.
2. The Default Service#
This is an optional section with the goal of understanding the default service application behavior and the code that drives it.
2a. Default Service Functionality#
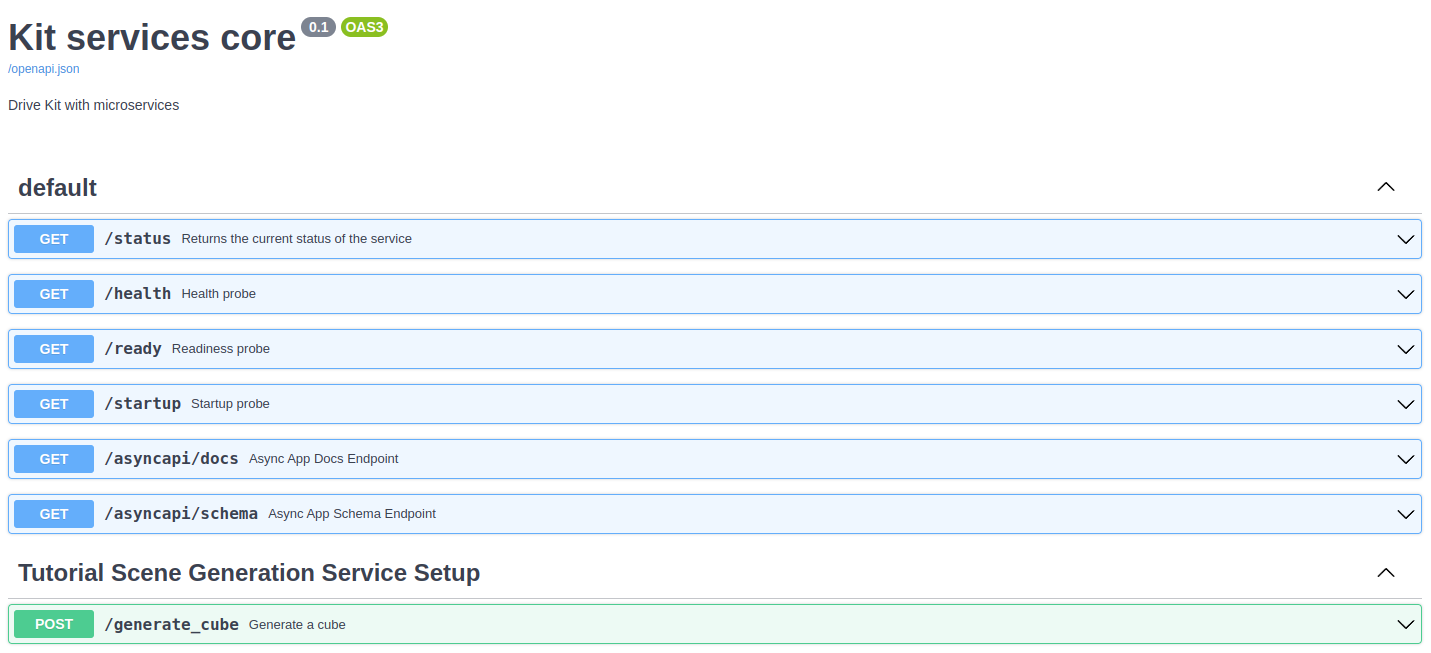
Visiting http://localhost:8011/docs we see that other than the default service endpoints, there is a single POST endpoint defined named /generate_cube. This endpoint generates a cube of a specific scale and writes it to a local directory. To test this functionality:
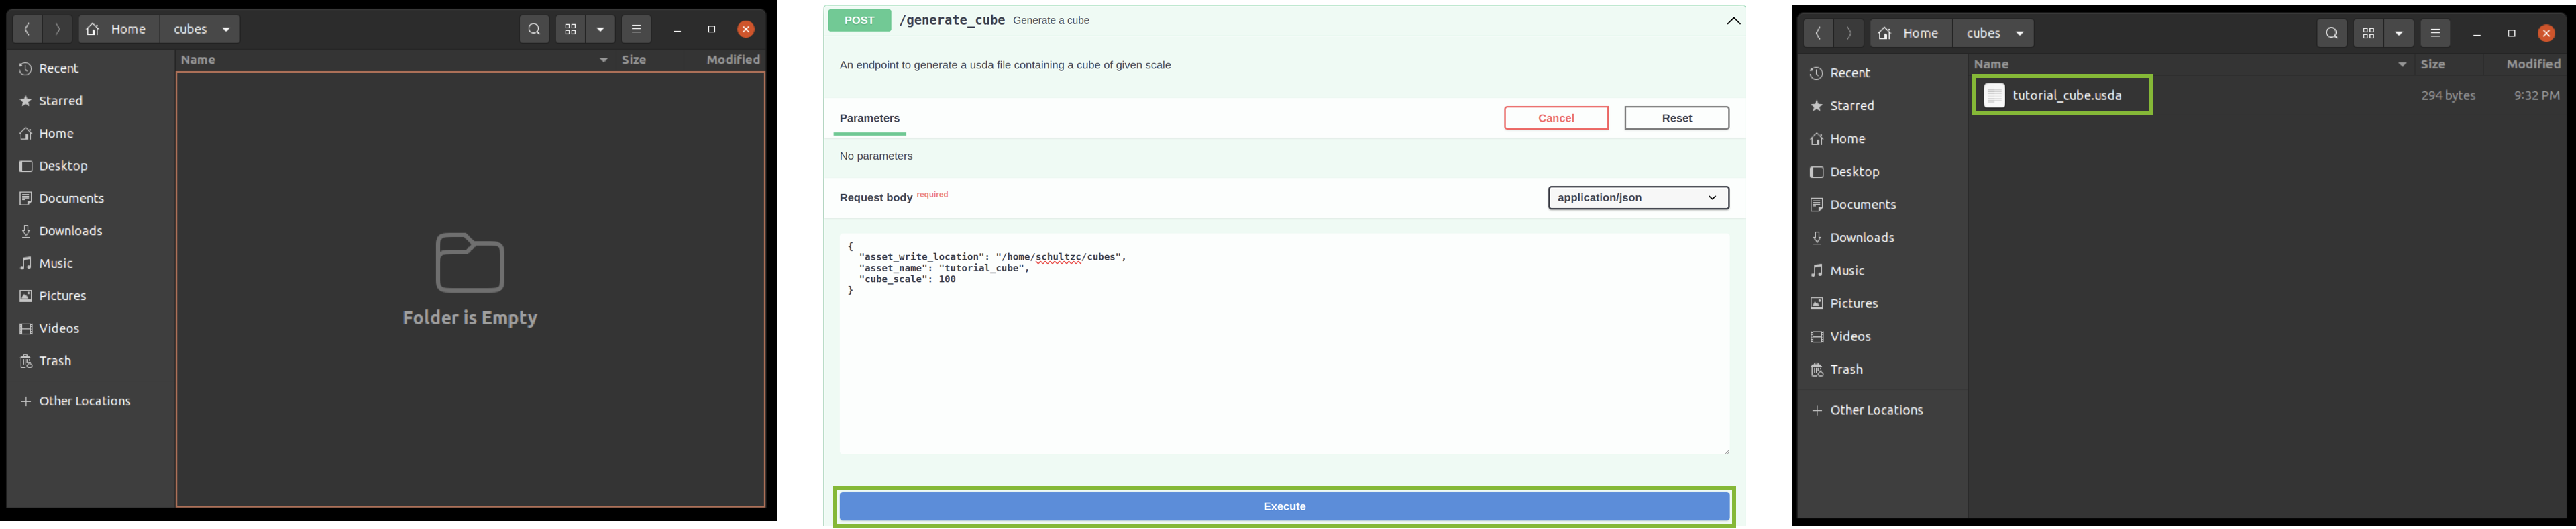
Expand the
/generate_cubeendpointClick the
Try it outbuttonDecide on a path to write the assets to : e.g.
/home/username/cubesNote for Windows Users: This path requires linux style forward slashes
/instead of the typical windows backslashes\
Set the Request Body:
{
  "asset_write_location": "/path/of/your/choosing",
  "asset_name": "tutorial_cube",
  "scale": 100
}
Click the
Executebutton
Note : Response code 200 indicates success and the response body will read:
"[tutorial.service.setup] Wrote a cube to this path: /home/username/cubes/tutorial_cube.usda"
The cube will now be written to the specified location. Because .usda files are human readable we can verify the generated .usda file in your preferred text editor. If specified similar to the above example, the content should be similar to the following:
#usda 1.0
(
    defaultPrim = "World"
    endTimeCode = 100
    metersPerUnit = 0.01
    startTimeCode = 0
    timeCodesPerSecond = 60
    upAxis = "Y"
)

def Xform "World"
{
    def Cube "Cube"
    {
        float3[] extent = [(-50, -50, -50), (50, 50, 50)]
        double size = 100
    }
}
This asset can also be opened in the Base Editor application template and rendered in the viewport, which we will do later in this tutorial.
2b - Default Service Code Walkthrough#
Configuration:
The .kit file (/source/apps/tutorial.service.kit) for the Kit Service template is the simplest of all the application templates. The only top level application dependency is the locally defined setup extension:
[package]
title = 'Tutorial Scene Generation Service'
version = '0.1.0'
description = """This Simple application shows you how to make a Kit Service"""
keywords = ["app"]

[dependencies]
"tutorial.service.setup" = { order = 10000 }

[settings.app.exts]

folders.'++' = ["${app}/../exts", "${app}/../extscache/"]
The remaining dependencies are defined within the setup extension and defined by the setup extension’s extensions.toml file (/source/extensions/tutorial.service.setup/config/extension.toml).
.. extension configuration

[dependencies]
"omni.services.core" = {}
"omni.services.transport.server.http" = {}
"omni.usd" = {}
"omni.kit.commands" = {}

... extension configuration
Behavior:
The behavior of the default service application is contained within the setup extension for the service. After initial template creation the setup extension is located at source/extensions/tutorial.service.setup. The logic for the service extension is primarily defined by two files:
tutorial/service/setup/extension.py: Contains the scaffolding logic for the Omniverse Kit SDK to manage the service setup extension effectively. On startup, the extension is simply registering the service router defined withintutorial/service/setup/service.py.class MyExtension(omni.ext.IExt): # ext_id is the current extension id. It can be used with the extension manager to # query additional information, like where this extension is located on the filesystem. def on_startup(self, ext_id): main.register_router(router) print("[tutorial.service.setup] MyExtension startup : Local Docs - http://localhost:8011/docs") def on_shutdown(self): main.deregister_router(router) print("[tutorial.service.setup] MyExtension shutdown")
tutorial/service/setup/service.py: Contains the service logic for the service application. This file defines the service endpoints and their behavior. The default logic does three core things:Instantiates a
ServiceAPIRouterwith the extension display name as a tag.from omni.services.core.routers import ServiceAPIRouter router = ServiceAPIRouter(tags=["Tutorial Scene Generation Service Setup"])
Sets up a pydantic data model for the cube generation request.
class CubeDataModel(BaseModel):
  """Model of a request for generating a cube."""

  asset_write_location: str = Field(
      default="/asset_write_path",
      title="Asset Path",
      description="Location on device to write generated asset",
  )

  asset_name: str = Field(
      default="cube",
      title="Asset Name",
      description="Name of the asset to be generated, .usda will be appended to the name",
  )

  cube_scale: float = Field(
      default=100,
      title="Cube Scale",
      description="Scale of the cube",
  )
Defines a single POST endpoint
/generate_cubewhich generates a cube of a specific scale and writes it to a local directory.@router.post( "/generate_cube", summary="Generate a cube", description="An endpoint to generate a usda file containing a cube of given scale", ) async def generate_cube(cube_data: CubeDataModel): print("[tutorial.service.setup] generate_cube was called") # Create a new stage # Set the default prim # Create cube # save stage
3. Extend the Service#
Now that we have a basic understanding of the service application, we can extend the service to generate a more complex scene. In this section we will add the following features to our service:
Generate a scene with multiple primitives (cubes and spheres).
Control the number of primitives, their scale, and spacing.
Add a ground plane to the scene.
Apply a material to one of the primitives.
3a - Additional Dependencies#
The section details the additional dependencies required to extend the service application.
Extension Dependencies:
We will be creating a ground plane as part of the extended service. This will require the creation of a Mesh primitive. To support this we will need omni.kit.primitive.mesh.
Add the following dependency to the extensions/tutorial.service.setup/config/extension.toml file in the [dependencies] section:
"omni.kit.primitive.mesh" = {}
Python Dependencies: We will need the following additional dependencies to extend the service application:
From pxr:
GfSdfUsdGeomUsdShade
Add the following to the import statements in tutorial/service/setup/service.py:
from pxr import Gf, Sdf, UsdGeom, UsdShade
3b - Modify the Data Model#
Given our desire to create a more complex scene we should expand on the data model that defines the generation request. Instead of CubeDataModel we will define a SceneDataModel that will allow for the specification of multiple primitives and their properties. Specifically, within service.py we will add:
Number of cubes
Cube spacing
Number of spheres
Sphere spacing
Sphere scale
Ground plane scale
Replace the existing CubeDataModel with the following SceneDataModel. Note for the purpose of this tutorial we are bounding the input values that are allowed for some of the parameters (e.g. ge - greater than or equal to, le - less than or equal to):
class SceneDataModel(BaseModel):
    """Model of a request for generating a scene of primitives."""

    asset_write_location: str = Field(
        default="/asset_write_path",
        title="Asset Path",
        description="Location on device to write generated asset",
    )

    asset_name: str = Field(
        default="scene",
        title="Asset Name",
        description="Name of the asset to be generated, .usda will be appended to the name",
    )

    num_cubes: int = Field(
        default=5,
        ge=1,
        le=20,
        title="Number of Cubes",
        description="Number of cubes to create",
    )

    cube_spacing: float = Field(
        default=50,
        ge=1,
        le=100,
        title="Cube Spacing",
        description="Distance between each cube",
    )

    cube_scale: float = Field(
        default=10,
        ge=1,
        le=100,
        title="Cube Scale",
        description="Scale of the cubes",
    )

    num_spheres: int = Field(
        default=4,
        ge=1,
        le=20,
        title="Number of Spheres",
        description="Number of spheres to create",
    )

    sphere_spacing: float = Field(
        default=20,
        ge=1,
        le=100,
        title="Sphere Spacing",
        description="Distance between each sphere",
    )

    sphere_scale: float = Field(
        default=8,
        ge=1,
        le=100,
        title="Sphere Scale",
        description="Scale of the spheres",
    )

    ground_plane_scale: float = Field(
        default=40,
        ge=1,
        le=100,
        title="Ground Plane Scale",
        description="Scale of the ground plane",
    )
3c - Update the POST Endpoint#
With the new data model defined, we can now update the /generate_cube endpoint to /generate_scene with multiple primitives. Additionally, we will add the required logic to apply a simple material to a single sphere within the scene.
Change the endpoint definition to:
@router.post(
    "/generate_scene",
    summary="Generate a scene of primitives",
    description="An endpoint to generate a usda file containing cubes, spheres and a groundplane.",
)
async def generate_scene(scene_data: SceneDataModel):
    print("tutorial.service.setup generate_scene was called")

    # Create a new stage
    usd_context = omni.usd.get_context()
    usd_context.new_stage()
    stage = omni.usd.get_context().get_stage()

    # Set the default prim
    default_prim_path = "/World"
    stage.DefinePrim(default_prim_path, "Xform")
    prim = stage.GetPrimAtPath(default_prim_path)
    stage.SetDefaultPrim(prim)

    # Create Cubes
    create_prims(
        stage,
        "Cube",
        scene_data.num_cubes,
        scene_data.cube_spacing,
        scene_data.cube_scale,
    )
    # Create Spheres
    create_prims(
        stage,
        "Sphere",
        scene_data.num_spheres,
        scene_data.sphere_spacing,
        scene_data.sphere_scale,
    )

    # Create a Ground Plane
    create_ground_plane(
        stage,
        scene_data.ground_plane_scale)

    # Apply a material to a Sphere
    apply_material(stage)

    # save stage
    asset_file_path = str(Path(scene_data.asset_write_location).joinpath(f"{scene_data.asset_name}.usda"))
    stage.GetRootLayer().Export(asset_file_path)
    msg = f"tutorial.service.setup Wrote a scene to this path: {asset_file_path}"
    print(msg)
    return msg
3d - Define Helper Functions#
You may have noticed that we have refactored our endpoint to call three new functions create_prims, create_ground_plane, and apply_material. These functions will handle the creation of the primitives, the creation of the ground plane, and the assignment of the material respectively. Add the following functions to service.py:
def create_prims(stage, prim_type: str, quantity: int, spacing: float, prim_scale: float):

    # Offset Cubes and Spheres
    if prim_type == "Cube":
        start = (prim_scale * 2, prim_scale, 0)
    else:  # if prim_type == "Sphere":
        start = (-prim_scale * 2, prim_scale, 0)

    for i in range(quantity):
        prim_path = omni.usd.get_stage_next_free_path(
            stage,
            f"/World/{prim_type}",
            False
        )

        omni.kit.commands.execute(
            "CreatePrimCommand",
            prim_path=prim_path,
            prim_type=prim_type,
            select_new_prim=False,
        )

        translation = (start[0], start[1], start[2] + (i * spacing))
        scale = (prim_scale, prim_scale, prim_scale)
        omni.kit.commands.execute(
            "TransformPrimSRT",
            path=prim_path,
            new_translation=translation,
            new_scale=scale,
        )


def create_ground_plane(stage, plane_scale: float):
    prim_type = "Plane"
    prim_path = f"/World/{prim_type}"

    omni.kit.commands.execute(
        "CreateMeshPrim",
        prim_path=prim_path,
        prim_type=prim_type,
        select_new_prim=False,
    )

    prim = stage.GetPrimAtPath(prim_path)
    xform = UsdGeom.Xformable(prim)
    xform_ops = {op.GetBaseName(): op for op in xform.GetOrderedXformOps()}
    scale = xform_ops["scale"]
    scale.Set(Gf.Vec3d(plane_scale, 1, plane_scale))


def apply_material(stage):
    prim = stage.GetPrimAtPath('/World/Sphere')
    materials_path = "/World/Looks"
    material_path = f"{materials_path}/OmniPBR"

    omni.kit.commands.execute('CreatePrim',
        prim_path=materials_path,
        prim_type="Scope",
        select_new_prim=False,
    )

    omni.kit.commands.execute('CreateMdlMaterialPrim',
        mtl_url="OmniPBR.mdl",
        mtl_name="OmniPBR",
        mtl_path=material_path,
        select_new_prim=True,
    )


    custom_shader = UsdShade.Shader(stage.GetPrimAtPath(f"{material_path}/Shader"))
    custom_shader.CreateInput("diffuse_color_constant", Sdf.ValueTypeNames.Color3f).Set(Gf.Vec3f(.46, .73, 0))
    custom_shader.CreateInput("reflection_roughness_constant", Sdf.ValueTypeNames.Float).Set(.25)

    omni.kit.commands.execute(
        "BindMaterial",
        prim_path=prim.GetPrimPath(),
        material_path=material_path
    )
3e - Launch the Extended Service#
With the service extended, we can now build and launch the service application to observe the new behavior. While it is not technically required to build the service application, it is recommended to ensure that any extension dependency related changes are correctly resolved.
Linux
./repo.sh build
Windows
.\repo.bat build
After the build is complete, we can launch to observe the extended service behavior:
Linux
./repo.sh launch
Windows
.\repo.bat launch
The tool will prompt you to select an application .kit file to launch. Select tutorial.service.kit
3f - Test Extended Service Functionality#
Once the service application has started, live documentation will be available at http://localhost:8011/docs.
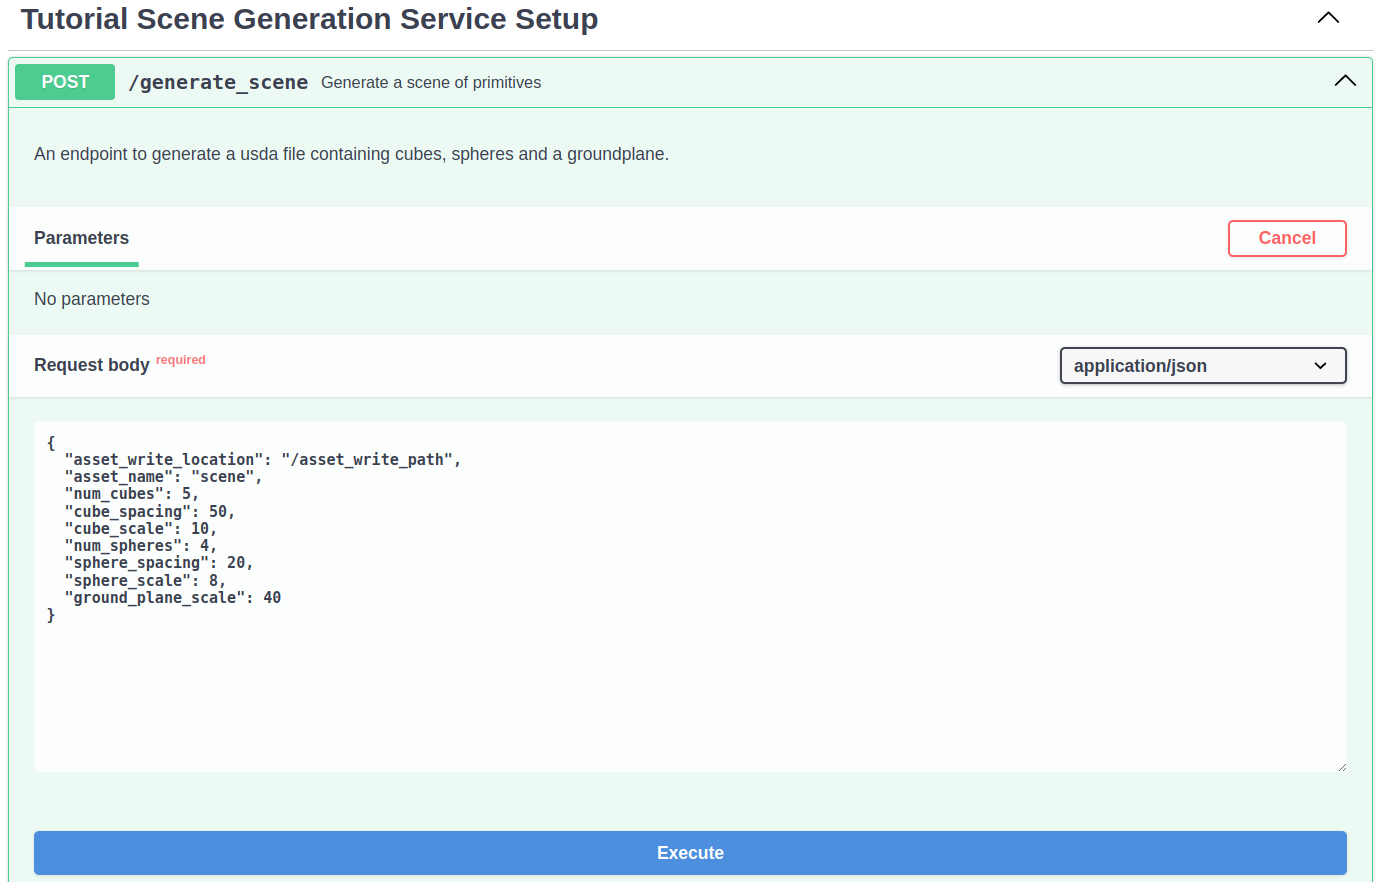
Visiting http://localhost:8011/docs we see that our single POST endpoint is now named /generate_scene. To test the new functionality:
Expand the
/generate_sceneendpointClick the
Try it outbuttonDecide on a path to write the assets to : e.g.
/home/username/sceneNote for Windows Users: This path requires linux style forward slashes
/instead of the typical windows backslashes\
Set the Request Body:
{
   "asset_write_location": "/path/of/your/choosing",
   "asset_name": "tutorial_scene",
   "num_cubes": 5,
   "cube_spacing": 50,
   "cube_scale": 10,
   "num_spheres": 4,
   "sphere_spacing": 20,
   "sphere_scale": 8,
   "ground_plane_scale": 40
}
Click the
Executebutton
Note : Response code 200 indicates success and the response body will read:
"tutorial.service.setup Wrote a scene to this path: /home/username/scene/tutorial_scene.usda"
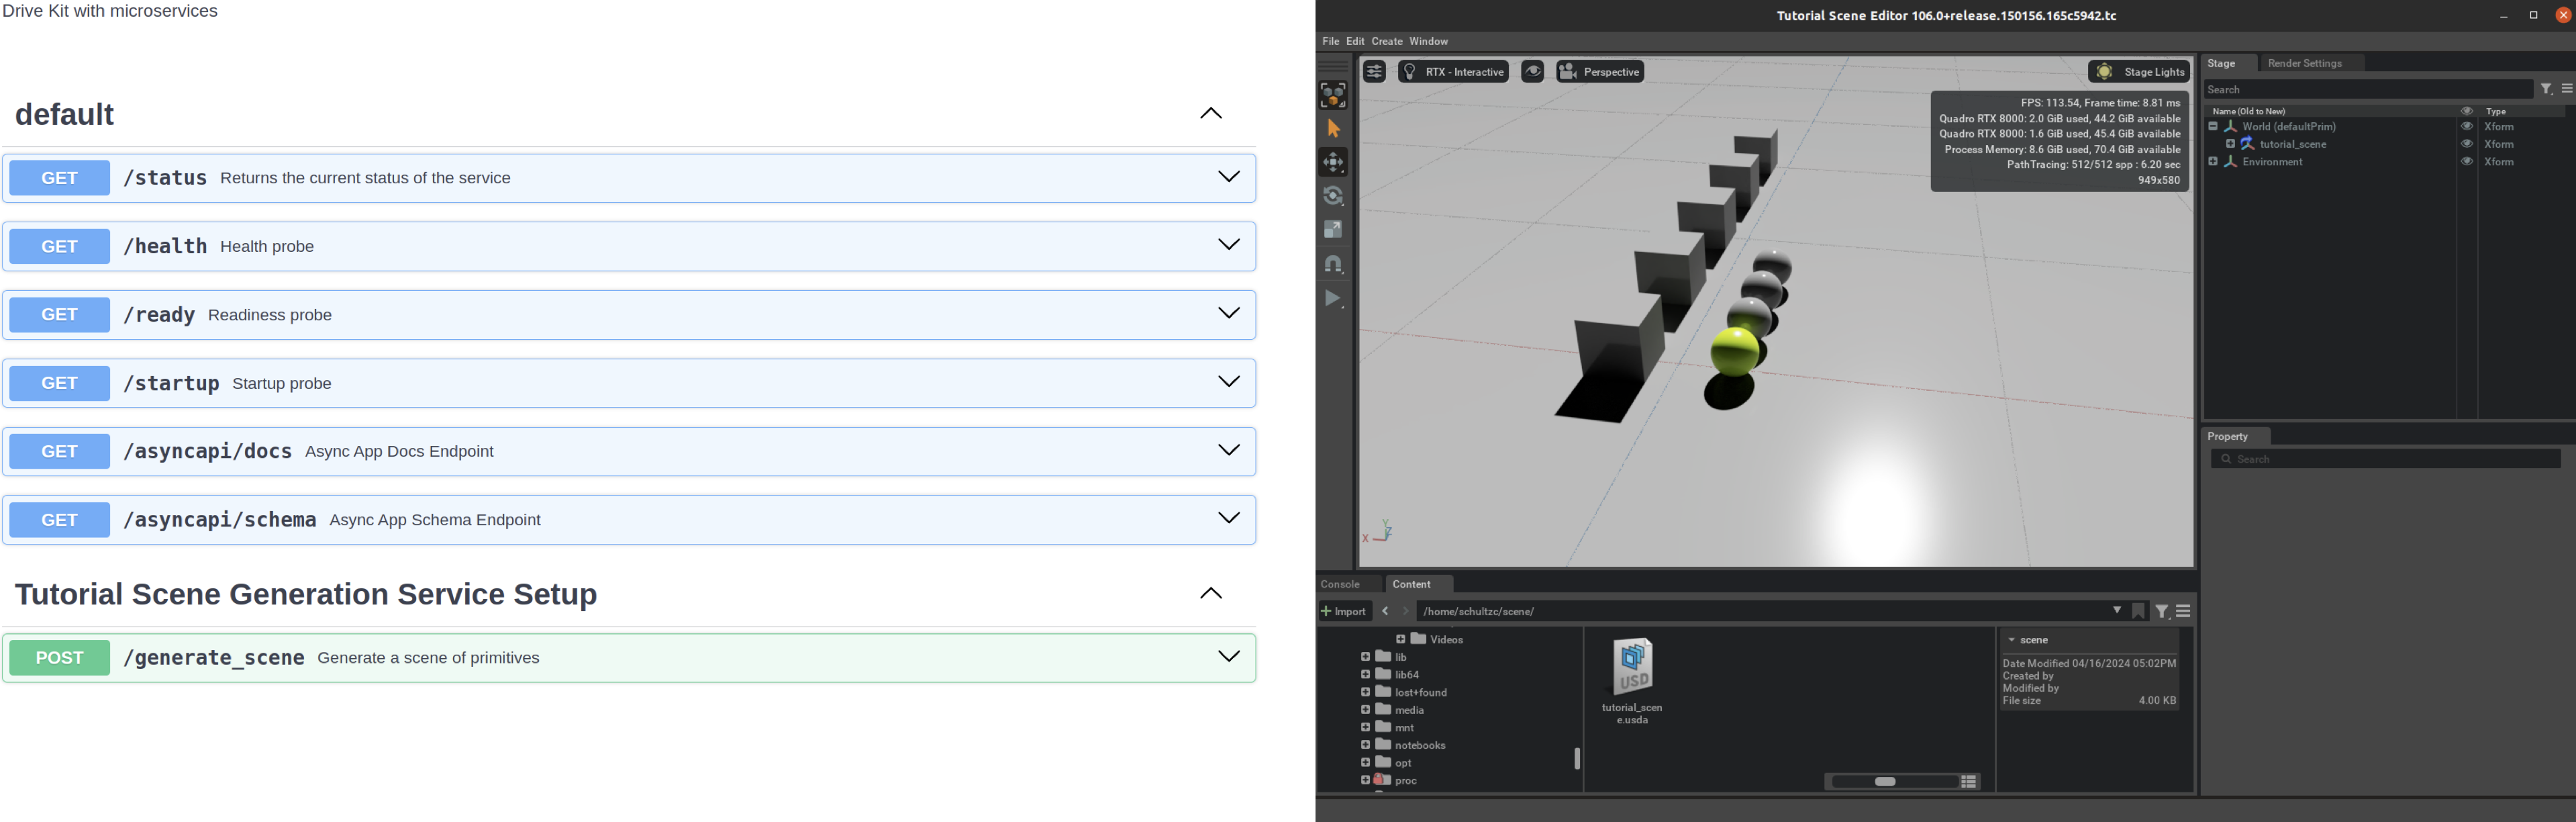
Visualize the Scene:
As before we could open the generated .usda file in a text editor to verify the scene contents. However, we can also open the scene using the Base Editor application template to render our USD scene. To do this:
Generate a new Base Editor application using the template new tooling:
Linux
./repo.sh template new
Windows
.\repo.bat template new
Follow the prompt instructions, and make the followings selections/entries:
? Select what you want to create with arrow keys ↑↓: Application
? Select desired template with arrow keys ↑↓: Base Editor
? Enter name of application .kit file [name-spaced, lowercase, alphanumeric]: tutorial.editor
? Enter application_display_name: Tutorial Scene Editor
? Enter version: 0.1.0
Build the new Tutorial Scene Editor Application:
Linux
./repo.sh build
Windows
.\repo.bat build
Launch the Tutorial Scene Editor Application:
Linux
./repo.sh launch
Windows
.\repo.bat launch
The tool will prompt you to select an application .kit file to launch. Select tutorial.editor.kit
Note that the first time startup of a rendering application may take 5-8 minutes as the shader cache is built.
With the new Editor application running, navigate to the saved .usda file in the Content Browser (See the Content tab along the bottom of the application window) and drag it into the viewport to visualize the scene.

4. Cleanup#
Before continuing to the next section, it is recommended to clean up the applications, extensions, and any other repository changes that were created during this exploration.
Either revert all local changes or remove your existing repository/project entirely. Then, recreate it by cloning the repository again or by running the new project script from the Kit SDK.
Typical cleanup steps include:
Revert changes to top level
premake5.luafileRevert changes to
repo.tomlDelete the
source/directoryDelete the
_build/directory, or run./repo.sh build -cor.\repo.bat build -c
Additional Considerations#
Loading USD Content: In order to eliminate the need for an asset dependency the entirety of this tutorial has used simple primitives to generate scene geometry. However, similar operations can be done with more complex USD content loaded into the stage. To load a USD file into the stage, the following code can be used:
# Load a USD file
stage = omni.usd.get_context().get_stage()
asset_stage_path = "/World/Asset"
asset_path = "/path/to/usd_asset"
asset_prim = stage.DefinePrim(asset_stage_path, "Xform")
asset_prim.GetReferences().AddReference(asset_path)