


Generative Meshing#
Generative Meshing creates a 3D asset from an image of the scene. Capture a viewport snapshot, then optionally refine it with an image model. Generate a mesh, import it, and align the result with the point cloud.
The omni.pointcloud.generative_meshing extension is experimental and is
enabled separately from the Point Cloud Streaming Bundle. Most models use
externally hosted inference services, for example Meshy and Hitem3D.
Trellis 1.0 and Trellis 2.0 server models are designed to run with a local
or self-hosted inference deployment.
For direct reconstruction from point coordinates, refer to
Meshing.
Prerequisites#
Launch a Kit application that includes this extension.
Open Window > Extensions, find
omni.pointcloud.generative_meshing, and enable it. Enable Autoload if needed.Enable the Point Cloud Streaming Bundle when working with streamed point clouds, then load your dataset.
Configure credentials for the selected services in the Kit process environment before launch. Provide network access to those services.
Configure only the variables that apply:
Service |
Environment variables |
|---|---|
Gemini image models |
|
GPT Image 2 |
|
Hitem3D / Hi3D |
|
Meshy |
|
Trellis 1.0 Server / Trellis 2.0 Server |
No API key required by these adapters. A compatible inference server must be running and reachable from Kit. |
NVIDIA_BASE_URL can
override the NVIDIA image-inference endpoint. Hosted requests honor
HTTP_PROXY, HTTPS_PROXY, and NO_PROXY. An explicit extension proxy
setting takes precedence:
--/exts/omni.pointcloud.generative_meshing/proxy=http://proxy.example.com:8080
Using the Generative Meshing Extension#
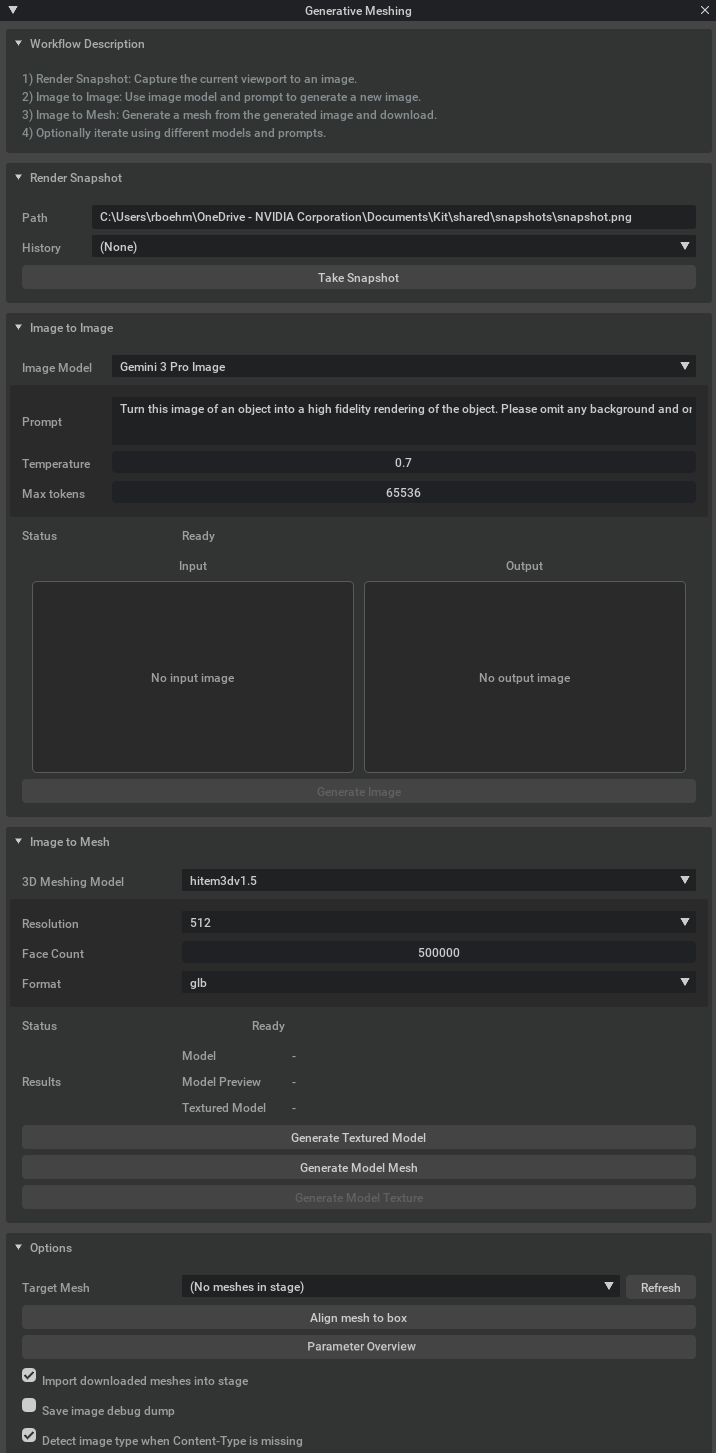
Open Tools > Generative Meshing. The window docks alongside Stage and groups the workflow into Workflow, Render Snapshot, Image to Image, Image to Mesh, and Options panels.
Render Snapshot#
Frame the object in the viewport. Center it and minimize occlusion and unwanted background. On the Selection Box, enable Use Section Planes where appropriate to isolate the object.
Expand Render Snapshot and select Take Snapshot.
Confirm the saved PNG path and image. The snapshot becomes the active input.
To reuse a snapshot, select it in History. History contains images from the current session. Alternatively, enter an existing image path in Path and press Enter.
You can set the output path in Kit settings. Refer to Output Directories and Options.
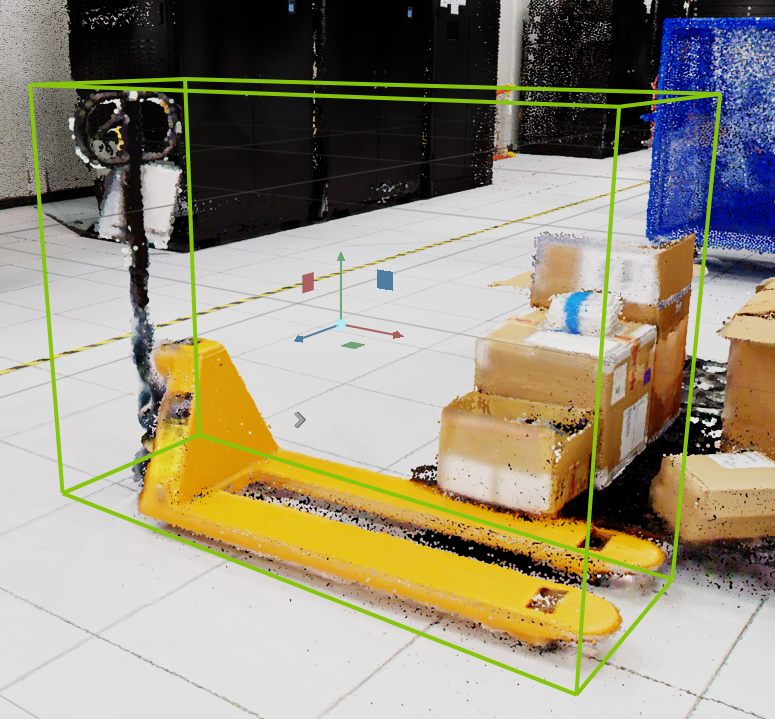
Image to Image#
This optional step refines the snapshot before mesh generation. To generate directly from the snapshot, continue to Image to Mesh.
Expand Image to Image and choose an Image Model: Gemini 3 Pro Image (default), Gemini 2.5 Flash Image, Gemini 3.1 Flash Image, or GPT Image 2.
Confirm the status line for missing credentials or endpoint problems.
Review the input preview by selecting the image to enlarge it.
Edit the prompt to describe the required result. For example: “Create a clean rendering of the central object. Preserve its visible shape and remove the background.”
Adjust the parameters available for the selected model, then select Generate Image.
Review the output preview by selecting the image to enlarge it. The generated
image is saved beside the input as ..._generated_v[X].png and becomes the
active input for mesh generation.
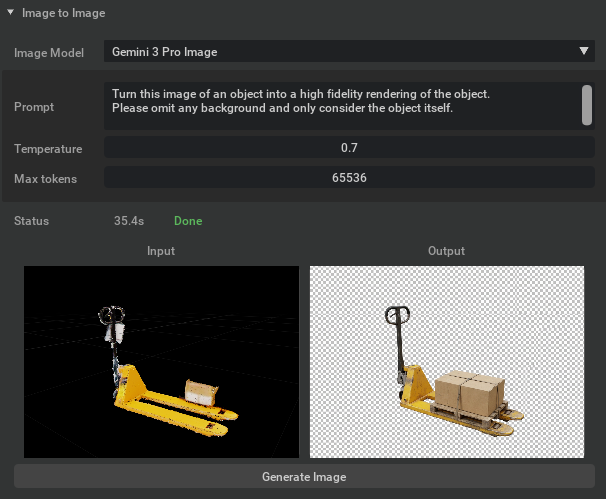
Image-to-Image Prompt Examples for Factory Assets#
Use image-to-image generation to prepare an isolated reference image before generating a mesh. Describe the target object, the visible features to preserve, and the specific cleanup required. The examples below are suggested starting points, not built-in presets or validated reconstruction settings.
Capture the complete object from a clear viewpoint first. A prompt cannot reliably recover parts that are cropped out or hidden in the source image. Replace bracketed descriptions with details visible in your snapshot.
General Asset Cleanup#
Use this prompt as a baseline for a machine enclosure, storage container, workbench, or other clearly isolated object.
Clean up this point-cloud image of the [target object]. Preserve its
viewpoint, proportions, colors, visible parts, and openings. Remove
scan noise and background; use a plain white background with soft
lighting, without adding details.
Electrical Cabinet: Preserve Functional Details#
Use when cabinet doors, controls, and ventilation features must remain recognizable. Inspect the result for duplicated or relocated controls.
Render this electrical cabinet on a white background with soft
lighting. Preserve its viewpoint, proportions, colors, door positions,
handles, vents, and controls. Remove scan noise without adding
components or inventing labels.
Conveyor: Preserve Repeated Parts and Gaps#
Use for a selected conveyor section. Repeated structures need particular attention during review because a plausible-looking result can change counts.
Render this roller conveyor on a white background with soft lighting.
Preserve its viewpoint, proportions, roller count and spacing,
supports, and open gaps. Remove scan noise without extending the
conveyor or adding parts.
Storage Rack or Pallet: Preserve Open Structure#
Use for an empty rack or pallet where openings are important to its appearance. If stored items obscure the structure, capture a clearer view first.
Render this empty storage rack on a white background with soft
lighting. Preserve its viewpoint, proportions, colors, shelf count and
spacing, braces, and open bays. Remove scan noise without adding
shelves or stored goods.
For a pallet, replace the rack-specific features with visible deck boards, support blocks, board spacing, and fork-entry openings.
Mobile Cart: Preserve Wheels and Clearance#
Use for a trolley, tool cart, or wheeled workstation.
Render this industrial cart on a white background with soft lighting.
Preserve its viewpoint, proportions, colors, handles, trays, wheels,
and ground clearance. Remove scan noise without filling gaps or adding
objects.
Robot Arm: Preserve the Captured Pose#
Use for a visual asset representing the robot’s captured configuration. The generated mesh does not establish joints or articulation.
Render this robot arm on a white background with soft lighting.
Preserve its viewpoint, captured pose, link proportions, base, and end
effector. Remove scan noise without moving joints or adding parts.
Pump or Pipe Assembly: Preserve Connections#
Use for a compact assembly whose connections are clearly visible.
Render this pump and pipe assembly on a white background with soft
lighting. Preserve its viewpoint, proportions, pipe routes, flanges,
valves, and visible connections. Remove scan noise without joining
separate pipes or closing open ends.
Reflective Equipment: Reduce Lighting Artifacts#
Use when strong reflections or shadows obscure an otherwise clear object. This requests a change in image appearance, not measured material properties.
Reduce glare, reflections, and strong shadows on this stainless-steel
machine. Preserve its viewpoint, proportions, metallic appearance,
seams, and openings. Use a white background with soft lighting without
changing physical features.
Appearance Variant: Repaint a Verified Asset#
Use for a proposed appearance variant. Keep the result separate from the reference used to represent the captured factory state.
Change only the painted enclosure panels from [source color] to [target
color]. Preserve the viewpoint, shape, components, labels, and safety
markings. Leave other materials, background, and lighting unchanged.
Compare and Validate Results#
Select the original snapshot in Render Snapshot > History, or enter its file path, before each independent comparison.
A generated image becomes the active input, so generating again can otherwise refine the previous result instead of the original snapshot.
Paste one complete prompt into Image to Image > Prompt. Include exclusions directly in the prompt. The shared image controls do not expose a separate negative-prompt field.
Select Generate Image.
Compare the output with the source. Confirm silhouette, relative dimensions, repeated-part counts, openings, machine pose, and the separation of adjacent components.
Reject results that add, remove, merge, or reposition important features. Recapture the object if the source is too ambiguous. Pass only an acceptable image to Image to Mesh.
After you generate a mesh, inspect it from multiple directions and compare its scale and placement with the source point cloud. A convincing image does not establish the accuracy of hidden surfaces or dimensions.
Note
Image-to-image prompts guide visual generation; they do not enforce dimensional accuracy, topology, polygon count, PBR material values, articulation, or collision behavior. Validate those properties in the downstream asset workflow. Treat completion of hidden or missing parts as an inferred approximation, not a measurement of the scanned object.
Image to Mesh#
Expand Image to Mesh and select a 3D Meshing Model. Confirm its availability. The controls and generation buttons adapt to the selected model.
The following table lists Hitem3D / Hi3D model capabilities:
Model |
Resolutions |
Staged texturing |
|---|---|---|
|
512, 1024, 1536, 1536pro |
Yes |
|
1536, 1536pro |
No |
|
1536fast, 1536pro |
No |
|
2048quality, 2048master |
Yes |
|
1536 |
Yes |
|
1536pro |
No |
|
1536profast, 1536pro |
No |
Hitem3D / Hi3D controls include Resolution, Face Count (100,000–5,000,000), and Format. The extension lists OBJ, GLB, STL, FBX, USDZ, and 3MF, with GLB selected by default. Import support depends on the application and format. The v2.0, v2.1, and v3.0 models also expose PBR and De-shading controls.
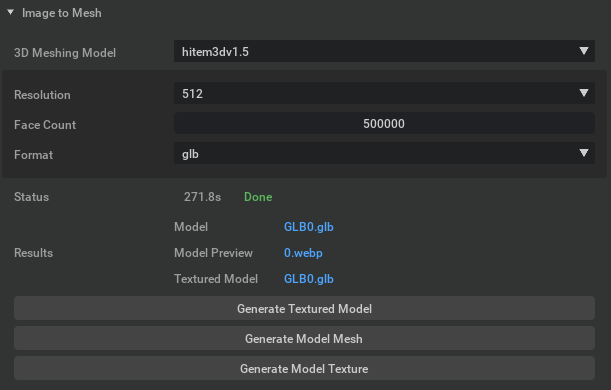
Generate Textured Model creates geometry and texture in one operation. Use this action for Meshy, Trellis, and the Hitem3D v2.0 and v2.1 models.
For a model that supports staged texturing:
Select Generate Model Mesh to generate geometry.
Wait for a model result. Generate Model Texture becomes available when a geometry model URL exists.
Select Generate Model Texture to texture that result using the input image.
Inspect Model, Textured Model, and Model Preview in Results as they become available. Hover over a link in Results to display the URL as a tooltip. Select the link to save the model or available preview.

For Trellis 1.0 Server or Trellis 2.0 Server listed as placeholders,
set Server URL to a compatible running server. The default is
http://127.0.0.1:8000, which is the machine or container running Kit.
In remote deployments, enter an address reachable from that runtime.
Trellis 2.0 returns a textured GLB in one pass.
You can set the output path in Kit settings. Refer to Output Directories and Options.
You can configure the models shown in the dropdown in Kit settings. Refer to Configure the Image to Mesh Model List.
Download and Import#
Results can be local files or remote URLs, depending on the model.
When generation returns an existing local mesh file, Import downloaded meshes into stage controls automatic conversion to USD and import into the active Stage. The option is enabled by default.
For a remote model URL, hover over the link in Results to display the URL as a tooltip, then save the model or preview. This action saves files only. Import the model separately using the application’s supported import workflow. For example, drag a supported GLB from the Content Browser into the scene.
Hitem3D / Hi3D returns remote result URLs in this workflow, so generation alone does not trigger local-file automatic import.
After import, select the resulting mesh in Stage and press F in the viewport to inspect it.
Align Mesh to Box#
Activate the Selection Box and position it over the reference object.
In Generative Meshing > Options, select the imported mesh in Target Mesh. Select Refresh if it is missing.
Select Align mesh to box.
Inspect the fit and adjust orientation or placement manually as needed.
Crop the reference object with the Streamed point cloud LOD Box operator in Selection Box > Point Set Operators.
Alignment centers the selected mesh on the box’s world-axis-aligned bounds and uniformly scales it to fit. The operation accounts for existing parent transforms. It does not rotate the mesh to match the box orientation.
A box must exist at /SelectionTools/SelectionToolBox. Helper meshes under
/SelectionTools are excluded from Target Mesh.
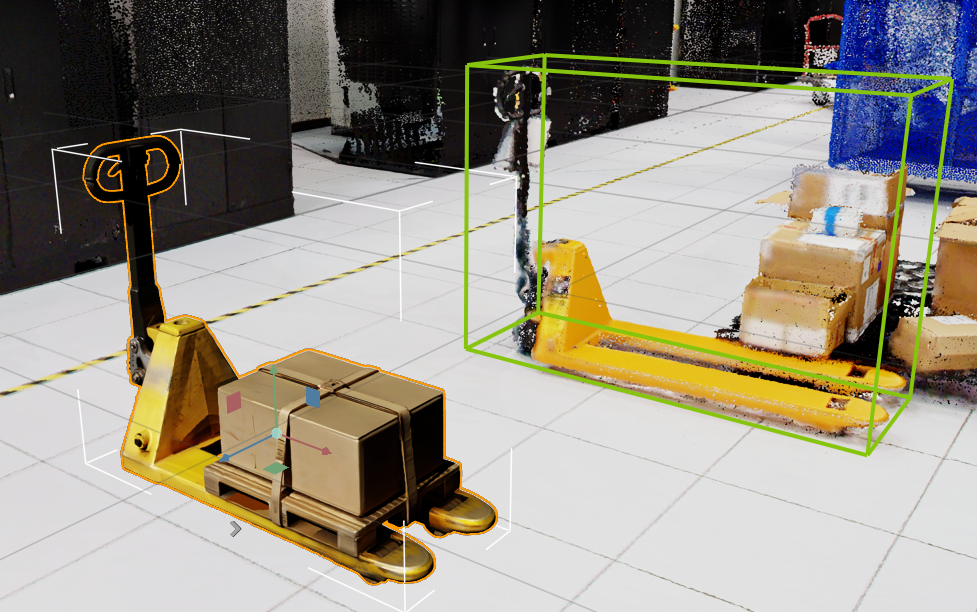
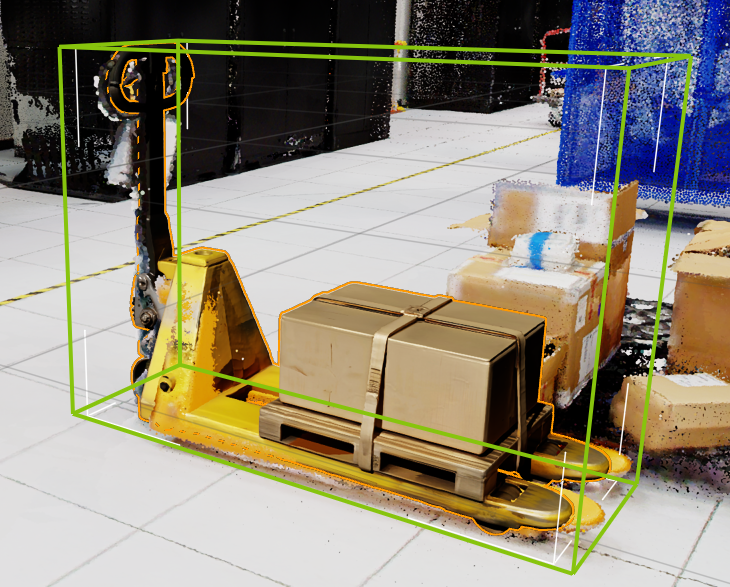
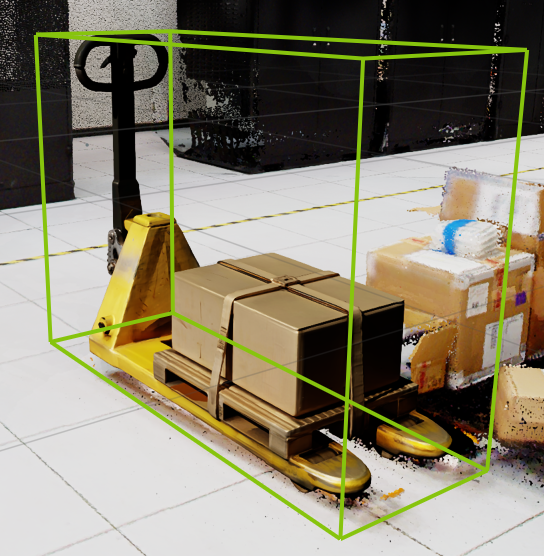
Generated mesh without reference object.#
Output Directories and Options#
Configure output directories through these Kit settings. Empty values use the
Kit shared-documents directory, honoring redirected Documents folders. The paths
below are the fallback locations. Configured paths support ~ expansion.
Setting |
Default directory |
|---|---|
|
|
|
|
The Parameter Overview panel exposes additional workflow parameters for troubleshooting. The control name is expected to change.
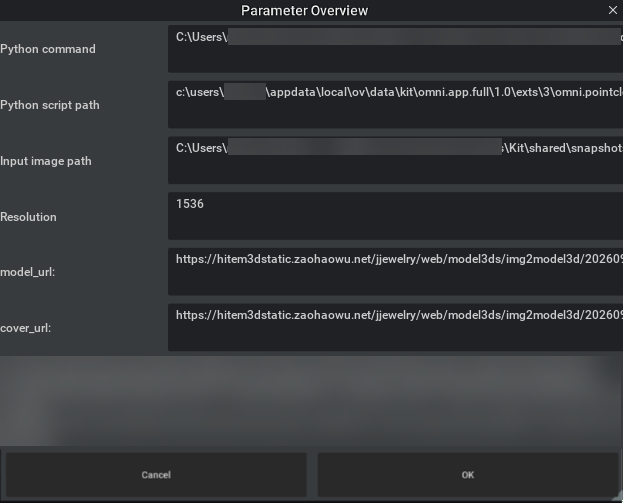
Save image debug dump writes the image-generation assistant message to a JSON file beside the generated image when enabled.
Detect image type when Content-Type is missing detects an image format from file bytes or the URL suffix when a returned HTTPS image lacks an image content type. With this option disabled, the workflow trusts the response content type.
If generation fails, confirm the status message, active image path, credentials, and endpoint reachability. For a server model, confirm the server is reachable from the Kit runtime. If automatic import fails, inspect the saved file and use the application’s supported manual import workflow.
Configure the Image to Mesh Model List#
Application developers can customize the models shown in Image to Mesh > 3D Meshing Model. The extension builds this dropdown from a Python model registry. This extension does not expose a general Kit setting or UI control for enabling, disabling, or reordering the production models.
The source files below are inside the omni.pointcloud.generative_meshing
extension. Their paths are relative to its Python package,
omni/pointcloud/generative_meshing/.
Configuration |
File |
Definition |
|---|---|---|
Providers and dropdown order |
|
|
Hitem3D / Hi3D versions and their order |
|
|
Hitem3D resolutions and defaults |
|
|
Hitem3D formats and parameter controls |
|
|
Model labels, credentials, and capabilities |
Provider adapters under |
Adapter metadata supplies the displayed label, required credentials, parameters, and staged-texturing capability. |
Change the Available Providers#
Open
models/registry.pyand locate the image-to-mesh portion ofbuild_default_registry().Add or remove the relevant
registry.register(...)calls to include or exclude providers. Hitem3D versions are registered together by the loop overbuild_hitem3d_adapters().Reorder these registrations to change the dropdown order. Models appear in registration order within the mesh modality.
Reload the extension or restart Kit so the registry is rebuilt. Open Image to Mesh and verify the displayed list.
For example, to exclude the hosted Trellis sample while retaining the Trellis
server adapters, remove this registration from build_default_registry():
registry.register(TrellisAdapter(str(script_path(ext_root, SCRIPT_TRELLIS1_WEBAPI))))
Keep at least one usable mesh adapter registered. API credentials control whether a selected service can run; they are not an enabled-model list.
Choose Hitem3D / Hi3D Versions#
Edit HITEM3D_MODEL_IDS in models/mesh/hitem3d.py to select the versions
that appear and their order. For example, this replacement lists only v2.1 and
v3.0, with v2.1 first:
HITEM3D_MODEL_IDS: list[str] = [
    "hitem3dv2.1",
    "hi3dv3.0",
]
Use the exact model identifiers. In particular, the v3.0 identifier is
hi3dv3.0. Keep the corresponding resolution, default, and capability
definitions consistent with each selected model. Adding a new identifier alone
does not establish service support or valid parameters.
Add a New Model Adapter#
Use models/mesh/example_stub.py as the reference for implementing a new
adapter. Mesh adapters declare a unique model ID, a display label, parameters,
and service requirements. They receive the input image and request type, then
return model and preview results. The supports_texture capability controls
whether the panel exposes the staged geometry and texture actions.
Implement the provider’s transport when needed, register its adapter in
build_default_registry(), and reload the extension. The UI builds the model
list and parameter controls from the adapter metadata, so a model that follows
the existing adapter contract does not require a separate dropdown edit.
Enable the Offline Example Model#
The bundled example mesh adapter has a dedicated Kit setting. It is disabled by default and is intended for development and workflow testing. Enable it at startup with:
--/exts/omni.pointcloud.generative_meshing/enable_example_mesh_model=true
Alternatively, set the equivalent value in the application’s Kit configuration:
[settings]
exts."omni.pointcloud.generative_meshing".enable_example_mesh_model = true
Add the setting to an existing [settings] section if one is already present.
After reloading the extension, the dropdown includes Example Mesh Stub
(offline). This adapter creates sample local geometry without a hosted service;
it is not a production mesh-generation model. Set the value to false and
reload to remove it. The separate enable_example_image_model setting affects
the Image to Image list only.