Quick Start#
Follow these steps to build and run the DSX Blueprint for AI Factories locally. You need two terminal windows. Use one for the Kit application (streaming server). Use the other for the web frontend.
Time expectations:
Initial setup and build: 15-20 minutes
Subsequent launches: 2-3 minutes
Shader compilation on first launch: 5-8 minutes
Step 1: Clone the Repository#
Open a terminal window.
Clone the repository:
git clone https://github.com/NVIDIA-Omniverse-blueprints/omniverse-dsx-blueprint-for-ai-factories.git
cd omniverse-dsx-blueprint-for-ai-factories
Verify the repository cloned successfully:
ls -la

# Compare this with the contents of the directory you cloned from. If they match, the repository cloned successfully.
Step 2: Download and Configure USD Scene Data#
The blueprint requires a USD scene dataset that is hosted separately from the repository.
Download the DSX Content Pack from NGC.
Extract the archive to a location on your disk, for example:
/data/dsx/
C:\data\dsx\
Note
On Windows, the built-in extractor may fail on deeply nested archives due to path length limitations. Use a third-party tool like 7-Zip to extract the content pack successfully.
Open
source/apps/dsx.kitand set theauto_load_usdpath to point to your extracted USD scene file. For example, if you extracted the content pack to/data/dsx/(Linux) orC:\data\dsx\(Windows):
[settings.app]
auto_load_usd = "<your_extract_path>/DSX_BP/Assembly/DSX_Main_BP.usda"
Replace <your_extract_path> with the location you chose in step 2.
Note
The auto_load_usd value is empty by default. If you skip this step, the application will start but no scene will load.
Step 3: Verify Environment Variables#
Before starting the application, verify that your API key is set correctly:
echo $NVIDIA_API_KEY

# Should display your API key (starting with "nvapi-")
# If it shows empty, return to :ref:`Prerequisites <prerequisites>` to set it up
$env:NVIDIA_API_KEY

# Should display your API key (starting with "nvapi-")
# If it shows empty, return to :ref:`Prerequisites <prerequisites>` to set it up
Step 4: Start the Kit Application#
In the first terminal, run the streaming script in the
dsxdirectory.
./run_streaming.sh
.\run_streaming.bat
The script builds the application (if needed) and starts the streaming server.
Note
Initial startup takes 5-8 minutes for shader compilation. Subsequent launches are faster.
Wait for the message indicating the streaming server is ready.
Verify the streaming server started successfully:
Look for these messages in the terminal output:
RTX ReadyNo error messages about GPU or display issues
If you see errors:
GPU errors: Verify GPU driver version with
nvidia-smi(must be 537.58+)Build failures: See Build and Compilation Issues in Troubleshooting
Step 5: Start the Web Frontend#
Open a second terminal window.
Ensure you are in the
dsxdirectory, and run the web development script.
./run_web.sh
.\run_web.bat
The script installs dependencies (if needed) and starts the development server.
Open the streaming URL in your browser. The URL format is
http://your-ip-address:8081/streaming.html, whereyour-ip-addressis your local machine’s IP address (shown in the terminal output).
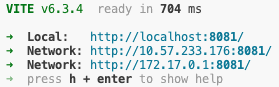
Terminal output displaying available URLs for local and network access#
The web interface connects to the Kit application and displays the 3D scene.
Expected browser behavior:
Page loads without errors
Interactive globe visible with site markers (Sweden, Virginia, New Mexico)
Left toolbar visible with navigation icons
Configurator panel appears on the right side
No console errors related to WebRTC or connection failures
If the browser shows connection issues:
Verify the streaming server is still running (check first terminal)
Check that you’re using the correct IP address from terminal output
Optional: Configuration Options#
You can configure the streaming connection using URL query parameters or environment variables:
Parameter |
Environment Variable |
Default |
Description |
|---|---|---|---|
|
|
|
Kit server address |
|
|
|
WebRTC signaling port |
|
— |
|
Stream width in pixels |
|
— |
|
Stream height in pixels |
|
— |
|
Target frame rate |
Example with custom settings:
http://localhost:8080?server=192.168.1.100&width=1280&height=720
For build issues, see Troubleshooting.