Prerequisites#
Before you begin, ensure your system meets the following requirements.
System Requirements#
Requirement |
Specification |
|---|---|
Operating System |
Windows 10/11 or Linux (Ubuntu 22.04 or 24.04) |
GPU |
NVIDIA RTX Pro 6000 Blackwell |
Driver |
Version 570.169 |
RAM |
64GB (DDR5) |
Storage |
1TB NVMe or greater (20GB+ free space required) |
Warning
Ubuntu 25.04 is incompatible and may experience crashes or unexpected behavior. Use Ubuntu 22.04 or 24.04.
Windows: Disable Hardware-Accelerated GPU Scheduling
On Windows, Hardware-Accelerated GPU Scheduling must be turned off or the Kit application may fail to start.
Open Settings > System > Display > Graphics.
Expand Advanced graphics settings.
Set Hardware-accelerated GPU scheduling to Off.
Restart your machine.
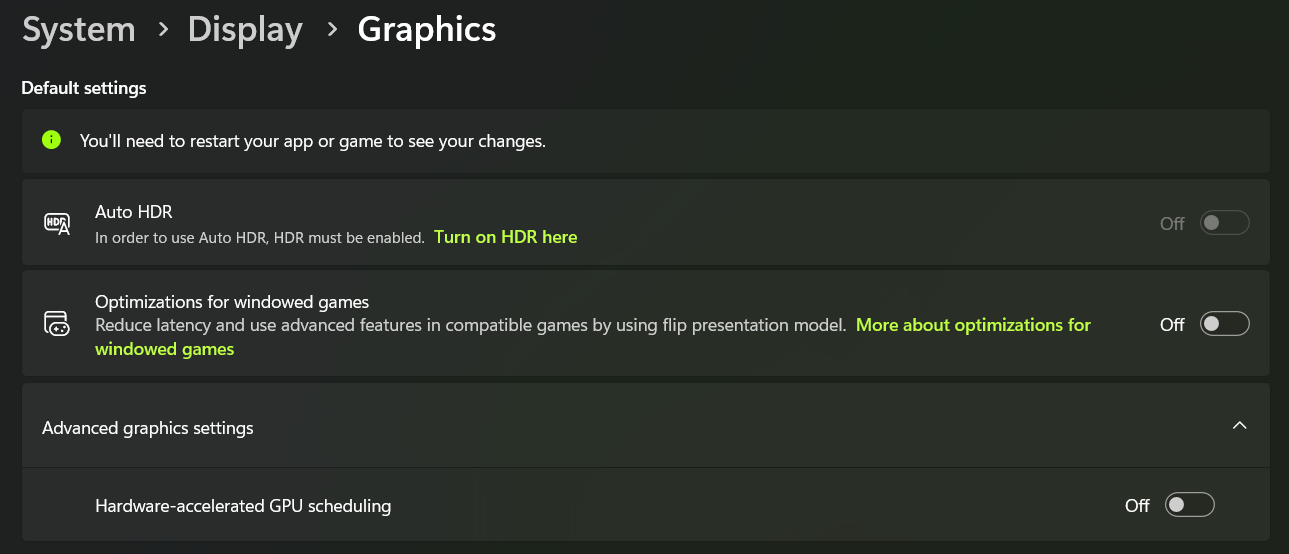
Windows Graphics settings with Hardware-accelerated GPU scheduling disabled.#
Verify GPU and Driver:
nvidia-smi

# Expected output should show:
# - Driver Version: 570.169 or higher
# - CUDA Version: 12.x or higher
# - GPU Name: RTX Pro 6000 Blackwell or better
Required Software#
Core Tools#
Git: For version control and repository management
Git LFS: For managing large binary files in the repository
Verify Git and Git LFS:
git --version      # Should be 2.x or higher
git lfs --version  # Should be 2.x or higher
API Key (Optional)#
NVIDIA API Key
The AI agent extension (omni.ai.aiq.dsx) requires an NVIDIA API key to communicate with the LLM backend. Obtain one from build.nvidia.com. The rest of the demo (3D viewer, camera controls, configurator) works without it. You’ll need to enter your email after clicking login, and may be prompted to create an account if you haven’t yet. Follow any prompts to validate your account. Select the Account icon in the top right corner of the page and then select “API Keys”.
After obtaining the API key, set it as a persistent environment variable:
echo 'export NVIDIA_API_KEY="nvapi-..."' >> ~/.bashrc
source ~/.bashrc
[System.Environment]::SetEnvironmentVariable("NVIDIA_API_KEY", "nvapi-...", "User")
Note
Restart your terminal after setting the variable. The Kit application reads NVIDIA_API_KEY from the environment at startup.
Kit Application Development#
sudo apt-get install build-essential
Install Microsoft Visual Studio 2019 or 2022 with the following components. The build will fail without them.
Follow the Windows Developer Configuration guide to install and configure:
Desktop development with C++ workload
Windows SDK
Restart your terminal after installation.
To verify, open Installed apps in Windows Settings, search for “Visual Studio”, and click Modify on your Visual Studio installation. Confirm that the Desktop development with C++ workload is checked.
Verify Build Tools:
gcc --version   # Should show GCC version
g++ --version   # Should show G++ version

# If not installed: sudo apt-get install build-essential
Open Visual Studio Installer
Verify “Desktop development with C++” workload is installed
Verify Windows SDK is installed (check “Individual components”)
Web Portal Development#
Node.js and npm: For frontend build and development
# Verify installation
node --version  # Should be v20.x or higher
npm --version   # Should be 9.x or higher

# Install Node.js 20.x using NodeSource repository if not already installed
curl -fsSL https://deb.nodesource.com/setup_20.x | sudo -E bash -
sudo apt-get install -y nodejs
node --version  # Should be v20.x or higher
npm --version   # Should be 9.x or higher
If not installed:
Download Node.js installer from nodejs.org
Run the installer and follow the setup wizard
Ensure “Add to PATH” option is selected during installation
Restart your terminal and verify installation:
Client Browser#
The web frontend uses ArcGIS for the 3D globe, which requires WebGL2. Your browser must have hardware acceleration enabled, or the globe will display “Unable to display map. WebGL2 support is required.”
Hardware acceleration is often disabled by default on laptops to conserve battery. To enable it:
Chrome: Go to
chrome://settings/systemand enable Use graphics acceleration when available. Relaunch the browser when prompted.Edge: Go to
edge://settings/systemand enable Use graphics acceleration when available. Relaunch the browser when prompted.Firefox: Go to
about:preferences> Performance, uncheck Use recommended performance settings, and enable Use hardware acceleration when available. Restart Firefox.
To verify WebGL2 is working, open chrome://gpu (or the equivalent for your browser) and confirm that WebGL2 shows as Hardware accelerated.
Note
This applies to the machine running the browser, not the server running the Kit application. If you are accessing the web frontend remotely (for example, port-forwarding from a Linux server to a Mac laptop), the browser on your local machine must have hardware acceleration enabled.
Recommended Software#
Docker (Linux): For containerized development and deployment
NVIDIA Container Toolkit (Linux): For GPU-accelerated containers
Visual Studio Code: For code editing and debugging
If any verification fails, install the missing component before proceeding. For detailed troubleshooting, see Prerequisites Validation.
Linux: IOMMU Configuration#
If IOMMU is enabled on your Linux system, the Kit application will hang during renderer initialization. This is because the GPU plugin displays a dialog that cannot be dismissed on headless or remote machines. Disable IOMMU in your BIOS settings or by adding iommu=off to your kernel boot parameters before running the application. Consult your hardware manufacturer’s documentation for the specific steps. For troubleshooting details, see IOMMU / zenity dialog.