Defining Your First Prims
15 minutes
Overview
In this Universal Scene Description (OpenUSD) tutorial, you will use the USD Python API to define Prims of different types on a Stage. You will learn two different methods for defining Prims.
Prims are the basic building blocks of USD and by following this tutorial will learn how you can begin to populate your own USD Stages which will serve as the foundation for you to start building large virtual worlds.
Prerequisites
Follow the USDView Quickstart to install USDView.
USDView/USD 22.11+ is required.
Learning Objectives
Create Prims of different types using the common
Usd.Stage.DefinePrim()API and also Schema classes.Practice working with Prim paths.
Query information common to all Prims.
In this tutorial:
Create the Stage
Defining your very first Prims
Getting a Usd.Prim object by its Prim path
Querying all the available Prim type names
Defining Prims using their respective Schema classes
Setup
For this tutorial, you will be creating a Python script that will create a Stage and populate it with various Prims. You will need a Python environment that includes the USD Python libraries and you will need to create a Python file that you will be scripting in.
Setup a USD Python Environment with one of these two options:
For Windows: Setup a USD Python Environment:
Here's an interactive tutorial
** Best experienced in Full Screen (click the icon in the top right corner before you begin) **For Windows, Linux, or macOS: You can install the USD Python libraries into your global Python installation or a virtual environment using:
pip install usd-core
Run this in the terminal to create a new Python file called
create_stage.pyin your user home directory:> python -c "from pathlib import Path;p=Path.home()/'create_stage.py';p.touch();print(str(p));" C:\Users\username\create_stage.py
This will print out the path where the python file was created.
Open the
create_stage.pyscript in your favorite code editor using the file path from the previous step.Add the following code to
create_stage.py:from pxr import Usd print(Usd.GetVersion())
Save and execute the
create_stage.pyscript:For Windows:
> python %HOMEPATH%/create_stage.py
(0, 23, 2)
For Linux or macOS:
> python ~/create_stage.py
(0, 23, 2)
It should print a version tuple to confirm that the USD Python environment is configured correctly. It’s ok if your version differs from this tutorial. It will match your USDView version.
When prompted to execute your script…
Keep this terminal window open. Throughout this tutorial, whenever you are prompted to execute the
create_stage.pyscript, you will run the command from this step in the terminal window you just setup.
1. Create the Stage
Even though the focus of this tutorial is about defining Prims, you need a Stage to put the Prims on and you need a backing USD layer to serve as the Stage’s root layer. You can get both done in one step using Usd.Stage.CreateNew().
Understanding the code blocks
Throughout this tutorial, ellipses (…) will be added to code blocks to represent code that has been omitted for brevity. New lines of code are emphasized and the immediate surrounding lines of code are still included for context.
Add the following code to
create_stage.py:from pathlib import Path from pxr import Usd print(Usd.GetVersion()) layer_path = str(Path.home() / "defining_prims.usda") print(f"USD Stage file path: {layer_path}") stage = Usd.Stage.CreateNew(layer_path) stage.Save()
Save and execute the
create_stage.pyscript.You should find an empty
defining_prims.usdain your user home directory. The path todefining_prims.usdawas printed in the terminal window.From the terminal, copy the file path you printed for your USD Stage file path.
Open USDView.
Click .
In the file dialog window, paste file path you copied into the File name: field.
Click the Open button.
This will open an empty stage in USDView, but you can confirm that it loaded correctly by observing that the file path in the USDView window title is the one you selected.
2. Defining your very first Prims
Now that the Stage is created, you are ready to set the Stage with your very first Prims. Prims are similar to objects or nodes in certain DCCs or you can think of them like elements in HTML. They are containers of key-value pairs that enrich and give meaning to a Prim. Prims can also have a type (e.g. Mesh, SphereLight, Material, etc.). Lastly, prims are hierarchical so they can have parent and child Prims. You will create a few different types of Prims now by using Usd.Stage.DefinePrim() which is a generic API for creating any type of Prim.
Start by updating the script to create a Scope Prim on the Stage. Add the following lines to the
create_stage.pyscript:from pathlib import Path from pxr import Usd print(Usd.GetVersion()) layer_path = str(Path.home() / "defining_prims.usda") print(f"USD Stage file path: {layer_path}") stage = Usd.Stage.CreateNew(layer_path) geom_scope: Usd.Prim = stage.DefinePrim("/Geometry", "Scope") stage.Save()
The first argument for
Usd.Stage.DefinePrim()is the Prim path which represents where on the Stage the Prim should be defined and the Prim’s namespace. Every Prim on the Stage can be identified by its Prim path. This Prim is namedGeometryand even though it is at the root of the Stage, it is parented to the pseudo-root Prim in USD which is denoted by the initial/.The second argument is the Prim’s type. In this case, you are using Scope which is a Prim type that serves as a sort of folder in USD to organize Prims that are parented to it.
Add the following lines to the
create_stage.pyscript:... stage = Usd.Stage.CreateNew(layer_path) geom_scope: Usd.Prim = stage.DefinePrim("/Geometry", "Scope") print(f"Prim Path: {geom_scope.GetPath()}") print(f"Prim Name: {geom_scope.GetName()}") print(f"Prim Type: {geom_scope.GetTypeName()}") stage.Save()
These lines of code are using some member functions of
Usd.Primto further explore the concepts of Prim paths, names, and types with the Scope you created.Save and execute the
create_stage.pyscript.You should see the following printed in the terminal after running the script:
> python create_stage.py
(0, 23, 2)
USD Stage file path: C:\Users\username\defining_prims.usda
Prim Path: /Geometry
Prim Name: Geometry
Prim Type: Scope
Create a couple more Prims of different types. Add the following lines to the
create_stage.pyscript:... print(f"Prim Type: {geom_scope.GetTypeName()}") xform: Usd.Prim = stage.DefinePrim("/Geometry/GroupTransform", "Xform") stage.DefinePrim(xform.GetPath().AppendPath("Box"), "Cube") stage.Save()
You are beginning to establish a Prim hierarchy.
Boxis parented toGroupTransformwhich is parented toGeometry. This is all done by the namespaces specified by the Prim paths. You’ll also notice thatBoxwas defined by appending to the Prim path of its parentGroupTransformwhich is a more robust approach than always hard-coding full paths. TheSdf.Pathobject returned byUsd.Prim.GetPath()has many useful methods for constructing and manipulating Prim paths.Save and execute the
create_stage.pyscript to regenerate the Stage.In USDView, click to reload the Stage and see your latest output. If you select the
BoxPrim, it should look like this now: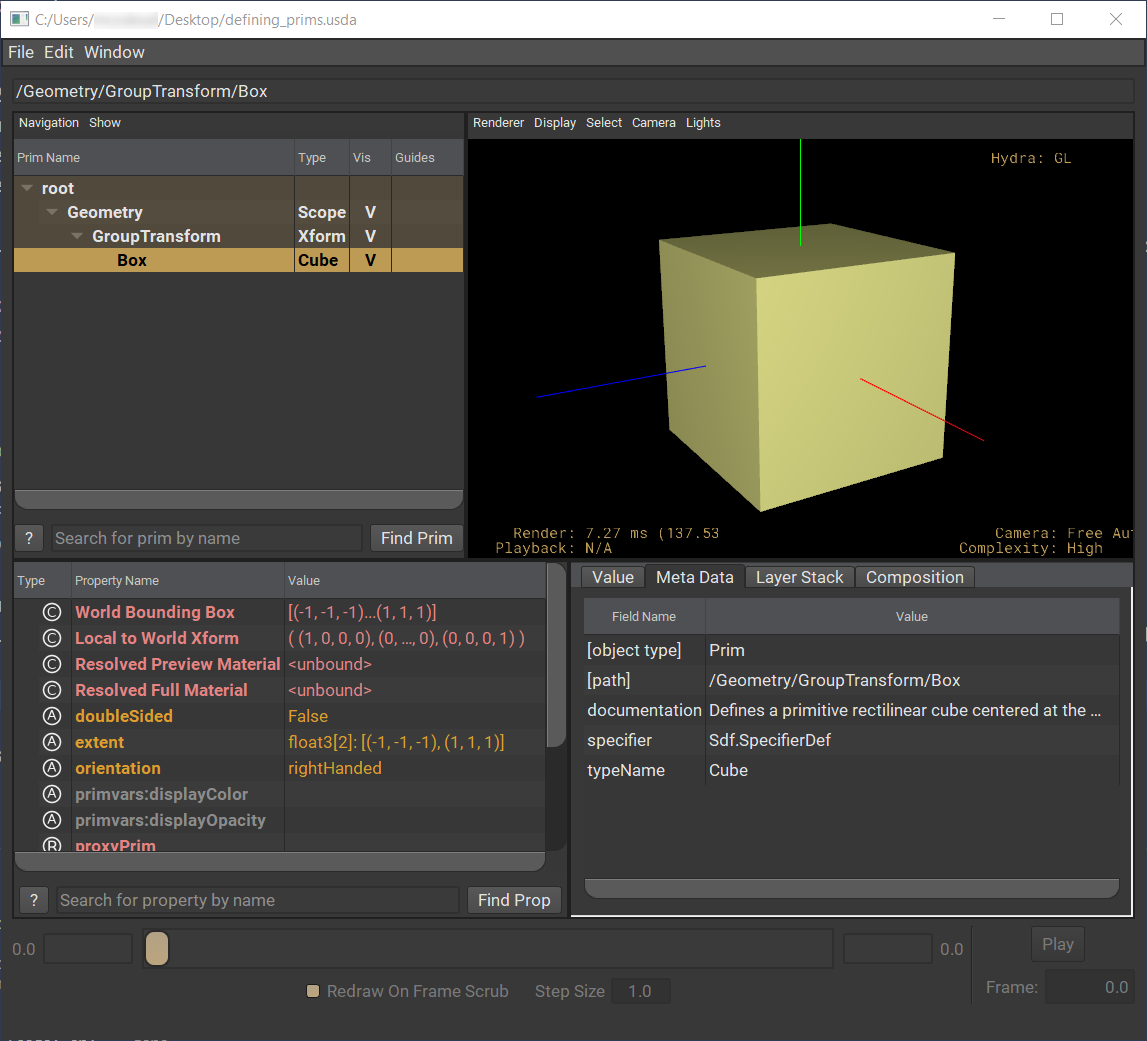
Notice the Prim hierarchy, Prim names, and Prim types in the Tree View. Also, try selecting each Prim individually to see their respective Prim paths in the field above the Tree View.
3. Getting a Usd.Prim object by its Prim path
Prim paths are important because they provide a reliable way to identify a Prim on the Stage. No two Prims on a Stage can have the same Prim path. If you need to query or edit an existing Prim on the Stage, you can get its Usd.Prim object if you know its Prim path. In this section, you’ll learn the basic way to get a Usd.Prim object for an existing Prim using Usd.Stage.GetPrimAtPath().
Add the following lines to the
create_stage.pyscript:... stage.DefinePrim(xform.GetPath().AppendPath("Box"), "Cube") box: Usd.Prim = stage.GetPrimAtPath("/Geometry/GroupTransform/Box") print(box) stage.Save()
Save and execute the
create_stage.pyscript to regenerate the Stage.You should see the script output this to the terminal now:
> python create_stage.py
(0, 23, 2)
USD Stage file path: C:\Users\username\defining_prims.usda
Prim Path: /Geometry
Prim Name: Geometry
Prim Type: Scope
Usd.Prim(</Geometry/GroupTransform/Box>)
The script was able to retrieve the previously created Cube prim using the Prim path,
/Geometry/GroupTransform/Box. The result is the printable representation for thatUsd.Primobject.
4. Querying all the available Prim type names
So far, you’ve created three different types of Prims by passing their type names in as arguments to Usd.Stage.DefinePrim(). You could experiment with different type names and realize that USD won’t error when your create a Prim of a type that it doesn’t know about or if you have a typo in the type name. In the section, 5. Defining Prims using their respective Schema classes, you will learn of a more robust way to work. For now, how do you know what all the available type names are? For the most part, the Prim type names correspond to their class names in Python. For example:
Prim Class |
Prim Type Name |
|---|---|
UsdGeom.Mesh |
Mesh |
UsdGeom.Camera |
Camera |
UsdLux.RectLight |
RectLight |
There are many more Prim types in USD. In this section, you’ll learn how to query all of the Prim type names in your current USD environment since it can be different depending on what USD plug-ins you may have loaded. Let’s explore USD a little bit in USDView’s Interpreter window.
In USDView, open the Interpreter window by clicking .
Execute this code in the Interpreter window:
>>> from pxr import Plug, Usd
>>> prim_types = Plug.Registry.GetAllDerivedTypes(Usd.Typed)
>>> type_names = [Usd.SchemaRegistry.GetSchemaTypeName(type_) for type_ in prim_types]
>>> print(type_names)
['GenerativeProcedural', 'SpatialAudio', 'Volume', 'RenderPass', 'RenderSettingsBase', 'Gprim', 'FieldBase', 'RenderVar', 'RenderProduct', 'Field3DAsset', 'RenderDenoisePass', 'BlendShape', 'PackedJointAnimation', 'Backdrop', 'RenderSettings', 'SkelRoot', 'Boundable', 'OpenVDBAsset', 'SkelAnimation', 'Skeleton', 'FieldAsset', 'Xformable', 'PhysicsDistanceJoint', 'PhysicsFixedJoint', 'PortalLight', 'PhysicsRevoluteJoint', 'PluginLight', 'PluginLightFilter', 'CylinderLight', 'Material', 'NonboundableLightBase', 'RectLight', 'GeometryLight', 'PhysicsSphericalJoint', 'LightFilter', 'SphereLight', 'NodeGraph', 'DomeLight', 'Shader', 'DistantLight', 'Imageable', 'PhysicsCollisionGroup', 'PhysicsJoint', 'BoundableLightBase', 'PhysicsPrismaticJoint', 'PhysicsScene', 'DiskLight', 'PointBased', 'Curves', 'Cylinder', 'Mesh', 'Camera', 'Cone', 'Cube', 'BasisCurves', 'Capsule', 'HermiteCurves', 'GeomSubset', 'NurbsPatch', 'Xform', 'Points', 'Scope', 'NurbsCurves', 'PointInstancer', 'Plane', 'Sphere']
Each string in the printed list represents a Prim type name that you can use to create Prims. Experiment with creating Prims of different types using
Usd.Stage.DefinePrim()and creating them in different places in the Prim hierarchy. Don’t forget to reload the Stage in USDView by clicking to view the results from yourcreate_stage.pyscript.
5. Defining Prims using their respective Schema classes
Most Prim types have a Schema class that you can use to author and query Prims of that type. This section will show you how to define Prims using their respective Schema classes.
Extra Info
Prim types defined by Codeless Schemas are the exception and don’t have a Schema class as they do not generate an API in order to avoid code compilation.
Schema classes for Prim types have a function called Define() that works similar to Usd.Stage.DefinePrim(). Let’s try it out with a couple of Prim types.
Create another Scope, but this time use the
UsdGeom.Scopeclass. Update your imports and add the following lines of code to thecreate_stage.pyscript:from pxr import Usd, UsdGeom ... print(box) lights_scope: UsdGeom.Scope = UsdGeom.Scope.Define(stage, "/Lights") stage.Save()
Define()takes aUsd.Stagefor the first argument and the Prim path for the second argument. This will create a Scope at the path/Lightsas a sibling to the/GeometryScope. You will use this new Scope to keep your lights organized separately from your geometry.Now create a couple of different lights within that
/LightsScope. This will use another module called,UsdLux. Update your imports and add the following lines of code to thecreate_stage.pyscript:from pxr import Usd, UsdGeom, UsdLux ... lights_scope: UsdGeom.Scope = UsdGeom.Scope.Define(stage, "/Lights") lights_scope_prim: Usd.Prim = lights_scope.GetPrim() UsdLux.DomeLight.Define(stage, lights_scope_prim.GetPath().AppendPath("MyDomeLight")) UsdLux.DistantLight.Define(stage, lights_scope_prim.GetPath().AppendPath("Sun")) stage.Save()
Here, you are using two additional classes,
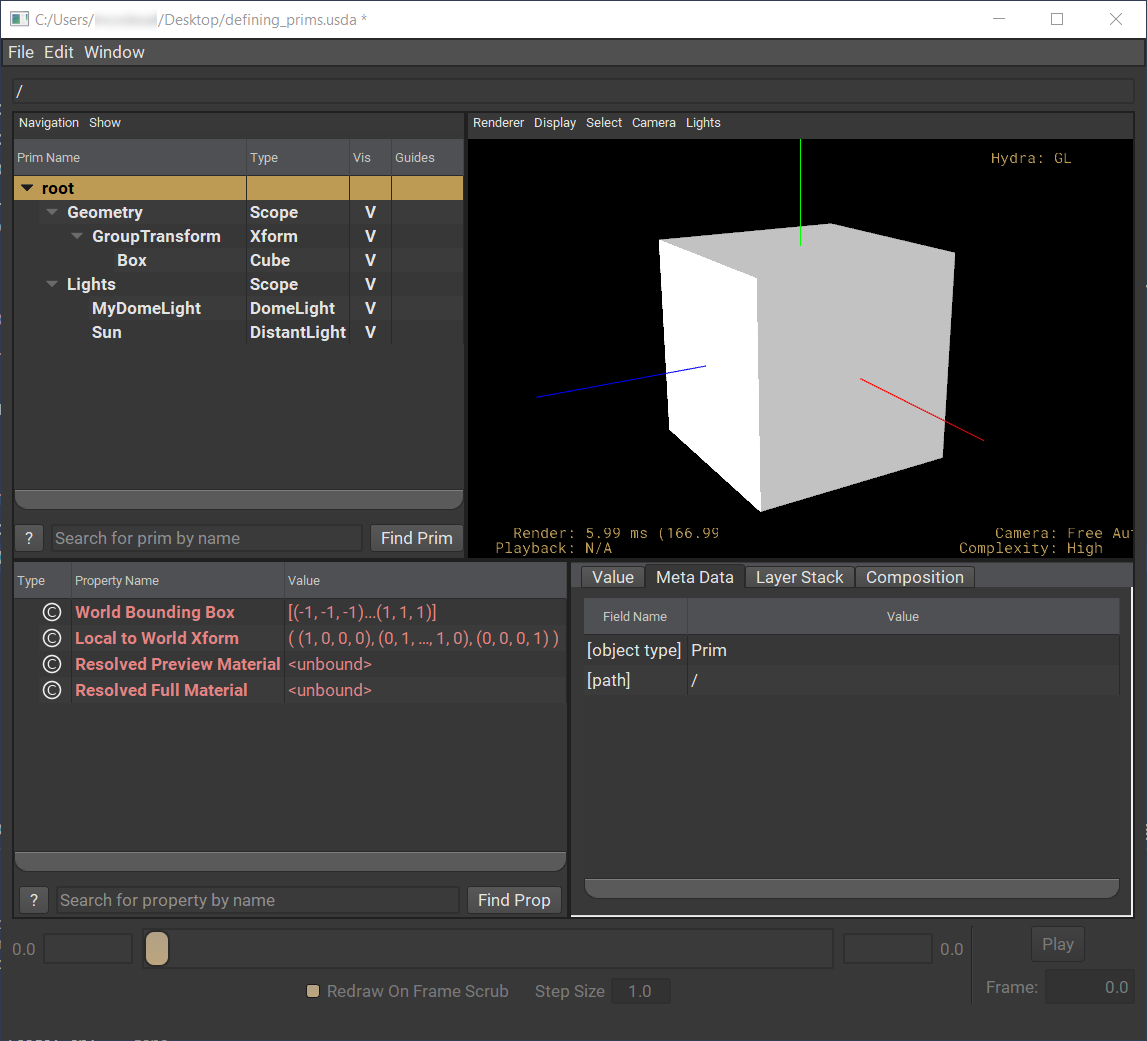
UsdLux.DomeLightandUsdLux.DistantLightto define two new Prim types. Notice also theGetPrim()call. As opposed toUsd.Stage.DefinePrim(),Define()returns an object of the class that it belongs to. If you ever need to, you can get the correspondingUsd.Primobject usingGetPrim().Save and execute the
create_stage.pyscript to regenerate the Stage.In USDView, click to reload the Stage and see your latest output. It should look like this now:

You should have a total of six prims, but you may notice that the lighting hasn’t changed. USDView needs to be configured to render the scene lights.
In the USDView Viewport, uncheck .
Check . This will give you the full effect of the scene lighting:
You can toggle the visibility of the light Prims by clicking on the V or I in the
Viscolumn of the Tree View. This way you can see the effect of each light individually.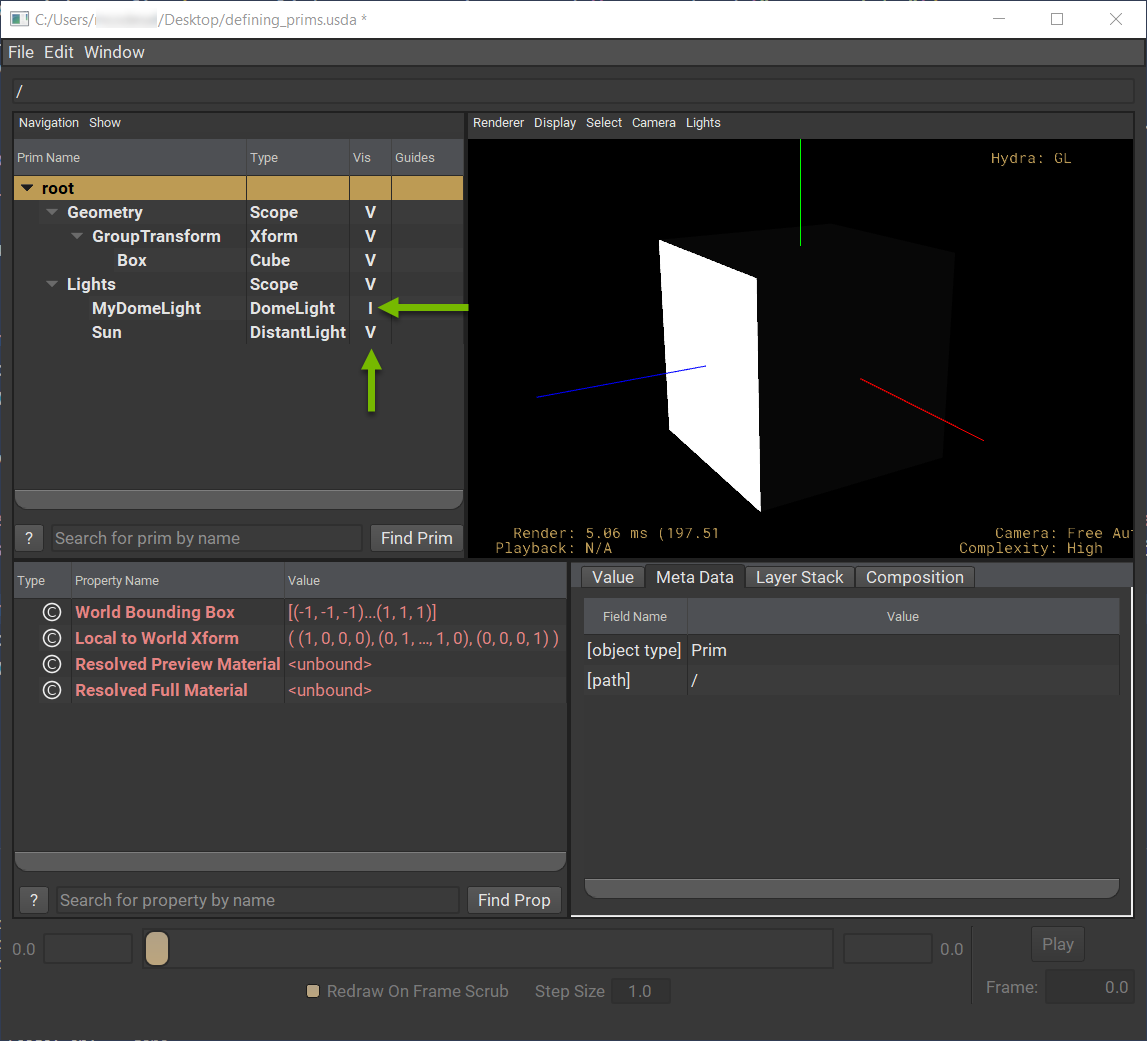
Completed Code
For your reference, here is the completed create_stage.py script.
Click to expand and see the full solution…
create_stage.py
from pathlib import Path
from pxr import Usd, UsdGeom, UsdLux

print(Usd.GetVersion())
layer_path = str(Path.home() / "defining_prims.usda")
print(f"USD Stage file path: {layer_path}")
stage = Usd.Stage.CreateNew(layer_path)
geom_scope: Usd.Prim = stage.DefinePrim("/Geometry", "Scope")
print(f"Prim Path: {geom_scope.GetPath()}")
print(f"Prim Name: {geom_scope.GetName()}")
print(f"Prim Type: {geom_scope.GetTypeName()}")
xform: Usd.Prim = stage.DefinePrim("/Geometry/GroupTransform", "Xform")
stage.DefinePrim(xform.GetPath().AppendPath("Box"), "Cube")
box: Usd.Prim = stage.GetPrimAtPath("/Geometry/GroupTransform/Box")
print(box)
lights_scope: UsdGeom.Scope = UsdGeom.Scope.Define(stage, "/Lights")
lights_scope_prim: Usd.Prim = lights_scope.GetPrim()
UsdLux.DomeLight.Define(stage, lights_scope_prim.GetPath().AppendPath("MyDomeLight"))
UsdLux.DistantLight.Define(stage, lights_scope_prim.GetPath().AppendPath("Sun"))
stage.Save()
Conclusion
Congratulations on completing the Defining Your First Prims tutorial. Through this tutorial, you created and queried a few different types of Prims on a Stage. You should continue by learning about Properties which will help you enrich and vary the descriptions of your Prims.