Digital Human Real-Time Rendering Setup
Intro
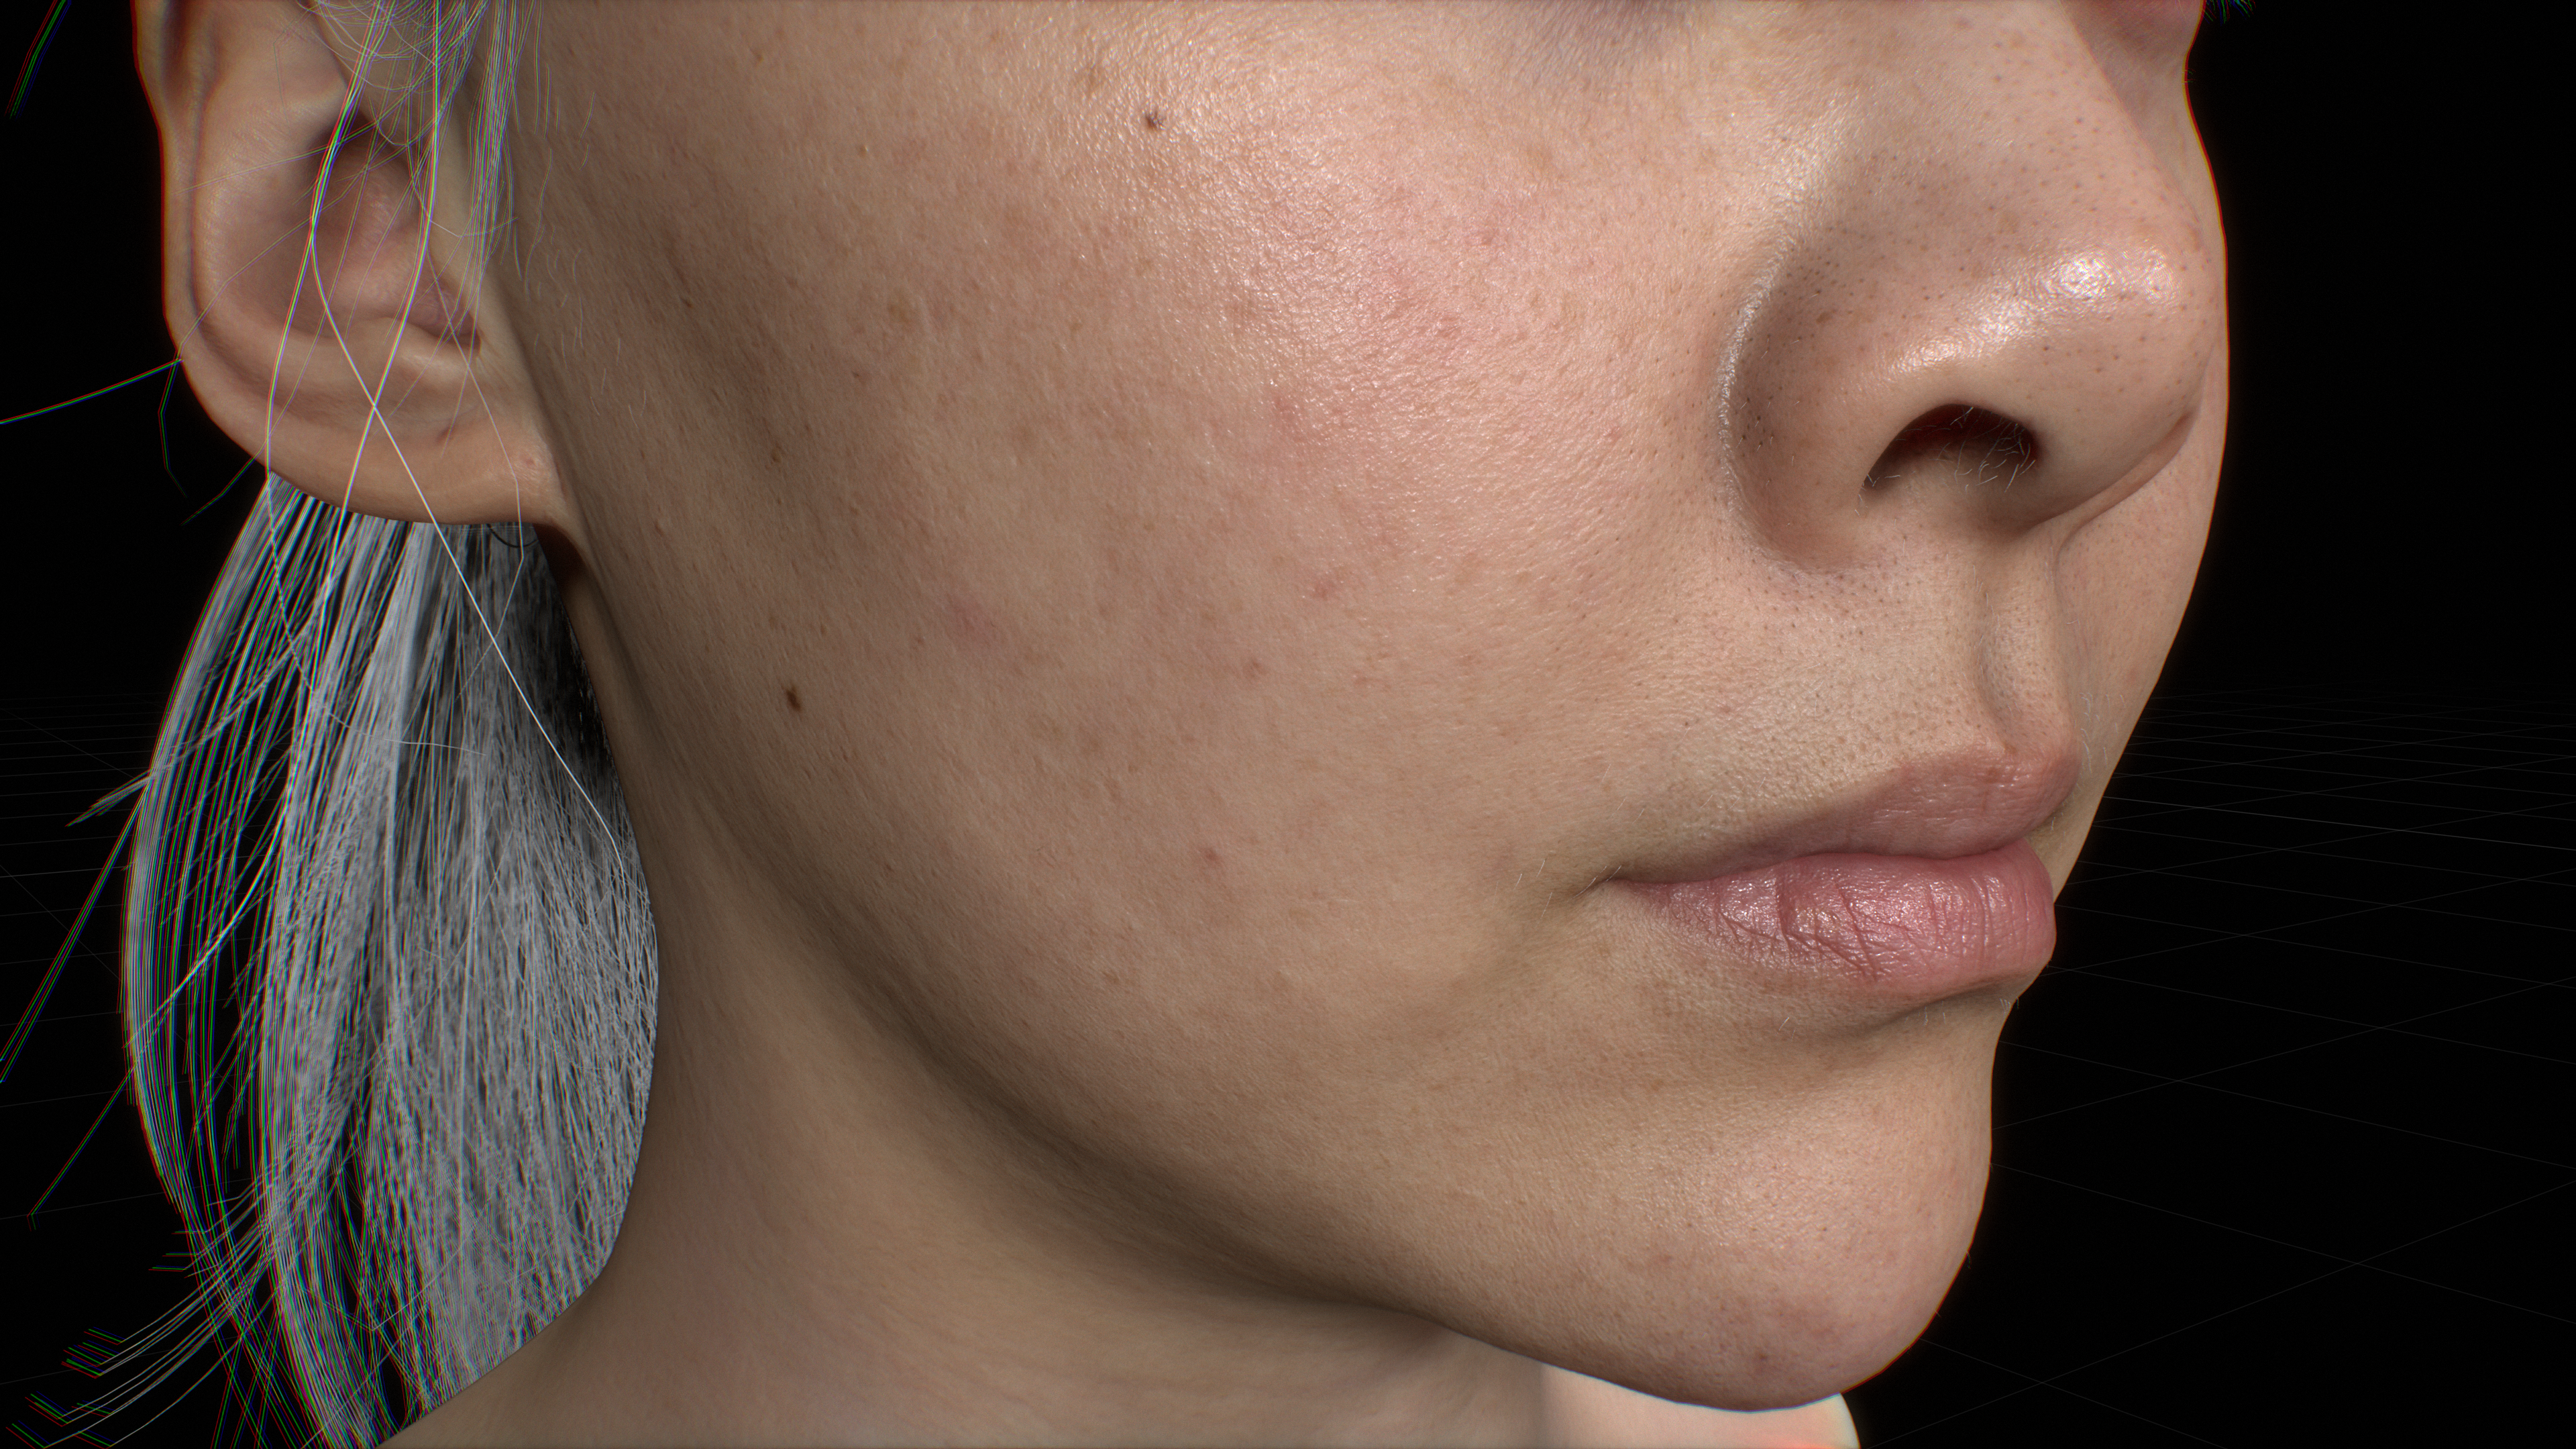
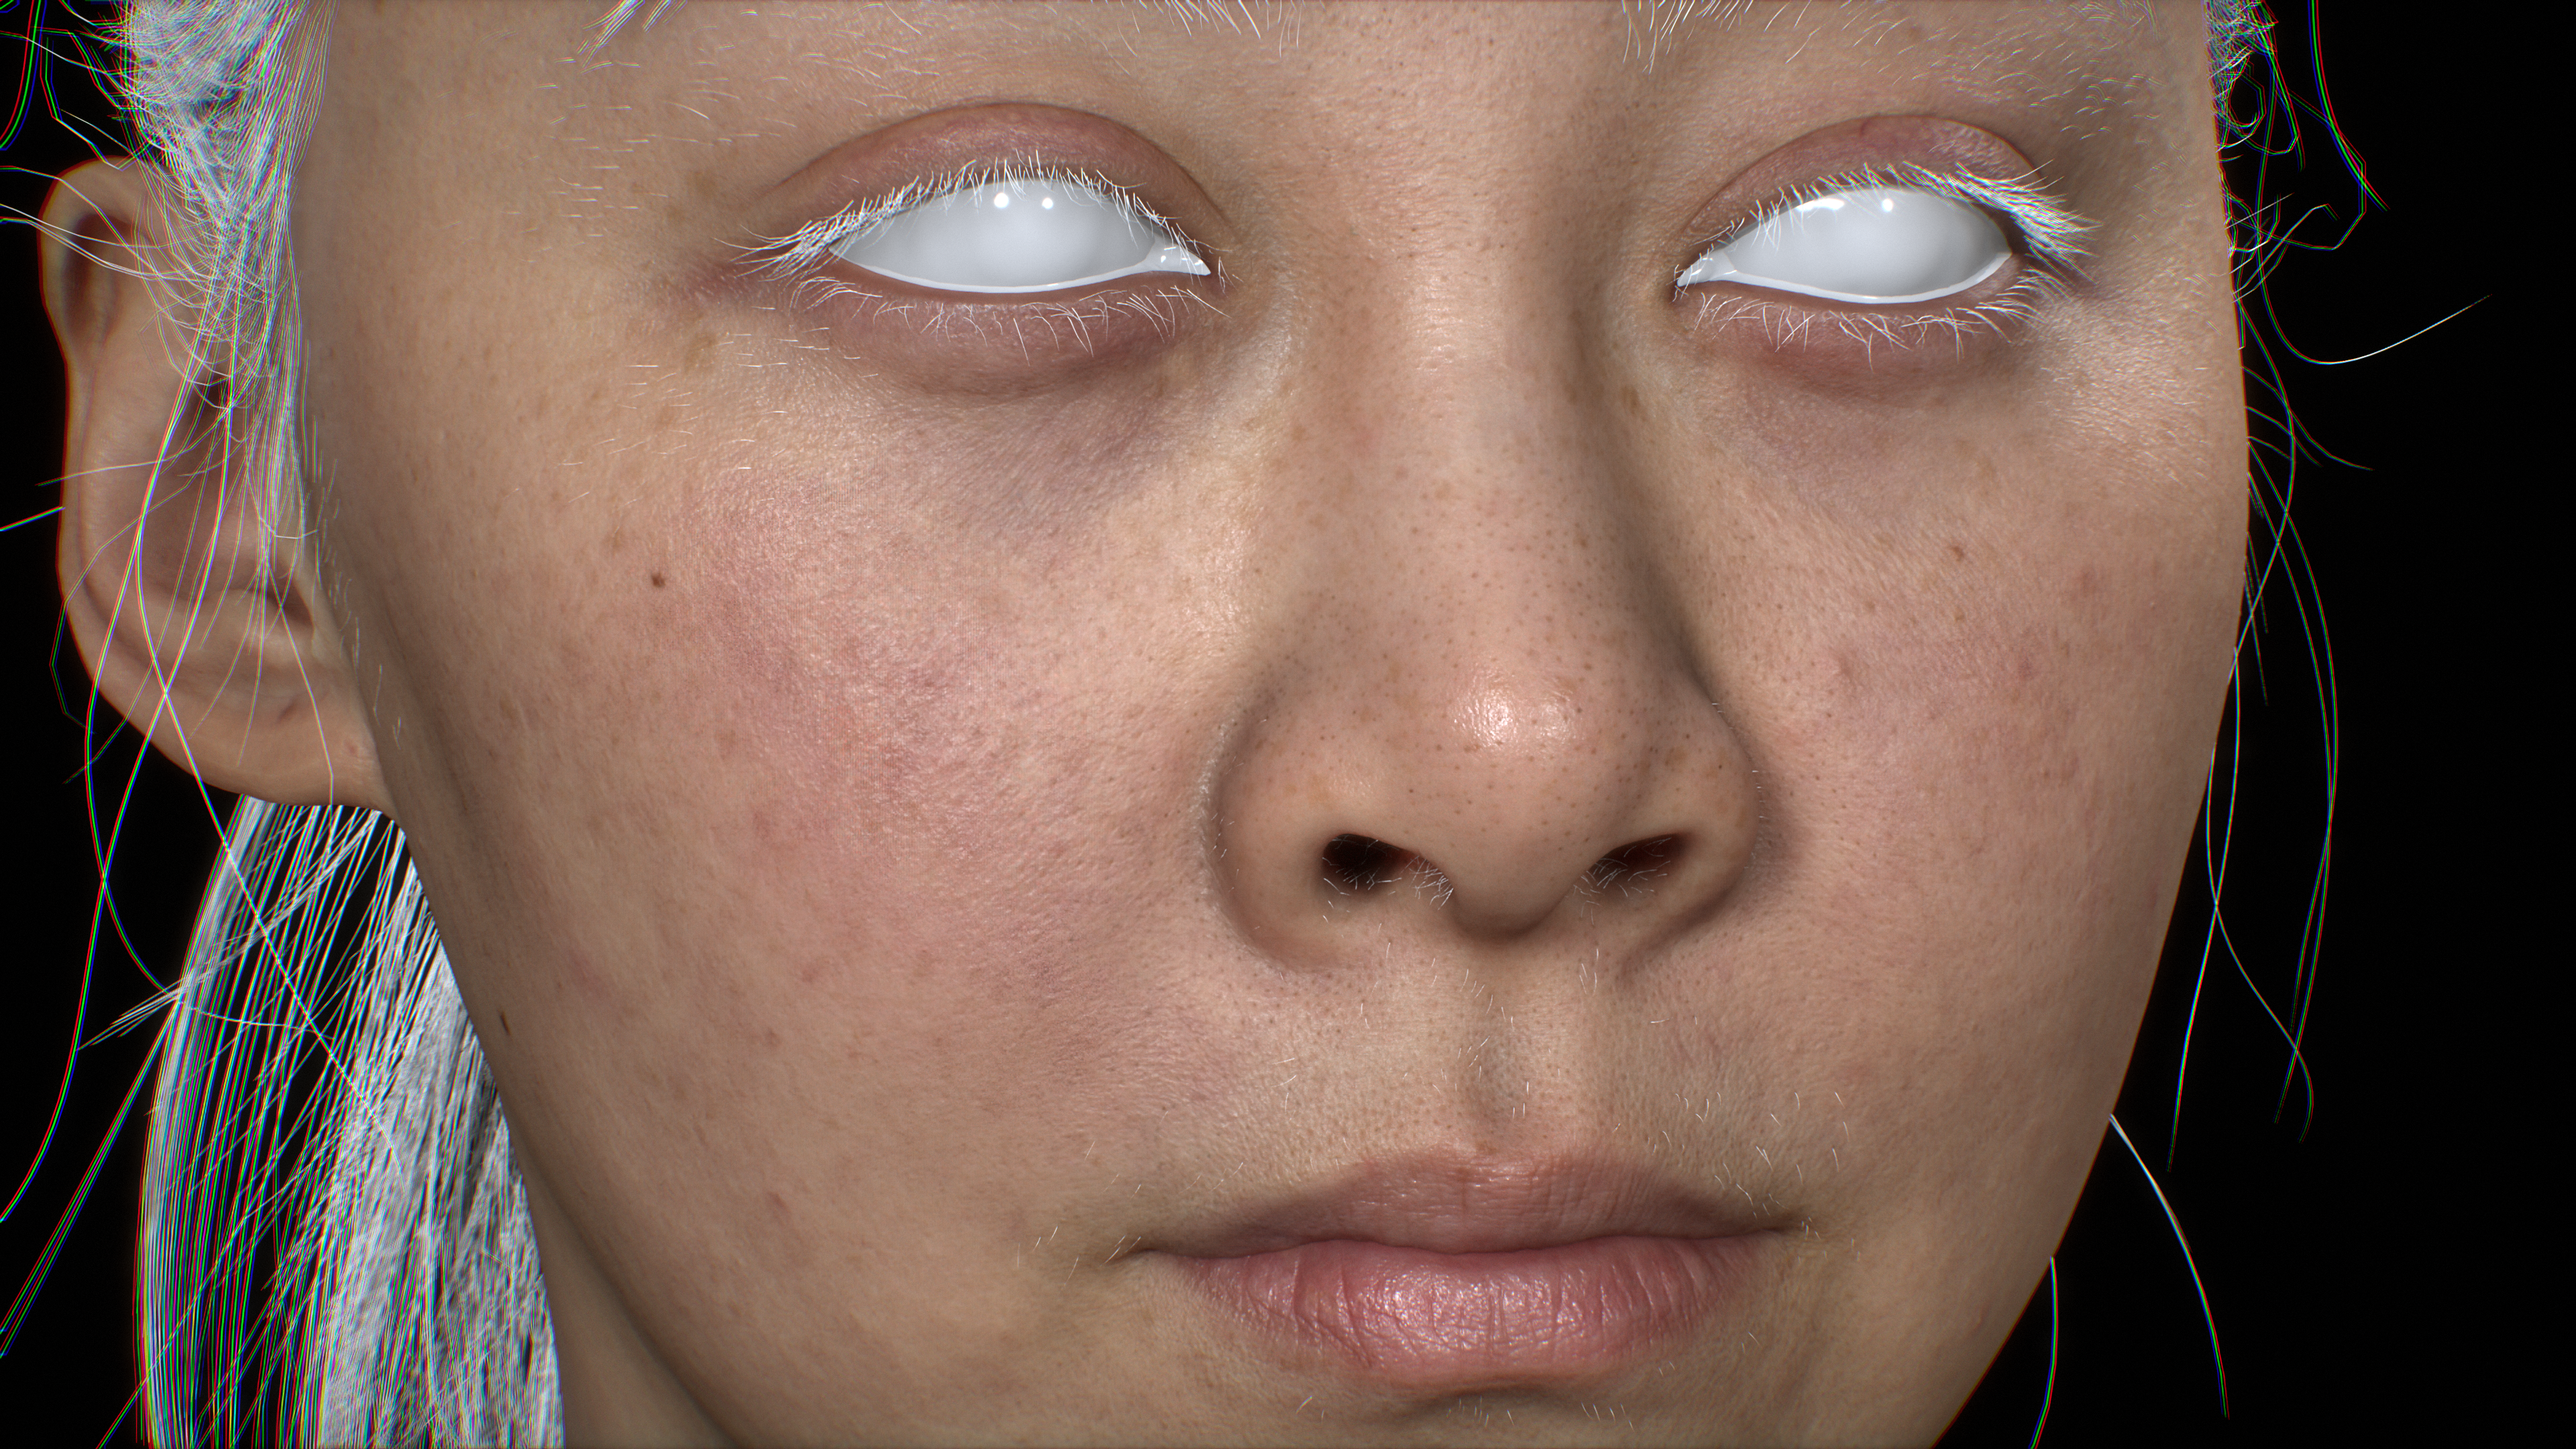
This page covers how to set up a realistic Digital Human in NVIDIA Omniverse using the RTX Real-Time Renderer.
|
|

Note
There is also a Siggraph 2022 Creating a Realistic Digital Human Portrait Tutorial for the RTX Path Tracing renderer.
Overview
Basic Stage Setup
Initial Setup
Set the viewport resolution to
UHD(3840x2160)orHD1080P(1920x1080)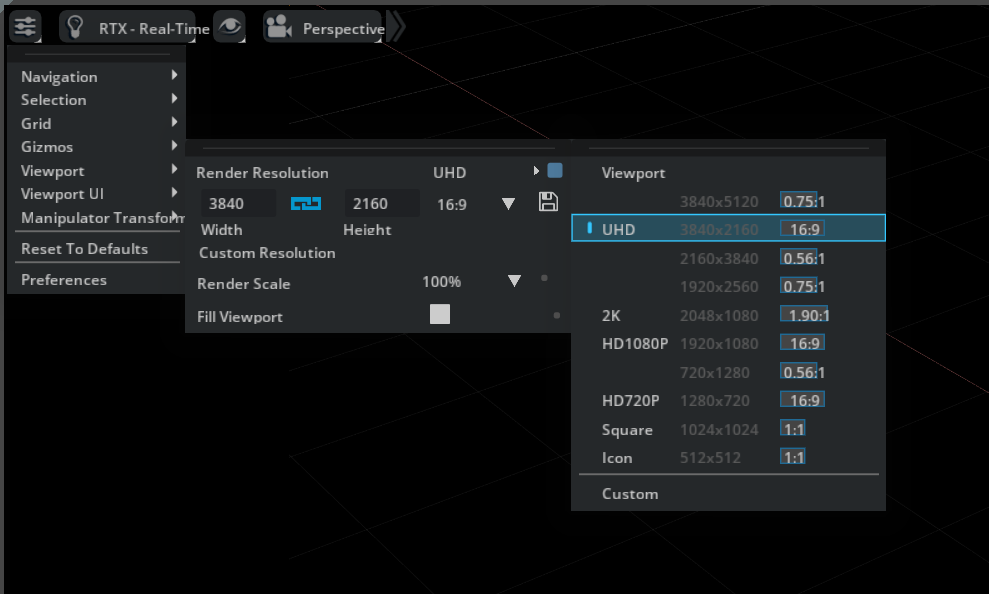
Set Viewport Resolution
Note
Set a higher resolution to get better detail in the render.
Higher resolutions also provide better input for NVIDIA Deep Learning Super Sampling (DLSS)
Enable “Display UDIM Sequence”, to use <UDIM> file texture path
File Browser GUI -> Top Right Corner Options Menu ->Display UDIM Sequence
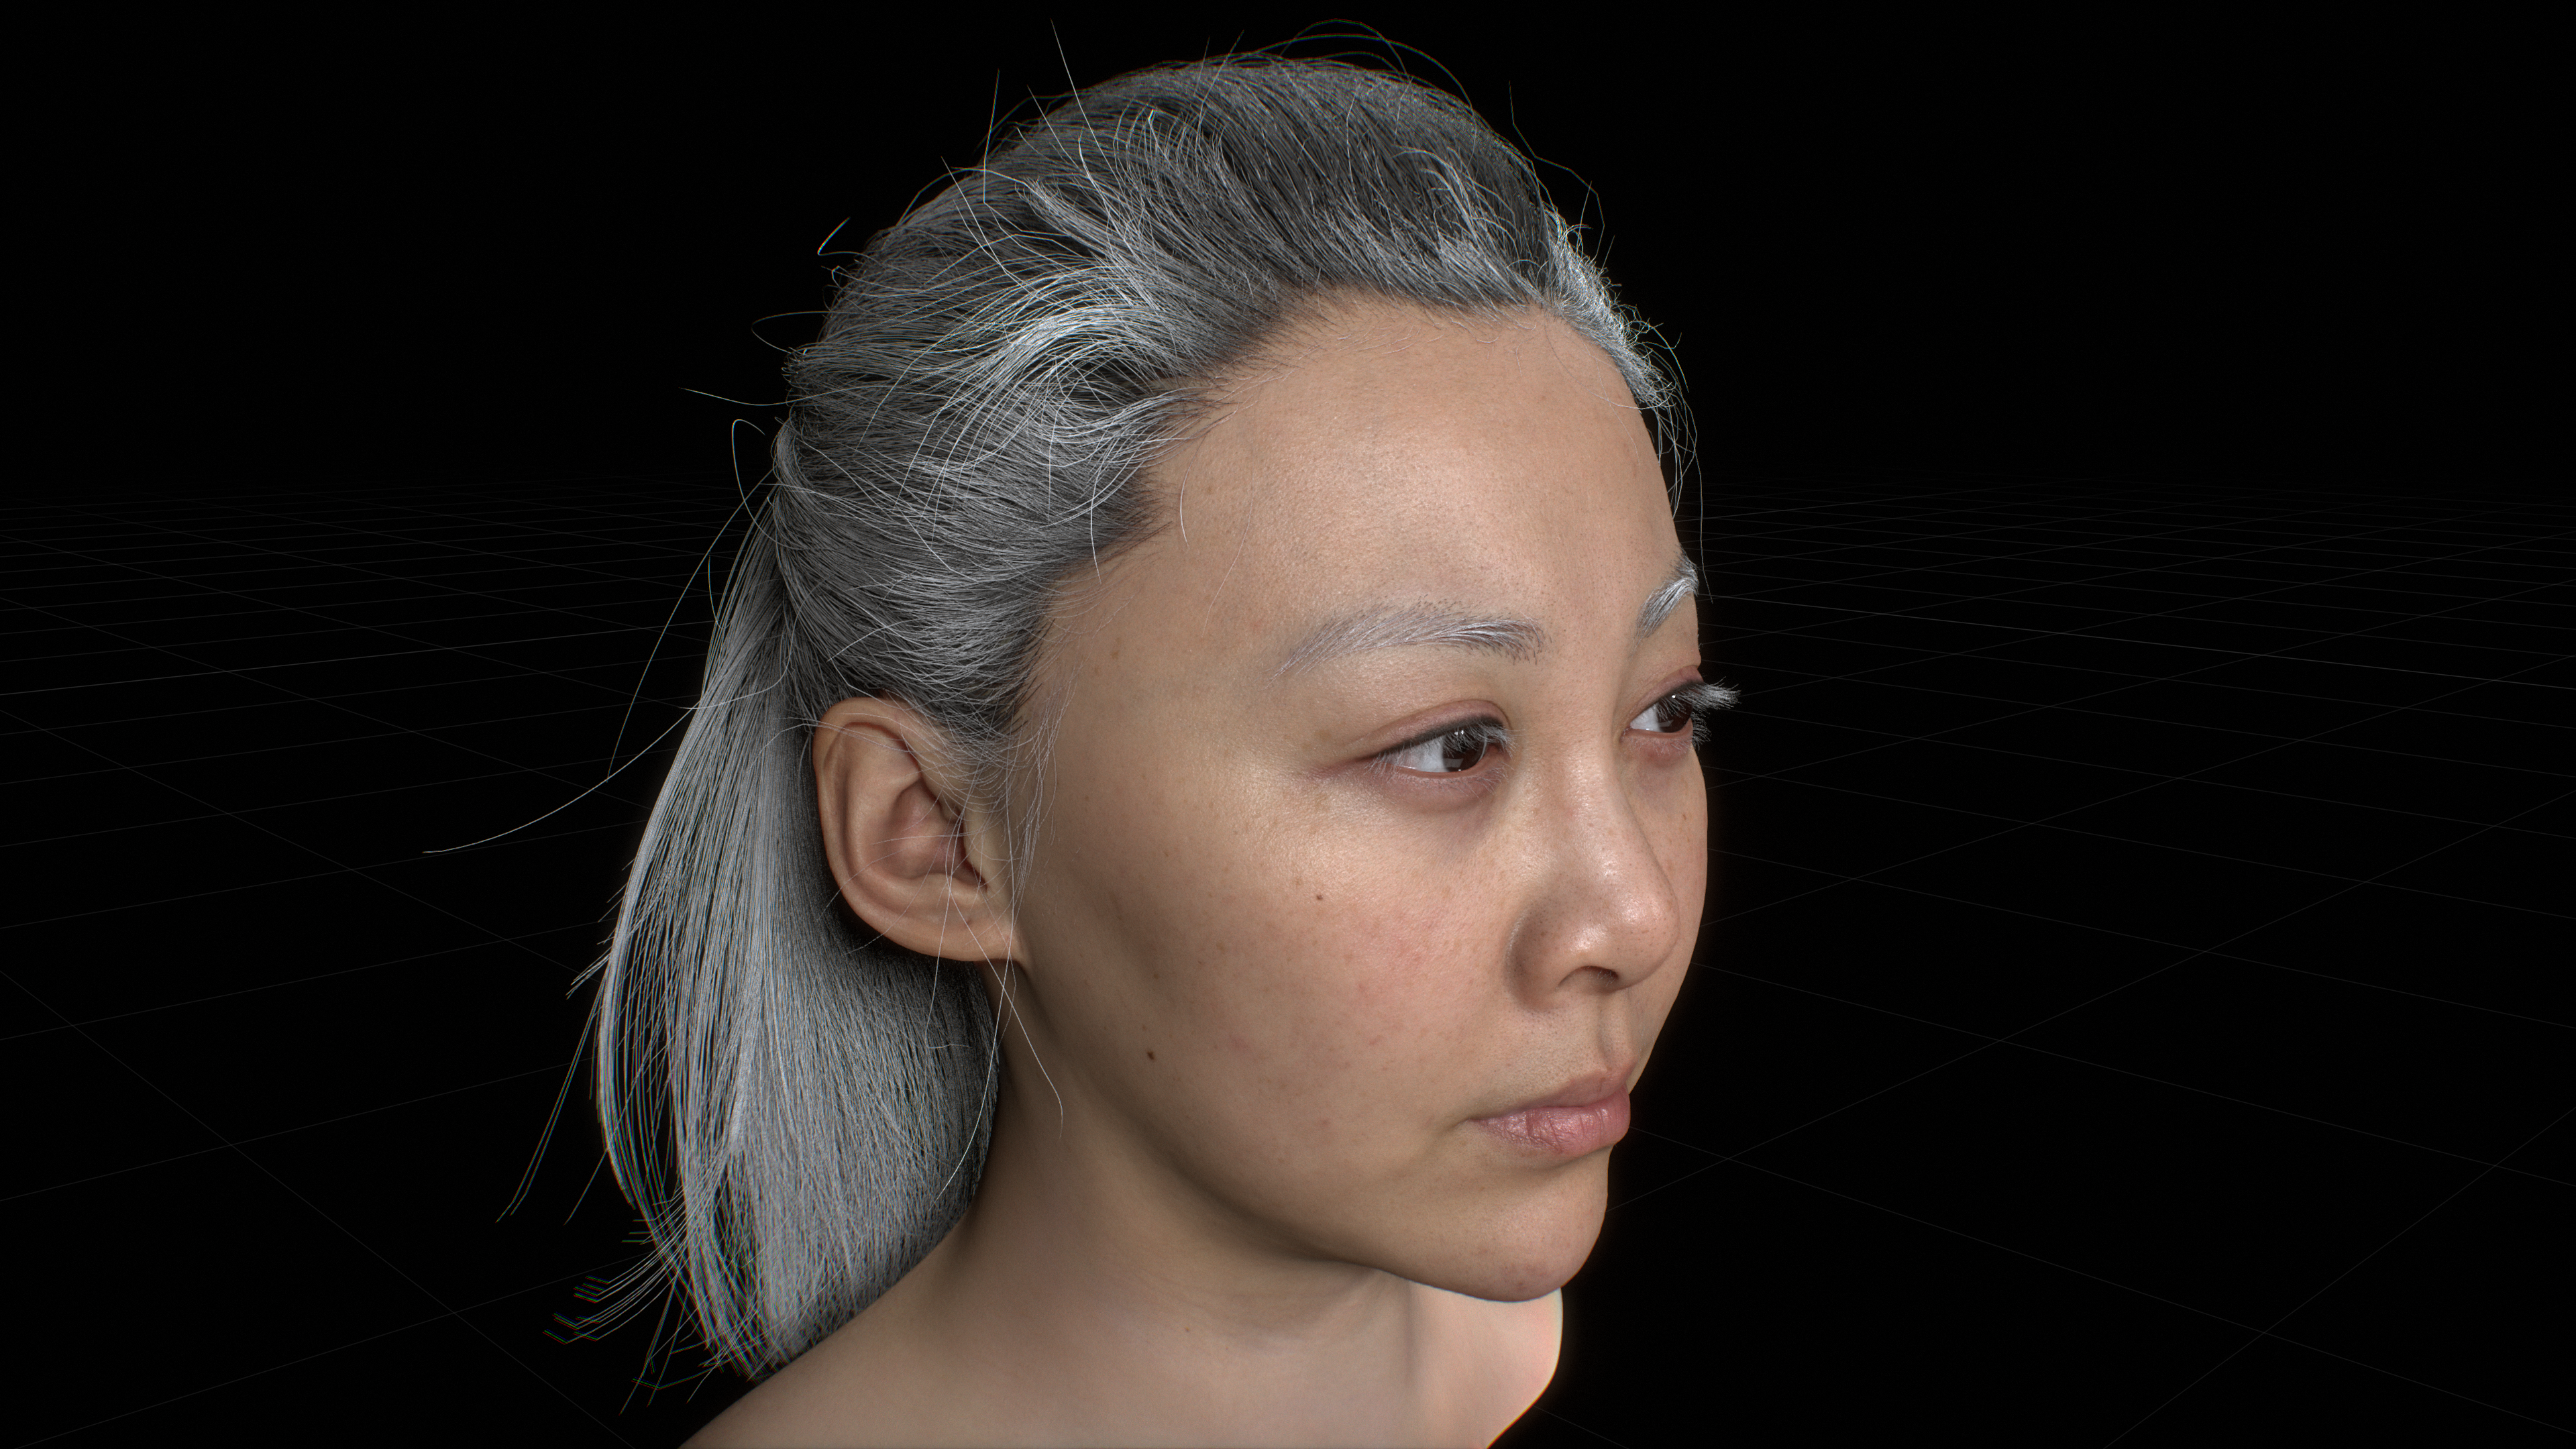
Open Example Scene
A grey-shaded example USD scene is provided for you to start with.
To load the example scene:
Open USD Composer GUI
Open Example Tab: Window -> Browsers -> Examples
Double click the
claire_lookdev_initto open the file
Open Initial Scene
Window -> Browsers -> Examples -> Open
claire_lookdev_initLoaded scene:
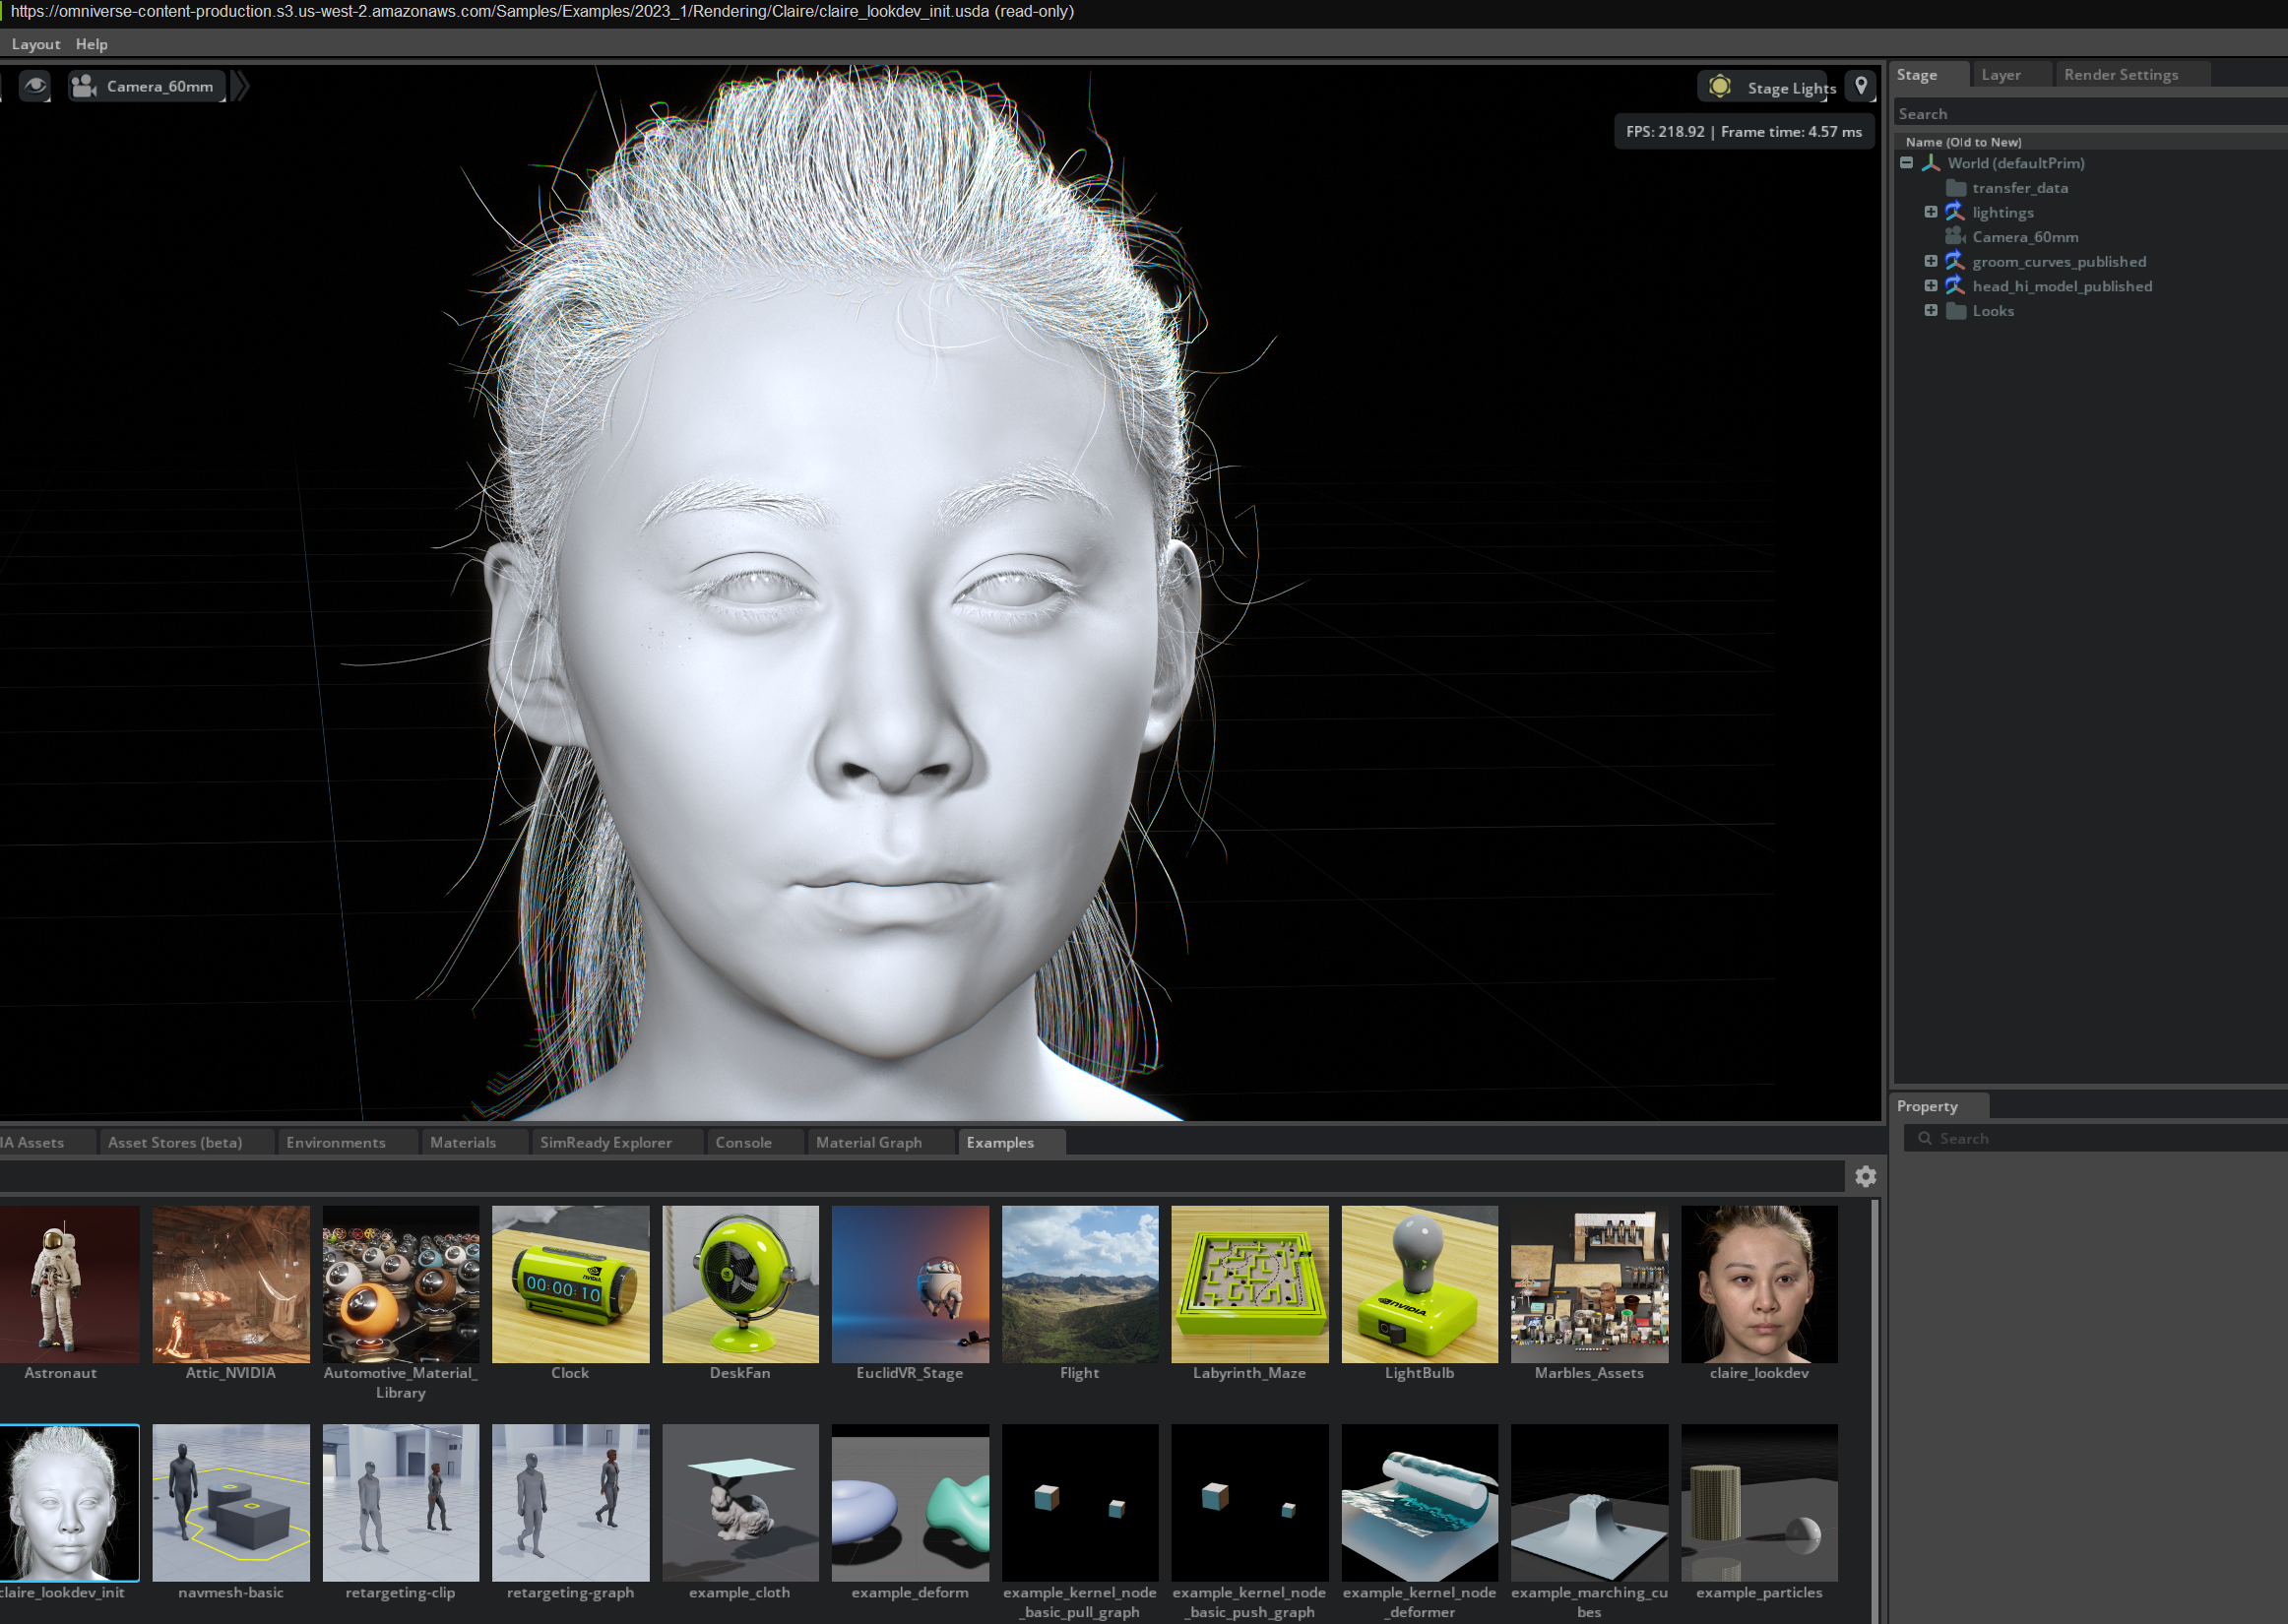
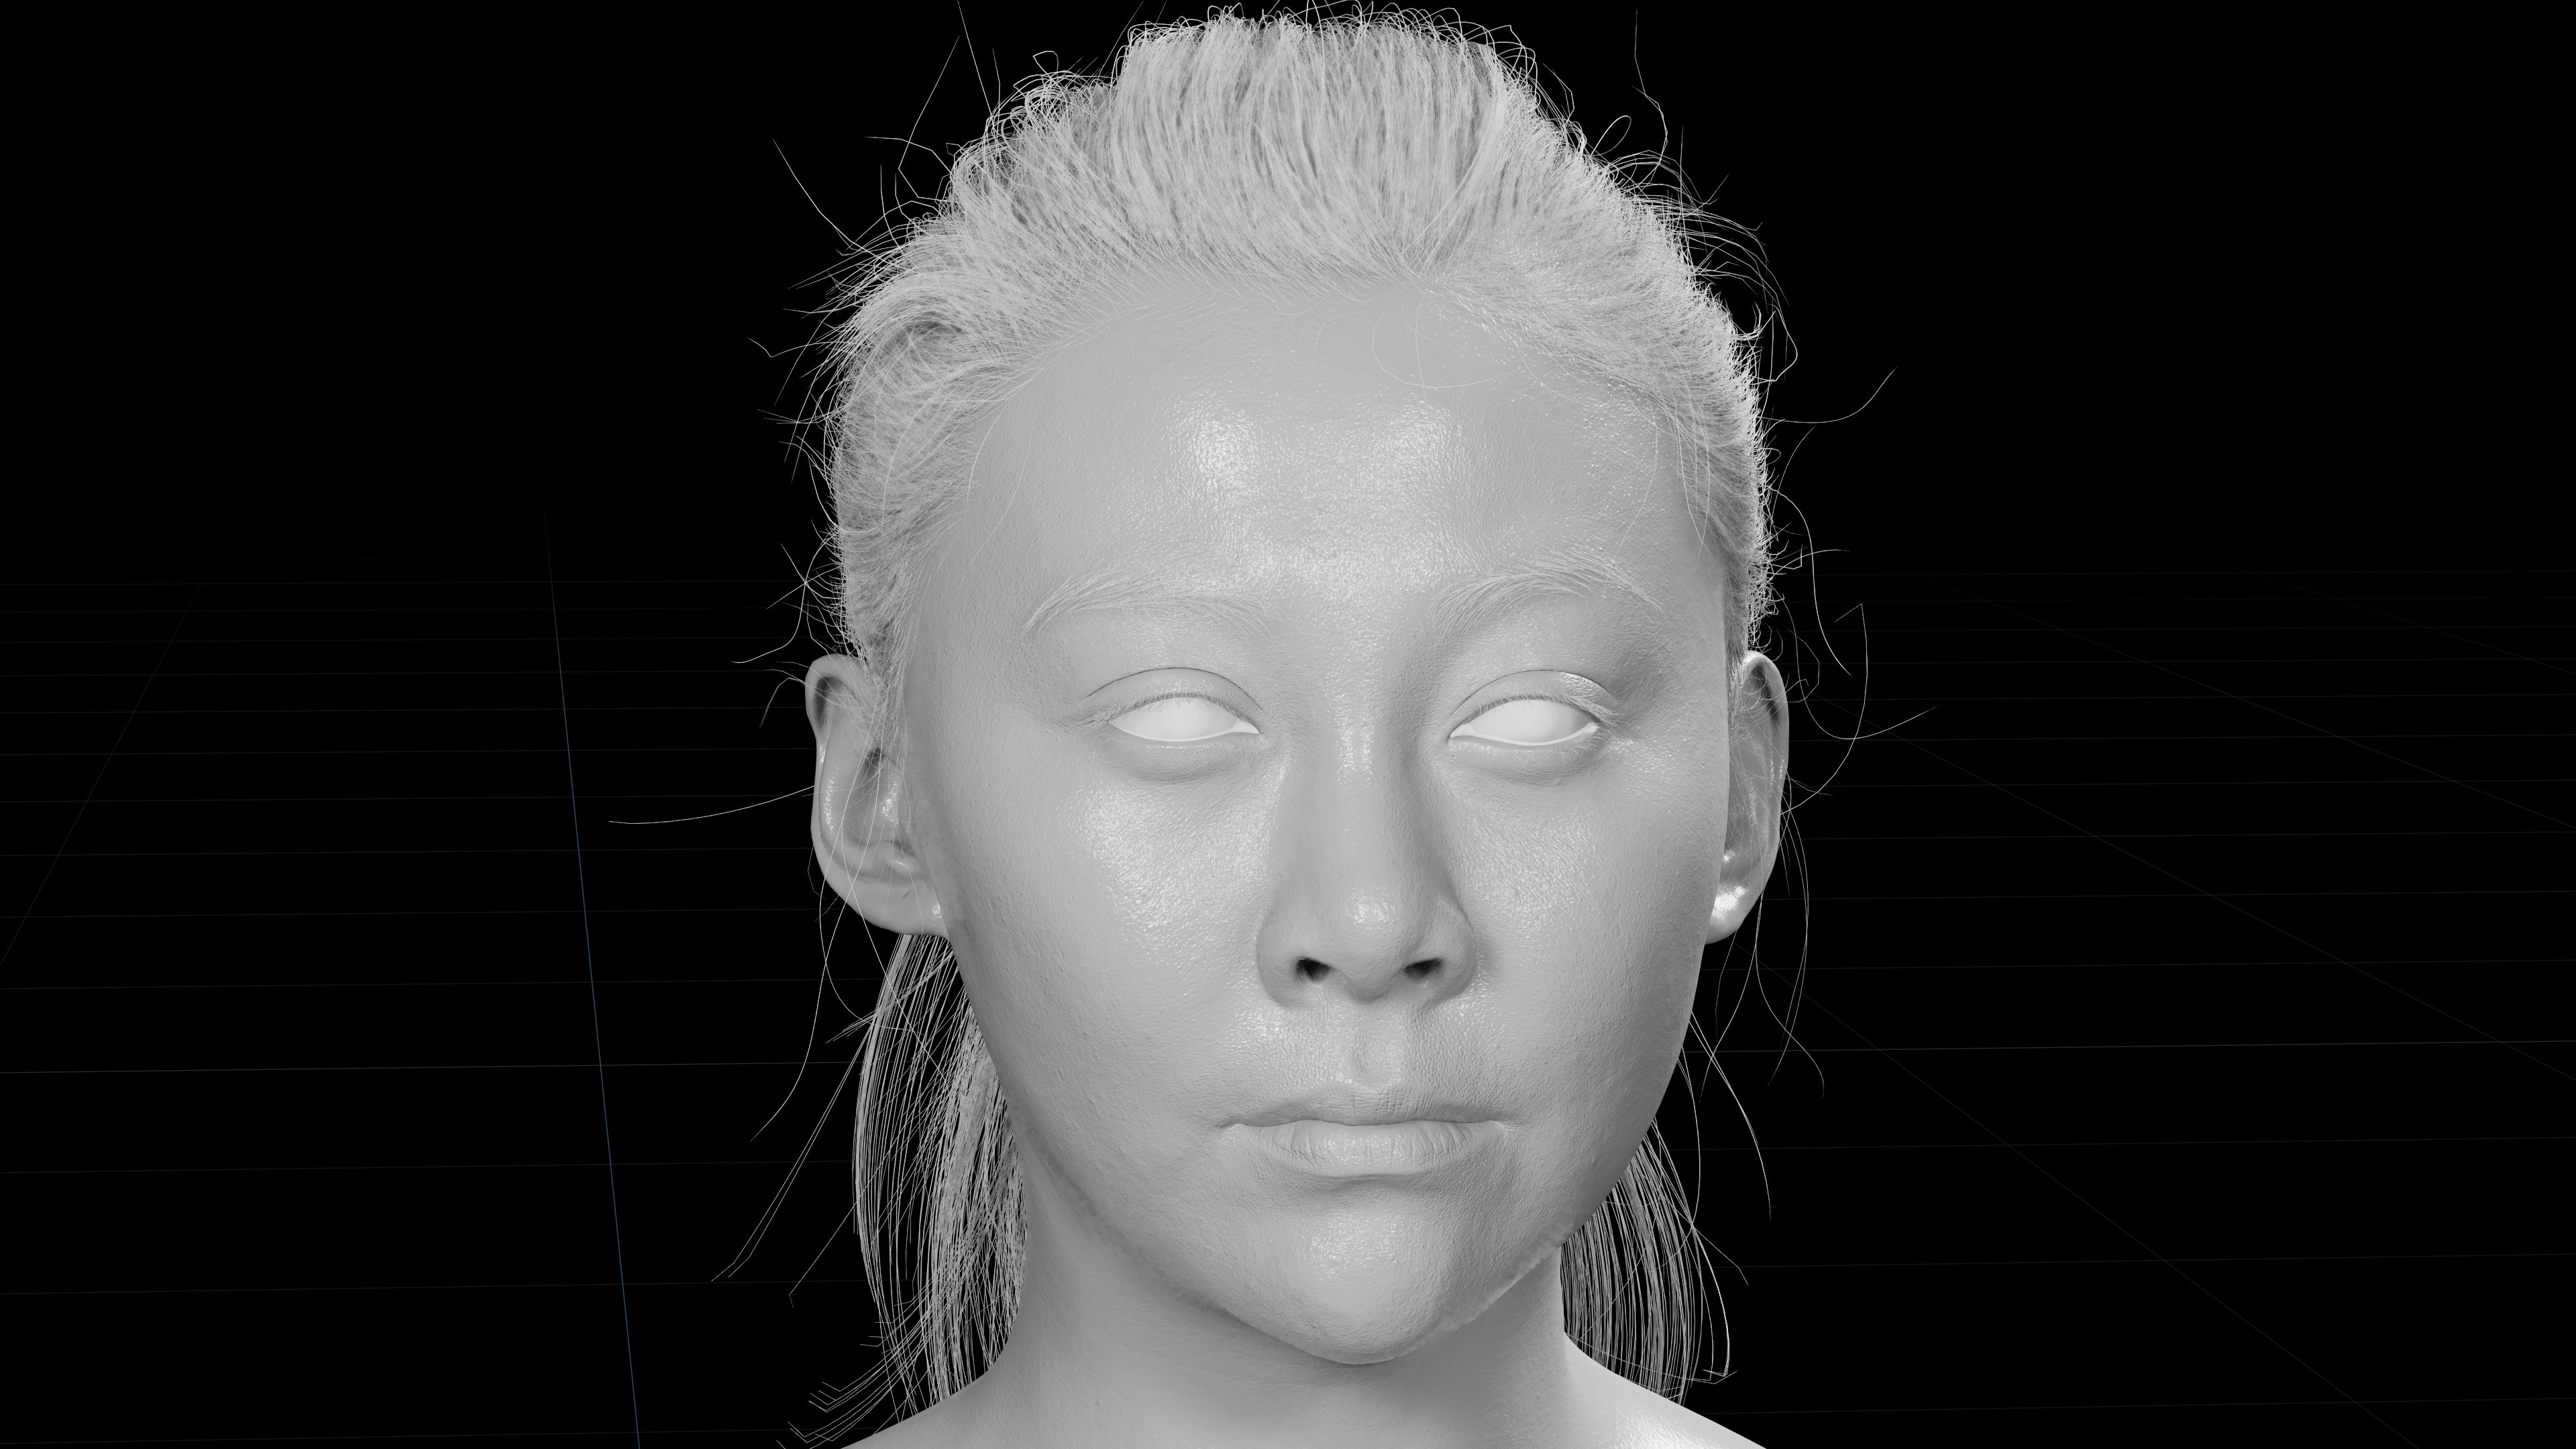
Loaded Example Scene
Once opened, the scene should look like the image above, with the following assets included as Payload
Head model
Hair groom
Camera
Lighting
Note
The initial scene is read-only. Make sure to save a copy of it with a new name in your own file location.
Use the camera /World/Camera_60mm that’s included in the scene or create your own camera.
A light rig is also provided in the initial scene. To create your own lighting, you can hide or delete the prim /World/lightings in the stage.
Additionally, it sets “Render “Settings -> Real Time-> Common -> Geometry -> Curve Settings -> Global Number BVH Splits” to 4.
A higher BVH split number is less likely to crash with a heavy hair curve asset but uses more VRAM as a tradeoff.
|

Important
If desired, a final example scene named claire_lookdev with fully setup materials can be opened through the “Example” tab.
Setting Up Materials
How to Create a New Material
Note
Omniverse ships with both built-in preset materials and Material Definition Language (MDL) graph material nodes if you want to build your own.
For this asset, using MDL graph nodes is preferred to have a finer level of control.
For more detail please go here
Open the MDL Graph Editor
Open MDL Graph Editor
Window -> Rendering -> MDL Material Graph
To create MDL graph nodes, search node type then drag to the work area:
Search Node Type -> Drag to Work Area
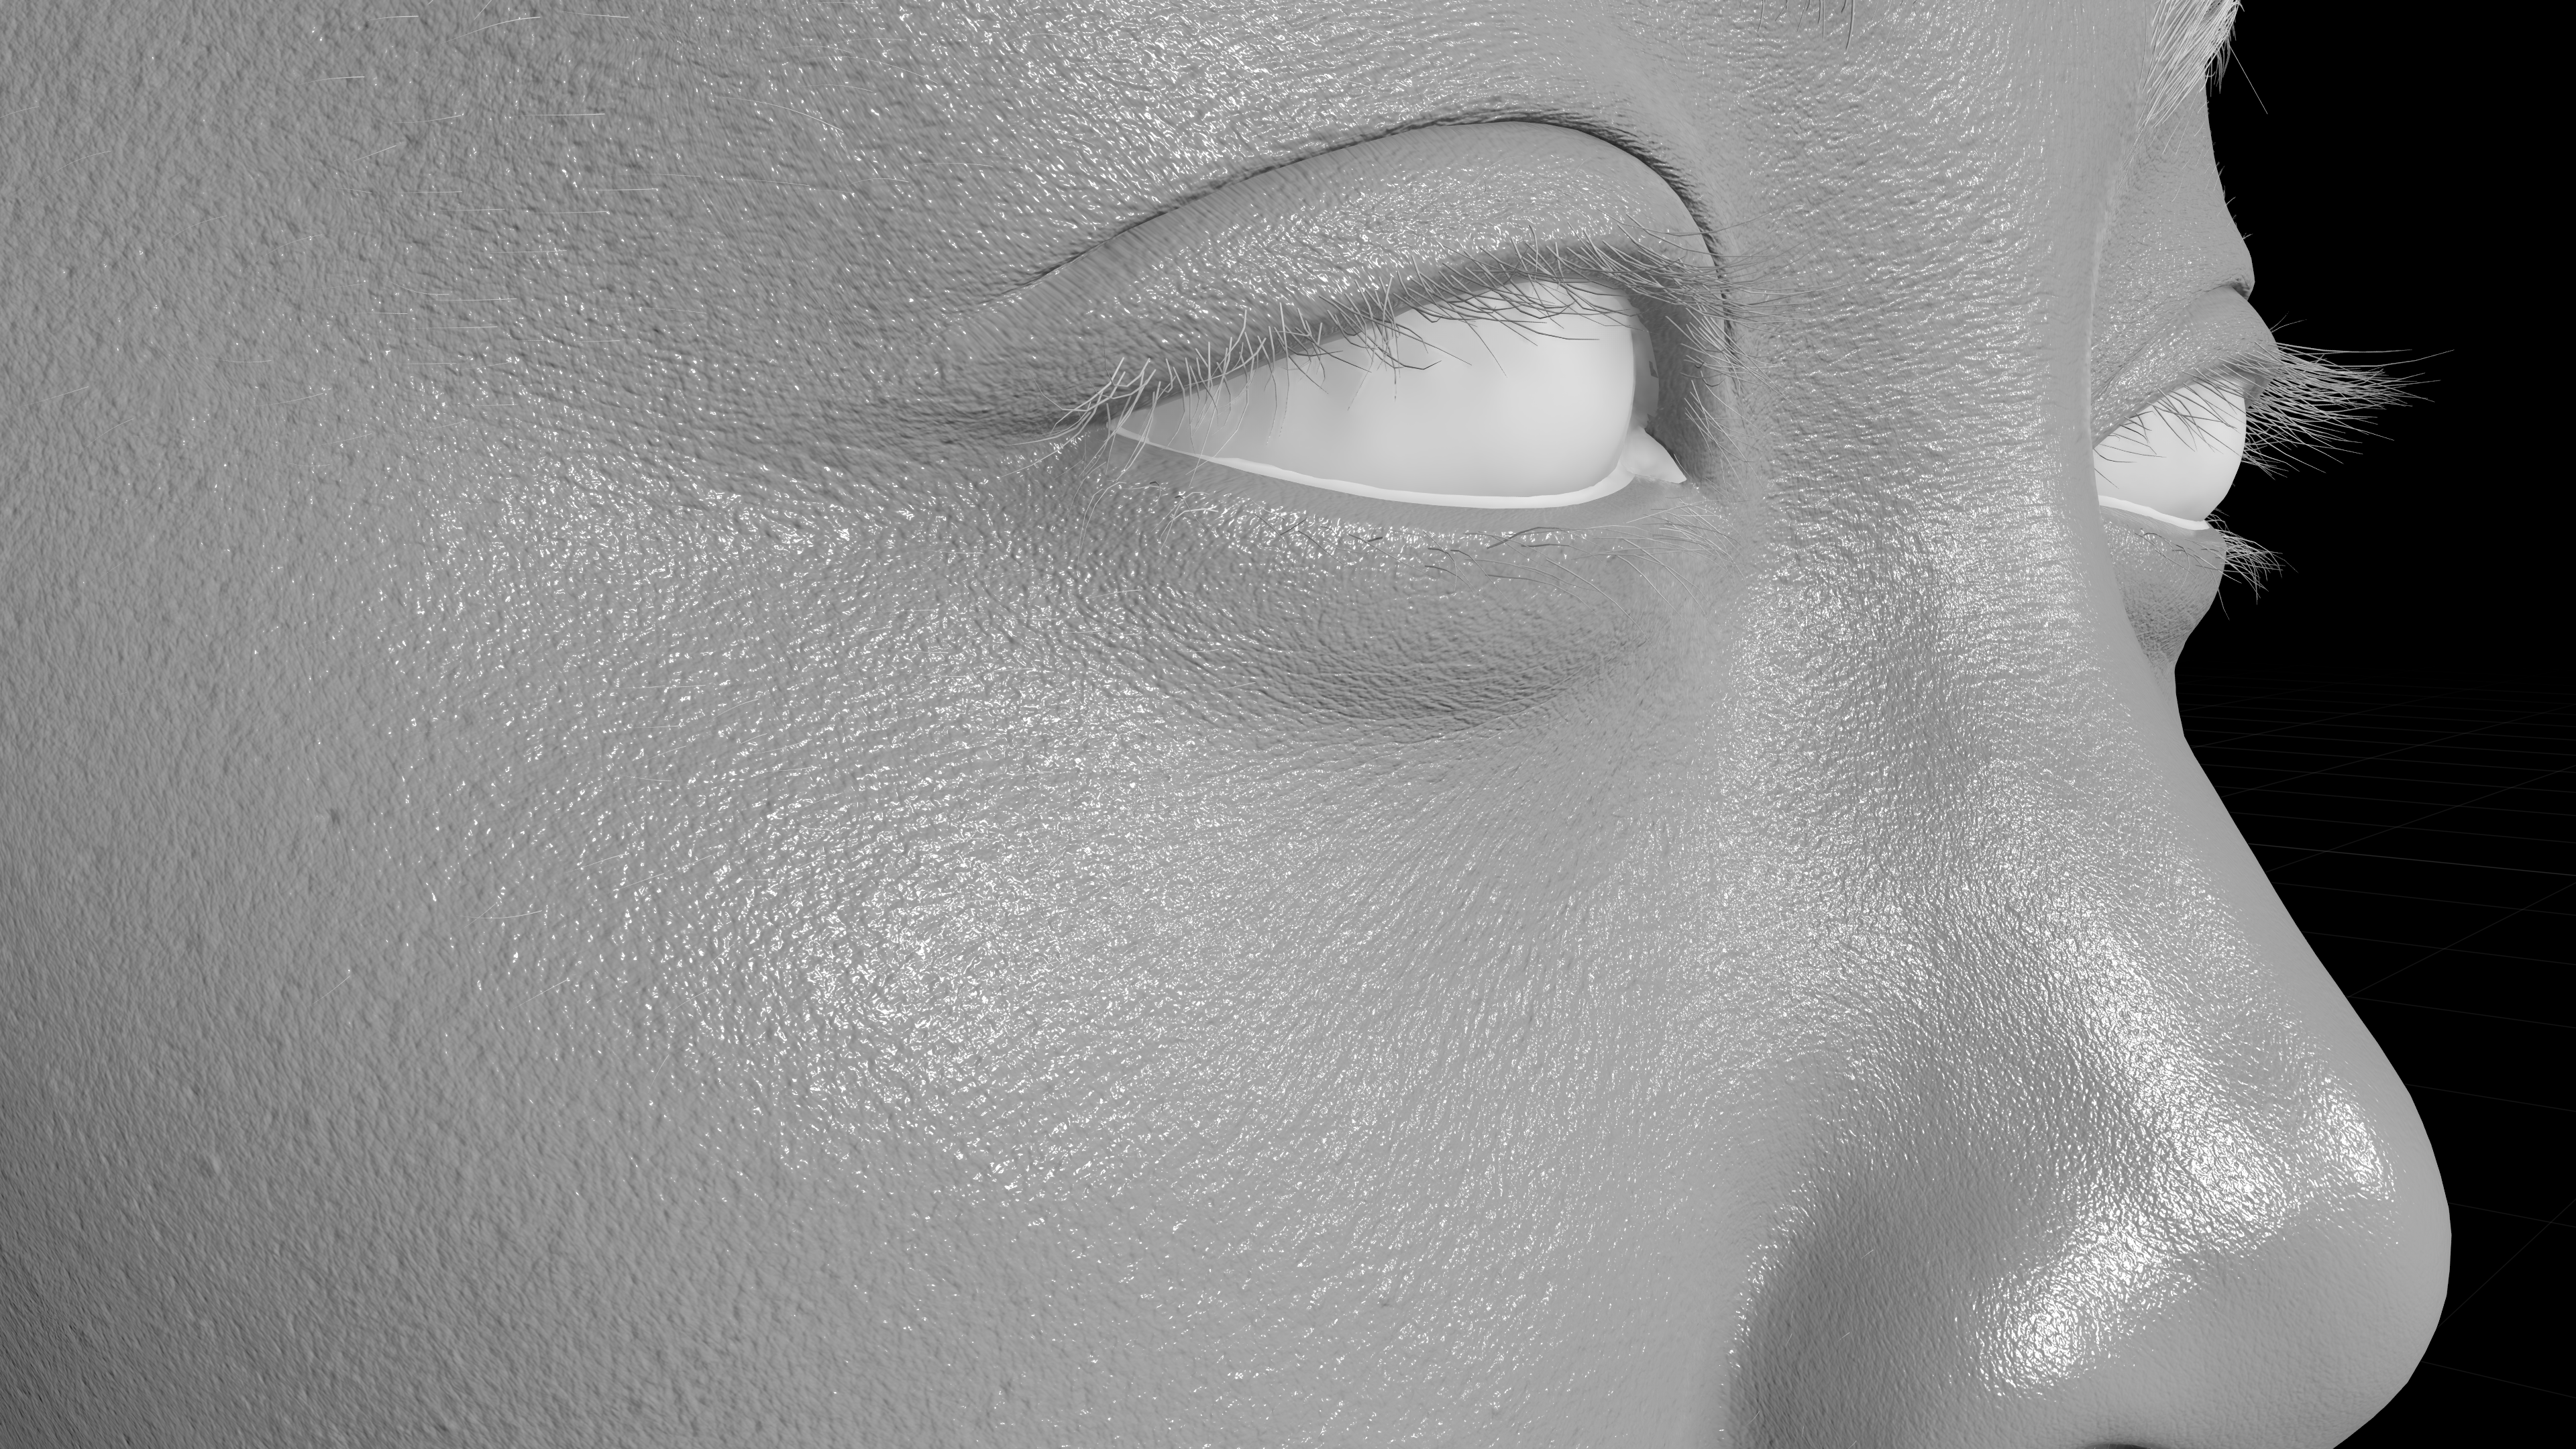
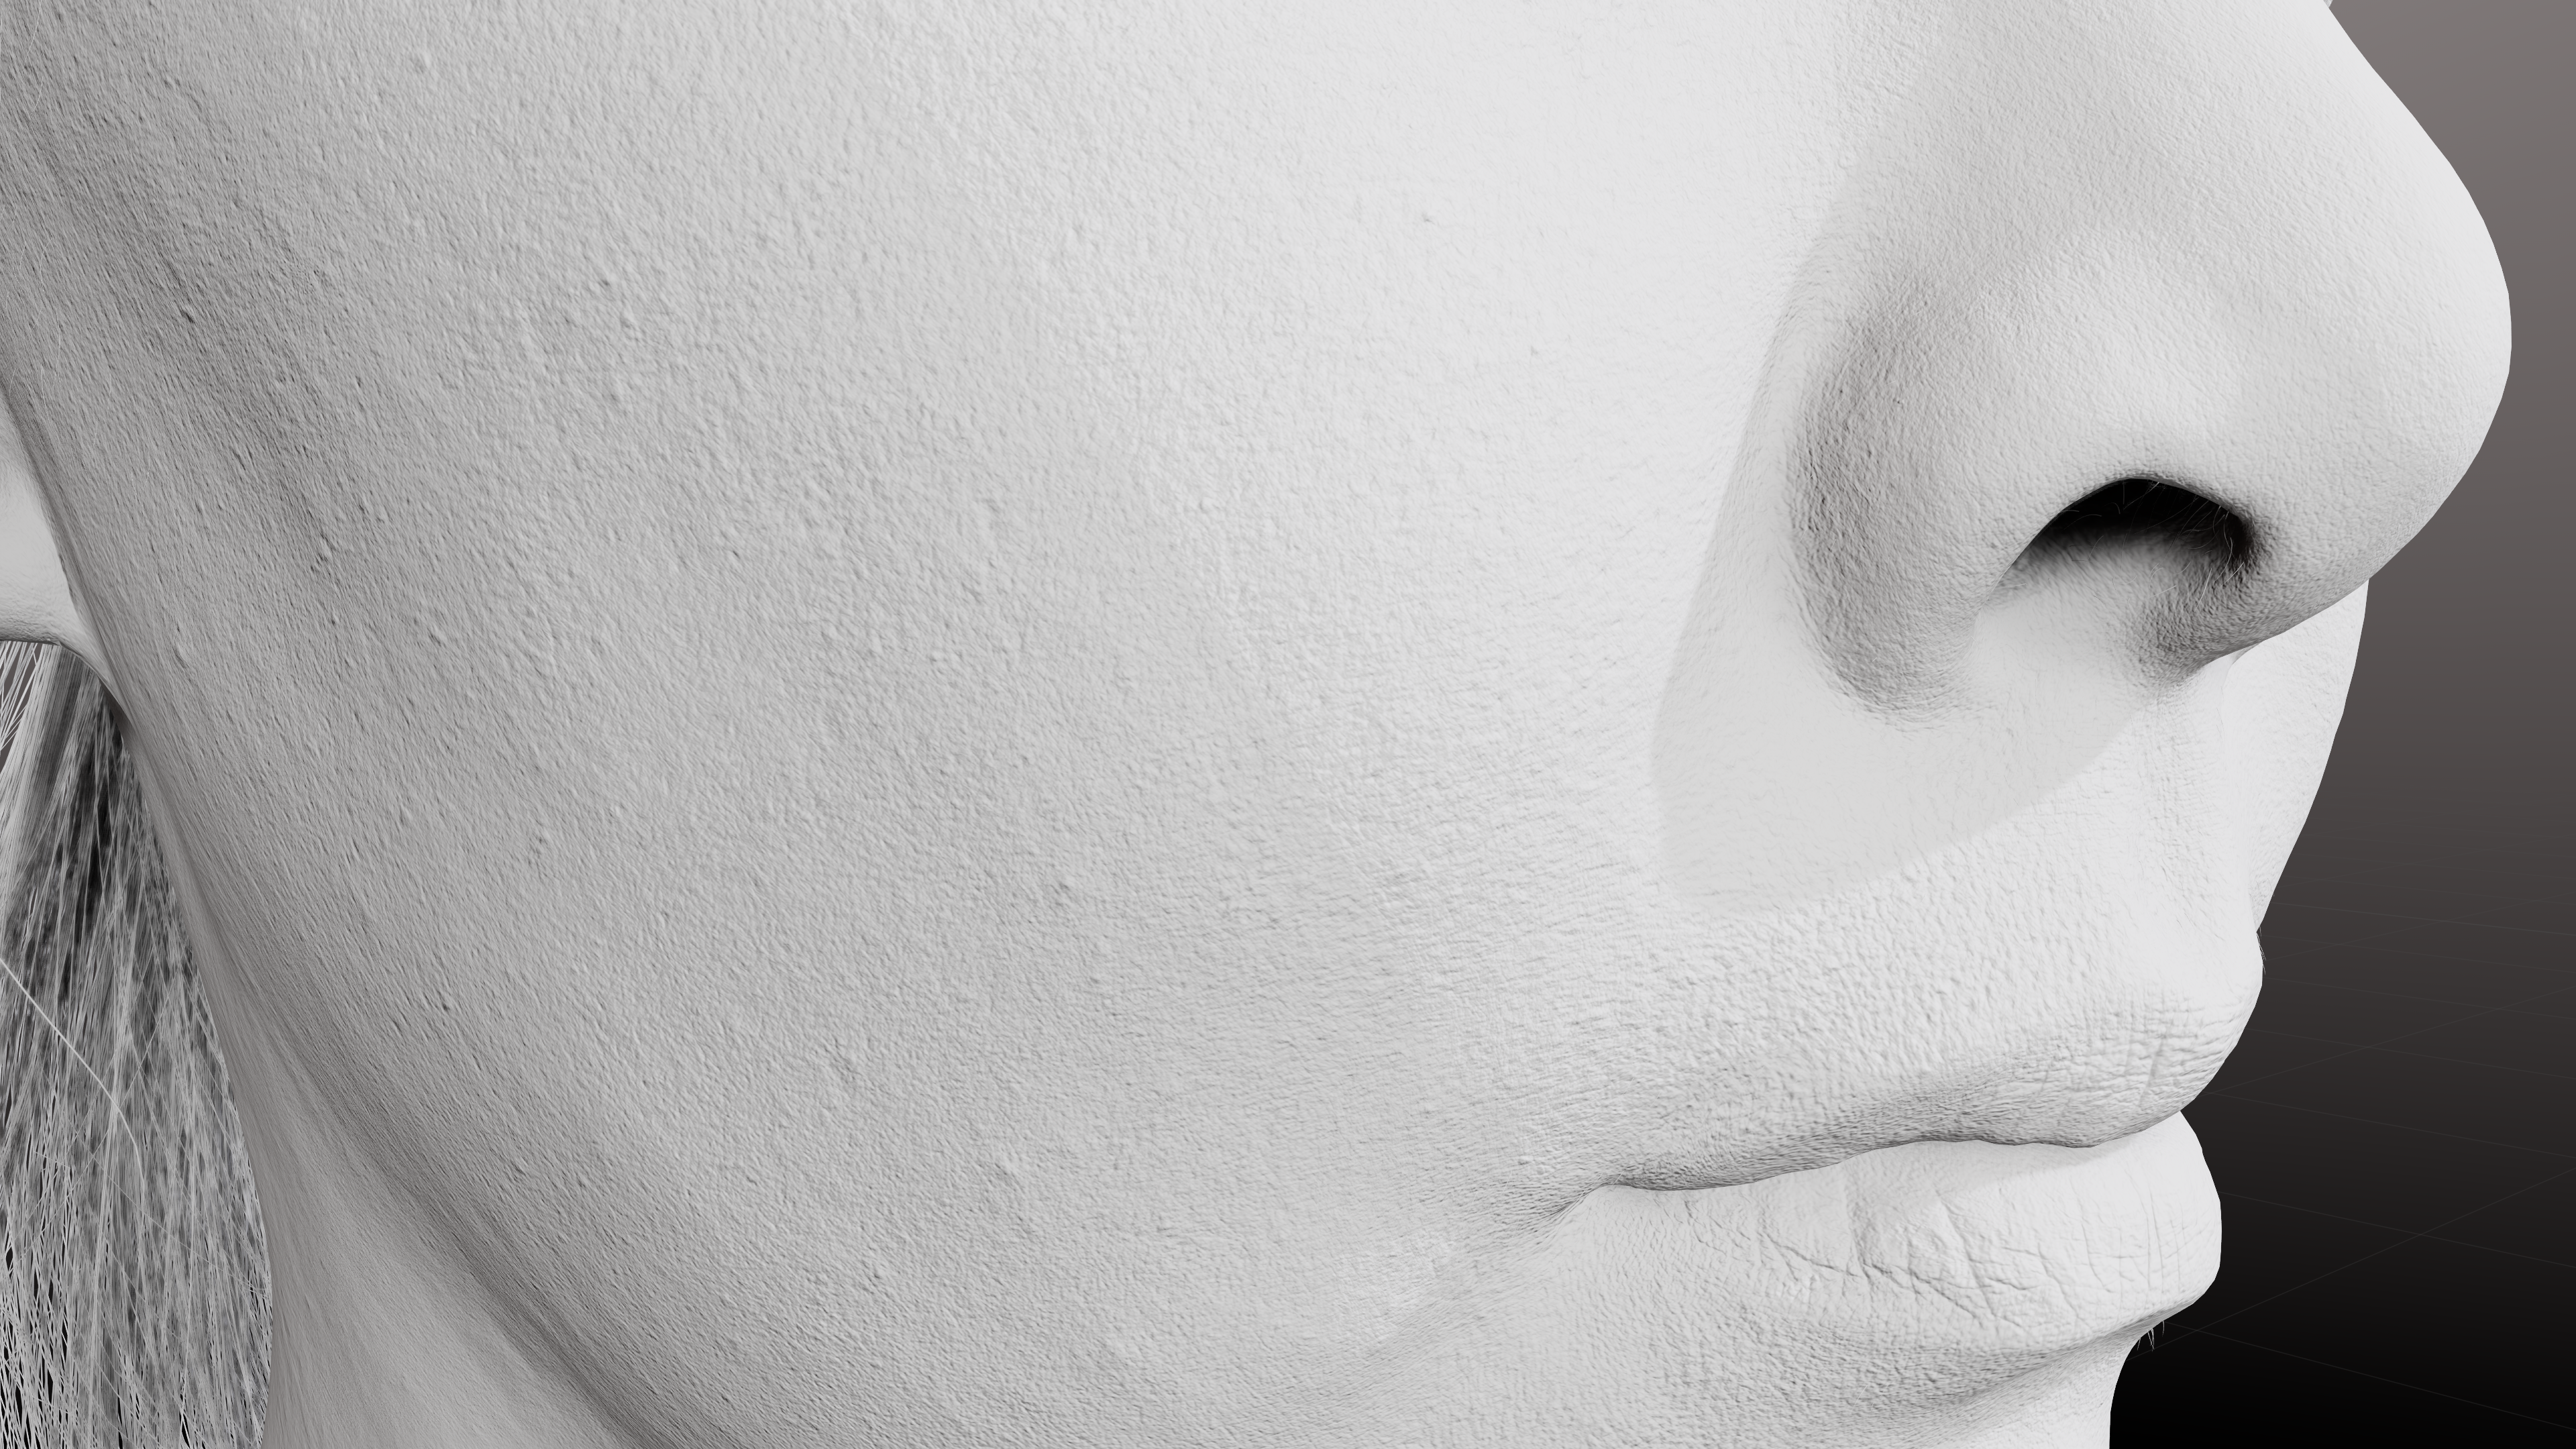
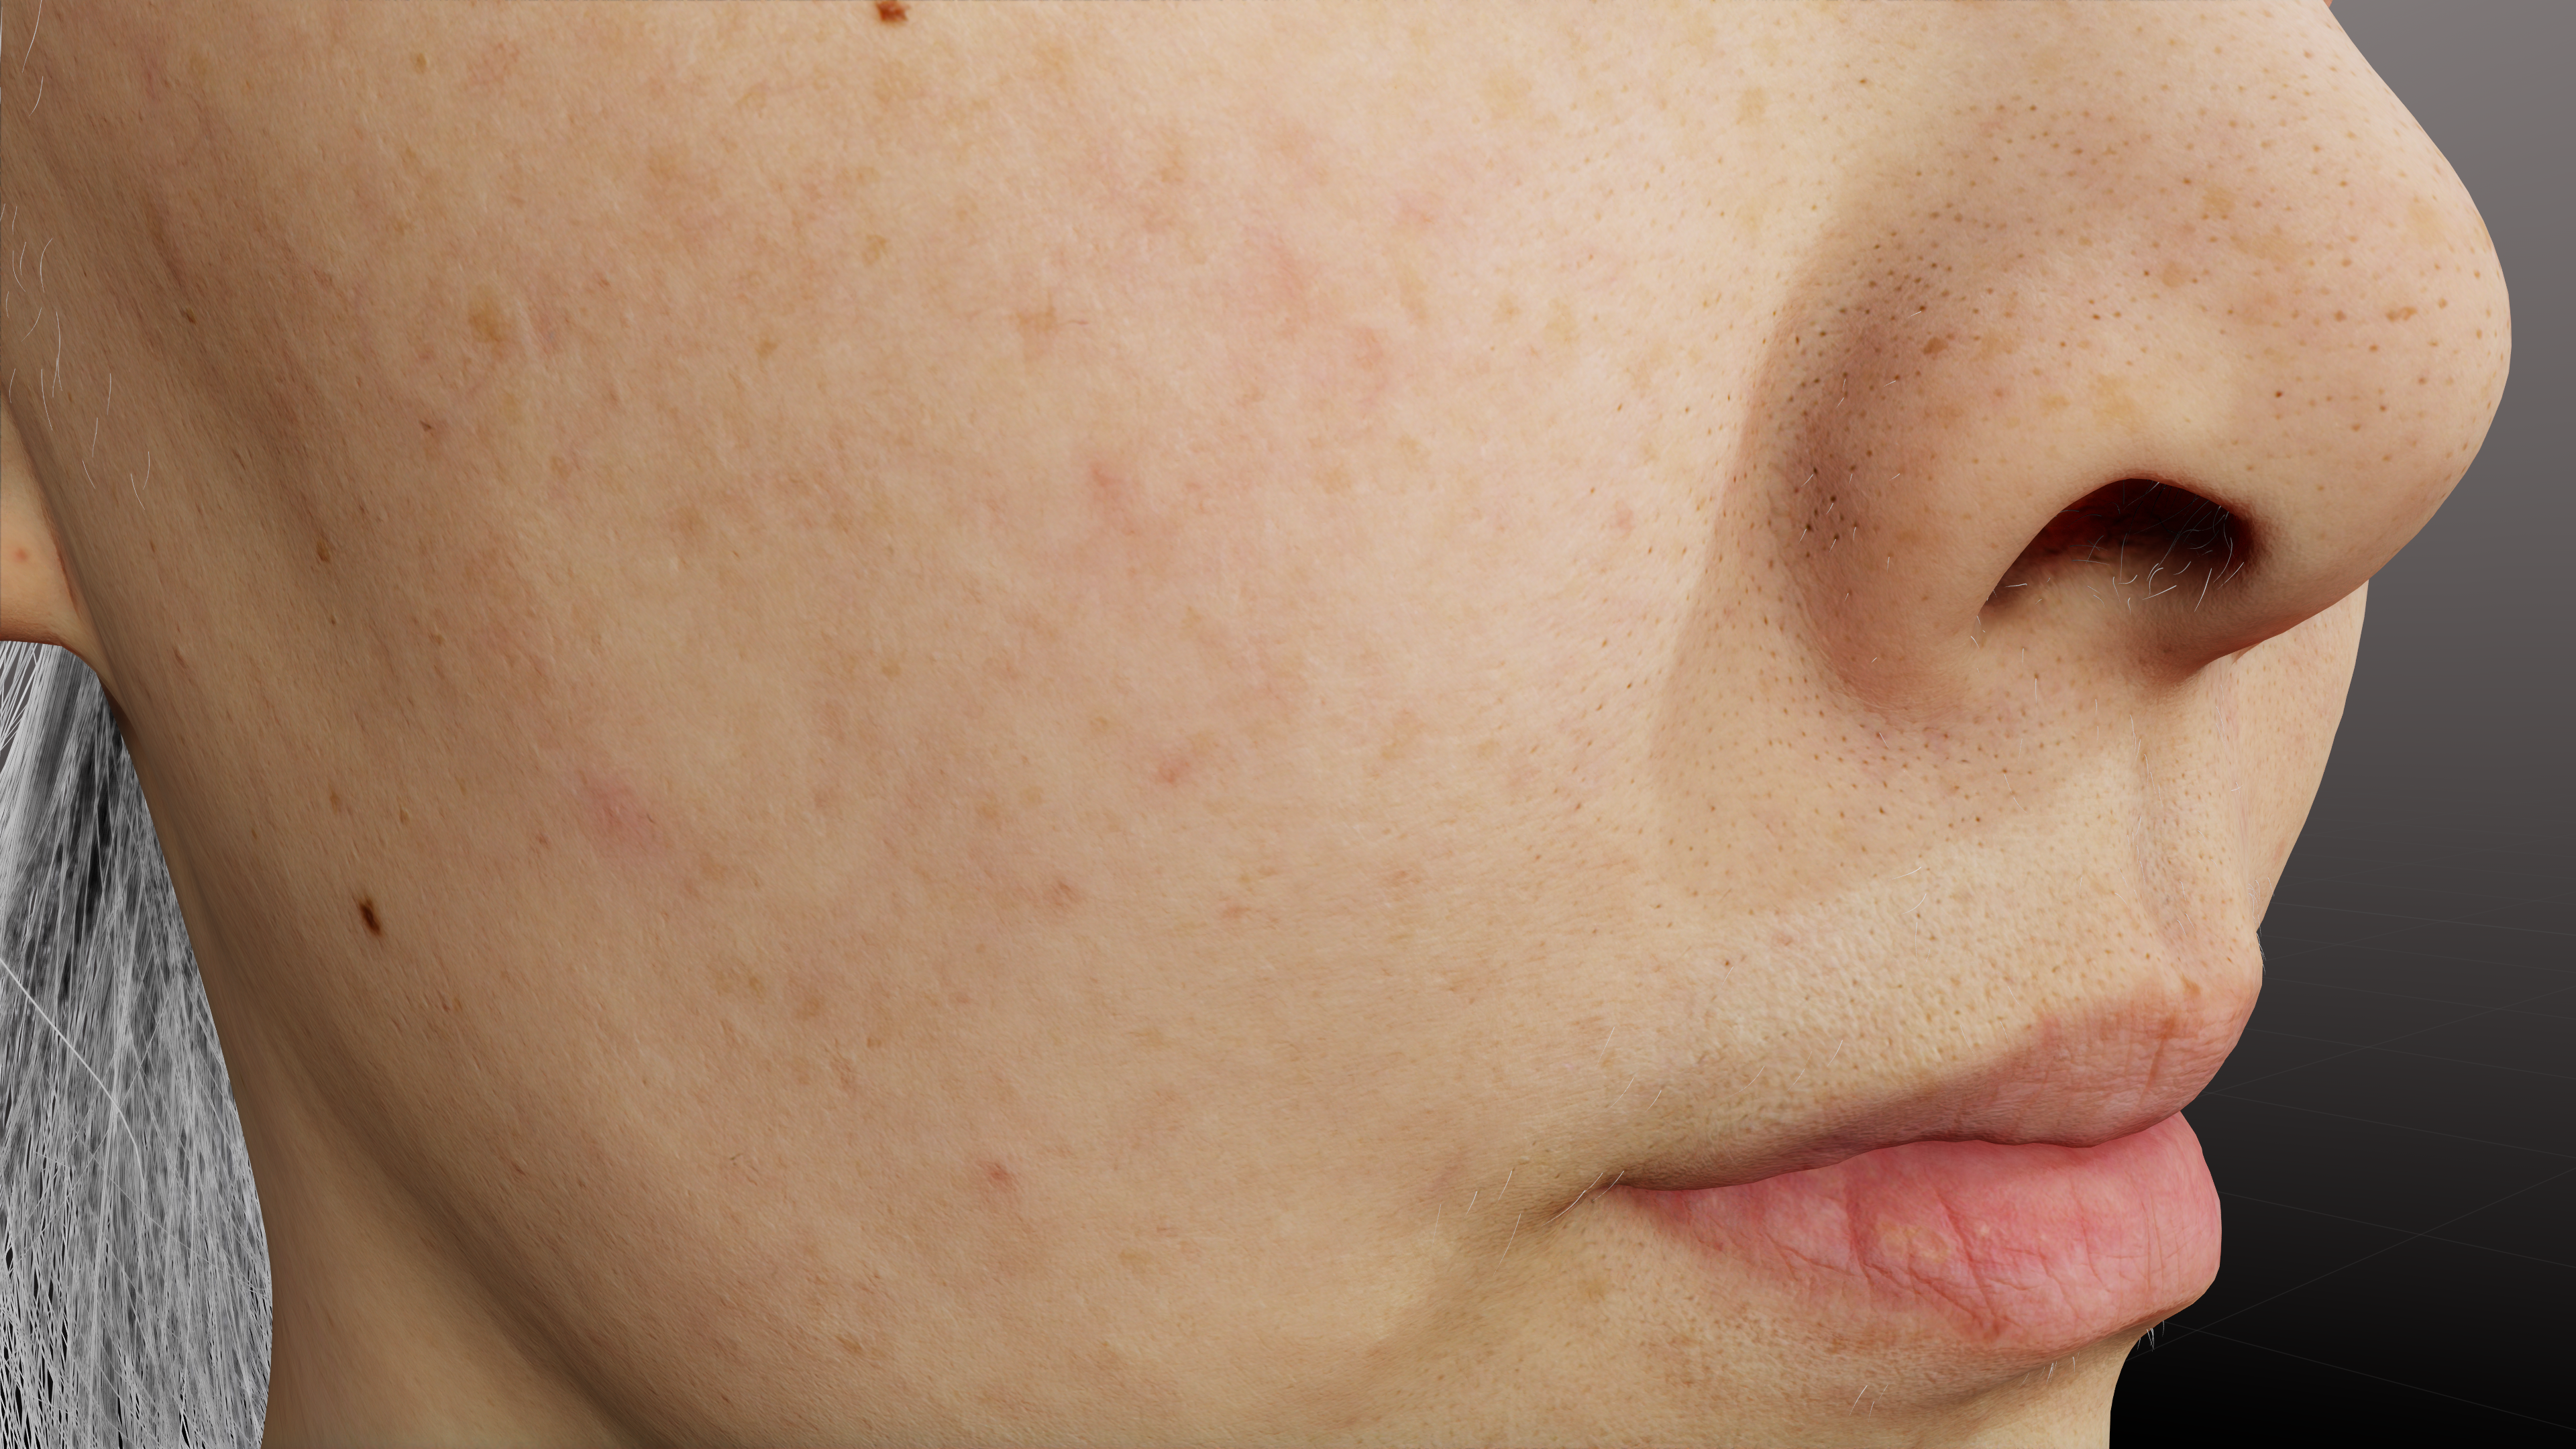
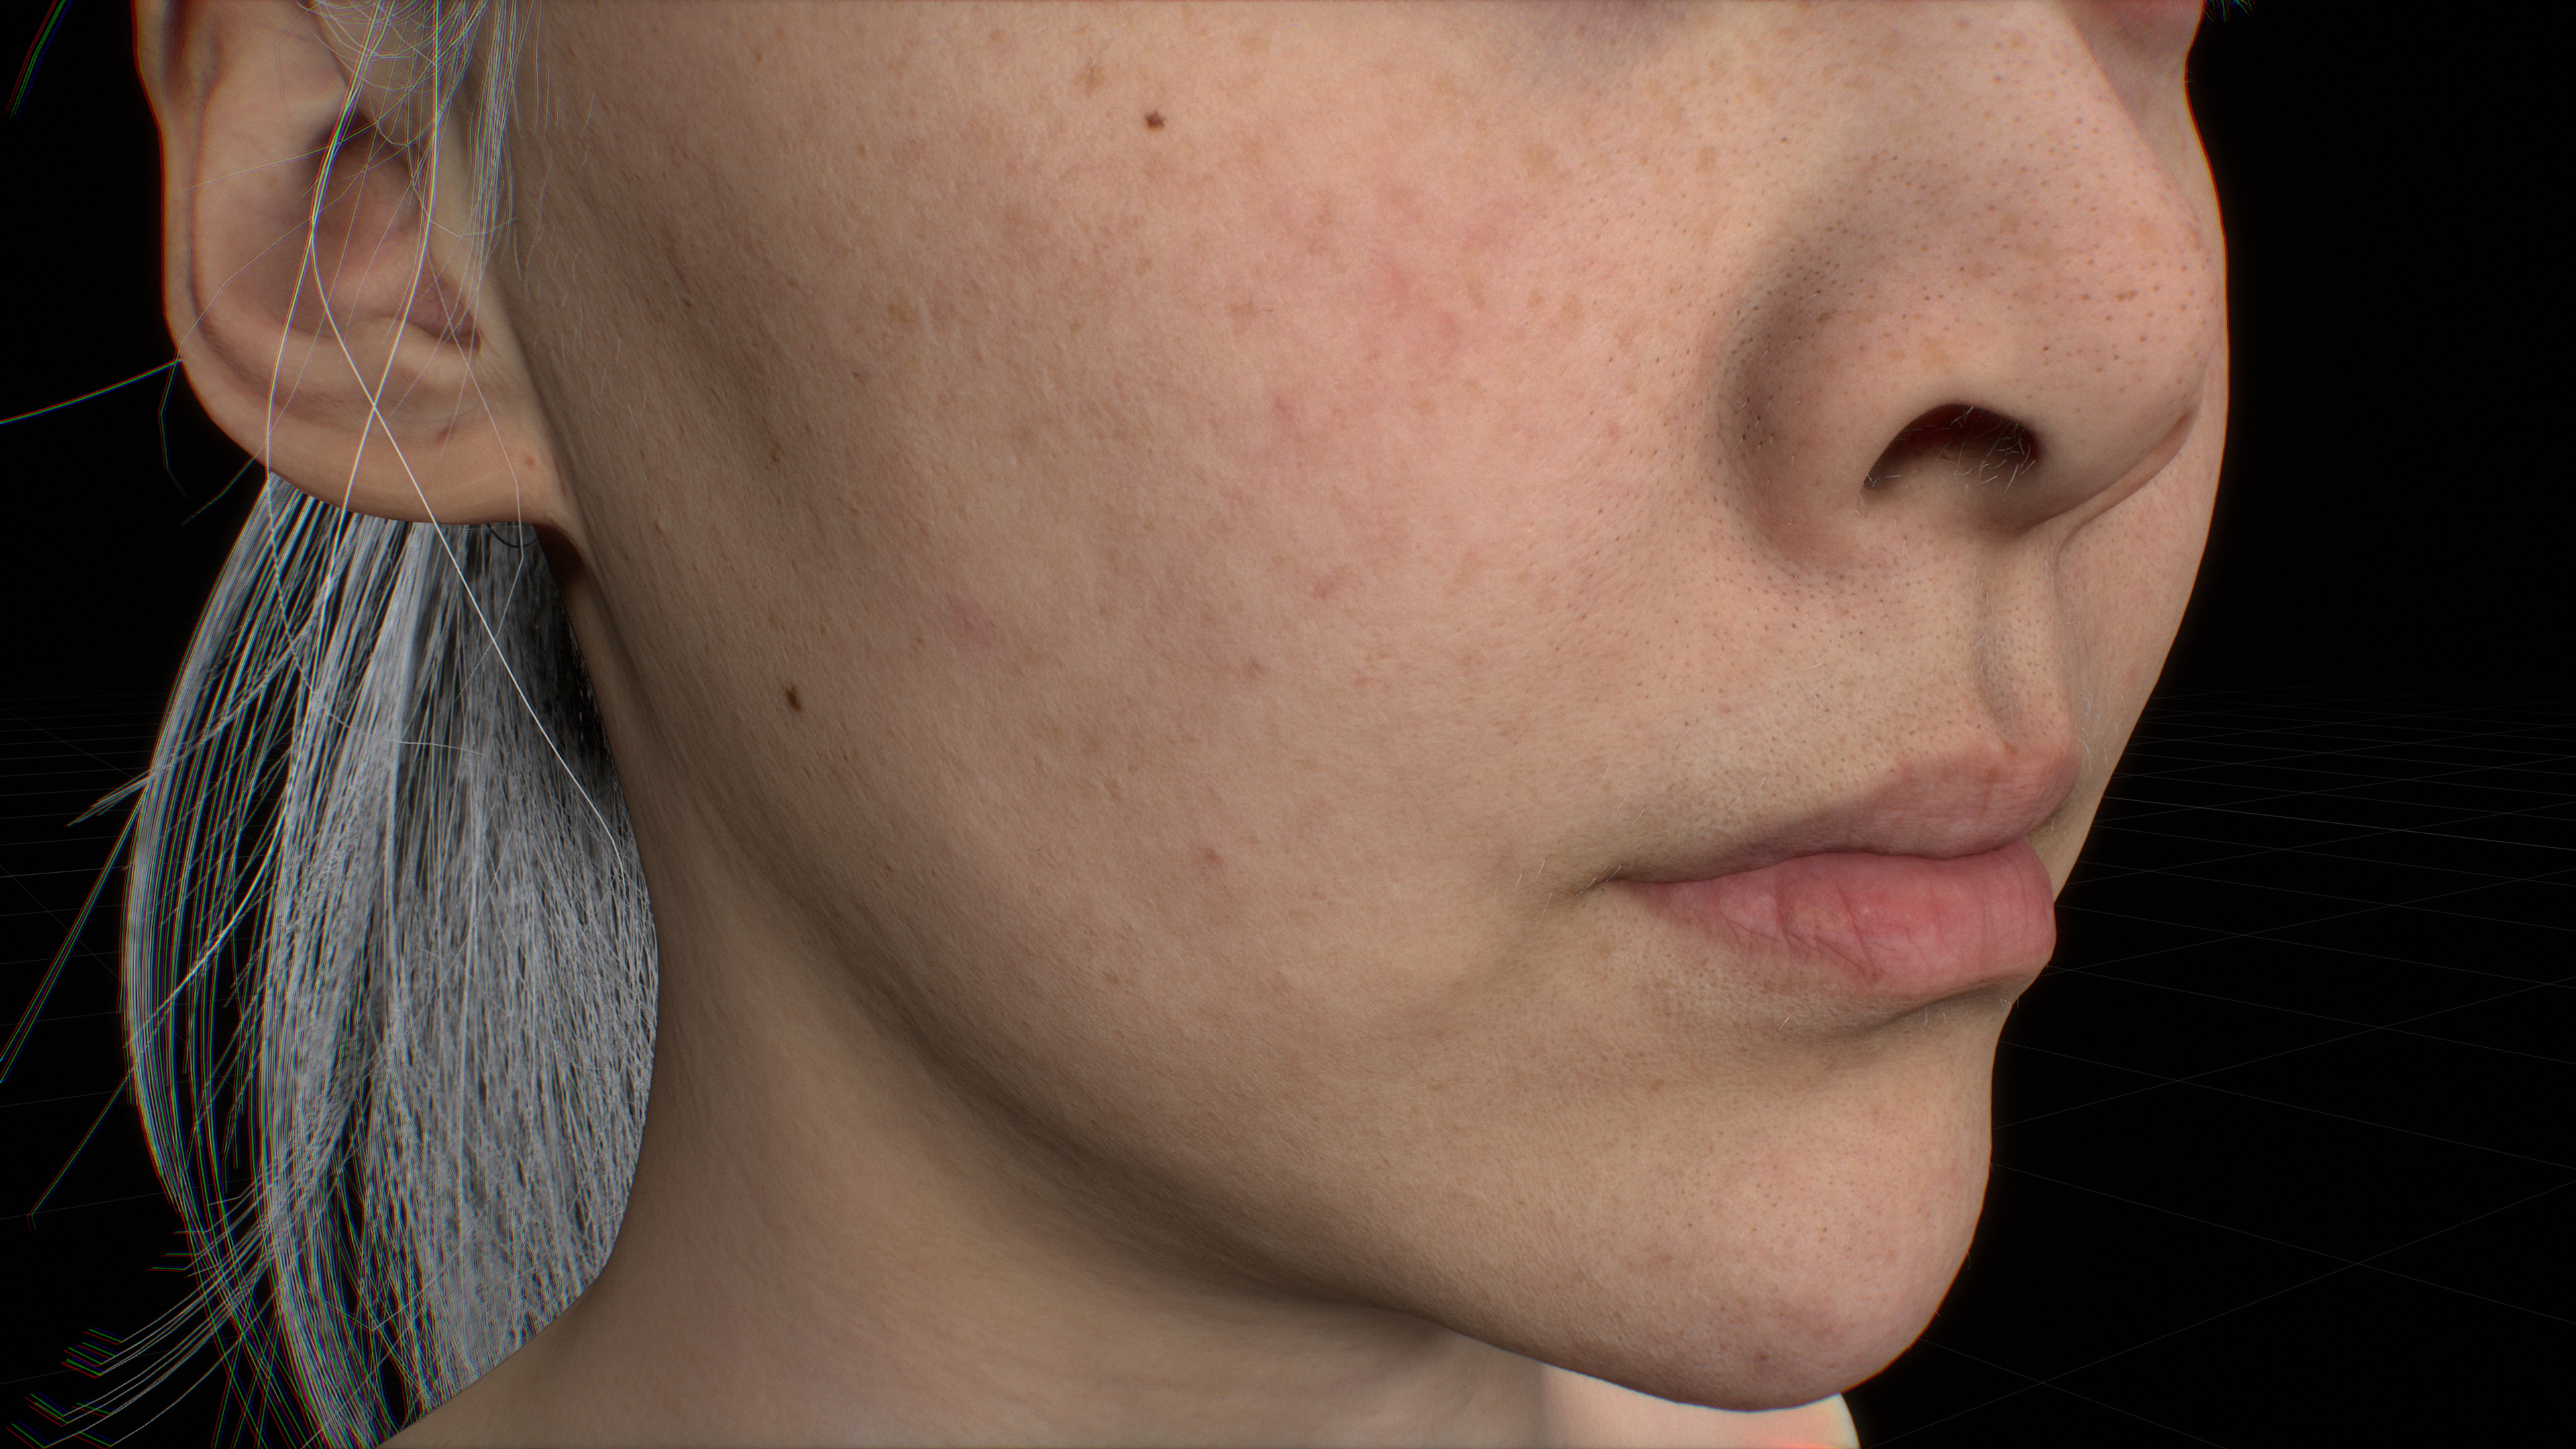
Skin Materials
The skin material is built from multiple components:
Steps |
Before |
After |
|---|---|---|
|
|
|
|
|
|
|
|
|
|
|
Create New Material
Create a new material and name it “c_skin_graph”
Create an OmniSurfaceBase node and connect the outputs
Create New material, Rename, Connect Outputs
Assign the material to
/World/head_hi_model_published/char_model_hi/c_headWatertight_hi
Setup Skin Normal
The goal of the normal map node network is to:
Add the skin normal map
Blend in the skin micro detail
Emphasize normal strength in certain areas using masks, in this case areas other than the lips
The Normal Map
Add
Normal map texturenode
Add Normal Map Node
On the newly-created normal map node, set the skin normal map texture and properties
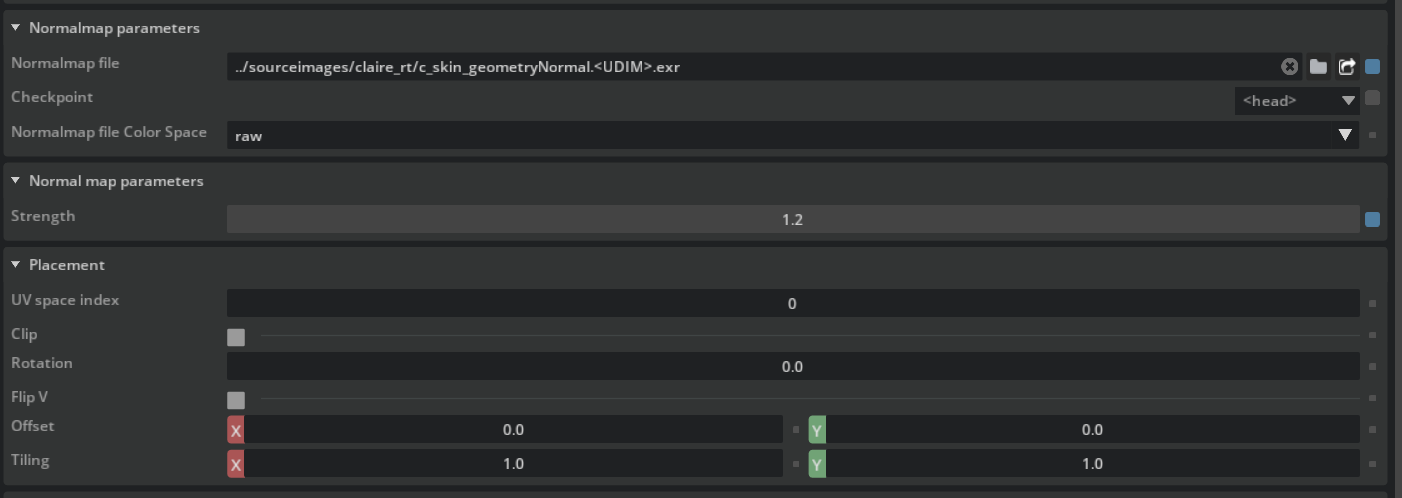
Set Skin Normal Map and Properties:
Normalmap file:
https://omniverse-content-production.s3.us-west-2.amazonaws.com/Samples/Examples/2023_1/Rendering/Claire/sourceimages/claire_rt/c_skin_geometryNormal.<UDIM>.exrStrength:
1.2Normal strength can be set to more than 1.0 to emphasize the surface bumpiness
Flip V:
OFFThis texture is a right-handed normal map
Add another
Normal map texturenode, set the skin micro detail map texture map path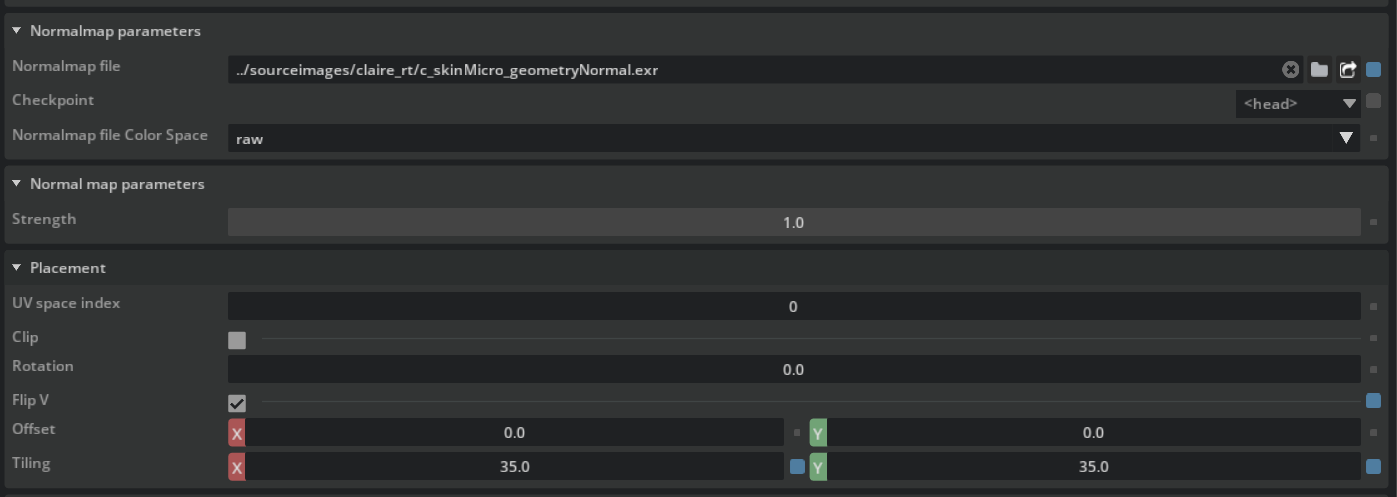
Set Detail Normal Properties:
Normalmap file:
https://omniverse-content-production.s3.us-west-2.amazonaws.com/Samples/Examples/2023_1/Rendering/Claire/sourceimages/claire_rt/c_skinMicro_geometryNormal.exrTiling:
35To fit the scale of the micro detail
Flip V:
ONThis texture is a left-handed normal map
Add a
Bitmap texturenode and name it “normal_blend_weight”. Set the skin normal weight map texture map path
Create Bitmap Texture Node
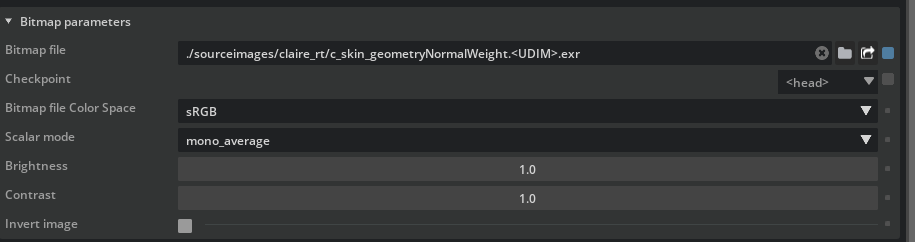
Skin Normal Weight Map and Properties
Bitmap file:
https://omniverse-content-production.s3.us-west-2.amazonaws.com/Samples/Examples/2023_1/Rendering/Claire/sourceimages/claire_rt/c_skin_geometryNormalWeight.<UDIM>.exrAdd a new
Bitmap texture nodeand name it “file_texture_c_skin_lipsMask_1_invert”Set the lip mask texture and properties
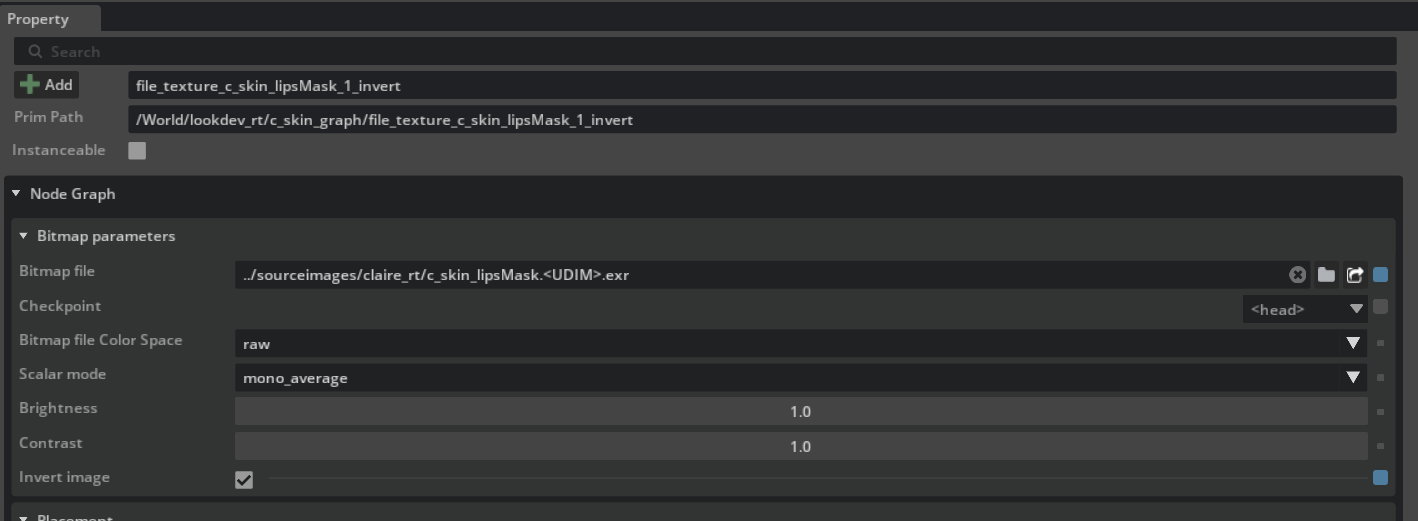
Lip Mask Map Properties
Bitmap file:
https://omniverse-content-production.s3.us-west-2.amazonaws.com/Samples/Examples/2023_1/Rendering/Claire/sourceimages/claire_rt/c_skin_lipsMask.<UDIM>.exrInvert Image:
ONGoal is to add micro skin normal detail in areas other than the lips
Add a
Blend Normalsnode. The node name defaults to “blend_normals”
Add Blend Normal Node
Add a
multiply floatnode and name it “multiply_02”Multiply it by 3x, e.g. three times the default normal strength
Add another
multiply floatnode and name it “multiply_05”Connect “multiply_02”.out -> “multiply_05”.a (first input)
Connect “file_texture_c_skin_lipsMask_1_invert”.r -> “multiply_05”.b (second input)
Connect normal nodes:
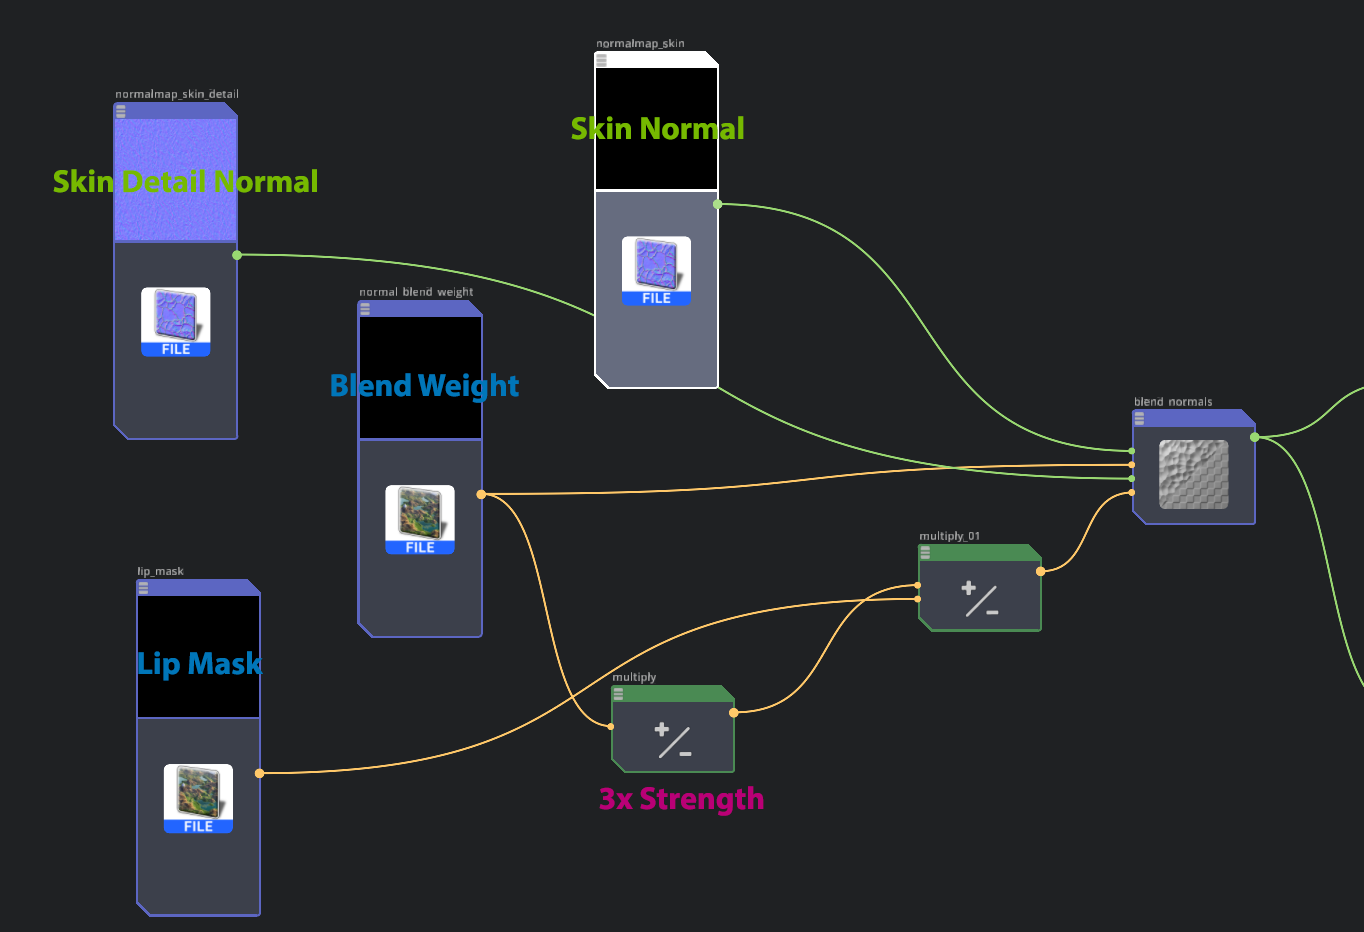
Connect Normal Map Nodes
Skin normal map.out -> blend_normals.base_normal
Skin detail normal map.out -> blend_normals.detail_normal
“multiply_01”.r -> blend_normals.detail_normal_weight
“”normal_blend_weight”.r -> blend_normals.base_normal_weight
Connect the blend_normal to the OmniSurfaceBase node
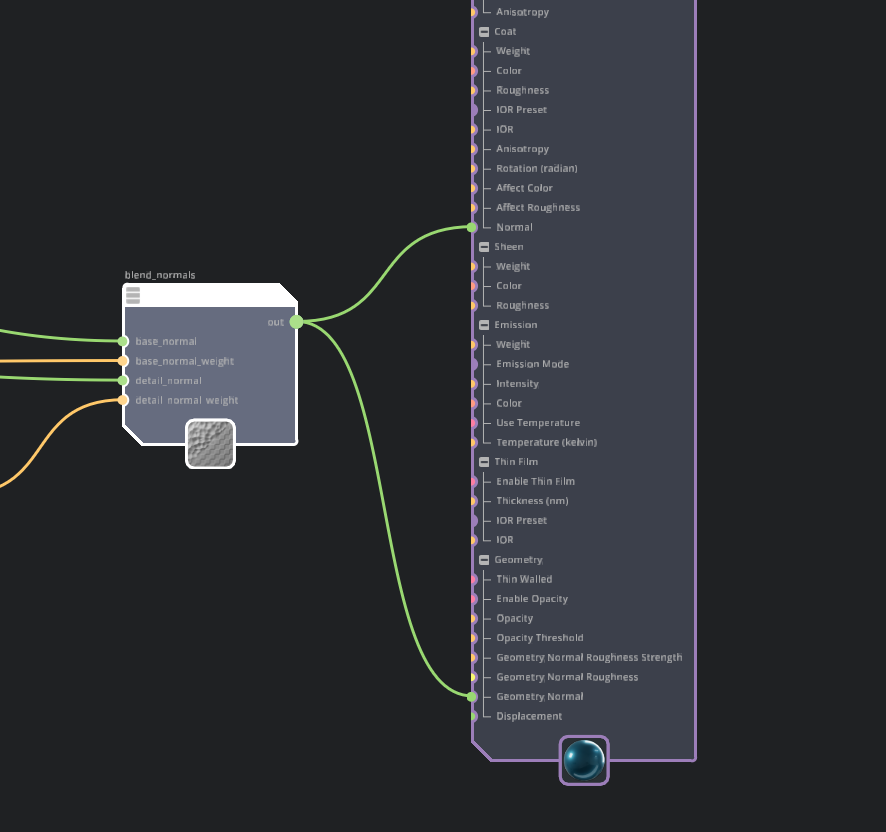
Connect Geometry Normal and Coat Normal
blend_normal.out -> OmniSurfaceBase.geometryNormal
blend_normal.out -> OmniSurfaceBase.coatGeometryNormal
Set Up Diffuse Reflection and Subsurface Scattering
Create a
Bitmap texturenodeSet the diffuseReflectionColor texture map file path and set color space to Raw
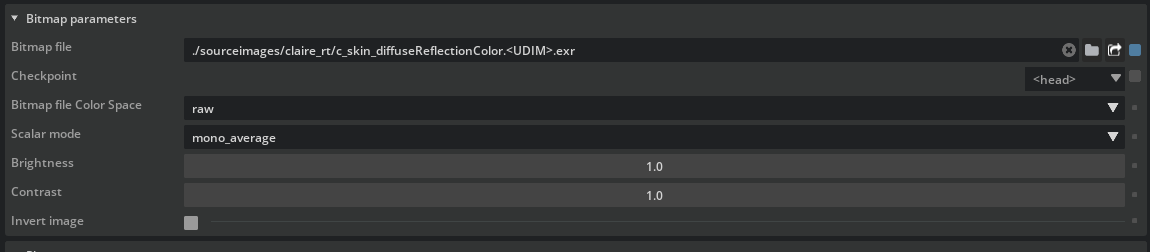
DiffuseReflectionColor Texture Properties
Bitmap file:
https://omniverse-content-production.s3.us-west-2.amazonaws.com/Samples/Examples/2023_1/Rendering/Claire/sourceimages/claire_rt/c_skin_diffuseReflectionColor.<UDIM>.exrBitmap file Color Space:
rawConnect the texture to the diffuseReflectionColor and subsurfaceScatteringColor slots of the OmniSurfaceBase node
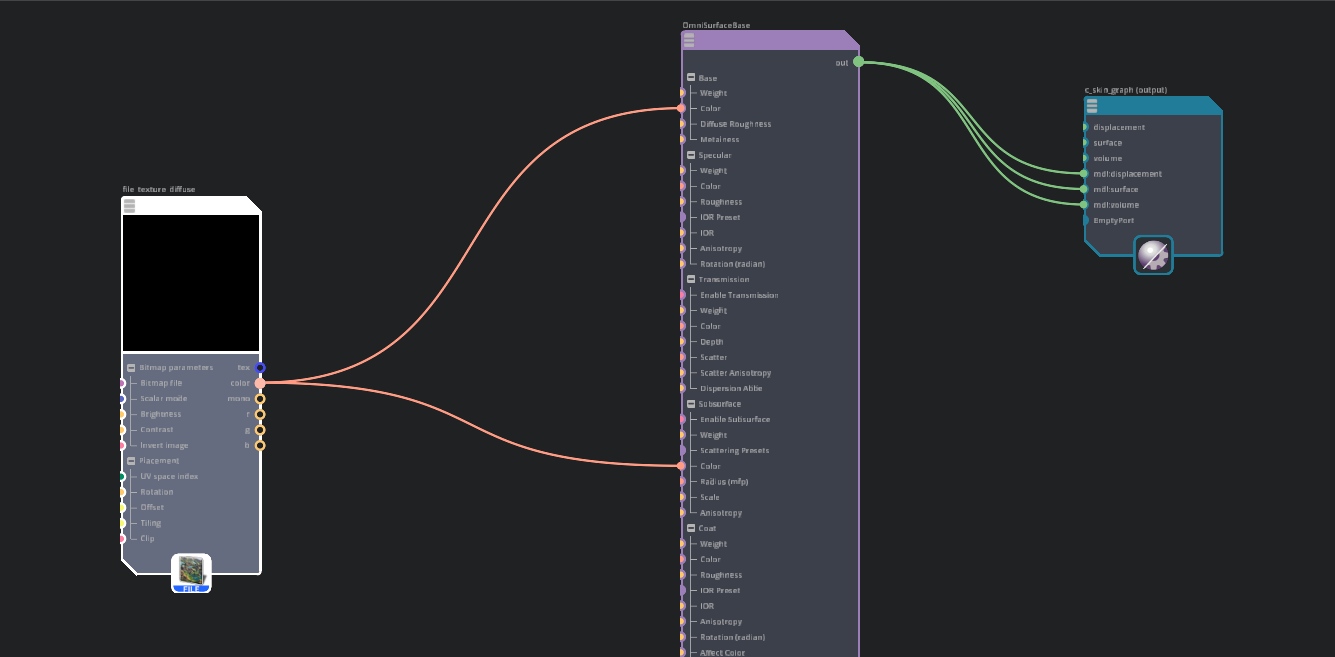
Connect to DiffuseReflectionColor and SubsurfaceScatteringColor
Create a
File Texture nodeand name it “file_texture_c_skin_specularReflectionColor_subsurfaceScatteringColor_specularReflectionRoughness”Set the file path to the below combined utility map
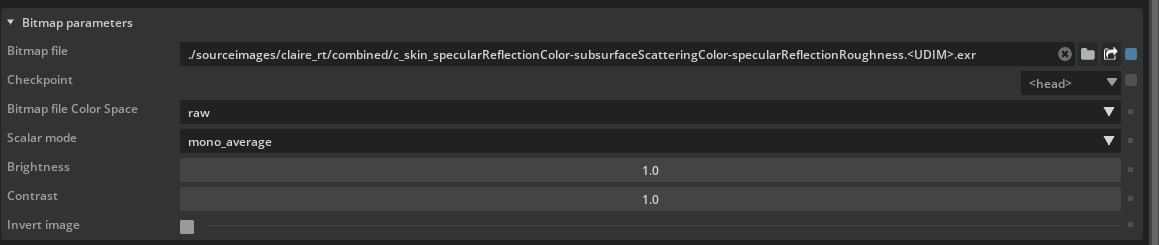
Combined Utility Map Properties
Bitmap file:
https://omniverse-content-production.s3.us-west-2.amazonaws.com/Samples/Examples/2023_1/Rendering/Claire/sourceimages/claire_rt/combined/c_skin_specularReflectionColor-subsurfaceScatteringColor-specularReflectionRoughness.<UDIM>.exrThis utility map contains three separate maps, one in each channel:
Red
Green
Blue
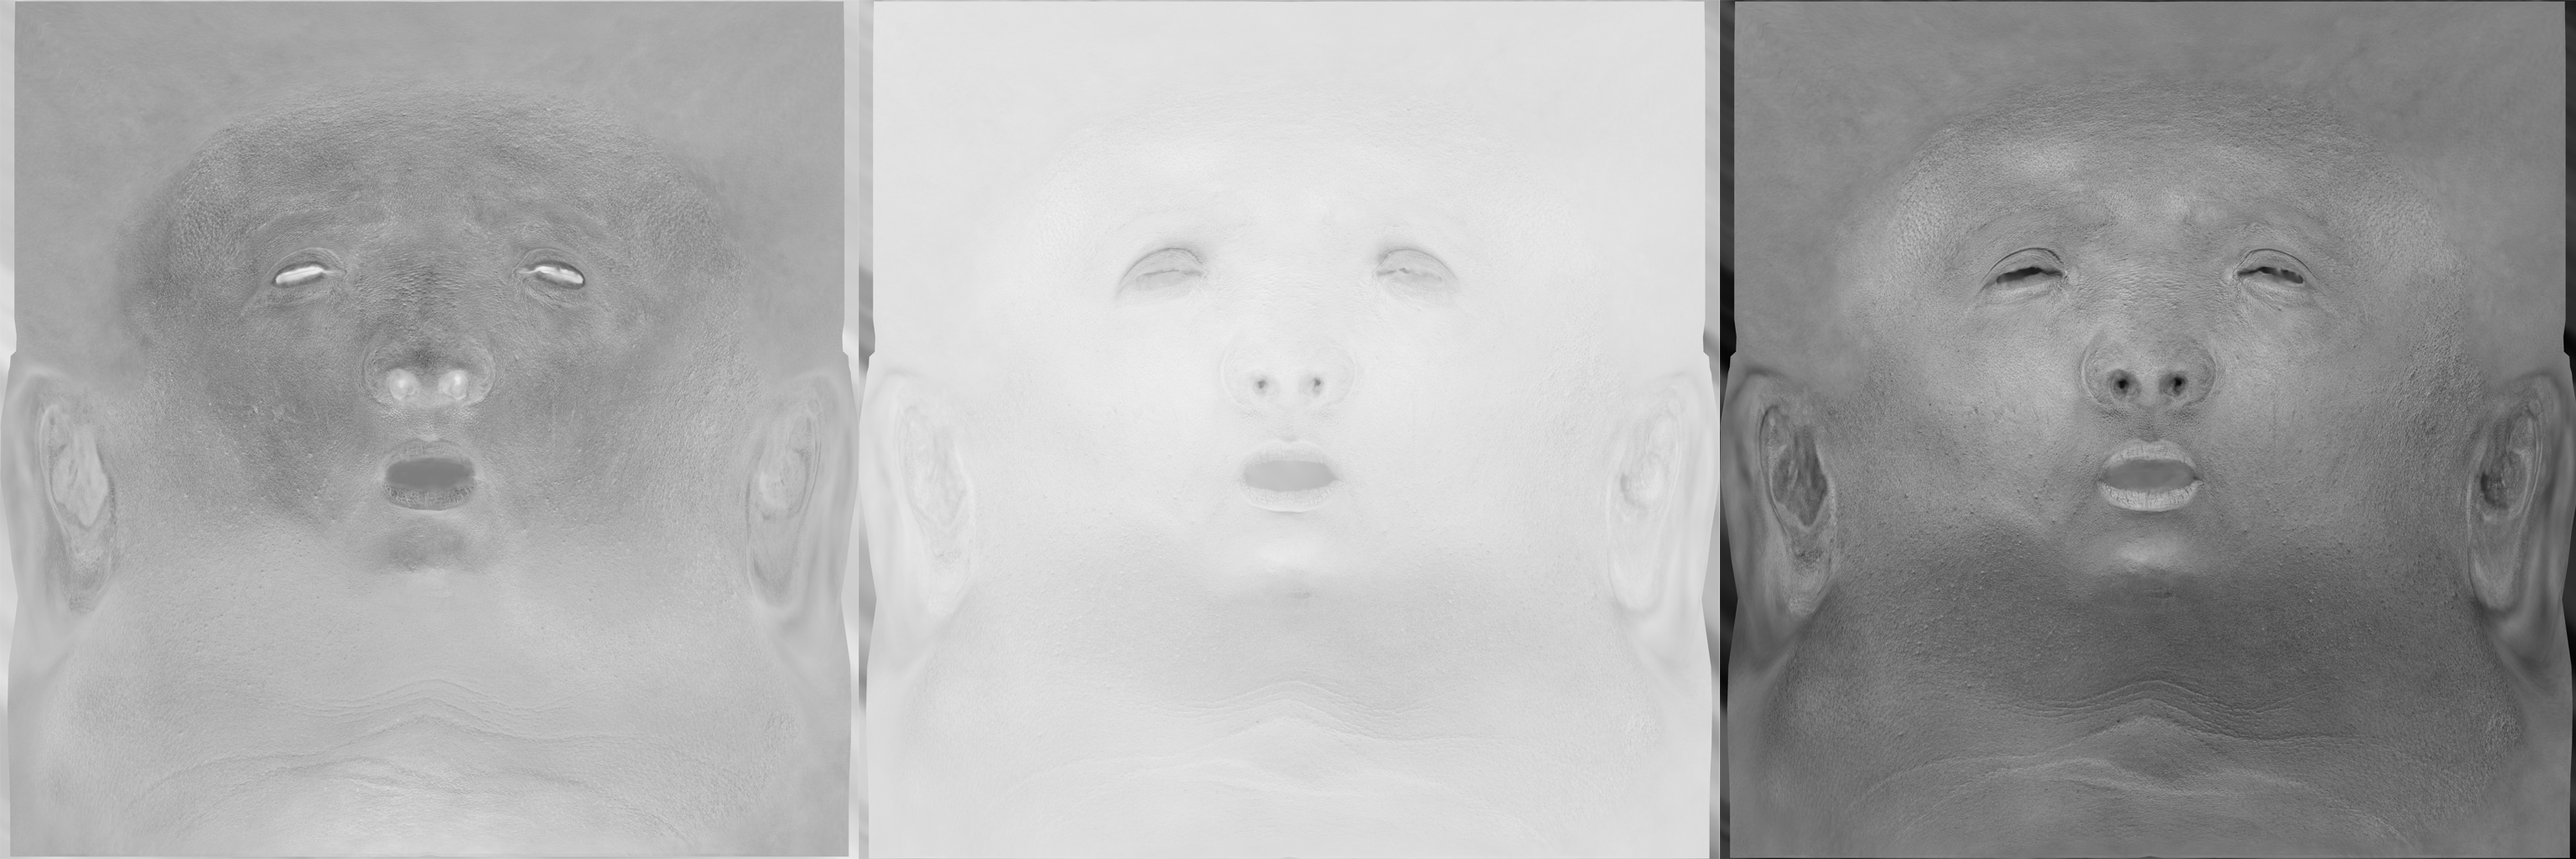
Red channel: specular roughness
Green channel: subsurface weight
Blue channel: specular weight
We combined these into one map to save GPU resources
Set Subsurface Scattering settings:
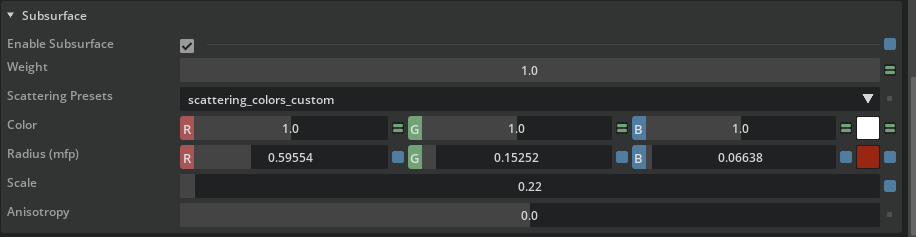
Subsurface Properties:
Enable Subsurface:
ONRadius(mfp):
(0.5955, 0.1525, 0.0664)Scale:
0.220.22 means 2.2 millimeters for the scale
Important
On the OmniSurfaceBase material, the following inputs:
Subsurface Color
Subsurface Radius(mfp)
Subsurface Scale
are used to calculate scattering color and absorption color under the hood.
Subsurface Scale is scene and asset dependent, depending on the scale of the scene and the size of the object.
By default the value is 1.0 (centimeter), which means the light penetrates the surface to a maximum depth of 10 millimeters.
The example asset, however, has a height of roughly 25 centimeters. A value of 10 millimeters here is obviously too large for the skin.
In this case, subsurface scale is set to
0.22, meaning the materials would allow 2.2 millimeters of scattering max.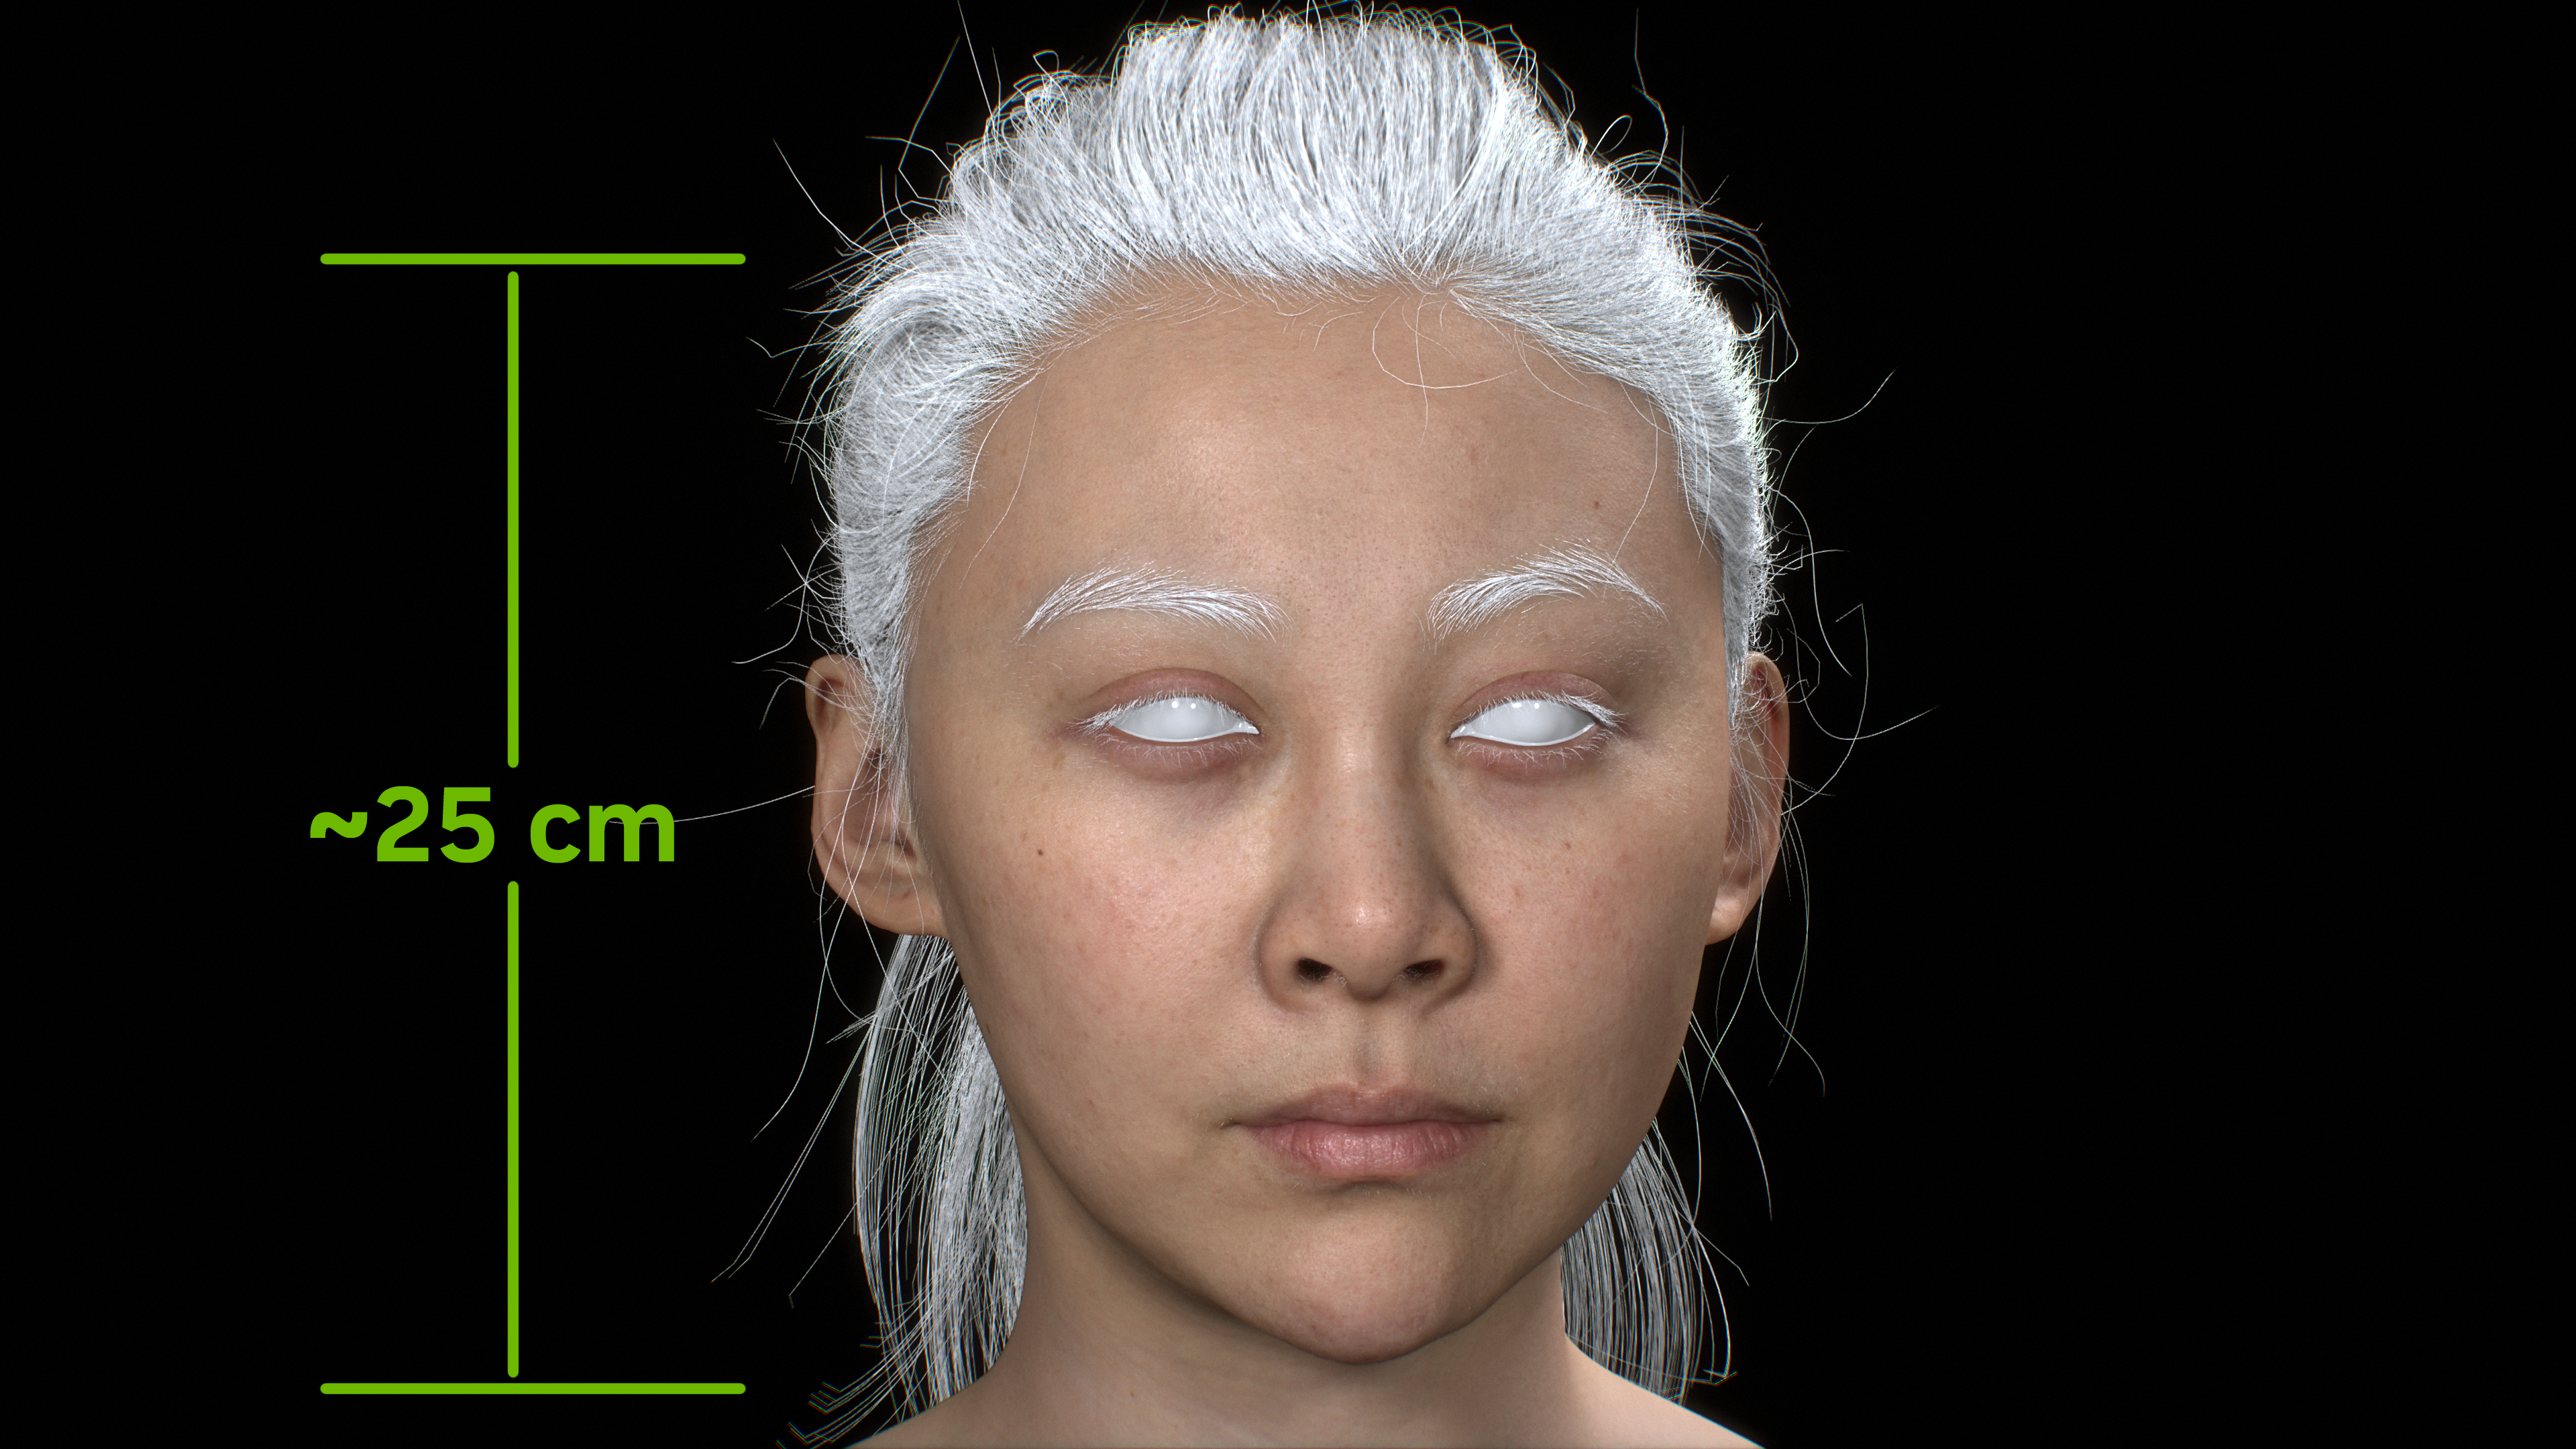
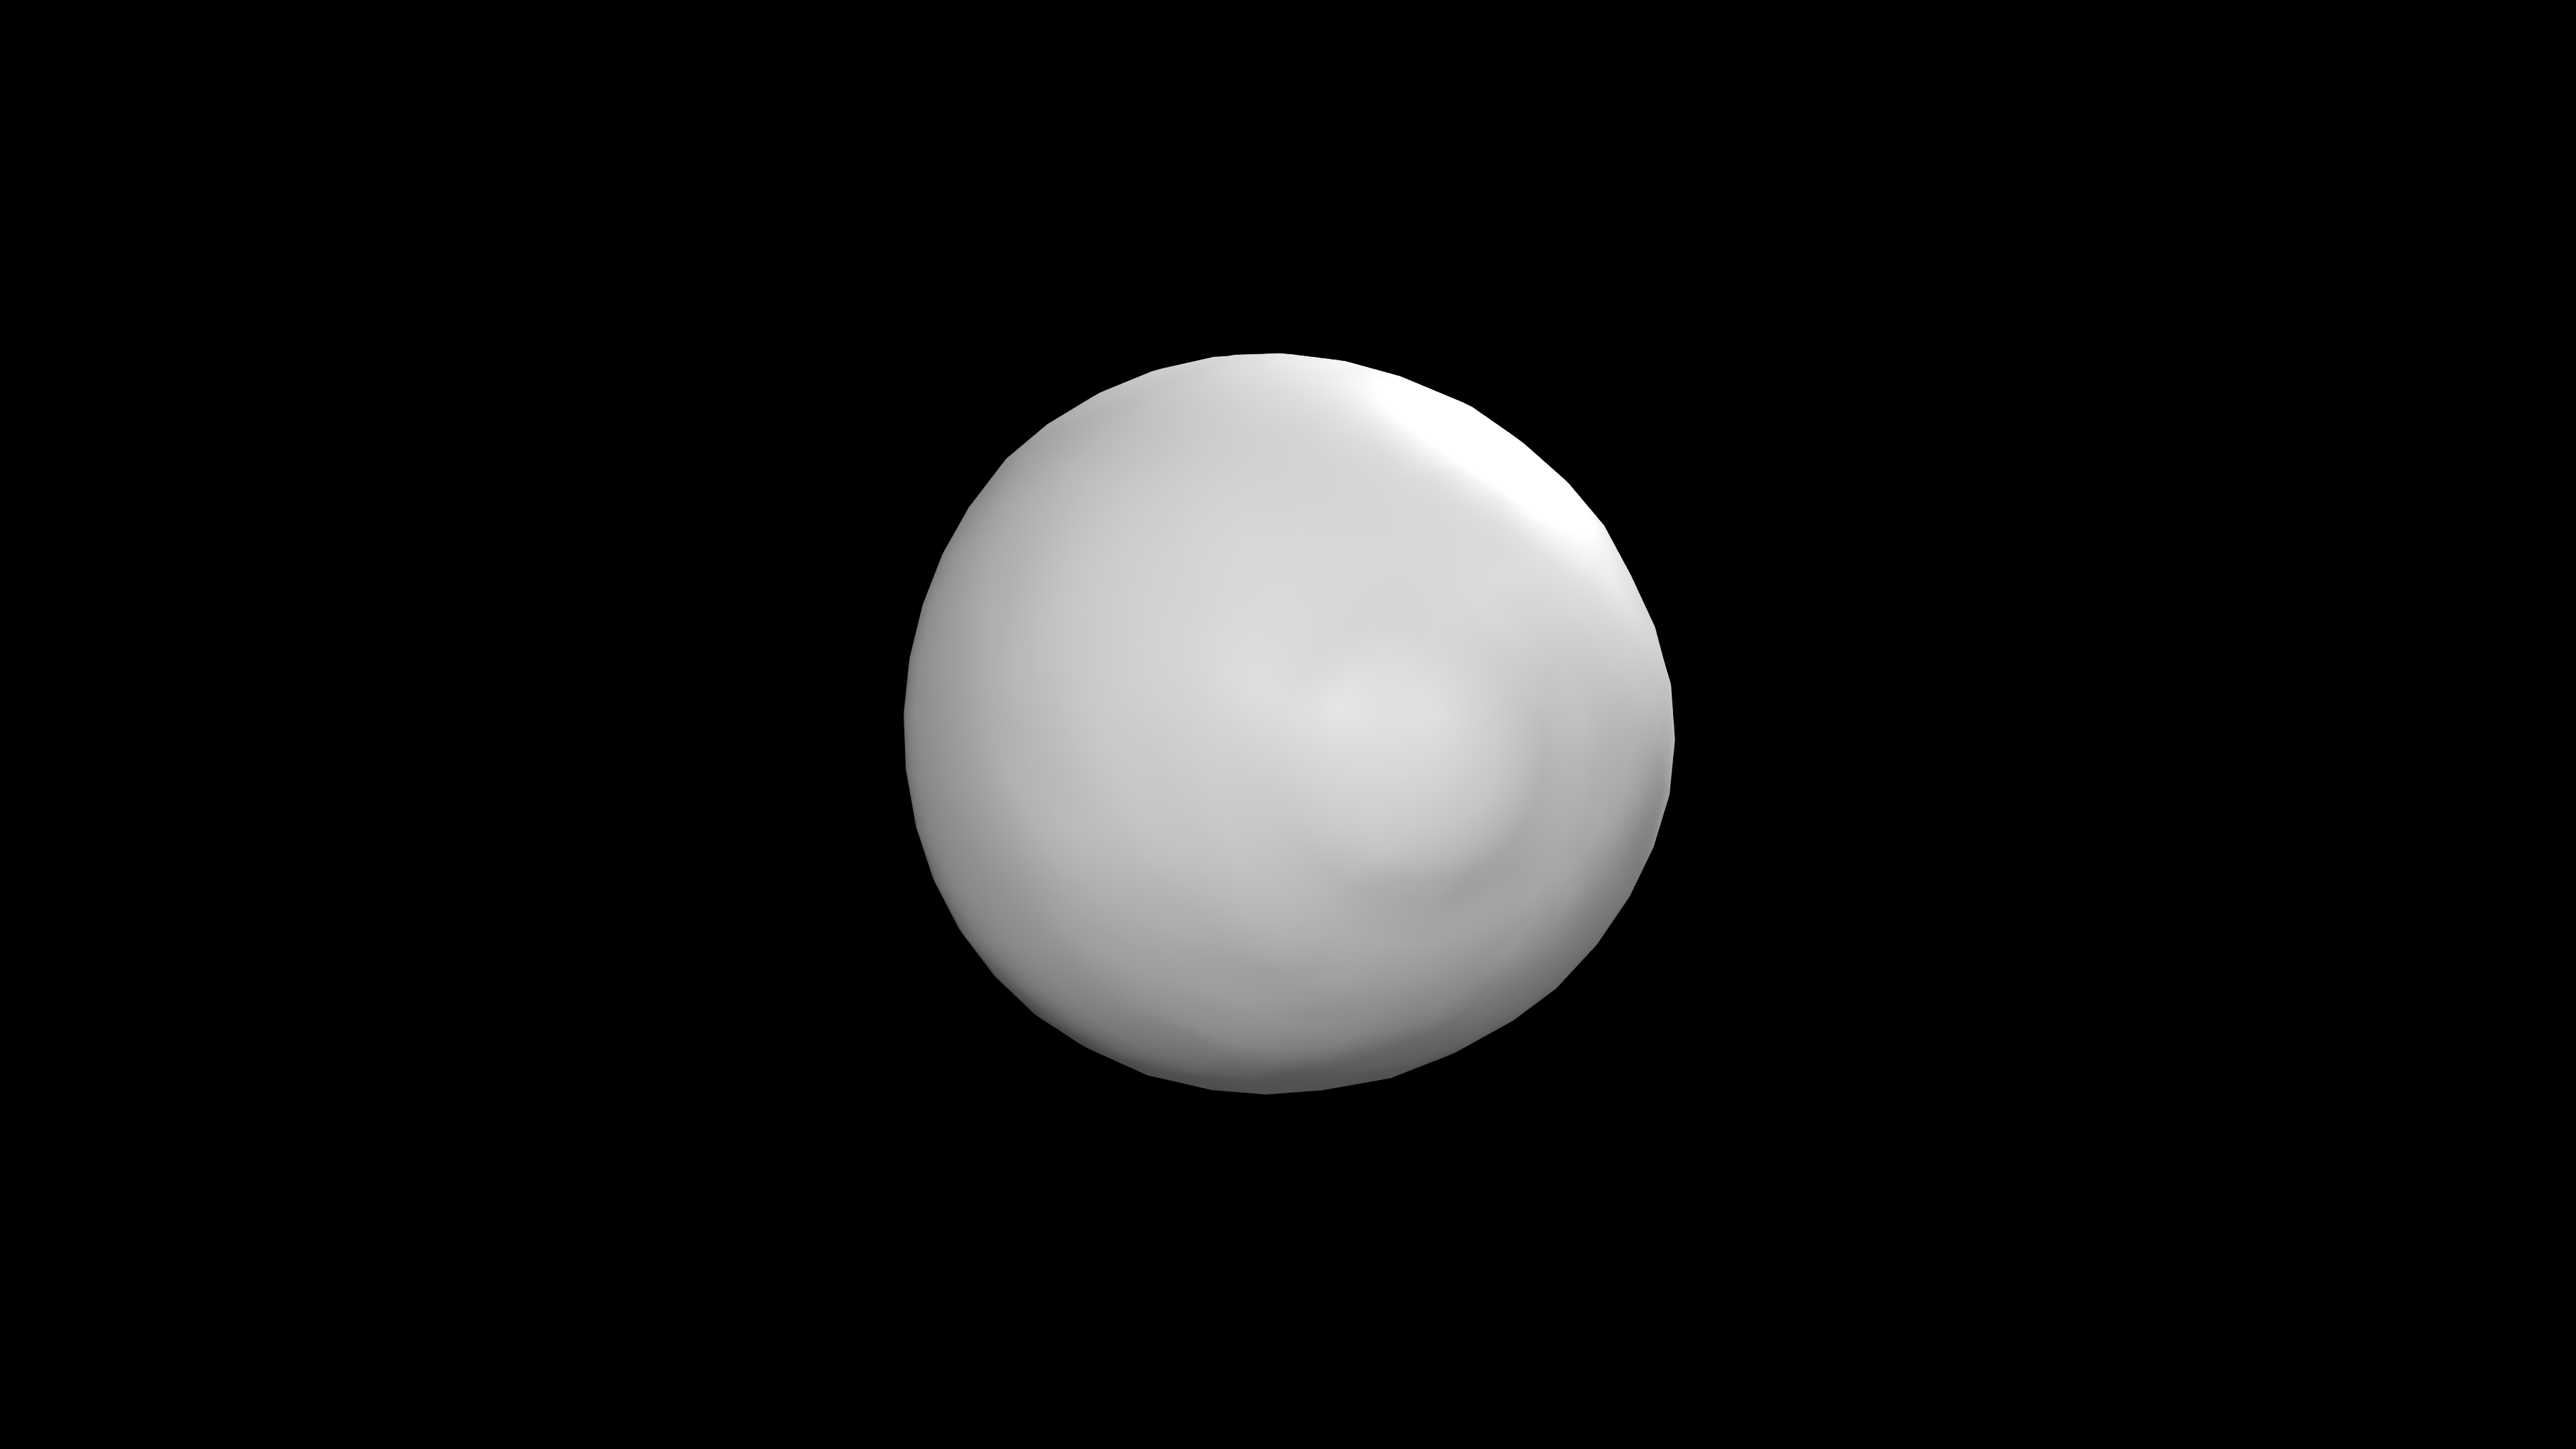
Asset Height
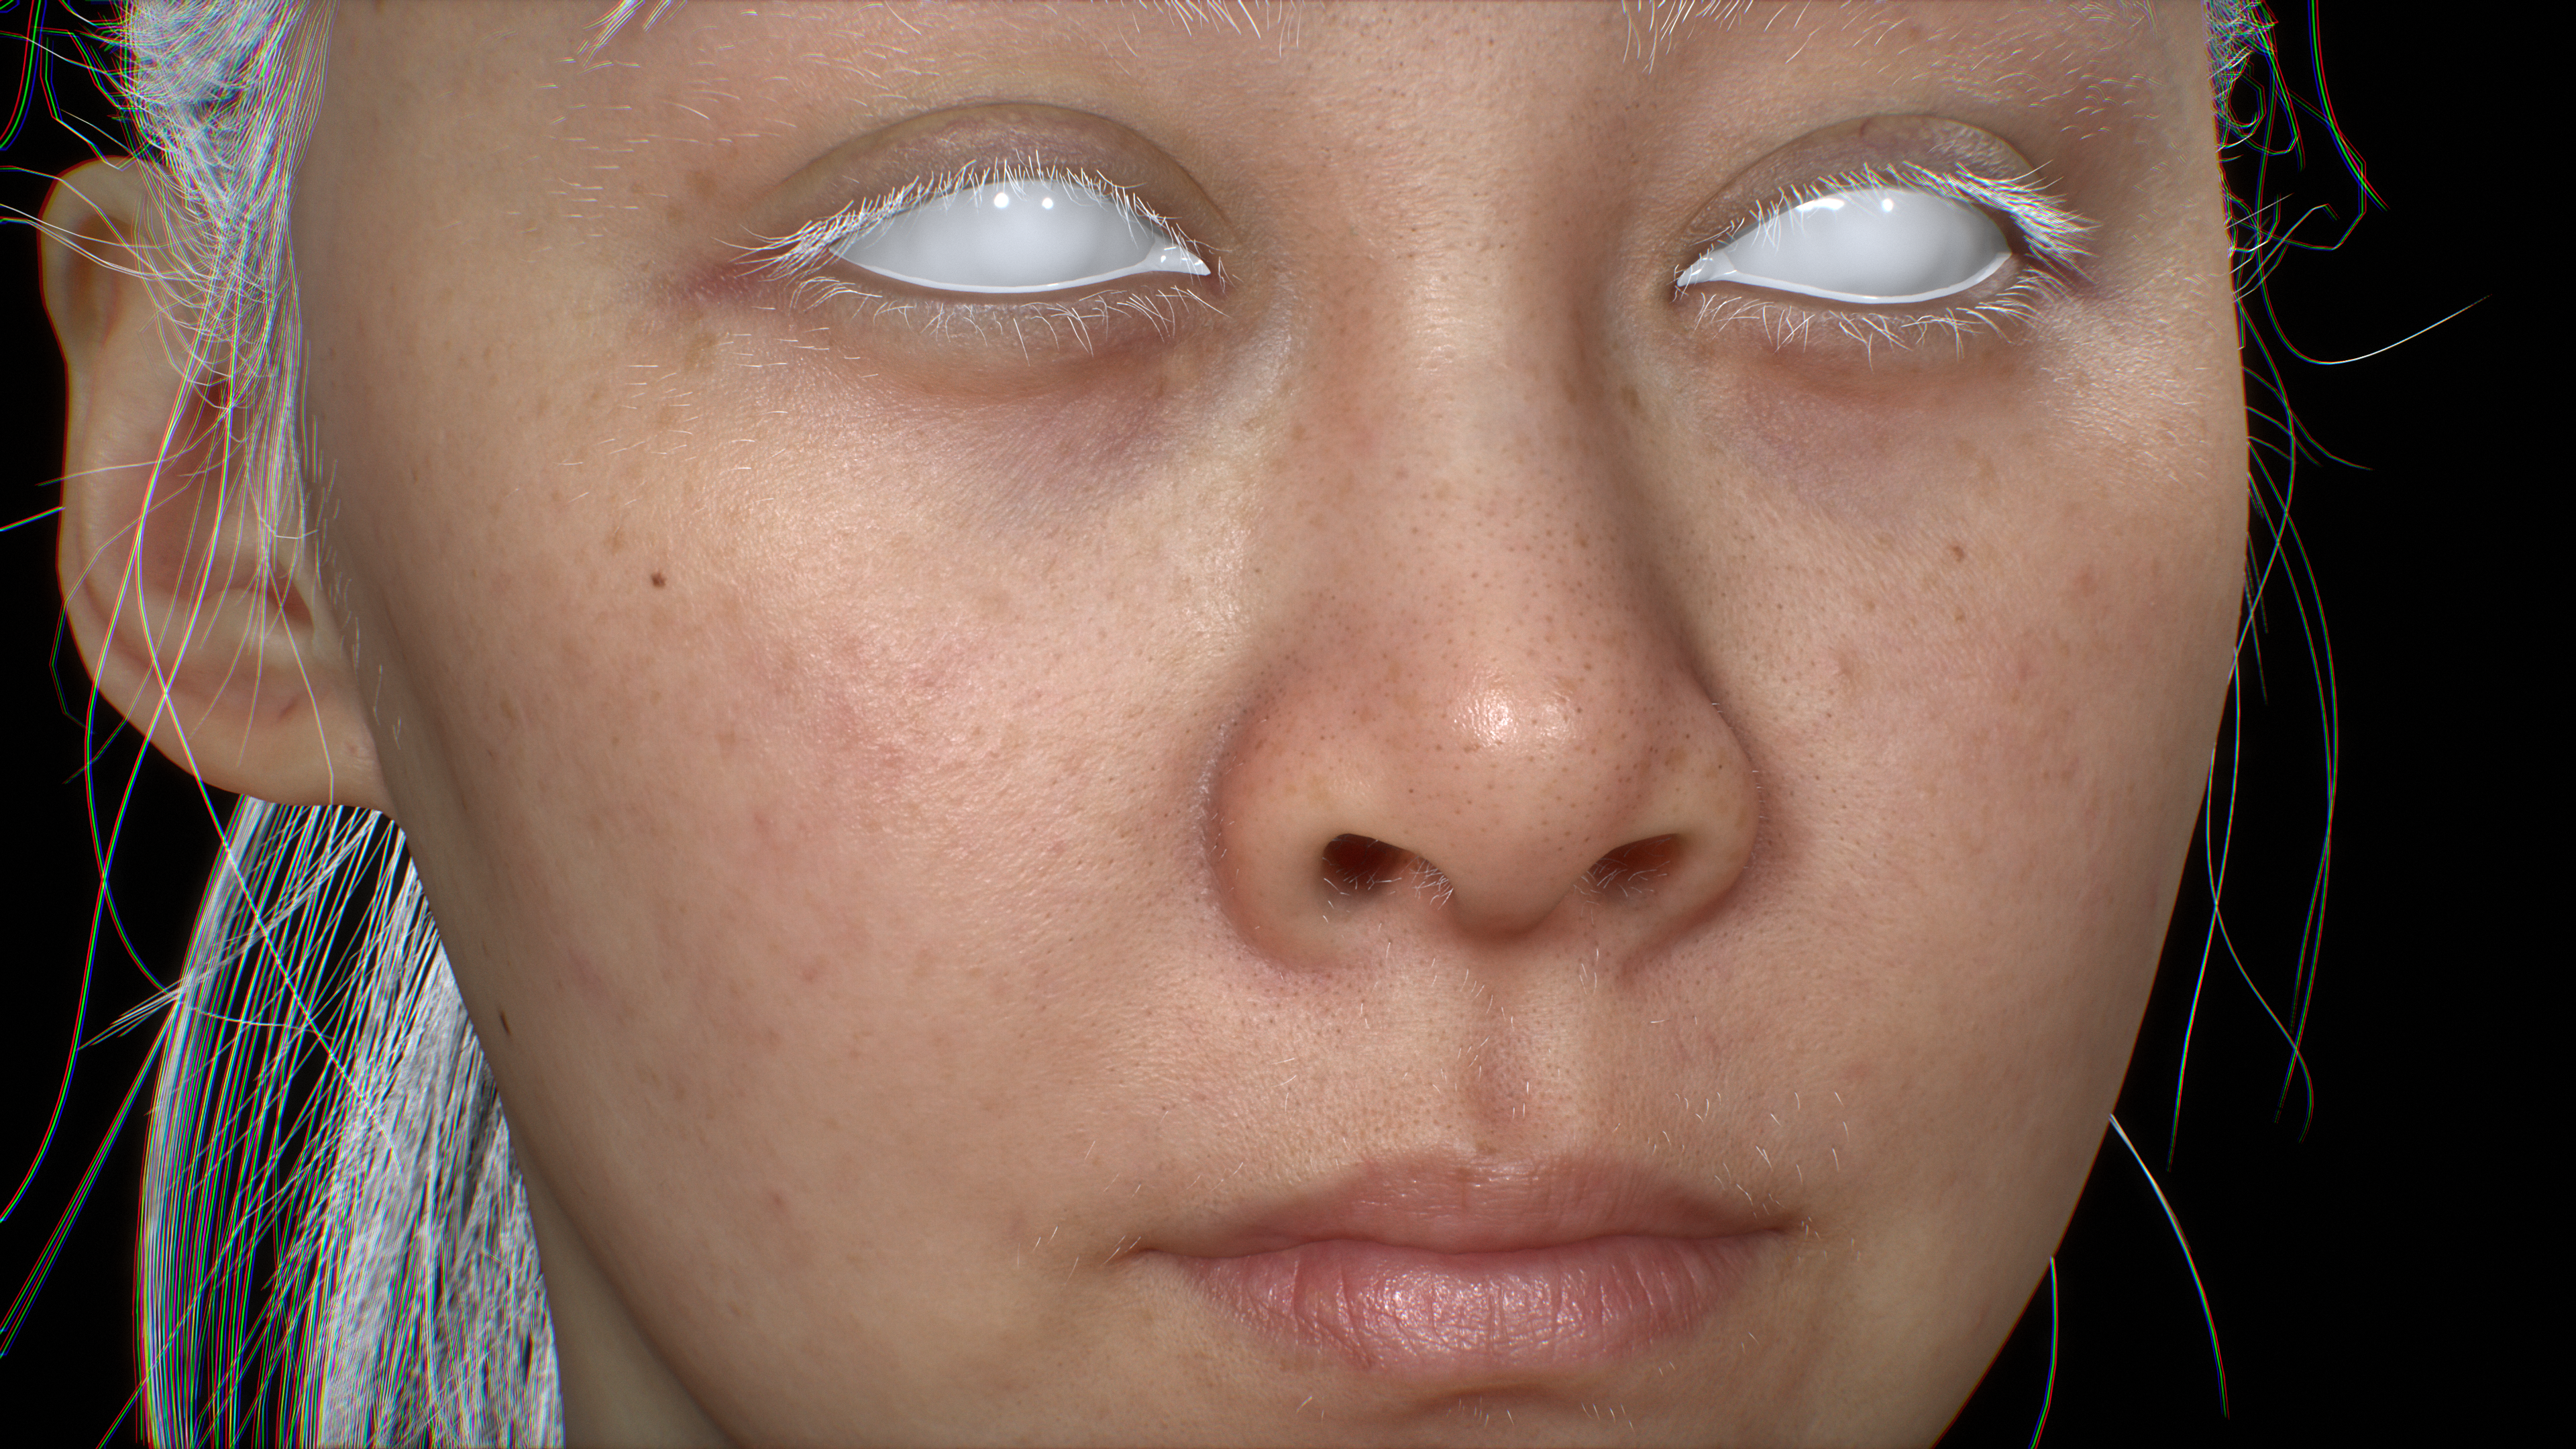
Scale 1.0
Scale 0.22
More detail on Subsurface
Connect “file_texture_c_skin_specularReflectionColor_subsurfaceScatteringColor_specularReflectionRoughness”.g -> OmniSurfaceBase.”Subsurface Weight”
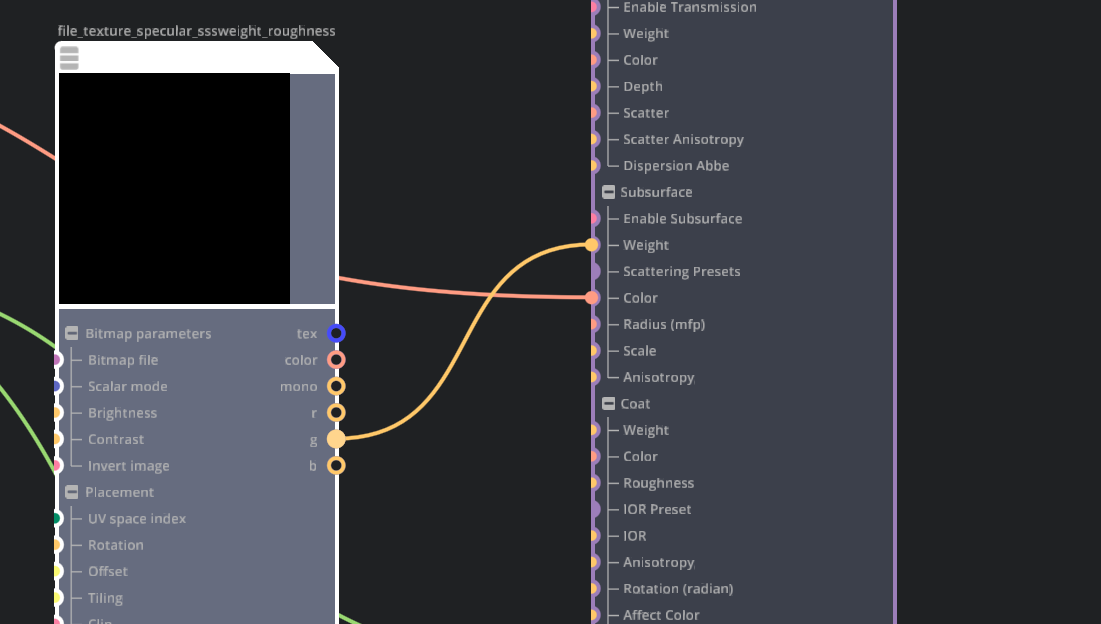
Connect SSS Weight Result to the Material
Setup Specular Reflections
Connect “file_texture_c_skin_specularReflectionColor_subsurfaceScatteringColor_specularReflectionRoughness”.r -> OmniSurfaceBase.”Specular Roughness”
Create an
Add FloatNode. The node name defaults to “add”Create a
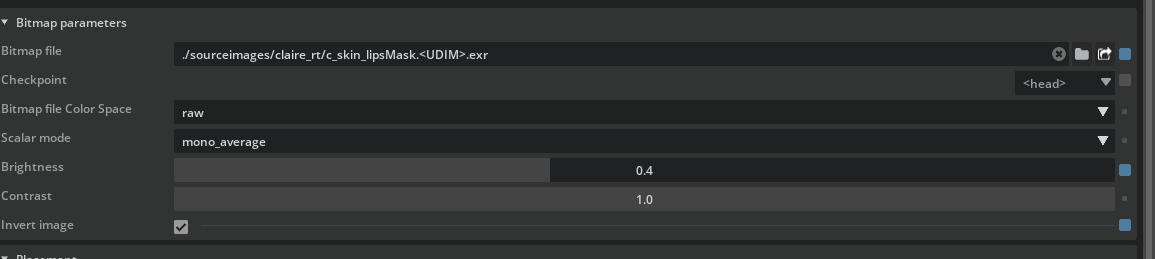
Bitmap texture node, name it “file_texture_c_skin_lipsMask_0_3”, and set the map file path to the same lip mask texture used previously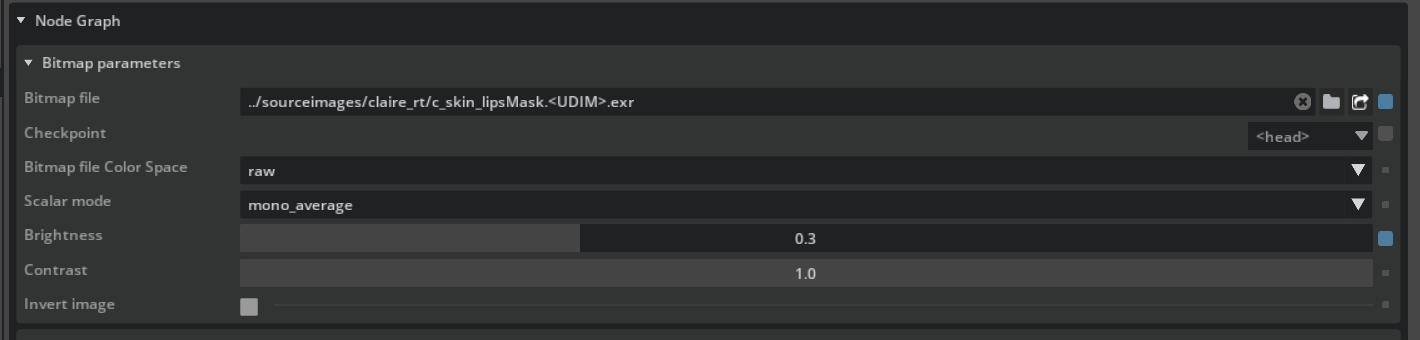
New Lip Mask, No Invert, 0.3 Brightness
Bitmap file:
https://omniverse-content-production.s3.us-west-2.amazonaws.com/Samples/Examples/2023_1/Rendering/Claire/sourceimages/claire_rt/c_skin_lipsMask.<UDIM>.exrBrightness:
0.3Invert Image:
OFFGoal is to have more reflection weight on the lips.
Connect “file_texture_c_skin_specularReflectionColor_subsurfaceScatteringColor_specularReflectionRoughness”.b -> “add”.a (a is the first input)
Connect “file_texture_c_skin_lipsMask_0_3”.r -> “add”.b (b is the second input)
The goal is to give the lips area more specular reflection than the rest of the face
Connect “add”.output -> OmniSurfaceBase.”Specular Weight”
Skin Specular node network
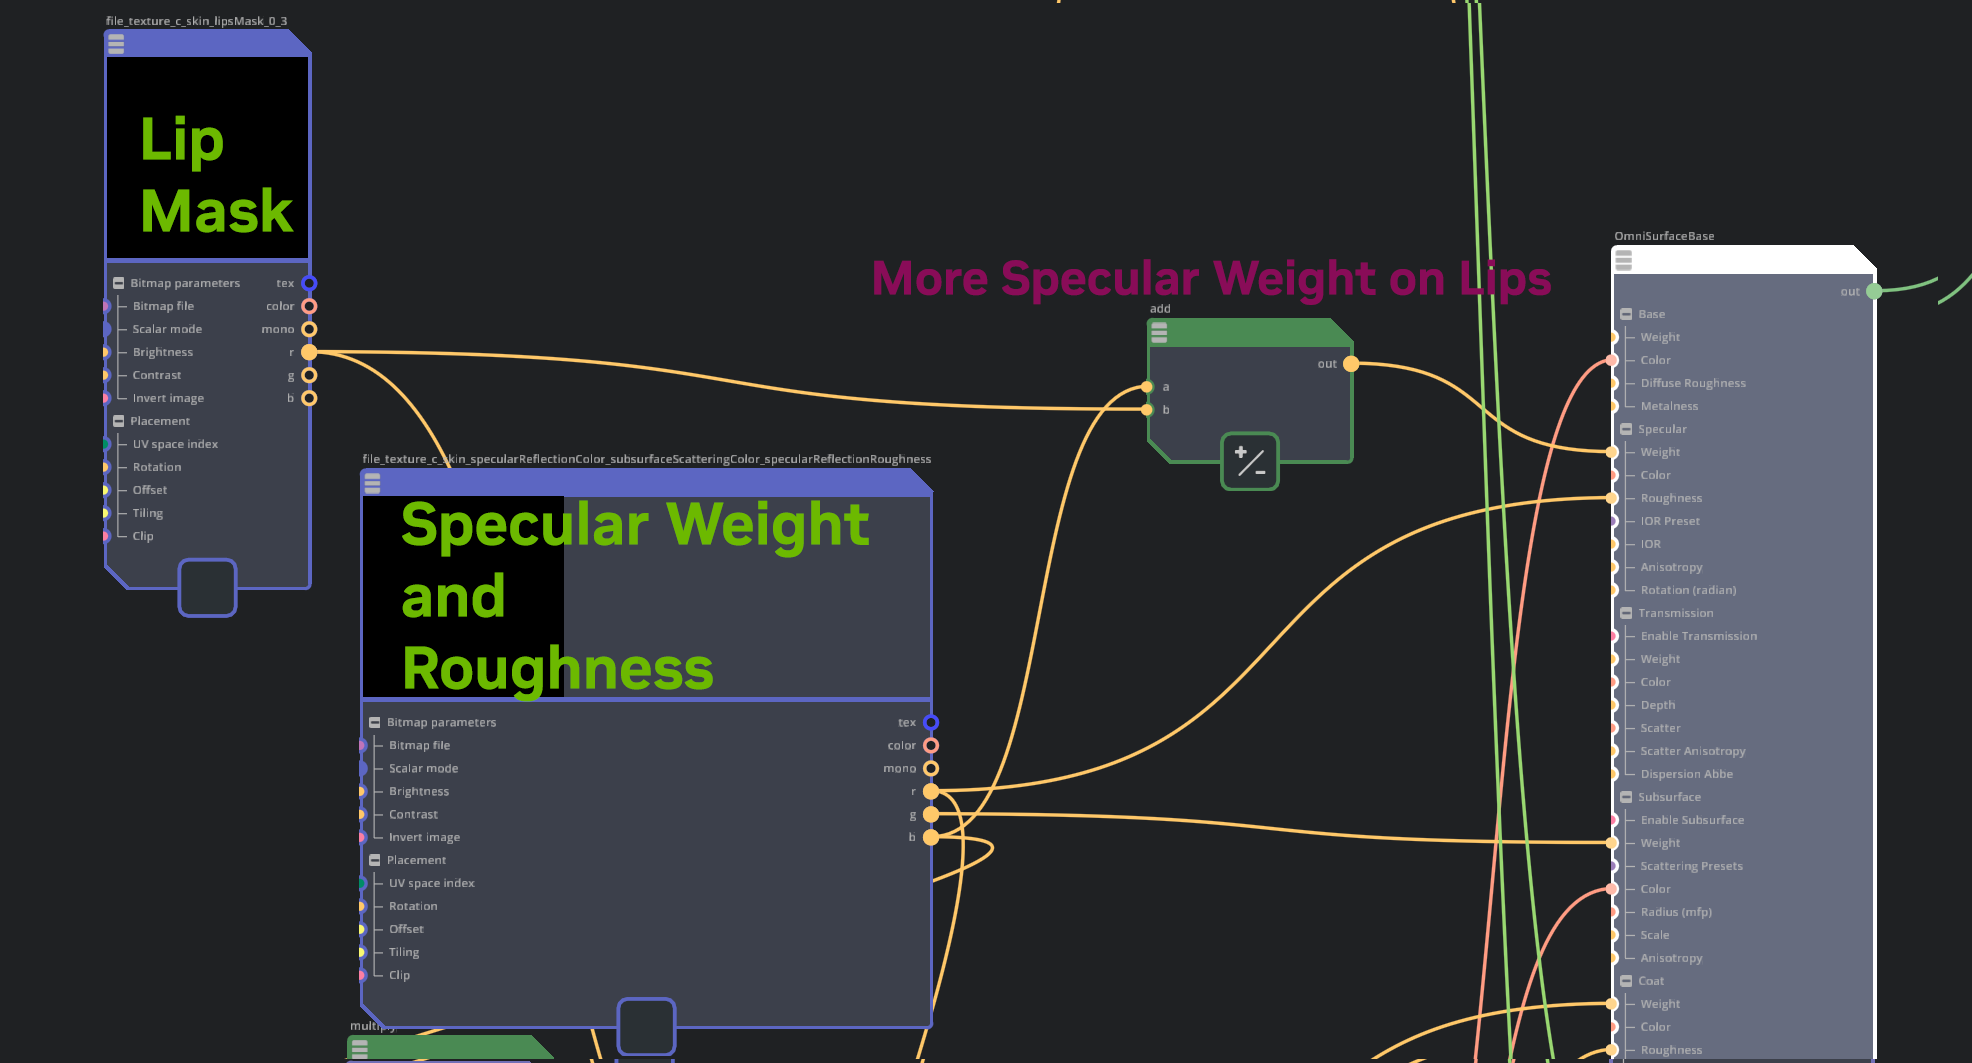
Specular Node Network
Setup Coat Reflections
Note
Coat reflections are used here to add some wetness to the lips.
Coat Weight Setup
Create a
Multiply Floatnode, name it “multiply”Connect “file_texture_c_skin_specularReflectionColor_subsurfaceScatteringColor_specularReflectionRoughness”.b -> “multiple”.a
Set “multiple” node’s b (second input) value to
0.35Goal is to darken the blue value of the utility map
Add the above result together with the skin lip mask texture:
Create an
Add Floatnode, name it “add_01”Connect “multiply_float”’.out -> “add_01”.a
Connect “file_texture_c_skin_lipsMask_0_3”.r -> “add_01”.a
Connect “add_01”.out -> OmniSurfaceBase.”Coat Weight”
Coat weight node network:
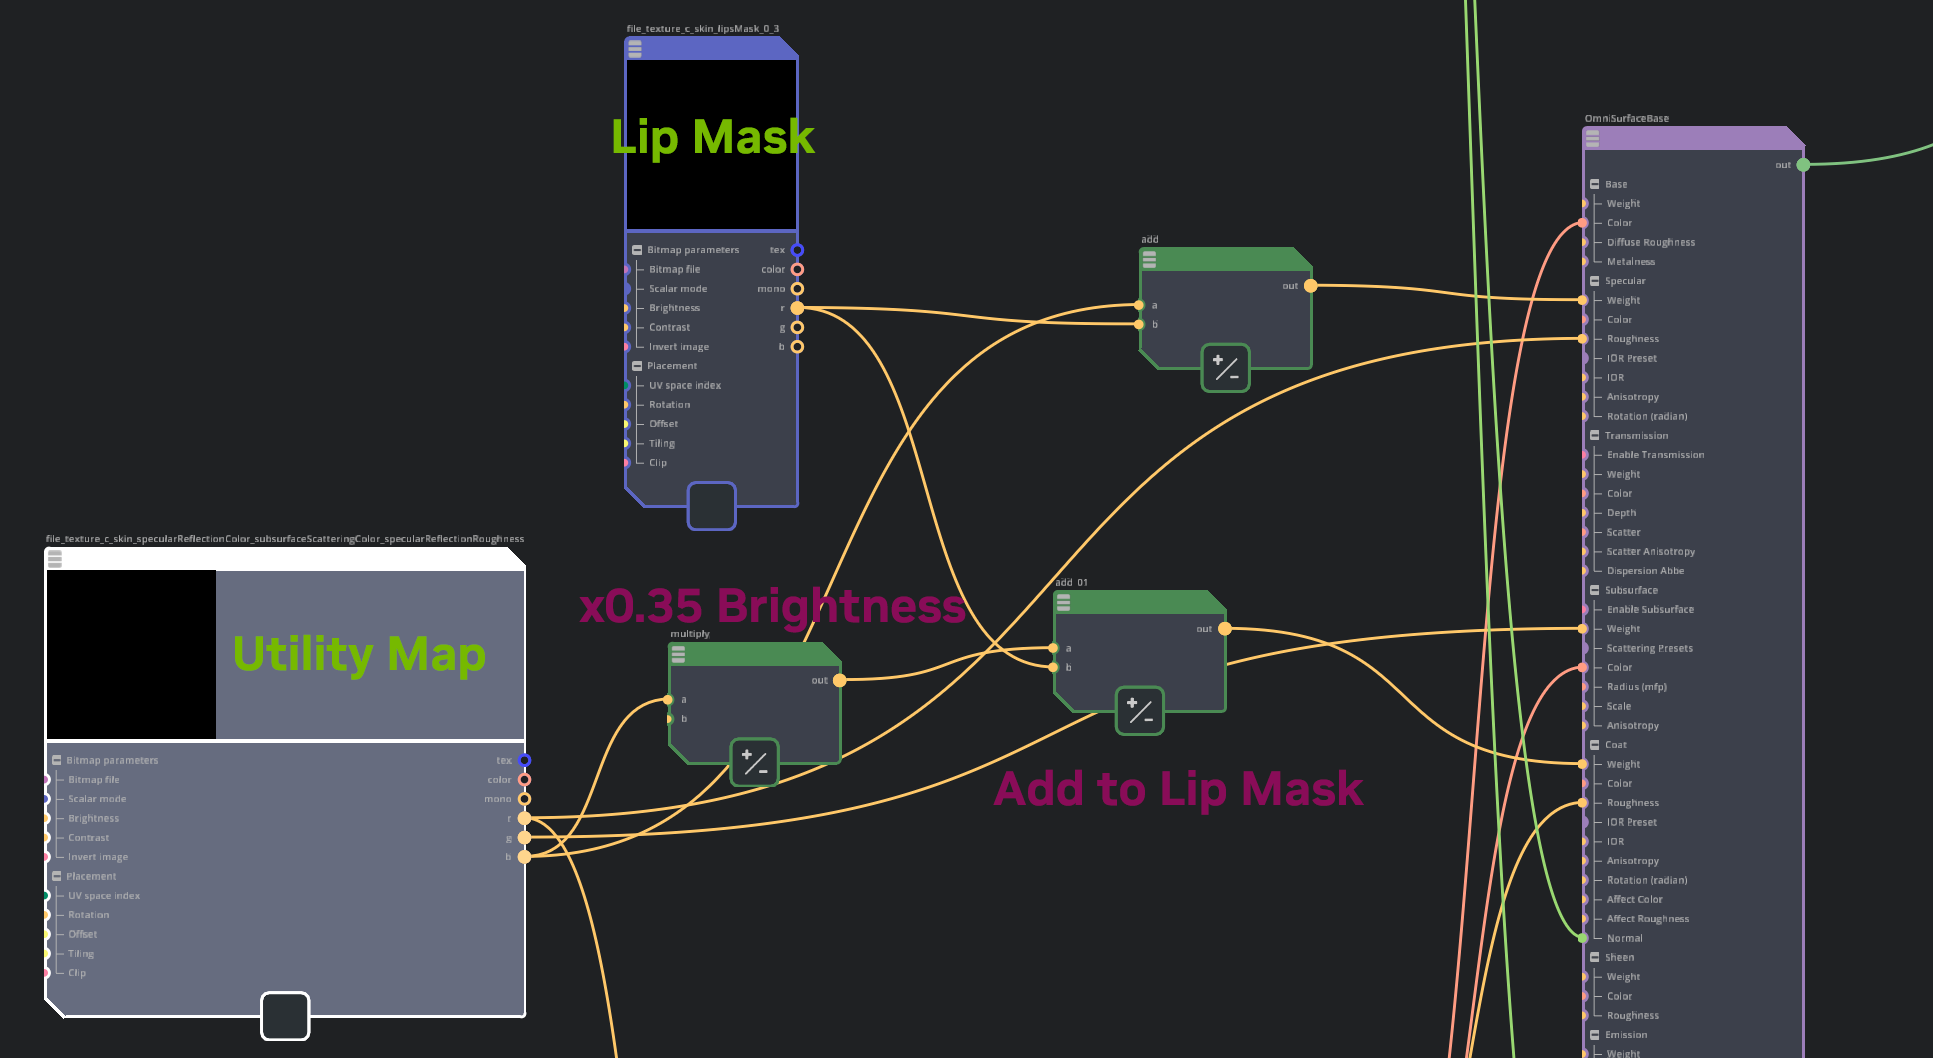
Coat Weight Node Network
Coat Roughness Setup
Note
Goal is to set lower roughness values for coat reflections, especially in the lips area.
Create a
Multiply Floatnode and name it “multiply_03”Connect Combined Utility Map ‘s R value into the multiply_03’s first input
Set “multiply_03”.b (second input) value to
0.6Create a new
Multiply Floatnode and name it “multiply_04”Create a new File Texture map using the same lip mask texture, and name it “file_texture_c_skin_lipsMask_0_4_invert”
file_texture_c_skin_lipsMask_0_4_invert properties:
Bitmap file:
https://omniverse-content-production.s3.us-west-2.amazonaws.com/Samples/Examples/2023_1/Rendering/Claire/sourceimages/claire_rt/c_skin_lipsMask.<UDIM>.exrBrightness :
0.4Invert Image:
ONThis mask gives less coat reflection roughness on the lips area
Connect file_texture_c_skin_lipsMask_0_4_invert.r -> multiply_04.r (first input)
Connect multiply_03.out -> multiply_04.b (second input)
Connect multiply_04.out -> OmniSurfaceBase.”Coat Roughness”

Coat Roughness Node Network
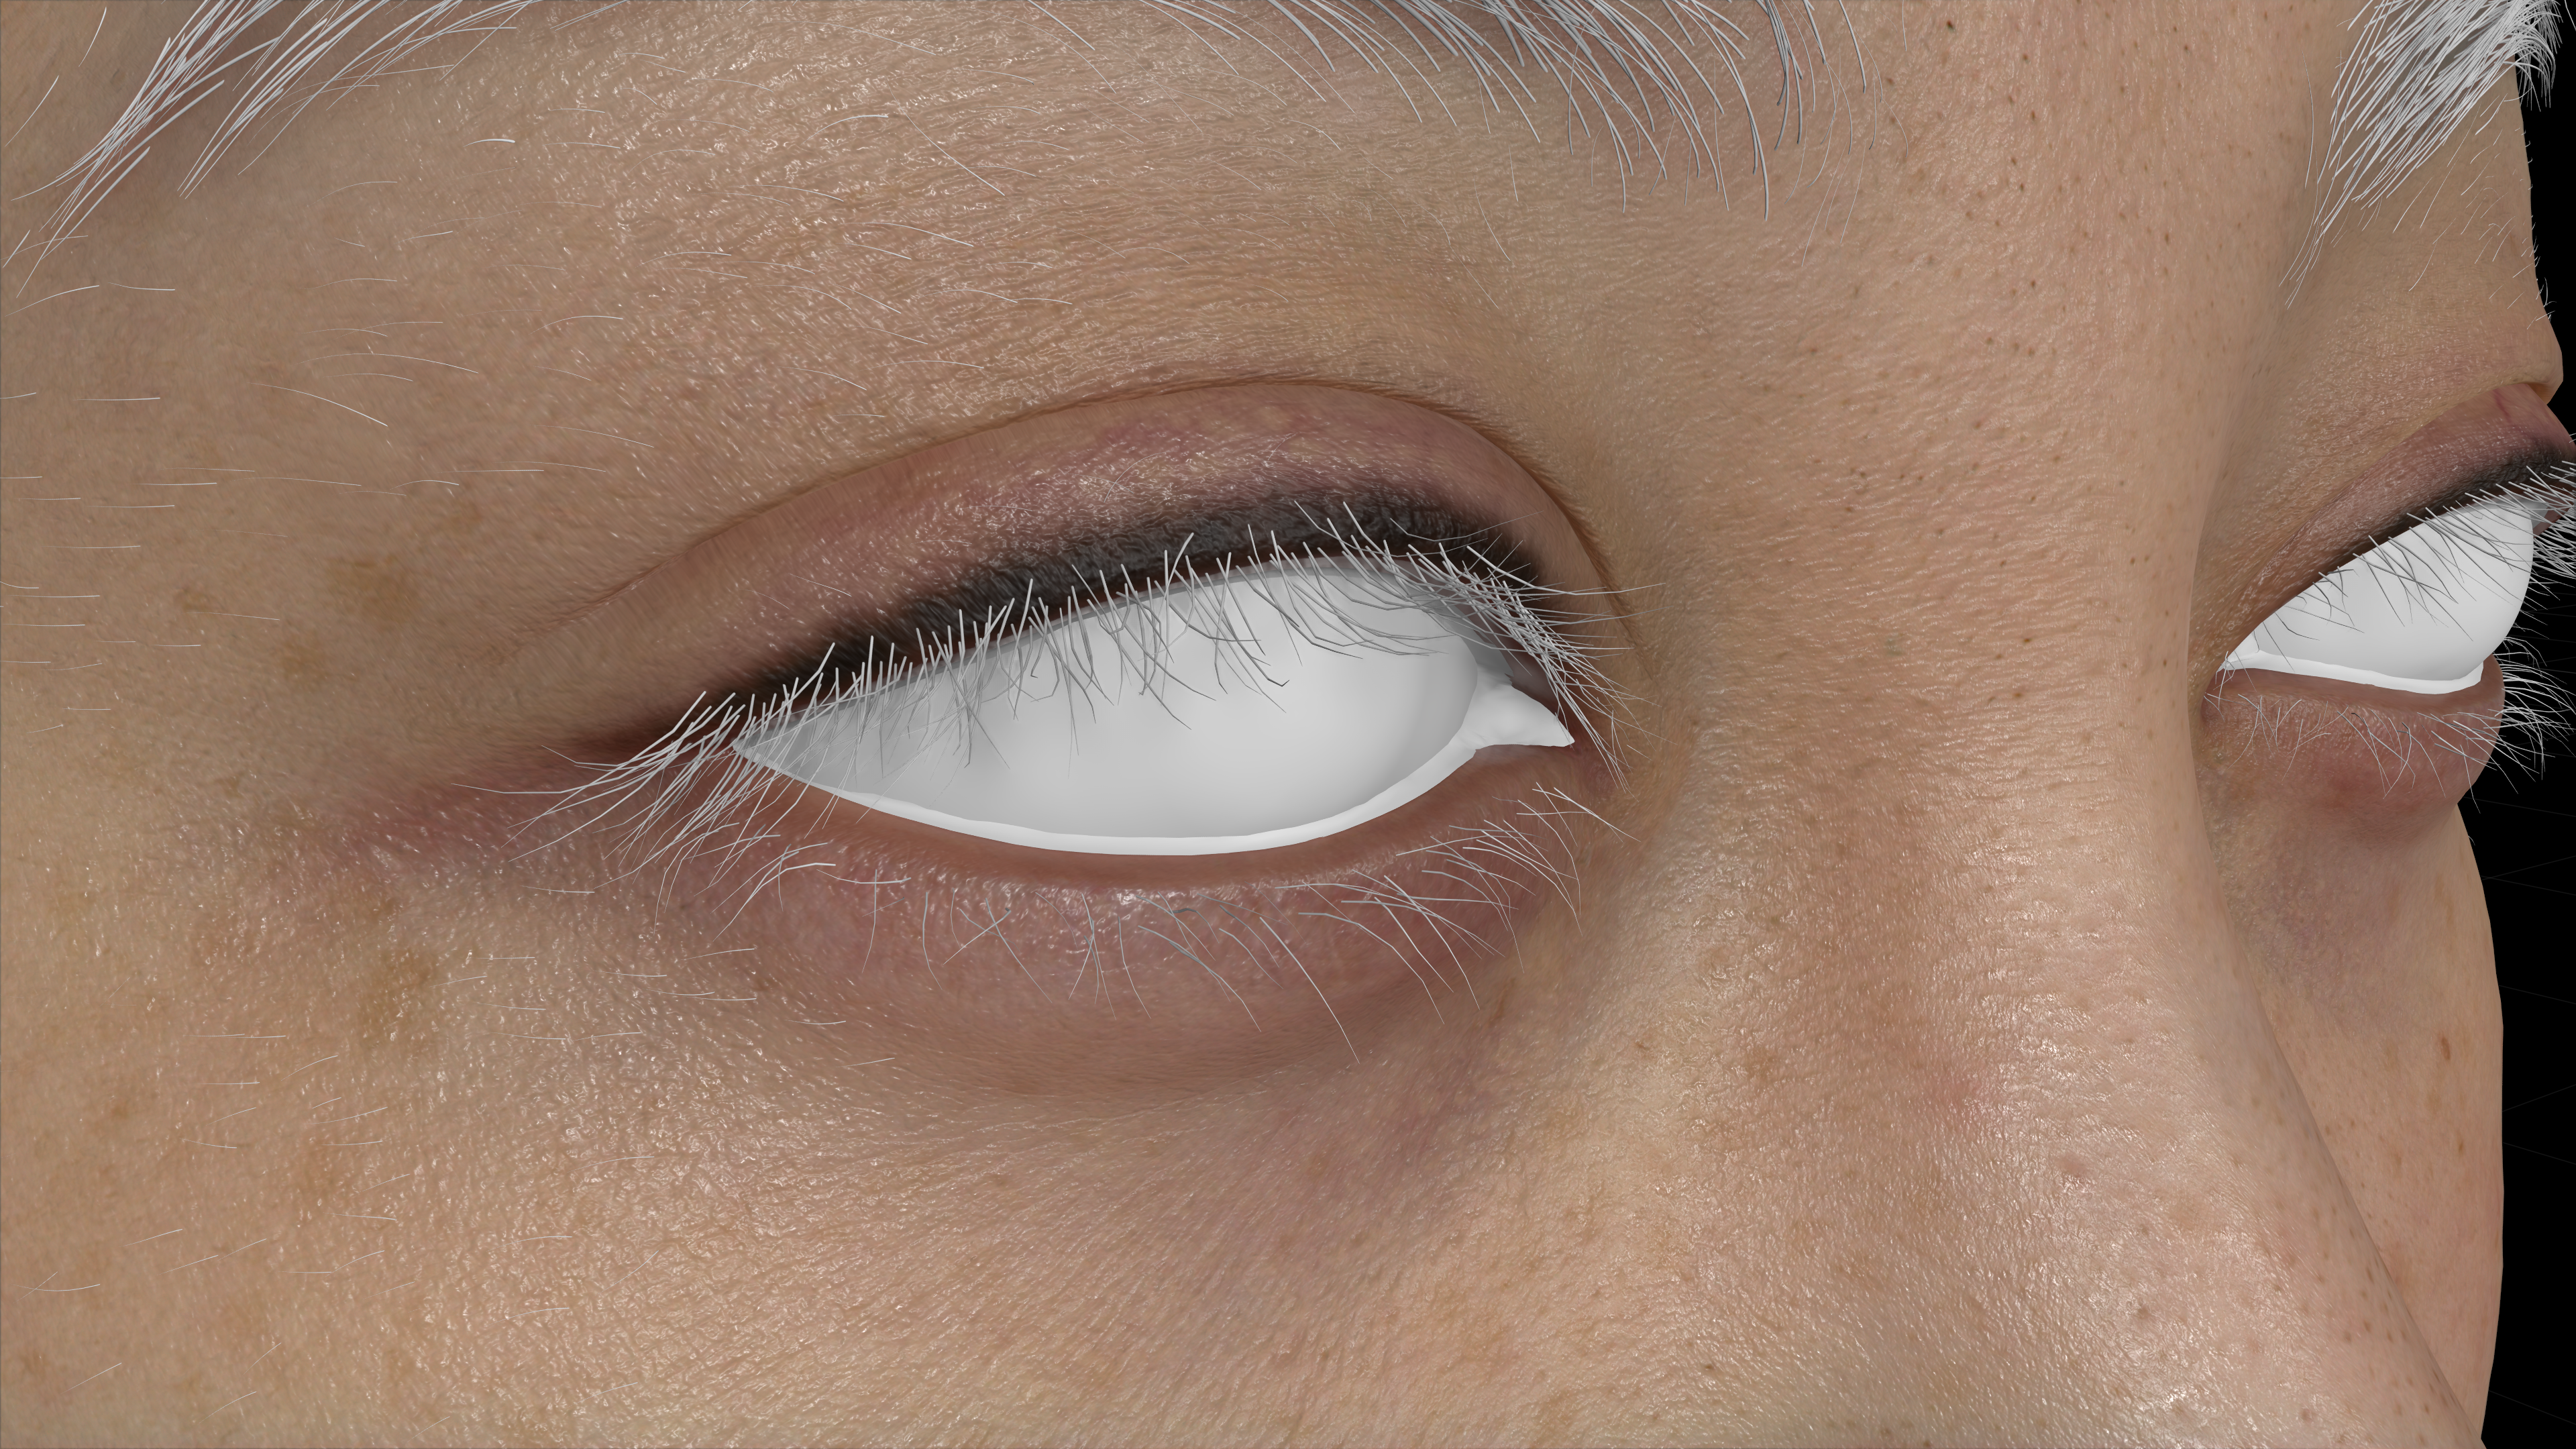
Add Makeup
Note
The goal is to add a dark eyeliner material layer on top of the skin material layer
Create an “OmniSurfaceBlendBase” node to create the start of the blend material
Create Blend Material Node
Create a “Bitmap texture node”, name it “makeup_mask”, and set the file path to the makeup mask texture
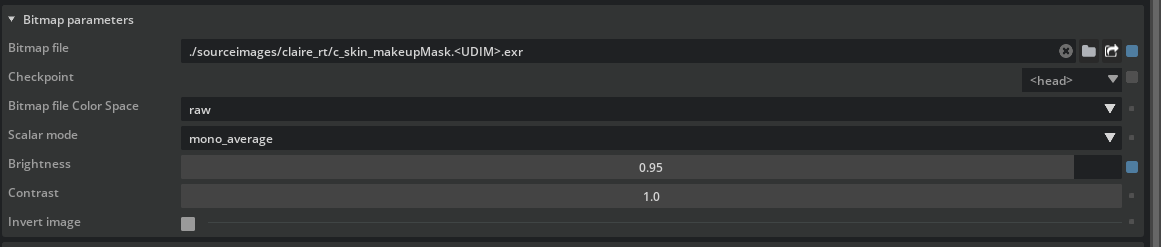
Makeup Mask Properties
Bitmap file:
https://omniverse-content-production.s3.us-west-2.amazonaws.com/Samples/Examples/2023_1/Rendering/Claire/sourceimages/claire_rt/c_skin_makeupMask.<UDIM>.exrCreate a new OmniSurfaceBase node and name it “c_skin_makeup_mtl”
Edit the c_skin_makeup_mtl to set the properties of the black eyeliner material
Goal is to create a material that looks dark and glossy.
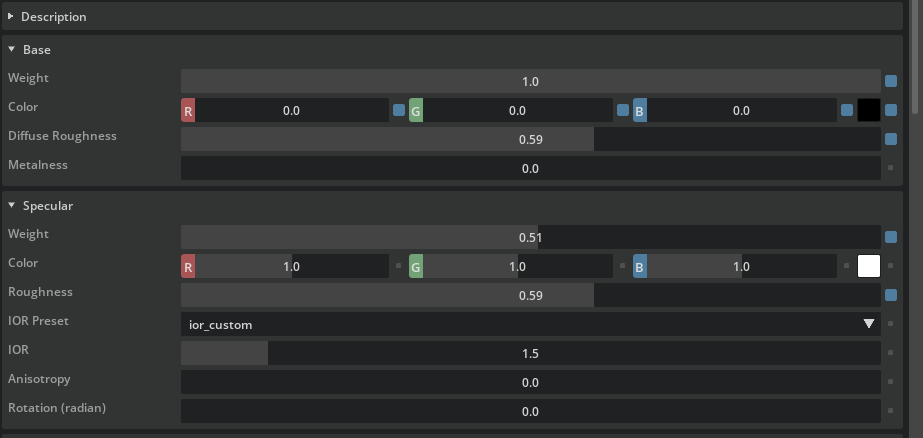
Makeup Material Properties:
diffuse_reflection_weight:
1.0diffuse_reflection_color:
(0, 0, 0)diffuse_reflection_roughness:
0.59specular_reflection_weight:
0.51specular_reflection_roughness:
0.59Makeup material node network:
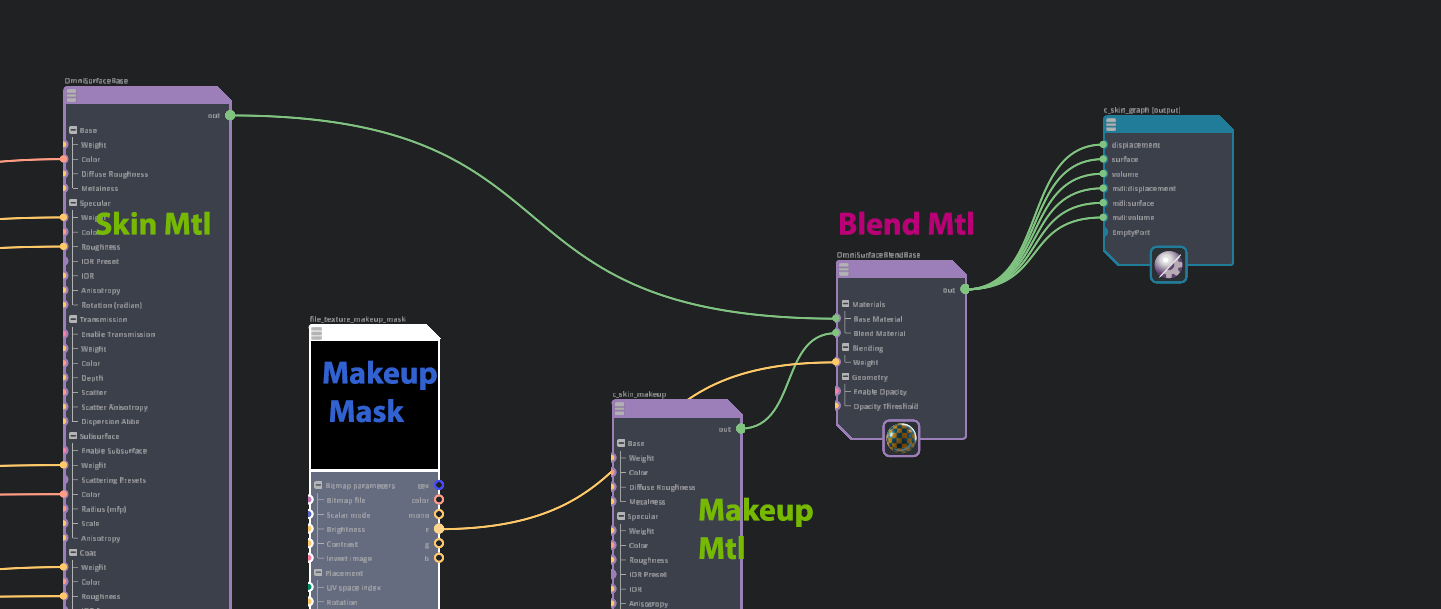
Blend Makeup Materials Network
“blend_normals”.out -> “c_skin_makeup_mtl”.geometryNormal *
“OmniSurfaceBase”.out -> “OmniSurfaceBlendBase”.”Base Material”
“c_skin_makeup_mtl”.out -> “OmniSurfaceBlendBase”.”Blend Material”
“makeup_mask”.r -> “OmniSurfaceBlendBase”.”Blending weight”
“OmniSurfaceBlendBase”.out -> “c_skin_graph”.mdl:surface
- *
The makeup layer uses the same geometryNormal as the skin
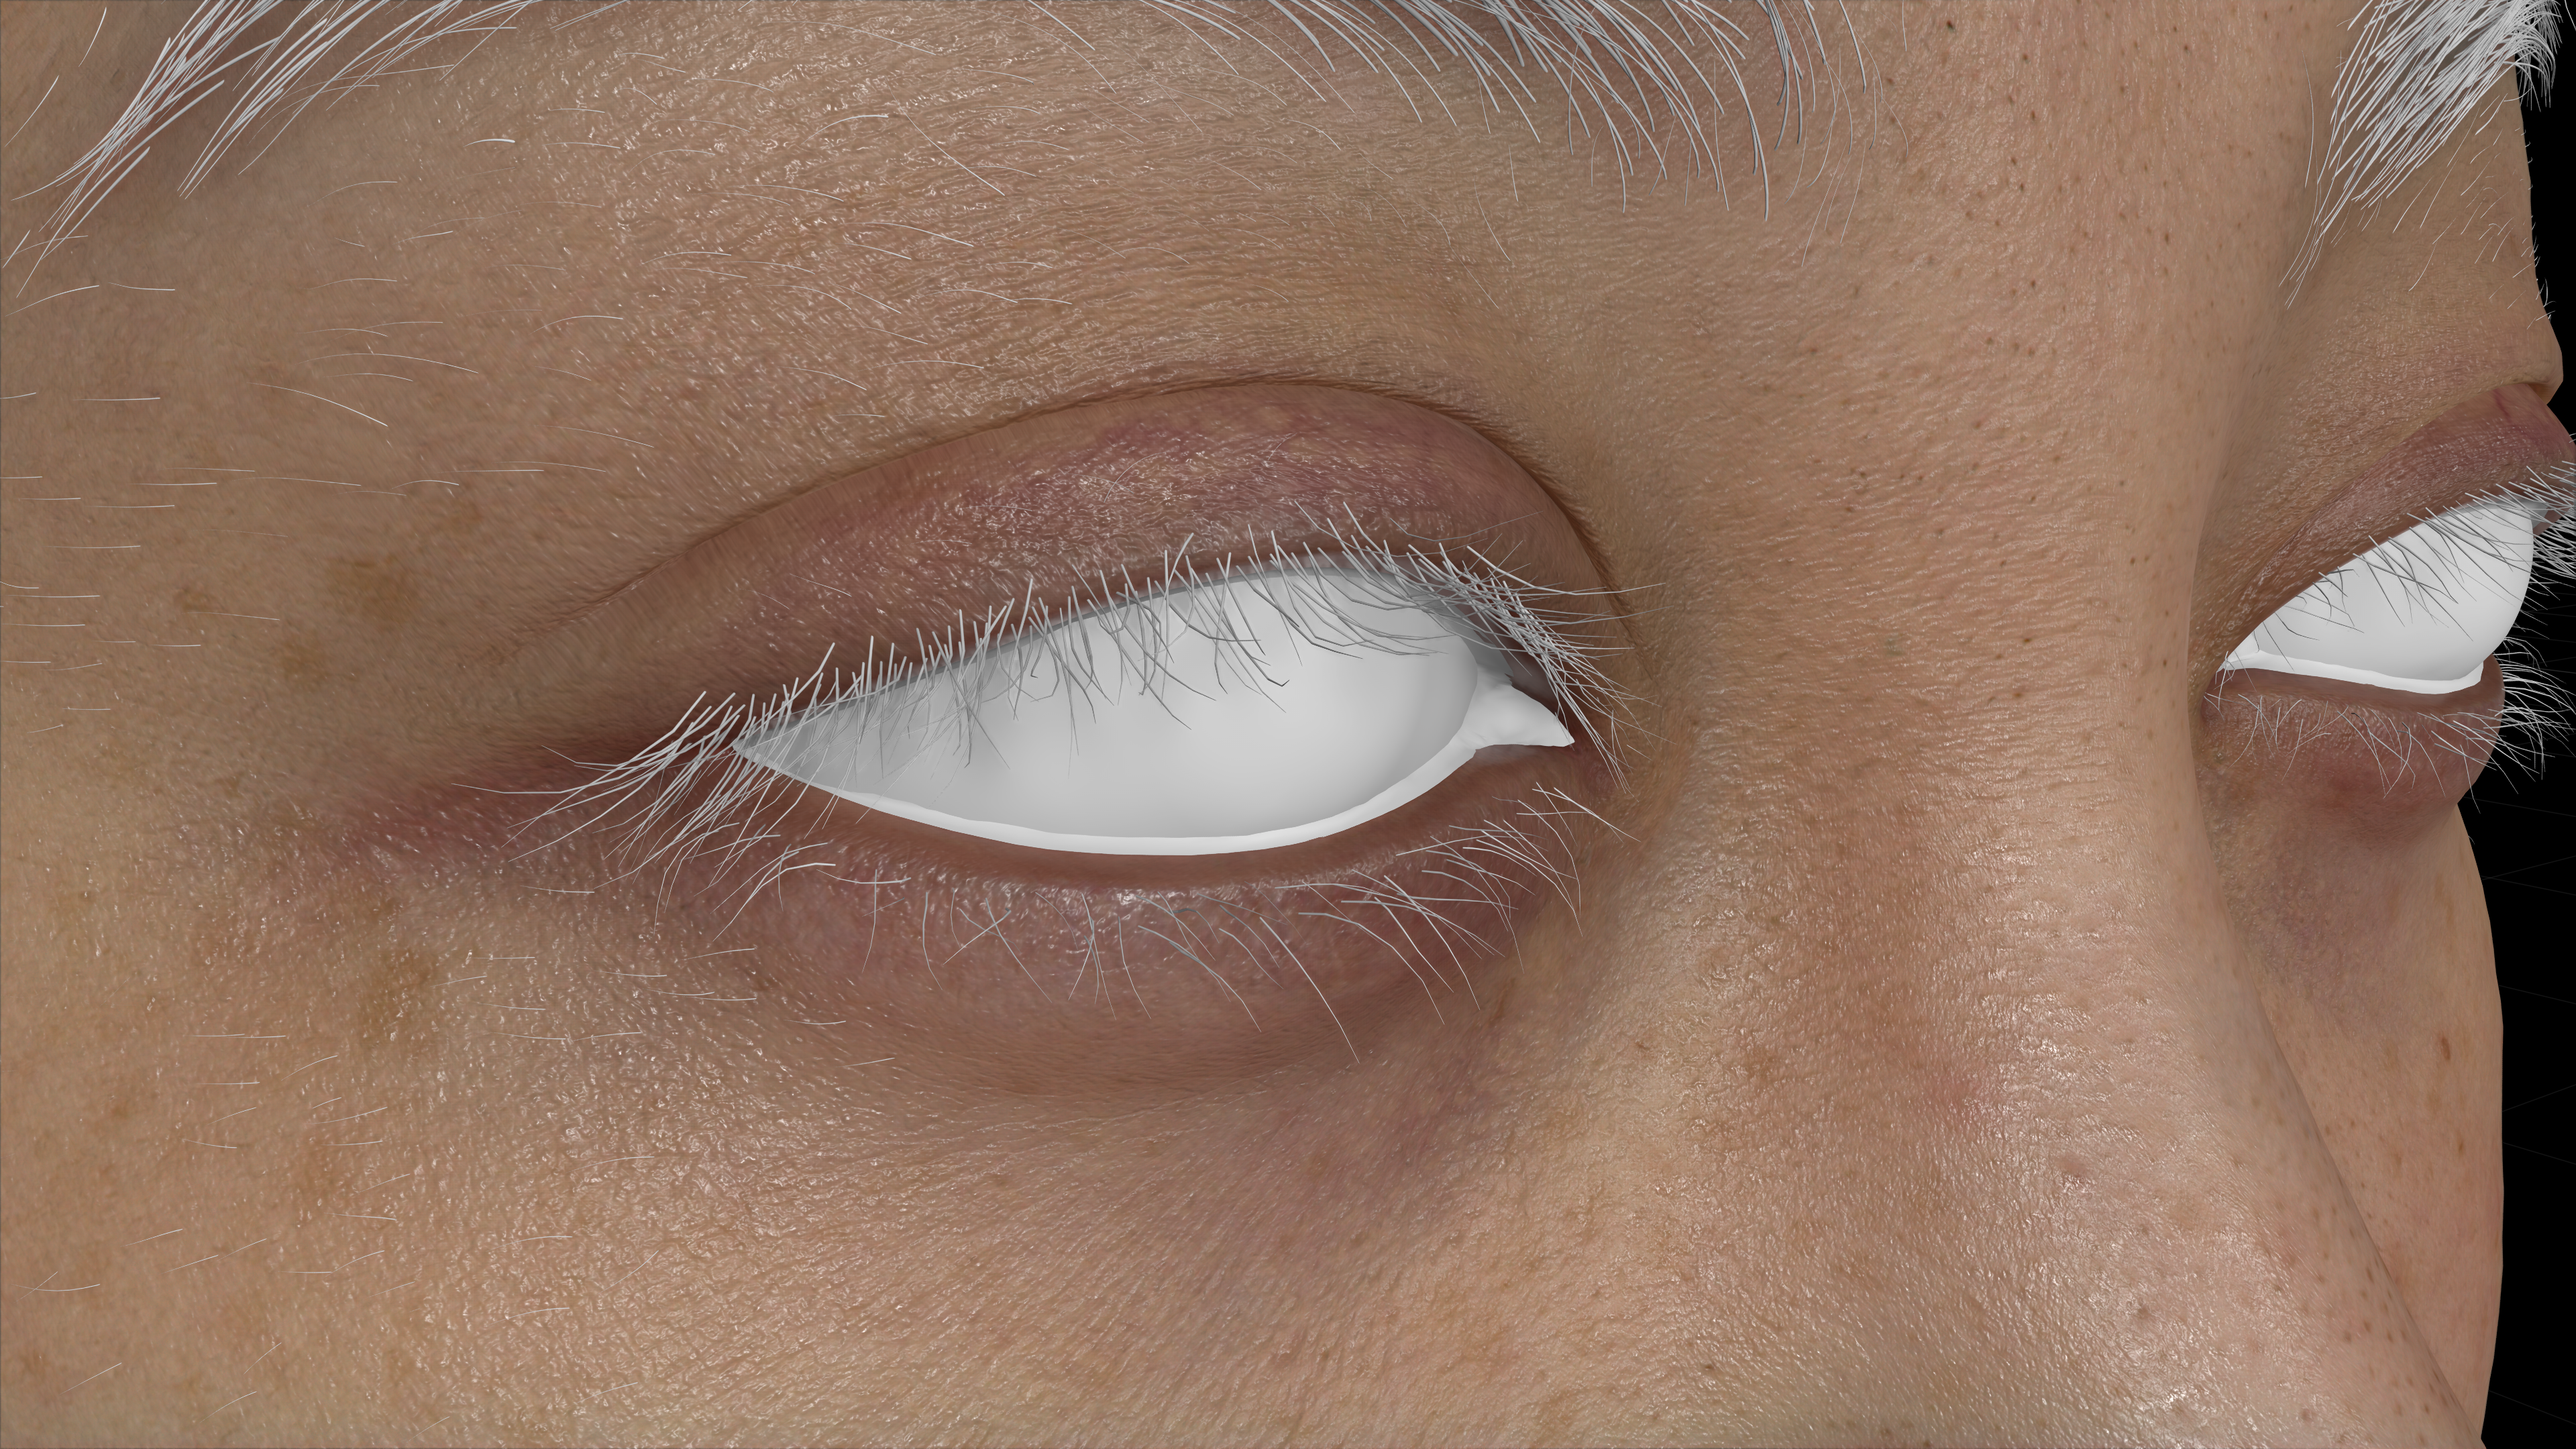
Eyes Materials
|
Steps |
Before |
After |
|---|---|---|
|
|
|
|
|
|
|
|
|
|
|
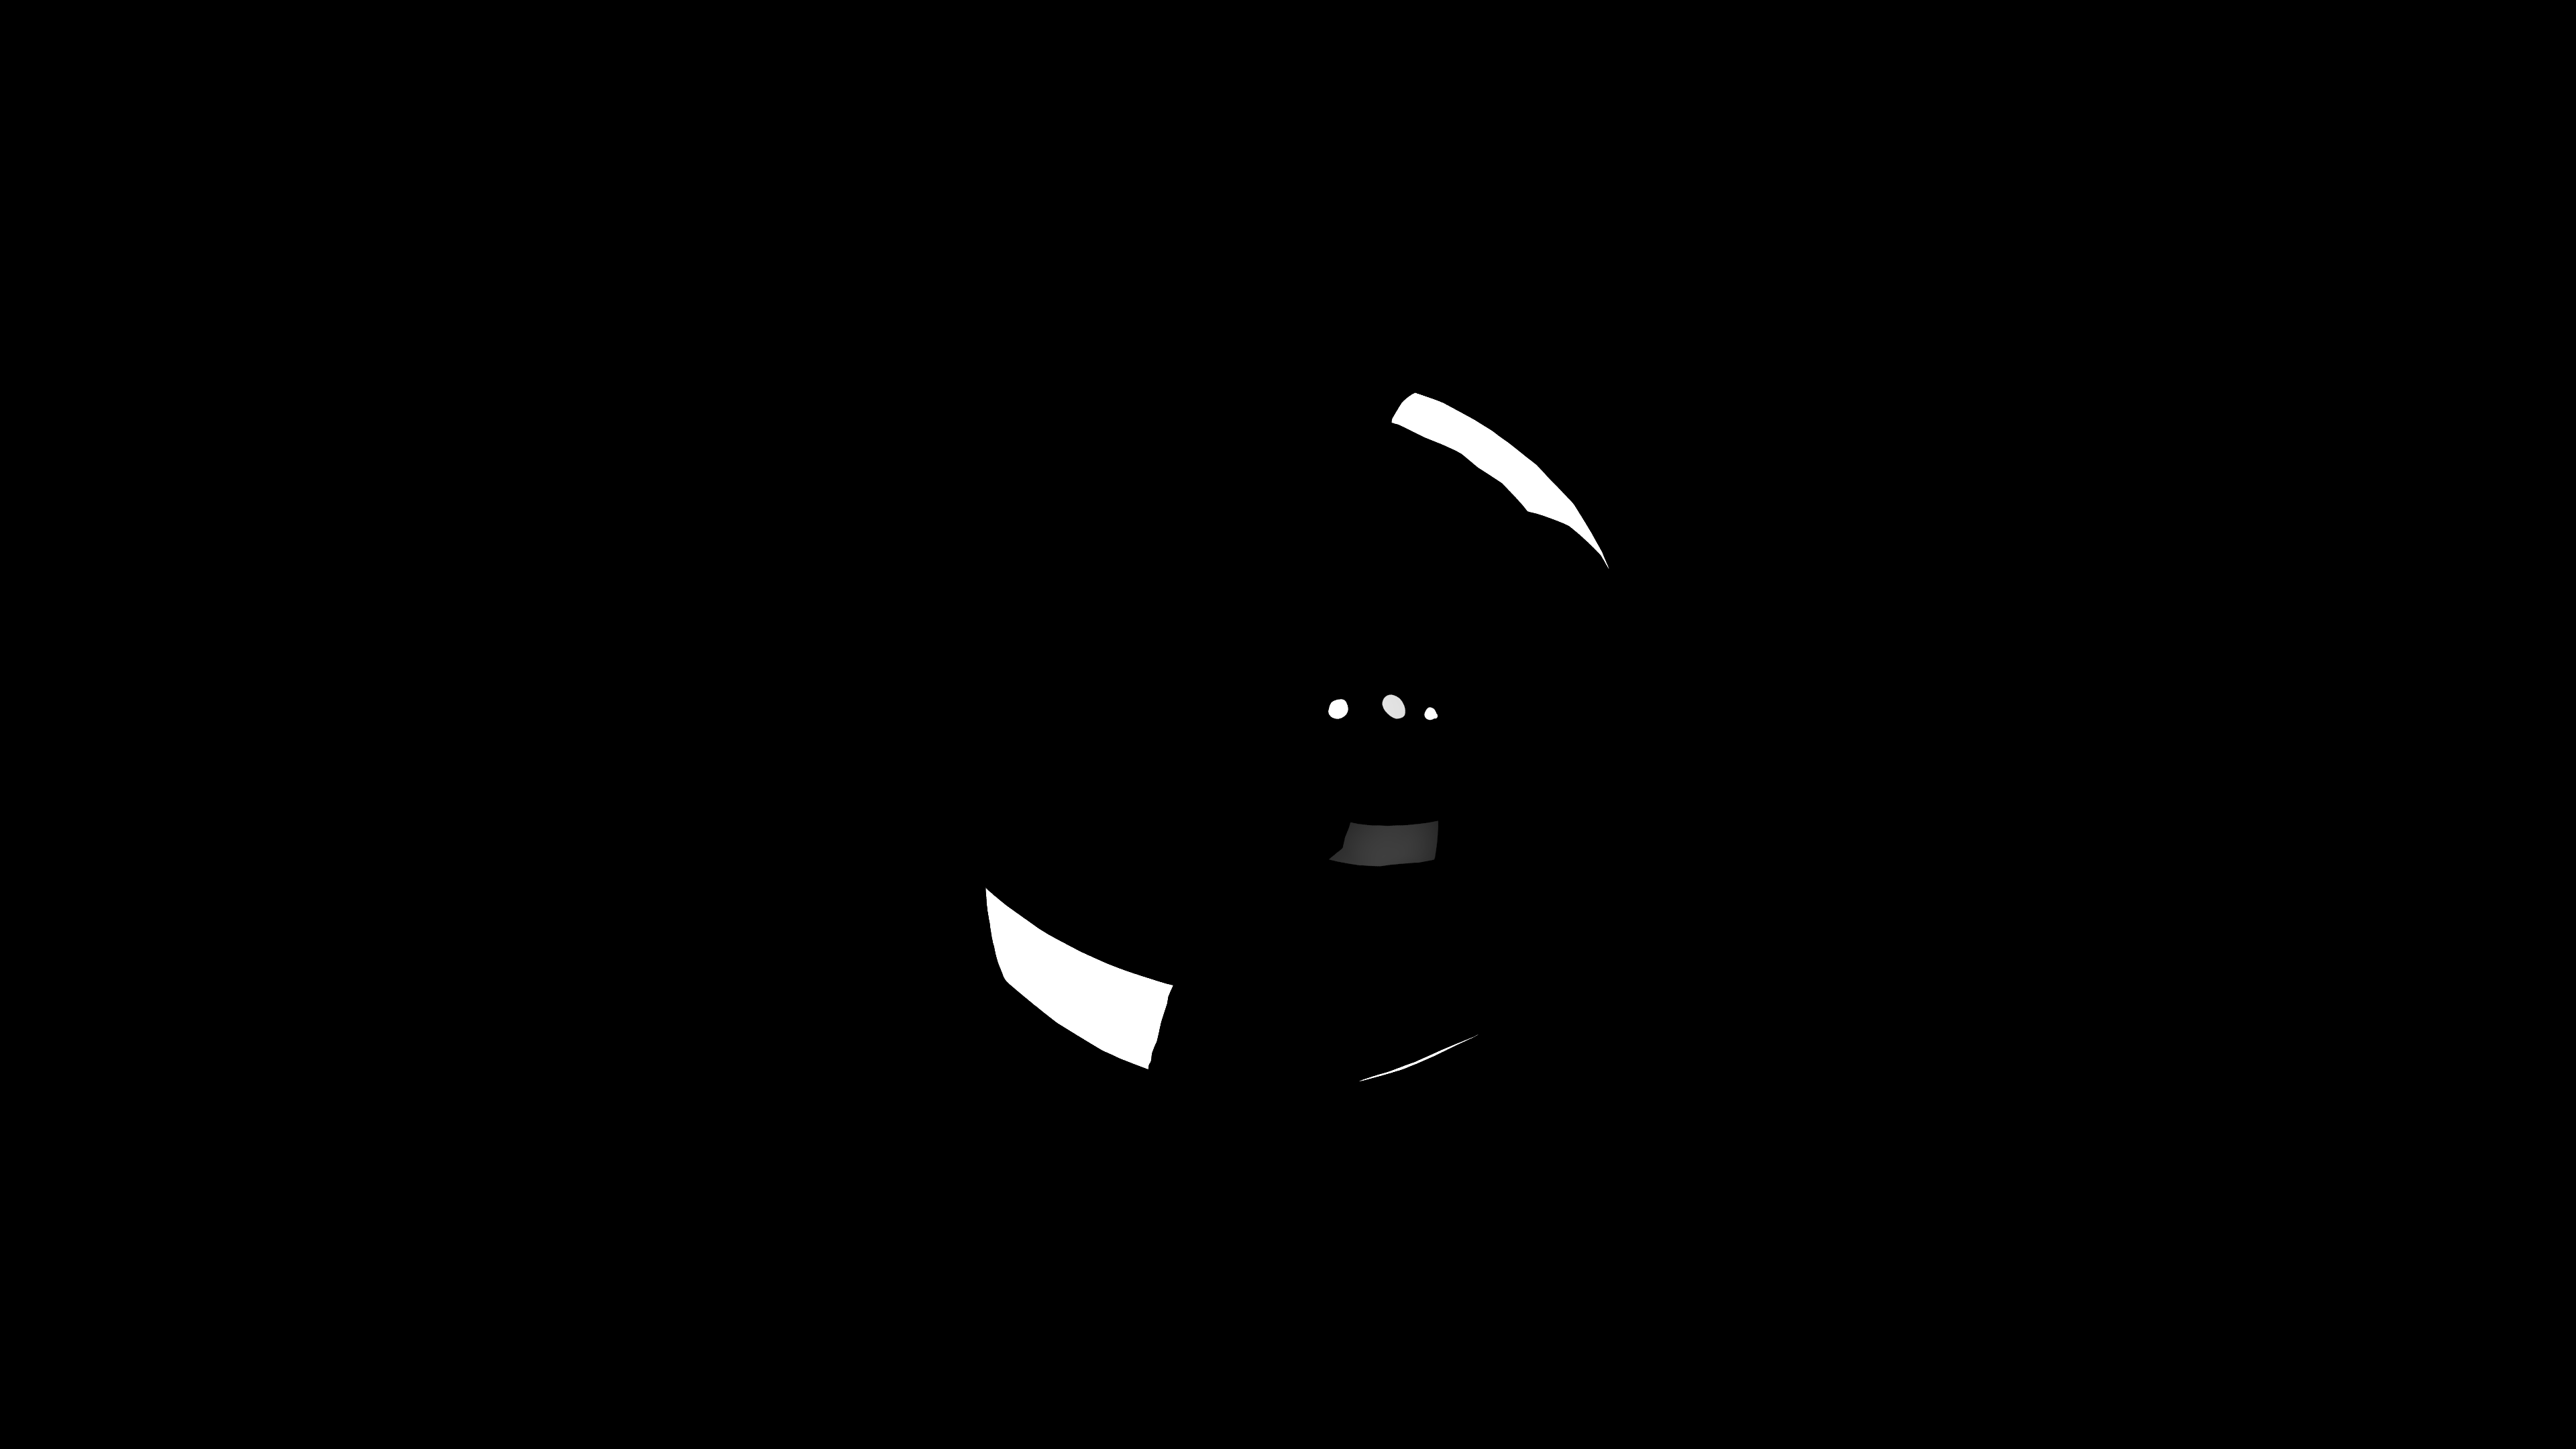
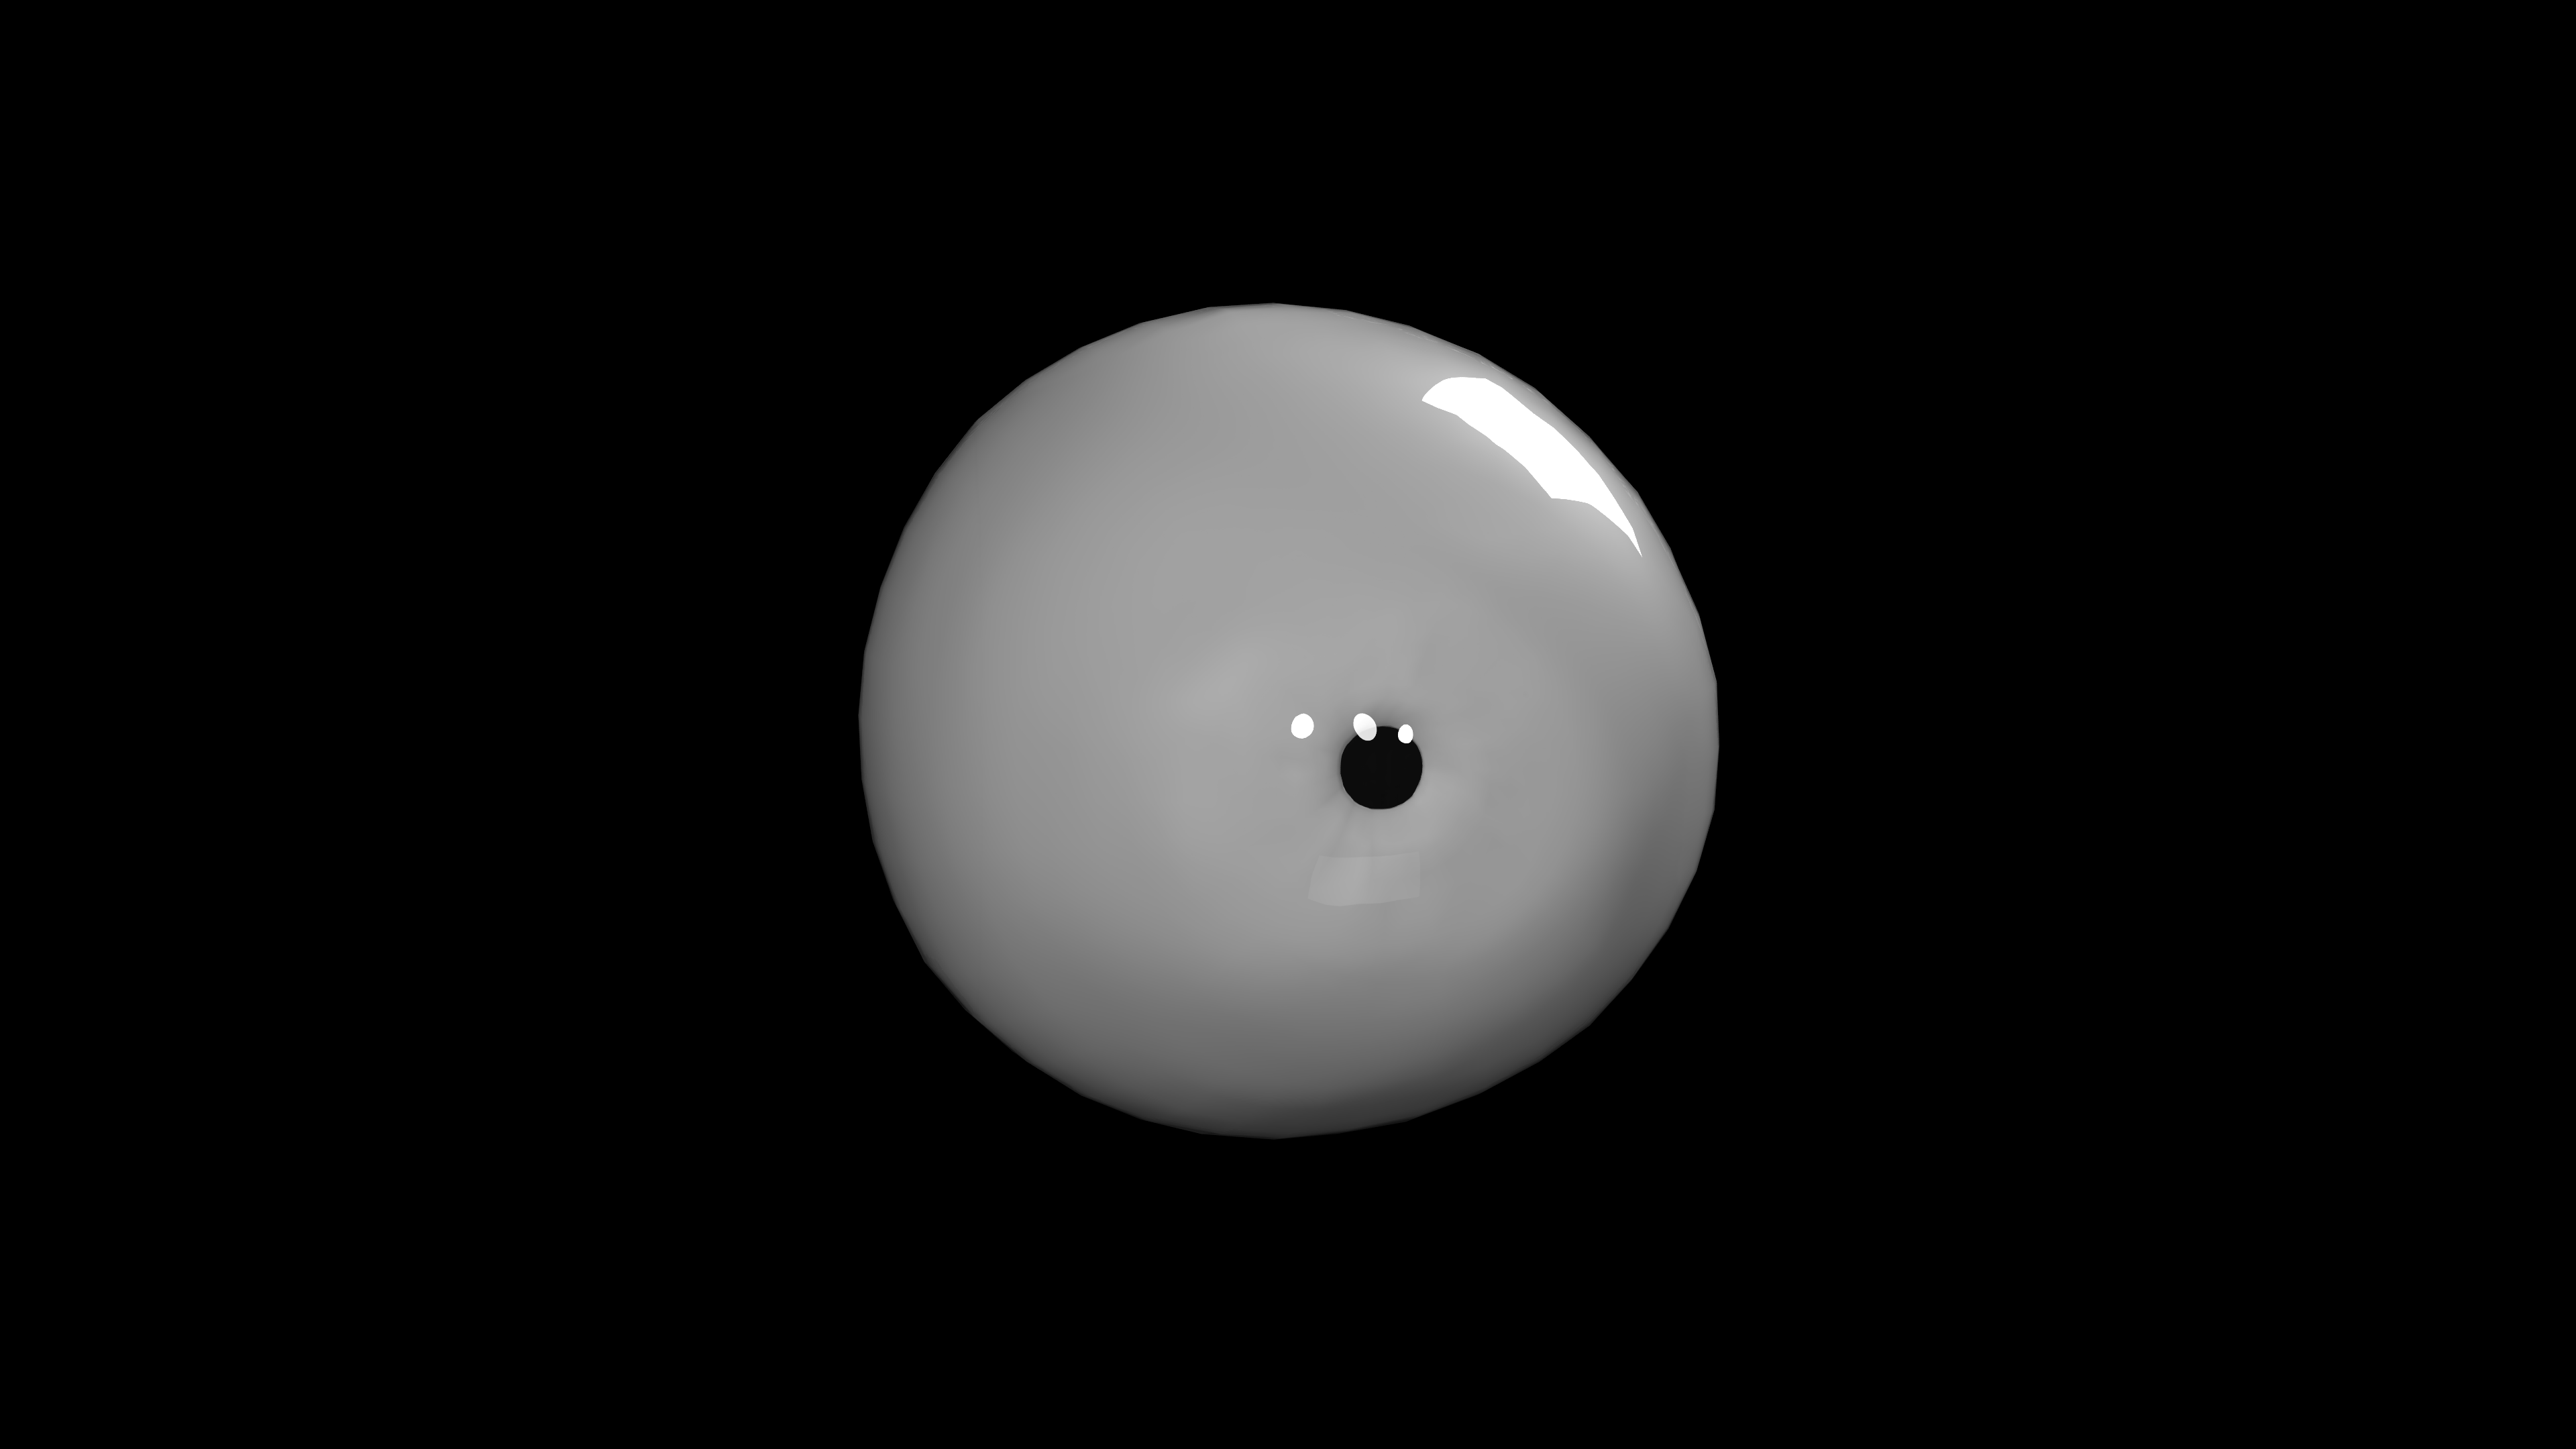
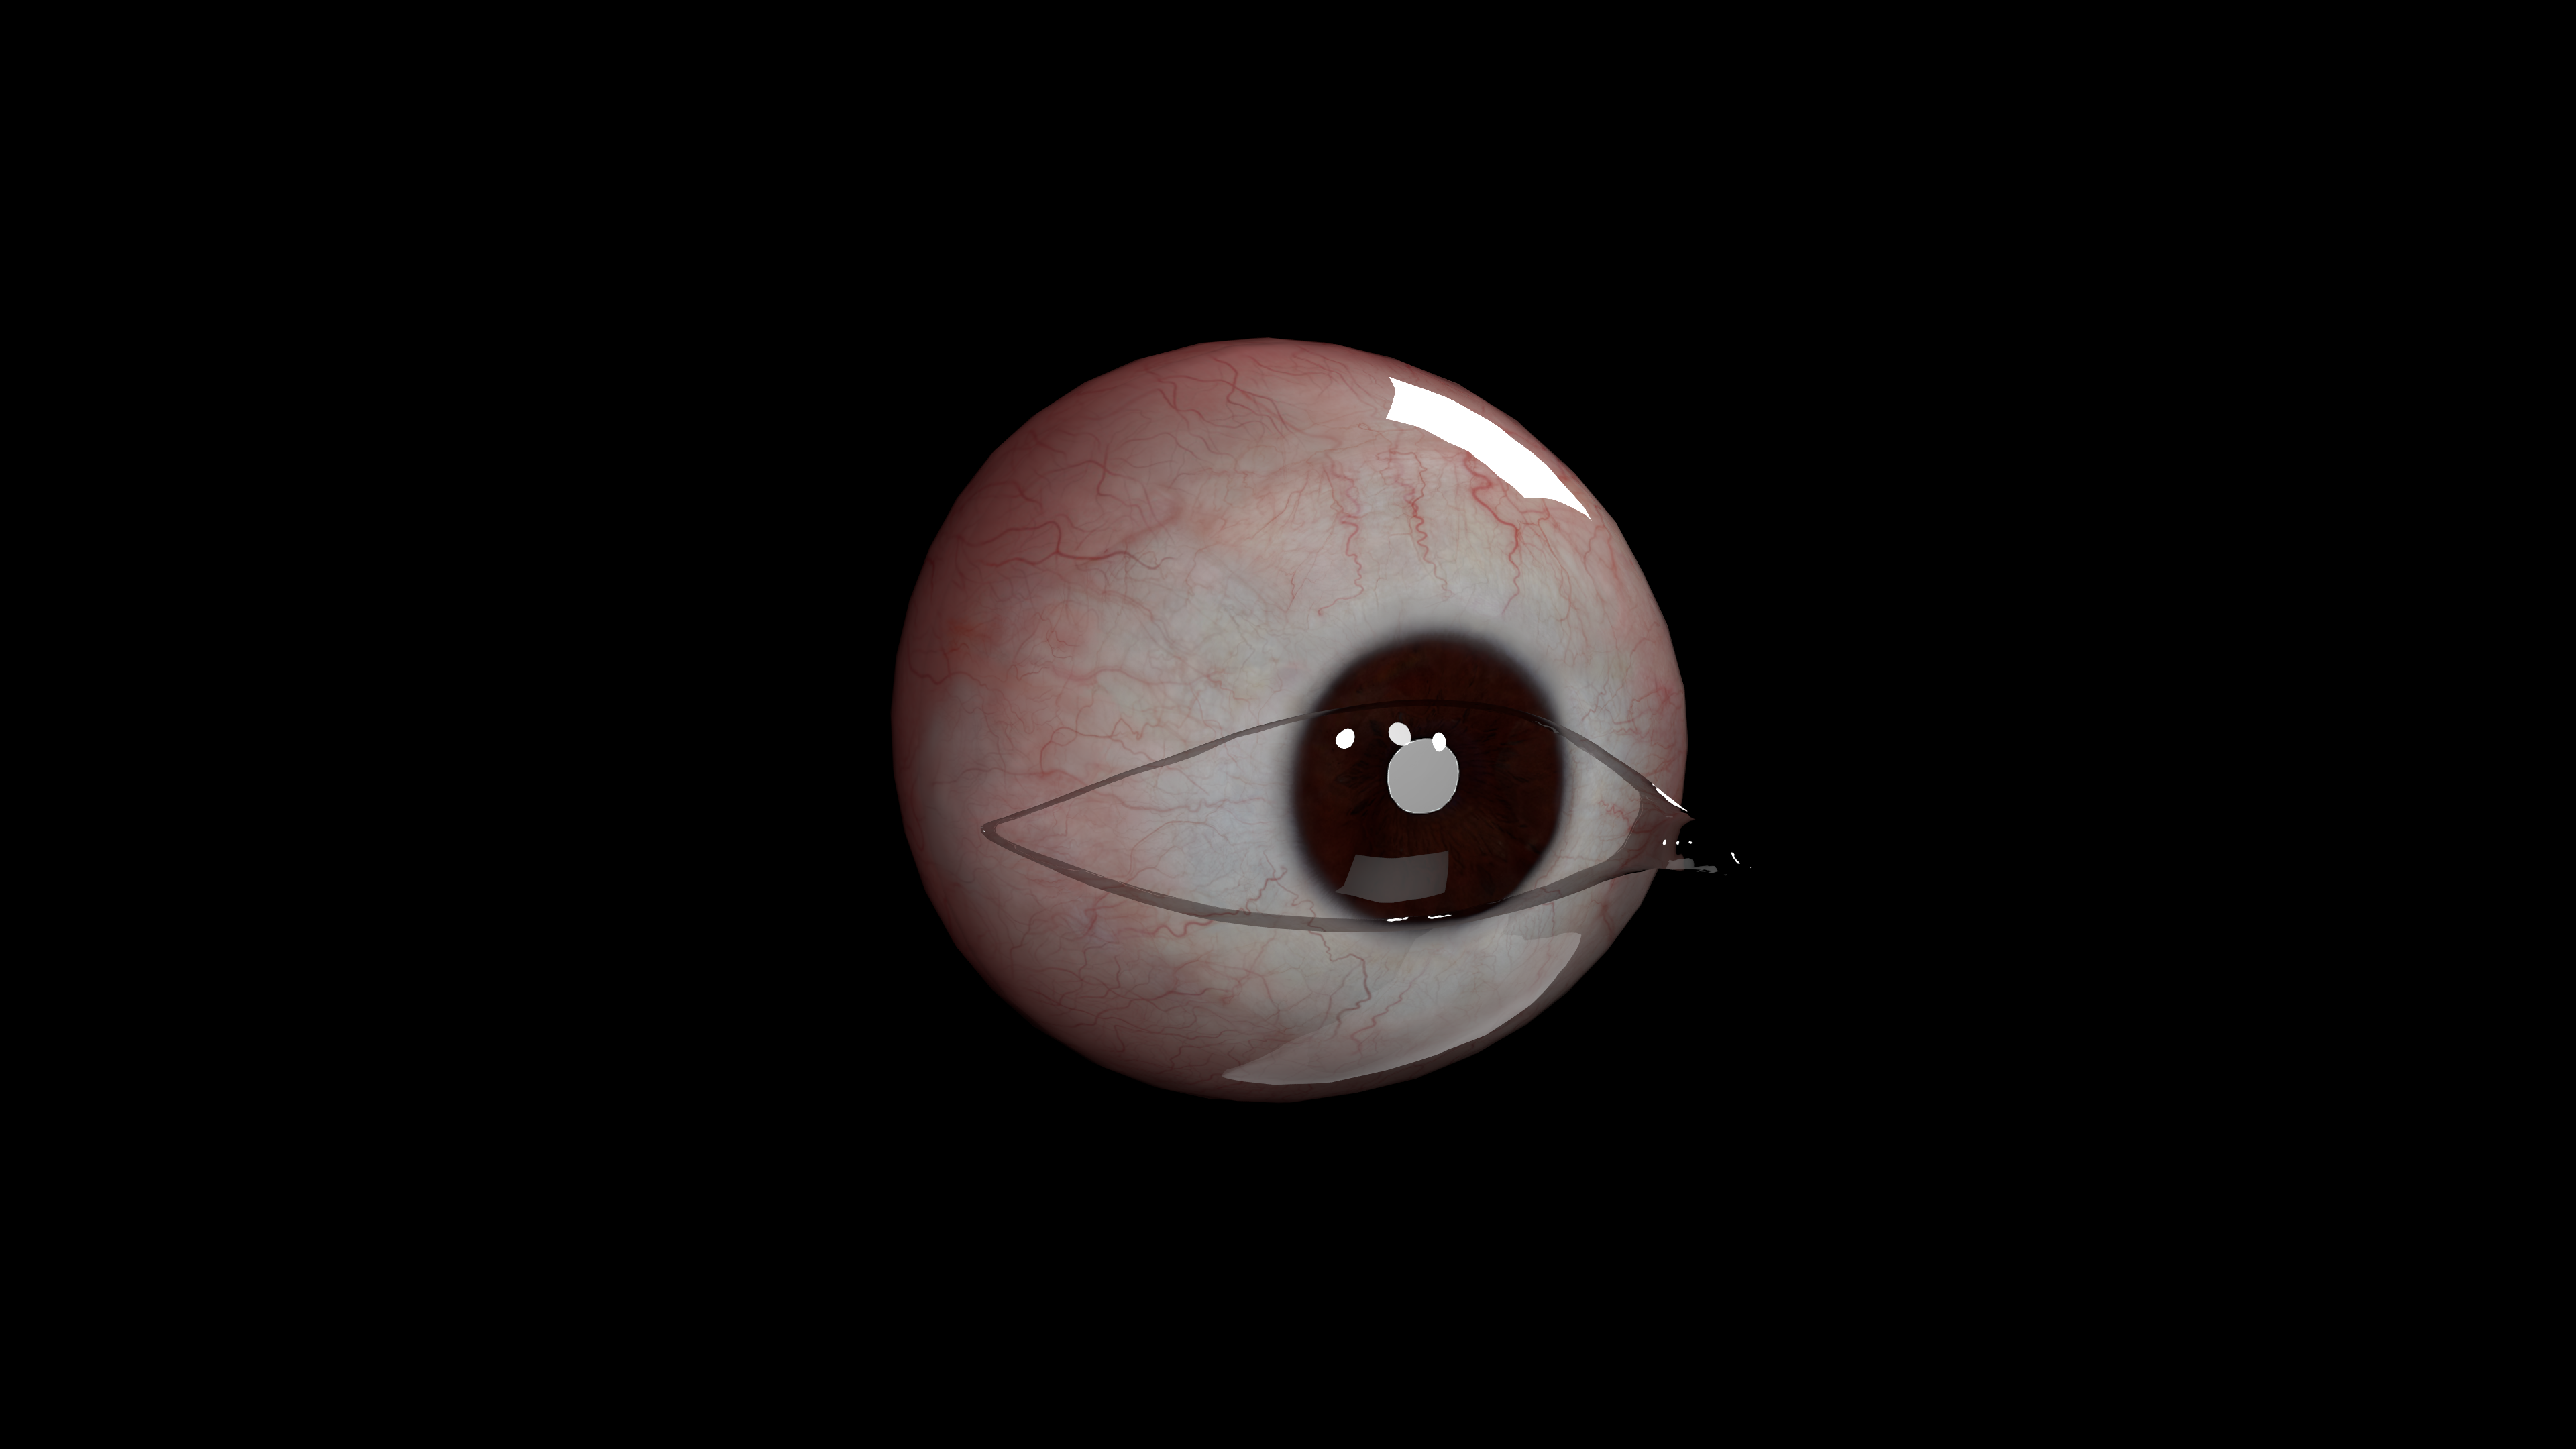
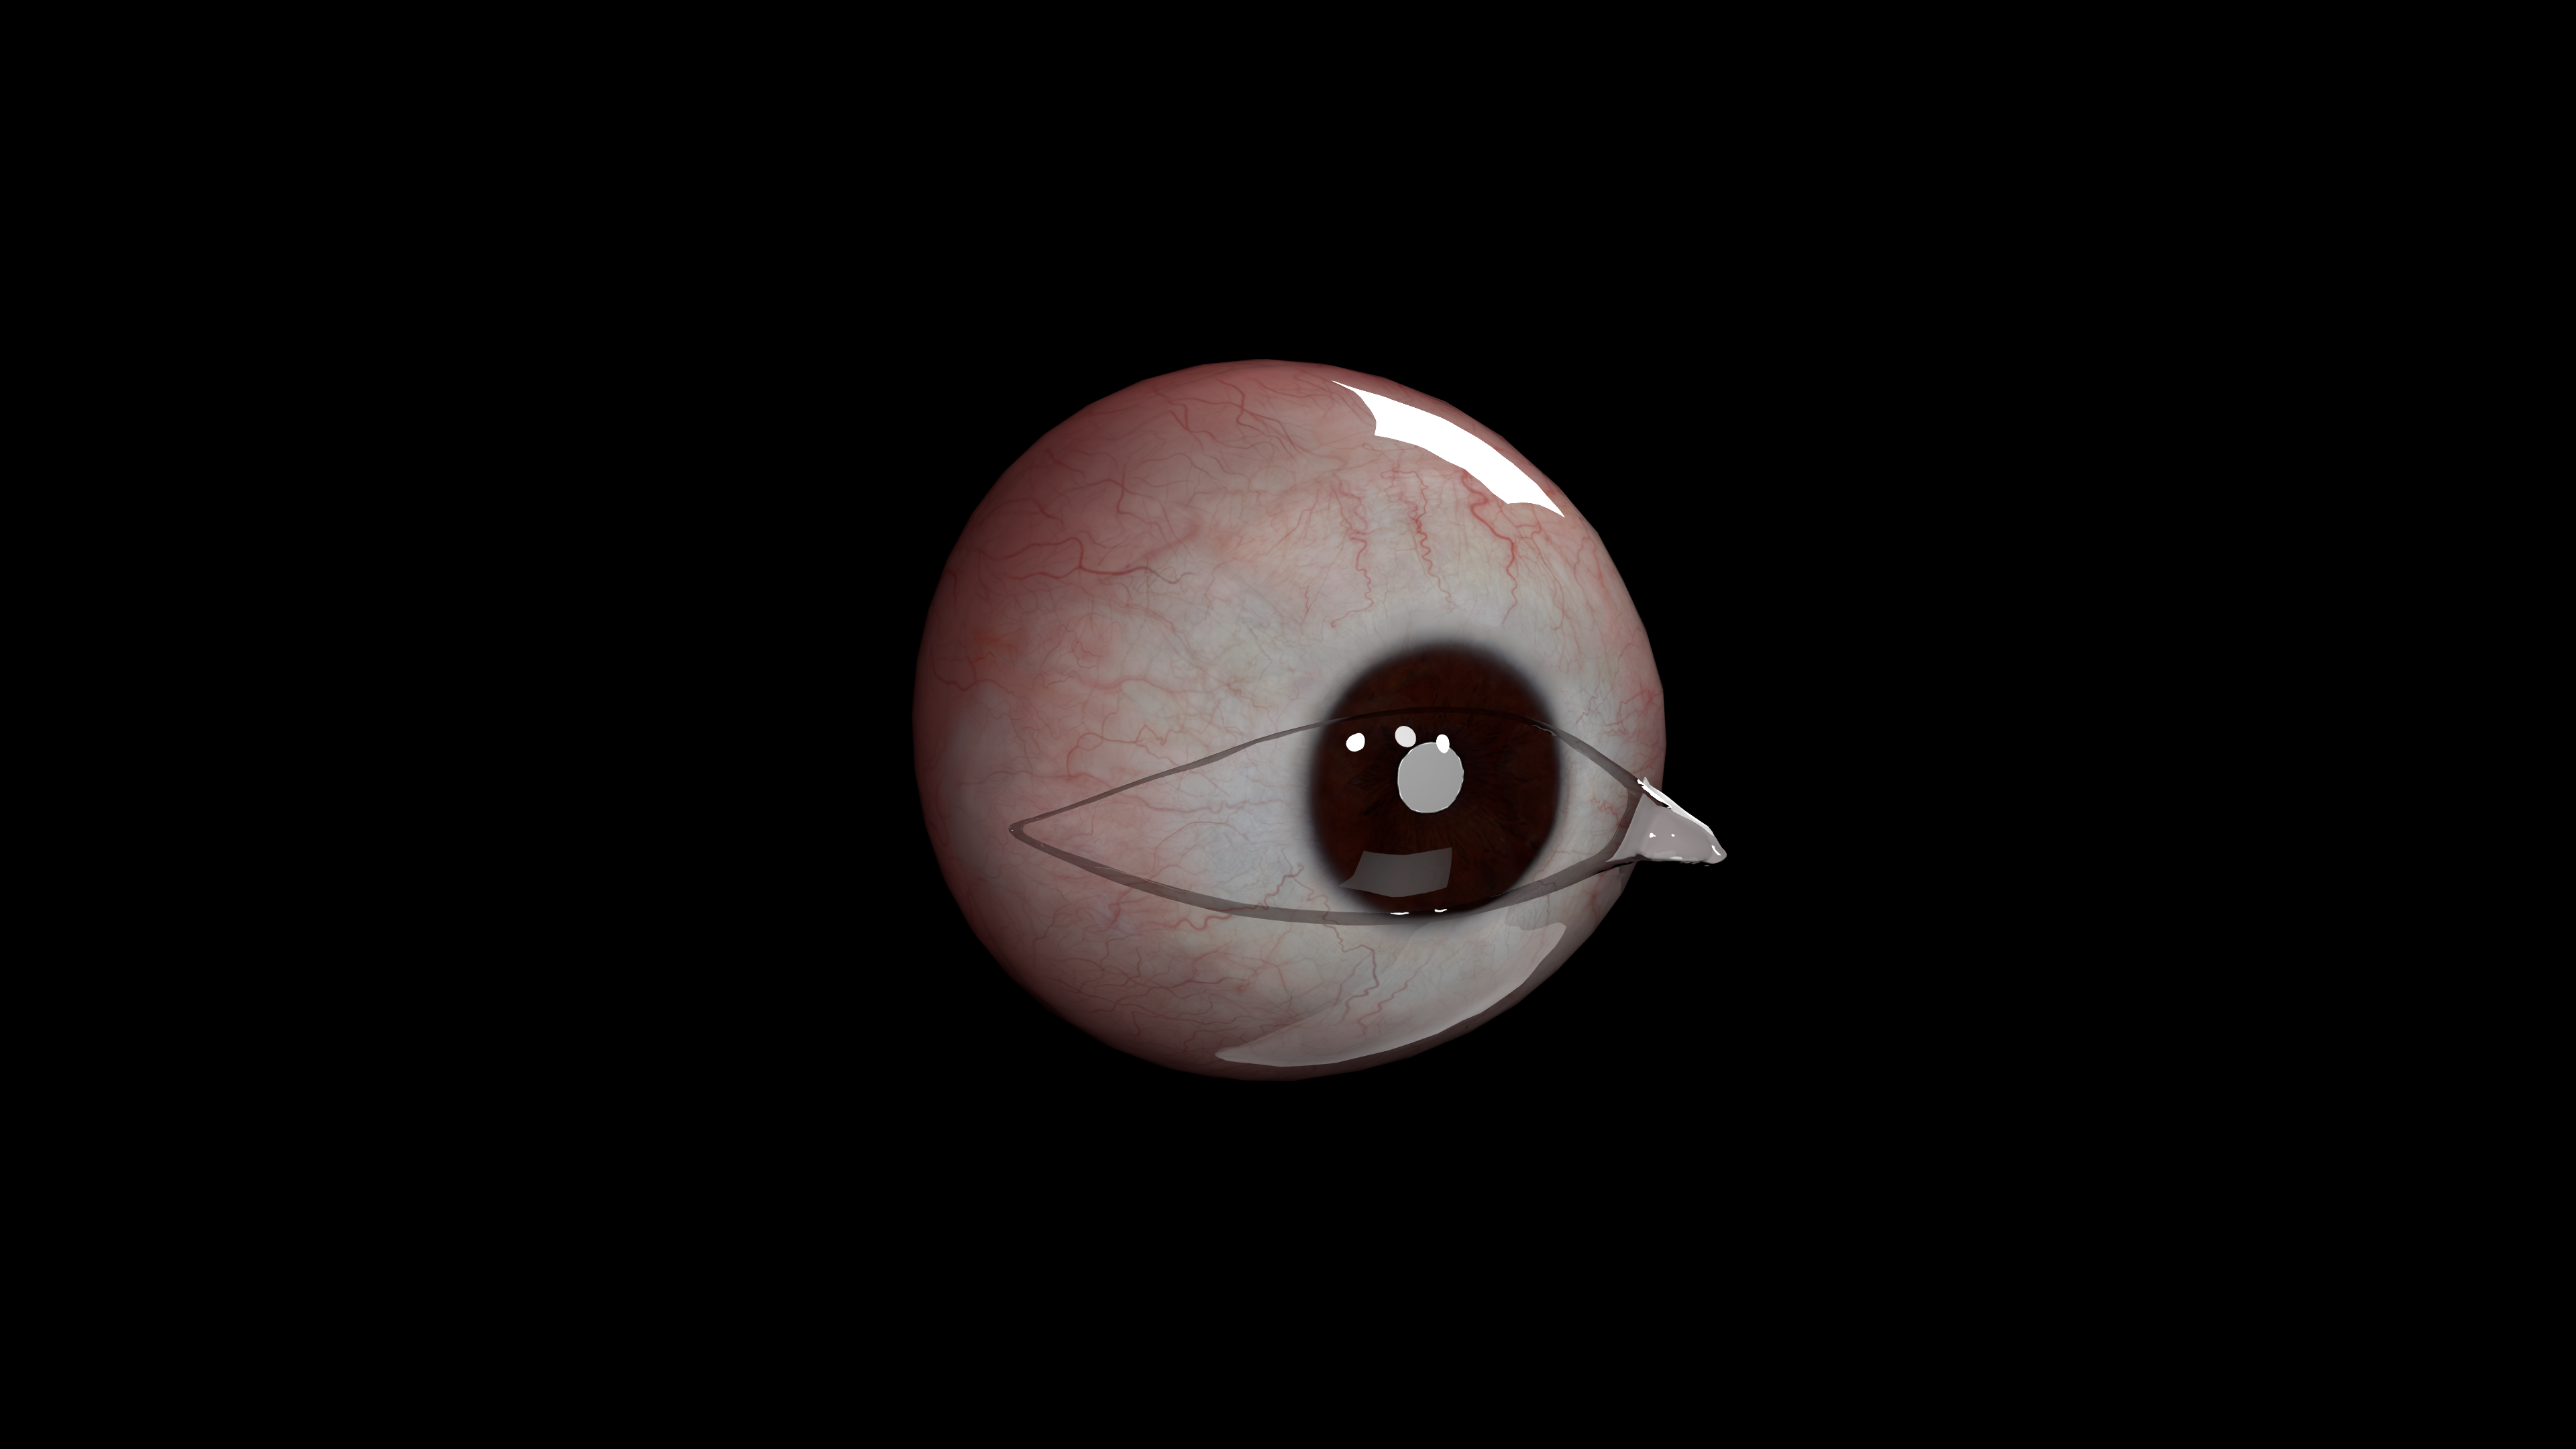
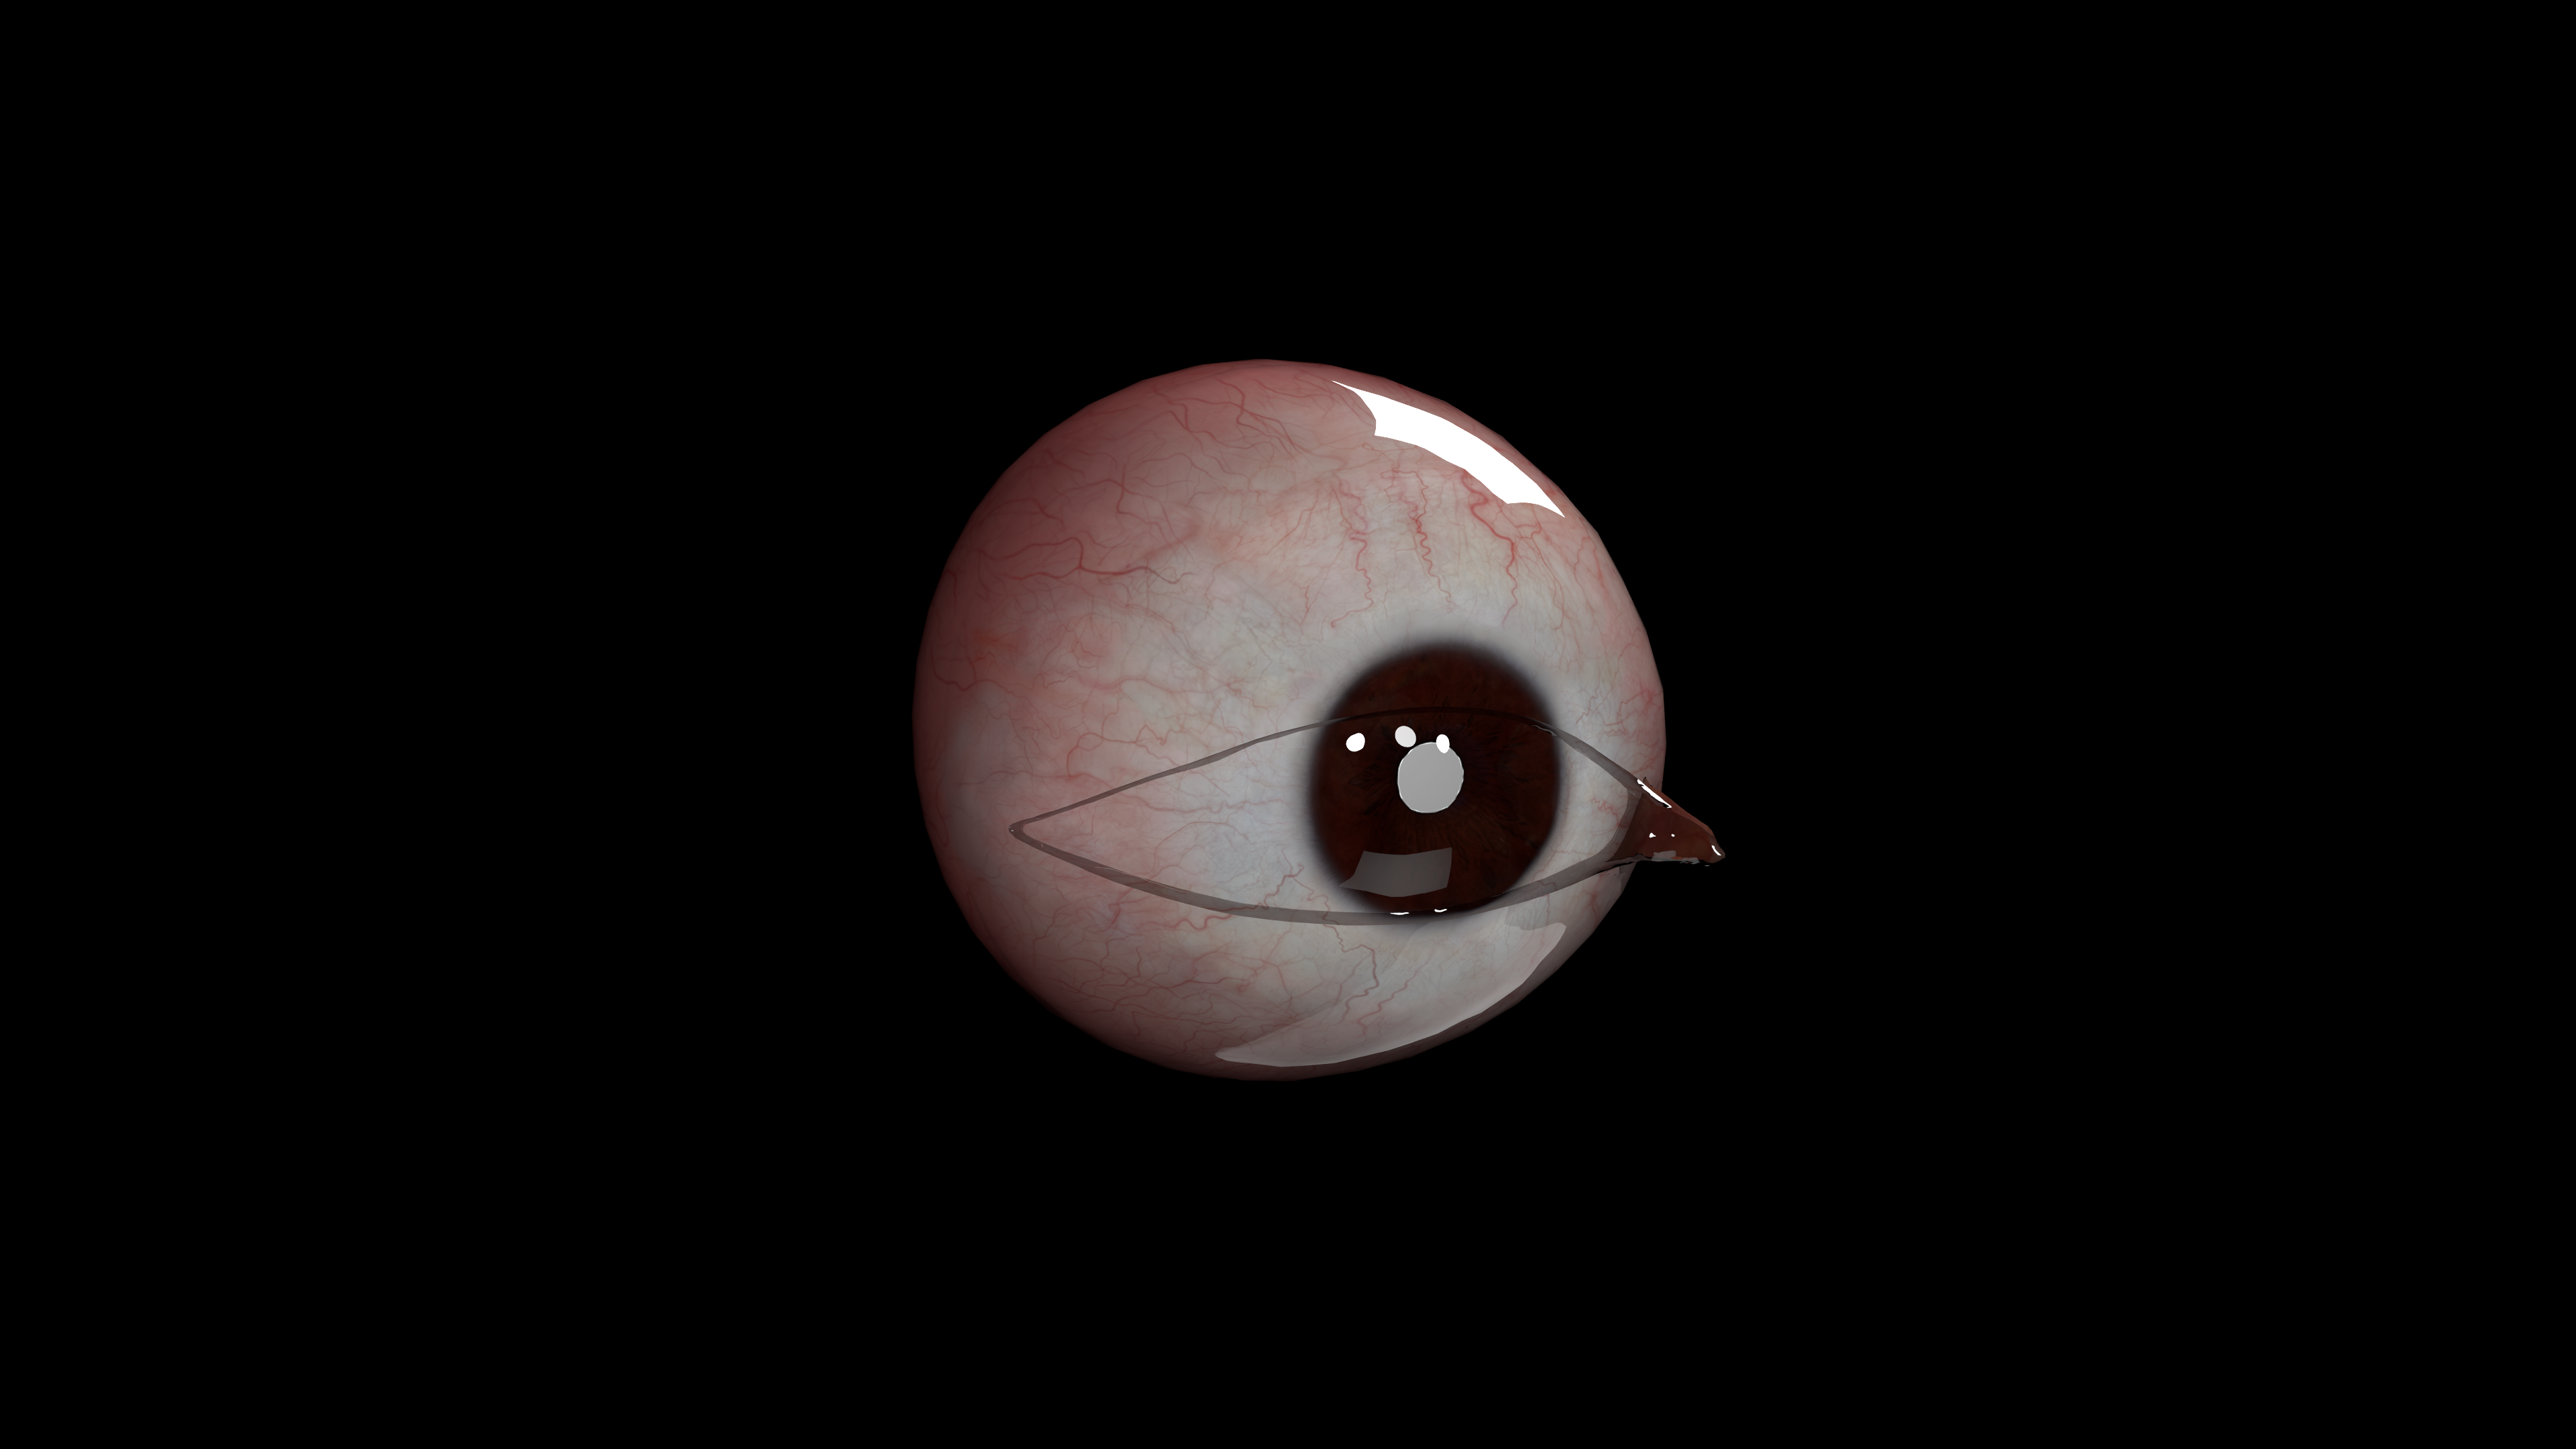
For the eye materials, several “OmniSurface” materials are used instead of MDL graph nodes since we don’t need the power and flexibility of the MDL graph here and these are simpler to work with.
To create an OmniSurface material:
Right Click on Stage View -> Create -> Material -> OmniSurface
Eyes Geometry Visibilities
Turn off visibility for the eyes aqueous meshes because they’re only needed for the Path Tracing Renderer
Mesh visibilities off:
/World/head_hi_model_published/char_model_hi/l_eye_grp_hi/l_aqueous_hi
/World/head_hi_model_published/char_model_hi/r_eye_grp_hi/r_aqueous_hi
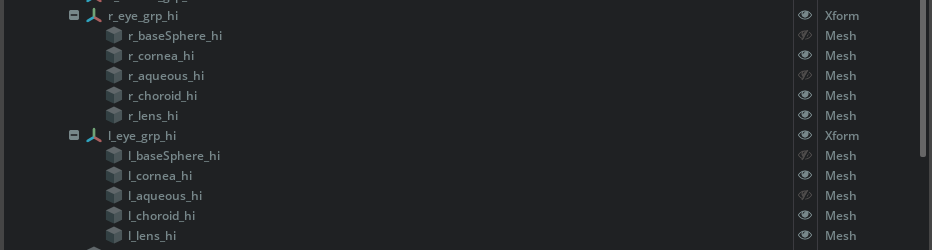
Hide Aqueous Meshes
Turn off “cast shadows” for the cornea meshes because RTX Real-Time Rendering doesn’t work well with transparent shadows just yet.
Mesh Cast Shadows
OFF:/World/head_hi_model_published/char_model_hi/r_eye_grp_hi/r_cornea_hi /World/head_hi_model_published/char_model_hi/l_eye_grp_hi/l_cornea_hi
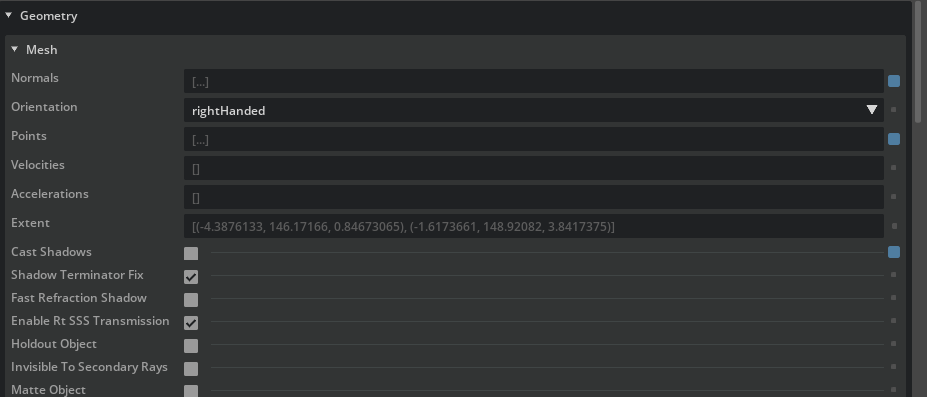
Cast Shadows:
OFF
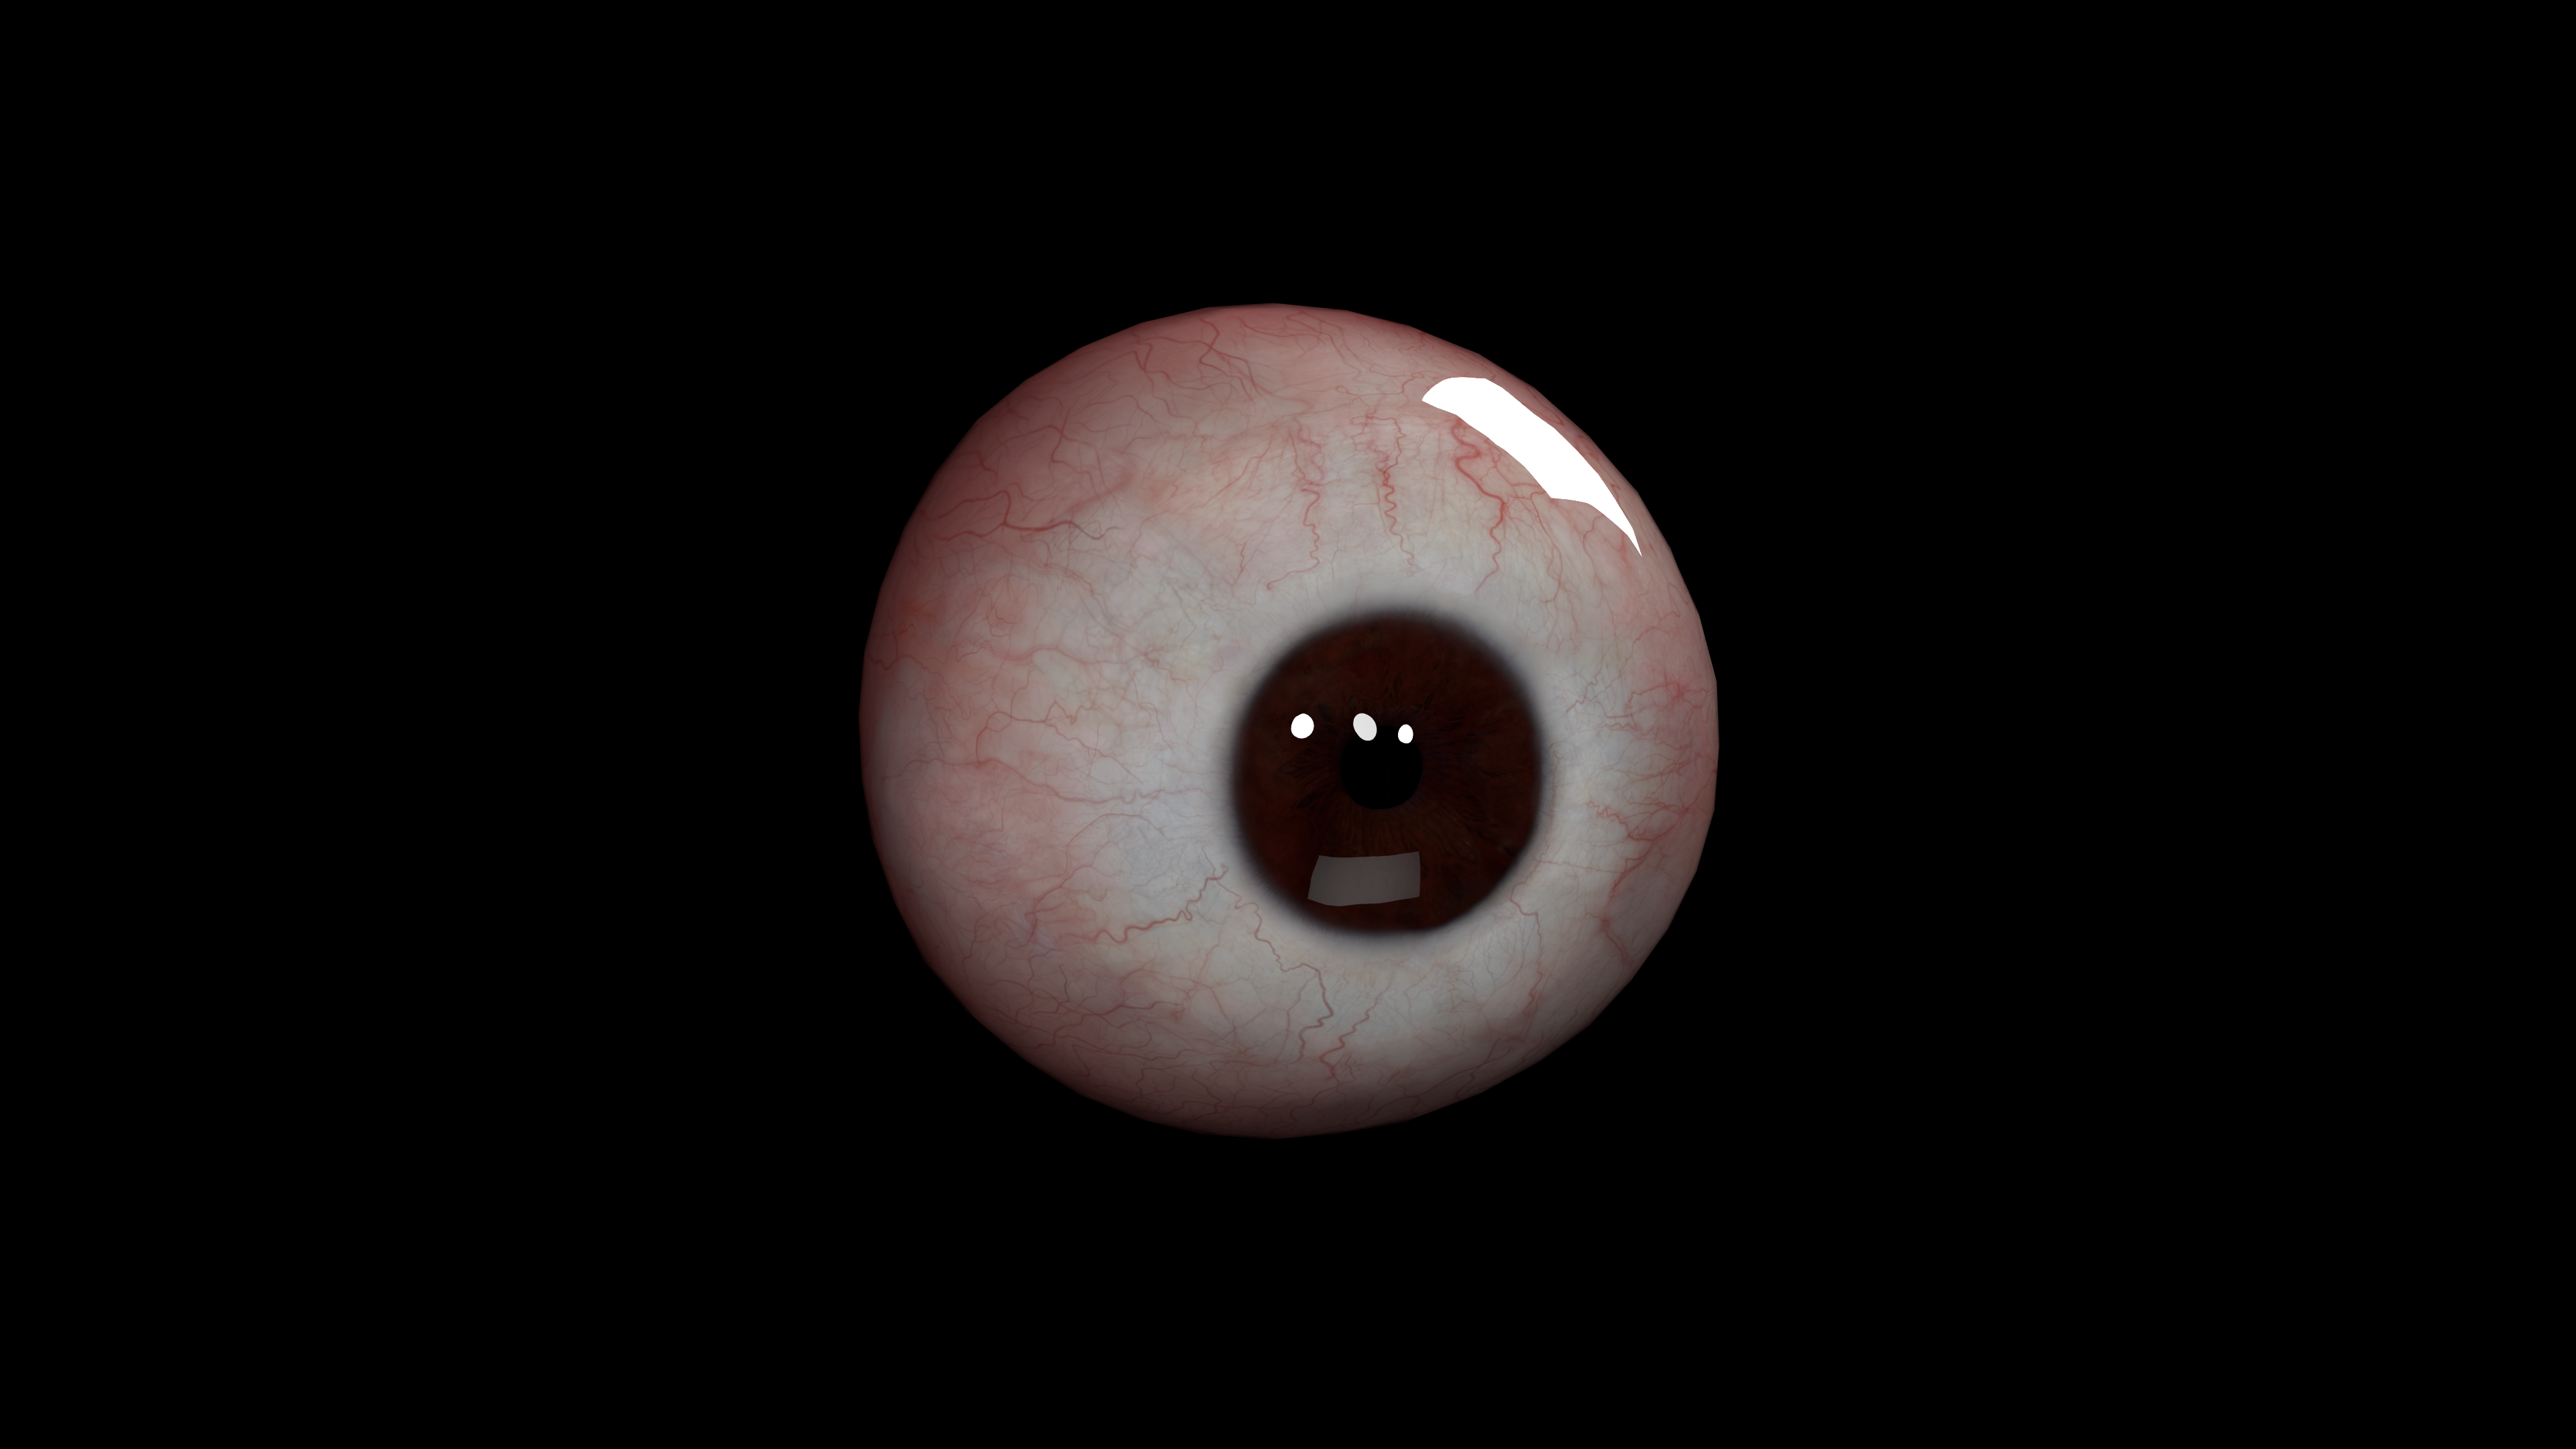
Eyes Cornea Material
Note
The cornea material is a slightly modified glass material.
Create an OmniSurface material and name it “c_cornea_mtl”
Assign it to the prims:
/World/head_hi_model_published/char_model_hi/r_eye_grp_hi/r_cornea_hi
/World/head_hi_model_published/char_model_hi/l_eye_grp_hi/l_cornea_hi
Cornea material properties:
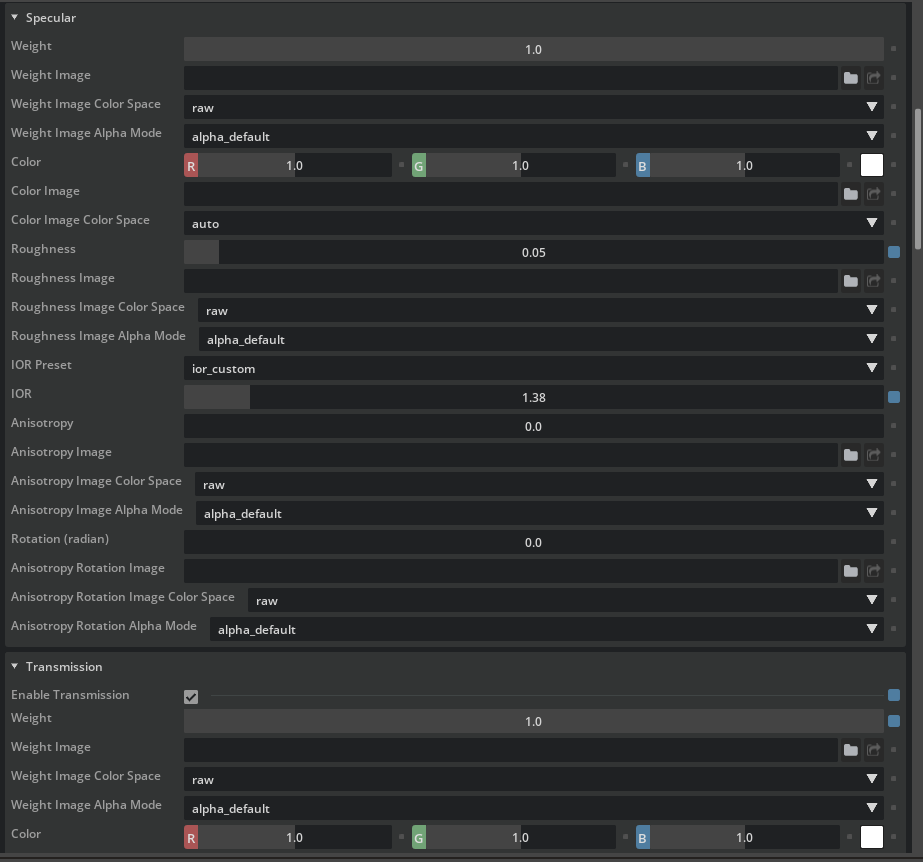
Cornea Material Properties:
Specular Roughness (specular_reflection_roughness):
0.05to create an almost but not quite perfect reflection
IOR:
1.38A value of 1.376 is often quoted in medical publications
Enable Transmisson:
ONTransmission weight:
1
Eyes Choroid Material
Create an OmniSurface material and name it “c_choroid_mtl”
Assign it to the prims:
/World/head_hi_model_published/char_model_hi/r_eye_grp_hi/r_choroid_hi
/World/head_hi_model_published/char_model_hi/l_eye_grp_hi/l_choroid_hi
Choroid material properties:
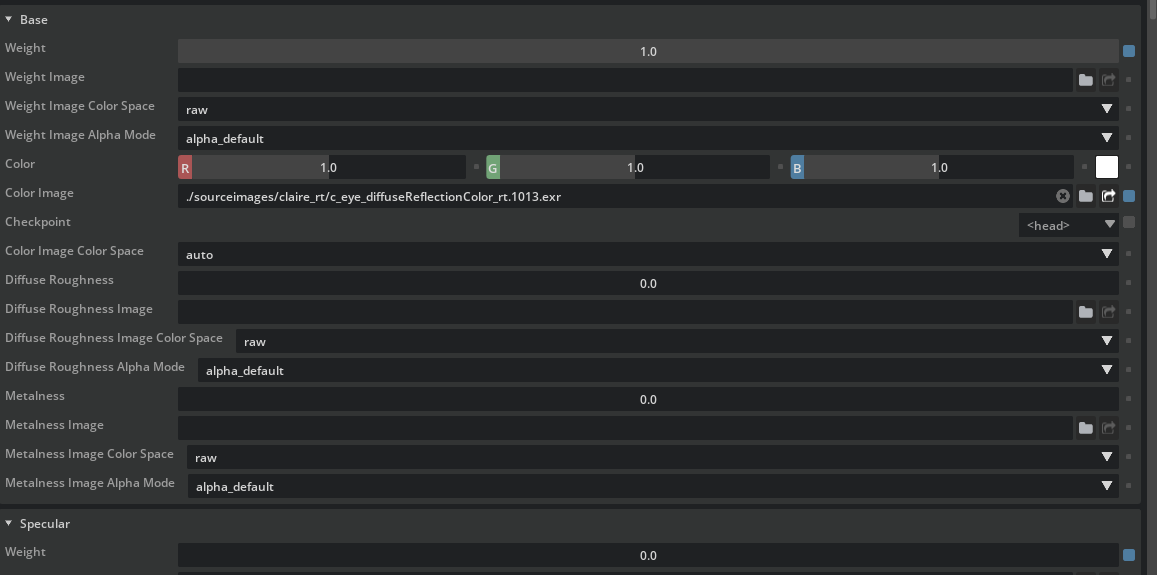
Choroid Material Properties:
Color image:
https://omniverse-content-production.s3.us-west-2.amazonaws.com/Samples/Examples/2023_1/Rendering/Claire/sourceimages/claire_rt/c_eye_diffuseReflectionColor_rt.1013.exrColor Image Color Space:
rawBase weight:
1Specular weight:
0Speculare reflection is effectively turned off. All the eyeball reflection colors are calculated from the Eyes_Cornea_Mtl
Eyes Lens Material
Note
The lens material is also a slightly modified glass material.
Create an OmniSurface Mtl and name it “c_lens_mtl”
Assign it to the prims:
/World/head_hi_model_published/char_model_hi/r_eye_grp_hi/r_lens_hi
/World/head_hi_model_published/char_model_hi/l_eye_grp_hi/l_lens_hi
Lens materials properties:
Lens Material Properties:
Enable Transmission:
ONTransmission weight:
1
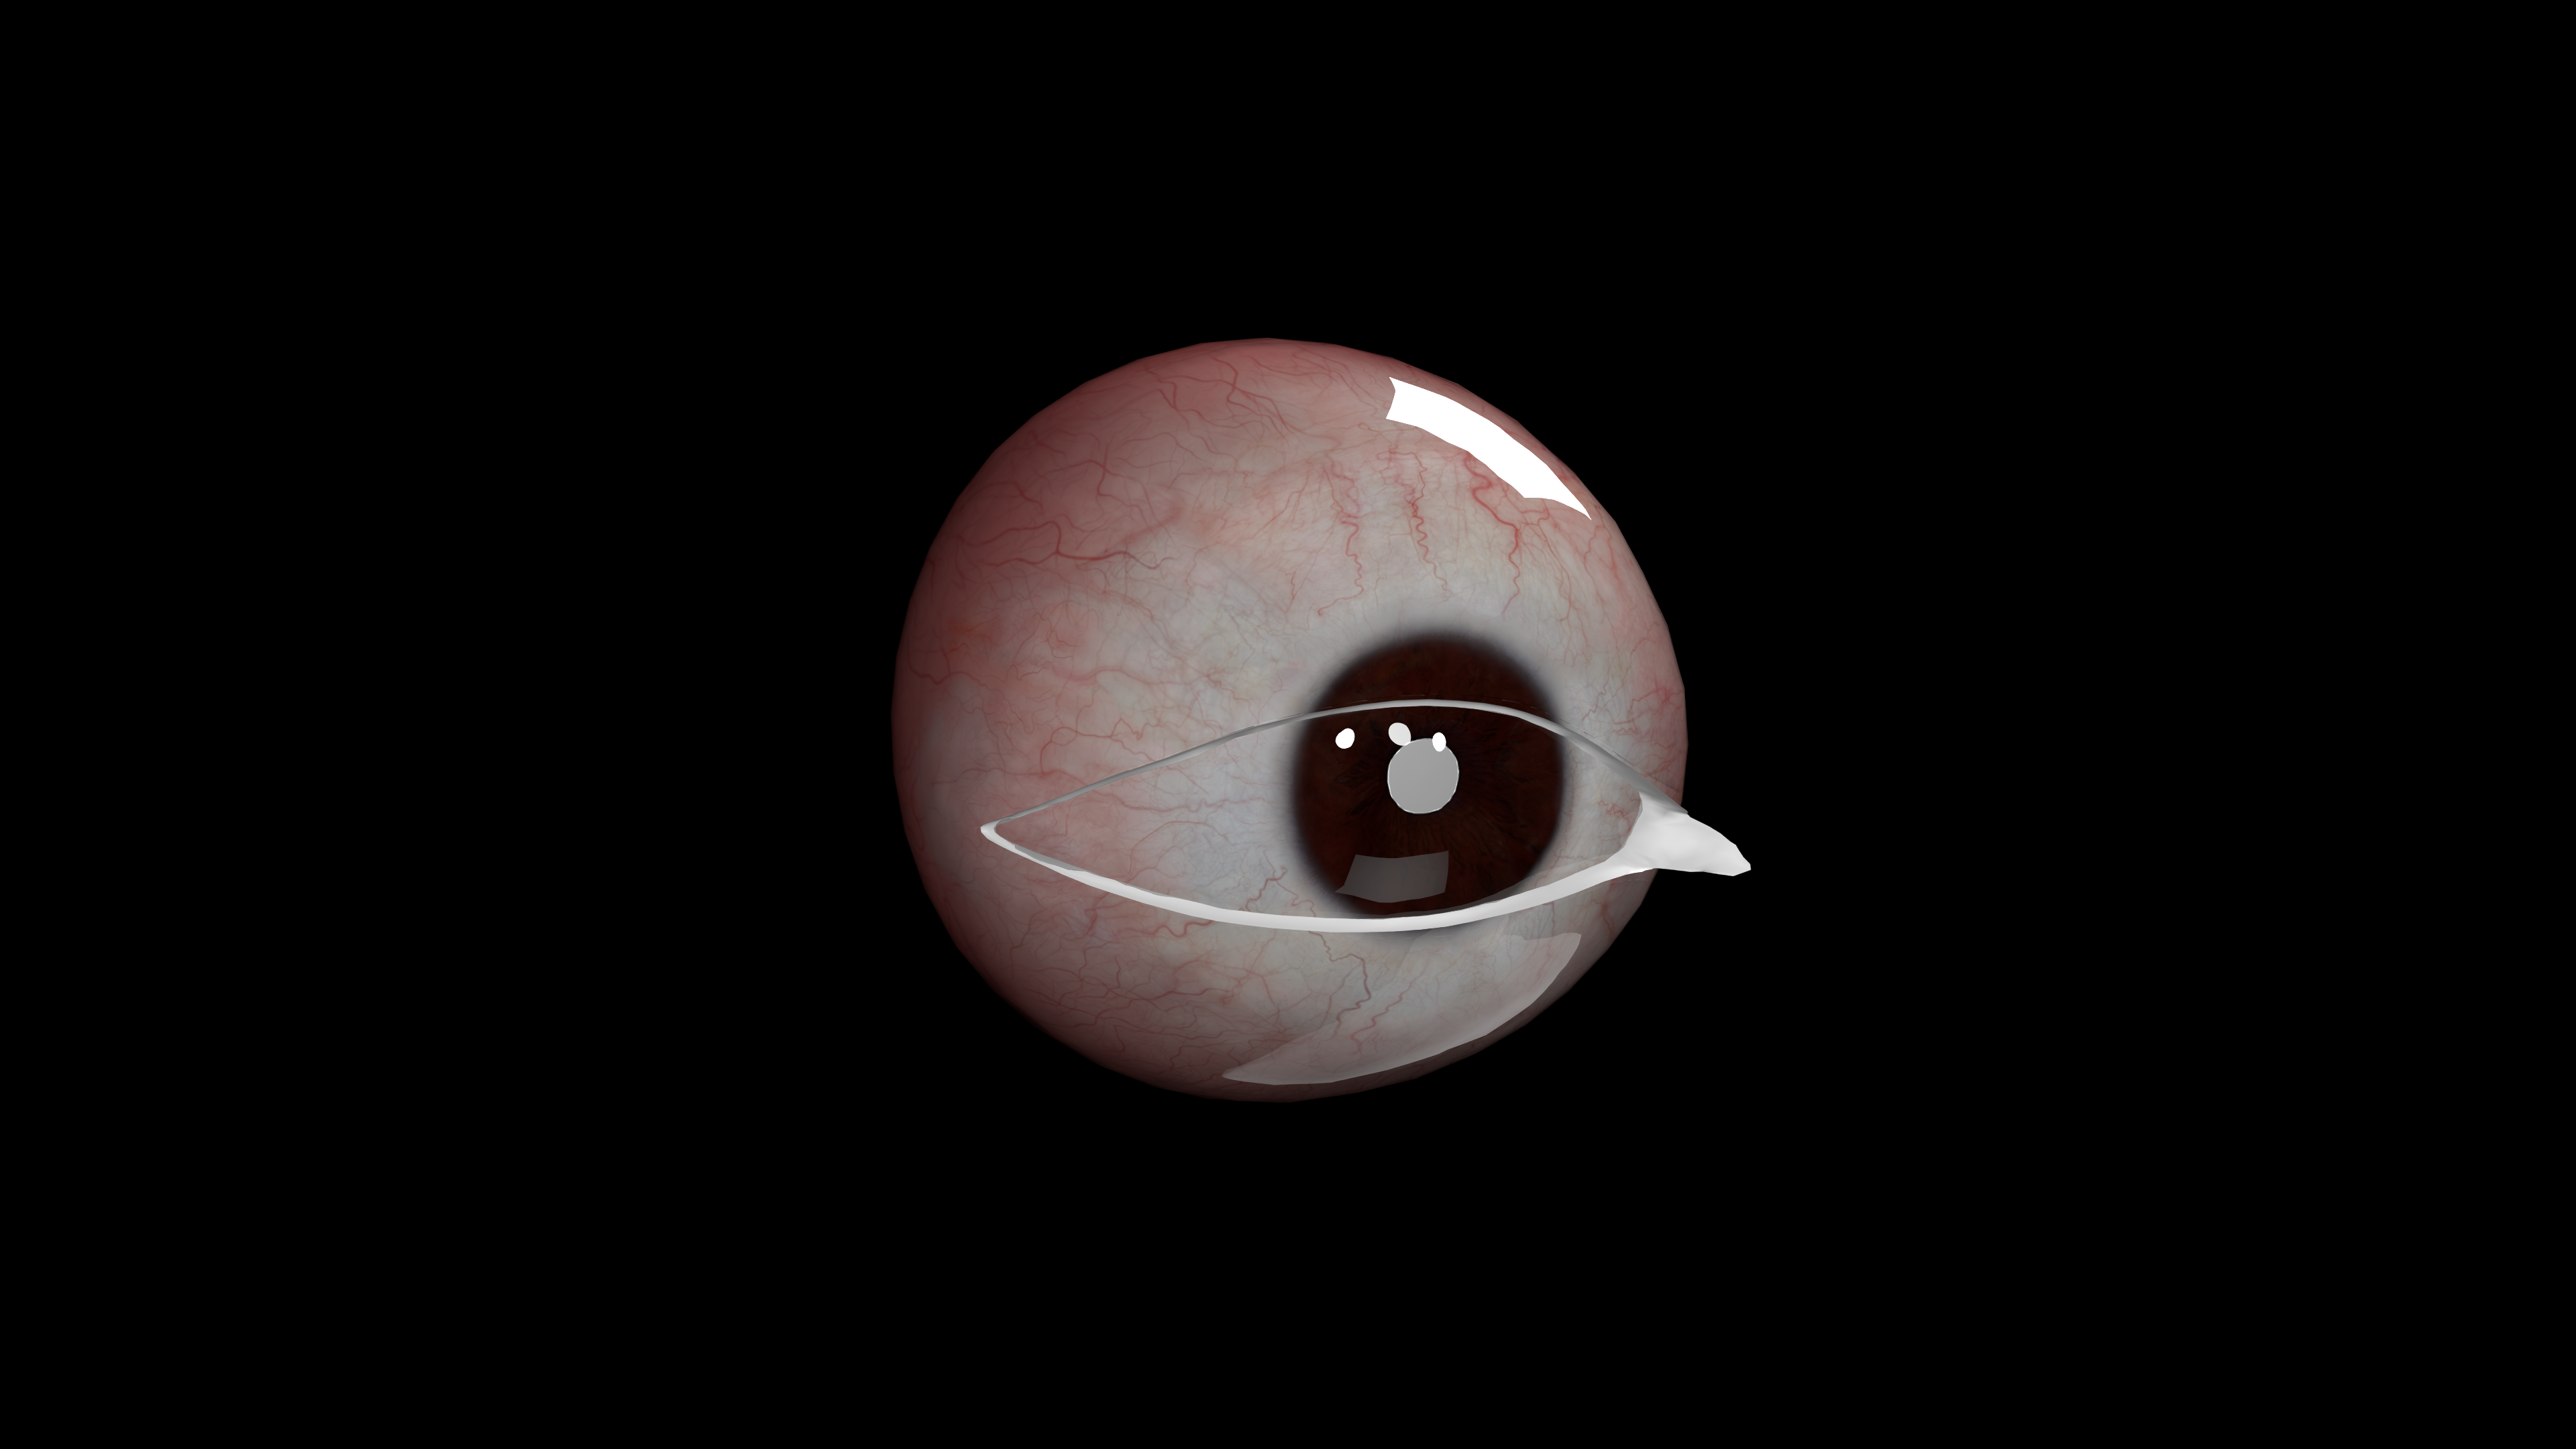
Eyes Tearline Material
Note
The Tearline Material is essentially a glass-like material with a noisy bump added
Create a new material in the MDL Graph Editor and name it “c_tearline_graph”
Add a new OmniSurfaceBase material, and connect outputs
Assign the material to:
/World/head_hi_model_published/char_model_hi/l_tearline_hi
/World/head_hi_model_published/char_model_hi/r_tearline_hi
“Cast Shadows” OFF on the tearline meshes
Cast Shadows:
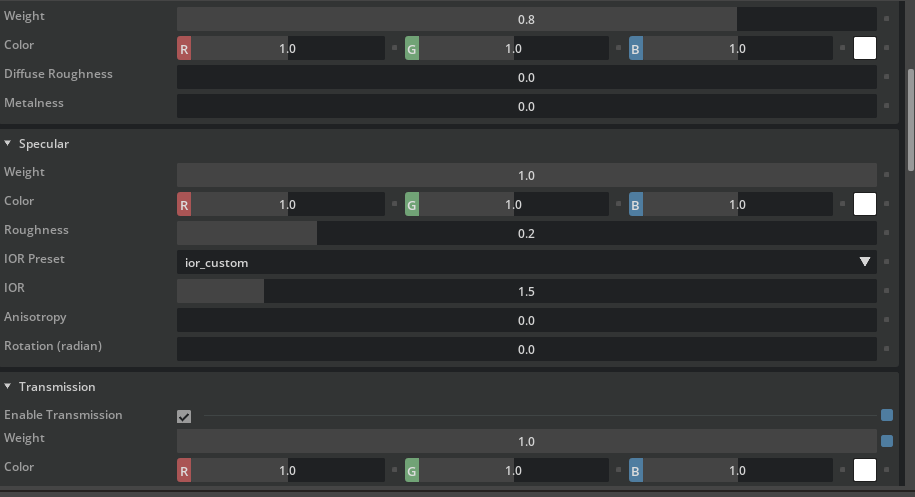
OFFSet the OmniSurfaceBase material properties:
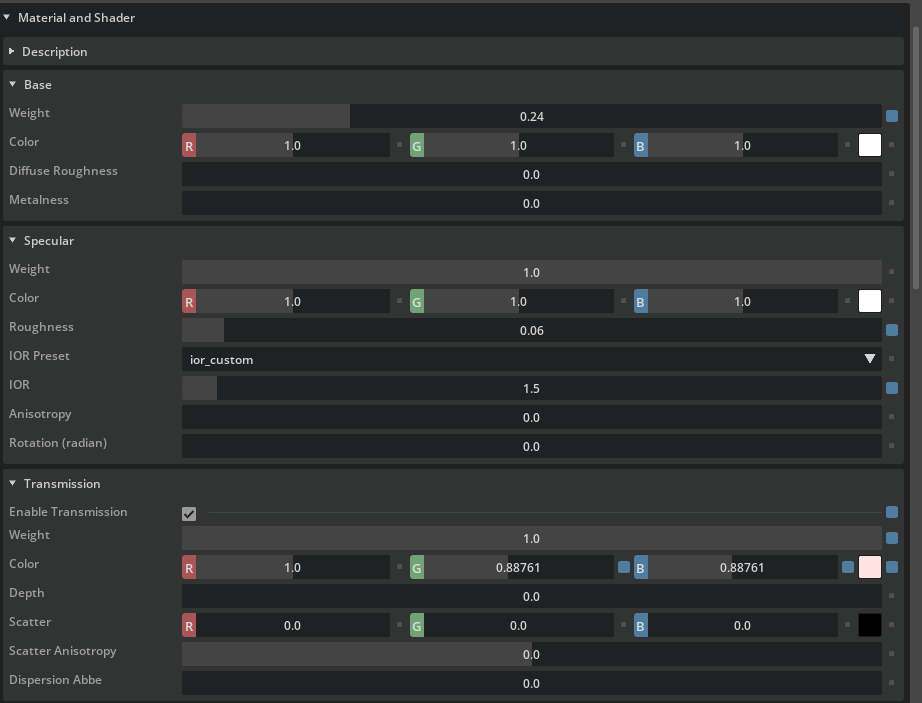
Tearline Material Properties:
Specular roughtness:
0.05Enable
TransmissionTransmission weight:
1Transmission color
(1, 0.8876, 0.8876)Add a
Bitmap texturenode and name it “file_texture_c_eye_tearlinesMask”This sets the tearline mask texture opacity, transitioning from center to the edge, fading the visibility of the mesh at the edges.
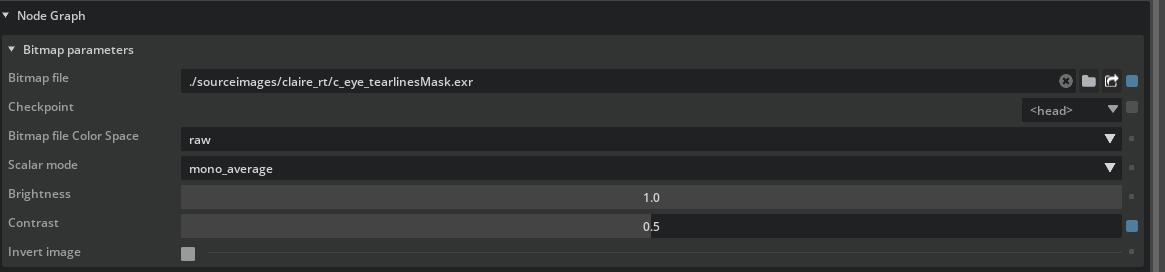
Tearline Mask Properties
Bitmap file:
https://omniverse-content-production.s3.us-west-2.amazonaws.com/Samples/Examples/2023_1/Rendering/Claire/sourceimages/claire_rt/c_eye_tearlinesMask.exrCreate a
Perlin Noise Bump Texturenode. The node name defaults to “perlin_noise_bump_texture”This adds a bit of bumpiness to the tearline material
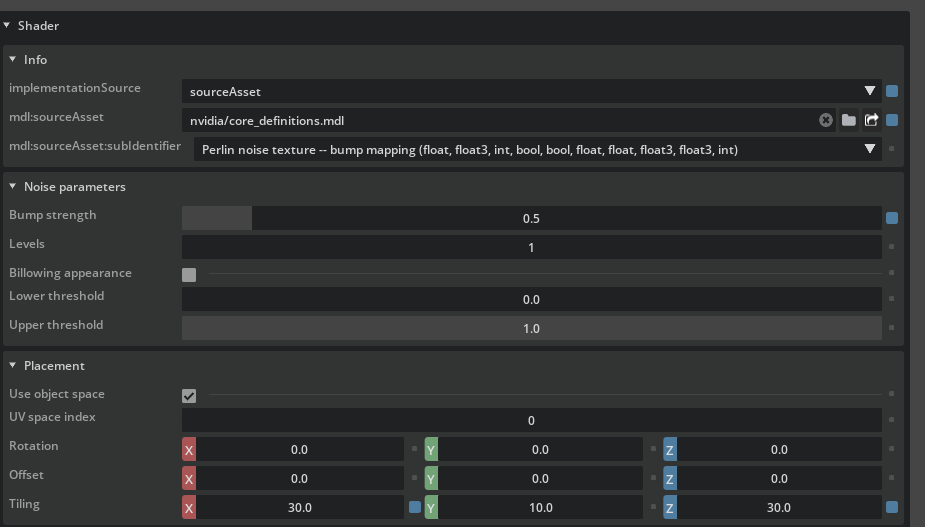
Tearline Noise Properties:
Bump strength:
0.5Tiling:
(30, 10, 30)Connect the texture and normal map
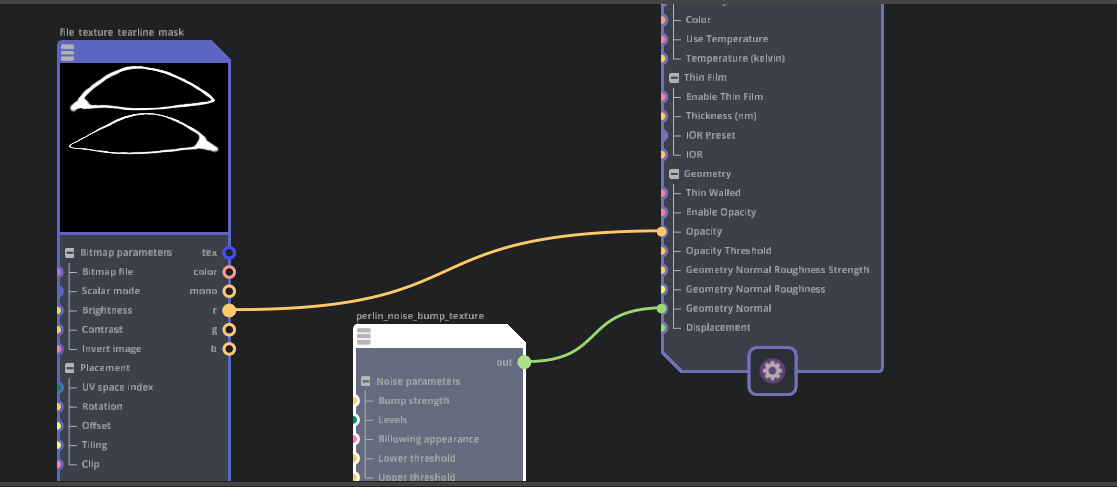
Tearline Opacity and Normal Network:
“perlin_noise_bump_texture”.out -> OmniSurfaceBase.”Geometry Normal”
“file_texture_c_eye_tearlinesMask”.r -> OmniSurfaceBase.”Opacity”
Eyes Caruncle Material
Note
The goal is to create a fleshy material. This material uses texture maps but it could also be done with dark red/pink colors and a noise bump.
Create a new material in the MDL Graph Editor and name it “c_caruncle_graph”
Assign the materials to the prims:
/World/head_hi_model_published/char_model_hi/l_caruncle_hi
/World/head_hi_model_published/char_model_hi/l_caruncle_hi
Create an OmniSurfaceBase node, connect to “c_caruncle_graph” inputs
Set OmniSurfaceBase Material properties
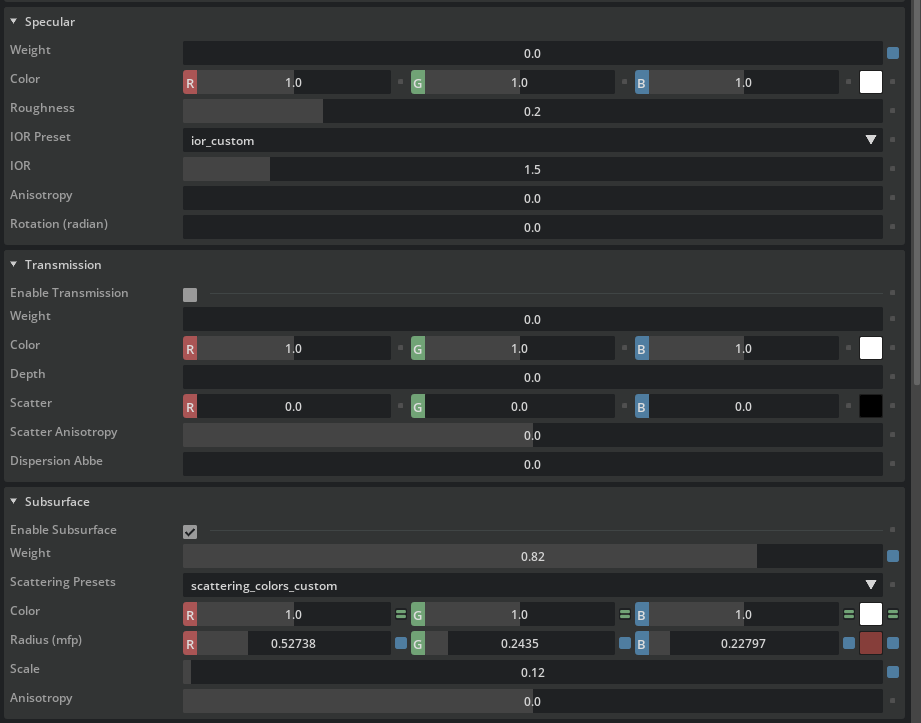
Eyes Caruncle Material Properties:
Specular weight:
0Subsurface weight:
0.82Subsurface radius color:
(0.5274, 0.2435, 0.2280)Subsurface scale:
0.121.2 millimeters scale for the caruncle
Create a File Texture node, name it “file_texture_c_eye_diffuseReflectionColor” and set the file name path.
Set color texture and properties
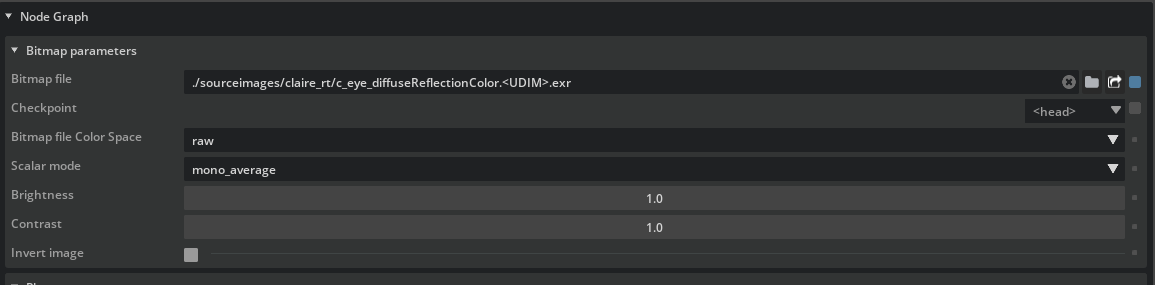
Eyes Caruncle Texture Properties
Bitmap file:
https://omniverse-content-production.s3.us-west-2.amazonaws.com/Samples/Examples/2023_1/Rendering/Claire/sourceimages/claire_rt/c_eye_diffuseReflectionColor.<UDIM>.exrConnect the “file_texture_c_eye_diffuseReflectionColor” to OmniSurfaceBase
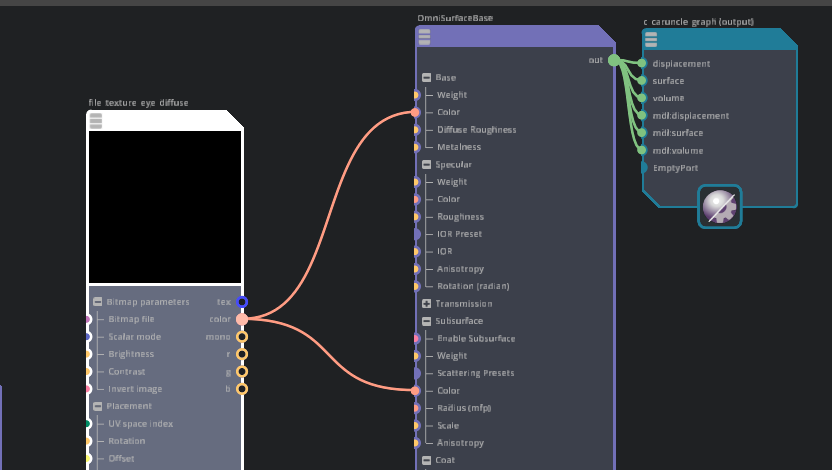
Eyes Caruncle Color Texture Connects To:
“file_texture_c_eye_diffuseReflectionColor”.color -> OmniSurfaceBase.diffuseReflectionCOlor
“file_texture_c_eye_diffuseReflectionColor”.color -> OmniSurfaceBase.subsurfaceScatteringColor
Create a Normal map texture node
Set the normal map file path. In this case it’s the same file path as the eyes normal map.
Connect the normal map output -> OmniSurfaceBase.”Geometry Normal”

Eyes Caruncle Normal Map Properties
Normalmap file:
https://omniverse-content-production.s3.us-west-2.amazonaws.com/Samples/Examples/2023_1/Rendering/Claire/sourceimages/claire_rt/c_eye_geometryNormal.<UDIM>.exr
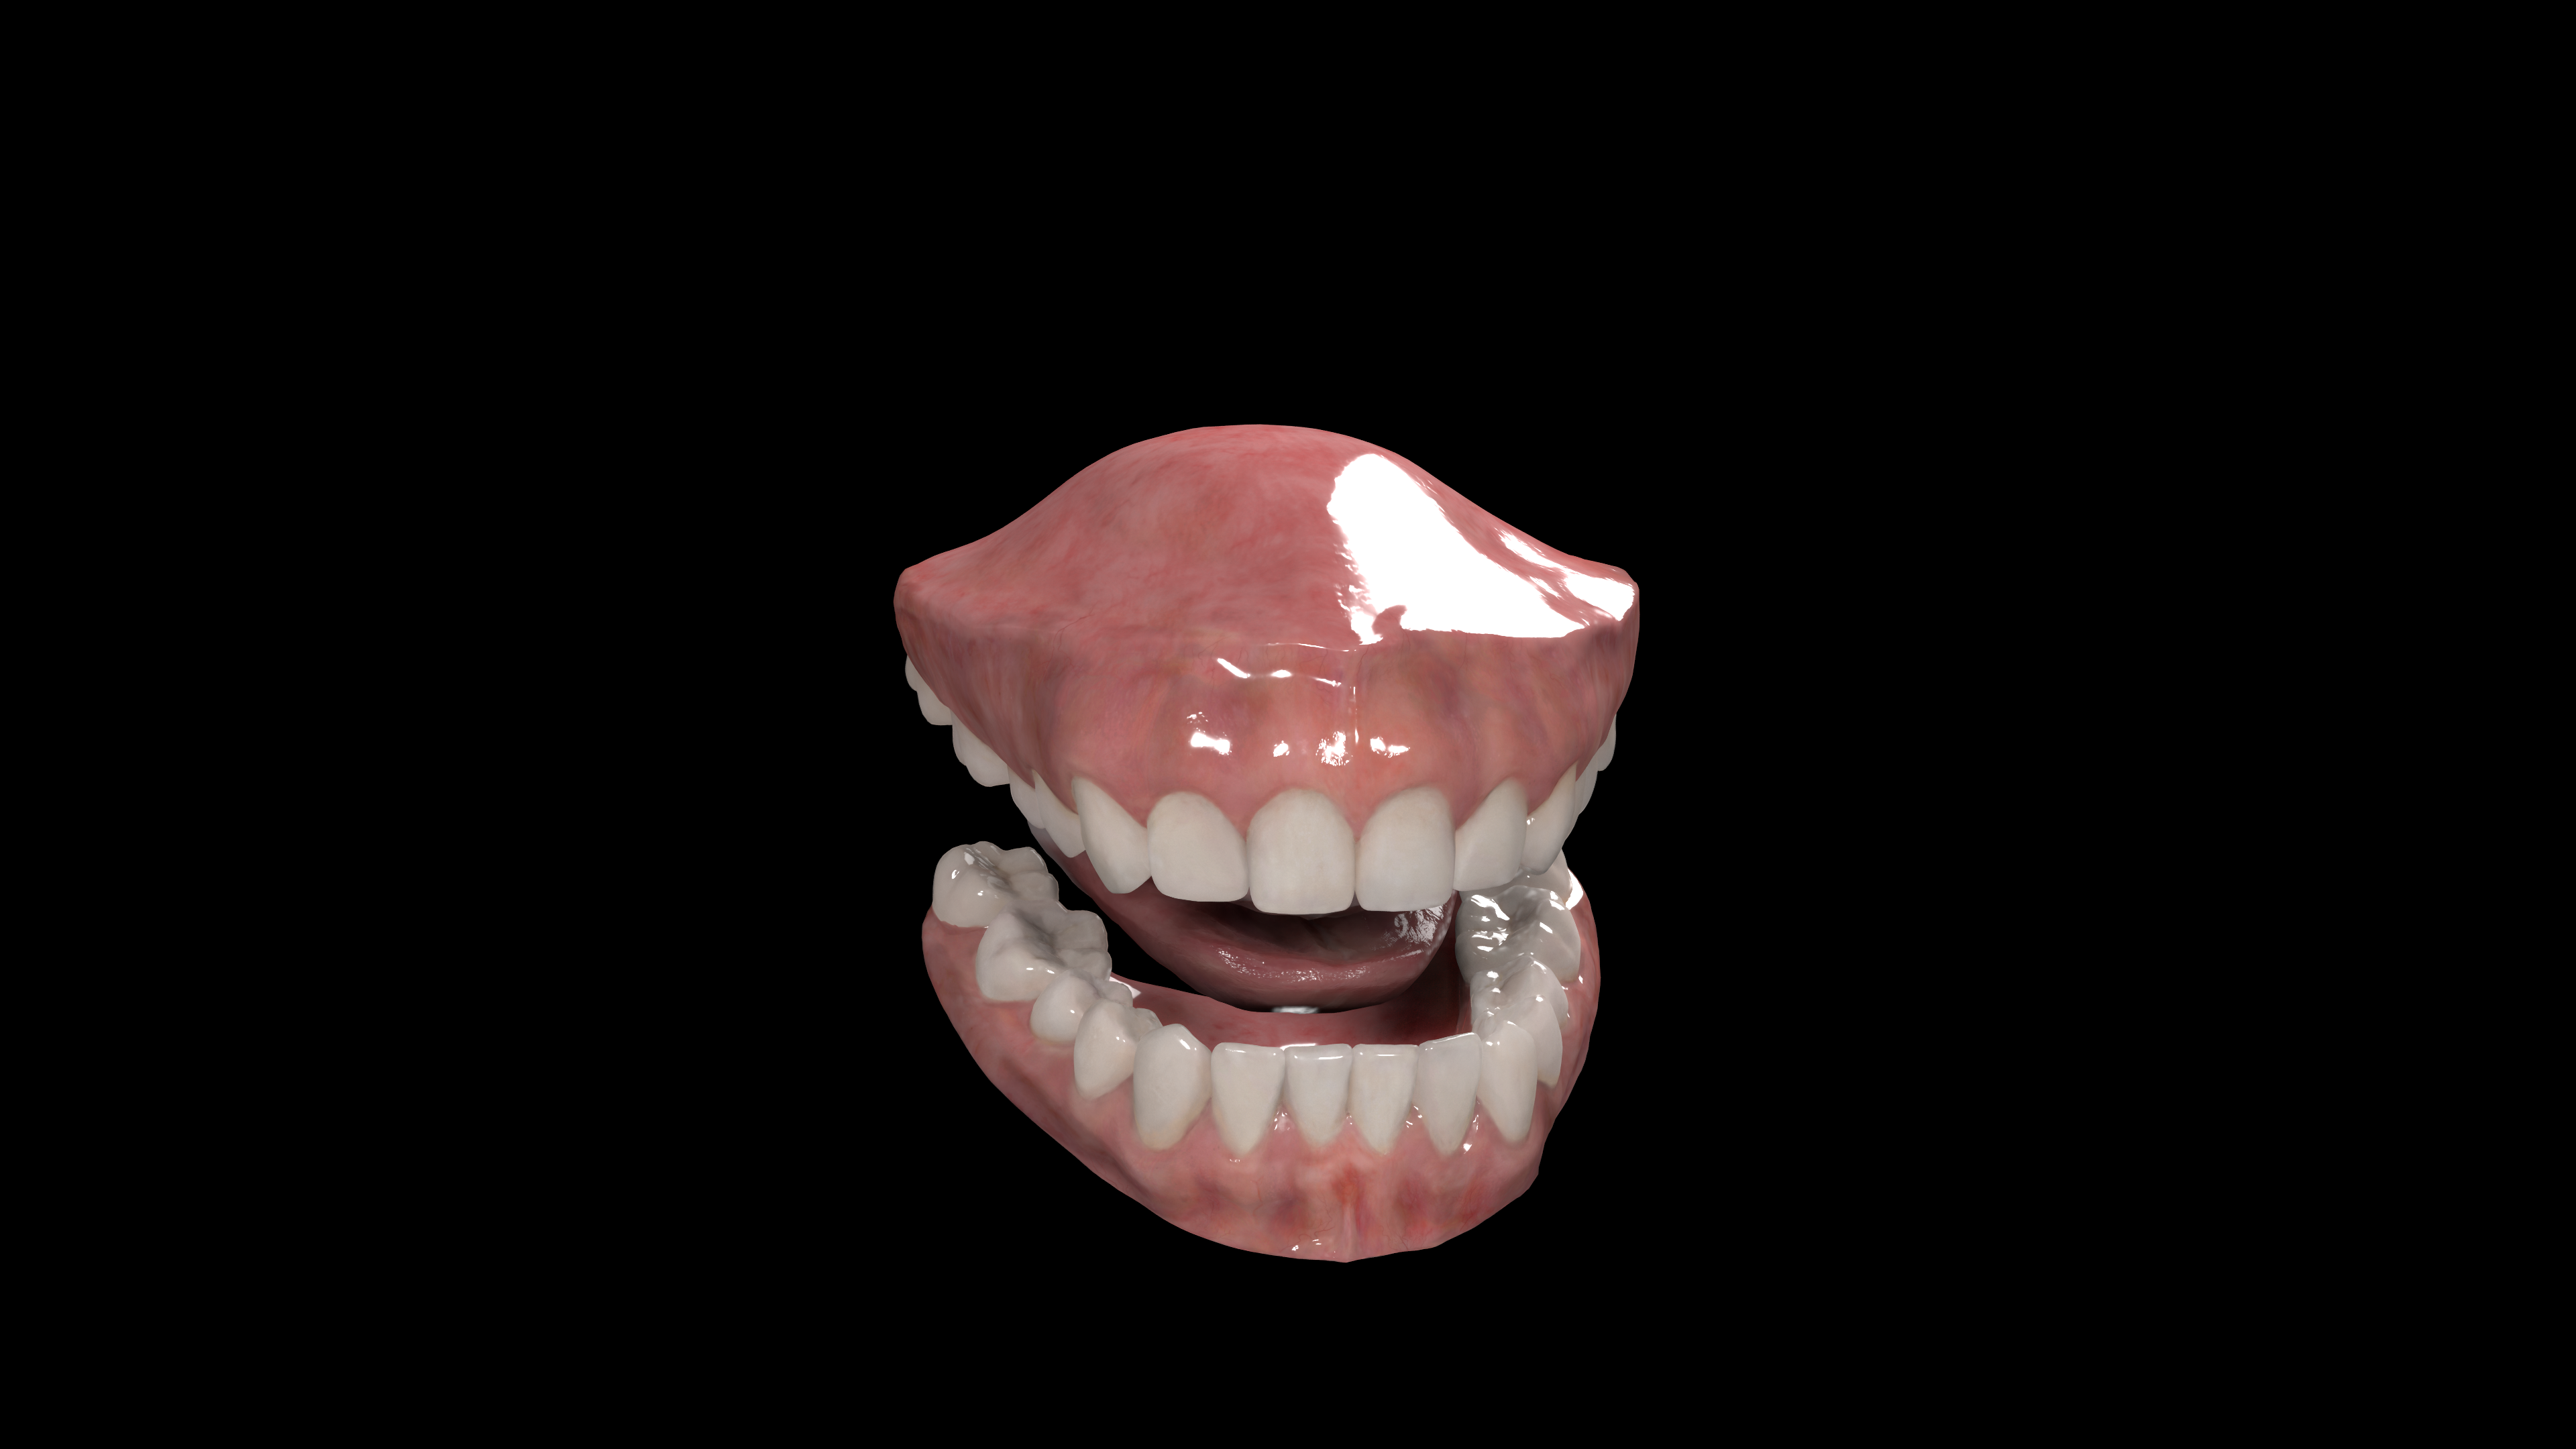
Dental And Tongue Materials
Dental Material
The Dental Materials |
Create a new material in the MDL Graph Editor and name it “c_dental_graph”
Assign the material to the prims:
/World/head_hi_model_published/char_model_hi/c_mouth_grp_hi/c_topDenture_hi
/World/head_hi_model_published/char_model_hi/c_mouth_grp_hi/c_bottomDenture_hi
Create an OmniSurfaceBase node, connect to outputs
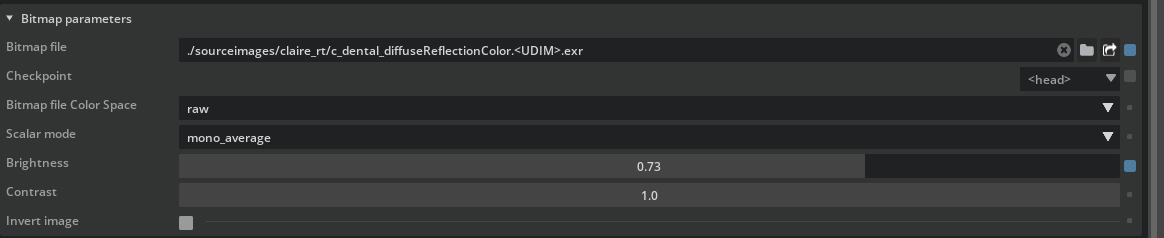
Create a File texture node and name it “file_texture_c_dental_diffuseReflectionColor”
Set the dental diffuse texture file map path
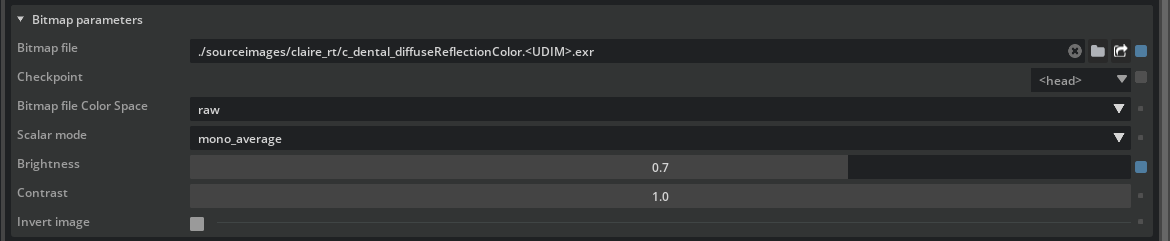
Dental Diffuse Texture Properties:
Bitmap file:
https://omniverse-content-production.s3.us-west-2.amazonaws.com/Samples/Examples/2023_1/Rendering/Claire/sourceimages/claire_rt/c_dental_diffuseReflectionColor.<UDIM>.exrCreate a new
Bitmap file Texturenode and name defaults to “file_texture”Set the dental ambient occlusion texture map file path
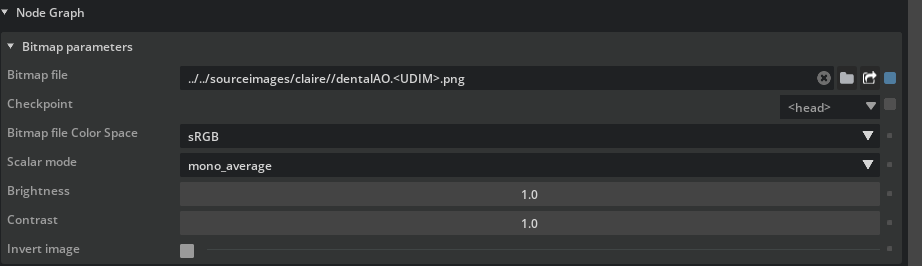
Dental Ambient Occlusion Texture
Bitmap file:
https://omniverse-content-production.s3.us-west-2.amazonaws.com/Samples/Examples/2023_1/Rendering/Claire/sourceimages/claire_rt/c_dental_ambientOcclusion.<UDIM>.pngNote
Ambient occlusion maps are used to add some shadow to the dental meshes. This minimized the number of shadow samples needed inside the mouth.
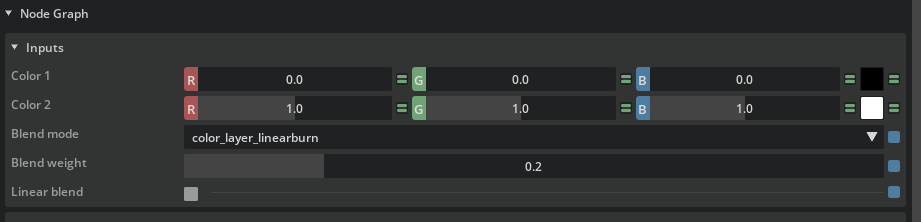
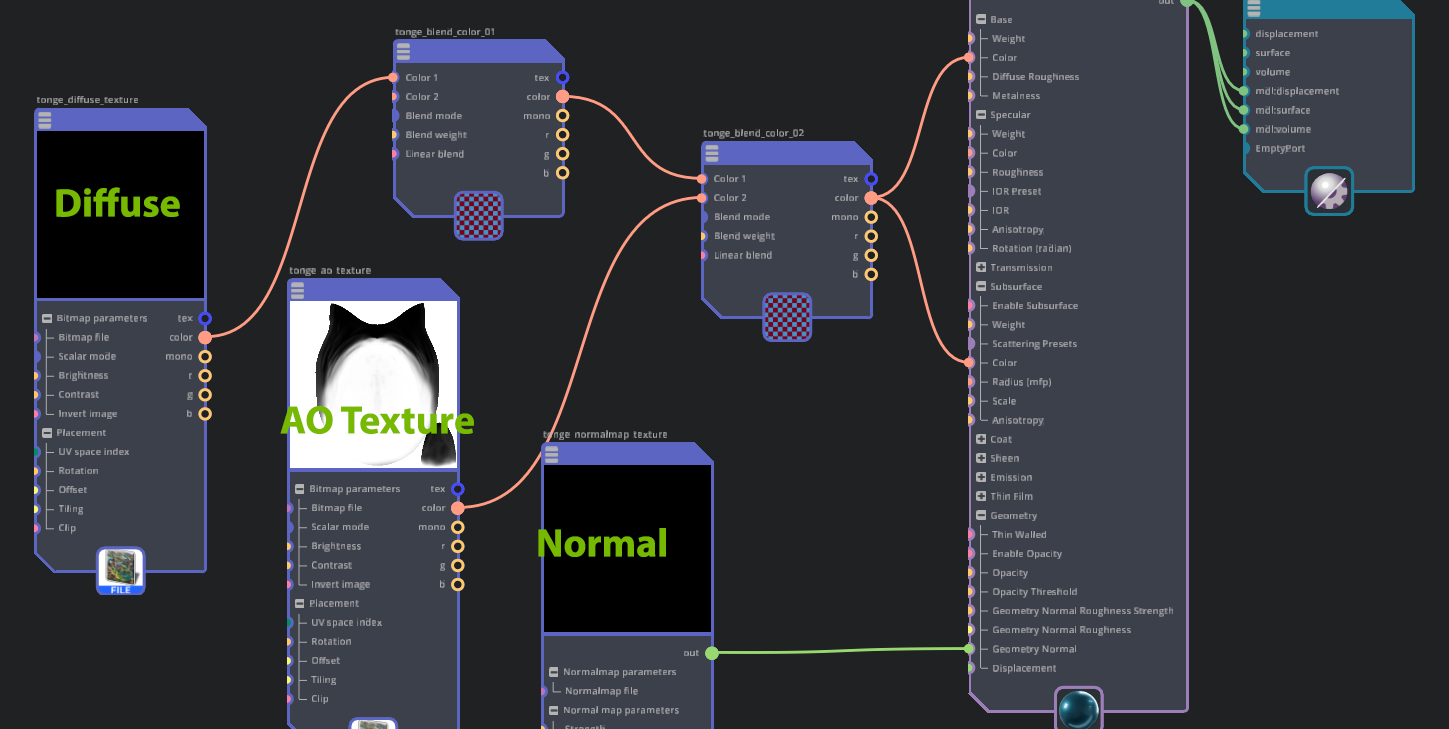
Create a blend color node and name it “blend_colors”,
Connect the above two texture nodes to the blend colors node
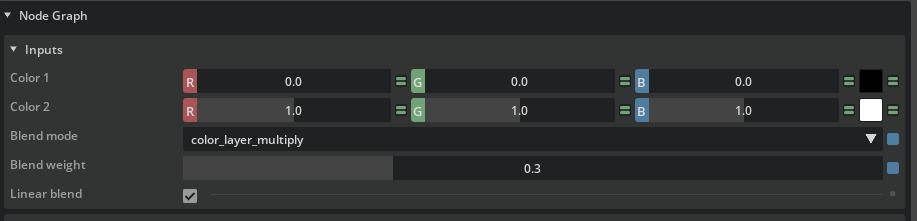
Blend Colors Node Properties
“tongue_diffuse_texture”.color -> “blend_colors”.”Color 1”
“file_texture”.color -> “blend_colors”.”Color 2”
Blend weight:
0.3“blend_colors”.color -> OmniSurfaceBase.diffuseReflectionColor
“blend_colors”.color -> OmniSurfaceBase.subsurfaceScatteringColor
Create a Normal map texture node and set the normal map texture file map path

Dental GeometryNormal Texture
Bitmap file:
https://omniverse-content-production.s3.us-west-2.amazonaws.com/Samples/Examples/2023_1/Rendering/Claire/sourceimages/claire_rt/c_dental_geometryNormal.<UDIM>.exrConnect the normal texture to the
geometery normalslot of the material
Set OmniSurfaceBase Material properties
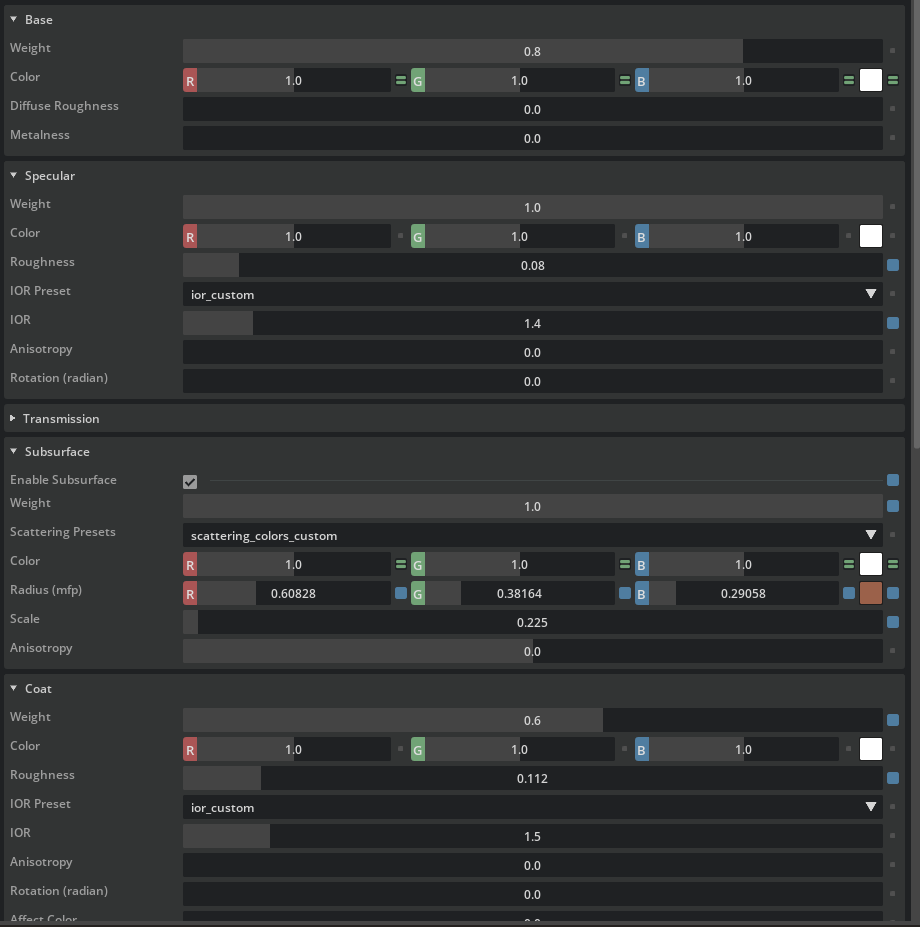
Dental Material Properties:
Specular Roughness:
0.08Specular IOR:
1.4Enable Subsurface:
ONSubsurface Weight:
1Subsurface Color: connected diffuse texture
Subsurface Radius Color:
(0.60828, 0.38164, 0.29058)Subsurface Scale:
0.225Coat Weight:
0.6Coat Roughness:
0.112Coat IOR:
1.5
Tongue Material
Note
In this asset the tongue and dental meshes share the same diffuse and normal maps. Your setup may be different.
The tongue material uses a similar ambient occlusion setup as the rest of the mouth
Create a new material in the MDL Graph Editor and name it “c_tongue_graph”
Assign the material to the prims:
/World/head_hi_model_published/char_model_hi/c_mouth_grp_hi/c_tongue_hi
Create an OmniSurfaceBase node, connect to outputs
Create a
Bitmap file Textureand name it “tongue_normal_texture”Use the same geometryNormal texture map file path as the dental material

Dental Normal Texture
Bitmap file:
https://omniverse-content-production.s3.us-west-2.amazonaws.com/Samples/Examples/2023_1/Rendering/Claire/sourceimages/claire_rt/c_dental_geometryNormal.<UDIM>.exr“tongue_normal_texture”.color -> OmniSurfaceBase.geometryNormal
Create a
Bitmap file Texturenode and name it “tongue_diffuse_texture”Use the same diffuseReflectionColor textures as the dental material but with the brightness toned down.
Tongue Diffuse Texture
Bitmap file:
https://omniverse-content-production.s3.us-west-2.amazonaws.com/Samples/Examples/2023_1/Rendering/Claire/sourceimages/claire_rt/c_dental_diffuseReflectionColor.<UDIM>.exrBrightness:
0.73Make it a bit darker by setting the Brightness to 0.73
Create a
Bitmap file Texturenode and name it “tongue_ao_texture”Set the ambient occlusion texture map file path
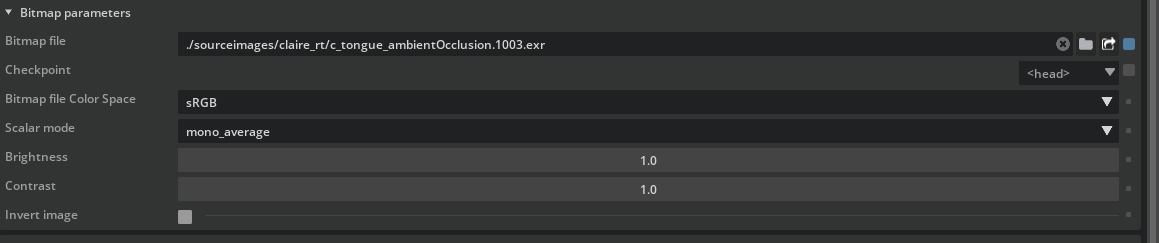
Tongue Ambient Occlusion Texture
Bitmap file:
https://omniverse-content-production.s3.us-west-2.amazonaws.com/Samples/Examples/2023_1/Rendering/Claire/sourceimages/claire_rt/c_tongue_ambientOcclusion.1003.exrCreate a blend color node and name it “tongue_blend_colors1”
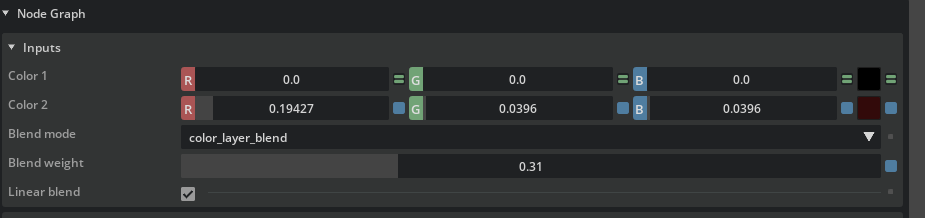
Tongue Blend Colors 1
“tongue_diffuse_texture”.color -> “tongue_blend_colors1”.”Color 1”
Color 2:
(0.19426751, 0.039595928, 0.039595928)Blend weight:
0.31Create a new blend color node and name it “tongue_blend_colors2”
Tongue Blend Colors 2
“tongue_blend_colors1” -> “tongue_blend_colors2”.”Color 1”
“tongue_ao_texture” -> “tongue_blend_colors2”.”Color 2”
Blend weight:
0.2Connect “tongue_blend_colors2” to “OmniSurfaceBase”
“tongue_blend_colors2” -> “OmniSurfaceBase”.diffuseReflectionColor
“tongue_blend_colors2” -> “OmniSurfaceBase”.subsurfaceScatteringColor
Set the OmniSurfaceBase materials properties
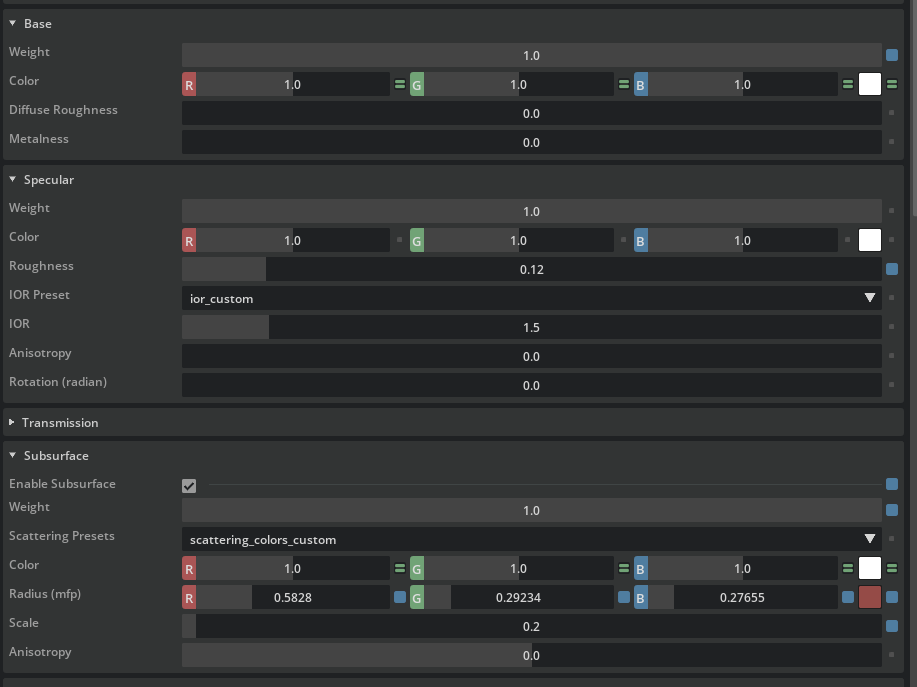
Tongue Material Properties:
Specular Roughness:
0.12Enable Subsurface, weight
1Subsurface radius color:
(0.5828, 0.2923, 0.27656)Subsurface scale:
0.2Tongue Node Network
Tongue Node Network
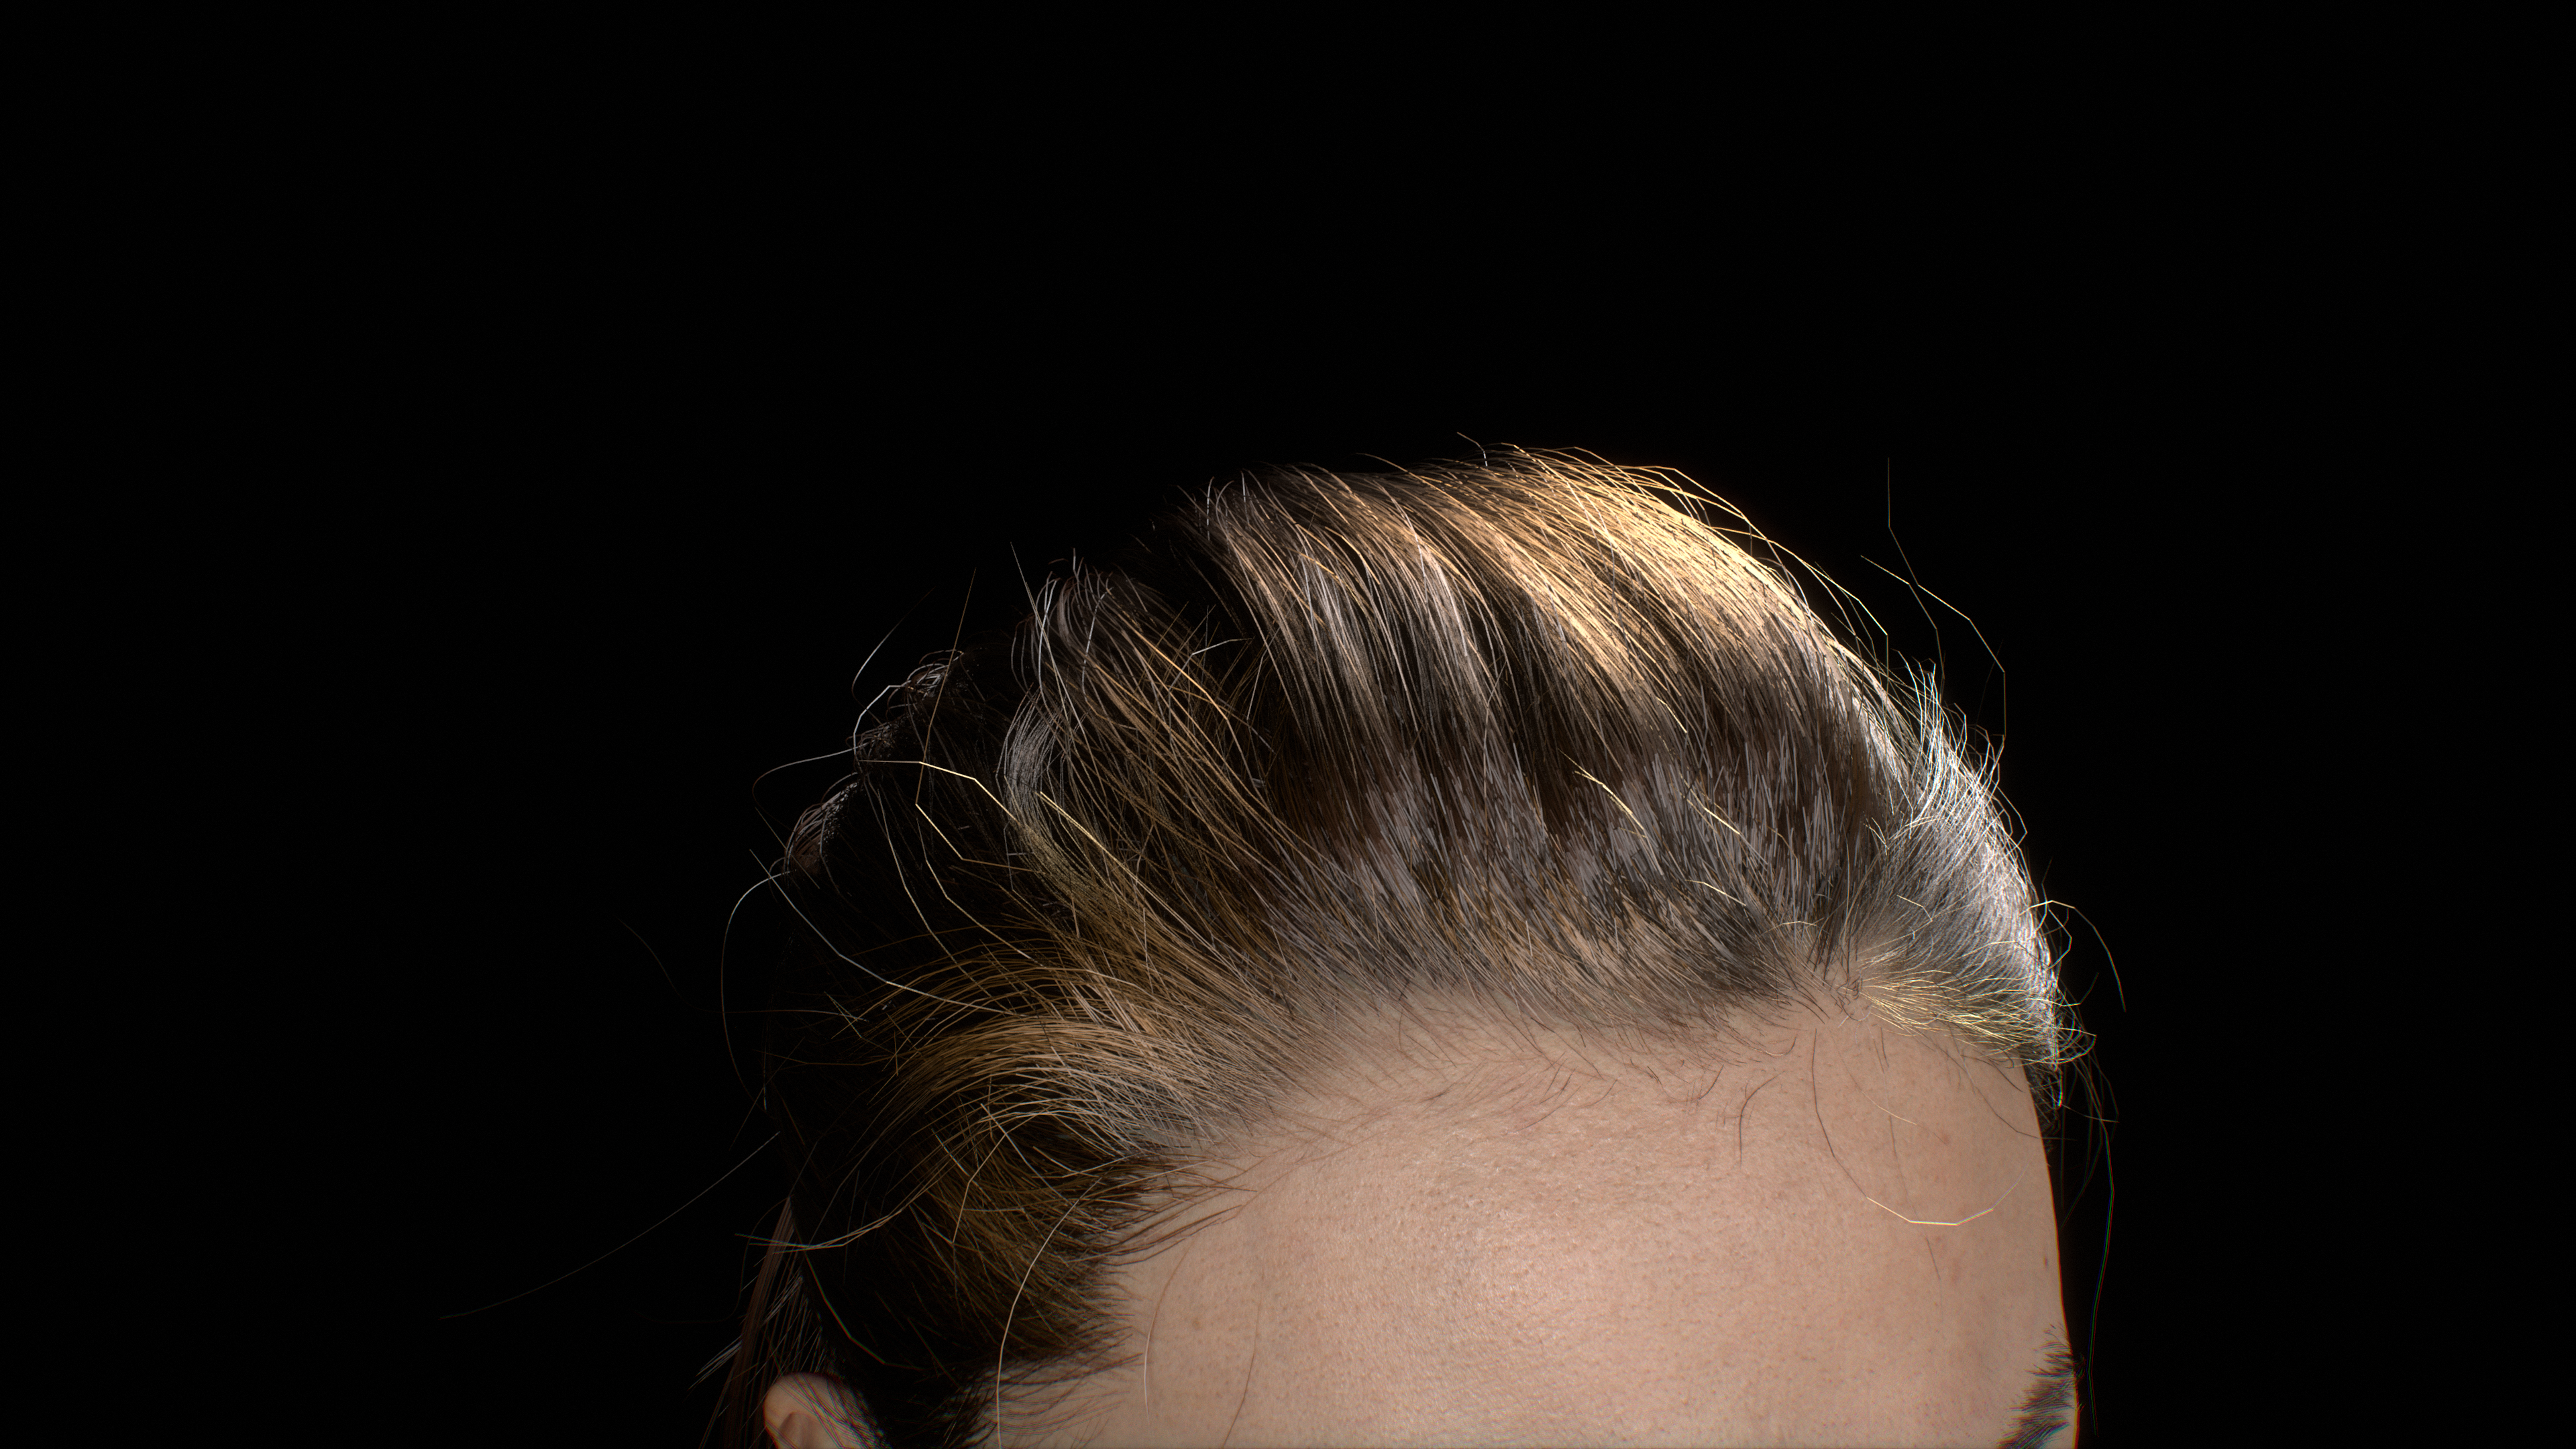
Hair Materials
Note
Omniverse has 2 UV sets for hair:
uvset0, u value interpolates from 0 at the root to 1 at the tip
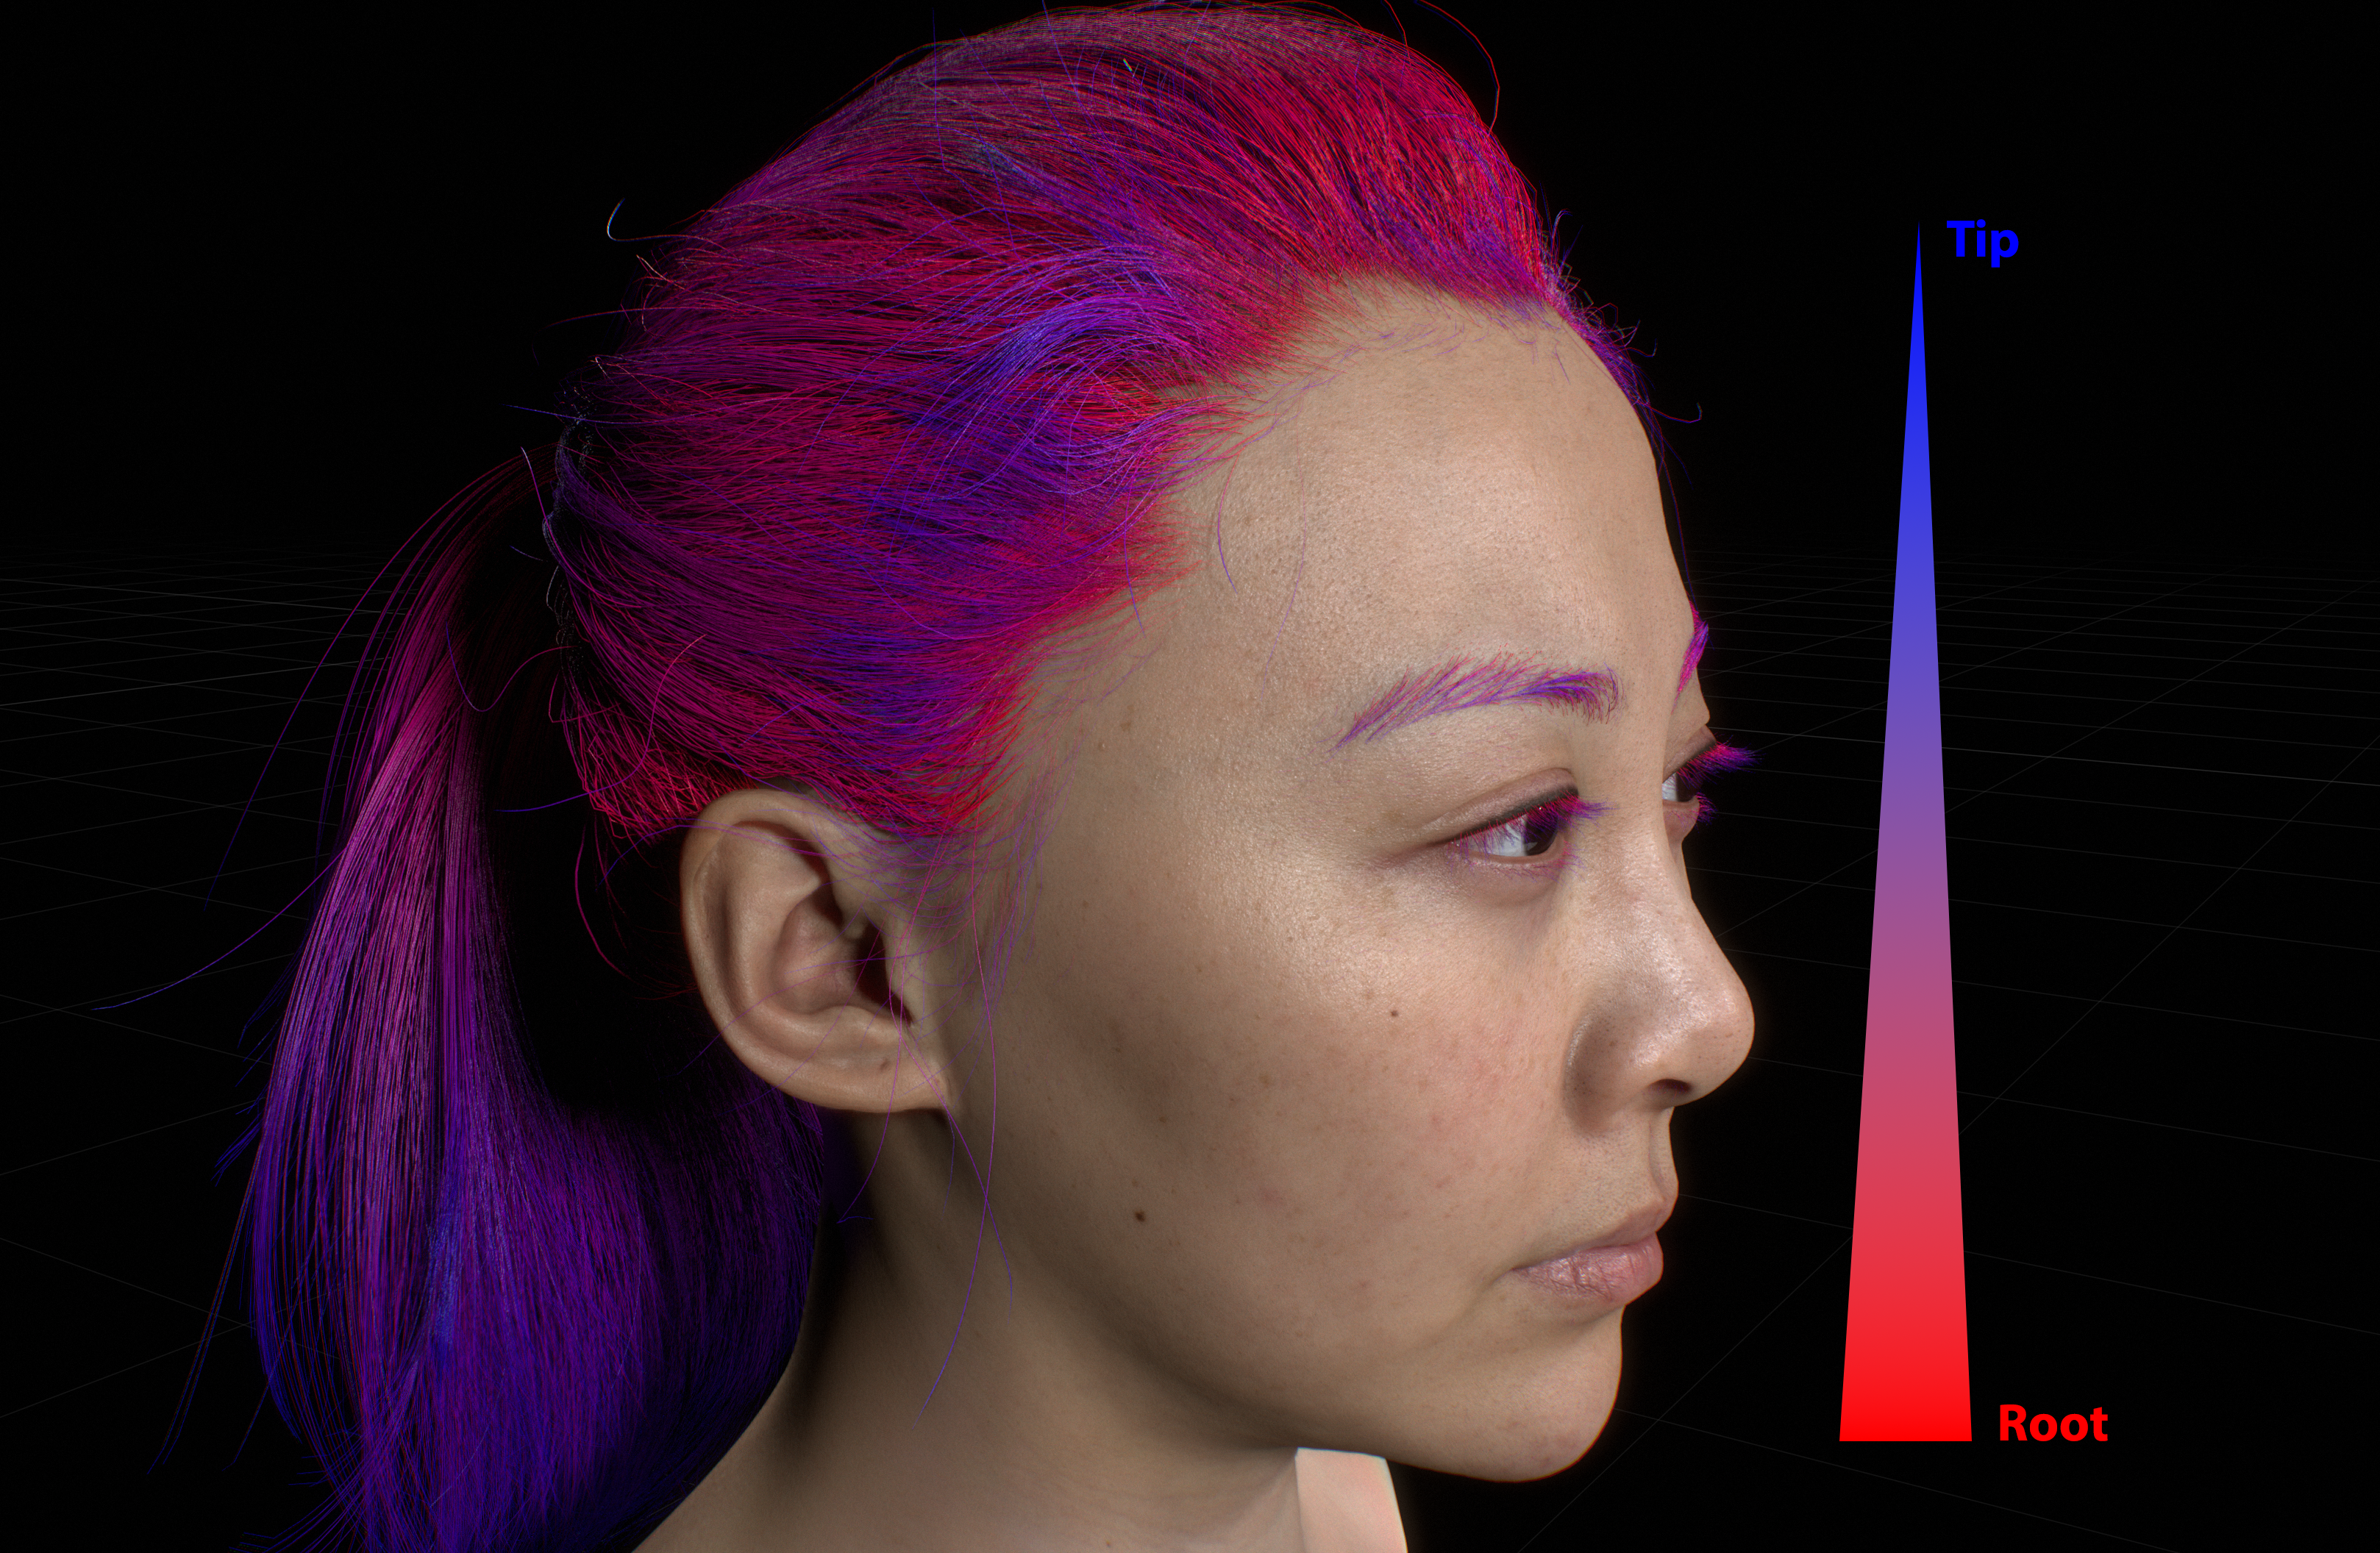
Hair UV0 visualized. Color is red at the root, blue at the tip
uvset1, based on the head uv’s
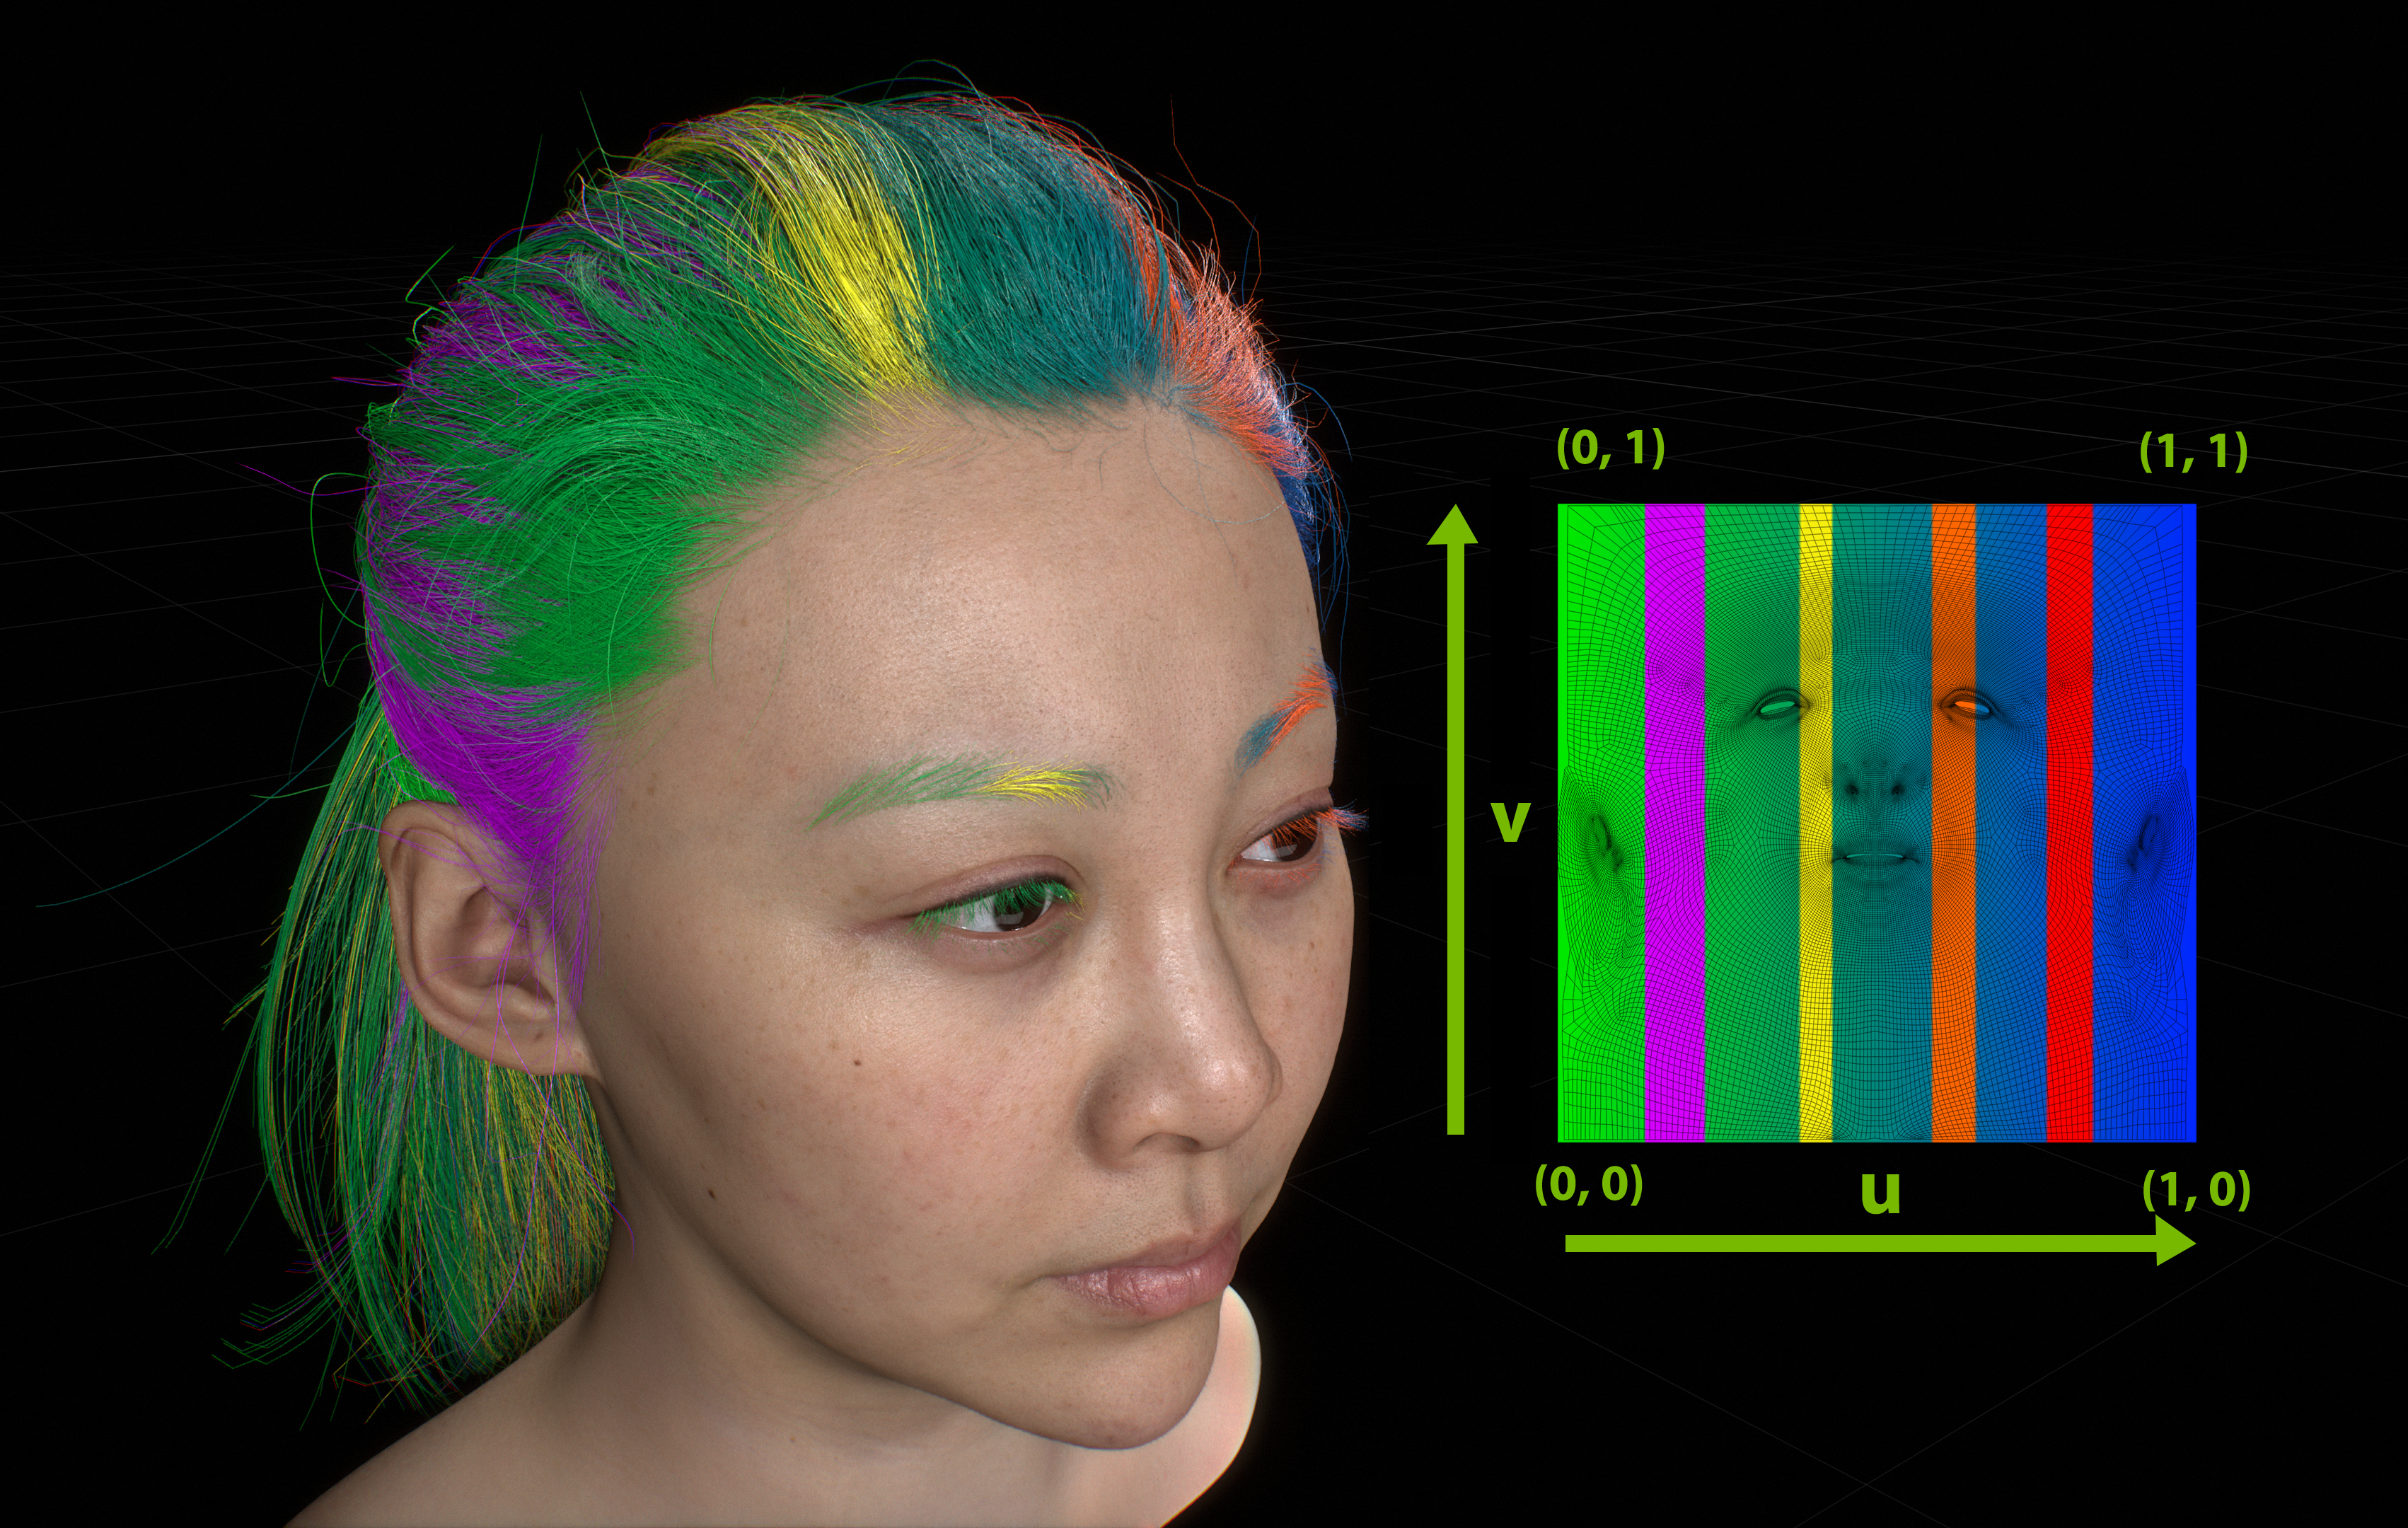
Hair UV1 visualized. Color is based on uv’s from the head mesh
More detail on exporting hair with UVs here .
Note
The hair material presets shipped with OmniHairBase provide a good starting point.
Presets can be accessed when creating OmniHair materials.
For Claire, the majority of the hair materials have only slightly different Melanin and Melanin Redness(Pheomelanin) values.
To create hair materials with a preset:
Right Click on Stage view -> Create -> Material -> OmniHairPresets -> Pick one from the options
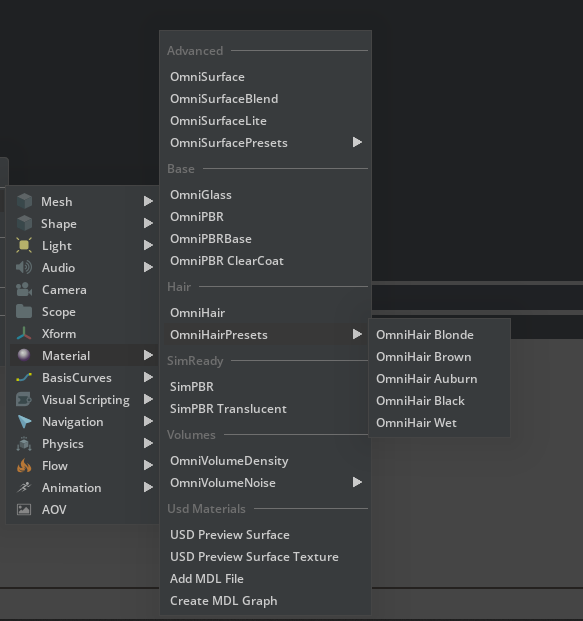
Preset OmniHair Materials
To pick melanin preset values:
Pick from the “Melanin Presets” dropdown options on the OmniHairBase material
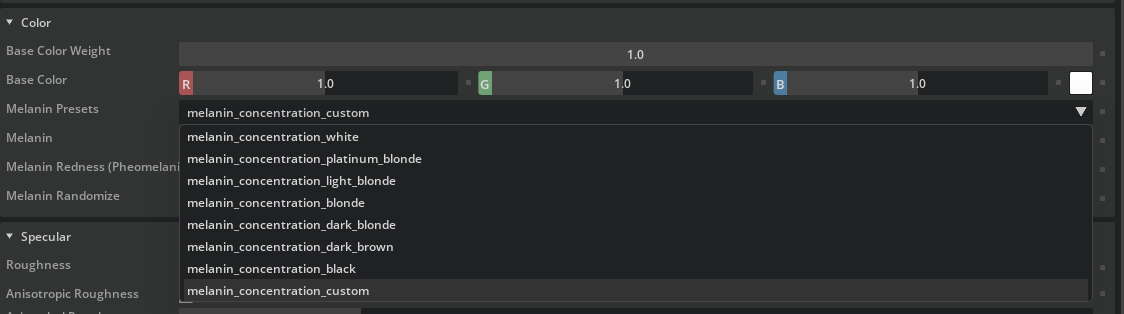
Preset OmniHair Melanin Values
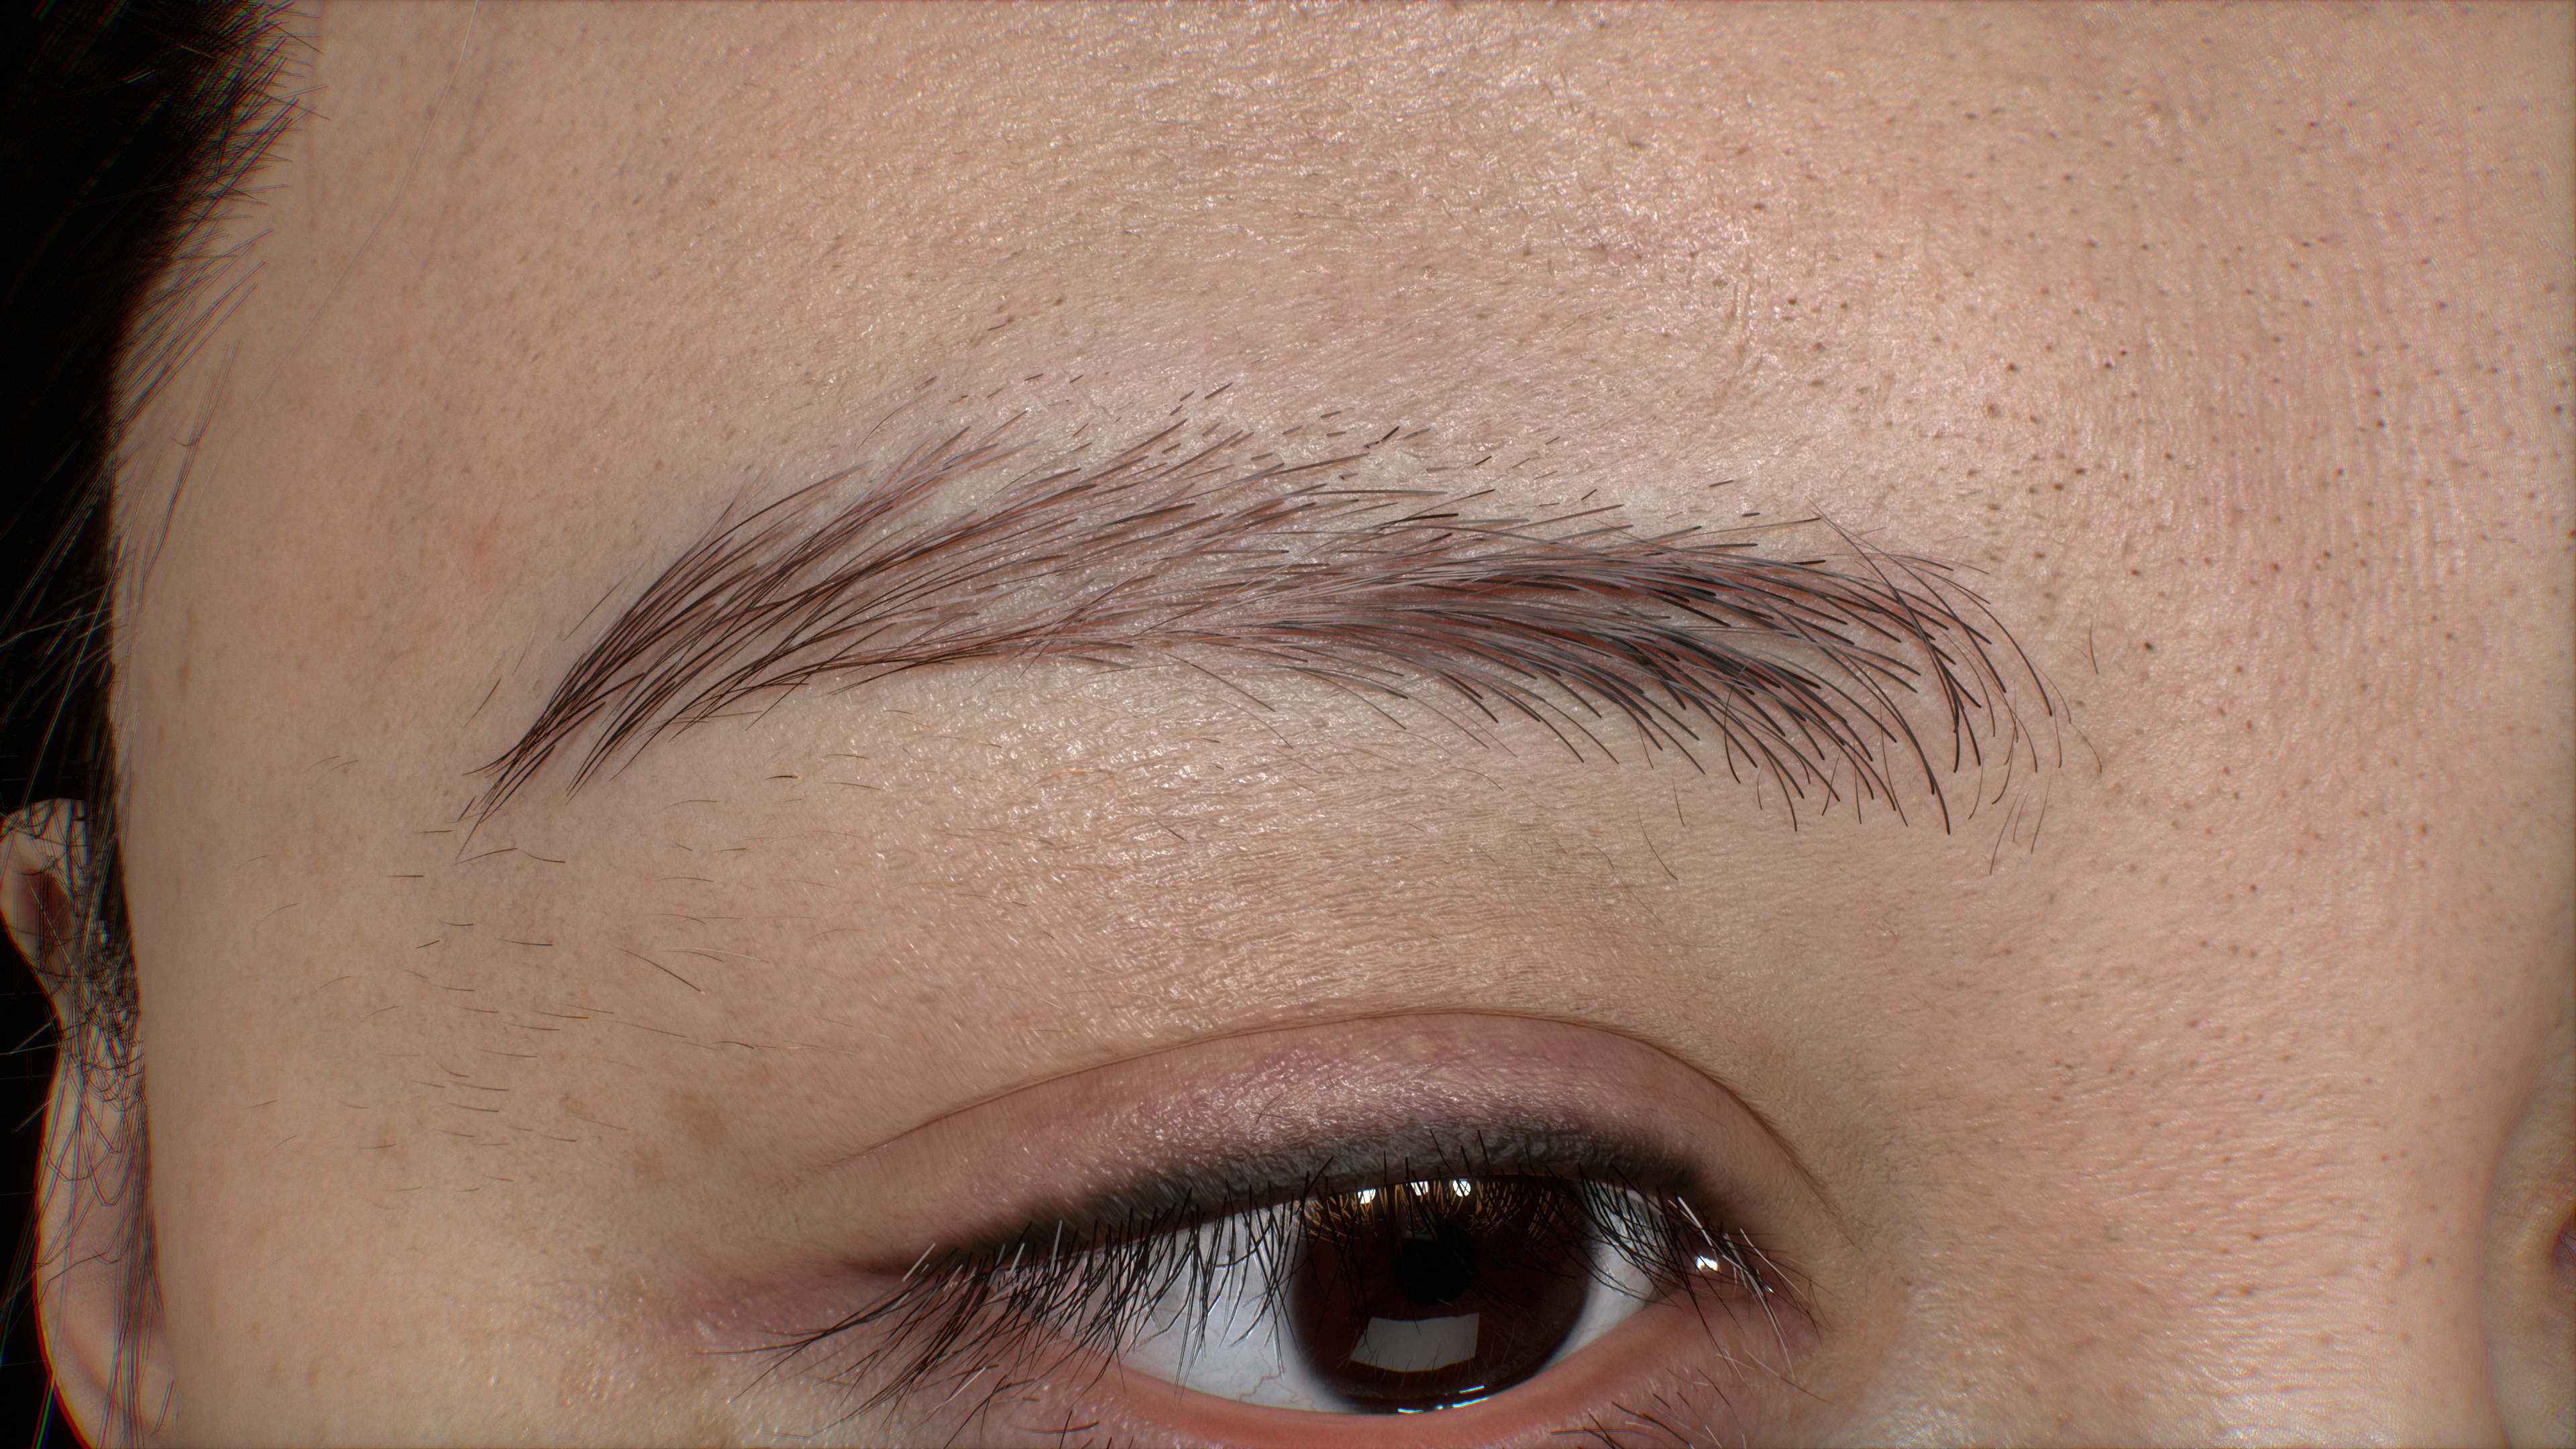
Eyebrow Material
Note
The Eyebrow Material is the default OmniHair Material with the Melanin value set to 1 - all black
The Eyebrow Materials |
Eyebrow Materials Properties: |
Melanin:
Specular Roughness:
|

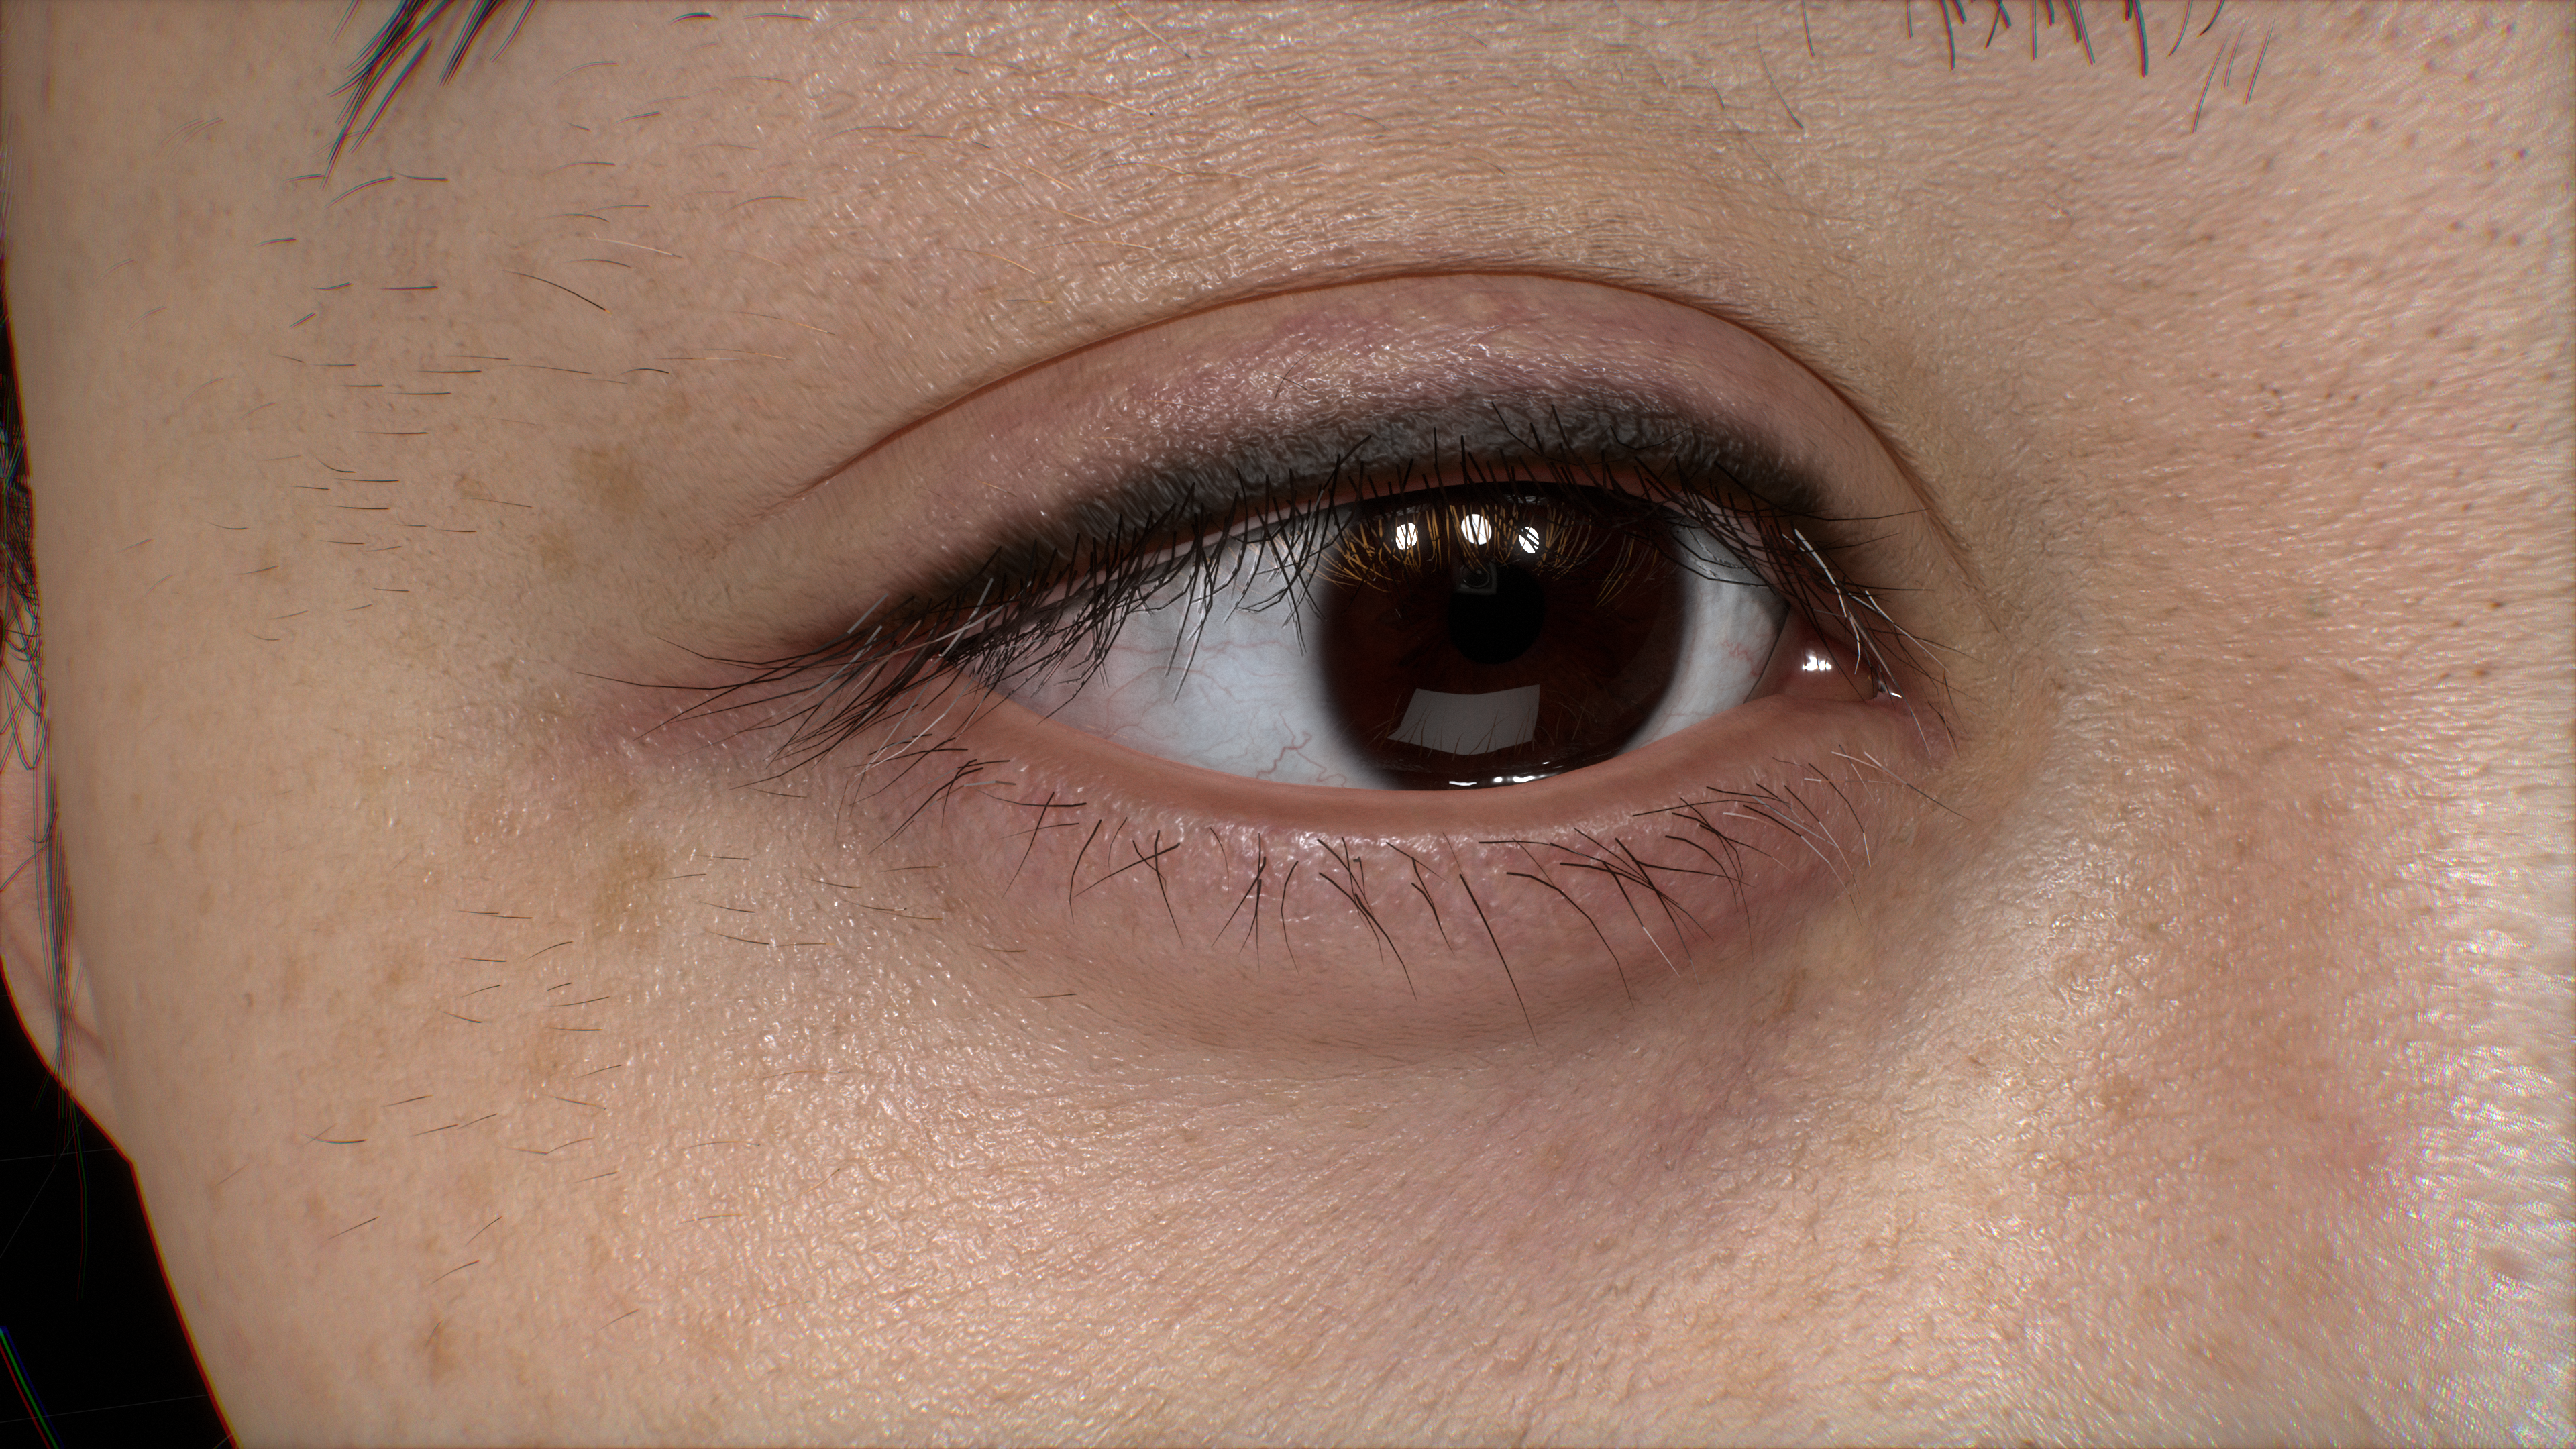
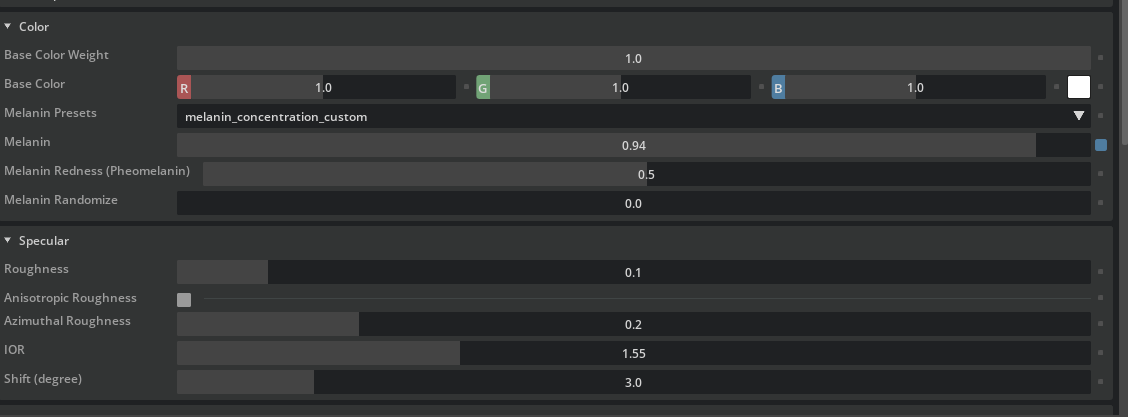
Eyelash Material
Note
The Eyelash Material is the default OmniHair Material with the Melanin value set to 0.94
The Eyelash Material |
Eyelash Material Properties |
Melanin:
|
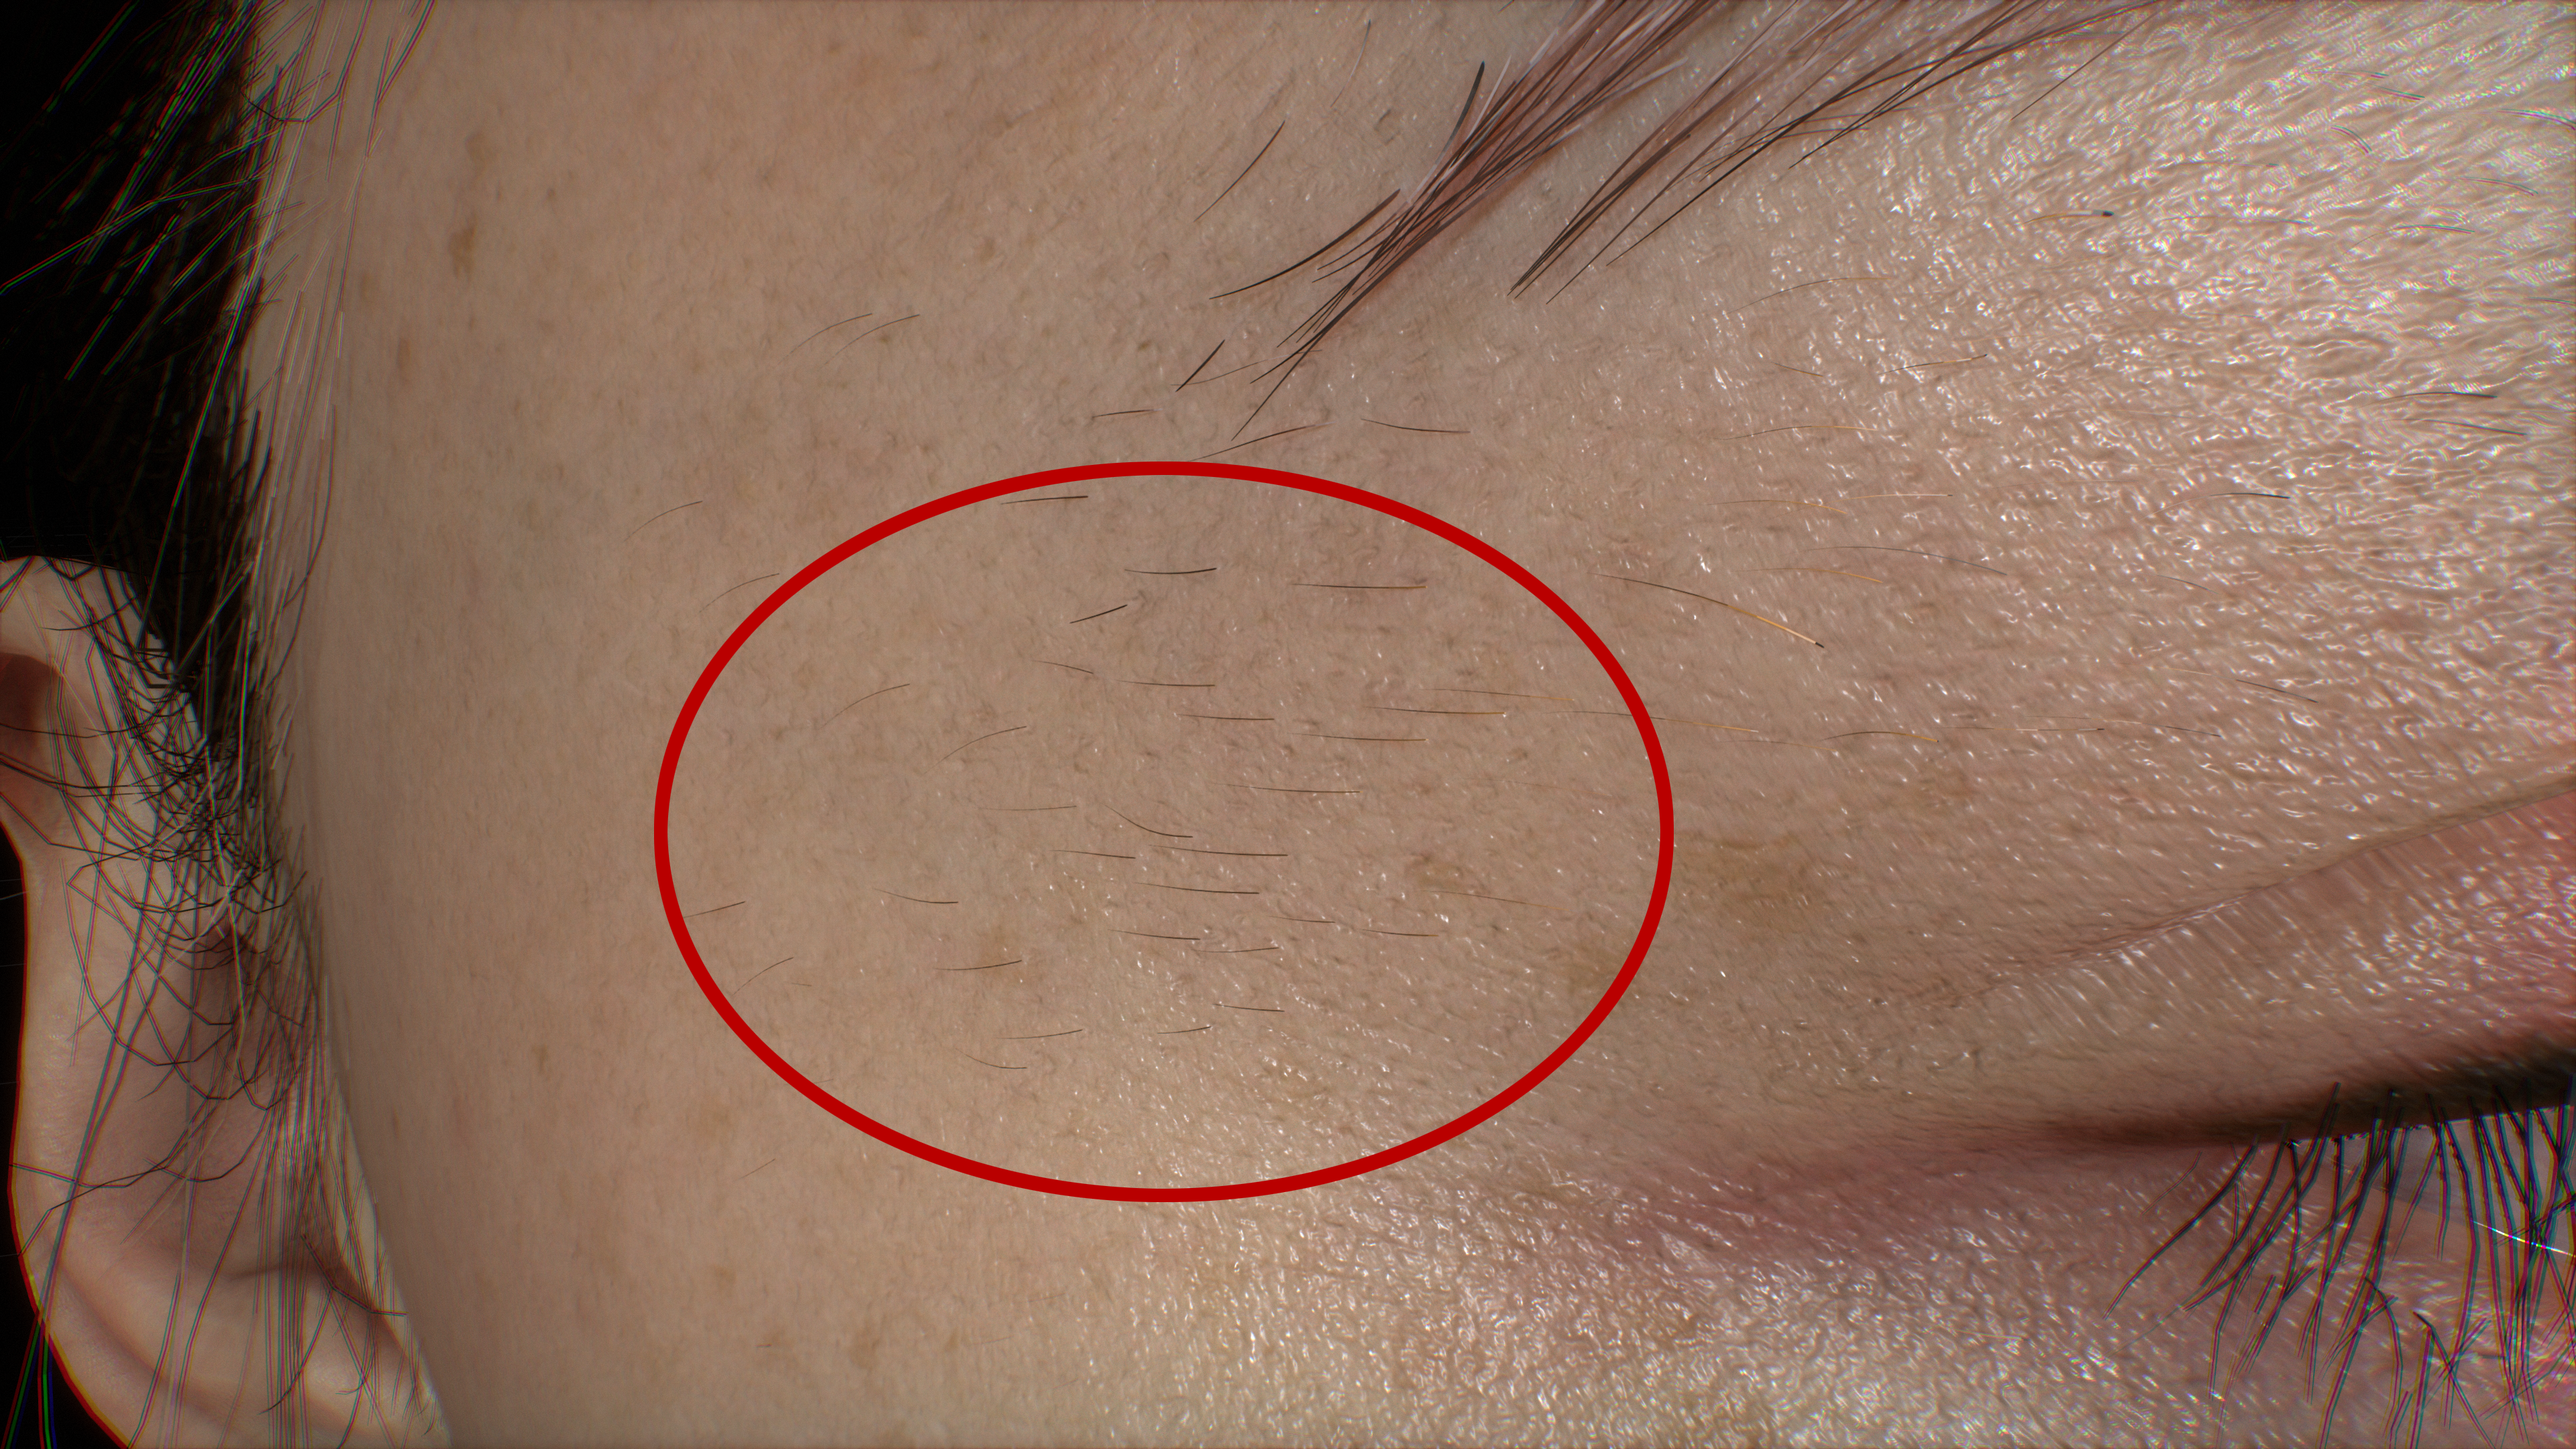
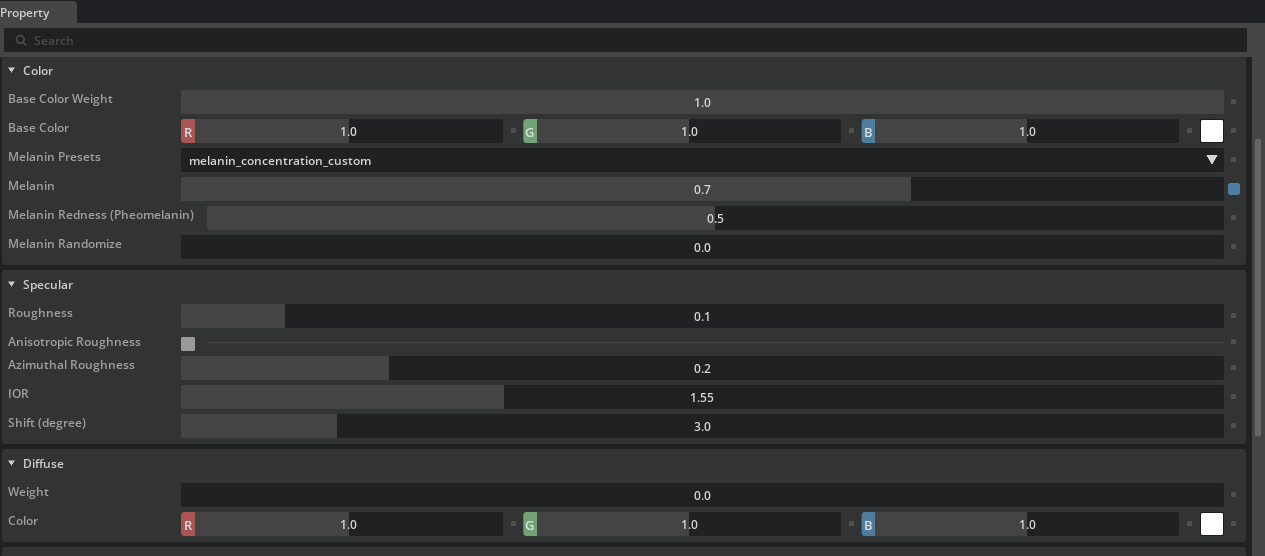
Facial Hair Material
Note
The Facial Hair Material is the default OmniHair Material with the Melanin value set to 0.7
The Facial Hair Material, Circled in Red |
Facial Hair Material Properties: |
Melanin: |
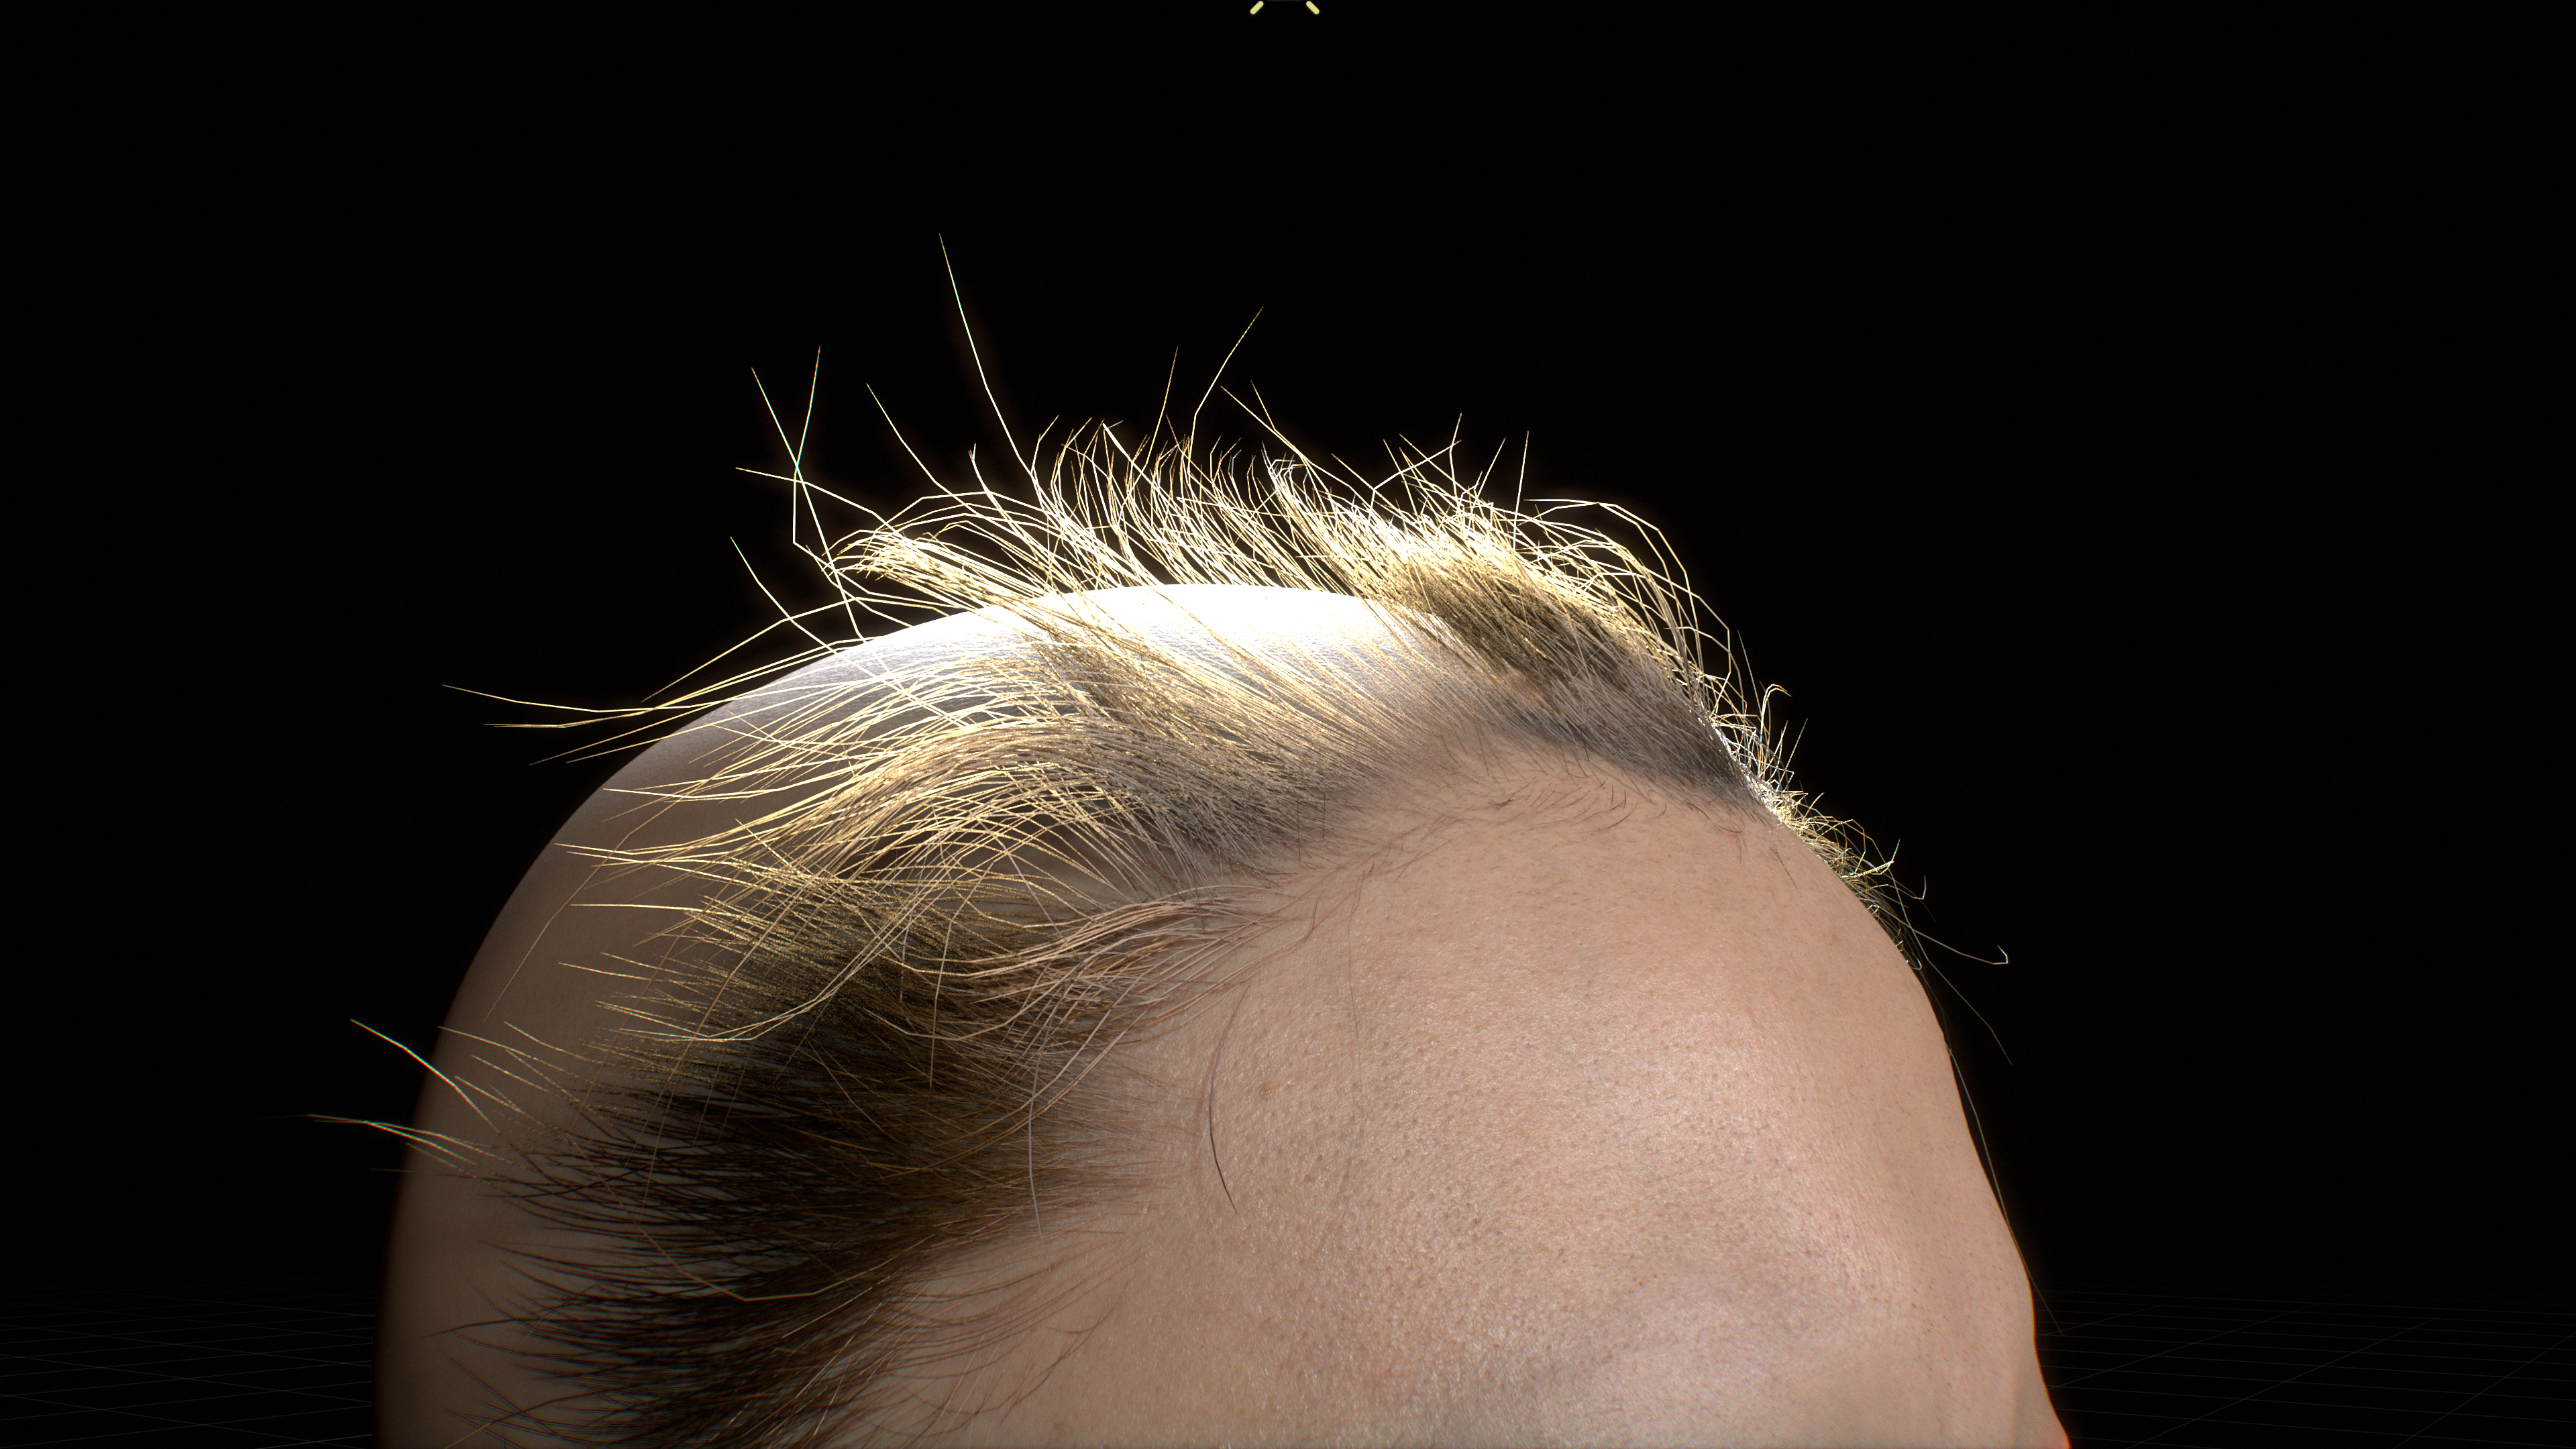
Baby Hair Material
Note
The Baby Hair is the thin hair on Claire’s forehead defining the hairline.
The Baby Hair Material |
Baby Hair Material Properties |
Melanin:
Anistropic Roughness: Azimuthal Roughness:
|

Main Hair Material Graph
The Main Hair Material graph is more complex than the other hair materials. It breaks down into the following steps:
Set a color gradient from hair root to tip (uvset0)
Blend in noise colors based on the head UV’s (uvset1)
Set the result to hair base color
Set diffuse color to a noise texture
adds some dryness to the hair here and there. Higher diffuse values create dryer looking hair.
Add noise to the hair geometryNormal
Additional settings on OmniHairBase material
The Main Hair Material
Detailed Steps
In the MDL Graph Editor, create an OmniHairBase material and name it “c_hair_main_graph”
Create OmniHairBase Node
Connect outputs
Create a
texture coordinate 2dnode. The node name defaults to “texture_coordinate_2d”set it to use index
0to access uvset0.
Create a
float2.Xnode. The node name defaults to “x”Connect “texture_coordinate_2d”.out -> “x”.a, to access the
Uvalue of the uvset0.Create a
powernode and name it “pow”,Connect “x”.out -> “pow”.a (“a” means first input of the power node)
Set the “pow”.b (power value) to 2.5
The goal is to be able to squeeze/expand the u value range. A bigger value gives a tighter root to tip color range
Power Value:
1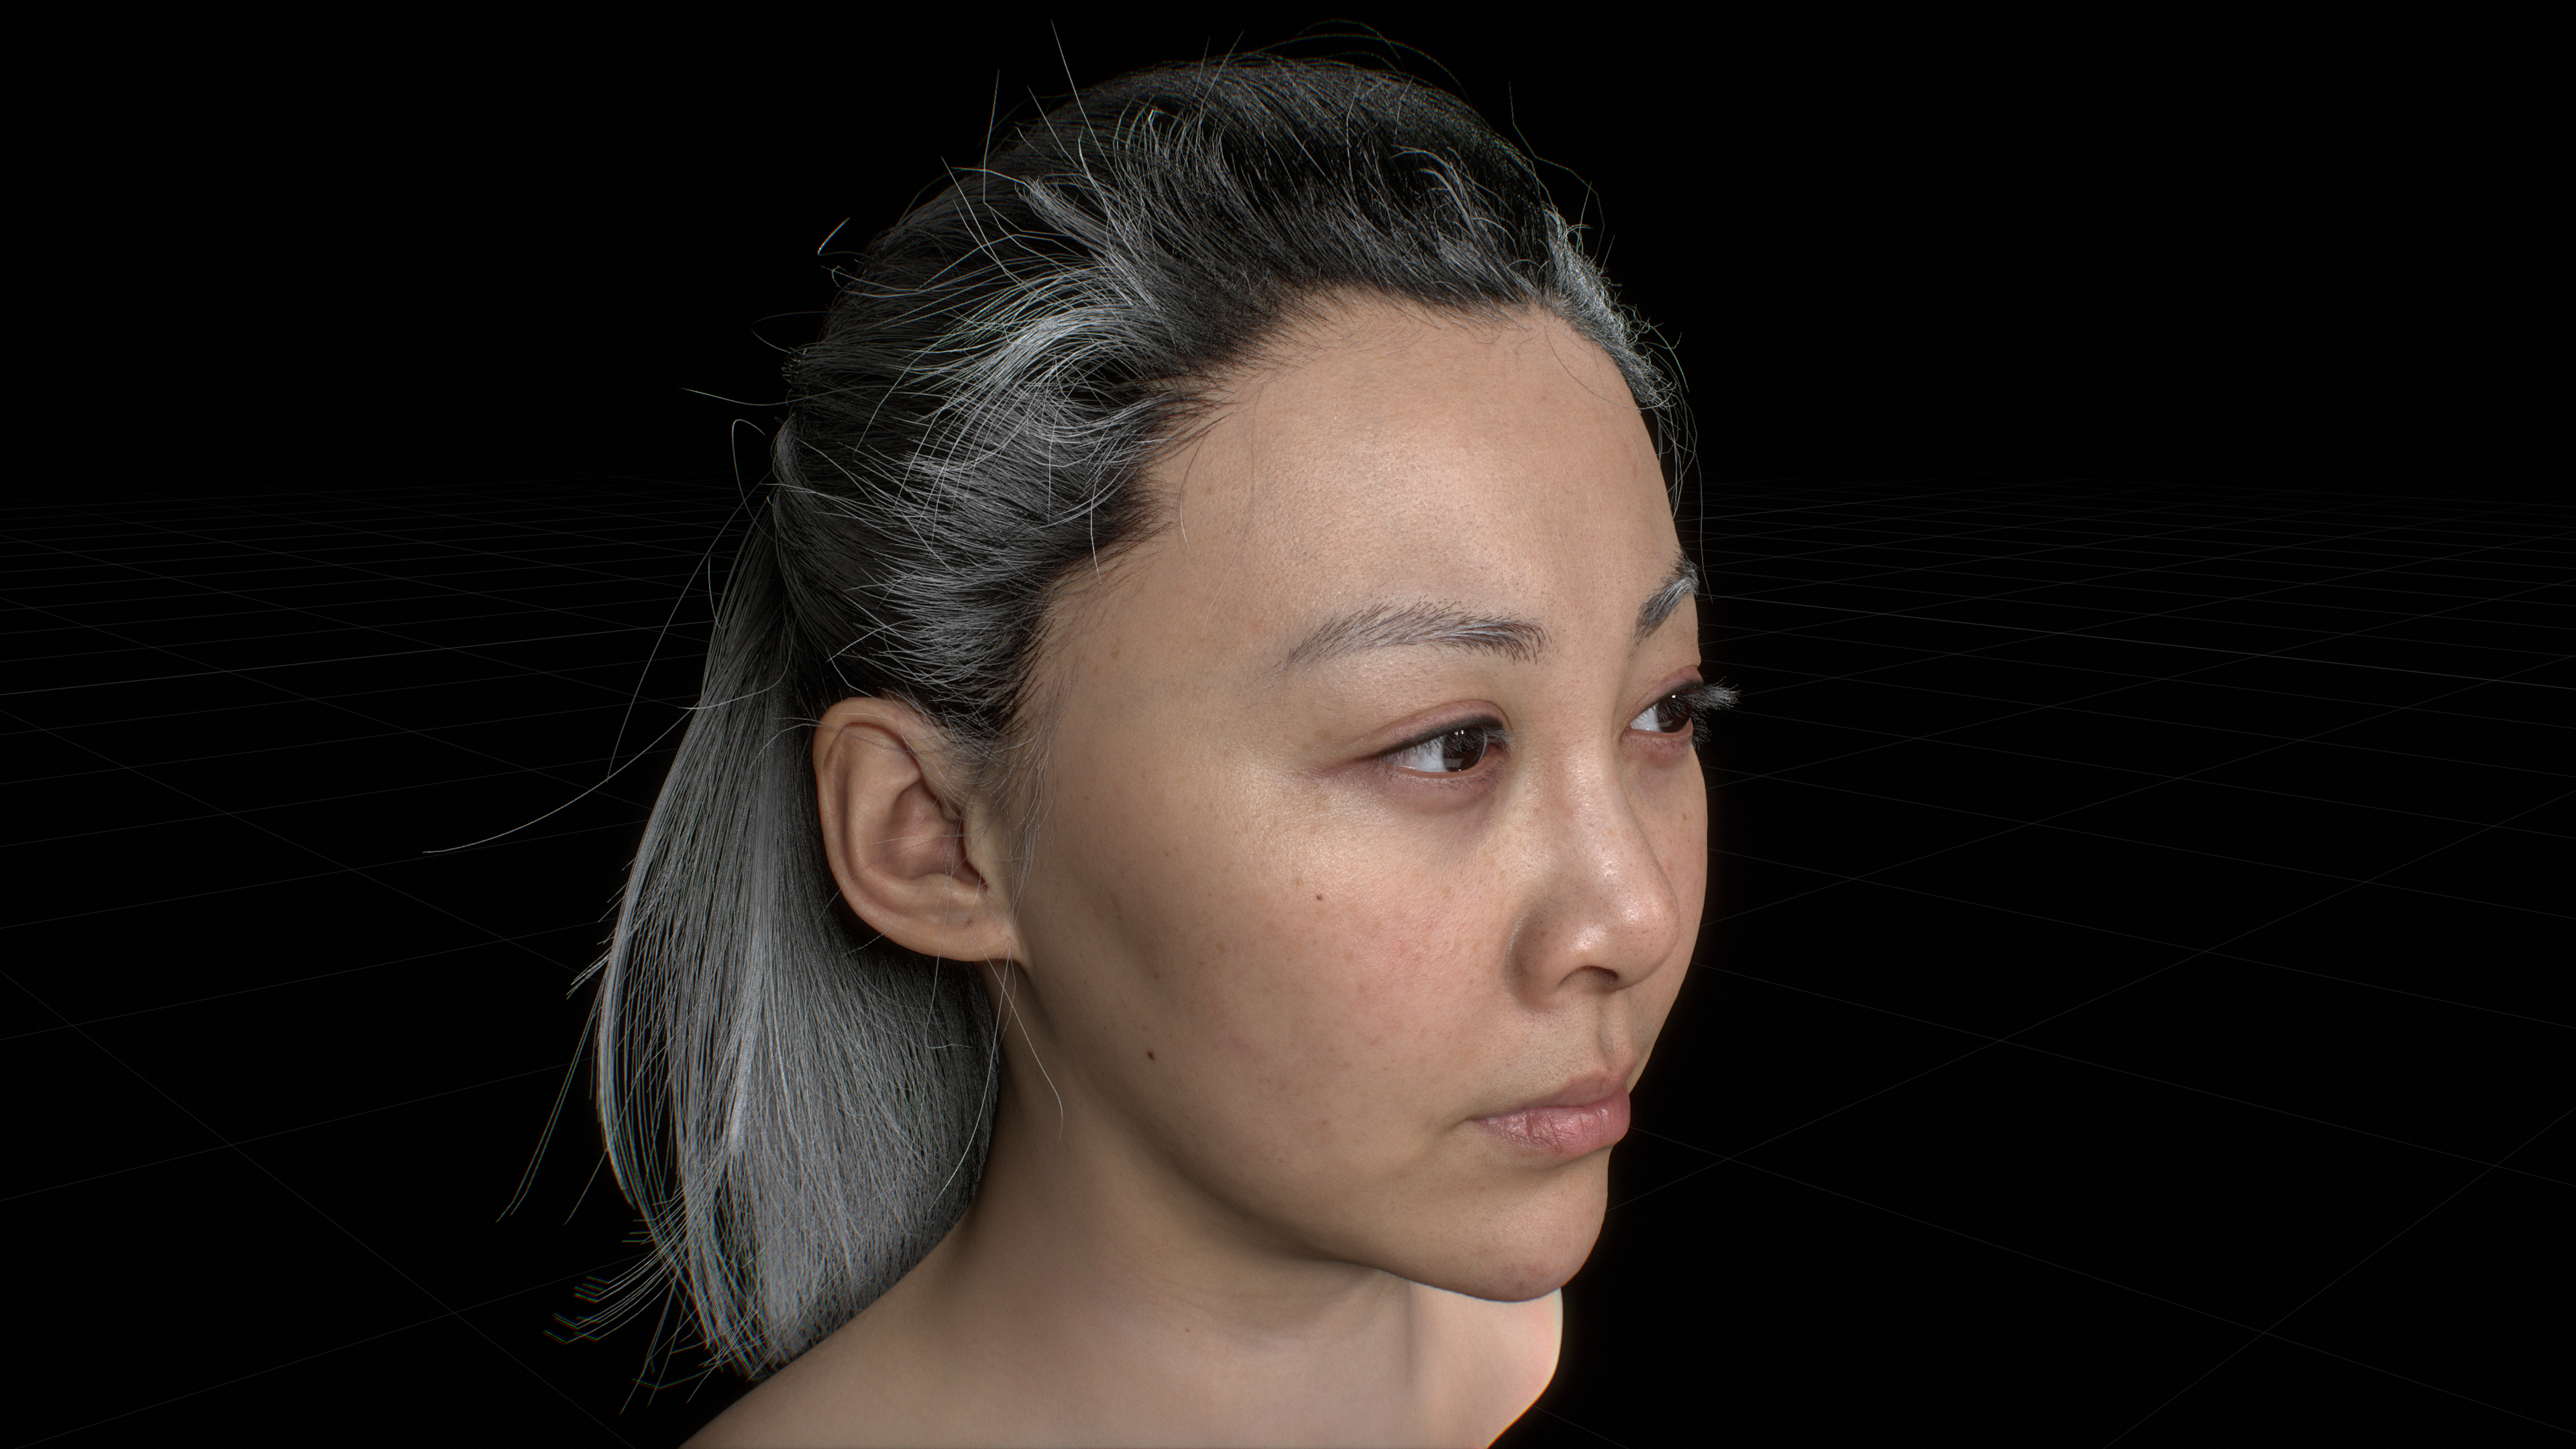
Power Value:
2.5Create a
Bitmap Texture nodeand name it “file_texture_c_hair_noise”Load a noisy texture map and use the second uvset:
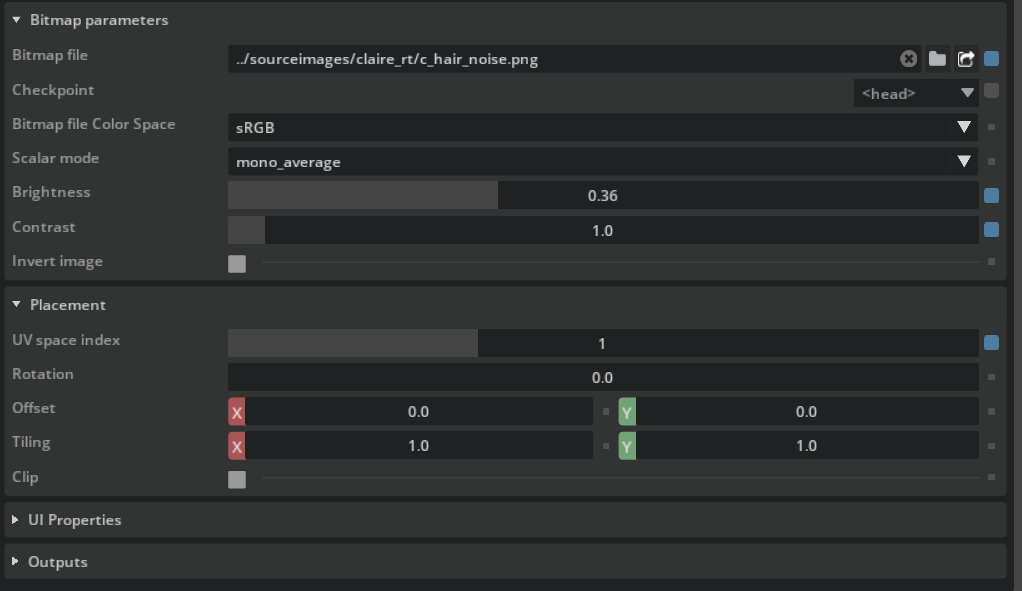
Hair Noise Texture Properties:
Bitmap file:
https://omniverse-content-production.s3.us-west-2.amazonaws.com/Samples/Examples/2023_1/Rendering/Claire/sourceimages/claire_rt/c_hair_noise.pngUV Space Index:
1“1” means second uvset
Brightness:
0.36Create a Lerp Color node. The node name defaults to “lerp”
Set the lerp node to interpolate between the above noise texture and a pink color.
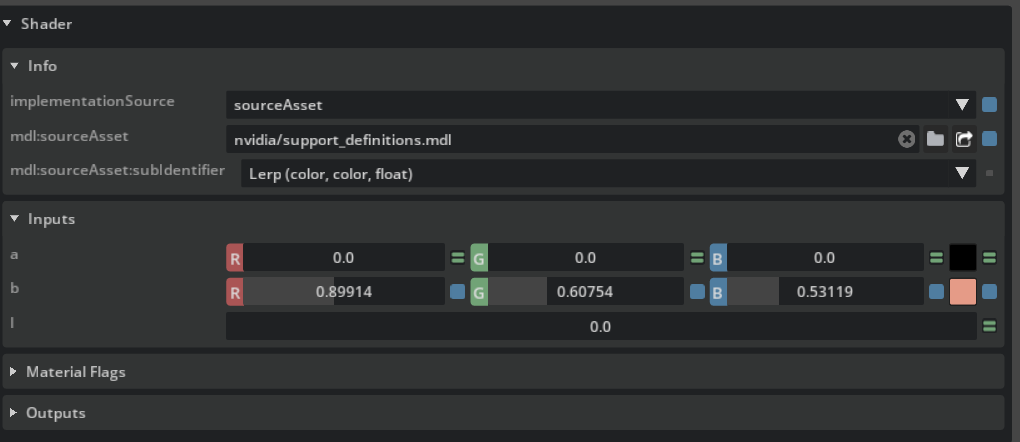
Lerp Node Properties:
Connect “file_texture_c_hair_noise”.color -> “lerp”.a
b:
(0.8991, 0.6075, 0.5312)Connect “pow”.out -> “lerp”.I (“I” means interpolation value)
Create two other
worley noise texturenodes and blend in the above lerp result with two other colors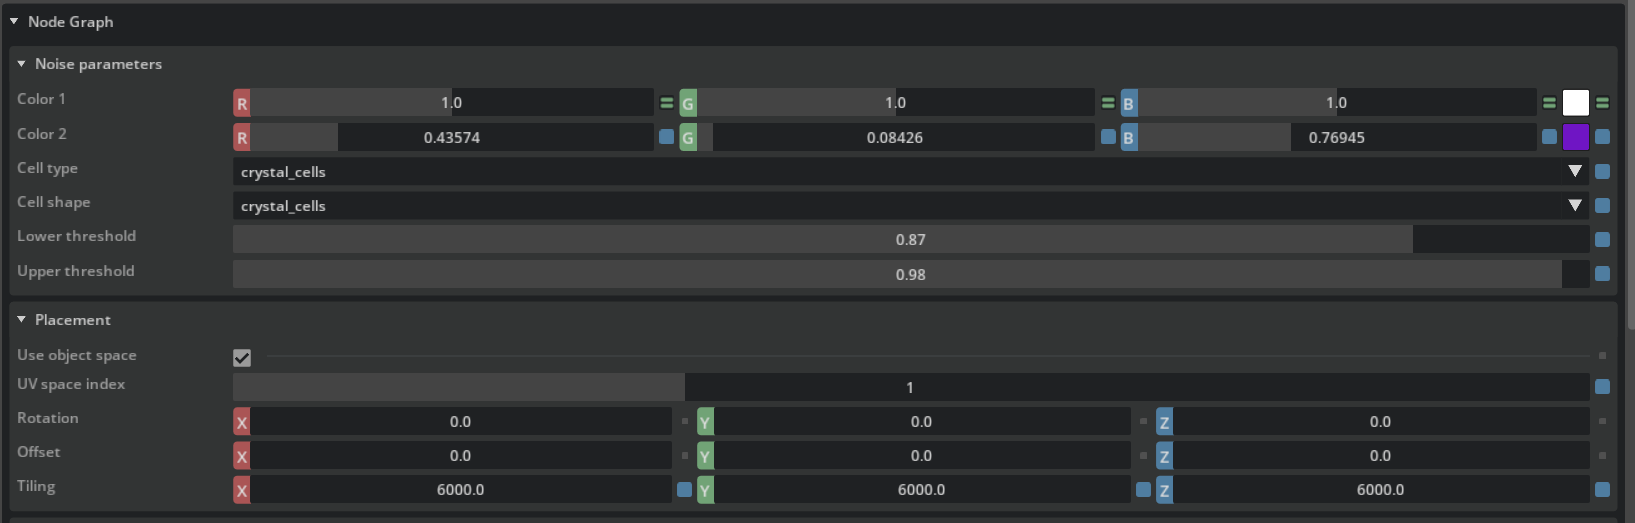
Name: “worley_noise_texture”
Color 1
connected to lerp nodeCell type:
crystal_cellsCell shape:
crystal_cellsColor 2:
(0.4357, 0.0843, 0.7695)Lower threshold:
0.87Upper threshold:
0.98UV space index:
1Tiling:
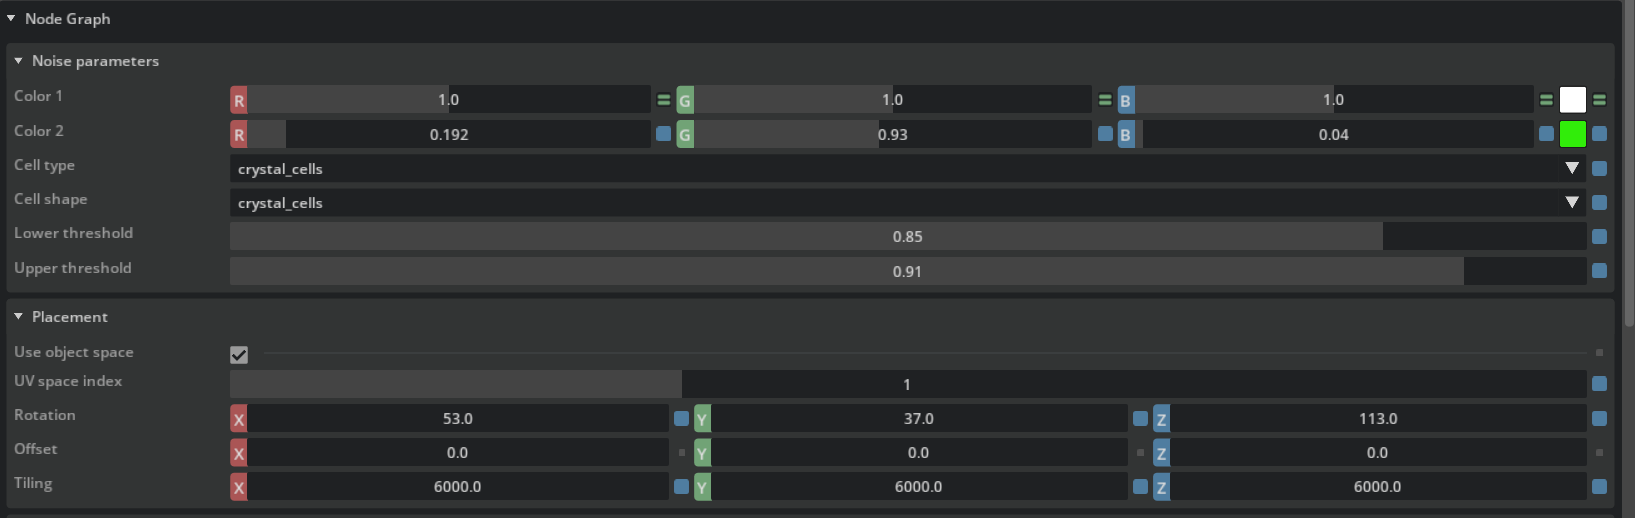
6000Name: “worley_noise_texture_01”
Color 1:
connected to worley_noise_aCell type:
crystal_cellsCell shape:
crystal_cellsColor 2:
(0.192, 0.93, 0.04)Lower threshold:
0.85Upper threshold:
0.91UV space index:
1Tiling:
6000Connect “worley_noise_texture_01”.color -> OmniHairBase.”base color”
Connect “pow”.out -> OmniHairBase.”Base Color Weight”
Add a
multiply colornode. The node name defaults to “multiply”Connect “file_texture_c_hair_noise”.color -> “multiply”.a (“a” means first color input)
Set “multiply” node’s second input color to dark red, e.g
(0.1338, 0.0817, 0.0341)
Connect “multiply”.out -> OmniHairBase.”Diffuse Color”
Create a
Perlin noise bump texture node. The node name defaults to “perlin_noise_bump_texture”This adds a subtle normal variation from root to tip on the hair curves
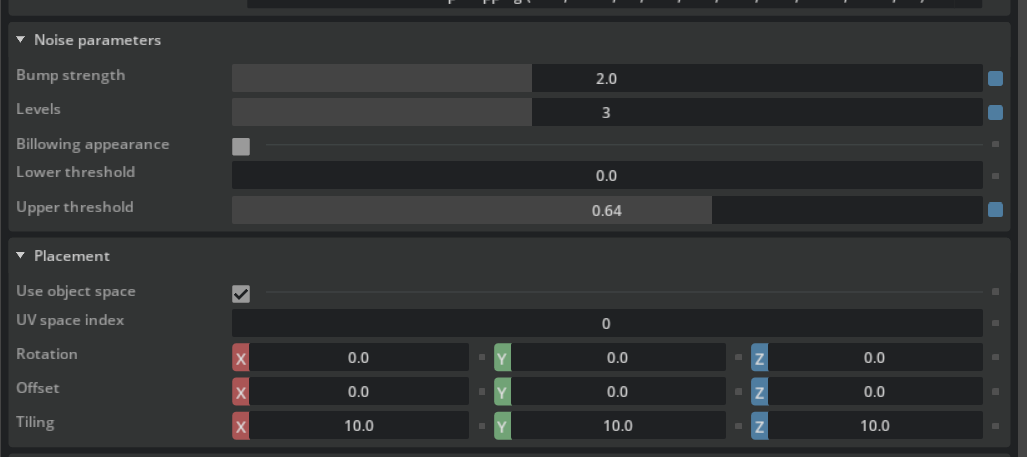
Perlin Noise Bump Node Properties:
Bump Strength :
2Upper threshold:
0.64Levels:
3Connect “perlin_noise_bump_texture”.out -> OmniHairBase.”geometryNormal”
Set OmniHairBase material properties:
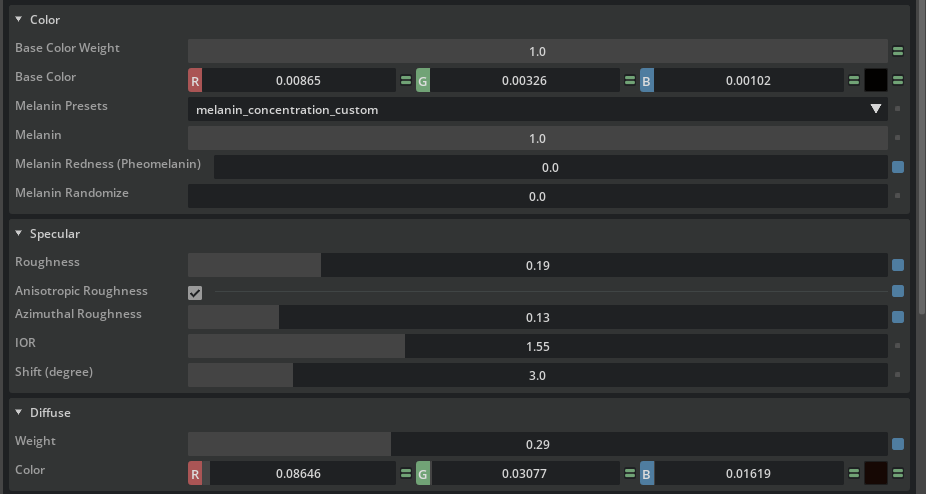
Main Hair Material Properties
Base Color:
Connected to Noise Color InputSpecular Roughness:
0.19Melanin:
1Anistropic Roughness:
ONAzimuthal Roughness:
0.13Diffuse Color:
Connected to Noise Color node InputThe main hair node graph network should look similar to this:
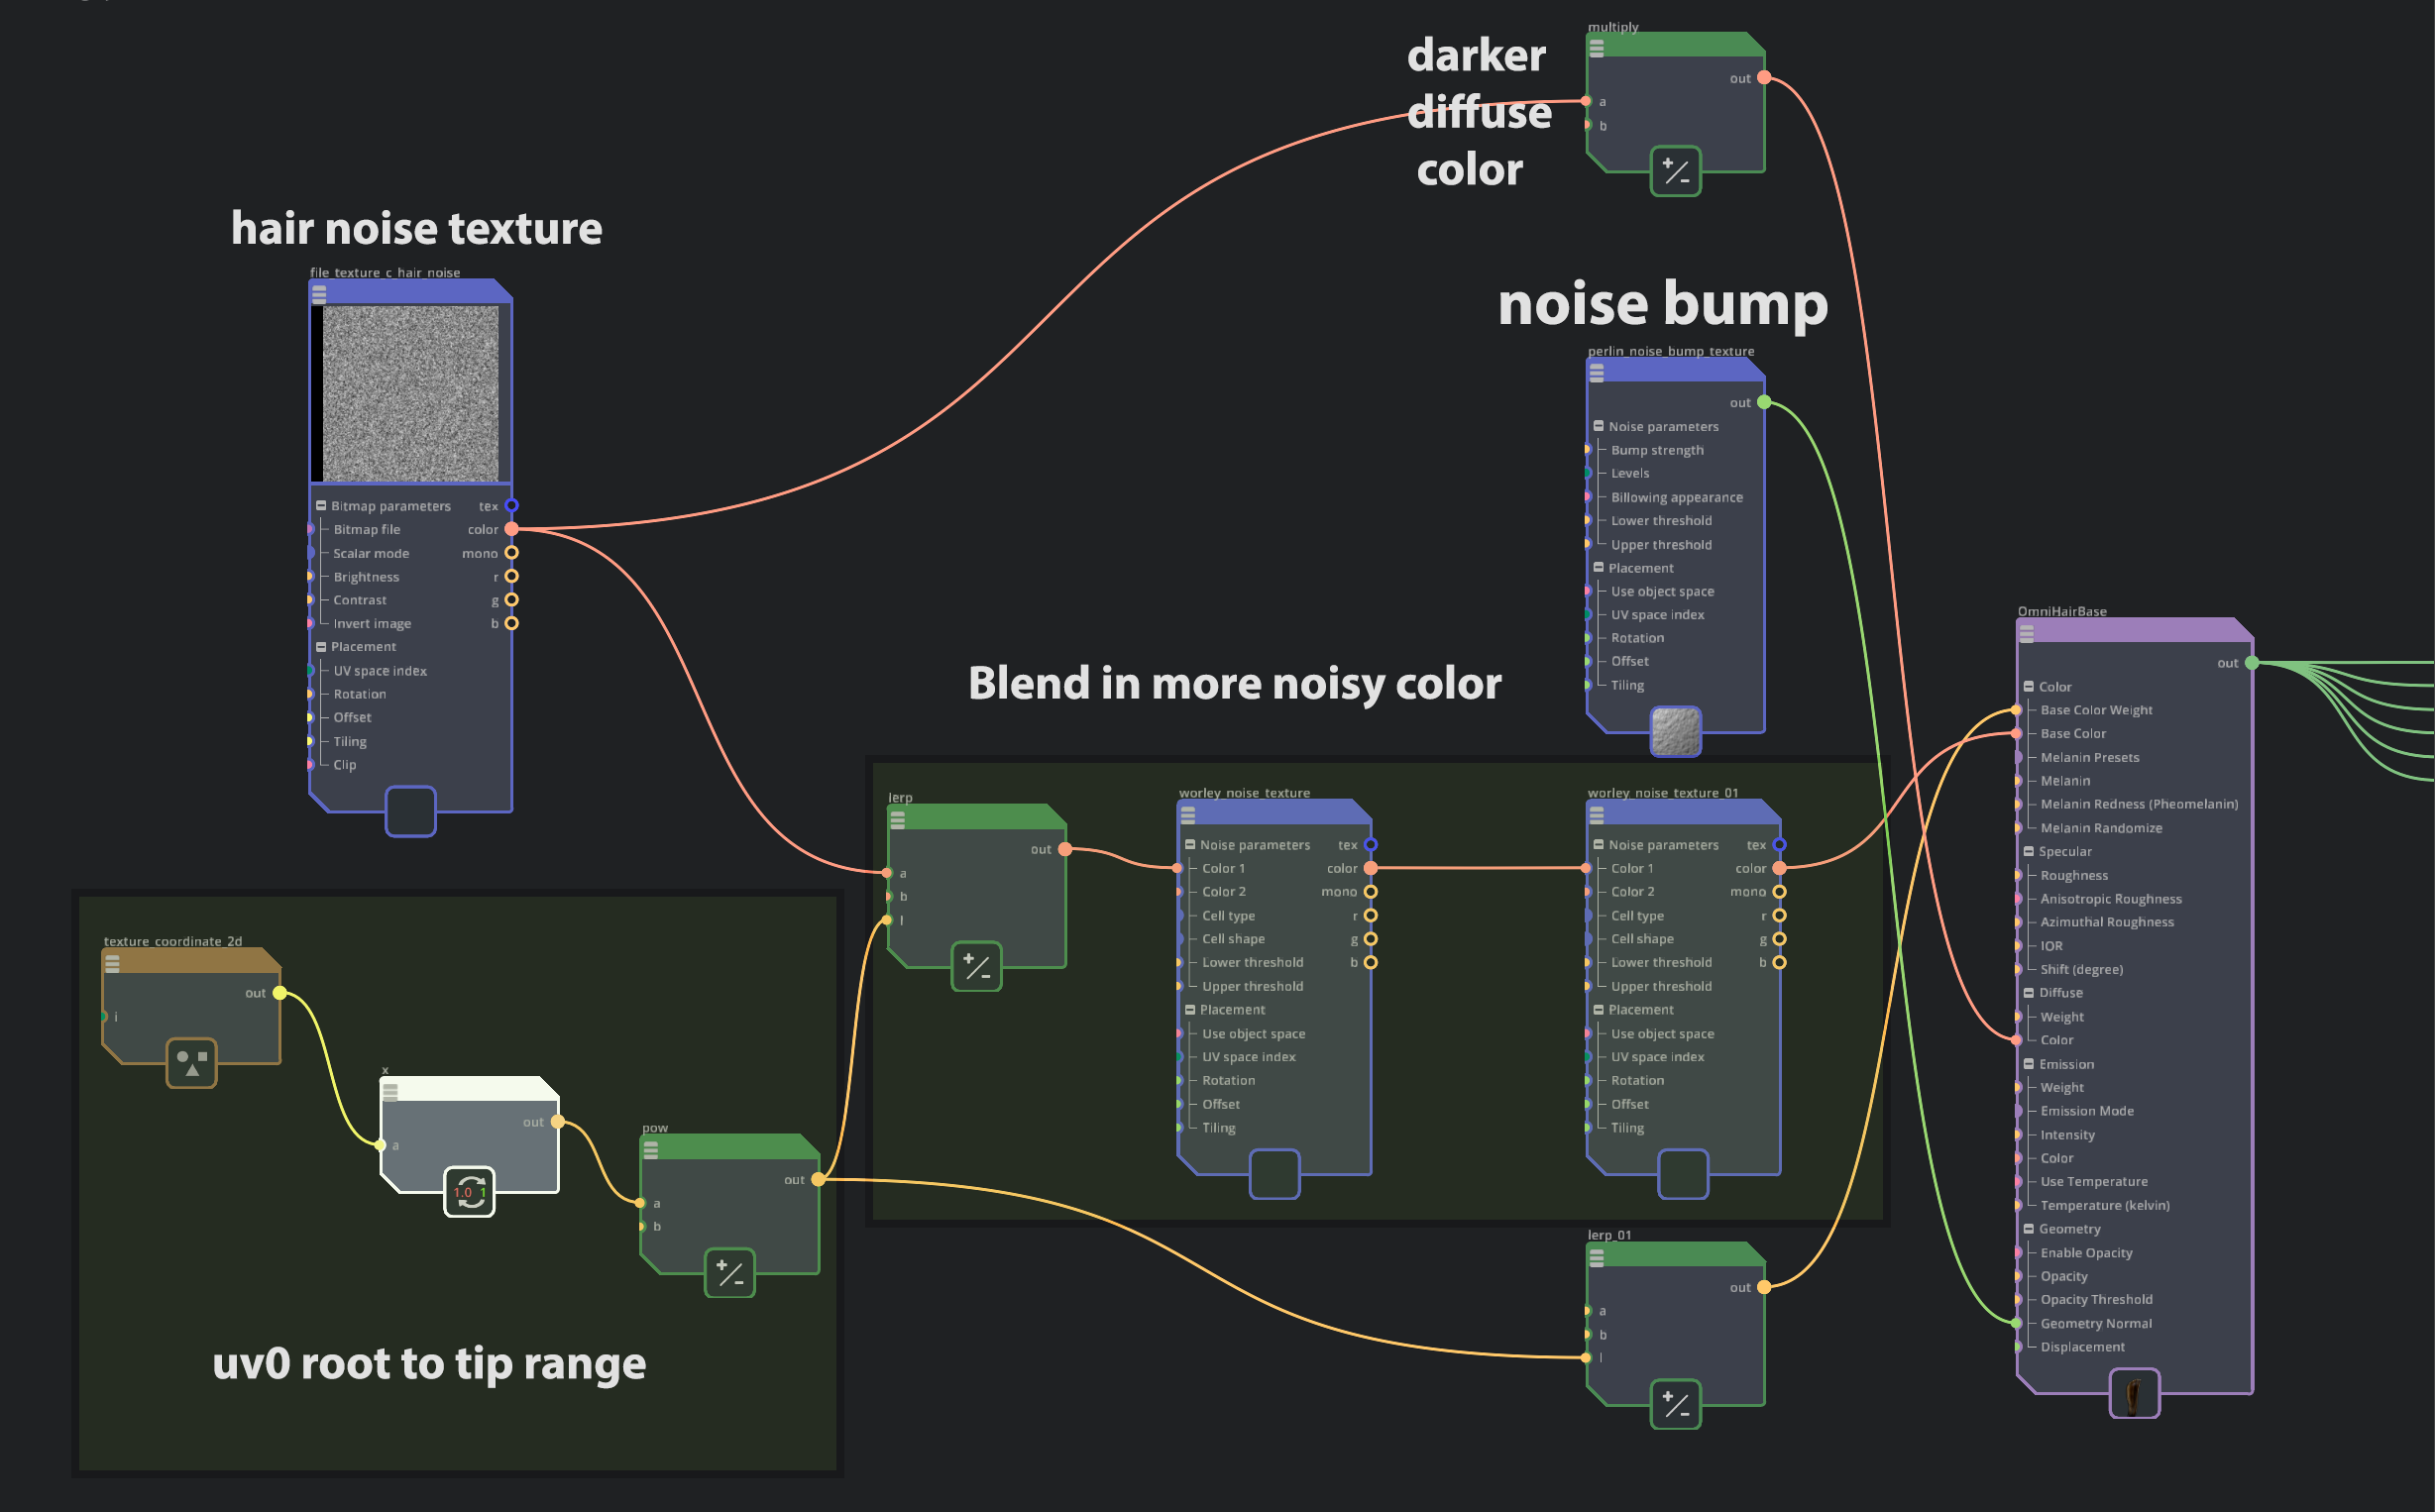
“c_hair_main_graph” network
Setup Post Processing and Render Settings
Setup Tone Mapping
Note
For this asset we preferred not to use any tone mapping and instead applied our own color corrections in the post processing settings.
Set Render Setting->Post Processing-> Tone Mapping-> Tone Mapping Operator to “Linear(Off)”
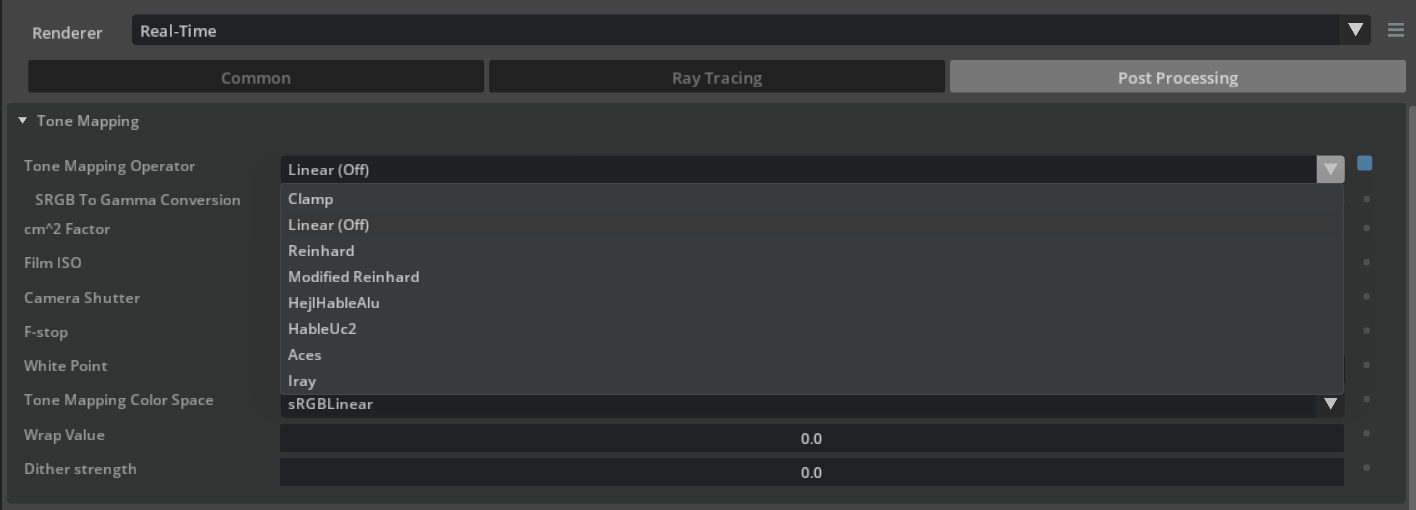
Tone Mapping Operator :
Linear(Off)Means no tone mapping is used
Post Processing
Note
The goal of this section is to:
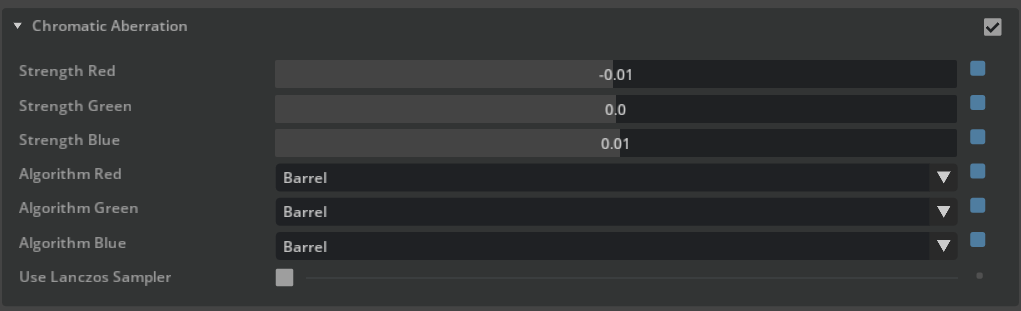
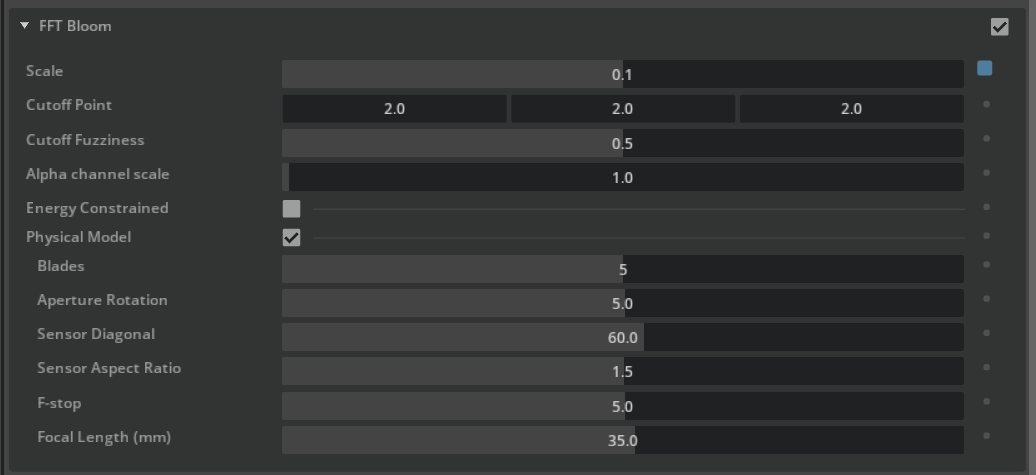
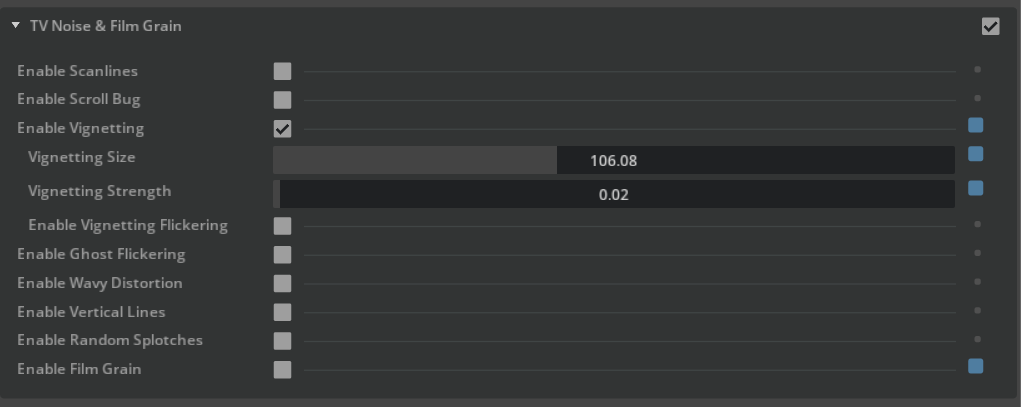
Add some contrast to the final render as well as some subtle real-life imperfections including chromatic aberration, vignetting, and bloom
Not that post processing settings are subjective, based on your preferences. These values are only suggestions. Experiment!
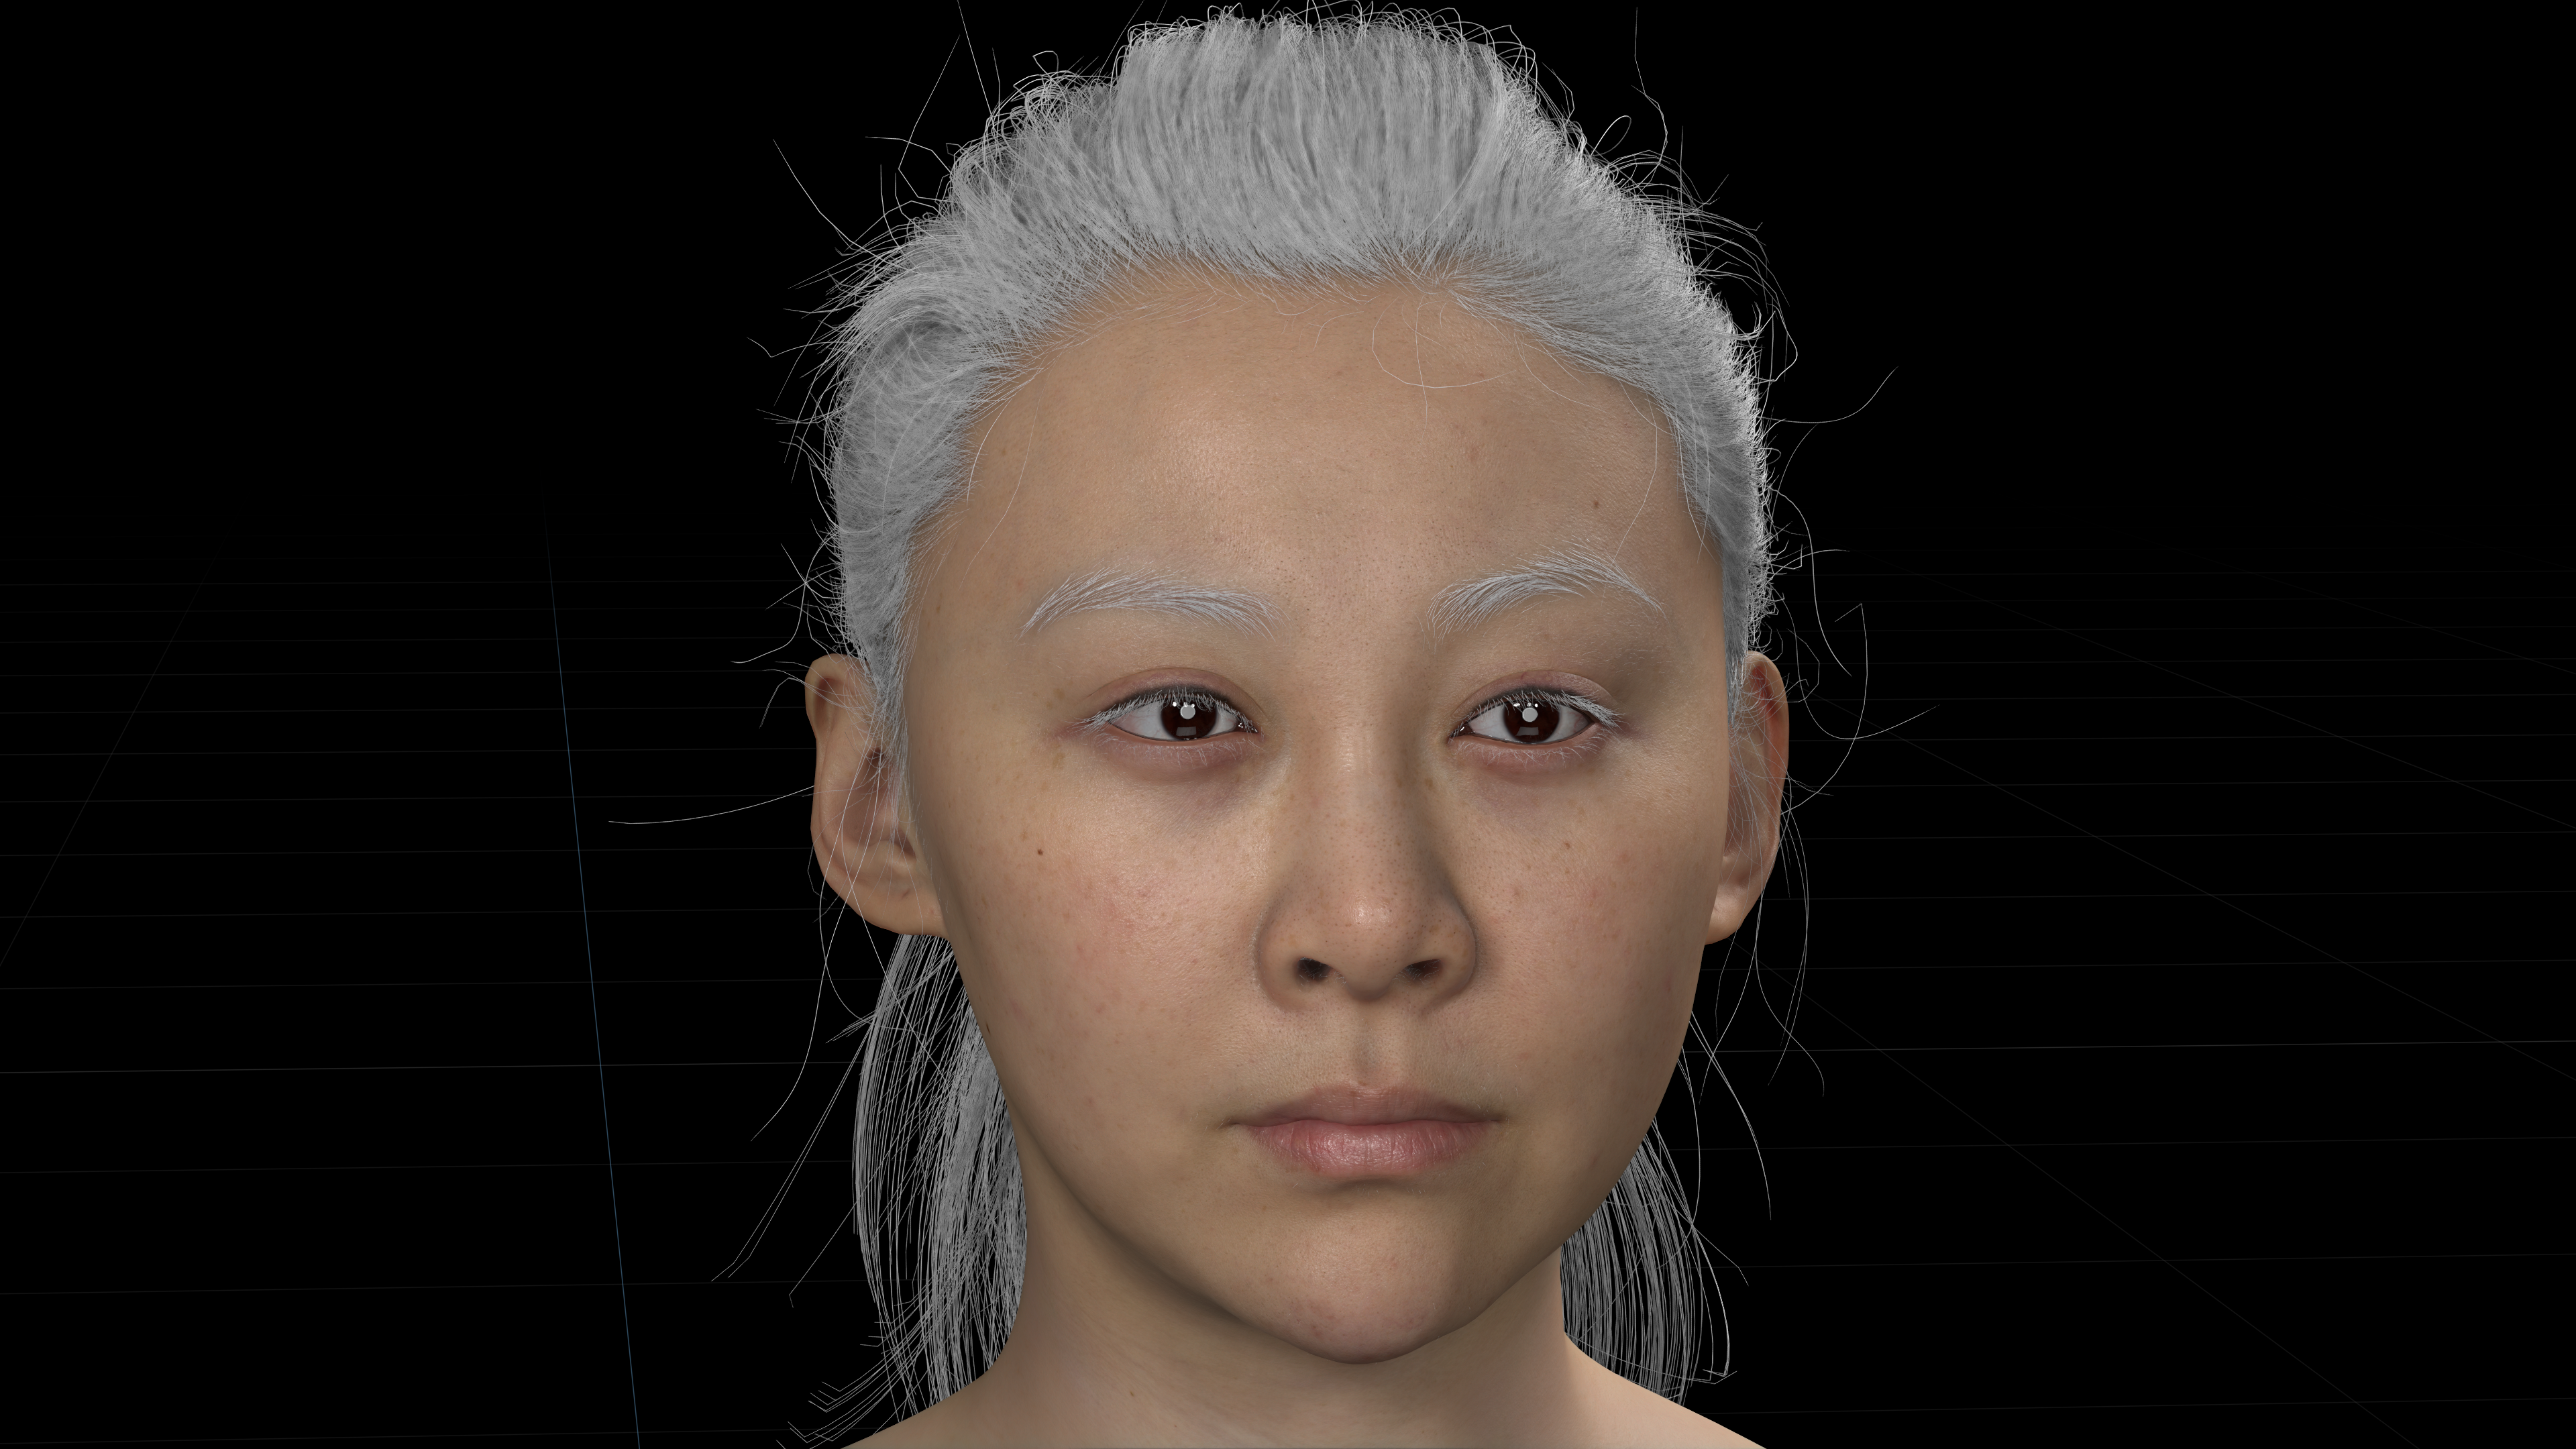
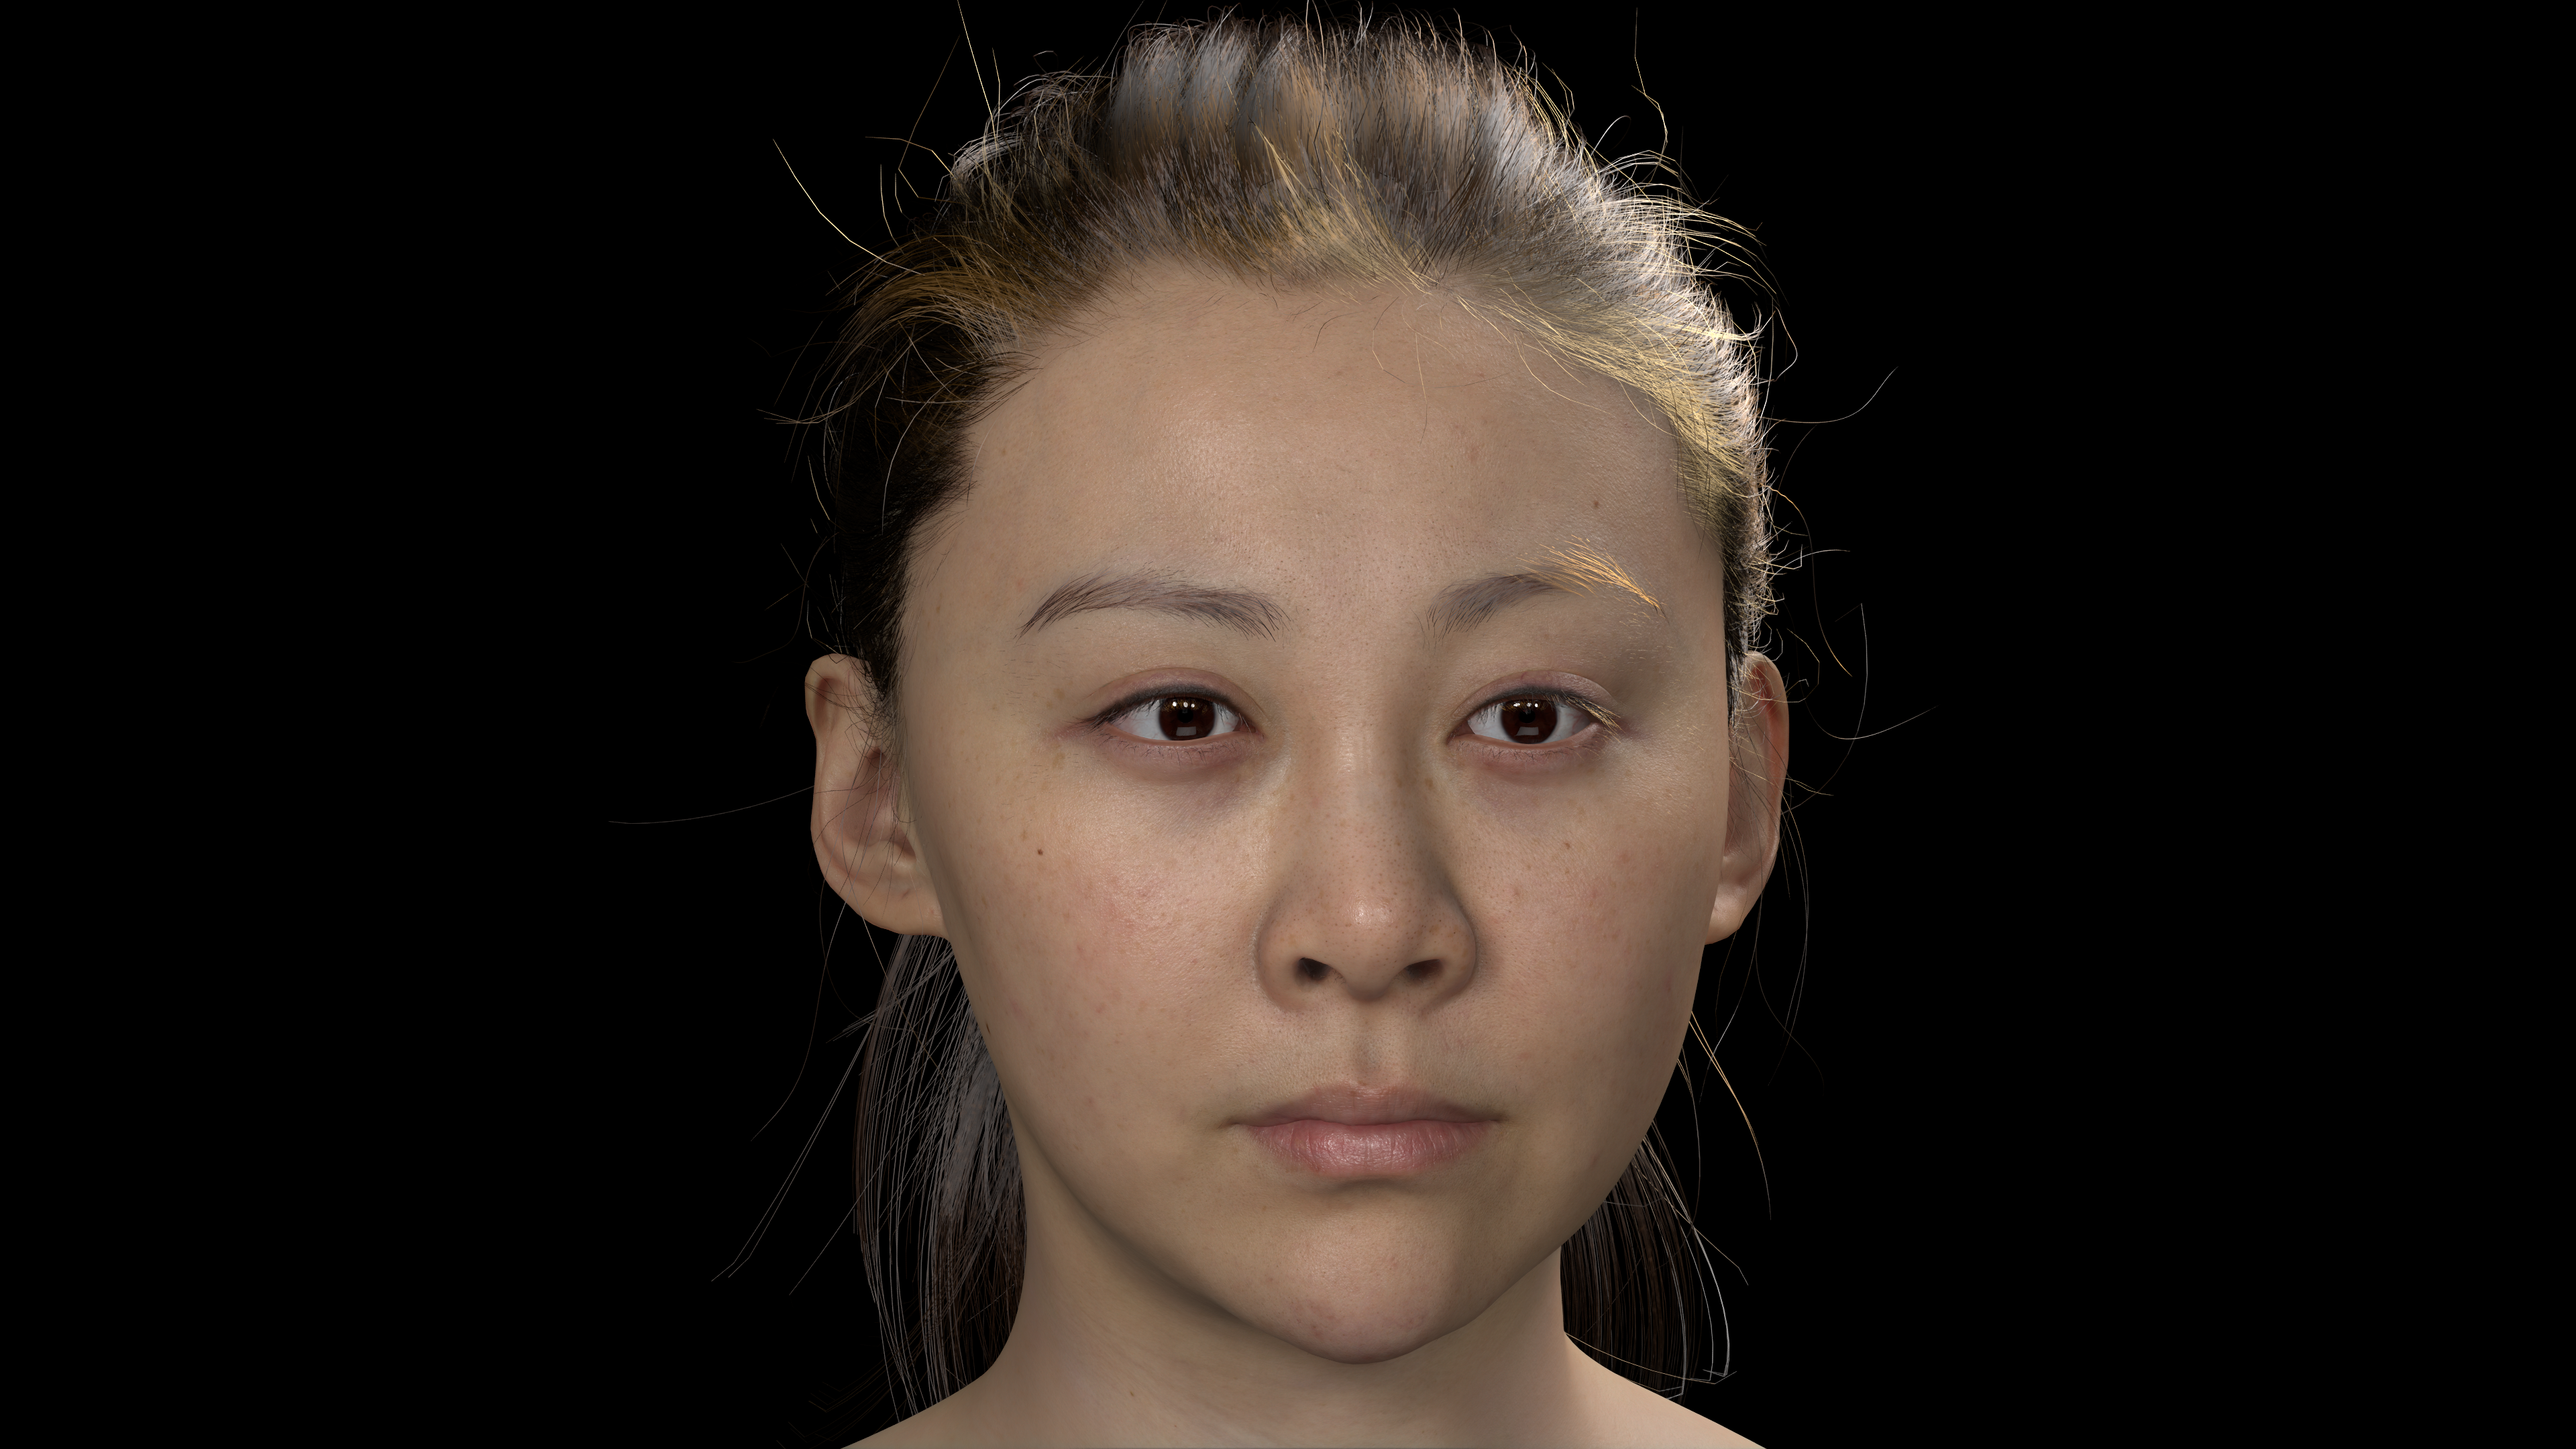
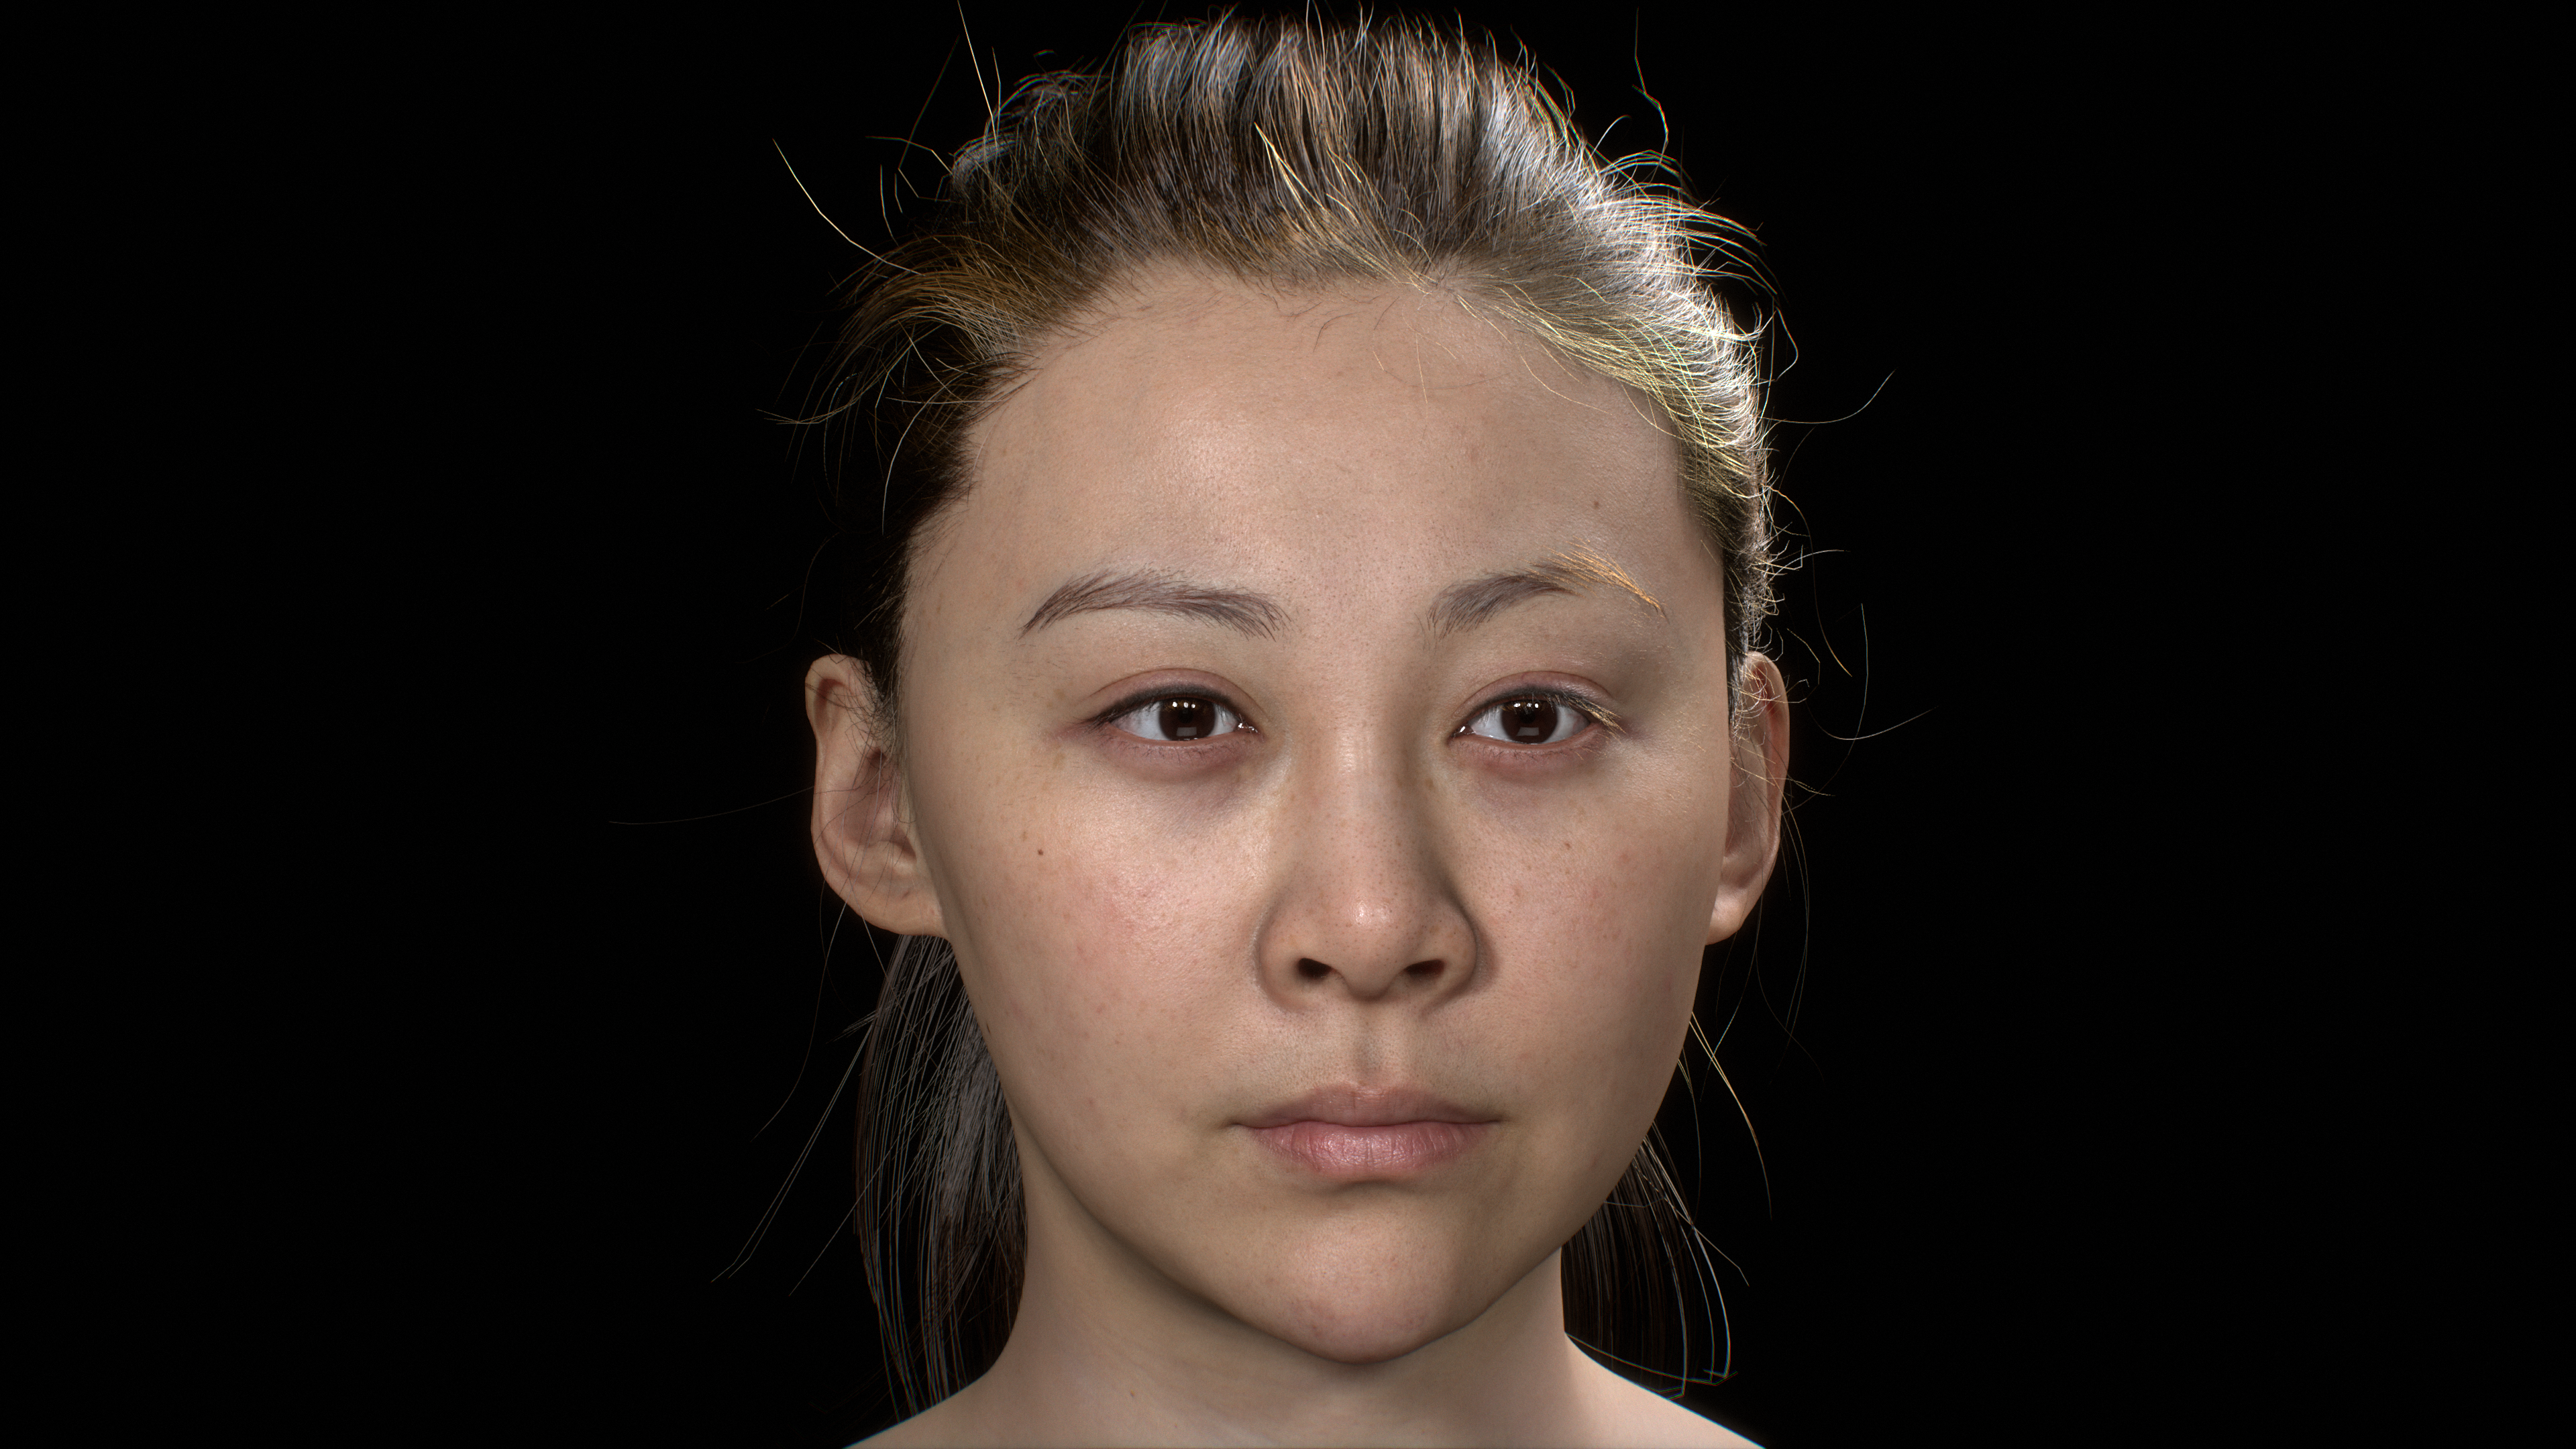
Before and After
|
|
Before |
After |
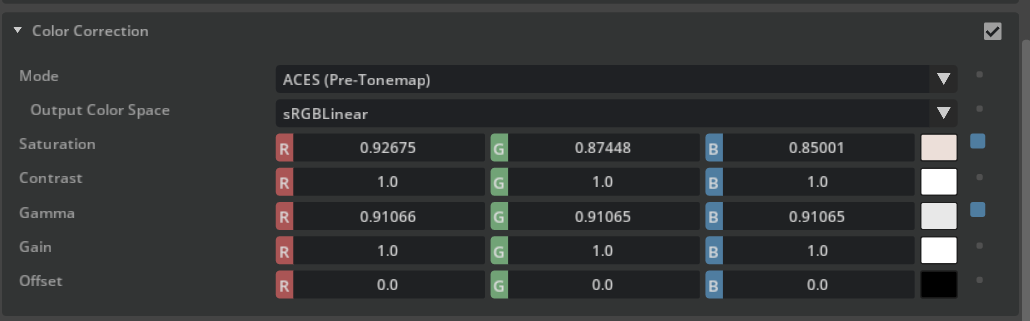
Color Correct Properties
|
Color Grading Properties
|
Chromatic Aberration Properties
|
Bloom Properties
|
Vignetting Properties
|

#usda 1.0
(
    customLayerData = {
        dictionary renderSettings = {
            bool "rtx:ambientOcclusion:enabled" = 0
            int "rtx:domeLight:upperLowerStrategy" = 3
            bool "rtx:hydra:materialSyncLoads" = 0
            bool "rtx:hydra:mdlMaterialWarmup" = 0
            bool "rtx:indirectDiffuse:enabled" = 0
            int "rtx:indirectDiffuse:updateSampleCount" = 0
            double "rtx:lightspeed:NRD_Common:denoisingRange" = 100000
            double "rtx:lightspeed:NRD_Common:disocclusionThreshold" = 0.00005
            int "rtx:lightspeed:NRD_ReLAX:diffuseFastHistoryFrames" = 2
            int "rtx:lightspeed:NRD_ReLAX:diffuseHistoryFrames" = 15
            double "rtx:lightspeed:NRD_ReLAX:diffusePhiLuminance" = 1
            int "rtx:lightspeed:NRD_ReLAX:specularFastHistoryFrames" = 0
            int "rtx:lightspeed:NRD_ReLAX:specularHistoryFrames" = 0
            bool "rtx:materialDb:syncLoads" = 0
            bool "rtx:multiThreading:enabled" = 1
            bool "rtx:post:chromaticAberration:enabled" = 1
            int "rtx:post:chromaticAberration:modeB" = 1
            int "rtx:post:chromaticAberration:modeG" = 1
            int "rtx:post:chromaticAberration:modeR" = 1
            double "rtx:post:chromaticAberration:strengthB" = 0.01
            double "rtx:post:chromaticAberration:strengthG" = 0
            double "rtx:post:chromaticAberration:strengthR" = -0.01
            bool "rtx:post:colorcorr:enabled" = 1
            float3 "rtx:post:colorcorr:gamma" = (0.91066283, 0.9106537, 0.9106537)
            float3 "rtx:post:colorcorr:saturation" = (0.9267516, 0.87448156, 0.8500142)
            float3 "rtx:post:colorgrad:blackpoint" = (0.051543683, 0.06724222, 0.105095565)
            float3 "rtx:post:colorgrad:contrast" = (1, 0.99999, 0.99999)
            bool "rtx:post:colorgrad:enabled" = 1
            float3 "rtx:post:colorgrad:gain" = (0.96496814, 0.9649585, 0.9649585)
            float3 "rtx:post:colorgrad:gamma" = (0.9267516, 0.9267423, 0.9267423)
            float3 "rtx:post:colorgrad:lift" = (0.06369424, 0.0636936, 0.0636936)
            float3 "rtx:post:colorgrad:offset" = (0.0159234, 0.015923483, 0.01592356)
            float3 "rtx:post:colorgrad:whitepoint" = (0.9798271, 0.9798173, 0.9798173)
            int "rtx:post:dlss:execMode" = 0
            double "rtx:post:dof:fNumber" = 20
            double "rtx:post:dof:subjectDistance" = 220
            double "rtx:post:histogram:whiteScale" = 17.639999605715275
            bool "rtx:post:lensFlares:enabled" = 1
            double "rtx:post:lensFlares:flareScale" = 0.1
            double "rtx:post:lensFlares:haloFlareWeight" = 0.01
            double "rtx:post:tonemap:dither" = 0.01
            int "rtx:post:tonemap:op" = 1
            double "rtx:post:tvNoise:colorAmount" = 0.9999999776482582
            bool "rtx:post:tvNoise:enableFilmGrain" = 0
            bool "rtx:post:tvNoise:enableVignetting" = 1
            bool "rtx:post:tvNoise:enabled" = 1
            double "rtx:post:tvNoise:grainAmount" = 0.03999999910593033
            double "rtx:post:tvNoise:lumAmount" = 0.549999987706542
            double "rtx:post:tvNoise:vignettingSize" = 106.07999801635742
            double "rtx:post:tvNoise:vignettingStrength" = 0.019999999552965164
            bool "rtx:raytracing:cached:enabled" = 0
            bool "rtx:raytracing:fractionalCutoutOpacity" = 1
            bool "rtx:raytracing:hair:fixAliasing" = 1
            bool "rtx:raytracing:subsurface:enabled" = 1
            int "rtx:raytracing:subsurface:maxSamplePerFrame" = 16
            bool "rtx:raytracing:subsurface:transmission:ReSTIR:enabled" = 1
            int "rtx:raytracing:subsurface:transmission:bsdfSampleCount" = 4
            bool "rtx:raytracing:subsurface:transmission:denoiser:enabled" = 0
            int "rtx:raytracing:subsurface:transmission:perBsdfScatteringSampleCount" = 6
            bool "rtx:realtime:mgpu:enabled" = 0
            double "rtx:reflections:maxRoughness" = 0.4
            int "rtx:shaderDb:cachePermutationIndex" = -1
            bool "rtx:shaderDb:driverAppShaderCacheDirPerDriver" = 0
            bool "rtx:shadows:constantSeed" = 0
            bool "rtx:shadows:denoiser:quarterRes" = 0
            bool "rtx:shadows:enableSpatialFiltering" = 0
            int "rtx:shadows:sampleCount" = 2
            bool "rtx:shadows:stratifySamples" = 0
        }
    }
)
Additional Render Settings
Note
Several Real-Time Rendering settings are set to optimize the balance between performance and quality.
The RTX Real-Time Renderer is still being actively developed. Some of the settings covered here may be deprecated once DLSS-D is ready. We’ll keep this section updated when things change.
Setting |
Value |
Notes |
|---|---|---|
Ray Tracing->NVIDIA DLSS->Frame Generation |
|
Frame Generation uses deep learning technology to generate a higher frame rate than what’s actually rendered. |
Ray Tracing->Direct Lighting->Non-Sampled Lighting Settings->Shadow Samples Per Pixel |
|
Trades render time for more shadow samples, providing a better input for the denoiser to work with. |
Ray Tracing->Direct Lighting->Non-Sampled Lighting Settings->Low Resolution Shadow Denoiser |
|
Low resolution shadows reduce shadow quality and detail. Enabling this setting can provide extra performance but for our high quality digital human head scene we turned it off. |
Ray Tracing->Indirect Diffuse Lighting->Ambient Occlusion |
|
Ambient Occlusion is an artistic way to add shadowing to the nooks and crannies of geometry but we decided to turn it off for this scene. |
Ray Tracing->Reflectons-> Roughness Cache Threshold |
|
Roughness threshold above which reflections are approximated. Higher values result in better quality but worse performance. We chose an in-between value which we thought optimal for the scene. |
Ray Tracing->Translucency->Fractional Cutout Opacity |
|
We used fractional opacity to render the eyes. |
Ray Tracing->Subsurface Scattering->Max Samples Per Frame |
|
This is a scene-dependent parameter. Higher samples didn’t result in obvious quality improvement for this particular scene. |
Ray Tracing->Subsurface Scattering->Transmission->BSDF Sample Count Ray Tracing->Subsurface Scattering->Transmission->Denoiser Ray Tracing->Subsurface Scattering->Transmission->Samples per BSDF Sample |
|
We increased the default sample count for transmission and disabled the denoiser to get a better translucency effect for subsurface materials while retaining sharp details |
Ray Tracing->Subsurface Scattering->Transmission->Sample Guiding |
|
Sample guiding helps the renderer acquire better samples for subsurface. It’s particularly useful in creating a more noise-free result without the denoiser enabled |