Entra ID (Azure AD) SSO (SAML)
Overview
While Nucleus includes a comprehensive system for managing users and groups, customers may choose to use a 3rd party identity provider for managing access. This document details the steps needed to integrate Nucleus and Entra ID (Azure AD) for Single Sign-On.
Prerequisites
To configure Entra ID (Azure AD) for SSO, the following is required:
A configured and functional Entra ID (Azure AD) tenant with a user that has administrative access
A stable and operational Enterprise Nucleus Server
An SSL/TLS certificate from a trusted Certificate Authority (CA) for the Nucleus SSO Gateway. (The entire certificate chain and private key is required.)
Access to create public DNS entries within your domain
Note
The file location examples shown in this document assume you are using the default installation path. Modify the file paths if you are using a custom location for your Nucleus SSO Gateway installation.
Part I: Pre-Configuration
Before configuring Entra ID (Azure AD), the following pre-configuration changes are needed:
Create a DNS entry for the Nucleus SSO Gateway which points to the IP Address of your Nucleus server. (Depending on your requirements, this may be a public or internal DNS entry.)
Part II: Configuring Azure
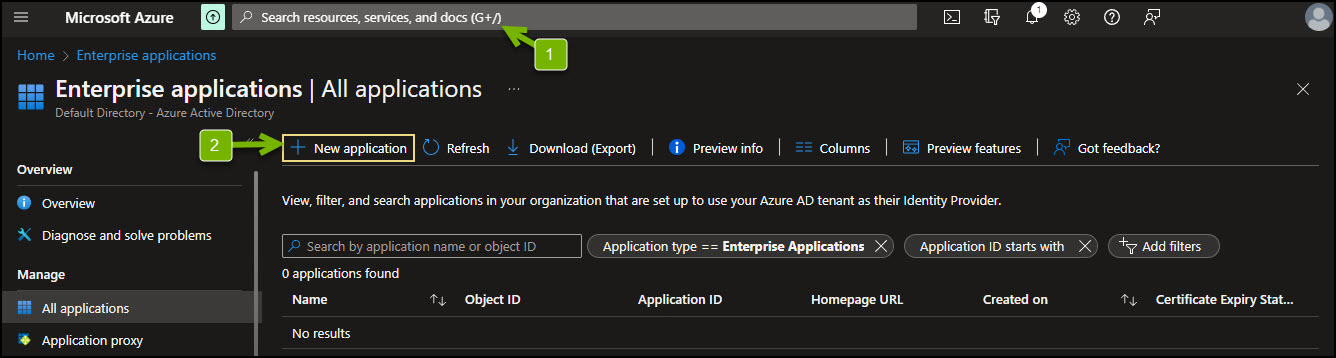
Using the search bar at the top of the portal, search for Enterprise Applications and select it.
From within the Enterprise Applications area, click New Application.
Click Create your own application.
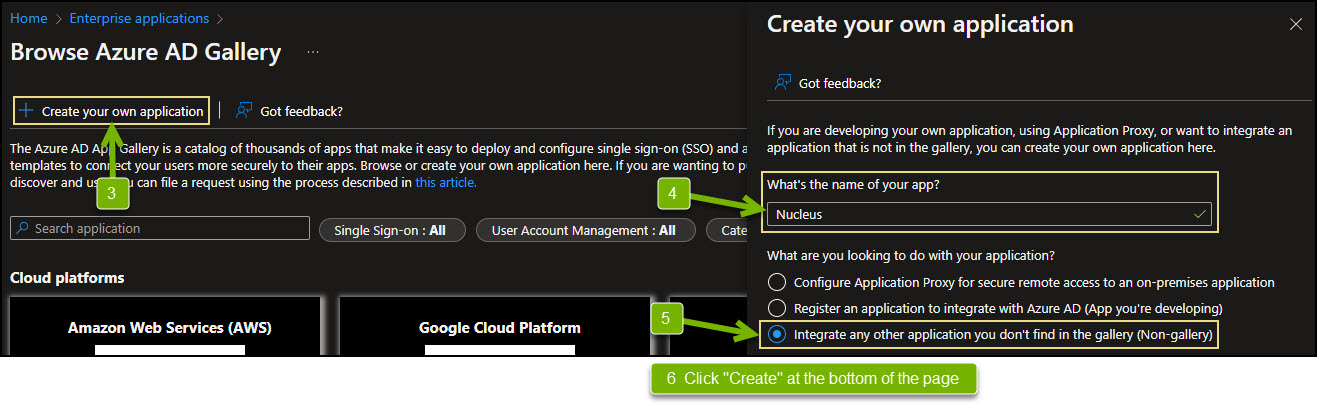
Name your application.
Select the Integrate any other application… option.
Click Create.
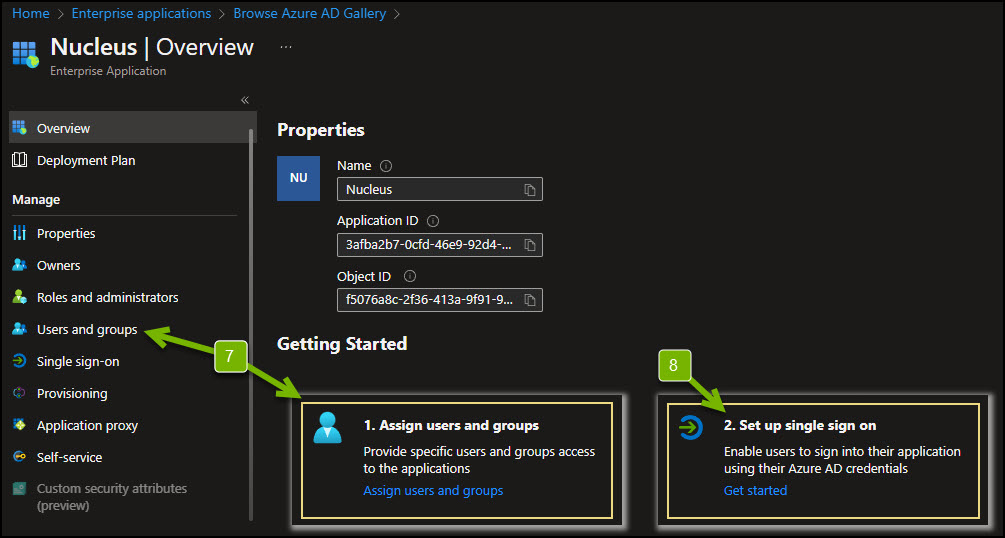
From the Overview page, click Assign users and groups and assign the appropriate users and groups as required.
Next from the Overview page, click Set up single sign on.
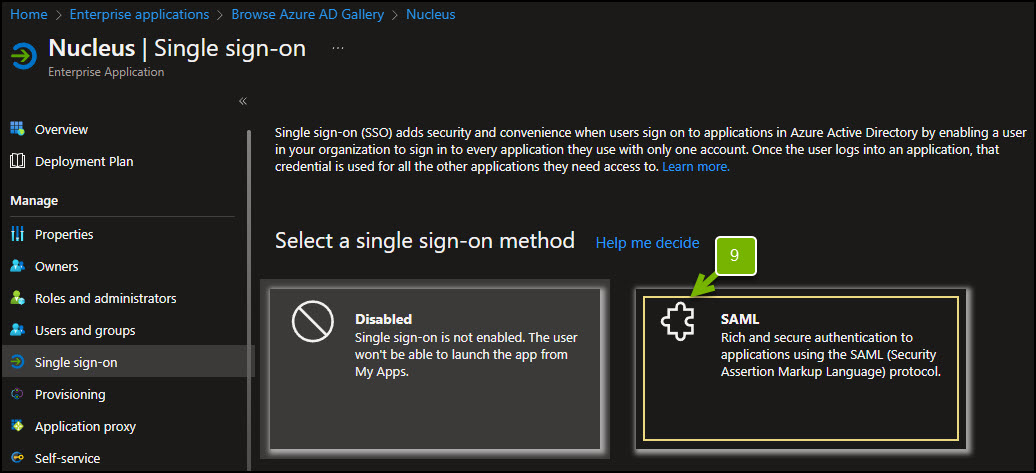
Click SAML.
For the Unique Identifier (entity ID), enter your SSO URL. (e.g., https://sso.omniverse.nvidia.com)
For the Reply URL, enter your SSO URL and include the /result path. (e.g., https://sso.omniverse.nvidia.com/result)
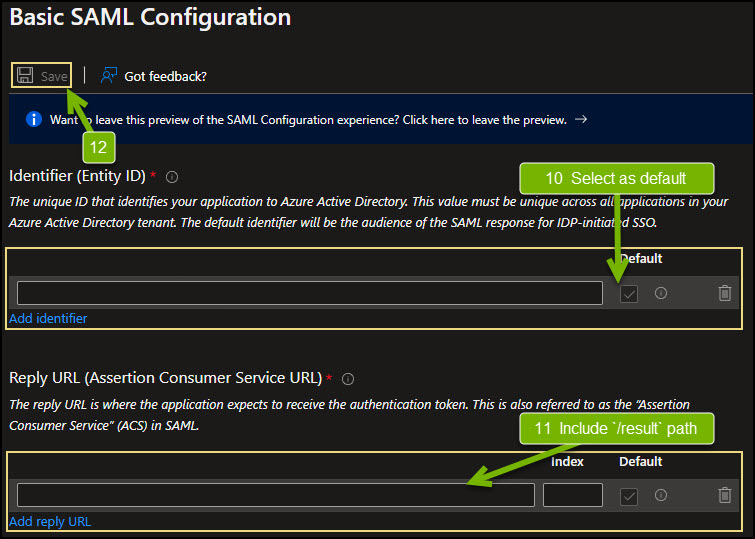
Click Save.
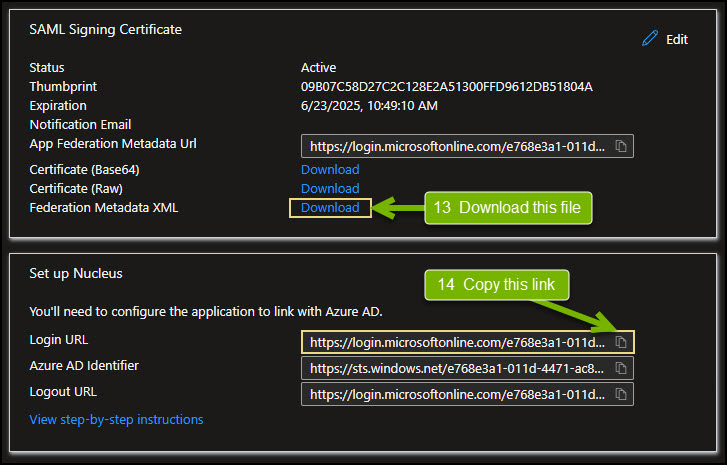
Download the Federation Metadata XML file to your computer and make note of the Login URL as it will be needed in a future step.
Part III: Configuring Nucleus
Prior to configuring the Nucleus configuration files, upload the metadata file that was downloaded from the Entra ID (Azure AD) portal and save it to this path:
/opt/ove/base_stack/saml/azuremetadata.xml
Within the nucleus-stack.env file, the following changes need to be made:
Enable the SSO functionality:
USE_SAML_SSO=1
Set the Nucleus SSO Gateway Address: (e.g., https://sso.omniverse.nvidia.com)
SSO_GW_ADDRESS=
Set the SSO Metadata file location: (This is the file from Step 1.)
FEDERATION_META_FILE=
Set the SAML IDP Login URL: (This address is provided by Entra ID (Azure AD).)
SAML_LOGIN_URL=
Set the text for the SSO button that will appear on the Nucleus log on screen:
SAML_SSO_NAME="Entra ID (Azure AD) SSO"
Note
Any fields within the nucleus-stack.env file that are not mentioned above should remain using their default configuration.
Configure the Nucleus SSO Gateway
Within the nucleus-sso-gateway.env file, make the following changes: (This file is located in the /opt/ove/sso directory if Nucleus was installed using the default installation path.)
Uncomment the End-User License Agreement (EULA):
# Uncomment to indicate your acceptance of EULA
ACCEPT_EULA=1
Specify the location of the SSL/TLS certificates and keys:
SSL_CERT=
SSL_KEY=
Note
It’s necessary to provide the full certificate chain and the Nucleus SSO Gateway requires all certificates to be contained within a single file and be in the following order (top to bottom): Domain Cert > Interim Cert(s) > CA/Root Cert.
If a password is required to decrypt the key, specify it here:
SSL_KEY_PASSWORD=
Make sure that your Nucleus SSO Gateway is running on TCP 443: (If required, the SSO Gateway may be run on a different port (i.e., TCP 444)):
SSO_GW_PORT=443
Before running the Nucleus SSO service, pull the necessary containers to ensure all required software is locally available:
sudo docker compose --env-file /opt/ove/sso/nucleus-sso-gateway.env -f /opt/ove/sso/nucleus-sso-gateway.yml pull
Once the software is pulled, it can be started:
sudo docker compose --env-file /opt/ove/sso/nucleus-sso-gateway.env -f /opt/ove/sso/nucleus-sso-gateway.yml up -d
Note
The above configuration assumes that SSL is being used for your Nucleus environment. If SSL is not being used, specify the no-ssl.yml configuration file.
Part IV: Testing
In your web browser, visit the URL for your Nucleus server, which should now display an Entra ID (Azure AD) SSO login option:
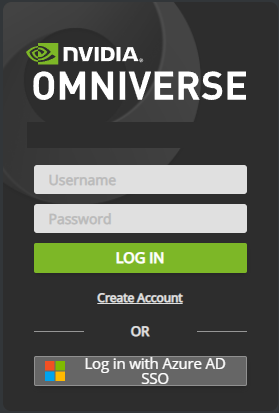
Clicking the Entra ID (Azure AD) SSO button will direct you to Entra ID (Azure AD) for authentication. Once correct credentials are entered and the user is authenticated, Nucleus Navigator will appear.
Part V: Optional Configuration
Hiding Local Account Credential Fields
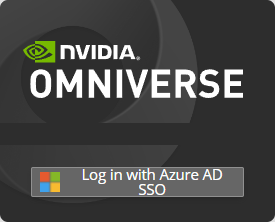
Once your Nucleus server is configured for SSO, the login dialog can be configured to hide the username, password, and Create Account link which then forces the user to log in only using the SSO provider.
To remove the extra credential fields, follow these steps:
Log into your Enterprise Nucleus Server and change to the directory where Nucleus is installed.
Using your preferred text editor, make the following change to
nucleus-stack.env: (Change True to False.)
CREDENTIAL_UI_VISIBLE=false
Restart the Docker containers on your Enterprise Nucleus Server.
The login page for Nucleus will now only display the link for the SSO provider as shown in the example below:
Important
The login/password credential window can be accessed by adding /admin to the end of the URL when logging into Nucleus Navigator using a web browser. (e.g., https://omniverse.nvidia.com/omni/web3/admin).
Using a Custom SSO Button Icon
If it’s desired to use a custom SSO button icon, follow these steps:
Log into your Enterprise Nucleus Server and change to the directory where Nucleus is installed.
Using your preferred text editor, make the following change to
nucleus-stack.env:
# Add the URL of where the image is hosted.  (e.g., https://www.nvidia.com/images/sso_icon.png)
SAML_SSO_IMAGE=
Additionally, make the following change to
nucleus-stack-ssl.ymlornucleus-stack-no-ssl.yml: (Depending on the use of SSL or not.)
# Uncomment (and set to valid URL) if custom SSO
# icon is desired
SAML_SSO_IMAGE: ${SAML_SSO_IMAGE}
Restart the Docker containers on your Enterprise Nucleus Server.
The SSO button will now display your preferred icon as shown in the example below:
Troubleshooting
If connections to your Nucleus server are failing, telnet to the SSO Gateway port from your computer. (By default, telnet is not enabled within Windows and is sometimes not installed on Linux distributions.)
If a connection refused or similar message is displayed, verify the following:
Ensure the Nucleus SSO Gateway service is running and the port configuration is correct.
Ensure there is not a local firewall running on the server and/or a firewall blocking connections.
To verify that your Nucleus SSO Gateway is configured correctly, visit the URL of the Nucleus SSO Gateway using your browser. If the configuration settings are correct, the following message will appear:

If you are using an NGINX proxy to provide TLS/SSL for Nucleus and are receiving a 414 Request-URI Too Large message when logging in with SSO:
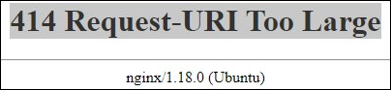
Make the following changes within the nginx.ingress.router.conf file on your NGINX server:
server {
    # Disable size limit on request bodies
    client_max_body_size 0;
    large_client_header_buffers  16 16k;
Once the change is made and the file is saved, restart the NGINX service and try again.