Single Sign-On (SSO) using SAML
Enterprise Nucleus Servers support integration with SAML Identity Providers (IDPs) for Single Sign-On and step-by-step documentation is available for several commonly used providers. SAML IDPs not listed below should be compatible, providing they align to SAML standards.
Prior to integrating with your SSO provider, we highly recommend that you review the following information which explains the basic principles of how SSO authentication works with Nucleus.
Overview
When integrating with SSO, there are three components involved: The SAML-based Identity Provider, Nucleus itself as a consumer, and the Nucleus SSO Gateway as a helper service.
Nucleus itself needs an identity - an account - for a client’s connection. Note that Nucleus Core does not have a preference where the account is coming from - it uses its own internally generated JSON Web tokens (JWT) to authenticate a user. Nucleus includes an Authentication Service specifically to handle this abstraction. The Authentication Service can take a specific authentication method, and once a user is authenticated with that method, issue a JWT to Nucleus. In the case of authentication with passwords, the authentication service acts as an identity provider in addition to issuing JWT, whereas with SSO it acts as an intermediary, redirecting a user to a third-party IDP and then, parsing the return.
The Nucleus SSO Gateway makes it convenient to integrate with IDPs, which insist on redirecting a user to a particular URL themselves once authentication is completed. The SSO Gateway acts as a “endpoint” for these redirects, being aware of their payloads, and is able to redirect a user to a desired Nucleus instance. This is extremely convenient when one runs many instances of Nucleus, or when Nucleus instance(s) are not configured with SSL/TLS.
The following diagram explains the basic interaction:
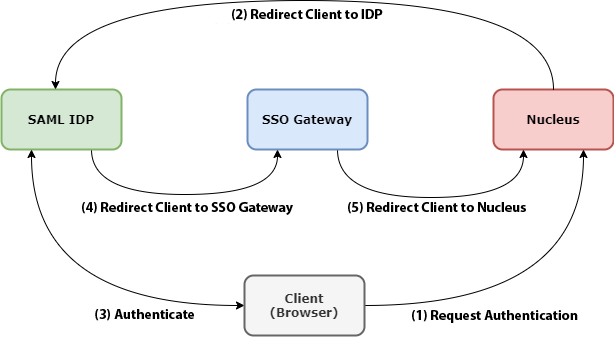
When a Client elects the SSO Authentication option (Reference 1), it’s sent to a pre-configured SAML IDP URL. (This URL is supplied by the IDP provider, and must be configured within Nucleus’s Authentication Service.) (Reference 2)
The Client then interacts with the SAML IDP and authenticates. (Reference 3)
Upon successful authentication, the IDP sends the Client to the Nucleus SSO Gateway, the URL of which is configured on the IDP side. Note that the hostname of that URL has to be resolvable by the Client - so it can be a hostname that’s on an Intranet (i.e.,
nucleus-sso-gateway.my-intranet.my-domain- wheremy-intranet.my-domainis not a valid DNS name on the Internet.) (Reference 4)The SSO gateway examines the payload returned by the IDP, and determines which Nucleus instance the authentication attempt was for. It then sends the Client back to Nucleus (Reference 5), which after validating the SAML response, issues an internal JWT for this connection and the session continues.
Configuring SAML Integration
Given the above description of fundamentals, there are three steps in the SAML integration process:
Deploying the Nucleus SSO Gateway
Configuring your preferred SAML IDP
Enabling and configuration the Nucleus Base Stack for SSO
Deploying the SSO Gateway
The SSO Gateway ships as a component of the Nucleus artifact. It consists of its own docker compose and settings (.env) files. Akin to configuring the Nucleus base stack, review the .env file and configure as needed.
Most IDP’s require the bounce-back or reply URL (Reply URL) to be HTTPS. This means that you will need an SSL/TLS certificate, and proper DNS hostname for the host running your SSO Gateway.
Also, while the SSO Gateway must to be SSL/TLS enabled, Nucleus does not. While not recommended, it is possible to have a non-SSL Nucleus using SAML SSO.
Configuring the SAML Identity Provider
On the SAML IDP’s side, the following is required:
Create an entity or application for your Enterprise Nucleus Server deployment
Configure the application with your SSO Gateway URL as the bounce-back or reply URL (i.e.,
https://my-sso-gateway.my-org.my-domain/result)Obtain the IDP-provided Login URL
Download the SAML Metadata XML - The Metadata XML must be using RSA-SHA256 XML signatures
SAML SSO Integrations
The following guides detail how to configure commonly used Identity Providers (IDP’s) for authentication with an Enterprise Nucleus Server using SAML.