USD in Kit
FAQ
Q: Does Kit (and Omniverse) use Vanilla USD?
The short answer is no - we have some custom modifications which mean our version of USD “nv_usd” is partially ABI incompatible with a standard build of USD. Many of these changes are in Hydra and Asset Resolver API. We are hoping to migrate towards using vanilla USD as soon as we can, as new APIs in USD like AR 2.0 make this possible. We do provide header files for nv_usd on request, which will allow you to build against nv_usd
Q: Does Kit ship with USD?
Yes - a full USD build is shipped as part of the Kit install. This contains standard command line tools like usdcat etc built against nv_usd. Some tools may require various env vars to be set before they can be used, we don’t currently supply a script which sets them for you.
Layers
USD layers in Kit can be manipulated through the ommi.kit.widget.stage Widget. This emits a number of commands which may be useful to understand
Layer/EditTarget Commands
These commands are all part of omni.kit.widget.layers and most of them can be invoked from various parts of that widget
SetEditTarget
CreateSublayer
RemoveSublayer
RemovePrimSpec
MergeLayers
FlattenLayers
CreateLayerReference
StitchPrimSpecsToLayer
MovePrimSpecsToLayer
MoveSublayer
ReplaceSublayer
SetLayerMuteness
LockLayer
An example of using the SetLayerMuteness command to mute a specific layer in a large scene:
import omni.kit.commands

omni.kit.commands.execute('SetLayerMuteness',
	layer_identifier='/media/USD/AnimalLogic/USD_ALab_0723_vanilla/USD_ALab_0723_vanilla/entity/ztl01_060/ztl01_060_light_pre_input_v002.usda',
	muted=True)
Transforms
USD has a fairly flexible but complex transformation stack, see:
Prims
We can create USD Prims in Kit as you would expect. The “Create” menu contains a representative set of Meshes, Shapes, Lights etc
Most of those are calling a single command - CreatePrim
If we call:
import omni.kit.commands

omni.kit.commands.execute('CreatePrim',
	prim_type='Cylinder',
	attributes={'radius': 50, 'height': 100, 'extent': [(-50, -50, -50), (50, 50, 50)]})
we will see a cylinder in the viewport. The resulting USD snippet is:
#usda 1.0
def Cylinder "Cylinder"
    {
        uniform token axis = "Y"
        float3[] extent = [(-50, -50, -50), (50, 50, 50)]
        double height = 100
        double radius = 50
        custom bool refinementEnableOverride = 1
        custom int refinementLevel = 2
        double3 xformOp:rotateXYZ = (0, 0, 0)
        double3 xformOp:scale = (1, 1, 1)
        double3 xformOp:translate = (0, 0, 0)
        uniform token[] xformOpOrder = ["xformOp:translate", "xformOp:rotateXYZ", "xformOp:scale"]
    }
Prim State Manipulation Commands
TogglePayLoadLoadSelectedPrims - Toggles the load/unload payload of the selected primitives
SetPayLoadLoadSelectedPrims - Set the load/unload payload of the selected primitives
ToggleVisibilitySelectedPrims- Toggles the visiblity of the selected primitives
UnhideAllPrims - unhide all prims which are hidden
Prim Creation Commands
CreateMeshPrim - create non-USD Primitive meshes (Cube, Cylinder, Plane, Sphere etc).
CreatePrimWithDefaultXform/CreatePrim - Create a typed USD Prim e.g Shape (Cube, Cylinder, Cone, Capsule), Light, Camera, Scope, Xform etc.
CreatePrims - Create multiple primitives
Hierarchy/Prim Modification Commands
ParentPrims - Move prims into children of “parent” primitives
UnparentPrims - Move prims into “/” primitives
GroupPrims - Group primitive
CopyPrim - Copy primitive
CopyPrims
CreateInstance - Instance primitive
CreateInstances
DeletePrims - Delete primitives
MovePrim - Move Prim
MovePrims
References/Payloads
Kit allows you to manipulate references and payloads on Prims, through e.g “Add” in the Context Menu available in the Viewport and Stage Widget.
Properties and Metadata
See
These can be manipulated using standard USD APIs but there are some Kit commands which can help. The “ChangeProperty” command is invoked whenever you change a property using one of Kit’s USD Property Panel Widgets
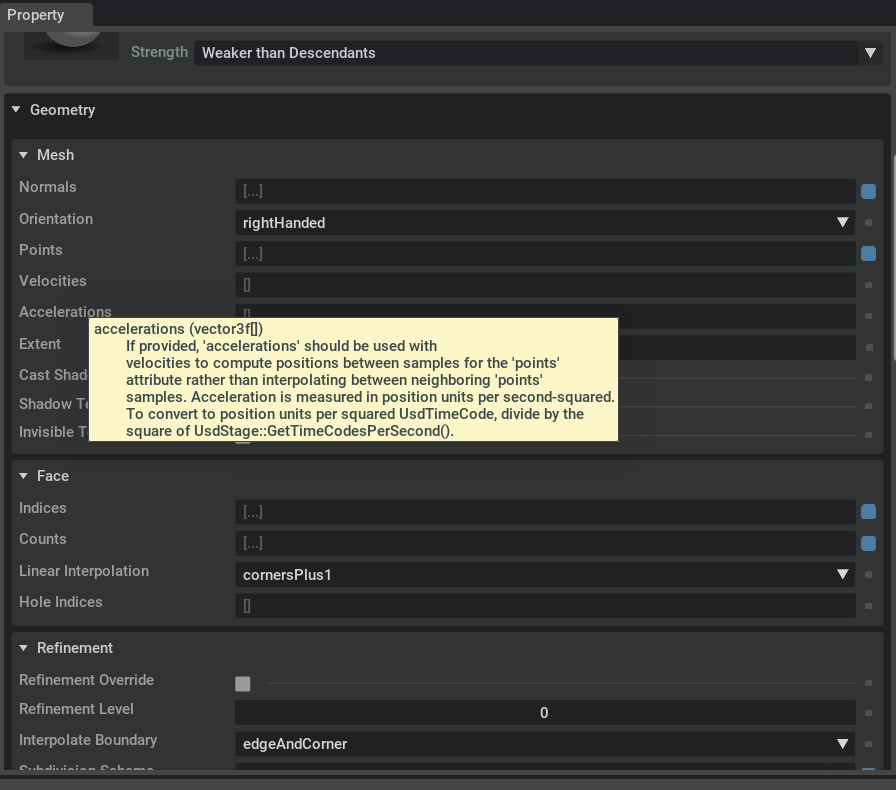
A handy tip - you can get API documentation for a property by hovering over it’s name in any Property Panel Widget e.g
Commands
ChangeProperty
RemoveProperty
ChangeMetadataInPrims
ChangeMetadata
ChangeAttributesColorSpace
Materials
The RTX renderer and IRay both use MDL as their shading language. MDL based shaders are used in Kit, see:
To understand Material binding, let’s start with a sphere created with Create->Shape->Sphere
#usda 1.0
def Sphere "Sphere"
{
    float3[] extent = [(-50, -50, -50), (50, 50, 50)]
    double radius = 50
}
If we have this sphere selected, and we call Create->Material->OmniSurface from the Kit Menu Bar and then tweak the resulting material so it’s red, it generates the following commands
import asyncio
import omni.kit.commands
from pxr import Gf, Sdf


async def assign_red_material():
    omni.kit.commands.execute('CreateAndBindMdlMaterialFromLibrary',
        mdl_name='OmniSurface.mdl',
        mtl_name='OmniSurface',
        mtl_created_list=None,
        bind_selected_prims=True)

    await omni.kit.app.get_app().next_update_async()

    omni.kit.commands.execute('ChangeProperty',
        prop_path=Sdf.Path('/World/Looks/OmniSurface/Shader.inputs:diffuse_reflection_color'),
        value=Gf.Vec3f(1.0, 0.0, 0.0),
        prev=Gf.Vec3f(1.0, 1.0, 1.0))


asyncio.ensure_future(assign_red_material())
NOTE THAT IF WE RUN THIS AS A SCRIPT - THE SHADER VALUES WILL NOT CHANGE.
Why not? In Kit, all MDL material params are populated in their corresponding USD shader nodes lazily.. so won’t be populated upfront The ChangePropertyCommand can only change properties that already exist in USD, so if we don’t trigger parameter authoring, it will fail silently. The authoring can be triggered by selecting the shader
Here is a working version of the above:
import omni.kit.commands
from pxr import Gf, Sdf
import asyncio


async def assign_red_material():
    omni.kit.commands.execute('CreateAndBindMdlMaterialFromLibrary',
        mdl_name='OmniSurface.mdl',
        mtl_name='OmniSurface',
        mtl_created_list=None,
        bind_selected_prims=True)

    await omni.kit.app.get_app().next_update_async()
    selection = omni.usd.get_context().get_selection()
    #NOTE SELECTION..
    selection.set_selected_prim_paths(["/World/Looks/OmniSurface/Shader"], False)
    await omni.kit.app.get_app().next_update_async()

    omni.kit.commands.execute('ChangeProperty',
        prop_path=Sdf.Path('/World/Looks/OmniSurface/Shader.inputs:diffuse_reflection_color'),
        value=Gf.Vec3f(1.0, 0.0, 0.0),
        prev=Gf.Vec3f(1.0, 1.0, 1.0))

asyncio.ensure_future(assign_red_material())
Running that snippet, the resulting USD scene looks like this:
#usda 1.0
def Xform "World"
{
    def Sphere "Sphere"
    {
        float3[] extent = [(-50, -50, -50), (50, 50, 50)]
        rel material:binding = </World/Looks/OmniRed> (
            bindMaterialAs = "weakerThanDescendants"
        )
        double radius = 50
    }

    def Scope "Looks"
    {
        def Material "OmniSurface"
        {
            token outputs:mdl:displacement.connect = </World/Looks/OmniSurface/Shader.outputs:out>
            token outputs:mdl:surface.connect = </World/Looks/OmniSurface/Shader.outputs:out>
            token outputs:mdl:volume.connect = </World/Looks/OmniSurface/Shader.outputs:out>

            def Shader "Shader"
            {
                uniform token info:implementationSource = "sourceAsset"
                uniform asset info:mdl:sourceAsset = @OmniSurface.mdl@
                uniform token info:mdl:sourceAsset:subIdentifier = "OmniSurface"
                color3f inputs:diffuse_reflection_color = (1, 0, 0) (
                    customData = {
                        float3 default = (1, 1, 1)
                    }
                    displayGroup = "Base"
                    displayName = "Color"
                    hidden = false
                )
                token outputs:out
            }
        }
    }
}
The first command in the script is an example of a composite command which is used to group together 3 other commands:
CreatePrim - Create “/World/Looks”, where all Material Prims live
CreateMdlMaterialPrim - Create “/World/Looks/Omnisurface” Material Prim
BindMaterial - Bind this material to the selected prim(s)
Material Prims are created in a shared/common location, and can be shared - i.e bound to many prims in the scene which is why the shader is created where it is
Material Commands
BindMaterial
SetMaterialStrength - Set material binding
CreateMdlMaterialPrim
CreatePreviewSurfaceMaterialPrim
CreateAndBindMdlMaterialFromLibrary
Material Queries in USD
query the bound material on a prim:
import omni.usd
from pxr import UsdShade
stage = omni.usd.get_context().get_stage()
prim = stage.GetPrimAtPath("/World/Sphere")
bound_material, _ = UsdShade.MaterialBindingAPI(prim).ComputeBoundMaterial()
print (f"Bound Material {bound_material}")
Material Assignment
As well as prim-based material assignment, Kit and RTX also support
Collection-based Material Assignment
GeomSubsets
For collection-based assignment, see
GeomSubsets
GeomSubset encodes a subset of a piece of geometry (i.e.a UsdGeomImageable) as a set of indices. Currently only supports encoding of face-subsets.
For more details:
Here is an example of a single mesh containing 2 cubes, with different materials assigned to each cube
#usda 1.0
def Mesh "cubeymccubeface"
{
    uniform token subsetFamily:materialBind:familyType = "partition"

    def GeomSubset "green"
    {
        uniform token elementType = "face"
        uniform token familyName = "materialBind"
        int[] indices = [12,13,14,15,16,17]
        custom rel material:binding = </World/Looks/OmniPBR2>
    }

    def GeomSubset "red"
    {
        uniform token elementType = "face"
        uniform token familyName = "materialBind"
        int[] indices = [0,1,2,3,4,5,6,7,8,9,10,11]
         custom rel material:binding = </World/Looks/OmniPBR1>

    }
    int[] faceVertexCounts = [4, 4, 4, 4, 4, 4, 4, 4, 4, 4, 4, 4, 4, 4, 4, 4, 4, 4]
    int[] faceVertexIndices = [0, 1, 3, 2, 0, 4, 5, 1, 1, 5, 6, 3, 2, 3, 6, 7, 0, 2, 7, 4, 4, 7, 6, 5, 8, 9, 11, 10, 8, 12, 13, 9, 9, 13, 14, 11, 10, 11, 14, 15, 8, 10, 15, 12, 12, 15, 14, 13, 16, 17, 19, 18, 16, 20, 21, 17, 17, 21, 22, 19, 18, 19, 22, 23, 16, 18, 23, 20, 20, 23, 22, 21]
    int foo = 6

    normal3f[] normals = [(0, -1, 0), (0, -1, 0), (0, -1, 0), (0, -1, 0), (0, 0, -1), (0, 0, -1), (0, 0, -1), (0, 0, -1), (1, 0, 0), (1, 0, 0), (1, 0, 0), (1, 0, 0), (0, 0, 1), (0, 0, 1), (0, 0, 1), (0, 0, 1), (-1, 0, 0), (-1, 0, 0), (-1, 0, 0), (-1, 0, 0), (0, 1, 0), (0, 1, 0), (0, 1, 0), (0, 1, 0), (0, -1, 0), (0, -1, 0), (0, -1, 0), (0, -1, 0), (0, 0, -1), (0, 0, -1), (0, 0, -1), (0, 0, -1), (1, 0, 0), (1, 0, 0), (1, 0, 0), (1, 0, 0), (0, 0, 1), (0, 0, 1), (0, 0, 1), (0, 0, 1), (-1, 0, 0), (-1, 0, 0), (-1, 0, 0), (-1, 0, 0), (0, 1, 0), (0, 1, 0), (0, 1, 0), (0, 1, 0), (0, -1, 0), (0, -1, 0), (0, -1, 0), (0, -1, 0), (0, 0, -1), (0, 0, -1), (0, 0, -1), (0, 0, -1), (1, 0, 0), (1, 0, 0), (1, 0, 0), (1, 0, 0), (0, 0, 1), (0, 0, 1), (0, 0, 1), (0, 0, 1), (-1, 0, 0), (-1, 0, 0), (-1, 0, 0), (-1, 0, 0), (0, 1, 0), (0, 1, 0), (0, 1, 0), (0, 1, 0)] (
        interpolation = "faceVarying"
    )
    point3f[] points = [(-50, -50, -50), (50, -50, -50), (-50, -50, 50), (50, -50, 50), (-50, 50, -50), (50, 50, -50), (50, 50, 50), (-50, 50, 50), (150, -50, -50), (250, -50, -50), (150, -50, 50), (250, -50, 50), (150, 50, -50), (250, 50, -50), (250, 50, 50), (150, 50, 50), (50, -50, -50), (150, -50, -50), (50, -50, 50), (150, -50, 50), (50, 50, -50), (150, 50, -50), (150, 50, 50), (50, 50, 50)]
    float2[] primvars:st = [(1, 0), (0, 0), (0, 1), (1, 1), (1, 0), (1, 1), (0, 1), (0, 0), (1, 0), (0, 0), (0, 1), (1, 1), (1, 0), (0, 0), (0, 1), (1, 1), (1, 0), (1, 1), (0, 1), (0, 0), (1, 0), (1, 1), (0, 1), (0, 0), (1, 0), (0, 0), (0, 1), (1, 1), (1, 0), (1, 1), (0, 1), (0, 0), (1, 0), (0, 0), (0, 1), (1, 1), (1, 0), (0, 0), (0, 1), (1, 1), (1, 0), (1, 1), (0, 1), (0, 0), (1, 0), (1, 1), (0, 1), (0, 0), (1, 0), (0, 0), (0, 1), (1, 1), (1, 0), (1, 1), (0, 1), (0, 0), (1, 0), (0, 0), (0, 1), (1, 1), (1, 0), (0, 0), (0, 1), (1, 1), (1, 0), (1, 1), (0, 1), (0, 0), (1, 0), (1, 1), (0, 1), (0, 0)] (
        interpolation = "faceVarying"
    )

    double3 xformOp:translate = (0, 0, 200)
    uniform token[] xformOpOrder = ["xformOp:translate"]
}
USD Collections
USD Collections can be used in Kit for:
Light-Linking in the RTX Pathtracer
Material Assignment
There are some widgets for manipulating, viewing and authoring collections in Kit, see:
The USD Scene in Kit
Saving an empty USD scene in Kit will give you the scene below…it’s worth digging into it a bit:
the customLayerData is read by Kit only - other USD clients will ignore it. It specifies some basic camera settings, render settings (empty unless invididual setings are set to non-default values), muted layer state
Some standard USD defaults - upAxis, timecode etc common to all “root” USD files
A default light
#usda 1.0
(
    customLayerData = {
        dictionary cameraSettings = {
            dictionary Front = {
                double3 position = (0, 0, 50000)
                double radius = 500
            }
            dictionary Perspective = {
                double3 position = (500.0000000000001, 500.0000000000001, 499.9999999999998)
                double3 target = (0, 0, 0)
            }
            dictionary Right = {
                double3 position = (-50000, 0, -1.1102230246251565e-11)
                double radius = 500
            }
            dictionary Top = {
                double3 position = (-4.329780281177466e-12, 50000, 1.1102230246251565e-11)
                double radius = 500
            }
            string boundCamera = "/OmniverseKit_Persp"
        }
        dictionary omni_layer = {
            dictionary muteness = {
            }
        }
        dictionary renderSettings = {
        }
    }
    defaultPrim = "World"
    endTimeCode = 100
    metersPerUnit = 0.01
    startTimeCode = 0
    timeCodesPerSecond = 24
    upAxis = "Y"
)

def Xform "World"
{
    def DistantLight "defaultLight" (
        prepend apiSchemas = ["ShapingAPI"]
    )
    {
        float angle = 1
        float intensity = 3000
        float shaping:cone:angle = 180
        float shaping:cone:softness
        float shaping:focus
        color3f shaping:focusTint
        asset shaping:ies:file
        double3 xformOp:rotateXYZ = (315, 0, 0)
        double3 xformOp:scale = (1, 1, 1)
        double3 xformOp:translate = (0, 0, 0)
        uniform token[] xformOpOrder = ["xformOp:translate", "xformOp:rotateXYZ", "xformOp:scale"]
    }
}
Audio
Kit includes a set of specialised Audio Schemas and a number of audio related commands
To get started, see:
Note that is similar to, but not a conformant implementation of
Pixar USD Spatial Audio Proposal
The audio prims are typed USD prims, so can be created with CreatePrimWithDefaultXform e.g
import omni.kit.commands

omni.kit.commands.execute('CreatePrimWithDefaultXform', prim_type='Sound', attributes={})

omni.kit.commands.execute('CreatePrimWithDefaultXform', prim_type='Sound', attributes={'auralMode': 'nonSpatial'})

omni.kit.commands.execute('CreatePrimWithDefaultXform', prim_type='Listener', attributes={})
There is a specialised API for working with Kit Audio, see:
Audio Commands
CreateAudioPrimFromAssetPath - create a new audio prim referencing an audio file
Physics
Start with the User Docs:
See also:
For Developer Docs, if the extension omni.physx.ui is enabled in Kit, you will see an entry for “Python Scripting Manual” under the Help Menu. This contains an overview, API reference, schema description, commands etc
Lights
USD comes with a set of basic Light types, see:
Many of these are supported by the RTX Renderer.
In theory the common set are portable across multiple renderers, but there may be some disparities - e.g illumination levels are not always the same across renderers
For example to get the Animal Logic ALab scene:
…to look roughly right, we made the following adjustments
   over "lightrig"
    {
        over "lgt_roof"
        {
            float exposure = 9.400001
        }

        over "lgt_bnc"
        {
            float exposure = 0.2
            float intensity = 19
        }

        over "lgt_fill01"
        {
            float exposure = 6.2000003
        }

        over "lgt_fill02"
        {
            float exposure = 5.9
        }

        over "lgt_drawer"
        {
            float exposure = 4.5
            float intensity = 18.800001
        }

        over "lgt_sun_bench"
        {
            float exposure = 19.4
            float intensity = 22.9
        }

        over "lgt_sun_spools"
        {
            float exposure = 17
        }

        over "lgt_sun_leaves"
        {
            float exposure = 20.2
        }
    }
Cameras
Kit uses standard USD Cameras, so you can create one like this:
import omni.kit.commands

omni.kit.commands.execute('CreatePrimWithDefaultXform', prim_type='Camera', attributes={'focusDistance': 400, 'focalLength': 24})
You can duplicate the existing Viewport camera with:
import omni.kit.commands

omni.kit.commands.execute('DuplicateFromActiveViewportCameraCommand', viewport_name='Viewport')
Note that manipulating the built-in cameras (“Perspective”, “Top”, “Front”, “Right”) does not cause commands to be emitted. The idea is that these are session layer cameras, used to navigate/manipulate the scene, you might not want undo/commands However if you create any new cameras, commands will be emitted for all relevant operations, and undo will be enabled.
Kit also adds several custom attributes to the base USD Camera schema, such as:
Sensor Model Attributes
Synthetic Data Generation Attributes
Fisheye Lens Attributes
Animation
Kit can play back sampled USD-based animation. There is a built in omni.timeline control that will allow you to control animation playback
There are many extensions available for Kit-based apps to work with and author USD-based animation e.g:
Curves
USD has a couple of schemas for curves, see:
Pixar Docs - USDGeomBasisCurves
Pixar Docs - USDGeomNurbsCurves
Only USDGeomBasisCurves schema is currently supported by RTX. Currently nonperiodic linear/Bezier/Spline tubes can be rendered (ribbons not yet)
Simple hair curve example:
import omni.usd
from omni.kit.usd_docs import simple_hair_01_usda

usd_context = omni.usd.get_context()
usd_context.open_stage(simple_hair_01_usda)
Points
Kit/RTX can render USDGeomPoints. See docs
Here is an example with 2 different interpolation modes for width
def Xform "Points"
{
    float3 xformOp:rotateXYZ = (0, 0, 0)
    float3 xformOp:scale = (1, 1, 1)
    float3 xformOp:translate = (0, 9, 0)
    uniform token[] xformOpOrder = ["xformOp:translate", "xformOp:rotateXYZ", "xformOp:scale"]

    def Points "VertexSize"
    {
        int[] curveVertexCounts = [7]
        point3f[] points = [(0, 0, 0), (1, 1, 0), (1, 2, 0), (0, 3, 0), (-1, 4, 0), (-1, 5, 0), (0, 6, 0)]
        color3f[] primvars:displayColor = [(1, 1, 1)]
        float[] widths = [0.1, 0.1, 0.2, 0.3, 0.4, 0.5, 0.6] (
            interpolation = "vertex"
        )
    }

    def Points "ConstantSize"
    {
        int[] curveVertexCounts = [7]
        point3f[] points = [(0, 0, 2), (1, 1, 2), (1, 2, 2), (0, 3, 2), (-1, 4, 2), (-1, 5, 2), (0, 6, 2)]
        color3f[] primvars:displayColor = [(1, 0, 0)]
        float[] widths = [0.5] (
            interpolation = "constant"
        )
    }
}
Particles
Kit/RTX can render USD PointInstancers. See docs:
Pixar Docs - USDGeomPointInstancer
There are a number of Kit extensions which allow authoring and manipulation of these in various ways, see:
Render Settings
See
Kit will store Render Settings for RTX and IRay in the root USD layer. Render Settings can also be saved as standalone USD files which can be loaded/saved like “presets”.. This is explained in the user docs above.
Settings are saved when you set a non-default value, and are part of the root customLayerData described above.
Example:
#usda 1.0
(
    customLayerData = {
        dictionary renderSettings = {
                    int "rtx:directLighting:sampledLighting:autoEnableLightCountThreshold" = 15
                    bool "rtx:directLighting:sampledLighting:enabled" = 1
                    bool "rtx:ecoMode:enabled" = 1
                    int "rtx:post:aa:op" = 1
                    double "rtx:post:scaling:staticRatio" = 0.8599999807775021
                    double "rtx:post:taa:alpha" = 0
                    int "rtx:post:taa:samples" = 13
                }
    }
Kit’s Render Settings predate the Pixar proposal for a standard set of schemas for Render Settings and related concepts, see:
Pixar White Paper We do hope to adopt this in the future
Asset Resolver
Kit ships with an Asset Resolver (currently using a slightly modified Asset Resolver 1.0 API) for resolving Omniverse URLs i.e those with the prefix “omni://” or “omniverse://”
Currently this does not easily allow you to fall back to a different URI scheme, although this will be possible with the AR2.0 API which we hope to implement soon.
You can use standard usd tools such as usdresolve e.g
./usdresolve "omniverse://mynucleus_server.ov.nvidia.com/Projects/ALab/USD_ALab_0730_OVMaterials/entry.usda"