


Getting Started#
This guide walks you through creating your first material in Material Graph, from opening the editor to saving your work. When you finish, you have a connected material graph ready for rendering.
Prerequisites#
A NVIDIA Omniverse™ Kit-based application, such as USD Composer or a custom Kit application, with the
omni.kit.window.material_graphextension enabled.A USD stage open in the application. Material Graph reads from and writes to the active stage, so you need at least an empty scene.
If Material Graph does not appear in your menus, confirm that the extension is enabled in the Extension Manager (Window > Extensions).
Step 1: Open the Editor#
There are two ways to open Material Graph:
From the menu bar:
Go to Window > Material Graph.
The editor opens as a dockable panel. You can drag it to any position in your layout.
From the stage (context menu):
In the Stage panel, right-click a
UsdShade.Materialprim.Select Open in Material Graph.
The editor opens with that material already loaded.
Step 2: Create a New Material#
In the Material Graph toolbar, click the Create (+) button on the far left.
A new material prim is created on the stage and loaded into the editor.
The material name appears in the toolbar, and the canvas is empty, ready for nodes.
To edit a material that is already on the Stage, select it and click Edit. You can also use the Stage context menu described in Step 1.

Step 3: Add Nodes from the Catalog#
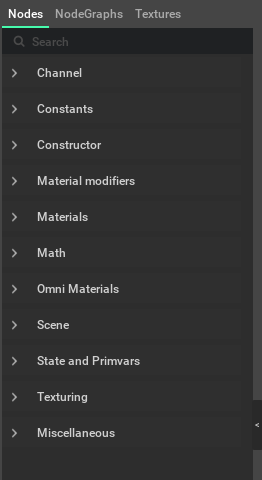
The Catalog panel on the left side of the editor lists all available nodes for the active render context.
Make sure the Nodes tab is selected at the top of the Catalog.
Browse the categorized list or type in the search field to filter by name.
Click and drag a node entry from the Catalog onto the canvas.
Release the mouse button to place the node at the drop position.
Repeat this for each node you need. For a simple material you might start with a surface shader node (the specific name depends on the active context) and a few upstream nodes for textures or value generation.
Step 4: Connect Nodes#
Nodes communicate through connections between their ports.
Locate the output port (right edge) on the source node you want to connect from.
Click and drag from that output port dot toward the destination node.
As you drag, compatible input ports (left edge) on other nodes are highlighted; incompatible ports are dimmed.
Release the mouse button over a highlighted input port to complete the connection.
A wire now links the two ports. Data flows left to right, from outputs to inputs.
Tips:
To disconnect a wire, drag from the connected input port and release over empty canvas space.
To rewire an existing connection, drag from the connected input port to a different output port.
To force-connect when the editor rejects a connection, hold Ctrl+Shift while dragging.
Step 5: Switch Render Contexts#
A single material can contain graphs for different render contexts. The context tabs in the toolbar let you switch between them.
Look at the context tabs in the toolbar: MDL, MaterialX, and Universal.
Click a tab to switch to that context.
The canvas updates to show the graph for the selected context, and the Catalog refreshes to list nodes available in that context.
Context-specific shader nodes appear only in the context whose plugin recognizes them. NodeGraphs and Backdrops can be shared across contexts or explicitly confined to selected contexts.
To preview only one context’s output in the Viewport, click Solo (S). This action temporarily disconnects the outputs of all other contexts so the renderer evaluates only the active one.
Step 6: Save Your Work#
Material Graph writes directly to the USD stage. Every node you create, every connection you make, and every parameter you change is authored as USD data on the active stage.
To persist your work, save the USD stage using File > Save (or Ctrl+S) in the host application.
The material graph is stored as part of the scene file. Reopening the scene and loading the material in Material Graph restores the full graph.
There is no separate save action inside Material Graph itself. The editor is a live view of the stage data.
Next Steps#
You now know how to open the editor, create a material, add and connect nodes, switch contexts, and save. From here you can explore:
Overview for a deeper look at key concepts and the full interface.
Hotkeys and Mouse Reference to speed up your workflow with keyboard shortcuts.
Preferences to customize Catalog visibility, texture paths, and validation behavior.