Nucleus on Google Cloud

Introduction
This guide focuses on installing and configuring an Omniverse Enterprise Nucleus Server on Google Cloud. The requirements for a successful deployment are outlined along with the technical steps below.
Depending on requirements and/or internal policies, there may be some settings and/or options that are set differently than what is covered within this documentation. This document focuses on using the Cloud Shell launched from within the Google Cloud console, however standing up individual Virtual Machines manually using the web-based interface is also supported.
Solution Overview
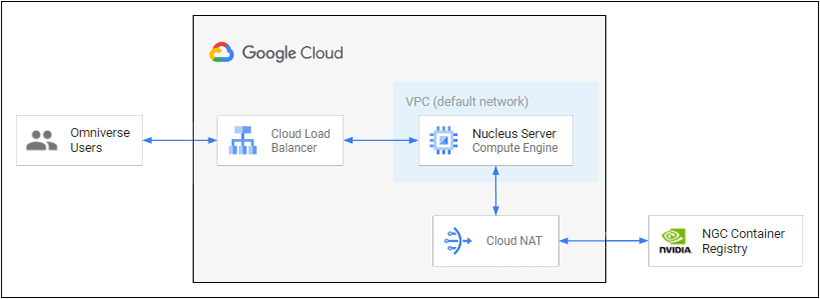
The following steps outline a reference solution that implements the primary components of a Nucleus deployment. To handle communication from end users, a Global Cloud Load Balancer is configured to direct and manage traffic to the Nucleus server. The Nucleus server runs on a Google Cloud instance with no external IP Address and only accepts traffic from the load balancer. To communicate with the NVIDIA Container Registry, a Cloud NAT is configured so the Nucleus server can access the Internet.
Attention
Steps within this document require network configuration changes to allow remote connectivity. Please consult your IT/Information Security team for proper advisement.
Prerequisites
A Google Cloud account to deploy the necessary Virtual Machines to run an Enterprise Nucleus Server.
This tutorial uses
gcloudandgsutilcommands, which can run from a Cloud Shell instance launched from the Console. If it’s preferred to use gcloud and gsutil from a local workstation, install the Google Cloud CLI. The documentation explains how to run commands using the in-browser Cloud Shell; if it’s preferred to use the gcloud CLI from a workstation, adjust the instructions accordingly.In the Google Cloud console, on the project selector page, select an existing or create a Google Cloud project.
Ensure a billing account is enabled for your new Google Cloud project. Click here to learn how to check if billing is enabled for your project.
Enable the Compute Engine API.
A Fully Qualified Domain Name (FQDN) that you plan to use for your Nucleus environment (e.g., nucleus.mydomain.com).
The ability to perform DNS changes (Creation of an A record.)
Attention
When copying the BASH and YAML code from this document to your workstation, use a text editor such as Notepad++ (Windows) or BBEdit (macOS) that supports Unix EOL (End of Line) conversion so the file is saved correctly. Some text editors add additional non-visible line breaks that may cause parsing issues.
Variable Legend
The following variables are used throughout this document:
Variable
|
Description
|
|---|---|
SERVER_NAME
|
The name for the Nucleus server
|
GROUP_NAME
|
The name for the instance group
|
ARTIFACT_NAME
|
The file name of the Nucleus artifact
|
ZONE
|
The desired zone for the server
|
SIZE
|
The size of the boot disk in GB
|
PROJECT
|
The name of the project
|
ADDRESS_NAME
|
The name for the IP Address resource, not the IP Address itself
|
CERTIFICATE_NAME
|
The name of the certificate
|
DOMAIN
|
The chosen FQDN for the Nucleus server
|
REGION
|
The zone where you created the Nucleus server
|
SOURCE
|
The path to the YAML file
|
PROJECT_ID
|
The Project ID (not the Project Name) of your project
|
Note
It’s very helpful to make a list of the values for the variables above in a text file on your workstation as they will be used often within this documentation.
Provisioning your Environment
Preparing your Cloud Shell environment
Using Cloud Shell run the following commands to prepare your environment.
Set your project:
gcloud config set project [PROJECT_ID]In the Console, you can locate your Project ID in the IAM & Admin Settings.
Ensure you have a default VPC network. If your project does not already have a default VPC network, create one:
gcloud compute networks create default \
  --subnet-mode=auto
Creating the Nucleus server instance
The Nucleus server instance is created from a base Ubuntu Linux 22.04 LTS image. This example uses an e2-standard-8 (8 vCPU’s, 32GB RAM) machine type. Choose the sizing that best meets your performance requirements.
Using Cloud Shell, create the instance:
gcloud compute instances create [SERVER_NAME] \
  --zone=[ZONE] \
  --machine-type=e2-standard-8 \
  --network-interface=subnet=default,no-address \
  --tags=nucleus-server,allow-iap \
  --maintenance-policy=MIGRATE \
  --provisioning-model=STANDARD \
  --scopes=https://www.googleapis.com/auth/cloud-platform \
  --create-disk=\
auto-delete=yes,\
boot=yes,\
image-project=ubuntu-os-cloud,\
image-family=ubuntu-2204-lts,\
mode=rw,\
size=[SIZE],\
type=projects/[PROJECT]/zones/[ZONE]/diskTypes/pd-ssd \
  --shielded-secure-boot \
  --shielded-vtpm \
  --shielded-integrity-monitoring \
  --reservation-affinity=any
Note
When choosing the size of the instance, consider both the current and expected future growth.
Creating an unmanaged instance group
In order for the Nucleus server to serve as the backend to a load balancer, it must be part of an instance group. The following details creating of the instance group and adding the Nucleus server to it.
Using Cloud Shell, create the instance group:
gcloud compute instance-groups unmanaged create [GROUP_NAME] --zone=[ZONE]
Add port mapping to the instance group to facilitate Nucleus server traffic:
gcloud compute instance-groups unmanaged set-named-ports \
[GROUP_NAME] \
  --zone=[ZONE] \
  --named-ports=\
api:3019,\
auth:3100,\
auth-login:3180,\
discovery:3333,\
lft:3030,\
search:3400,\
tagging:3020,\
web:80
Add the instance to the instance group:
gcloud compute instance-groups unmanaged add-instances [GROUP_NAME] \
  --instances=[SERVER_NAME] --zone=[ZONE]
Creating a static IP Address
Create a static external IP Address for the load balancer. This IP Address will also be used to map the server to your domain.
Using Cloud Shell, create a static external IP Address:
gcloud compute addresses create [ADDRESS_NAME] \
  --global \
  --ip-version IPV4 \
  --network-tier=PREMIUM
Take note of the resulting address in the Console for the next step.
Using a DNS service such as domains.google.com, map the reserved external IP Address you created to a fully qualified domain name (FQDN) using an A record. (e.g., nucleus.mydomain.com)
Creating a certificate
Create a certificate to provide a secure TLS/SSL connection to the Nucleus server.
Using Cloud Shell, create the certificate:
gcloud beta compute ssl-certificates create [CERTIFICATE_NAME] \
  --global \
  --domains=[DOMAIN]
Creating a firewall rules
In this example, you create the nucleus-ports firewall rule. This is an ingress rule that allows traffic from the Google Cloud load balancer to your Nucleus server over specified ports. Google Cloud load balancers always use IP ranges, 130.211.0.0/22 and 35.191.0.0/16, so there is no need to change these values. This example uses the target tag nucleus-server to identify the VM.
Using Cloud Shell, create a firewall rule:
gcloud compute firewall-rules create nucleus-ports \
  --direction=INGRESS \
  --priority=1000 \
  --network=default \
  --action=ALLOW \
  --rules=\
tcp:80,tcp:3009,tcp:3010,tcp:3019,tcp:3020,\
tcp:3030,tcp:3100,tcp:3180,tcp:3333,tcp:3400 \
  --source-ranges=130.211.0.0/22,35.191.0.0/16 \
  --target-tags=nucleus-server
Create a health check and specify TCP Port 3333 to use for it:
gcloud compute health-checks create http http-basic-check \
  --request-path="/healthcheck" \
  --port 3333
As the Nucleus server has no external IP Address, connect to it using Identity-Aware Proxy (IAP). Create a firewall rule to allow IAP traffic to your Nucleus server:
gcloud compute firewall-rules create allow-ssh-from-iap \
--source-ranges 35.235.240.0/20 \
--target-tags allow-iap \
--allow tcp:22
Creating a Cloud NAT
Your Nucleus server will not have an external IP Address, so cannot reach the Internet without a Cloud NAT and Cloud Router.
Create a Cloud Router:
gcloud compute routers create nat-router \
  --network default \
  --region [REGION]
Add a configuration to the router:
gcloud compute routers nats create nat-config \
  --router-region [REGION] \
  --router nat-router \
  --nat-all-subnet-ip-ranges \
  --auto-allocate-nat-external-ips
Creating the HTTPS load balancer
You create an HTTPS Load Balancer to serve as a front end for the Nucleus server. An HTTPS Load Balancer provides a single endpoint to connect to the Nucleus server, while at the same time providing added security and traffic management.
Creating the backend services
Omniverse Nucleus requires different traffic types to be routed in different ways. There are eight different backend services to create.
Copy this BASH script to a text file on your local workstation, edit it using a text editor of your choice, and ensure that the file ends with the extension of .sh. Then upload the file into your Cloud Shell environment.
#! /bin/bash

GROUP_NAME=[GROUP_NAME]
ZONE=[ZONE]
BACKENDS="api auth auth-login discovery lft search tagging web"

# Iterate over all backends.
for BACKEND in $BACKENDS; do

  # Create backend service.
  gcloud compute backend-services create nucleus-$BACKEND \
    --load-balancing-scheme=EXTERNAL_MANAGED \
    --protocol=HTTP \
    --port-name=$BACKEND \
    --health-checks=http-basic-check \
    --enable-cdn \
    --enable-logging \
    --timeout=30 \
    --global

  # Add backend service to instance group.
  gcloud compute backend-services add-backend nucleus-$BACKEND \
    --instance-group=$GROUP_NAME \
    --instance-group-zone=$ZONE \
    --balancing-mode "UTILIZATION" \
    --capacity-scaler=1 \
    --max-utilization=1 \
    --global

done
Wait until all backend services are created before proceeding to the next step.
Creating the URL map
This step creates what is referred to as the load balancer resource itself. Using Cloud Shell, create a URL map to route the incoming requests to the default backend service:
gcloud compute url-maps create nucleus-lb \
  --default-service nucleus-web
Creating the HTTPS proxy
The proxy is the portion of the load balancer that holds the TLS/SSL certificate for an HTTPS load balancer. You will also load your certificate in this step.
Using Cloud Shell, create a target HTTPS proxy to route requests to the load balancer:
gcloud compute target-https-proxies create nucleus-https-lb-proxy \
  --url-map=nucleus-lb \
  --ssl-certificates=[CERTIFICATE_NAME]
Create a global forwarding rule to route incoming requests to the proxy:
gcloud compute forwarding-rules create nucleus-https-443 \
  --load-balancing-scheme=EXTERNAL_MANAGED \
  --network-tier=PREMIUM \
  --address=[ADDRESS_NAME] \
  --global \
  --target-https-proxy=nucleus-https-lb-proxy \
  --ports=443
Create a global TLS/SSL policy and attach it to the HTTPS proxy:
gcloud compute ssl-policies create nucleus-ssl-policy \
  --profile MODERN \
  --min-tls-version 1.0
Attach the TLS/SSL policy to the global target HTTPS proxy:
gcloud compute target-https-proxies update nucleus-https-lb-proxy \
  --ssl-policy=nucleus-ssl-policy
Importing the URL map configuration file
In Google Cloud, a URL map routes incoming web requests to backend services. You configure the mapping using YAML syntax. Copy this YAML code to a text file on your local workstation, edit it using the editor of your choice, and ensure that the file ends with the extension of
.yaml. Then upload the file into your Cloud Shell environment.
Replace
PROJECTwith the Project ID of your Google Cloud project andDOMAINwith the FQDN of your chosen domain (e.g., nucleus.mydomain.com).defaultUrlRedirect: hostRedirect: [DOMAIN] httpsRedirect: true prefixRedirect: /omni/web3/ redirectResponseCode: FOUND hostRules: - hosts: - [DOMAIN] pathMatcher: path-matcher kind: compute#urlMap name: nucleus-lb pathMatchers: - defaultService: https://www.googleapis.com/compute/v1/projects/[PROJECT]/global/backendServices/nucleus-web name: path-matcher pathRules: - paths: - / urlRedirect: httpsRedirect: false pathRedirect: /omni/web3/ stripQuery: false - paths: - /omni/web3/* routeAction: urlRewrite: pathPrefixRewrite: / service: https://www.googleapis.com/compute/v1/projects/[PROJECT]/global/backendServices/nucleus-web - paths: - /omni/api service: https://www.googleapis.com/compute/v1/projects/[PROJECT]/global/backendServices/nucleus-api - paths: - /omni/auth service: https://www.googleapis.com/compute/v1/projects/[PROJECT]/global/backendServices/nucleus-auth - paths: - /omni/auth/login/* routeAction: urlRewrite: pathPrefixRewrite: / service: https://www.googleapis.com/compute/v1/projects/[PROJECT]/global/backendServices/nucleus-auth-login - paths: - /omni/discovery/healthcheck routeAction: urlRewrite: pathPrefixRewrite: /healthcheck service: https://www.googleapis.com/compute/v1/projects/[PROJECT]/global/backendServices/nucleus-discovery - paths: - /omni/discovery/* service: https://www.googleapis.com/compute/v1/projects/[PROJECT]/global/backendServices/nucleus-discovery - paths: - /omni/discovery service: https://www.googleapis.com/compute/v1/projects/[PROJECT]/global/backendServices/nucleus-discovery - paths: - /omni/lft/* routeAction: urlRewrite: pathPrefixRewrite: / service: https://www.googleapis.com/compute/v1/projects/[PROJECT]/global/backendServices/nucleus-lft - paths: - /omni/search3 service: https://www.googleapis.com/compute/v1/projects/[PROJECT]/global/backendServices/nucleus-search - paths: - /omni/tagging3 service: https://www.googleapis.com/compute/v1/projects/[PROJECT]/global/backendServices/nucleus-tagging - paths: - /omniverse://* routeAction: urlRewrite: pathPrefixRewrite: / service: https://www.googleapis.com/compute/v1/projects/[PROJECT]/global/backendServices/nucleus-web
Import the URL map configuration file to the load balancer:
gcloud compute url-maps import nucleus-lb \
  --source=[SOURCE] \
  --global
Creating the HTTP load balancer
In Google Cloud, you create a second HTTP load balancer to forward requests to the HTTPS load balancer. Copy this YAML code to a text file on your local workstation, edit it using the editor of your choice, and ensure that the file ends with the extension of
.yaml. Then upload the file into your Cloud Shell environment.kind: compute#urlMap name: nucleus-lb-redirect defaultUrlRedirect: redirectResponseCode: MOVED_PERMANENTLY_DEFAULT httpsRedirect: True
Using Cloud Shell, import the URL map configuration file to the load balancer:
gcloud compute url-maps import nucleus-lb-redirect \
  --source=[SOURCE] \
  --global
Create a target HTTP proxy to route requests to the load balancer, using the URL map you created:
gcloud compute target-http-proxies create nucleus-http-proxy \
  --url-map=nucleus-lb-redirect
Create a global forwarding rule to route incoming requests to the proxy:
gcloud compute forwarding-rules create nucleus-http-80 \
  --load-balancing-scheme=EXTERNAL_MANAGED \
  --network-tier=PREMIUM \
  --address=[ADDRESS_NAME] \
  --global \
  --target-http-proxy=nucleus-http-proxy \
  --ports=80
Installing Nucleus
Locate the Enterprise Nucleus Server artifact on your local workstation and upload the file into your Cloud Shell environment.
Using Cloud Shell, copy the artifact to your instance using the following command:
gcloud compute scp [ARTIFACT_NAME] [SERVER_NAME]:/tmp --zone=[ZONE]
Log into your instance using SSH using the following command:
gcloud compute ssh [SERVER_NAME] --zone=[ZONE]
See the Additional Reading and Reference Links at the bottom of this document for a walk-through of installing and configuring an Enterprise Nucleus Server.
Troubleshooting
When initially creating the instance, the following error may appear:

If this error appears, locate the Project ID within the GCP project selector. (Use the Project ID not the name.) Then use the following command to set the project:
gcloud config set project [PROJECT_ID]