Configuring Nucleus Bridge
2023.2.0 and above
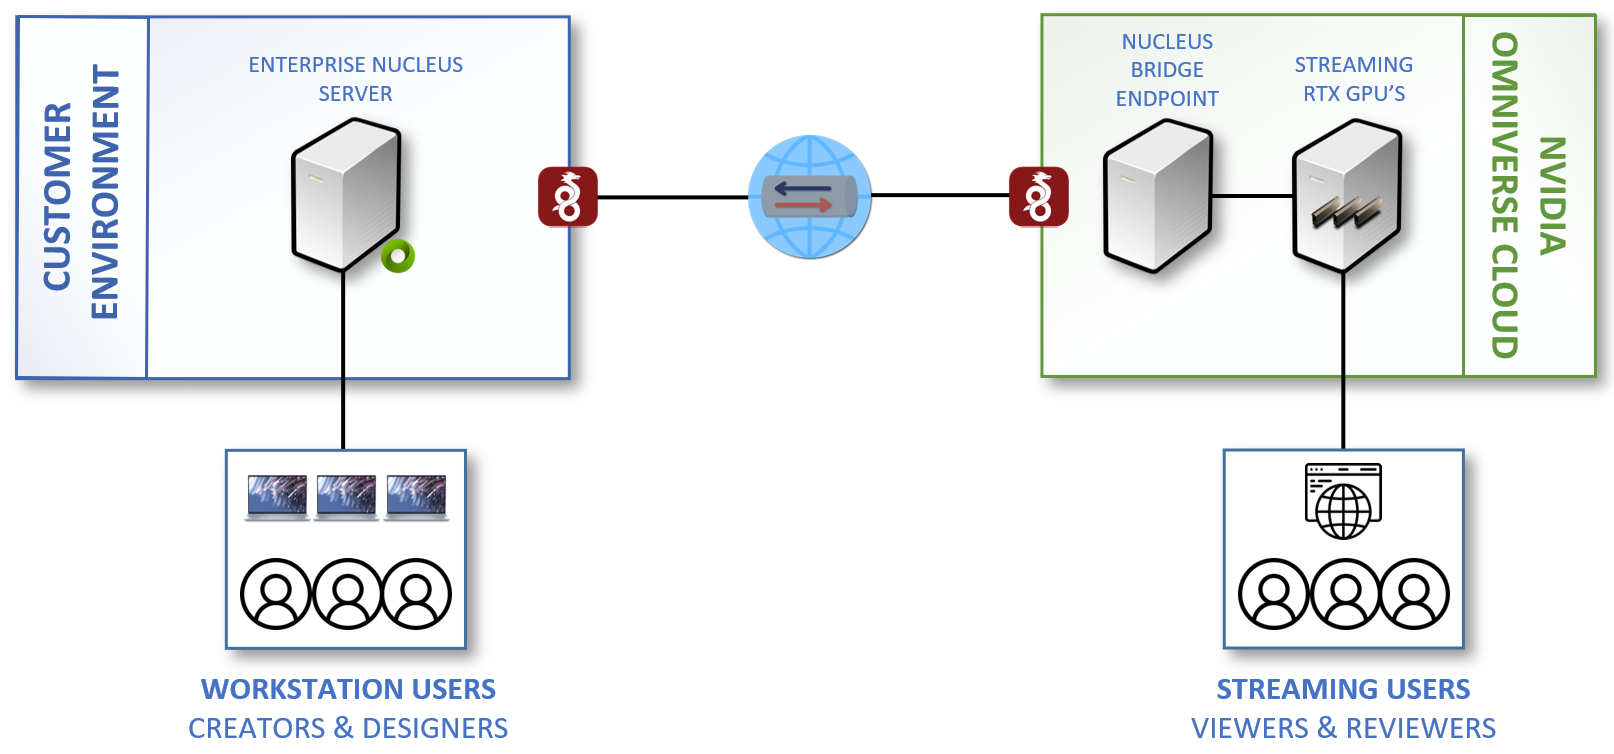
Overview
Nucleus bridge allows an Enterprise Nucleus Server to be linked to Omniverse Cloud. By combining these powerful technologies, users can enjoy using Omniverse services such as RTX streaming to their device through a web browser.
Nucleus bridge incorporates two methods of transport layer encryption: the streaming session from Omniverse Cloud is TLS-encrypted into the bridge, protecting it from eavesdropping or data leakage. Connections are further encapsulated back to your Enterprise Nucleus Server using a WireGuard tunnel which leverages strong cryptographic cipher suites inclusive of the Noise protocol framework, Curve25519 Diffie-Hellman function, ChaCha20 stream cipher, Poly1305-AES and SipHash24 pseudorandom message-authentication codes, and Blake2 hashing function.
Strong data security is paired with minimal performance impact, providing the ability to connect to your Enterprise Nucleus Server safely from Omniverse Cloud.
Note
Omniverse Cloud and Nucleus bridge are additional services offered by NVIDIA. Please contact your NVIDIA Account Representative for additional information.
Prerequisites
The Nucleus bridge functionality requires Linux kernel 5.15 or greater which is the default kernel in Ubuntu 22.04. If the Enterprise Nucleus Server is using an older kernel, the kernel will need to be upgraded or Nucleus and its data will need to be migrated to a Linux server with a compatible kernel.
The kernel installed on your Enterprise Nucleus Server can be verified using the following command:
uname -a
This will display the following result: (The information below is for example only and your information may differ.)
Linux 5.15.0-86-generic #96-Ubuntu SMP Wed Sep 20 08:23:49 UTC 2023
x86_64 x86_64 x86_64 GNU/Linux
Additionally, the Internet-facing IP Address of your Enterprise Nucleus Server will need to be provided to NVIDIA. If you are unsure of this address, run the following command after logging into your Nucleus Server and the public-facing IP Address will be displayed:
curl ifconfig.me
Note
Prior to configuring the Nucleus bridge, obtain the required bridge.map file from NVIDIA Enterprise Support.
Configuring the Nucleus Bridge
The Nucleus bridge configuration files and containers are included within the Enterprise Nucleus Server 2023.2.0 (or greater) Docker artifacts.
The configuration below assumes Nucleus is installed into the
recommended location of /opt/ove. As installations may differ, please
modify the commands below to reflect your specific environment.
Follow the steps below to configure your Nucleus bridge:
Note
Before completing these steps, shut down all Nucleus containers if they are running.
Create the Nucleus bridge private and public keys using this command:
docker compose --env-file /opt/ove/base_stack/nucleus-stack.env -f /opt/ove/base_stack/nucleus-bridge-client-bootstrap.yml up
The following information will be displayed:
----------------------------------------------------------------
Bootstrapping Nucleus bridge Client
----------------------------------------------------------------
You will need to communicate the following to NVIDIA:
----------------------------------------------------------------
Your Bridge Client Public Key:  (PUBLIC_KEY)
Your Bridge Client IP address:  192.168.3.3
----------------------------------------------------------------
The real public key will be displayed in place for the (PUBLIC_KEY). Make a note of this public key as this needs to be provided to NVIDIA for the Nucleus Bridge.
Note
This key is stored within the base_stack/bridge directory in the bridge.client.key.public file if needed in the future.
Warning
For safety, Nucleus bridge encryption keys will not be regenerated if the nucleus-bridge-client-bootstrap container is started multiple times. If it’s required to regenerate the keys, delete the bridge.client.key and bridge.client.key.public from the
base_stack/bridgedirectory, then re-run the container.Edit the
/opt/ove/base_stack/nucleus-stack.envfile and locate the Connection to Nucleus bridge section.Enable the Nucleus bridge by changing the BRIDGE_ENABLED value to
1.BRIDGE_ENABLED=1
Warning
Connecting your Enterprise Nucleus Server to Omniverse Cloud using the Nucleus bridge may require network configuration changes (i.e., firewall changes allowing outbound connections to the IP Address(es) and UDP port(s) as contained within the bridge.map file.)
The other information within this section should remain using the defaults unless NVIDIA advises differently. If there are no additional changes, save and close the file.
As part of the Nucleus bridge configuration, NVIDIA will provide a bridge.map file as mentioned above. Save this file to this location:
/opt/ove/base_stack/bridgeStart Nucleus with the Nucleus bridge with the following command:
docker compose --env-file /opt/ove/base_stack/nucleus-stack.env \
-f /opt/ove/base_stack/nucleus-stack-ssl.yml \
-f /opt/ove/base_stack/nucleus-ingress-router.yml up -d
Confirm with NVIDIA that the Nucleus bridge is connected.
Additional Troubleshooting
From within the nucleus-ingress-router container, it’s possible to check the status of the Nucleus bridge connection. If this is needed, follow these steps:
Using the following command, locate the Docker container ID for the nucleus-ingress router:
docker ps
On the container list that appears, locate the following container and note the container ID on the left. (The container ID listed below is for example only.)
baf8fdjcb232 nvcr.io/omniverse/nucleus-ingress-router:1.0.0
Log into the container using the following command:
docker exec -it baf8fdjcb232 bash
Once logged into the container, run the following command:
wg show
This will show the status of the Nucleus bridge connection: (The information below is for example only and your information will differ.)
interface: wg0
  public key: (PUBLIC_KEY)
  private key: (hidden)
  listening port: 49123

peer: (PEER_KEY)
  endpoint: ENDPOINT_PUBLIC_IP:60000
  allowed ips: 192.168.3.3/32
  latest handshake: 33 seconds ago
  transfer: 845.99 KiB received, 1.33 MiB sent
  persistent keepalive: every 25 seconds
Note
To ensure that the Nucleus bridge connection is active, verify the latest handshake value appears and the transfer and received bandwidth counters are incrementing.
To log out of the container, type exit and press enter.
You can now log out of your Enterprise Nucleus Server having verified the Nucleus bridge is functioning as expected.