Permission Web UI#
The Permission Web UI is a browser application for managing the catalog exposed by Permission Service: it lists, creates, and deletes policies, edits service metadata, and calls the diagnostics endpoint to inspect how an authorization request would be evaluated. It is a thin single-page app — every action on screen maps to a call on the REST API documented elsewhere in this guide.
The UI is a React application served by nginx from a container image. Authentication is handled client-side by react-oidc-context against the same OpenID Connect provider that the backend trusts. All backend calls carry the signed-in user’s bearer token, so the caller must hold the standard meta-permissions — permissions:view, permissions:edit, permissions:meta, and permissions:diagnostics — to see and change anything through the UI.
Optionally, the UI can also talk to a User Info Service to resolve principal identifiers to human-readable names and to drive user autocomplete in the policy form. When no User Info Service is configured, the Users and Groups pages in the left navigation are hidden and principal inputs fall back to plain text fields.
Deployment#
The UI ships as a Helm chart published to NGC. At runtime the chart renders a main.json ConfigMap that the container serves at /config/main.json; the SPA fetches this file on startup to pick up the OpenID client, the Permission Service URL, and (optionally) the User Info Service URL.
Service Ports#
Port |
Protocol |
Description |
|---|---|---|
8080 |
HTTP |
nginx port serving the SPA and |
Pulling the Permission Web UI Helm Chart#
Pull and unpack the chart from the NGC catalog. Replace {NGC_API_KEY} with your NGC API key and {VERSION} with the chart version you want to install.
# pull the chart from NGC
helm fetch https://helm.ngc.nvidia.com/nvidia/omniverse/charts/permission-ui-{VERSION}.tgz --username='$oauthtoken' --password=${NGC_API_KEY}

# unpack the chart and cd into the directory
tar -xvf permission-ui-{VERSION}.tgz
cd permission-ui
Configuring the Chart#
Create a permission-ui-values.yaml file with the image-pull secret, the OpenID provider, the client registration, and the backend URLs:
image:
  pullSecrets:
    - name: ngcpull-secret

openId:
  # OIDC discovery document of the identity provider the UI and the backend share.
  # The chart strips the "/.well-known/openid-configuration" suffix to derive the
  # authority URL passed to the OIDC client.
  openIdConfigurationUri: "https://auth.example.com/realms/my-realm/.well-known/openid-configuration"

  clientRegistrations:
    # Client registered in the identity provider for the browser app.
    # The chart looks for an entry named "permission-ui" first; if absent, the
    # "default" entry is used.
    - name: "default"
      clientId: "permission-ui"
      scope: "openid email profile"

config:
  endpoints:
    # Base URL of the Permission Service REST API. The UI calls endpoints under
    # "/v1beta/..." relative to this base URL.
    # When httpProxy.enabled is true and this value is left empty, the chart
    # derives the URL from httpProxy.fqdn.domain as "permissions.<domain>".
    backend: "https://permissions.example.com"

    # Optional. Base URL of the User Info Service; when unset, the Users and
    # Groups pages are hidden and principal autocomplete falls back to a plain
    # text field. The UI calls endpoints under "/api/v1alpha/..." relative to
    # this base URL.
    userService: "https://userinfo.example.com"

  # Optional Content-Security-Policy header applied by the nginx frontend.
  csp: ""

httpProxy:
  enabled: true
  fqdn:
    host:   "web.permissions"
    domain: "example.com"
  tls:
    enabled: true
permission-ui-values.yaml
Notes on the values:
openId.openIdConfigurationUrimust point at the same identity provider the Permission Service trusts. The chart derives theauthorityURL the browser sends to the IdP by trimming the standard/.well-known/openid-configurationsuffix.openId.clientRegistrationsholds the OIDC client registered in the IdP for the browser app. Entries are keyed byname; the chart prefers the entry namedpermission-ui, and falls back todefaultwhen nopermission-uientry is present.config.endpoints.backendis the Permission Service REST base URL. If you enable the chart’shttpProxysection but leavebackendempty, the chart defaults the URL topermissions.<httpProxy.fqdn.domain>on the matching protocol.config.endpoints.userServiceis optional; leave it unset in deployments that do not run a User Info Service.httpProxyexposes the UI through a ContourHTTPProxy. The final hostname is composed as<host>.<domain>and the redirect URI handed to the IdP is derived the same way — the identity provider must have<protocol>://<host>.<domain>/openidregistered as a redirect URI for the configured client.
Install the Permission Web UI#
Validate and install the chart:
# validate the chart
helm template . -f permission-ui-values.yaml

# dry-run the install
helm upgrade --install permission-ui . -f permission-ui-values.yaml --namespace storage-apis --dry-run --debug
If everything looks good, install the UI:
# install the permission web UI
helm upgrade --install permission-ui . -f permission-ui-values.yaml --namespace storage-apis

# validate the pod is running
kubectl get pods -n storage-apis
Verify the UI is responding from inside the cluster:
# fetch the rendered runtime config
curl http://permission-ui.storage-apis.svc.cluster.local:8080/config/main.json
When the ingress is enabled, the UI is reachable at https://<httpProxy.fqdn.host>.<httpProxy.fqdn.domain>/.
Note
The user signing in to the UI must be granted the relevant meta-permissions in the Permission Service. See Granting administrative permissions for the list of actions and how to seed the corresponding Cedar policies.
Using the UI#
The UI opens on the Policies page after the user completes the OIDC login flow. The left-hand navigation provides direct access to every top-level view:
Policies — browse, search, create, edit, and delete policies.
Services — view, register, and edit service metadata.
Users / Groups — browse users and groups from the User Info Service (hidden when no User Info Service is configured).
Diagnostics — inspect which policies would be evaluated for a given request.
Policies page#
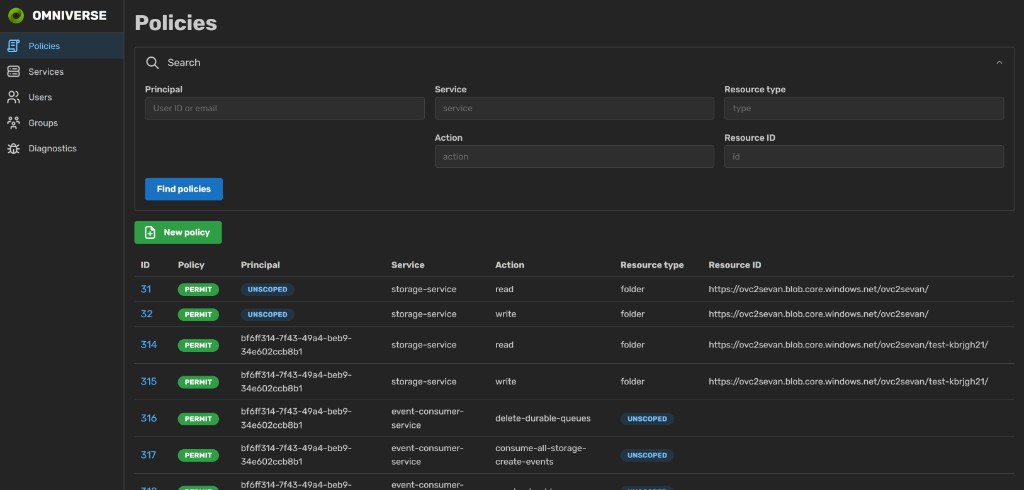
The Policies page shows every policy registered in the service as a paginated table, one row per policy, with its effect, principal, service, action, resource type, and resource ID. Each row is a link into the Policy details page. The New policy button below the search form opens the policy form.
The Search form at the top of the page narrows the list by principal, service, action, resource type, and resource ID. Every input is an autocomplete that is driven by two back-end sources:
The Service, Action, and Resource type inputs are fed by the service metadata API. The Service field lists every service registered through
GET /v1beta/services/; once a service is picked, Action suggests values fromGET /v1beta/services/{service}/actions/and Resource type suggests values fromGET /v1beta/services/{service}/resource-types/.The Principal input is fed by the User Info Service. As the user types a display name or email, the UI calls the User Info Service to suggest matching users; picking a suggestion stores the user’s identifier (either
suboremail, depending on the target service’s idClaim) in the form.
Each scoped field also accepts an Unscoped badge that matches policies which are not scoped on that dimension (for example, a policy with no principal scope is returned when the Principal filter is set to Unscoped). Find policies submits the form and rewrites the URL so that search results can be bookmarked and shared.
Creating a new policy#
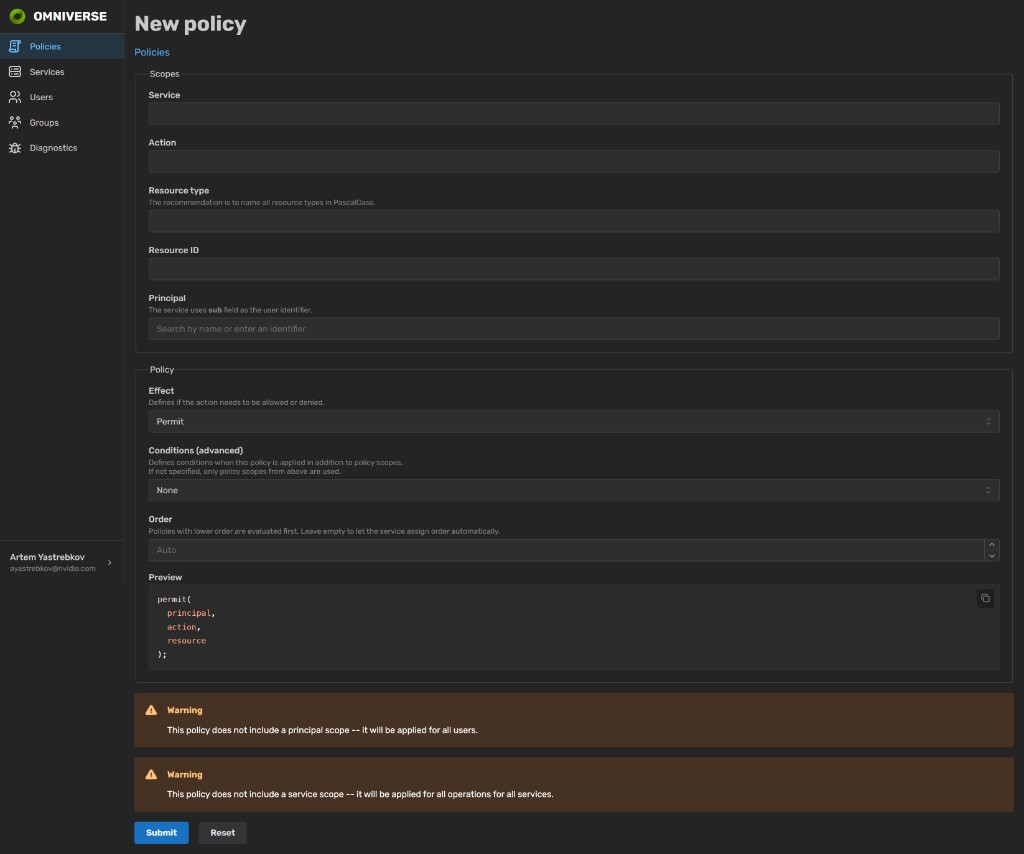
Clicking New policy on the Policies page opens the policy form. The form is organized into two fieldsets — Scopes and Policy — and a live Preview of the Cedar text that will be submitted.
Scopes holds the Service, Action, Resource type, Resource ID, and Principal inputs. Service, Action, and Resource type share the same autocomplete plumbing as the search form, so the dropdowns only propose values already registered through the service metadata API. When a service is chosen, its
id_claimis fetched throughGET /v1beta/services/{service}/and displayed in the Principal field description so the policy author knows what kind of identifier the service expects (for example,suboremail). The Principal input uses the same user autocomplete as the search form and stores the resolved identifier that matches the service’sid_claim.Policy holds the Effect (
PermitorForbid), the optional Conditions clause (None,When, orUnless) and its Cedar body, and the Order number. Order controls the evaluation order of the policy in the authorization pipeline; leaving it empty lets the service pick the next value automatically.
Every change to the form updates the Preview block in real time, so the author sees the exact Cedar statement that is about to be stored. The form validates that at least one scope or condition is present and shows warnings when a scope is left empty (for example, “this policy will be applied for all users” when the principal scope is missing). Submit writes the policy through PUT /v1beta/policies/ and navigates to the new policy’s details page; Reset restores the initial values.
When an existing policy is edited through the Edit button on the details page, the same form is rendered with the current values pre-filled. Submitting the edit form creates a new policy record with the updated values and deletes the original, so the policy’s numeric ID changes on edit.
Policy details page#
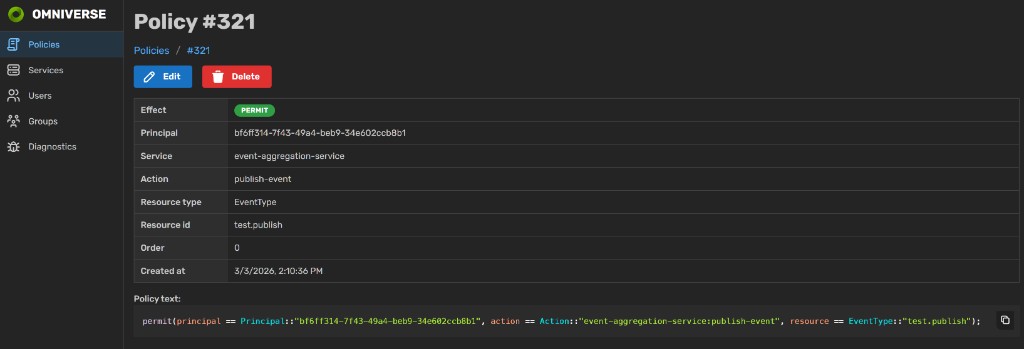
Every policy has a details page, reachable either from the Policies search page or directly via /policies/{id}. The page shows the policy’s scopes and metadata as a table and its full Cedar text at the bottom.
Two actions are available at the top of the page:
Edit navigates to the policy form pre-populated with the current policy values. Submitting the form stores the updated policy under a new ID and deletes the original record.
Delete opens a modal confirmation dialog. Confirming the dialog calls
DELETE /v1beta/policies/{id}and navigates back to the Policies list on success.
Services page#
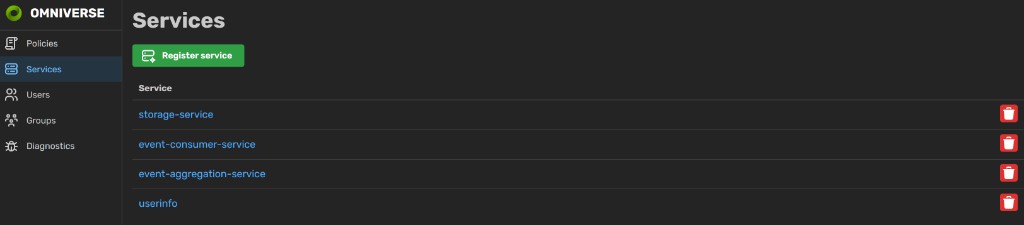
The Services page, reachable from the left-hand navigation, lists every service registered in Permission Service — exactly what GET /v1beta/services/ returns. Each row links into the Service form for that service and carries a delete button that removes the service record and its actions and resource types after a modal confirmation. Deleting a service does not delete policies that reference that service.
Clicking Register service or an entry in the list opens the service form:
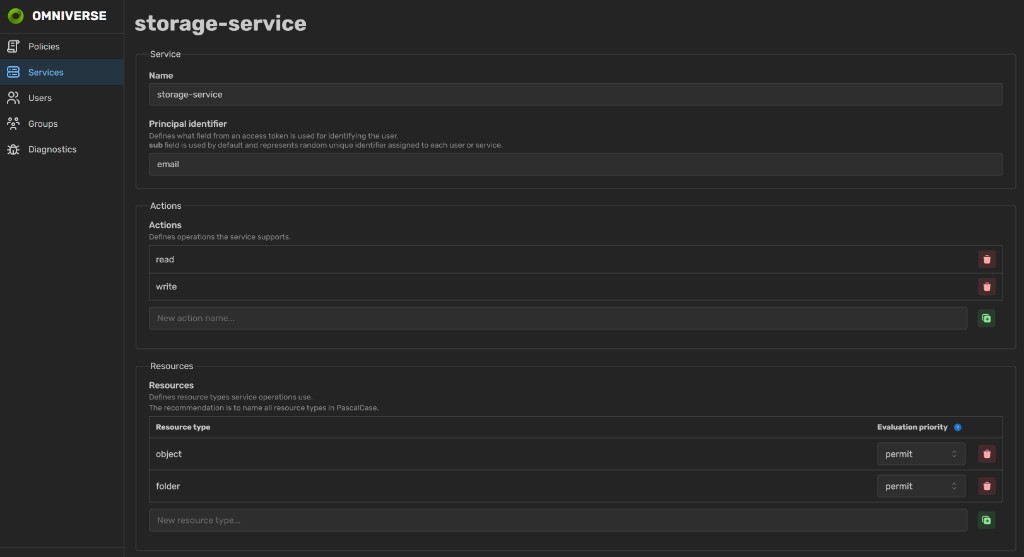
The service form is the UI counterpart to the service metadata API. It lets the user declare:
Name — the service identifier used by Cedar policies as
Action::"<service>:<action>".Principal identifier — the per-service id_claim that selects which claim from the caller’s bearer token is used as the principal id when authorization targets this service.
Actions — the list of operations the service supports, rendered as an editable list; each entry becomes one record under
/v1beta/services/{service}/actions/.Resources — the list of resource types the service operates on. Each row also carries an Evaluation priority selector (
forbidorpermit) that controls how competing policies are combined for resources of that type (see Evaluation priority for resources).
Submit writes the full record through a single call to PUT /v1beta/services/{service}/ and related action / resource-type endpoints, invalidates the metadata caches that feed autocomplete on the other pages, and navigates back to the Services list. Because Cedar policies are evaluated independently of the metadata catalog, changes made here do not alter existing policies — they only affect what the autocomplete dropdowns suggest on the policy and diagnostics pages, and how the service resolves id_claim and evaluationPriority for future authorization requests.
Diagnostics page#
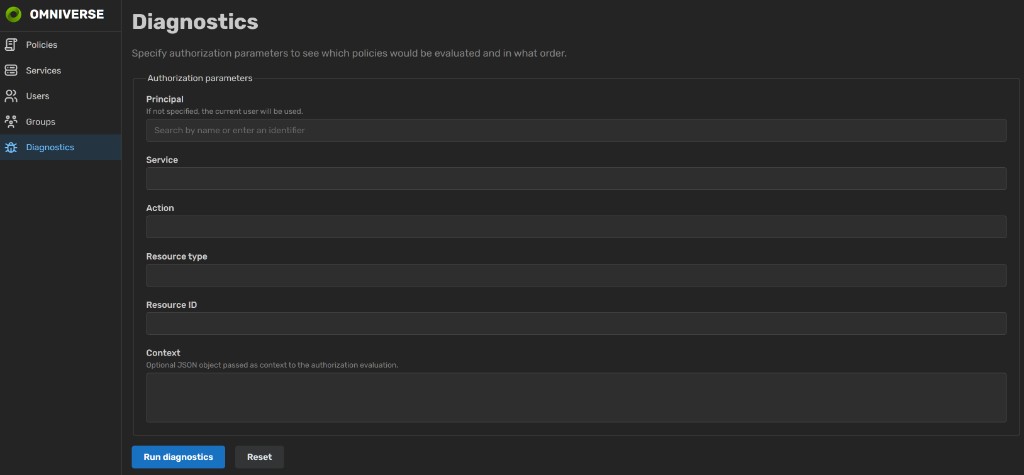
The Diagnostics page exposes the POST /v1beta/diagnostics/authorize/ endpoint as a form. It is intended as a troubleshooting tool for policy authors: instead of making an authorization call and receiving a single allow / deny / skip decision, it returns the ordered list of policies that would be evaluated for the supplied PARC parameters and the evaluation priority configured for the matching resource type.
The form accepts the same parameters as the real authorization endpoint:
Principal — optional; when empty, the signed-in user is used. Same user autocomplete as the policy form.
Service and Action — both required; same metadata-backed autocomplete as the other pages.
Resource type and Resource ID — optional, but mutually required (supplying one without the other is rejected by the form).
Context — optional free-form JSON passed as the Cedar evaluation context, useful for testing policies with
whenorunlessclauses that inspectcontextattributes.
Run diagnostics submits the form. The Results panel below the form lists the matching policies sorted by order ascending and id ascending, exactly as they would be evaluated in a real authorization request, with their Cedar text rendered inline. The evaluation priority displayed above the table is taken from the resource type’s metadata and governs how Cedar decisions are combined in the live authorization pipeline — see How authorization requests are evaluated for the details of that combination.
Note
The diagnostics endpoint is gated by the permissions:diagnostics meta-permission and the check is always performed, even when the principal in the form matches the signed-in user. Users without that permission see a 403 Forbidden response when they submit the form. See Granting administrative permissions for how to grant it.
See also#
Managing policies through the REST API — policy REST API the UI wraps.
Managing service metadata through the REST API — metadata REST API that drives the autocomplete on every policy input and backs the Services page.
Diagnostics API — the endpoint behind the Diagnostics page.
Deployment — deploying Permission Service and seeding the meta-permissions the UI relies on.
Authenticating with an OpenID Connect Identity Provider — OIDC integration that the UI shares with the backend.