Simulation Management
You are able to have fine grained control over PhysX simulations. To do this, you can adjust settings that are located in four key places in the UI:
The property window of the prims that are simulation objects, for example rigid bodies. In the property window, you can add and remove simulation components, and fine-tune properties such as mass, collision-shape approximation, etc.
The property window of the Physics Scene that holds general simulation properties such as gravity and solver parameters.
The Physics Settings window provides per-stage settings saved in USD metadata for portability; for example, settings include a lower bound on the simulation rate and mouse-interaction parameters.
The Physics Preferences in Edit > Preferences provide general simulation settings such as the option to en/disable reset on stop.
The layer metadata that USD uses to scale units (e.g. distance). The physics extension considers this scaling when parsing simulation parameters, so you should be aware of what scale you are authoring a simulation in.
Debug visualization
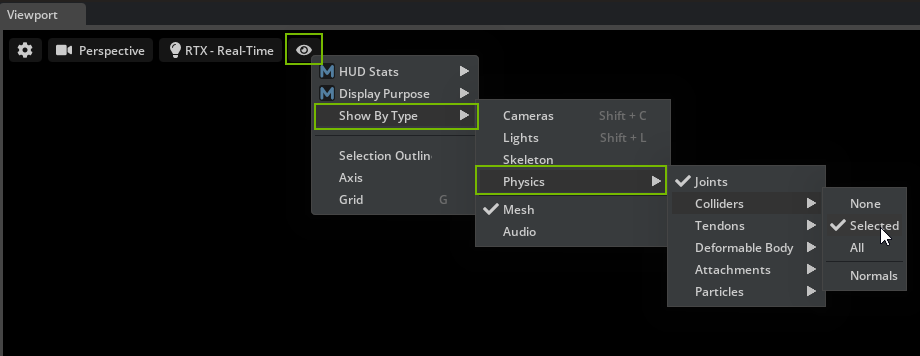
Visualizing for example collision-shape approximations may help you figure out issues with a simulation. There are many visualization and other debug options in the Physics Debug Window (Window > Simulation > Debug). In addition, you can enable feature-specific debug visualization in the Show/Hide (Eye) menu in the viewport:
Note
Debug visualization can be slow for large scenes.
Mouse Interaction
Finally, it is fun and may be helpful for testing to interact with objects. You can push or grab objects by shift-clicking them in the viewport when the simulation is running. See the related settings and description in the Mouse Interaction Settings.
Property Window
In the Property Window (Window > Property), you can edit the physics properties of a prim, or you can add or remove simulation components (i.e. USD APIs).
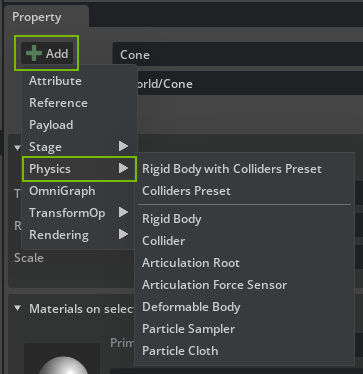
You can add physics components with the Add button that shows a list of components that you may add to the selected prim. The list is context-sensitive and only shows physics components that are compatible with the prim and other physics components that the prim already has. Adding a component populates the Property Window with a new rollout that shows the component’s properties (i.e. API attributes).
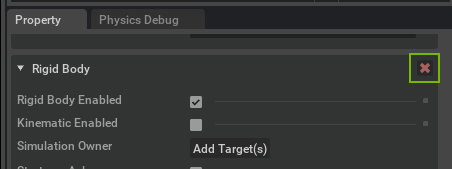
You may remove a component from a prim by clicking the red X that is shown with the component rollout:
A hint for editing numeric values: Ctrl-Click or double-click lets you edit the current value. If you want to reset values to their default, you can do so by clicking the blue square next to the value:

Tool Tips
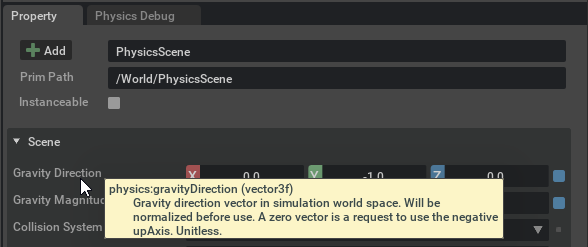
You can hover over the name of a property to reveal a tooltip with further information about a parameter:
Physics Scene
The Physics Scene holds simulation settings such as gravity. To create a scene, select Create > Physics > Physics Scene. Then, you can configure the scene settings in its property window. For details on the parameters, refer to their tool tips.
Note
The extension creates a temporary default scene if simulation objects are detected but a physics scene is missing. You may disable this behavior in the Physics Preferences.
Often it makes sense to create physics objects such as a scene in their own USD layer.
Multiple Scenes
Multiple simulation scenes are supported. Each simulation actor, like a rigid body does have a simulationOwner relationship that defines where the actor is simulated. If empty, the first scene found during traversal is used.
Multiple simulationOwners can be set for an actor:
For dynamic rigid body, the first simulationOwner rel owns that body and is simulated there as a dynamic body. The rest of the simulationOwners get a mirror of that body. That body is moved as a kinematic body.
For static rigid body all bodies are mirrored into each simulationOwner scene.
Note
Actors in different scenes do not interact with each other.
Scene Stepping
Physics stepping is determined by several variables. Scene is always stepped with a fixed time step. This is defined on a physics scene primitive - Time Steps Per Second (60 default). However the time provided by the update loop is variable (can be set to fixed in rendering properties). So physics is doing substeps to simulate the given variable delta time.
The number of steps is determined from the given variable delta time, the time steps per second on a physics scene and min frame rate setting defined in Physics settings (Window->Simulation->Settings). The required number of steps is equal to the delta time multiplied by the time steps per seconds. However, if the delta would be large, the number of steps would continue to grow. In order to prevent this, the min frame rate does limit the maximum number of steps. Maximum number of step equals to time steps per second divided by the min frame rate. As an example, if the time steps per second is 60, the min frame rate is 30, then the maximum number of steps is two and for any delta that is larger then 1/30 only two substeps are done, with a fixed 1/60 step.
Physics Materials
Materials defining properties of physics objects can be created with Create > Physics > Physics Material or added to an already existing Material prim through the Add > Physics menu.
A physics material can be assigned to a physics object in the Physics Materials on Selected Models rollout in the Property window, which binds the material to the prim with the ‘physics’ purpose. Physics materials follow the same resolution logic as render materials as they are both based on the same Material prim type.
One may define both render and physics properties on the same Material prim (e.g. to combine the visual and physical properties of rubber in a single material prim) and assign it in the “Materials on selected models” rollout.
Another option is to bind a material to the Physics Scene prim in the Physics default material rollout, and this material is used as a default when a physics object does not have a physics material bound to it after USD material resolve. Note that multiple physics material types (Rigid/Deformable/PBD Particle) can be added to the same material prim, so that the material bound to the Physics Scene can define defaults for all physics object types.
When parsing physics material properties of a prim the priority is then as follows:
Material binding with a ‘physics’ purpose (physics material).
Material binding with no purpose (render material).
Material binding with a ‘physics’ purpose on the Physics Scene prim.
Default values of material properties.
Physics Settings
Physics Settings are per-stage settings saved in USD metadata. You can view and change them through Window > Simulation > Settings. The Physics Settings window should be by default docked behind the Stage tab on the upper-right side.
Update
You can configure what data the simulation writes back to USD (analogous to editing operations).
Update to USD |
Enables writing object transforms back to USD. Expert setting that should be left enabled. |
Update velocities to USD |
Enables writing object velocities back to USD. If you do not need velocity information, you can disable the writeback to save some computational overhead. |
Output Velocities in Local space |
Display velocities in local coordinate space. The simulation also expects user changes to velocities (like initial velocity of a body) to be in local/global space according to this setting. |
Update Particles to USD |
Enables writing particle positions (and velocities, if update velocities is enabled) back to USD. Particle updates are otherwise disabled if particle iso-surface mesh generation is enabled. |
Simulator
Min Simulation Frame Rate |
Sets the minimum simulation update rate in Hertz with respect to render-frame updates. In general, the Physics simulation runs in real (wall) time, so if rendering is slow, the simulation may take many steps at |
Mouse Interaction
Mouse Interaction Enabled |
Enables interaction with physics objects through shift-click if the simulation is running. For advanced physics-based authoring, refer to the Zero Gravity extension. |
Mouse Grab |
Toggles between grabbing behavior (enabled) and applying a push (disabled). |
Mouse Grab With Force |
Toggles between grabbing using a force (enabled) or using a D6 joint (disabled). Both the force and D6 are applied at the click (raycast) location. |
Mouse Grab Force Coefficient |
Scales the force used for grabbing. The grabbing force is proportional to the mass of the grabbed object and multiplied with this parameter. |
Mouse Push Acceleration |
Scales the push-acceleration applied to the object. |
Physics Preferences
Besides the physics scene and physics settings, the Physics tab in Edit > Preferences provides global simulation-related settings.
General
Create Temporary Default PhysicsScene When Needed |
Controls whether a scene is auto-created when you press Play and simulation objects are present but no PhysicsScene was added to the stage. |
Reset simulation on stop |
If enabled, the state (i.e. transforms, velocities) of the simulation objects is reset to the initial state before Play was pressed. |
Use Active CUDA Context |
If enabled, the PhysX simulation uses the currently active CUDA context for its GPU computations. If disabled, a new context is created for the simulation. |
Reset Physics Preferences |
Use this button to reset the values of the Physics preferences here, and the debug-visualization. |
Backward Compatibility
Backward Compatibility Check on Scene Open |
Configures the behavior of the physics USD backward compatibility module: In case of opening a scene with deprecated USD schema the extension can either ignore it, print out a warning to console, show a visual prompt to upgrade, or upgrade the scene automatically without prompting. |
Run Backwards Compatibility On Current Stage |
Manually trigger a backwards compatibility check and update on current stage. |
Run Backwards Compatibility On Folder |
Manually trigger a backwards compatibility check and update on a folder. |
Simulator
Num Simulation Threads |
The number of simulation threads controls how many background threads are spawned and reserved for simulation. |
Use PhysX CPU Dispatcher |
Use internal PhysX task scheduler instead of the default one. Can be more efficient for some scenes. |
Expose PhysX SDK Profiler Data |
Adds PhysX SDK profiling zones to the Kit profiler. |
Release Physics Cooked Data |
Deletes cooked data (i.e. pre-optimized simulation data for collision meshes, etc.) for all prims on the stage from USD, i.e. deletes the corresponding API and attributes holding the data. Forces re-cooking of the data (if the local mesh cache is cleared as well). |
Local Mesh Cache
Enable, set the size of, and release the local (disk) mesh cache that stores results from collision mesh approximations and Physics data cooking for reuse with identical geometry.
Units
USD supports scaling of units through layer metadata that you may edit in the layer properties, see below. The default unit scaling for new stages can be set in the Stage tab of the Preferences Window.
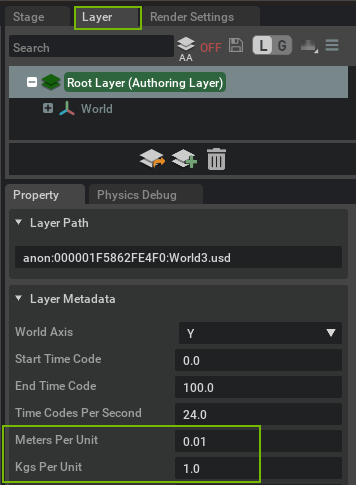
The Physics extension scales default or auto-computed values by this metadata. For example, if Meters Per Unit is 0.01 (i.e. 1cm per unit), as you would set for assets that were authored at a centimeter-scale, the Physics extension sets the gravity magnitude of a newly created scene to 981.0 cm / s2. Any property value that you edit is assumed to be in the scale of the layer that it is authored in (see limitations in the note).
Note
Time is never scaled and is always in seconds (Time Codes Per Second is not considered for physics simulation).
Automatic reconciliation of unit-scales between different layers is currently not supported, so you must ensure that all layers are authored at the same scale.
In order to run simulations in engineering SI units (except angles), set all scaling to 1.0. Related, you may change the stage up-axis in the layer metadata from graphics-default Y-up to Z-up that is more common in engineering.
Angles are represented in degrees and cannot be set to radians. All physics parameters that refer to rotation are in degrees as well: For example an angular drive of a revolute joint has its stiffness defined in units of torque/degrees.
Physics Debug Window
The Window > Simulation > Debug window should be the first place to look when physics simulation is generating unexpected results.
Simulation Control
In addition to running and stopping, you can Step the simulation one time step at a time, so you can inspect problems that happen very quickly.
Simulation Overrides
You can manually perform updates from USD or release simulation objects, and override the CPU/GPU and solver settings of the PhysicsScene.
Simulation Debug Visualization
You can enable and configure a low-level visualizer that renders directly based on the PhysX engine’s state, which is useful if for some reason the simulation is not in sync with USD. When you check the Enabled box, the different elements to visualize are presented. Note that data is only visualized when the simulation is running. The Scale field can be used to adjust the length of some lines and arrows.
Note that some data like contact points are generated at the start of an update, and bodies are moved at the end of the update. Shapes are also drawn using their state at the start of an update so they line up with contact points. For this reason the visualization display may appear to lag one frame behind the graphics rendering.
Deformable Debug Visualization
Configure the options for deformable bodies.
Collision Mesh Debug Visualization
In addition to the wireframe debug visualization available in the viewport show/hide menu, you can visualize the collision-mesh approximations using solid render meshes. You may also inspect a convex decomposition using the explode-view distance.
PVD
Enable and configure PVD data logging by the PhysX PVD logger, which can be helpful to inspect the PhysX simulation objects created from USD data.
Sleeping
Sleeping is a mechanism in PhysX to save on computational resources when dynamic physics objects (e.g. rigid or deformable bodies) are not in motion and do not require simulation updates. If an object is not moving for a short time duration, it may go to sleep until it is woken up either by
the user when they set a property that causes the object to move again, for example applying a force on a rigid body or changing the target position of an articulation joint drive;
or the simulation when another object collides or interacts with the sleeping object, such that the sleeping object may move again.
For the different dynamic object types, e.g. rigid bodies, articulations, or deformable bodies, you will find sleep-related properties such as a flag to have the rigid body start a simulation asleep, or the thresholds that PhysX uses to determine if an object is not moving and may be put to sleep. If you set those thresholds to zero, you can disable sleeping altogether on the object.
Note
There is a subtle connection between sleeping and effective solver iterations (e.g. position and velocity iteration settings): In a GPU simulation, it is computationally efficient to apply the same number of iterations to all objects in the scene; and this number will be equal to the maximal iteration setting over all physics objects in the scene that are not asleep. Especially for deformable bodies whose dynamics can be affected when the effective iteration count changes, this is important to keep in mind: For example, if you have two deformable bodies with 20 and 40 iterations each in a scene and both are awake, the solver will apply 40 iterations to both. However, if the body with 40 iterations goes to sleep, the other body will only have 20 iterations applied to it, which may change its behavior.
PhysX Flatcache (also known as Fabric rename in next release)
The Flatcache feature enables bypassing USD to communicate PhysX simulation data to the rendering engine, which is more efficient and results in higher combined simulation and rendering performance.
The feature currently only supports rigid bodies (excluding point instancer rigid bodies as well). You can enable and test the Flatcache feature as follows:
Enable the extension omni.physx.flatcache
Enable FPS display in the viewport show/hide menu (eye) HUD Stats
Compare FPS in a scene with many rigid bodies (e.g. ~1k) with and without Flatcache enabled
Note
When the extension is enabled small window is displayed showing what the output of a simulation is (USD/Fabric).
Using Fabric means that the data are not available in USD. This will cause USD based functionality to not work. For example debug visualization of physics colliders wont work anymore, because the transformations are not synchronized.
Using a python script to update and get USD state wont work because USD does not have current transformation information.
If scene graph instancing is used together with Fabric, support for that in omni hydra has to be enabled. Enable omni.hydra.ui and enable the scene graph instancing using omni.hydra. Reload your stage.