Clash Detection UI
In this section, we will explore the Clash Query Management window and the Clash Detection Results window.
To start a clash detection, a clash detection query must first be created using Clash Query Management window. You can define as many queries as necessary.
Clash Query Management Window
To create new clash query, click the
Create New Querybutton. The new query will be created with a default nameNew Query ###.Rename the query by double clicking its name as necessary.
To duplicate the selected clash query (or queries), click
Duplicate Selected Query.To delete an existing clash query (or queries), click
Delete Selected Query.You can also enter your own comment to further clarify its purpose by double clicking empty space in the
Commentcolumn.The
First Createdcolumn shows the timestamp when was the query first created. TheLast Modifiedcolumn shows the timestamp when was the query last modified.

In the right side pane, you can see various options that help you to customize the clash detection query to your needs:
Limit the clash detection processing scope by defining search sets.
If both Searchset A and Searchset B are empty -> process full scene.
If only the Searchset A list contains items -> limit processing only to Searchset A items.
If Searchset A and Searchset B lists contain items -> process Searchset A against Searchset B.
Option |
Description |
|---|---|
Dynamic |
Tells the clash detection engine to run dynamic clash detection inspecting time sampled animations. |
Start Time on Timeline |
Start Time on Timeline in seconds. Works only when dynamic clash detection is enabled.
0 = timeline start time (auto-detected).
|
End Time on Timeline |
End Time on Timeline in seconds. Works only when dynamic clash detection is enabled.
0 = timeline end time (auto-detected).
|
Purge Permanent Overlaps |
If two objects overlap for the whole duration of the dynamic clash, such overlap is ignored. Works only when dynamic clash detection is enabled. |
Tolerance |
Tolerance distance for overlap queries. Use zero for hard clashes, non-zero for soft (clearance) clashes. |
Option |
Description |
|---|---|
Use New Task Manager |
Use new task manager implementation. |
Number of Tasks |
Number of tasks used when running multi-threaded. Generally speaking, the more the better. |
Pose Epsilon |
Epsilon value used when comparing mesh poses. This is used when detecting ‘duplicate meshes’, i.e. meshes with the same vertex/triangle data in the same place. |
Bounds Epsilon |
Epsilon value used to enlarge mesh bounds a bit. This ensures that flat bounds or bounds that are just touching are properly processed. |
Area Epsilon |
Epsilon value used to cull small triangles or slivers. Triangles whose area is lower than this value are ignored. Use 0 to keep all triangles. |
Coplanar |
Detect collisions between coplanar triangles. |
Option |
Description |
|---|---|
Log info in Console |
Log info & perf results to console. |
Single Threaded |
Run single-threaded or multi-threaded code. Mainly for testing. |
Filter Test |
Experimental filtering. Ignore pairs whose meshes have a direct similar sub-component. |
Any hit |
Any hit or all hits. |
Tight Bounds |
Use tight bounds for meshes. |
Quantized |
Quantized or not. |
Tris per leaf |
Number of triangles per leaf. |
Overlap Code |
Use alternative triangle-triangle overlap code. |
Do not forget to click the Save Properties button to save your changes!
Note
By default, currently an edited query is automatically saved on query selection change. If you don’t like this behavior, you can turn it off by going to settings and unchecking Save Edited Query on Selection Change.

Clash Detection Results Window
This window provides results per selected clash query.
First, select a clash query you want to work with in the dropdown list Selected Clash Query. You can edit clash queries in the Clash Query Management window, described in the previous section.
Click Query Management to open the Clash Query Management window.
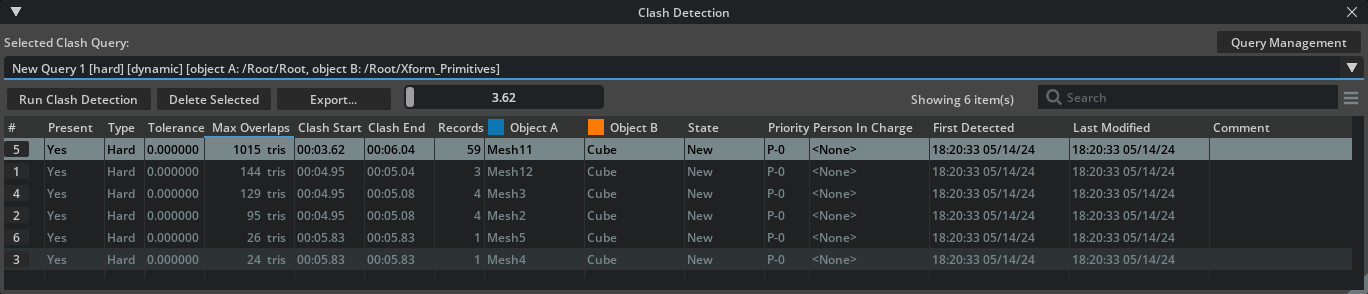
Click Run Clash Detection to start the clash detection process on the currently opened stage, using parameters from currently selected clash query in the Selected Clash Query dropdown list.
Once clicked, the button changes to a progress bar. If desired, you can click the progress bar to cancel the process.
To delete an existing clash query (or queries) together with all its results, click Delete Selected.
To export results to a HTML or JSON file, click Export. Additional options display:
Export only filtered itemsIf ticked, only visible clashes will get exported. If not, all clashes that belong to the to selected clash query will get exported.Export clash screenshotsIf ticked, clash images for each clash will get captured and saved to the target location<target-file-name>_imagessubfolder.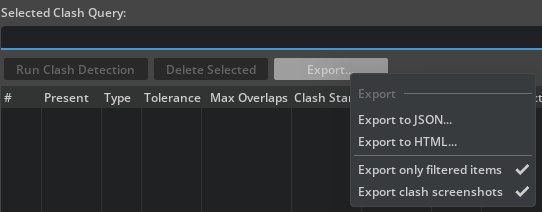
You can instantly filter the resulting list by typing a string into the Search field.
Review descriptions of the results list columns.
Column |
Description |
|---|---|
# |
Clash number.
|
Present |
Indicates, if the clash is present in the stage or not. Note that we never delete even resolved clashes. If you are no longer interested in a clash, simply delete it yourself. |
Type |
Type of clash. Hard or Soft. |
Tolerance |
Tolerance which was set at the time when clash detection was run. For hard clashes, the tolerance is always zero. For soft clashes it is non-zero. |
Max Overlaps |
Maximum number of overlapping triangles. |
Clash Start |
Starting timestamp of the clash. |
Clash End |
Ending timestamp of the clash. |
Records |
Total number of clashing frames. |
Object A |
Name of the clashing object A. |
Object B |
Name of the clashing object B. |
State |
Management flag: Current state of the clash. (New, Approved, Resolved, Closed, Invalid). |
Priority |
Management flag: Priority of the clash from 0 to 5. |
Person in Charge |
Management flag: Name of a person this clash is assigned to. |
First Detected |
Shows timestamp when was the clash first detected. |
Last Modified |
Shows timestamp when was the clash last modified. |
Comment |
An optional comment for each clash. |
Right-click on a selection in the list to bring up a contextual menu, which offers actions like selecting clashing objects or copy info to clipboard.

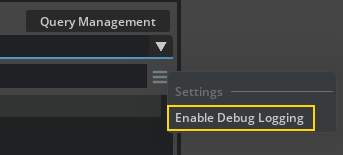
Advanced Tip: You can turn on debug logging and diagnostic messages by clicking the menu icon and checking Enable Debug Logging.
➤ Next Steps: Clash Detection Viewport