Nucleus Navigator
Overview
Nucleus Navigator makes it easy to browse the data stored in Nucleus using a web browser, from Nucleus tab within the Omniverse Launcher, or by using the standalone Nucleus Navigator application. Using the standalone Nucleus Navigator application will provide the most comprehensive and feature-rich experience.
Whether adding new content, adjusting permissions, or sharing content URLs, Nucleus Navigator provides convenient access to files, users and permissions for any Nucleus host.
Note
The video above showcases Nucleus Navigator 3.3 and prior. See below for additional Nucleus Navigator 3.4+ features.
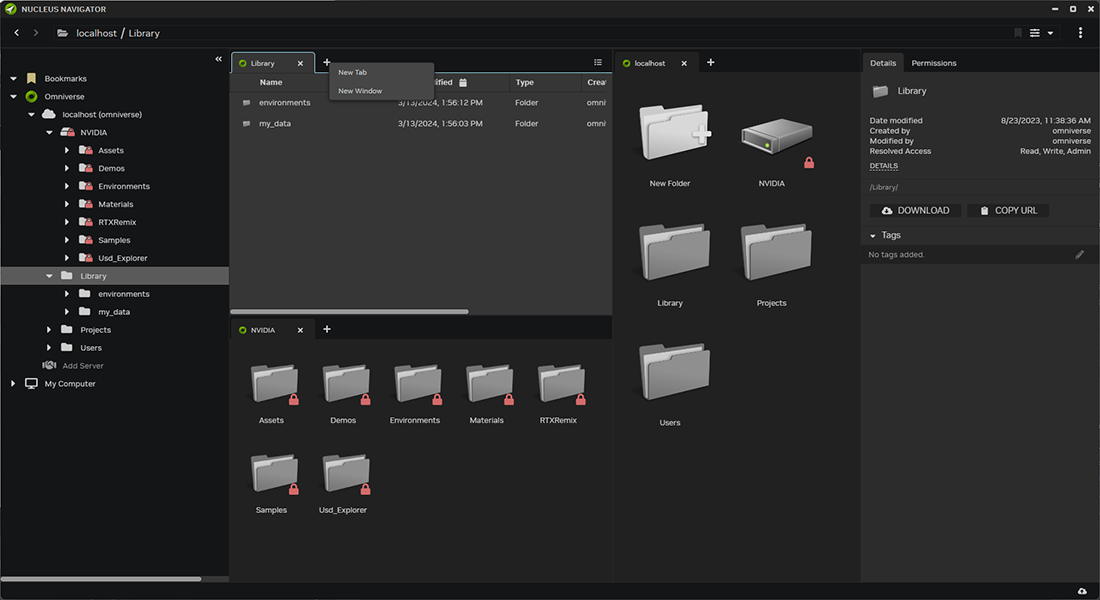
Nucleus Navigator 3.4+

Ref # |
Option |
Usage |
|---|---|---|
1 |
Server/Directory Tree |
Quick access to servers/nested folders. |
2 |
Add Server |
Connect another server to Nucleus (if enabled.) |
3 |
Unified Address/Search Bar |
Displays current directory path, or use as your search bar. |
4 |
Content Browser |
Contents of the current selected directory. |
5 |
View Selector |
Toggle view between Column or List. |
6 |
Details tab |
Display details for selected directory item. |
7 |
Permissions tab |
Show/assign permissions for selected item. |
8 |
Copy URL |
Copies the URL for currently selected item to the clipboard. |
9 |
Add/Remove Bookmark |
Add or remove the current path from your bookmarks list |
10 |
Detail Search Dropdown |
Detail search drop down to refine your file search |
11 |
Theme Selector |
View Dark/Light mode, and Navigator version information. |
12 |
Show/Hide Details |
Toggle the view for the details/permissions panel. |
13 |
Show/Hide Hidden files |
Toggle visibility of files or directories that begin with a . (period) |
Navigator 3.4+ offers support for tabbed browsing and multiple windows. Using tabs, you can snap them into convenient layouts.
Nucleus Navigator 3.3.0 and prior

Ref # |
Option |
Usage |
|---|---|---|
1 |
Server/Directory Tree |
Quick access to servers/nested folders. |
2 |
Add Server |
Connect another server to Nucleus (if enabled.) |
3 |
Content Browser |
Contents of the current selected directory. |
4 |
Search Bar |
Search for files in the File Tree of Nucleus |
5 |
Details tab |
Display details for selected directory item. |
6 |
Permissions tab |
Show/assign permissions for selected item. |
7 |
Download |
Download a ZIP file for the selected asset, folder, or directory. |
8 |
Copy URL |
Copies the URL for currently selected item to the clipboard. |
9 |
View Selector |
Toggle view between Column or List. |
10 |
Theme Selector |
View Dark/Light mode, and Navigator version information. |
11 |
Show/Hide Details |
Toggle the view for the details/permissions panel. |
Details Tab
When you select a directory item, the details tab reports information known about the asset. Additionally, you may open the selected file in your default app directly from Navigator by clicking “open in launcher”.
Permissions Tab
The permissions tab allows you to control access to data. The latest feature we have added is you can now see how your permissions are resolved. This makes it easy to understand where the permissions are coming from since Nucleus supports permission inheritance. Users can also see how their permissions are inherited. With the new “resolved” [R] section in the Permissions Tab panel, users can understand where the most permissive permissions are coming from so they can adjust who can read and/or write their files.

Permission |
Displayed As |
|
|---|---|---|
Read |
read |
Grants Read Access to this principal |
Write |
write |
Grants Write Access to this principal |
Admin |
admin |
Grants Administrator Rights to this principal |
To manage permissions see ACLs and Permissions Management.
Multiple Server Connections
Depending on how your deployment was configured, users may have the ability to connect Multiple Nucleus servers from one Navigator instance, allowing cross-server search functionality. If this feature is disabled, users will not see the “Add Server” button in Nucleus.
This feature cannot be controlled by regular system users.
Multiple server support may only be configured by system administrators for the centralized deployment in the browser.
For those who install Navigator from Launcher, this option is enabled by default and cannot be reconfigured.
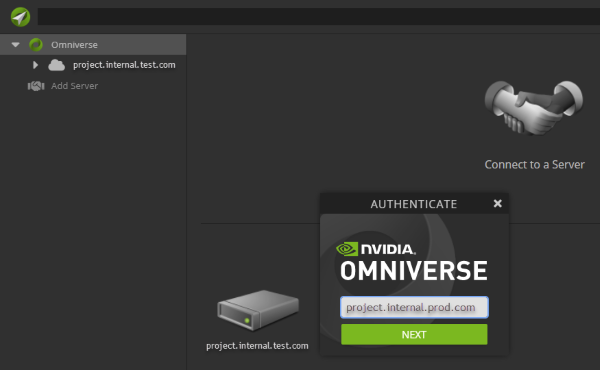
Add a Server
To add a server, click the Omniverse logo in the directory tree. Wait for a moment for the system to search for the server connector. If multiple server connectivity is enabled, click “Add Server”.

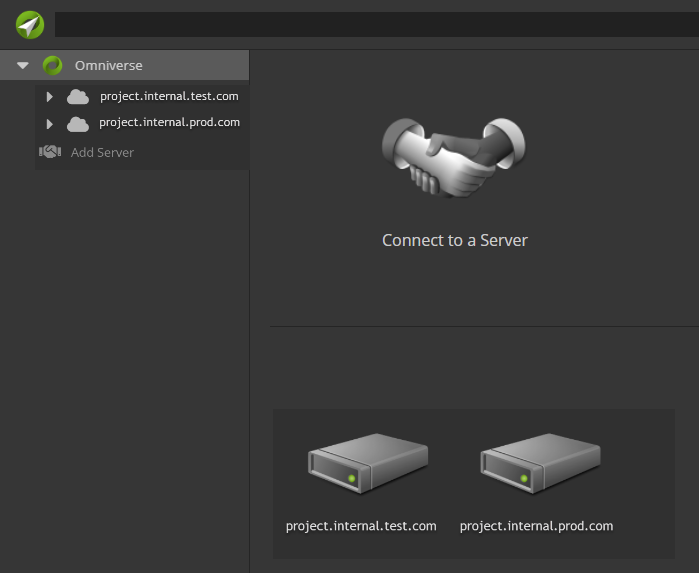
Enter the server address and click “Next”. A successful connection attempt will display the new server in the navigation pane.
Connecting to a server
To connect, select/highlight the server or instance, then click “Connect to a Server”. Enter your credentials and the server should populate in the directory on the left.
Issues with server Connections
Ensure that the server is actually running.
Check your scheme: http v. https
Remove any extraneous endpoints or services that may be trailing the address.
Check your server login credentials or request permission from your administrator.
Version Control
Navigator creates and lists Checkpoints. See the Checkpoints page.
Checkpoint Rename, Move, and Copy
Checkpoints are created automatically for the destinations of Rename, Move, and Copy operations.
For Rename and Move the description states which source was used to replace the file contents.
For Copy the description states where the file was copied from.
Delete
Deleting a file or folder will physically removes the head revision and all associated checkpoints from the server.
Caution
The Delete operation will permanently delete items; there is no recovery feature.
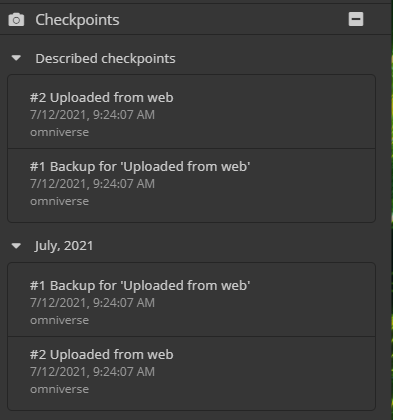
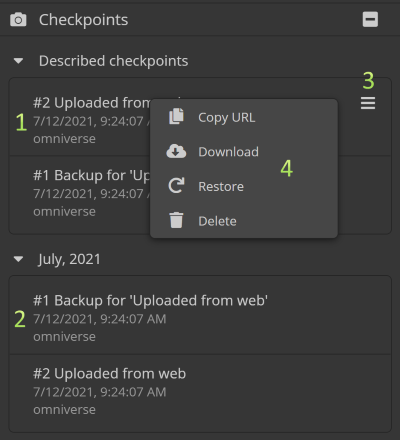
Checkpoint Listing
Ref # |
Item |
Usage |
|---|---|---|
1 |
Current Checkpoint |
All Checkpoints with descriptions are listed in the top category labeled Described checkpoints. |
2 |
Checkpoint |
Other categories group checkpoints according to the date created. |
3 |
Hover for Menu |
Hover over an item in the list to reveal a menu button. |
4 |
Menu for Checkpoint |
Checkpoint operations; Administrators will have Obliterate shown. |
Note
To view long checkpoint names, click the checkpoint to expand.
Asset Tagging
Omniverse Nucleus Navigator allows meta tagging assets. This functionality requires the following services to be available:
Service |
Description |
|---|---|
Tagging service |
Stores all the information about assets’s tags. |
Deeptag Search Service (optional) |
Enables tag searching functionality. |
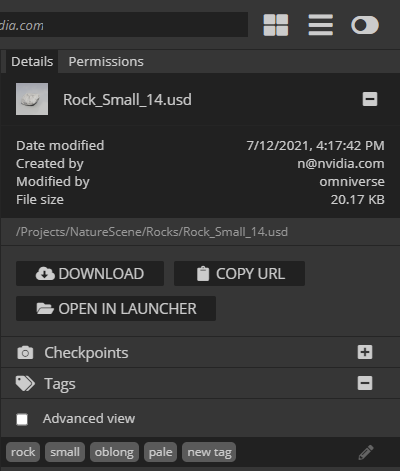
If an asset has tags associated with it, they will be visualized in the Tags tab, as depicted by the image below.

Working with Asset Tags
Add comma-separated tags in the tags text box as shown below.

When complete, press Enter and these tags will appear in the Tags tab of the asset, as shown in the image below.

Removing tags for an asset can be done in the similar manner.
User Administration
For additional information, please view the Authentication and User Management documentation.