Deploying Kit Apps#
Overview#
The information below explains the process of deploying containerized Kit Applications to Omniverse Streaming on NVCF. In this section we will cover:
Push Kit app container to NGC Container Registry
Push Kit app container to Amazon Elastic Container Registry (ECR)
Push Kit app container to Azure Container Registry (ACR)
Create and Deploy NVCF functions with NVCF CLI
Configure NVCF Functions for Omniverse Streaming
Prerequisites#
A local instance of a containerized Kit app is available on a Linux machine
NGC access and NGC Personal API Key
- Amazon AWS account access
EKS Cluster access
AWS ECR access
- Microsoft Azure account access
AKS Cluster access
Azure ACR access
- NVCF CLI
NVCF CLI installed and configured (see the NVCF CLI section below)
kubectl installed
kubectl configured to access your NVCF cluster
Validate Local Container#
The Omniverse Kit app must appear in the list of Docker images. If you do not have a docker container, you can build one by following the Developing and Containerizing Apps documentation.
This step must be verified before proceeding further:
docker image ls
You should see the Kit app as app-name_nvcf:latest in your local container registry.
NGC Container Registry#
This section will walk you through pushing a container image to the NGC Container Registry.
Identify NGC Organization Name#
Identify Your NGC Organization Name as an Organization Member
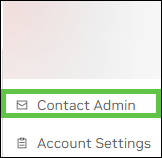
Log in to your NGC Organization and select Contact Admin from the drop down list under your username in the upper right-hand corner:
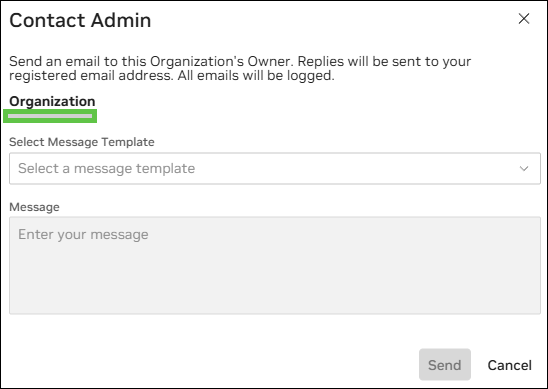
Your NGC Organization Name can be found under the Organization heading.
Identify Your NGC Organization Name as an Organization Owner
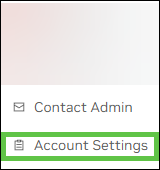
Log in to your NGC Organization and select Account Settings from the drop down list under your username in the upper right-hand corner:
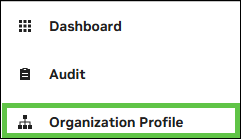
Select Organization Profile from the left hand side:
Capture the value under Name. This will later be referred to as the
<NCA_ID>in the upload script: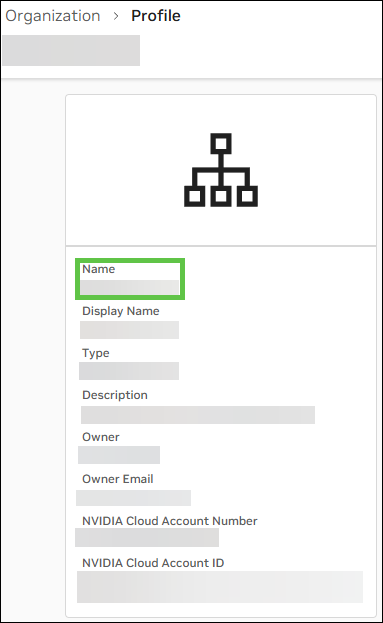
Note
Although the variable is named <NCA_ID>, the value should be set to the Name of the NGC subscription, not the NVIDIA Cloud Account ID shown on the same page.
DO NOT USE the outlined value below:
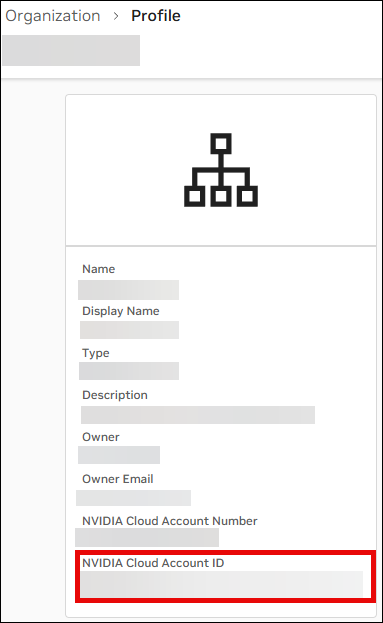
Note
Record the NGC Organization Name and store it in a secure location. It is later referred to as the <NCA_ID>.
Create a Personal API Key#
Navigate to the NGC Portal to generate your personal API key, which is required for accessing the NGC Private Registry and NVCF.
For additional information on generating NGC API Keys, click here to access the NGC documentation.
Note
Record the API Key and store it in a secure location. It is later referred to as the <NGC_API_KEY>.
Set Environment Variables#
In your Linux terminal, run the following commands, including the quotation marks to export the required environment variables:
export NCA_ID="paste your <NCA_ID> here"

export NGC_API_KEY="paste your <NGC_API_KEY> here"
Log in to NGC Container Registry#
Use the command below to authenticate:
docker login -u \$oauthtoken -p $NGC_API_KEY nvcr.io
After a successful login, you should see an output similar to the example below:
Login Succeeded
Tag Container#
Tag the container to point to the correct registry. By default, most containers in the local Docker will have the tag latest. This should be tagged with a specific version that adheres to semantic versioning:
docker tag app-name_nvcf:latest nvcr.io/$NCA_ID/app-name_nvcf:0.1.0
In some scenarios, you may need to push to a specific team within an organization. To do this, you will need to slightly modify the variable accordingly:
docker tag app-name_nvcf:latest nvcr.io/$NCA_ID/<TEAM_NAME>/app-name_nvcf:0.1.0
Verify Tag#
Run the docker image ls command to confirm that the tag has been properly allocated:
nvcr.io/$NCA_ID/app-name_nvcf:0.1.0
Push the Container#
Once the image has been tagged, it can be pushed to the NGC Container Registry. Use the docker push command to upload the container to the remote registry:
docker push nvcr.io/$NCA_ID/app-name_nvcf:0.1.0
Verify the Container in NGC#
Go to the Private Registry to verify your container was uploaded with the correct tag.
After pushing the image to the registry, verify that it is available and matches what you built with docker pull. If this command succeeds, the image tag exists in the registry and can be pulled by other clients:
docker pull nvcr.io/$NCA_ID/app-name_nvcf:0.1.0
Amazon Elastic Container Registry (ECR)#
This section will walk you through pushing a container image to the Amazon Elastic Container Registry (ECR).
Authenticate Registry#
You can use the AWS Management Console, the AWS CLI, or the AWS SDKs to create and manage private repositories. Authentication tokens must be obtained for each registry used.
For additional information, see Private registry authentication in Amazon ECR.
Log in to Amazon ECR#
Use the command below to authenticate with AWS CLI:
aws ecr get-login-password --region <region> | docker login --username AWS --password-stdin <aws_account_id>.dkr.ecr.<region>.amazonaws.com
After a successful login, you should see an output similar to the example below:
Login Succeeded
Tag Container#
Tag the container to point to the correct registry. By default, most containers in the local Docker will have the tag latest. This should be tagged with a specific version that adheres to semantic versioning:
docker tag app-name_nvcf:latest <your-account-id>.dkr.ecr.<your-region>.amazonaws.com/app-name_nvcf:0.1.0
In some scenarios, you may pull a container from NGC and Tag it to push to ECR. To do this:
docker tag nvcr.io/$NCA_ID/app-name_nvcf:0.1.0 <your-account-id>.dkr.ecr.<your-region>.amazonaws.com/app-name_nvcf:0.1.0
Verify Tag#
Run the docker image ls command to confirm that the tag has been properly allocated:
<your-account-id>.dkr.ecr.<your-region>.amazonaws.com/app-name_nvcf:0.1.0
Push the Container#
Once the image has been tagged, it can be pushed to the Amazon Elastic Container Registry. Use the docker push command to upload the container to the remote registry:
docker push <your-account-id>.dkr.ecr.<your-region>.amazonaws.com/app-name_nvcf:0.1.0
Verify the Container in ECR#
After pushing the image to the registry, verify that it is available and matches what you built with docker pull. If this command succeeds, the image tag exists in the registry and can be pulled by other clients:
docker pull <your-account-id>.dkr.ecr.<your-region>.amazonaws.com/app-name_nvcf:0.1.0
Azure Container Registry (ACR)#
This section will walk you through pushing a container image to the Azure Container Registry (ACR).
Authenticate Registry#
You can use the Azure portal, the Azure CLI, or a service principal to create and manage private registries and authenticate to them.
For additional information, see Authenticate with an Azure container registry.
Log in to Azure ACR#
Use the command below to authenticate with the Azure CLI. This logs Docker in to your registry’s login server (<registry-name>.azurecr.io):
az login
az acr login --name <registry-name>
After a successful login, you should see an output similar to the example below:
Login Succeeded
Tag Container#
Tag the container to point to the correct registry. By default, most containers in the local Docker will have the tag latest. This should be tagged with a specific version that adheres to semantic versioning:
docker tag app-name_nvcf:latest <registry-name>.azurecr.io/app-name_nvcf:0.1.0
In some scenarios, you may pull a container from NGC and Tag it to push to ACR. To do this:
docker tag nvcr.io/$NCA_ID/app-name_nvcf:0.1.0 <registry-name>.azurecr.io/app-name_nvcf:0.1.0
Verify Tag#
Run the docker image ls command to confirm that the tag has been properly allocated:
<registry-name>.azurecr.io/app-name_nvcf:0.1.0
Push the Container#
Once the image has been tagged, it can be pushed to the Azure Container Registry. Use the docker push command to upload the container to the remote registry:
docker push <registry-name>.azurecr.io/app-name_nvcf:0.1.0
Verify the Container in ACR#
After pushing the image to the registry, verify that it is available and matches what you built with docker pull. If this command succeeds, the image tag exists in the registry and can be pulled by other clients:
docker pull <registry-name>.azurecr.io/app-name_nvcf:0.1.0
NVCF Function Creation and Deployment#
NVIDIA Cloud Functions (NVCF) is a serverless API to deploy & manage workloads on GPUs, which provides security, scale and reliability to your workloads. The API to access the workloads is un-opinionated and supports HTTP polling, HTTP streaming & gRPC.
This section provides the basic steps to create and deploy a container-based streaming function, using NVCF CLI.
NVCF CLI#
Creating and deploying NVCF functions on a self-hosted cluster requires the NVCF CLI documentation for installation, configuration, and verification as prerequisites before continuing below.
The NVCF CLI provides command-line tools for managing self-hosted NVCF deployments, including:
API key generation and management
Function creation and management
Function deployment operations
Cluster configuration
Initialize the CLI#
After installing the CLI, initialize it with your cluster configuration. This generates an admin token that allows the CLI to authenticate with your NVCF cluster:
./nvcf-cli init
Generate API Key#
Create an API key with specific scopes for authenticating with the NVCF API:
./nvcf-cli api-key generate
The output will include your API key. Save it securely as it cannot be retrieved later. You will need the NVCF API key for cloud function authentication, when configuring your intermediary proxy for web-streaming with Create OV WebRTC App to invoke your streaming function.
Create Streaming Function#
The CLI uses JSON configuration files for function creation.
Function Definition
For Kit streaming applications, use this function definition example to start:
{
    "name": "my-streaming-app",
    "inferenceUrl": "/sign_in",
    "inferencePort": 49100,
    "healthProtocol": "HTTP",
    "healthUri": "/v1/streaming/ready",
    "healthPort": 8011,
    "healthTimeout": "PT10S",
    "healthExpectedStatus": 200,
    "containerImage": "<your-account-id>.dkr.ecr.<your-region>.amazonaws.com/app-name_nvcf:0.1.0",
    "apiBodyFormat": "CUSTOM",
    "description": "My Kit Streaming Application",
    "functionType": "STREAMING",
    "containerEnvironment": [
        {"key": "NVDA_KIT_ARGS", "value": "--/exts/omni.services.livestream.session/resumeTimeoutSeconds=300"}
    ]
}
Create Function
Create the function:
./nvcf-cli function create --input-file create-function.json
Save the functionId and versionId from the output.
Deploy Streaming Function#
The CLI uses JSON configuration files for function deployment.
Deployment Specification
Create a deployment specification:
{
    "functionId": "<functionId>",
    "versionId": "<versionId>",
    "deploymentSpecifications": [
        {
            "gpu": "L40S",
            "instanceType": "NCP.GPU.L40S_1x",
            "minInstances": 1,
            "maxInstances": 1,
            "maxRequestConcurrency": 1
        }
    ]
}
Deploy Function
Deploy the function to your cluster:
./nvcf-cli function deploy create --input-file deploy-function.json
Wait for the deployment to report successful.
The deployment specification file should include the function ID, version ID, and deployment specifications (GPU type, instance type, scaling parameters, etc.).
Commands#
List Functions
List all functions in your cluster:
./nvcf-cli function list
Delete Function
Delete a function in your cluster:
./nvcf-cli function delete --function-id <id> --version-id <version>
Additional Streaming Function Configurations#
This section covers optional environment variables and Kit arguments to support additional functionality in your Streaming Functions. Set the environment variables in create-function.json under containerEnvironment.
When you need multiple Kit arguments, join them as a single space-separated value in NVDA_KIT_ARGS:
{
  "key": "NVDA_KIT_ARGS",
  "value": "--kit-arg-one=value1 --kit-arg-two=value2"
}
Session Timeout Configuration
Sets how long an inactive livestream session remains resumable before its state is discarded and a new session is required. You can set this with NVDA_KIT_ARGS:
--/exts/omni.services.livestream.session/resumeTimeoutSeconds=300
Load USD File
Load USD file from URL. You can set this with key: NVDA_KIT_ARGS:
--/app/auto_load_usd='url/name.usd'
Derived Data Caching (OVDC)
Omniverse Derived Cache (OVDC) is designed to support real-time distributed simulation and rendering. OVDC reduces scene load time and improves performance when configured and sized for the workload. For more on OVDC, see OVDC documentation.
The examples below assume a Service named ovdc in namespace ovdc. To use this name with the ovderivedcache Helm chart, set fullnameOverride: ovdc in your Helm values. Without that override, release ovdc creates the Service ovdc-ovderivedcache; use ovdc-ovderivedcache.ovdc.svc.cluster.local:3010 instead. You can set the following Kit arguments with NVDA_KIT_ARGS:
--enable omni.ujitso.default  # required to load the UJITSO extension
--/UJITSO/enabled=true  # enabled by default in Kit 109+
--/UJITSO/textures=true  # enabled by default in Kit 109+
--/UJITSO/geometry=true  # optional, enable geometry caching
--/UJITSO/materials=true  # optional, enable material caching
--/persistent/UJITSO/geometry=true  # optional, persist geometry caching setting
--/UJITSO/datastore/grpcDnsName=ovdc.ovdc.svc.cluster.local:3010  # OVDC gRPC endpoint
--/UJITSO/datastore/GRPCDataStore/selfFile/enabled=false  # disable local self-file fallback
--/UJITSO/datastore/GRPCDataStore/useTLS=false  # enable/disable TLS to OVDC
OVDC can also serve as the shader cache backend via the drivercachewrapper extension. Set these Kit arguments to point shader caching at OVDC:
--/drivercachewrapper/enableByProtocol=grpcdns://ovdc.ovdc.svc.cluster.local:3010
--/drivercachewrapper/grpcDnsName=ovdc.ovdc.svc.cluster.local:3010
--/drivercachewrapper/grpcUseTLS=false
A function should use either GXCache or OVDC for shader caching, not both, because the GXCache client and the drivercachewrapper compete for the driver shader cache. If GXCache is still deployed in the cluster, confirm its webhook is not mutating the pods of functions that use these settings (a mutated pod has a gxcache-init init container); otherwise warm-start shader compile times will not improve.
Storage API
Storage API exposes storage APIs via in-cluster adapters so your function can reach backend storage services like S3. Set these environment variables when Storage API is available. For more on Storage API, see Storage API documentation.
{"key": "OMNI_STORAGE_DISCOVERY", "value": "http://discovery-service.<storage-api-namespace>.svc.cluster.local:8080"}
The following variable is only required before Kit 109:
{"key": "OMNI_STORAGE_ENABLED", "value": "1"}
Omniverse Content Cache
OVCC provides a content store running as an intermediary between object storage and Cloud Function clients. It caches USD (Universal Scene Description) content to accelerate scene loading and reduce bandwidth usage. For more on OVCC, see OVCC documentation.
{"key": "OMNICLIENT_HTTP_PROXY", "value": "http://ovcc.ovcc.svc.cluster.local:14128"}
Local Testing of Streaming Functions#
For optional local testing, you can use kubectl port-forward to reach NVCF services running inside your cluster from your local machine, without exposing them externally. This is useful for local testing, debugging, or using the CLI against a cluster-local deployment. Once port forwarding is set up, create a web-streaming client and intermediary proxy via Web Streaming Client to invoke your streaming function.
API Service
Use this command to forward the NVCF API service so it’s accessible locally at http://localhost:8080 and http://localhost:9090:
kubectl port-forward -n nvcf service/api 8080:8080 9090:9090
gRPC Service
Use this command to forward the NVCF gRPC service so it’s accessible locally at localhost:10081 for gRPC traffic:
kubectl port-forward -n nvcf service/grpc 10081:10081
Conclusion#
You have successfully completed the deployment process for your Omniverse Streaming function. Here’s a summary of what you accomplished:
Pushed a Kit app container to the NGC Container Registry, Amazon Elastic Container Registry (ECR), or Azure Container Registry (ACR)
Created and Deployed NVCF streaming functions with NVCF CLI
Configured NVCF functions for Omniverse Streaming with optional arguments and variables
Set up port forwarding for optional validation of local connection to function streaming
For web-streaming instructions, including containerization of web-streaming client and intermediary proxy, refer to the Web Streaming Client.