Usage#
The user can import CAD files into Omniverse via two workflows: through the File Menu Window or through the Content Window.
How to Import and Convert Files#
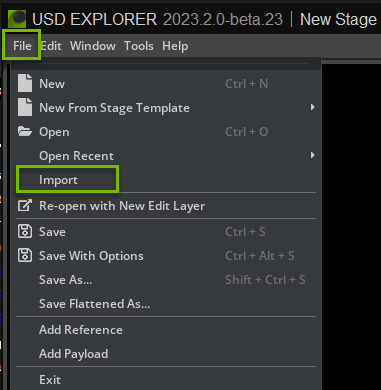
File → Import#
To import a JT file into Omniverse, choose Import in the File menu.
A file manager window will appear. Select a JT file for conversion from this window.
Refer to the Converter Options section for more information on conversion settings.
Import through the Content Window#
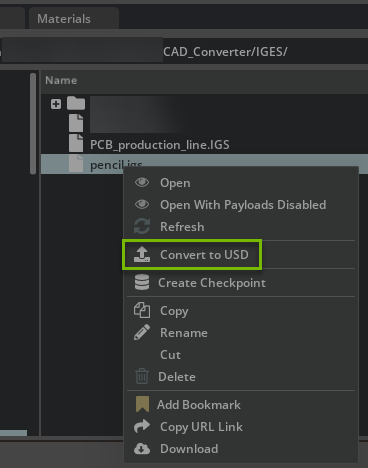
By default, the Content window is located at the bottom of the Omniverse App. To convert a JT file to USD, select the file in the Content window and choose Convert to USD in the context menu (right-click).
Browse to the location of your file(s), select them, right-click, and select Convert to USD in the context menu.
The Converter Options dialog window will appear. Modify any options as needed and click Convert.
Note: The Content Window tab provides a file browser interface for navigating and managing files. If it is not shown, go to the Menu toolbar, select Window, and then select Content.
Converter Options#
The JT converter provides several options to control how files are converted:
Stage Metrics Options#
These options modify the stage’s metersPerUnit and upAxis settings, applying relevant transformations to maintain proper world space units.
Option |
Description |
|---|---|
Override Up-Axis |
Override the stage’s up-axis to Y-up, Z-up, or use converter default (File Default) |
Meters Per Unit |
Set the unit to use for the conversion. Options include: Use Model Units, Meters, Feet, Inches, Centimeters, Millimeters, Micrometers, Nanometers |
Conversion Options#
Option |
Description |
|---|---|
Convert Curves |
If enabled, curve elements from the source file are converted to USD BasisCurves. If disabled, these elements are ignored. |
Instancing Style |
Controls the style of instancing used in USD when handling instanced Parts and Assemblies in the JT file. Options: None (no instancing), Reference (reuses geometry/materials, not instanceable), Instanceable Reference (reuses geometry/materials, instanceable). See Instancing in USD for detailed information about how instancing is authored and how to work with prototype prims. |
Material Options#
Material Type |
Description |
|---|---|
None |
No materials generated |
Preview Surface |
Default option, creates a simple preview surface material compatible with Universal renderer |
OmniPBR |
Creates a physically based material compatible for RTX and Universal renderers |
Note: For more information about materials, see Materials Templates documentation
Advanced Options#
Option |
Description |
|---|---|
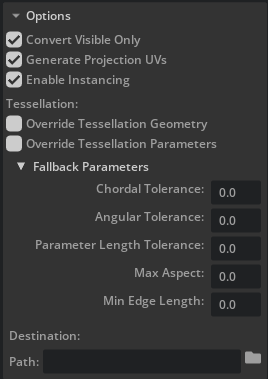
Generate Projection UVs |
When UV texture coordinates are missing, uses Scene Optimizer Kit Extension to generate texture coordinates for meshes. Uses default values as described in the Generate Projection UVs documentation. |
Flatten |
When enabled, flattens the hierarchy of the converted USD structure, creating a single level of geometry |
Layer Filter Style |
Controls how layer filtering is applied during conversion. Options: None (apply no filtering, all entities converted), Omit (skip filtered/hidden elements), Deactivate (convert all but deactivate filtered ones), Hide (convert all but hide filtered ones by setting visibility to invisible) |
Override Tessellation Geometry |
When enabled, embedded tessellation geometry will be ignored in favor of explicit tessellation of surface geometry |
Override Tessellation Parameters |
When enabled, embedded tessellation parameters will be ignored in favor of explicit fallback tessellation parameters. When this option is enabled, you can specify fallback tessellation parameter values (see below) |
Tessellation Control#
Tessellation options control how BREP (Boundary Representation) surfaces are converted into triangular meshes. These settings determine mesh accuracy versus performance.
Fallback Tessellation Parameters#
When Override Tessellation Parameters is enabled, these parameters control the tessellation quality:
Parameter |
Description |
Range |
|---|---|---|
Angular |
Maximum angle (in degrees) between two adjacent tessellated line segments in a curve approximation. For best results, use in conjunction with Chordal parameter. Smaller values produce smoother surfaces with more triangles. |
[0.0, 90.0] |
Chordal |
Maximum distance that a tessellated line segment may deviate from the actual curve it is approximating. For best results, use in conjunction with Angular parameter. Smaller values produce smoother surfaces with more triangles. |
[0.0, 1.0] |
Length |
Maximum absolute length of tessellated line segments in a curve approximation. Sets the maximum edge length for fallback tessellation. |
Non-negative numbers |
Max Aspect |
Maximum allowable aspect ratio of the longest side to the shortest side of a triangle. Smaller values produce smoother surfaces with more triangles. |
Non-negative numbers |
Min Angle |
Minimum allowable angle (in radians) between adjacent face normals. Smaller values produce smoother surfaces with more triangles. |
Non-negative numbers |
Min Edge Length |
Minimum edge length for tessellation. Smaller values produce smoother surfaces with more triangles. |
Non-negative numbers |
Hole Removal Fraction |
Size tolerance of holes and arcs (e.g., “fillets”) to suppress. The value represents a floating point fractional percentage of the bounding box diagonal of the part undergoing suppression. A value of 0.0 indicates no suppression. |
[0.0, 1.0] |
Trim Suppress |
When enabled, suppresses trimming of geometry |
true/false |
Output Options#
Option |
Description |
|---|---|
Path |
Destination folder for converted USD (defaults to source location) |
Scene Optimizer Config |
Path to Scene Optimizer JSON config file or JSON string for predefined optimization stack. See Scene Optimizer Service documentation. |
Destination Options#
The entry points for conversion expose different destination options.
File → Import#
Recommended for importing data into your stage.
Content Browser → Convert to USD#
Convert to USD is recommended to convert files to external USD files only. You may choose to Reference in Current Stage or not.
Path: The default location for the converted USD file matches the source file’s location. You may specify an alternative destination if preferred.
Enable Reference in Current Stage to automatically add references in the current stage after conversion. If disabled, the converted USD is saved to the default or specified destination and is not added as a reference in the current stage.
Getting Help#
The Developer Community can also ask questions or report issues on the Omniverse Developer forums