Usage#
The user can import CAD files into Omniverse via two workflows: through the File Menu Window or through the Content Window.
How to Import and Convert Files#
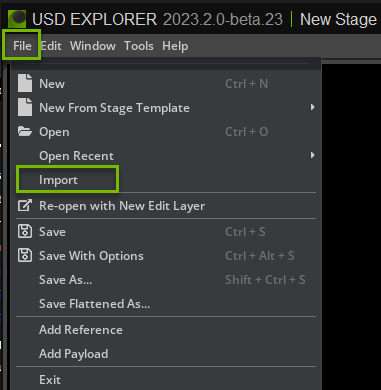
File → Import#
To import a CAD file into Omniverse, choose Import in the File menu.
A file manager window will appear. Select a CAD file for conversion from this window.
Refer to the Converter Options section for more information on conversion settings.
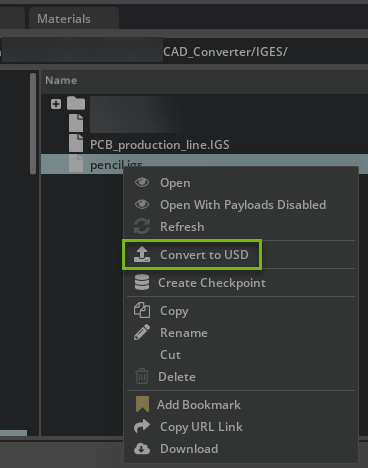
Import through the Content Window#
By default, the Content window is located at the bottom of the Omniverse App. To convert a CAD file to USD, select the file in the Content window and choose Convert to USD in the context menu (right-click).
Browse to the location of your file(s), select them, right-click, and select Convert to USD in the context menu.
The Converter Options dialog window will appear. Modify any options as needed and click Convert.
Note: The Content Window tab provides a file browser interface for navigating and managing files. If it is not shown, go to the Menu toolbar, select Window, and then select Content.
Converter Options#
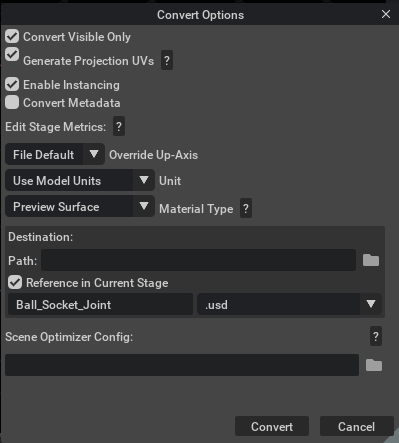
The Hoops converter provides several options to control how files are converted:
Stage Metrics Options#
These options modify the stage’s metersPerUnit and upAxis settings, applying relevant transformations to maintain proper world space units.
Option |
Description |
|---|---|
Override Up-Axis |
Override the stage’s up-axis to Y-up, Z-up, or use converter default (File Default) |
Meters Per Unit |
Set the unit to use for the conversion. Options include: Use Model Units, Meters, Feet, Inches, Centimeters, Millimeters, Micrometers, Nanometers |
Conversion Options#
Option |
Description |
|---|---|
Convert Curves |
If enabled, curve elements from the source file are converted to USD BasisCurves. If disabled, these elements are ignored. |
Instancing Style |
Controls the style of instancing used in USD when handling Shared Cell References. Options: None (no instancing), Reference (instancing using references), Instanceable Reference (instancing using instanceable references). See Instancing in USD for detailed information about how instancing is authored and how to work with prototype prims. |
Composition Style |
Controls how CAD assembly sub-components are composed in USD output. When a CAD assembly references external sub-assembly or part files, this determines whether the output is a single monolithic USD file or multiple files linked via composition arcs. None: Single monolithic file (default). Reference: Sub-assemblies and parts are written to separate USD files and composed via USD References. Payload: Sub-assemblies and parts are written to separate USD files and composed via USD Payloads. |
Material Options#
Material Type |
Description |
|---|---|
None |
No materials generated |
Preview Surface |
Default option, creates a simple preview surface material compatible with Universal renderer |
OmniPBR |
Creates a physically based material compatible for RTX and Universal renderers |
Note: For more information about materials, see Materials Templates documentation
Advanced Options#
Option |
Description |
|---|---|
Generate Projection UVs |
When UV texture coordinates are missing, uses Scene Optimizer Kit Extension to generate texture coordinates for meshes. Uses default values as described in the Generate Projection UVs documentation. |
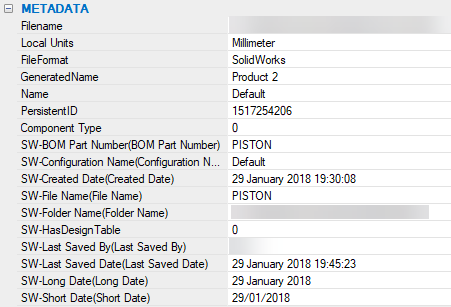
Convert Metadata |
If enabled, metadata including PMI and BIM relationships (applicable only to .ifc models) are imported as USD Attributes or USD Relationships. Otherwise, metadata is ignored. The converted metadata is prefixed with the |
Dedup Mesh Vertices |
When enabled, welds mesh elements in appropriate groups for optimization |
Filter Style |
Controls how hidden entities in the source file are treated during conversion. None: Apply no filtering; all entities are converted. Omit: Do not convert the filtered entity or its descendants (skip hidden elements). Hide: Convert all entities and hide the ones that were filtered (set their visibility to invisible). Deactivate: Convert all entities and deactivate the ones that were filtered. This option replaces the legacy |
Global Xforms |
When instancing is disabled, controls whether global transforms are composited. When disabled, local transforms are applied instead |
Use Normals |
When enabled, normals from the source file are passed to USD. When disabled, normals are not included |
Use Materials |
When enabled, materials from the source file are converted to USD materials. When disabled, converter creates materials with the color set as an attribute or converts colors to USD |
View Layer Name |
Specifies which simplified representation or view to extract from the Creo model. This option is only available for Creo/Pro/E file formats |
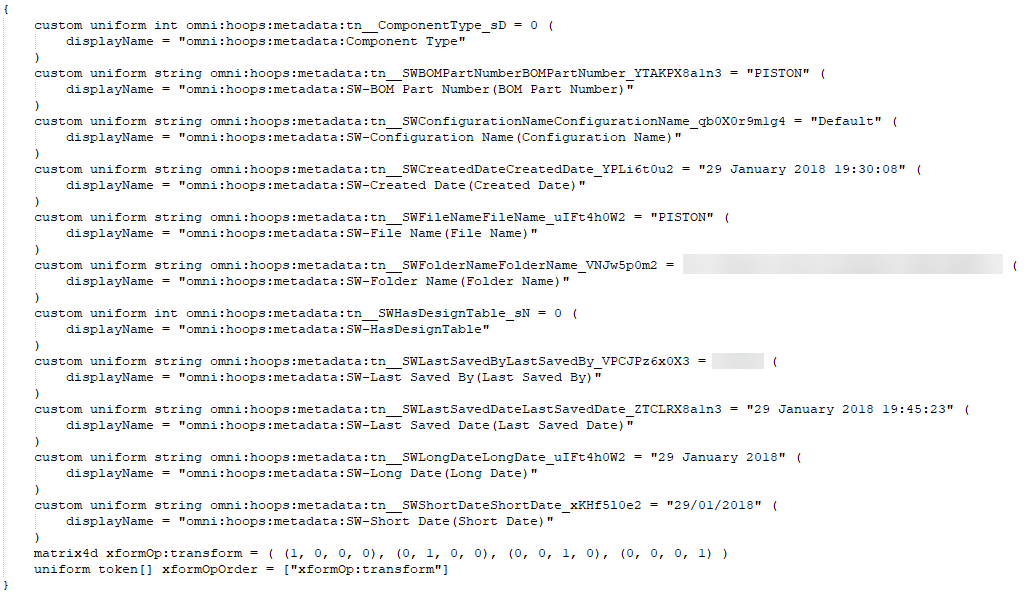
Metadata Conversion Example#
Here is an example of metadata conversion from CAD to USD:
Tessellation Control#
Tessellation options control how BREP (Boundary Representation) surfaces are converted into triangular meshes. These settings determine mesh accuracy versus performance.
Tessellation Level#
Tessellation level presets provide values to define ChordHeightRatio and AngleToleranceDeg. The available presets are:
Level |
ChordHeightRatio |
AngleToleranceDeg |
|---|---|---|
ExtraLow |
50 |
40 |
Low |
600 |
40 |
Medium (default) |
2000 |
40 |
High |
5000 |
30 |
ExtraHigh |
10000 |
20 |
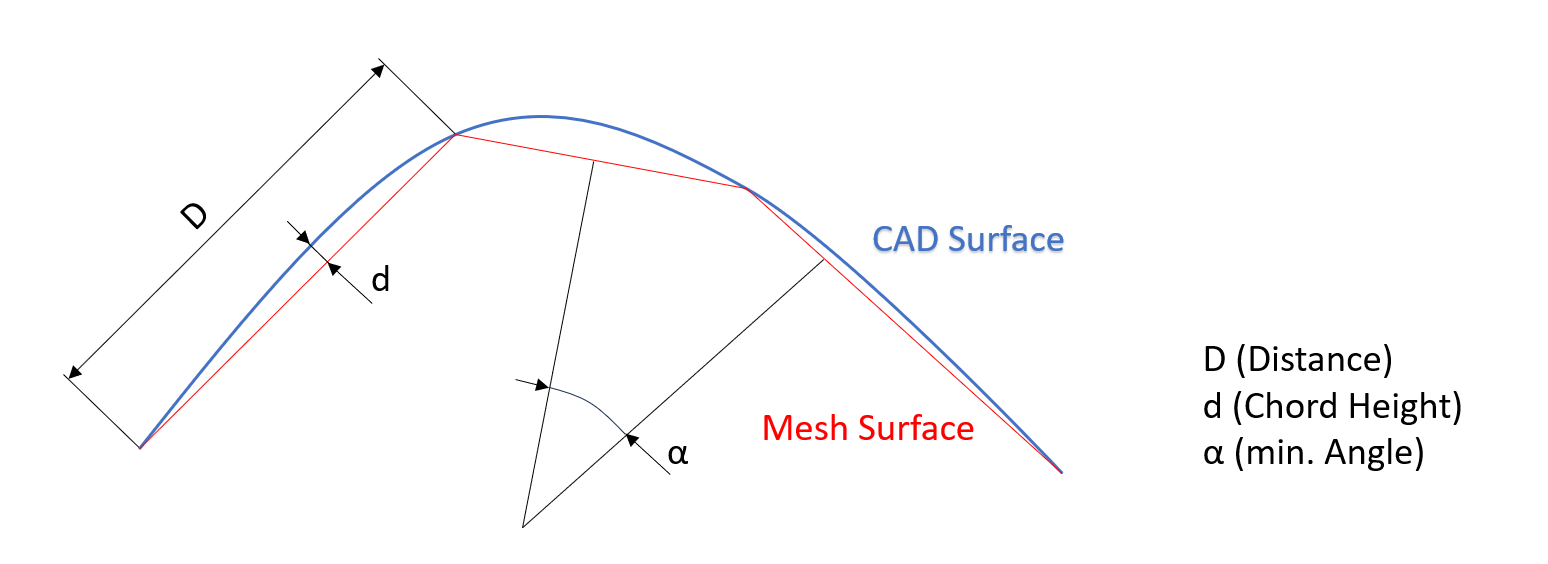
ChordHeightRatio: Specifies the ratio of the diagonal length of the bounding box (defined by D×d) to the chord height. A value of 50 means that the diagonal of the bounding box is 50 times greater than the chord height. Values can range from 50 to 10,000. Higher values will generate more accurate tessellation.
AngleToleranceDeg: Specifies the maximum angle between two contiguous tessellation segments describing the curve of a topological edge for every face. During tessellation, the curve describing the edge of a topological face will be approximated using straight line segments. AngleToleranceDeg is the maximum angle between two consecutive segments. Allowable values range from 10 to 40. Lower values will result in greater accuracy.
Additional Tessellation Options#
Option |
Description |
Default |
|---|---|---|
Accurate Surface Curvatures |
When enabled, respects surface curvature to control triangle elongation directions, resulting in better mesh quality for curved surfaces |
Enabled |
Output Options#
Option |
Description |
|---|---|
Path |
Destination folder for converted USD (defaults to source location) |
Scene Optimizer Config |
Path to Scene Optimizer JSON config file or JSON string for predefined optimization stack. See Scene Optimizer Service documentation. |
Destination Options#
The entry points for conversion expose different destination options.
File → Import#
Recommended for importing data into your stage.
Content Browser → Convert to USD#
Convert to USD is recommended to convert files to external USD files only. You may choose to Reference in Current Stage or not.
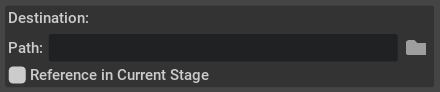
Path: The default location for the converted USD file matches the source file’s location. You may specify an alternative destination if preferred.
Enable Reference in Current Stage to automatically add references in the current stage after conversion. If disabled, the converted USD is saved to the default or specified destination and is not added as a reference in the current stage.
Getting Help#
The Developer Community can also ask questions or report issues on the Omniverse Developer forums