Script Node
This script node allows you to execute arbitrary Python code inside an OmniGraph. The compute function is defined by you at runtime and can be unique in every instance of a script node that you create. Inside that function you can access the database for the node, which is used for getting and setting all attribute values that you define.
Exploring The Script Node
What Is A Script Node?
A script node is an implementation of a single node type for OmniGraph that can be used to create many different behaviors at runtime. Unlike most node types, whose behavior is hardcoded, each instantiation of a script node type can have its own custom behavior, implemented as a Python script on the node.
Some of the best uses of a script node are, to make quick prototypes of functionality to validate concepts you are trying out, and to write one-off nodes that are so simple that it is easier to write them yourself rather than to try to find an equivalent node (e.g. write a node that computes the hexadecimal string equivalent of an integer).
Using The Script Node
These are the three steps you need to add a customized script node to your OmniGraph:
Create a script node.
Add the Python code required to implement the runtime behavior of the node.
Add necessary attributes for its operation.
In practice steps 2 and 3 can be done in either order, though we think you will find it easier to first define your function and then from that decide the list of attributes to be added.
Important
The script node will not be operational until you have added the extra attributes required. In the graph editor this execution failure shows up as a red coloring on the node. Once you have added the attributes normal execution will resume.
The script node can be used either directly from the UI via the graph editor and property panel, or indirectly through Python scripting, either in the script editor or in external files. The instructions below show both approaches - choose the one that you feel most comfortable with.
Creation
To start using the script node you must first create an OmniGraph in which it can live, and then create an instance of the script node in that graph.
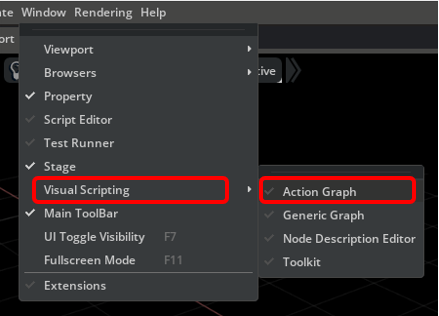
Open the Action Graph Editor using the Visual Scripting menu
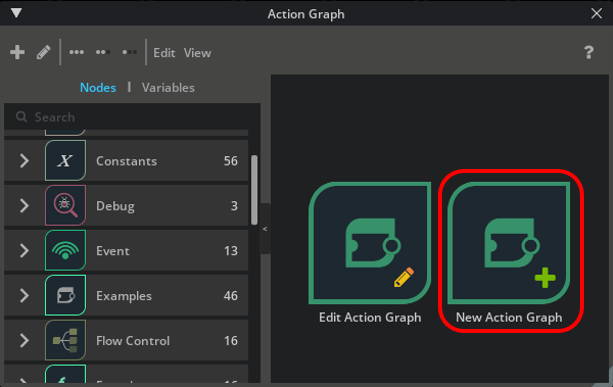
Create a new Action Graph to hold the script node
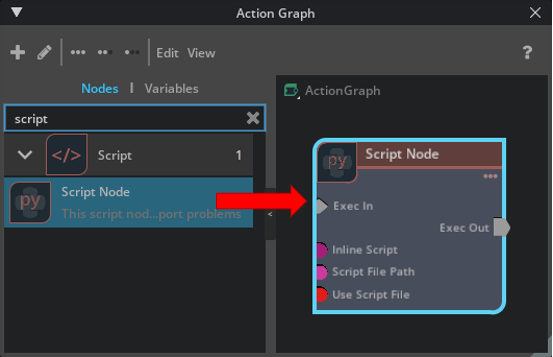
Drag the script node icon from the navigation bar on the left onto the newly created graph
Once you have created a script node it will look something like this in your graph editor. The script node is suitable for use in any type of graph. In an Action Graph the node will have an execIn pin to trigger its execution and an execOut pin to trigger other nodes when its compute completes.
The Controller is the main class through which you can manipulate an OmniGraph using a script file or
the script editor. This script will create an Action Graph and add a script node to it.
from textwrap import dedent  # Just to make the documentation look better

import omni.graph.core as og
# Note the extra parameter to the graph to ensure it is an action graph.
(_, (script_node,), _, _) = og.Controller.edit(
    {"graph_path": "/TestGraph", "evaluator_name": "execution"},
    {og.Controller.Keys.CREATE_NODES: ("ScriptNode", "omni.graph.scriptnode.ScriptNode")},
)
# After this call "script_node" contains the og.Node that was created in a brand new OmniGraph.
Writing A Compute Function
The actual input from the script node can come from one of two sources - a string set directly on the node, or an external file containing the script. These are defined using shared attributes, present in all script nodes. The extra attributes you will use as part of your computation will be added later.
Contents Of The Script
The script node creates a limited override of the API accessible from omni.graph.core.NodeType.
The following callback functions can be defined in the script, and will be used as the runtime implementations of
the equivalent functions on the node type API.
compute(db): called every time the node computes (should always be defined).setup(db): called before compute the first time, or after the reset attribute value is set.cleanup(db): called when the node is deleted or the reset attribute value is set.
db: omni.graph.core.Database is the node interface where attributes are exposed like db.inputs.foo.
This includes the predefined attributes used by the script node as described below, as well as any dynamic attributes
added to a script node instance by the user. The predefined functions db.log_error or db.log_warning should be
used to report problems in the node’s computation.
In addition, for convenience the omni.graph.core module is imported under the variable named og.
import statements, function/class definitions, and global variables may be placed, outside of the callbacks, as you would in any other Python module definition.
Variables may be added to the db.per_instance_state state object for persistence across nodes that are instanced
in more than one graph. See how the
sample snippet for the Fibonacci function makes use of this feature to
walk through the values in the Fibonacci sequence on each successive evaluation.
Overriding the db.setup(db) and db.cleanup(db) functions can be used to let your script node define values
that will be used through multiple evaluations, but which you do not wish to persist when the script node itself is
deleted. See how the
sample snippet for the Controller function makes use of this feature to
initialize and clean up the USD stage for a script node that is responsible for creating cubes.
Note
The setup function corresponds to the omni.graph.core.NodeType.initialize() function on the node type
and the cleanup function corresponds to the omni.graph.core.NodeType.release() function. The reason they
are different is that they will also be called when the script node is reset whereas the API functions only get
called when the node is created and destroyed.
All of the attribute values you get back from calling the db.inputs or db.outputs properties have a specific
data type based on their attribute type.
You can find a description of all of the data types returned from the database for the supported attribute types
by looking through the data type descriptions.
Setting The Script With Text
The attribute inputs:script is a simple text string which will be later translated into Python.
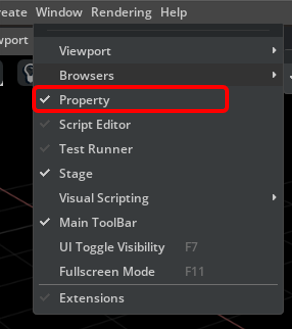
After creation of the script node it should be selected and its properties should be visible in the property panel. If you don’t have the property panel visible you can turn it on with this menu
This is what the property panel for your script node will look like on creation. Notice how the script field has been pre-populated with some placeholders for the functions you are allowed to write as well as some instructions on what the script can contain.
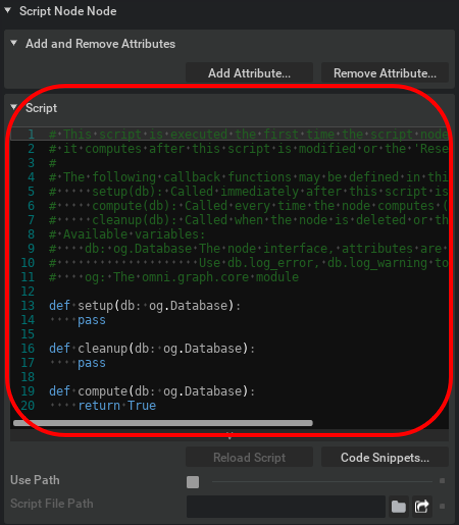
Here is the full text of the instructions:
# This script is executed the first time the script node computes, or the next time
# it computes after this script is modified or the 'Reset' button is pressed.
#
# The following callback functions may be defined in this script:
#     setup(db): Called immediately after this script is executed
#     compute(db): Called every time the node computes (should always be defined)
#     cleanup(db): Called when the node is deleted or the reset button is pressed
# Available variables:
#    db: og.Database The node interface - attributes are exposed in a namespace like db.inputs.foo and db.outputs.bar.
#                    Use db.log_error, db.log_warning to report problems in the compute function.
#    og: The omni.graph.core module


def setup(db: og.Database):
    pass


def cleanup(db: og.Database):
    pass


def compute(db: og.Database):
    return True
Ignoring the setup(db) and cleanup(db) functions for now copy-paste this simple node type definition string and replace the Script text field with it.
"""Set the output to True if the first input is larger than the second input"""

def compute(db: og.Database):
    db.outputs.greater = db.inputs.first_input > db.inputs.second_input
    # You always return True to indicate that the compute succeeded
    return True
"""
The attribute values required to point the script node at a file can be set through the Controller.
Here is an example of a simple script that defines a script node that will output a boolean indicating
whether the first input is greater than the second input.
script_text = '''
"""Set the output to True if the first input is larger than the second input"""

def compute(db: og.Database):
    db.outputs.greater = db.inputs.first_input > db.inputs.second_input
    # You always return True to indicate that the compute succeeded
    return True
'''
script_attr = script_node.get_attribute("inputs:script")
og.Controller.set(script_attr, dedent(script_text))
Tip
As script nodes do not have unique node type definitions it is always a good idea to add Python docstrings as documentation as a reminder of exactly what the node does.
Now that you have a script defined you can skip ahead to Adding Attributes.
Setting The Script With A File
If you want to use an external file then you set the Use Path attribute to True and set the Script Path attribute to be a string containing the path to the script file on disk. It can be an absolute path name, which will be highly reliant on your file system configuration, or it can be relative to the USD edit layer so that the script can be passed along with your USD file as a “sidecar” file.
After creation of the script node it should be selected and its properties should be visible in the property panel. If you don’t have the property panel visible you can turn it on with this menu

This is what the property panel for your script node will look like on creation. Notice how the script field has been pre-populated with some placeholders for the functions you are allowed to write as well as some instructions on what the script can contain.

Now check the Use Path checkbox to tell the script node that it is getting its input from a file rather than the Script value above. Next set the Script File Path value to point to a file in which you have put your script. (See the Setting The Script With Text script section above for an example of what you might put into your file.) When you are done your property panel should look something like this.
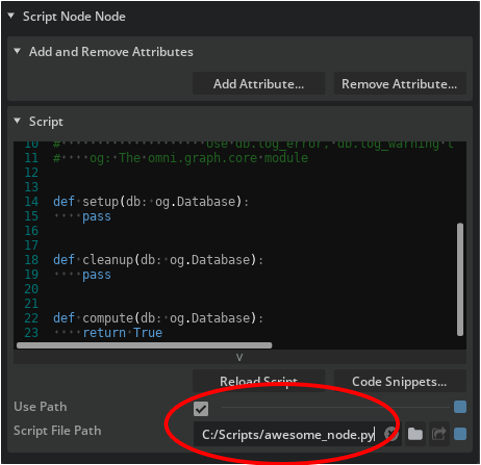
The attribute values required to point the script node at a file can be set through the Controller.
This example creates a temporary file with the same script as the example above and accesses it.
script_text = '''
"""Set the output to True if the first input is larger than the second input"""

def compute(db: og.Database):
    db.outputs.greater = db.inputs.first_input > db.inputs.second_input
    # You always return True to indicate that the compute succeeded
    return True
'''
with TemporaryDirectory() as test_directory:
    tmp_file_path = Path(test_directory) / "sample_scriptnode_script.py"
    with open(tmp_file_path, "w", encoding="utf-8") as script_fd:
        script_fd.write(dedent(script_text))
    use_path_attr = script_node.get_attribute("inputs:usePath")
    script_path_attr = script_node.get_attribute("inputs:scriptPath")
    og.Controller.set(use_path_attr, True)
    og.Controller.set(script_path_attr, str(tmp_file_path))
Adding Attributes
Since there is no .ogn description of the node your script node will rely on Dynamic Attributes to define the inputs
and outputs of the node. A dynamic attribute is just one that is not predefined by the node type. In the script
you have written above these appear as anything in your compute() functions accessed as db.inputs.X for input
attributes and db.outputs.Y for output attributes.
As the intent of your code is unknown (e.g. did you mean to add two integers or two arrays of points when you typed db.inputs.a + db.inputs.b) you must manually add each of the attributes with the types you intend to use.
In the script node property panel you will see a button labeled Add Attribute…. You will click on it once for each attribute that your compute() function requires; in this case it will be two inputs and one output.
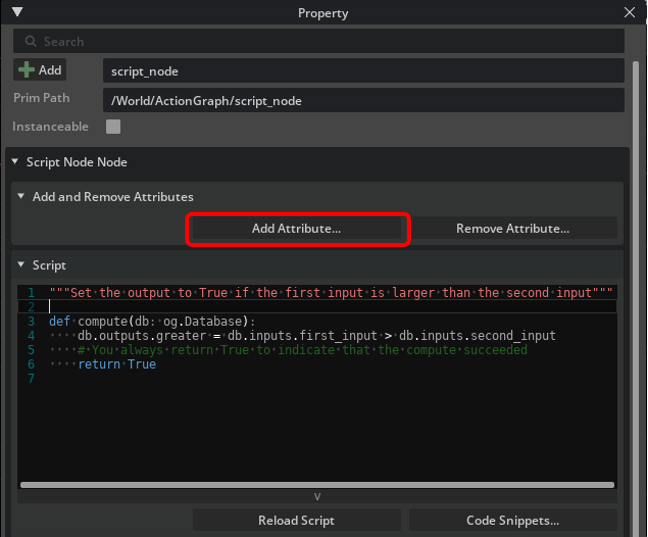
This brings up a dialog where you can define your attributes. Here is what you will enter in order to define the first attribute as an integer value.
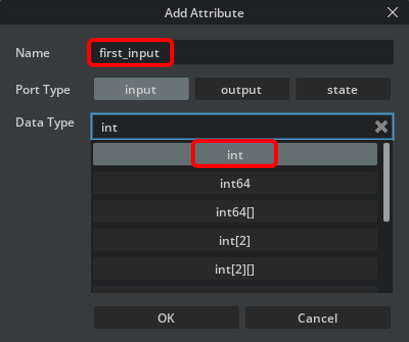
Repeat this for the other input second_input and then once again for the output attribute.
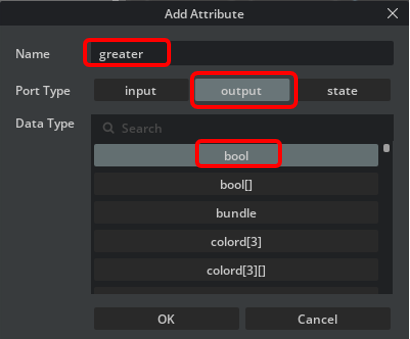
Notice here that you must also click the output button to specify that the new attribute will be an output. As a rule of thumb, inputs are values that you read and outputs are values that you write.
Once you have created a script node it will look something like this in your graph editor. The script node is suitable for use in any type of graph. In an Action Graph the node will have an execIn pin to trigger its execution and an execOut pin to trigger other nodes when its compute completes.
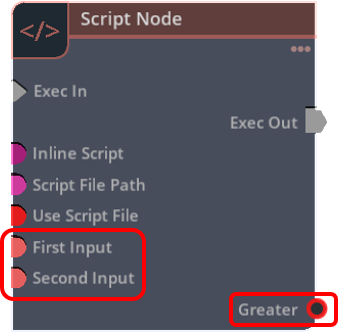
The Controller can also be used to add attributes to a node. This example makes our two inputs integer
types and the output a boolean type. Note that this is a continuation of the previous script as it must
appear inside the TemporaryDirectory context to work properly.
    # In the script you have accessed the database variables "db.inputs.first_input", "db.inputs.second_input",
    # and "db.outputs.greater". These all correspond to attributes of the named port type (input or output)
    # that must now be added to the node in order for it to function correctly.
    first_input = og.Controller.create_attribute(script_node, "first_input", "int", og.AttributePortType.INPUT)
    second_input = og.Controller.create_attribute(
        script_node, "second_input", "int", og.AttributePortType.INPUT
    )
    output = og.Controller.create_attribute(script_node, "greater", "bool", og.AttributePortType.OUTPUT)
Note
You may have seen references to another type of attribute port beyond input and output. The state attribute port is just like an output port except that it is guaranteed to retain its value between executions of the compute() function. Use state attributes for temporarily caching information.
Tradeoffs: Script Node vs. Python Node
The script node, accessible when you load the extension omni.graph.scriptnode, provides a generic node type inside OmniGraph. It includes an input attribute that holds a Python script encoded as a string. This string acts as the implementation of this node.
Although the syntax is slightly different from what you might find in a normal Python node the benefit of the script node is that you do not have to write any external files, including any .ogn definitions to implement the new node.
The downside is that, since the script node you write is not on disk, it is more difficult to share the implementation with other users.
Note
This is an important distinction. In simple terms, a node type is like a blueprint for making nodes. The blueprint can be used by scripts or by the graph editor to create as many nodes of the same type as you wish. A node is the actual thing created based on that blueprint. Think of it like a cookie cutter (node type) used to make cookies (nodes).
The script node type then is a general template for creating nodes that run scripts. A script node is a specific cookie made using that template, having its unique attributes and a Python script to run. While everyone can use the same cookie cutter (script node type) to make cookies (nodes) using standard tools, to create a new, specific cookie (script node), you’d have to duplicate an existing one.
Code Snippets: Pre-Packaged Code Samples
If you have been using the property panel for editing you may have noticed a button labeled Code Snippets. This button accesses a drop-down menu that will populate your compute() function with working examples. You may have to enable extra extensions to make them work (e.g. omni.warp), and you will definitely have to inspect the snippets to see what types of attributes they are expecting as those must still be added manually by you.
# In this example, we retrieve the number of times this script node has been computed
# and assign it to Output Data so that downstream nodes can use this information.
# Add these attributes first:
#   outputs:my_output_attribute(int) Number of times the compute function was executed.
def compute(db):
    compute_count = db.node.get_compute_count()
    db.outputs.my_output_attribute = compute_count
# In this example, we produce the Fibonacci sequence 0, 1, 1, 2, 3, 5, 8, 13, 21...
# Each time this node is evaluated, the next Fibonacci number will be set as the output value.
# This illustrates how variables declared in the setup script can be used to keep persistent information.
# Add these attributes first:
#   outputs:my_output_attribute(int) The current number in the Fibonacci sequence.
#   state:last(int) The most recent Fibonacci number.
#   state:previous(int) The second-most recent Fibonacci number.


def compute(db):
    # Bootstrap the first call
    if db.state.previous == 0:
        db.state.last = 0
        db.state.previous = 1
    total = db.state.last + db.state.previous
    db.state.last = db.state.previous
    db.state.previous = total

    db.outputs.my_output_attribute = db.state.last
# In this example, we use omni.graph.core.Controller to create cube prims.
# Each time this node is evaluated, it will create a new cube prim on the scene.
# When the 'Reset' button is pressed or the node is deleted, the created cube prims will be deleted.

import omni.kit.commands


def setup(db):
    state = db.per_instance_state
    state.cube_count = 0


def compute(db):
    state = db.per_instance_state
    state.cube_count += 1
    og.Controller.edit(
        db.node.get_graph(), {og.Controller.Keys.CREATE_PRIMS: [(f"/World/Cube{state.cube_count}", "Cube")]}
    )


def cleanup(db):
    import omni.usd
    from pxr import Usd

    for prim in Usd.PrimRange(omni.usd.get_context().get_stage().GetPrimAtPath("/World")):
        print(f"Deleting prim {prim.GetPrimPath()}", flush=True)

    state = db.per_instance_state
    omni.kit.commands.execute("DeletePrims", paths=[f"/World/Cube{i}" for i in range(1, state.cube_count + 1)])
# In this example, we deform input points using a Warp kernel, varying the deformation based on a time sequence
# Add these attributes first:
#   inputs:points(pointf[3][]) Points to be deformed
#   inputs:time(float) Point in time at which the deformation is to be computed
#   outputs:points(pointf[3][]) Deformed positions of the points at the given time

import omni.warp
import warp as wp


@wp.kernel
def deform(points_in: wp.array(dtype=wp.vec3), points_out: wp.array(dtype=wp.vec3), time: float):
    tid = wp.tid()
    points_out[tid] = points_in[tid] + wp.vec3(0.0, wp.sin(time + points_in[tid][0] * 0.1) * 10.0, 0.0)


def compute(db):
    # Indicate that inputs:points and outputs:points should be stored in cuda memory.
    # outputs:points can be connected to a similarly configured input to avoid
    # that attribute being copied from the device
    db.set_dynamic_attribute_memory_location(
        on_gpu=True,
        gpu_ptr_kind=og.PtrToPtrKind.CPU,
    )
    with wp.ScopedDevice(f"cuda:{og.get_compute_cuda_device()}"):
        points_in = omni.warp.from_omni_graph(db.inputs.points, dtype=wp.vec3)
        n = db.inputs.points.shape[0]
        if not n:
            return
        out_points = wp.zeros_like(points_in)
        # launch kernel
        wp.launch(kernel=deform, dim=n, inputs=[points_in, out_points, db.inputs.time])

        # allocate output array
        db.outputs.points_size = n
        # copy points
        points_out = omni.warp.from_omni_graph(db.outputs.points, dtype=wp.vec3)
        wp.copy(points_out, out_points)
# In this example, we register a value changed callback function for inputs:my_input_attribute.
# The callback is called when the value of inputs:my_input_attribute is changed from the property panel.
# Add these attributes first:
#   inputs:my_input_attribute(int) The attribute triggering the callback.


def on_my_input_attribute_changed(attr):
    print(f"inputs:my_input_attribute = {attr.get_attribute_data().get()}", flush=True)


def setup(db):
    print("Setting up the value changed callback", flush=True)
    attr = db.node.get_attribute("inputs:my_input_attribute")
    attr.register_value_changed_callback(on_my_input_attribute_changed)


def cleanup(db):
    print("Removing the value changed callback", flush=True)
    attr = db.node.get_attribute("inputs:my_input_attribute")
    attr.register_value_changed_callback(None)


def compute(db):
    pass
# The setup() and cleanup() functions can be used to manage resources required by the node that correspond to the
# lifetime of the node. The management of state attributes is something that would commonly be done at these times
# since such attributes persist for the life of the node and remember their values throughout.
#
# Here is an example of how you might add state information and use the `setup()` and `cleanup()` functions to create an
# accumulated execution time for a node.
#
# For this example you will not create an Action Graph. Instead, create a `Generic Graph` and add a script node to it.
# Copy and paste the snippet below into your script node's script field. No attributes are required for this example.
#
# Since the node is in a push graph it will evaluate continuously. You can periodically hit the ``Reset`` button and it
# will report the total amount of time it spent in the `compute()` function since the last time you reset it.
#
# You can see how this simple mechanism could generalize to include per-compute averages, min and max times, etc.
# If you wish to accumulate all of the data you could even add a file descriptor to your internal state information,
# opening the file in the `setup()` function, printing to it in the `compute()` function, and closing it in the
#  `cleanup()` function to create a journal of every computation time. -->


import time


def setup(db: og.Database):
    """Initialize the timing information to start at 0.0"""
    db.per_instance_state.elapsed = 0.0
    print("Initialize the elapsed time", flush=True)


def cleanup(db: og.Database):
    """Report the final timing information"""
    print(f"Total time spent in the script compute = {db.per_instance_state.elapsed}", flush=True)


def compute(db: og.Database):
    """Accumulate the timing information for each compute.
    For the `compute()` a simple delay will serve to illustrate how the time accumulates as the node executes. As with any
    other node, the database has a member called `per_instance_state` in which you can store any data that belongs to the node
    which will persist for the lifetime of that node.
    """

    start_time = time.perf_counter()
    time.sleep(0.1)  # Normally this would be your actual computation
    end_time = time.perf_counter()

    db.per_instance_state.elapsed = db.per_instance_state.elapsed + (end_time - start_time)

    return True
Installation
To use this node enable omni.graph.scriptnode in the Extension Manager.
Inputs
Name |
Type |
Descripton |
Default |
|---|---|---|---|
Exec In (inputs:execIn) |
|
Signal to the graph that this node is ready to be executed. |
None |
Inline Script (inputs:script) |
|
A string containing a Python script that may define code to be executed when the script node computes. See the default and example scripts for more information. |
None |
Script File Path (inputs:scriptPath) |
|
The path of a file containing a Python script that may define code to be executed when the script node computes. See the default and example scripts for more info. |
None |
Metadata |
uiType = filePath |
||
Metadata |
fileExts = Python Scripts (\*.py) |
||
Use Script File (inputs:usePath) |
|
When true, the python script is read from the file specified in ‘Script File Path’ (inputs:scriptPath), instead of the string in ‘Inline Script’ (inputs:script). |
False |
Outputs
Name |
Type |
Descripton |
Default |
|---|---|---|---|
Exec Out (outputs:execOut) |
|
Signal to the graph that execution can continue downstream. |
None |
State
Name |
Type |
Descripton |
Default |
|---|---|---|---|
Omni Initialized (state:omni_initialized) |
|
State attribute used to control when the script should be reloaded. This should be set to false to trigger a reload of the script. |
None |
Metadata
Name |
Value |
|---|---|
Unique ID |
omni.graph.scriptnode.ScriptNode |
Version |
2 |
Extension |
omni.graph.scriptnode |
Icon |
ogn/icons/omni.graph.scriptnode.ScriptNode.svg |
Has State? |
True |
Implementation Language |
Python |
Default Memory Type |
cpu |
Generated Code Exclusions |
None |
uiName |
Script Node |
Categories |
script |
Generated Class Name |
OgnScriptNodeDatabase |
Python Module |
omni.graph.scriptnode |
