Preferences Panel
The preferences panel is a common element of all Omniverse Kit based apps and provides a long list of settings that are applicable to the current app. Because of this, not all apps have all of the categories or options listed on this page. Note that all settings here apply to the app as a whole and are not stored with individual USD stages.
Omniverse
Messaging
Option |
Description |
|---|---|
Use Old Message Format |
Uses older message exchange format offering backwards compatibility.
|
Timeline
Option |
Description |
|---|---|
Receive Updates from Omniverse |
|
Send Updates to Omniverse |
Capture Screenshot
Capture Screenshot
Option |
Description |
|---|---|
Path to Save Screenshots |
The path where captured screenshots are saved.
|
Quality |
Sets the compression level of screenshots captured.
Low: High Compression, Lower Quality, Smaller Files.
Medium: Medium Compression, Balanced Quality / Size
High: Low Compression, High Quality, Large Files.
|
Capture only 3D viewport |
Checked: Will only Capture the Viewport.
Unchecked: Captures Interface and Viewport.
|
Capture Screenshot
Super Resolution Scale
Option |
Description |
|---|---|
Size |
A list resolution multipliers, 2x, 4x, …, 32x to specify how large of an image Super Resolution Capture will create.
|
Thumbnail Generation
MDL Thumbnail Generation Settings
Thumbnail settings for materials.
Option |
Description |
|---|---|
Path USD Template to Render MDL Thumbnail |
Storage/Retrieval path for generated thumbnail images.
|
Name of Stand-in Prim |
Prim to use in thumbnail generation.
|
Render Type |
Pathtracing: Better quality thumbnails.
Raytracing: Faster generation of thumbnails.
|
Rendering Samples |
Number of samples to use in rendering the thumbnail when using Pathtracing as the render type.
|
USD Thumbnail Generation Settings
Thumbnail Settings for USD Models.
Option |
Description |
|---|---|
Render Type |
Pathtracing: Better quality thumbnails.
Raytracing: Faster generation of thumbnails.
|
Rendering Samples |
Number of samples to use in rendering the thumbnail when using Pathtracing as the render type.
|
Save USD Thumbnail on Save |
Generates a new thumbnail on each save action.
|
Audio
There are some application preferences that can help to control the behavior of audio output globally in Omniverse Omniverse USD Composer. These preferences affect all USD stages loaded in Omniverse Omniverse USD Composer. These settings are not stored as part of the USD stage. The app preferences window can be opened by going to the “Edit” menu and choosing “Preferences”. The audio preferences can be found by selecting “Audio” in the sections list on the left.
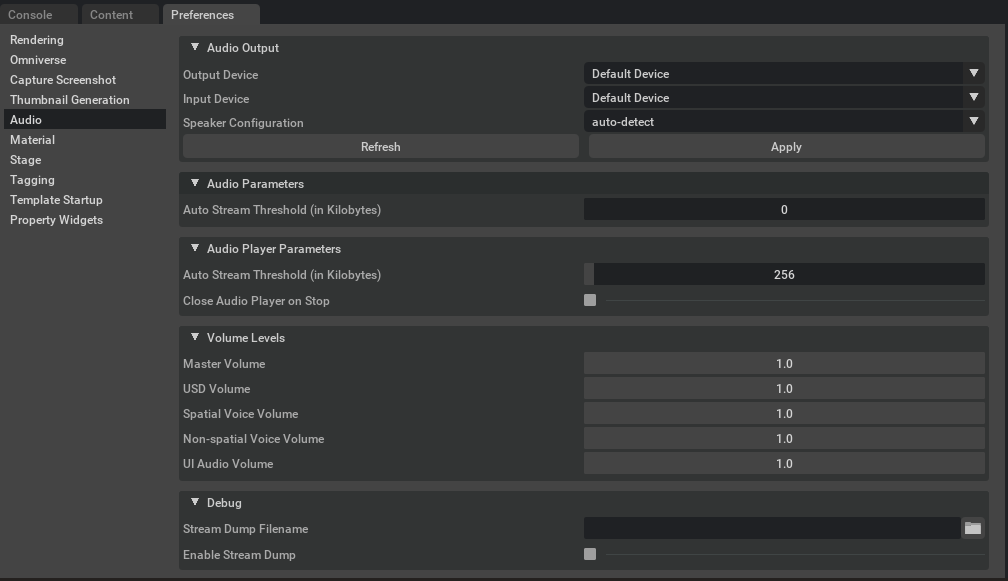
Audio Devices
Input and Output device preferences.
Option |
Description |
|---|---|
Output Device |
Displays a drop-down box containing the names of all audio output devices connected to the system. This may be used to select the desired device for output in Omniverse USD Presenter. This affects output for the main USD stage and all UI audio. Once a device is selected from the list, the Apply button must be pushed to accept the change. Changing both this setting and the speaker configuration below will cause the output of all open audio contexts to be changed. If the state of devices attached to the system has changed recently (ie: a new device was connected or a device was disconnected from the system), the Refresh button can be used to collect the new device list. By default, the system’s default output device will be chosen.
If the selected device is disconnected from the system between launches of Omniverse USD Presenter or the device list changes between launches, the previously selected device will attempt to be found first on the next launch. If it is still attached to the system, it will be used. If it could not be found in the device list, the system’s default output device will be used instead.
|
Input Device |
Displays a drop-down box containing the names of all audio input devices connected to the system. This may be used to select the desired device to use for recording in Omniverse View. This affects input for all USD stages. Once a device is selected from the list, the Apply button must be pushed to accept the change. The input device is unaffected by the “Speaker Configuration” setting. If the state of devices attached to the system has changed recently (ie: a new device was connected or a device was disconnected from the system), the Refresh button can be used to collect the new device list. By default, the system’s default input device will be chosen.
If the selected device is disconnected from the system between launches of Omniverse USD Presenter or the device list changes between launches, the previously selected device will attempt to be found first on the next launch. If it is still attached to the system, it will be used. If it could not be found in the device list, the system’s default output device will be used instead.
|
Speaker Configuration |
Sets the speaker configuration to use for output. All configurations are supported regardless of the device’s capabilities (ie: a 5.1 configuration is still supported on a stereo device). In the case the output mode is not directly supported by the selected device, the final output of the audio system will be down-mixed to the device’s preferred configuration. As much of the original stream as is possible will be preserved in the down-mixed output.
If the “auto-detect” configuration is selected, the output will try to match the device’s preferred format. Note that this could result in extra processing requirements on some devices due to the larger number of speaker channels.
The Apply button must be pushed (or Omniverse Omniverse USD Composer relaunched) after changing this setting for this to take effect. | Refreshes the device lists for audio input and output. If a new device is connected to the system or an existing device is removed, pushing this button will refresh the device lists to reflect the new device sets for both input and output.
Note: this button may disappear in the future in favor of auto-detecting system device changes.
|
Apply |
Applies all changes to the audio input and output device selections. This will have no effect if none of the options have changed. However, if a device is in use at the time (ie: actively recording audio or actively playing audio in a stage), this could result in a brief interruption in audio. It is best to ensure that all audio recording and playback has been stopped before pushing this button.
|
Audio Parameters
Option |
Description |
|---|---|
Auto Stream Threshold |
Defines the asset size at which the audio system will decide to stream a compressed audio asset instead of decompress it into memory. This threshold is expressed in kilobytes. If this is set to zero the auto-streaming feature will be disabled. If this is set to any larger value, any compressed audio asset with a decompressed size larger than this threshold will be streamed from the original compressed object instead of being decompressed. The benefit of this is lower memory usage and faster asset loading. However, streaming sounds do require slightly more processing time. The default value is 0KB.
|
Audio Player Parameters
Option |
Description |
|---|---|
Auto Stream Threshold |
Defines the asset size at which the audio player will decompress a compressed asset on-the-fly during playback instead of decompressing it into memory on load. This has the benefit of using less memory and allowing playback to start sooner (for large assets at least). This threshold is expressed in kilobytes. If set to zero, all assets will be decompressed before playing. If set to a non-zero value, any compressed asset with a decompressed size larger than this value will be decompressed as it plays. This defaults to 256KB.
|
Close Audio Player on Stop |
Determines whether the audio player will close on its own once the first playback of a sound completes. This is useful when previewing large numbers of audio assets from the content browser. If this option is left unchecked, the audio player window will remain open after playback completes. This defaults to unchecked.
|
Volume Levels
Adjust volume properties of sounds.
Option |
Description |
|---|---|
Master Volume |
Defines the master volume level for all audio output. All other volume levels are effectively multiplied by this volume level to get the final overall volume. Setting this to 0.0 will result in silence (though audio data will still be fully processed). Setting this to 1.0 will be full volume. The volume level changes linearly across this range. This defaults to 1.0.
If the selected device is disconnected from the system between launches or the device list changes between launches, the previously selected device will attempt to be found first on the next launch. If it is still attached to the system, it will be used. If it could not be found in the device list, the system’s default output device will be used instead.
|
USD Volume |
Defines the volume level to be used by all audio for the USD stage audio output. This affects all spatial and non-spatial sounds. Setting this to 0.0 will result in silence (though audio data will still be fully processed). Setting this to 1.0 will be full volume. The volume level changes linearly across this range. This defaults to 1.0.
|
Spatial Voice Volume |
Defines the volume level to be used for all spatial sounds in the USD stage. This volume level is effectively multiplied by the “USD Volume” level setting as well before output to get the final volume level for spatial sounds. Setting this to 0.0 will result in silence (though audio data will still be fully processed). Setting this to 1.0 will be full volume. The volume level changes linearly across this range. This defaults to 1.0.
|
Non-spatial Voice Volume |
Defines the volume level to be used for all non-spatial sounds in the USD stage. This volume level is effectively multiplied by the “USD Volume” level setting as well before output to get the final volume level for non-spatial sounds. Setting this to 0.0 will result in silence (though audio data will still be fully processed). Setting this to 1.0 will be full volume. The volume level changes linearly across this range. This defaults to 1.0.
|
UI Audio Volume |
Defines the volume level to be used for all UI audio sounds in Omniverse USD Presenter. Setting this to 0.0 will result in silence (though audio data will still be fully processed). Setting this to 1.0 will be full volume. The volume level changes linearly across this range. This defaults to 1.0.
|
Debug
Sound debugging options
Option |
Description |
|---|---|
Stream Dump Filename |
Defines the filename to be used when dumping the USD stage audio output to file. This will be written out in WAVE file format regardless of the extension on the filename. The channel count and data format will match the current output device’s selected channel count and format. This file will be written to disk as audio is played and will always try to remain within a few milliseconds of audio away from what is playing on the device (as close as possible).
The output file must be on a local file volume. Sending output to an omniverse location is not supported. Once stream dumping is enabled, the output file will be created and it will be written to as new audio data is produced. The output will continue until stream dumping is disabled or The Omniverse App is exited. The default value for this setting is an empty string.
Note that as long as this feature is left enabled, data will continue to be written to the output file. Since this is written as uncompressed data, this file will tend to grow rather quickly. For example, a 48KHz stereo floating point signal will write approximately 22MB per minute. For this reason, the “Enable Stream Dump” setting is not persistent in this Omniverse app’s user configuration. It will always be off when the Omniverse App launches.
|
Enable Stream Dump |
Defines whether stream dumping is currently enabled. As soon as this is enabled and a valid filename is selected in “Stream Dump Filename”, writing to the output file will begin. Stream dumping will continue until this setting is disabled or this Omniverse app is exited. This setting does not persist in this Omniverse app’s user configuration. It will always be disabled on a fresh launch.
|
Material
Material
Option |
Description |
|---|---|
Binding Strength |
|
Render Context Material Network |
Stage
New Stage
Parameters used to establish new stages when created.
Option |
Description |
|---|---|
Default Up Axis |
|
Default Animation Rate |
|
Default Meters per Unit |
|
Default Time Code Range |
|
Default DefaultPrim Name |
|
Interpolation Type |
Linear:
Held:
|
Start with Transform Op on Prim Creation |
Checked:
Unchecked:
|
Default Transform Op Type |
|
Default Rotation Order |
|
Default XForm Op Order |
|
Default XForm Precision |
Logging
Option |
Description |
|---|---|
Mute USD Coding Error from USD Diagnostic Manager |
Checked:
Unchecked:
|
Tagging
Tagging
Option |
Description |
|---|---|
Allow Advanced Tag View |
Checked:
Unchecked:
|
Show Hidden Tags in Advanced View |
Checked:
Unchecked:
|
Allow adding and modifying hidden tags directly |
Checked:
Unchecked:
|
Sun
Sun Study Settings
Option |
Description |
|---|---|
Auto Sky |
Checked:
Unchecked:
|
Template Startup
New Stage Template
Option |
Description |
|---|---|
Path to User Templates |
|
Default Template |
- orphan
Viewport Preferences
With the Preferences panel, you control the layout of the Viewport toolbar:
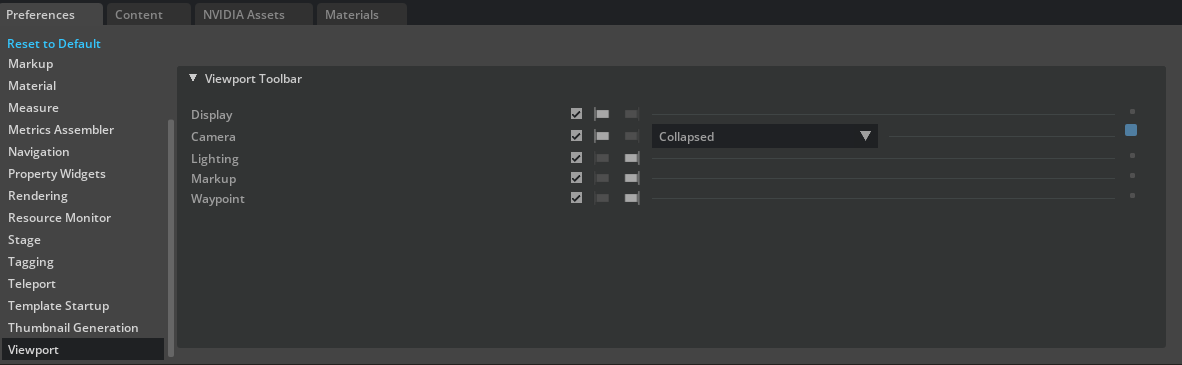
Reference Number |
Option |
Result |
|---|---|---|
1 |
Visibility Toggle |
Hides or shows the toolbar item |
2 |
Alignment |
Aligns the item on the left or right side of the toolbar |
3 |
Expanded State |
Expands or collapses the Camera menu |
4 |
Modified |
Indicates whether or not the option has been modified (Uncheck this box to restore the option’s default state.) |
You can also click and drag an option to change its position in the toolbar.
Misc
Tool Tip Settings
Option |
Description |
|---|---|
Tooltip |
Checked: Displays tooltips on hover.
Unchecked: Disables Tooltips on Hover.
|
Thumbnail Settings
Option |
Description |
|---|---|
Path to save thumbnail files |
Displays a directory browser for selecting the destination folder where any generated thumbnail images will be stored.
|
Inertia Settings
Option |
Description |
|---|---|
Enable Inertia Mode |
Toggles natural acceleration and deceleration on all camera movements. Different types of inertial motion can be selected with the Inertia Decay dropdown.
|
Brush Settings
Option |
Description |
|---|---|
Path to save brush files |
Brush Settings
Option |
Description |
|---|---|
Path to save thumbnail files |
|
Use Local Thumbnail File |
Checked:
Unchecked:
|
Auto-Generate USD Thumbnails on Open |
Checked:
Unchecked:
|
Auto-Generate USD Thumbnails on Save |
Checked:
Unchecked:
|
Rendering
Throttle Rendering
Option |
Description |
|---|---|
Async Rendering |
Toggles asynchronous rendering |
Skip Rendering While Minimized |
|
Yield ‘ms’ while in focus |
|
Yield ‘ms’ while not in focus |
|
Enable UI FPS Limit |
Limits the Viewport rendering framerate to the specified FPS Limit |
UI FPS Limit uses Busy Loop |
Limits the Viewport rendering framerate with a busy loop |
UI FPS Limit |
Sets the framerate in frames per second (FPS) if Set FPS Limit is checked |
White Mode
Option |
Description |
|---|---|
Material |
Sets the material used in White Mode |
Exception |
Excludes this list of prims from White Mode |
Viewport
Gamepad Setting
Option |
Description |
|---|---|
Gamepad Control |
Enables viewport camera control with a connected gamepad. |
Grid Setting
Option |
Description |
|---|---|
Grid Color |
Sets the color of the grid lines |
Grid Size |
Sets the size of the grid cells |
Viewport Menubar Resolution
The number of resolution options displayed in the Viewport Resolution control can be controlled by enabling/disabling specific entries with the Active checkbox.
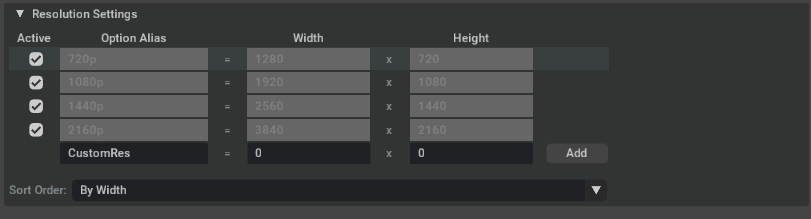
Custom resolution entries can be added with the Add button and the name and width x height fields.