Warehouse Physics
Overview
This tutorial teaches you how creators can connect their favorite applications to NVIDIA Omniverse. To accomplish this task, we’ve created a series of videos which help you gain an understanding of the Omniverse workflow.
The first 8 videos show you the creative process, with the last step showing you how to simulate and interact with the final stage.
We highlight how to use Connectors to sync to live changes between Omniverse USD Composer and Adobe Substance 3D Painter, AutoDesk 3dsMAX and Maya. For this project, we have created assets to populate a warehouse. Then, in Create, we setup physics for the racks, boxes and hanging lamps. This workflow highlights how quickly creators can generate compelling pre-viz and final physics-based animations inside Create.
Key Takeaways
Getting familiar with a typical Omniverse project data structure
Organizing layers and stage groupings for efficient production file sharing
Click to see the tracklist
00:00 - 00:17 Project overview
00:18 - 00:45 Layer tab and interface overview
00:46 - 01:15 Warehouse and props stage’s properties discussion
01:16 - 01:59 Details about specific Rack_Master layer, and other layer files
02:00 - 02:22 Conclusion
Step 1: Asset Generation With Adobe Substance
In this next video we use Adobe Substance 3D Painter to create materials for our boxes and pallet. We use the Connector to live sync Adobe Substance 3D Painter to Omniverse USD Composer to see material changes in context. Finally, we use layer configurations to add texture details to models of cardboard packages stacked in a warehouse.
Key Takeaways
Gaining knowledge of the materials and texture creation in Adobe Substance 3D Painter
Using the Omniverse Connectors to update textures and material changes live in Omniverse USD Composer
Click to see the tracklist
00:00 - 00:49 Overview of Omniverse Launcher
00:50 - 02:12 Editing UVs with Autodesk 3ds Max
02:13 - 02:15 Exporting FBX and USD files from Autodesk 3ds Max using theOmniverse Connector
03:00 - 03:26 Introduction to Adobe Substance 3D Painter
03:27 - 04:05 Project Configuration and Connector Setup
04:06 - 05:00 Introduction to Omniverse USD Composer and adding Painter Extensions
05:01 - 06:45 Modifying layers and adding environment maps to match views
06:48 - 07:20 Customizing Painter Brushes and painting on 3D models
07:25 - 07:44 Conclusion
Step 2: Pallet Configuration Variants
This third video explores layout variations and previsualization for the collection of props used in the Warehouse Project. We will start by arranging boxes and pallets in various configurations to add visual style and complexity to a stage. Then use the Autodesk 3ds Max Connector for live updates of the Omniverse stage while evaluating design choices.
Key Takeaways
Key knowledge for using and managing a layered stage structure in Omniverse
Basic modeling workflow using Autodesk 3ds Max to build project assets
Making creative decisions by creating visual variants and using Live Sync to evaluate design choices
Click to see the tracklist
00:00 - 00:14 Configuring nine different variations of pallet and box arrangements
00:15 - 00:27 Importing file from Adobe Substance 3D Painter to begin configuring
00:28 - 01:30 Aligning pivot points on assets to maximize placement methods
01:31 - 02:25 Arranging boxes on the nine pallets in different configurations
02:26 - 05:00 Aligning all pallet versions to a dummy object and creating OmniVariants
05:05 - 06:10 Exporting geometry to USD and Omniverse USD Composer using the Autodesk 3ds Max Connector
06:15 - 07:37 Viewing Variants in Omniverse USD Composer using Live Sync
07:40 - 10:05 Adding Physics Behavior to the boxes and pallets
10:05 - 10:05 Updating master materials layer to manage subsequent texture updates
13:30 - 13:49 Conclusion
Step 3: Rack and Warehouse Layout
This fourth video illustrates the layout workflow used for the warehouse stage. Combinations of package box assets, and pallets on shelf racks, will be arranged in the warehouse building to make the best use of the physical space.
Key Takeaways
Understanding previsualization (previs) and layout workflow for a dynamic animated stage.
Gain knowledge of Omniverse Live Sync, physics setups, and simulation testing iteration.
Click to see the tracklist
00:00 - 00:15 Introduction
00:16 - 01:30 Exporting shelf units from Autodesk 3ds Max and adding physics in Omniverse USD Composer
01:30 - 02:45 Assembling shelves and pallets in Create and choosing Variant placement
02:46 - 03:40 Testing physics and adjusting placement to maximize physics behavior
03:45 - 04:45 Continuing to randomize the arrangements of pallets and boxes on shelf stacks
04:48 - 06:05 Testing physics behavior of a single rack of pallets and saving master rack file
06:06 - 10:58 Building the layout of the warehouse set
11:04 - 12:30 Checking the layout and adding copies of shelf racks using Live Sync
12:30 - 13:30 Testing physics behavior for a sampling of placed shelf racks
13:30 - 14:15 Complete layout of shelf racks and review design of final configuration
14:16 - 15:38 Saving individual layers and experimenting with crashing physics in the stage
15:39 - 16:00 Conclusion
Step 4: Adding Colliders and Impulse
This fifth video guides you through creating efficient physics simulations by making smart collision shapes for rigid bodies. You will also experiment with different physics behaviors and understand what parameters make for the best possible results.
Key Takeaways
Understanding collision concepts for simulation of rigid body dynamics
Experimenting with dynamic attributes to achieve a variety of effects with simulations
Click to see the tracklist
00:00 - 00:32 Overview
00:33 - 02:33 Adding Warehouse Collider Layer to create collider shapes for stage structure
02:35 - 03:50 Creating impulse box objects and adding velocity to create physics effects
03:55 - 04:40 Experimenting with Mass values to fine tune the visual effect of the destruction
04:45 - 05:25 Duplicating the first impulse shape to increase the impact of the collision
05:27 - 05:47 Conclusion
Step 5: Creating and Adding Warehouse Lamps
This video shows you how to add lamps to the warehouse environment and use rigid body joints to add a swinging motion to the lamps hanging from the ceiling.
Key Takeaways
Learn about more complex rigid body setups and the specific challenges of simulating a different type of behavior
Re-use existing assets already set up and modify certain attributes to meet the requirement for behaving properly in a different scenario
Click to see the tracklist
00:00 - 00:12 Overview
00:13 - 01:03 Exporting lamps on longer chords from Autodesk 3ds Max
01:04 - 01:32 Combining layers in Create to make Lamp assemblies
01:33 - 03:25 Adding Materials to the lamp geometry in Omniverse USD Composer
03:25 - 06:13 Adding physics properties to the lamp parts to create multiple swing pivots
06:15 - 07:00 Refining the swinging action using damping on the simulation
07:00 - 08:35 Creating lamps with longer chords from the short chord version
08:40 - 11:20 Placing the lamps as a layer into the warehouse stage
11:30 - 13:30 Correcting length of chords on the Long Lamp layer using Live Sync
13:35 - 15:45 Modifying pivot point on attachment for lamps with long chord
15:45 - 17:00 Populate warehouse with all swinging lamps
17:00 - 17:33 Conclusion
Step 6: Adding Environmental Lighting
This seventh video covers some of the more useful rendering techniques and settings to add more atmosphere and post-processing effects to your stage.
Key Takeaways
Learn about using render settings and post-processing effects
Add dramatic fog effects and volumetrics
Click to see the tracklist
00:00 - 00:19 Overview
00:20 - 01:20 Add distant light for sunlight and view using Path Tracing
01:20 - 01:50 Render Settings and Ray Tracing
01:52 - 03:30 Add Fog and Volumetric Effects
03:31 - 04:10 Post Processing Options add more dramatic lighting from the lamps
04:13 - 05:20 Adding Dynamic Environment changes time of day lighting
05:22 - 06:00 Inspecting all rendering effects while playing simulation in real time
06:01 - 06:43 Adding Bloom to final render and Conclusion
Step 7: Camera Sequencing
Now that a final render is complete, this next video guides you through the mechanics of manipulating cameras in a stage, adding multiple cameras, and creating a sequence of shots that can be viewed as an animatic using the Omniverse Sequencer.
Key Takeaways
Understanding camera navigation techniques in Omniverse USD Composer
Creating a previs animatic using multiple cameras cut together in a sequence
Click to see the tracklist
00:00 - 00:09 Overview
00:10 - 01:20 Exploring camera navigation controls
01:20 - 02:29 Camera creation and multiple ways of adding cameras to the stage
02:29 - 03:18 Positioning Shot Cameras for Shot 001 and Shot 002
03:19 - 03:58 Adding camera effects like focal length and focal distance to create depth of field
03:58 - 05:44 Adding Camera for Shot 003 and animating the camera
05:45 - 06:15 Adjusting the camera animation timing using the Curve Editor Window
06:18 - 08:00 Creating a sequence using Create’s Sequencer
08:01 - 08:24 Enabling the physics playback to time with the animated camera
08:25 - 09:12 Rendering the sequence out to a movie file using Movie Capture
09:12 - 09:34 Conclusion
Step 8: Autodesk Maya Connector
This last video illustrates how to use Autodesk Maya to create a prop of a forklift animated on a curve and export the animation clip to Omniverse USD Composer using the Autodesk Maya Connector. You will also learn to add a dynamic effect to make the forklift destroy shelf racks of boxes in the warehouse.
Key Takeaways
Animating an asset on a curve using Autodesk Maya
Exporting the animation to the warehouse stage in Omniverse USD Composer using the Autodesk Maya Connector
Click to see the tracklist
00:00 - 00:05 Overview
00:06 - 00:35 Adding a forklift model as a layer in the warehouse
00:37 - 01:23 Using Autodesk Maya, load a forklift into the stage
01:24 - 01:54 Adding warehouse environment as a reference to animate against
01:55 - 03:29 Creating curve for path of forklift and attaching forklift to curve
03:30 - 04:05 Adjusting the timing of the animation on the curve using the Graph Editor
04:05 - 05:20 Exporting the Animation Clip of the forklift to Create using the Maya Connector
05:21 - 05:58 Importing the animation Clip onto the forklift in Omniverse USD Composer
06:00 - 08:13 Adding the dynamic impulse to occur when the forklift crashes into shelf racks
08:13 - 08:40 Conclusion
Step 9: Load the Stage
For this lab we have provided the final stage, complete with physics, for you to explore. In this stage you can simply press play to see the physics in action or dig into the stage by changing impulse values or interacting with live physics by grabbing items in the stage.
The video below gives a quick overview of how you can interact with this stage.
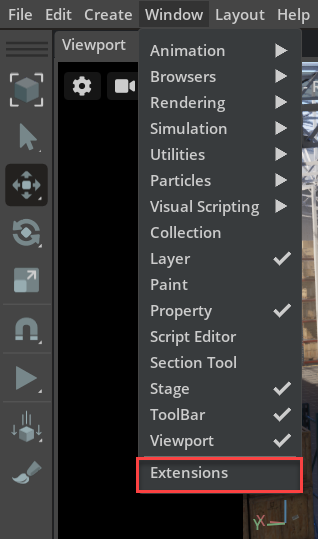
Step 1: Connect to Nucleus
If necessary, launch Omniverse USD Composer and then Connect to Nucleus Server
Important
You must enable the “PhysX FlatCache” extension before loading the stage
Step 2: Navigate to the extension
Go to Windows > Extensions
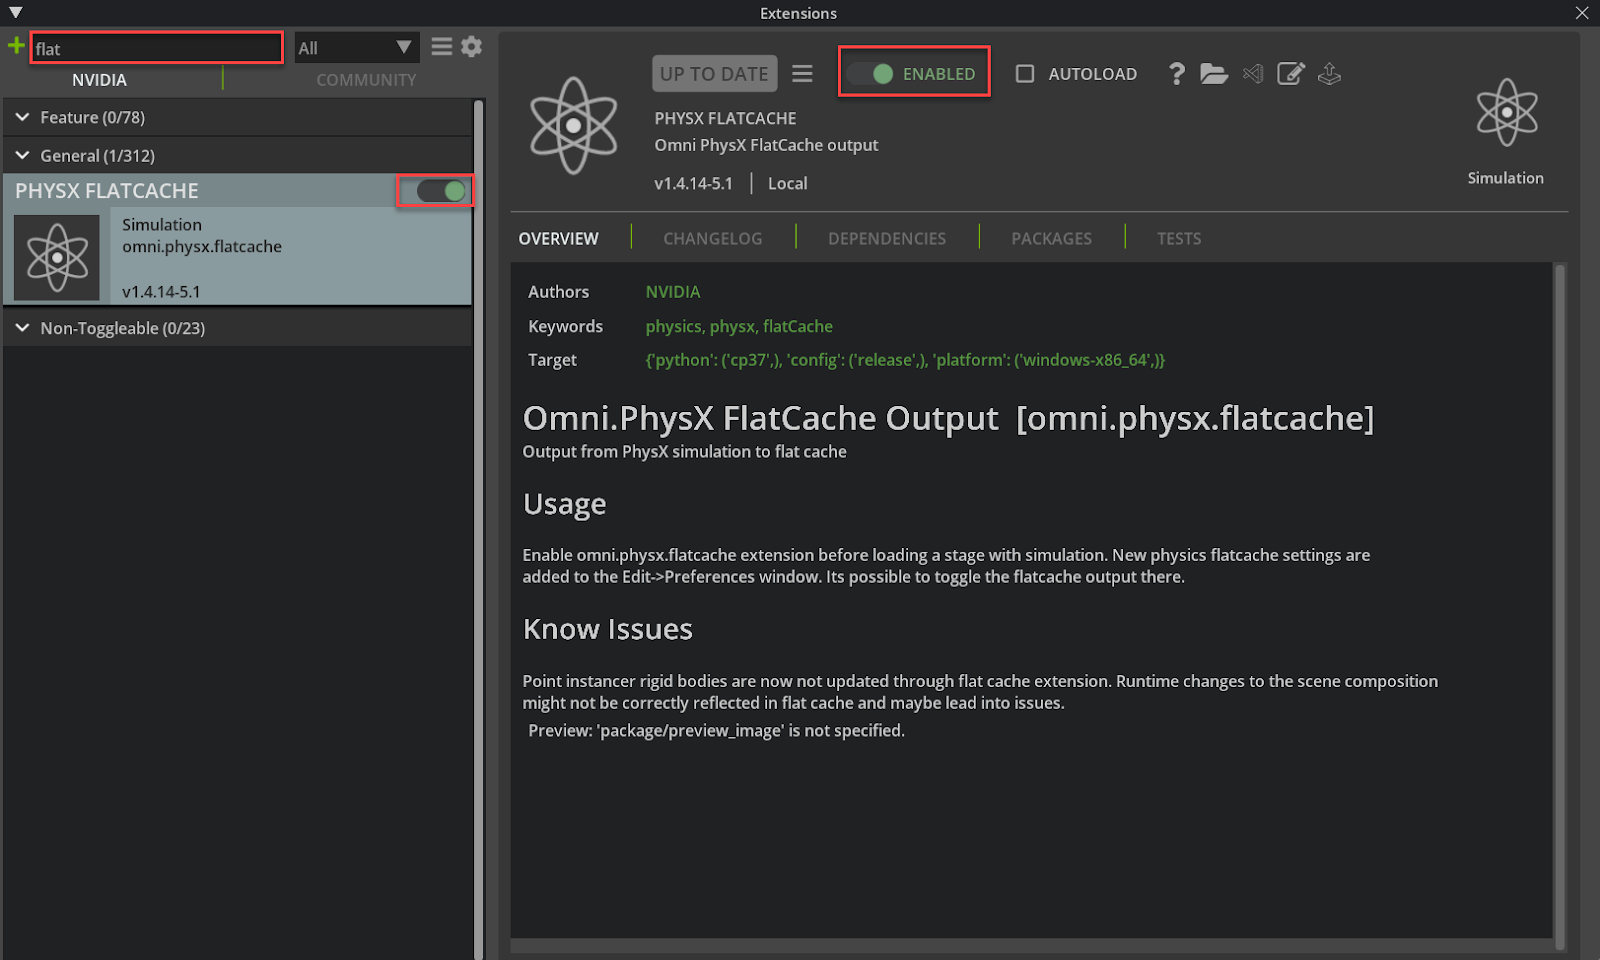
Step 3: Find and enable the extension
Search for flat and enable the PhysX FlatCache extension
Step 4: Open the Stage
Load the stage file at the following path: omniverse://omniverse-nucleus.nvidialaunchpad.com/NVIDIA/Demos/WarehousePhysics/Worlds/World_Demopack.usd. Choose Open Original file and Wait for the stage to load (blue progress bar in the lower right corner)
Step 5: Declutter the viewport
You can press SHIFT + H to activate “declutter” mode which hides all icons and gizmos in the viewport
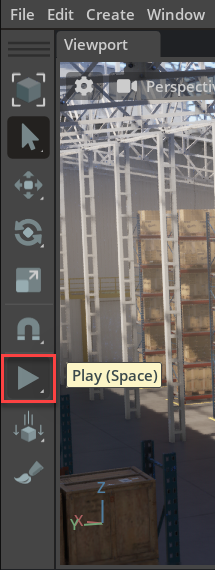
Step 6: Play the simulation
Press spacebar or click the Play button to start and pause playback
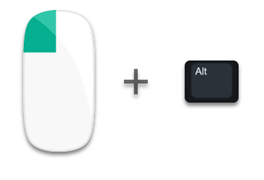
Use SHIFT + Left Click Drag to move objects while the stage is playing back. You can use this to pull shelves and boxes around during playback. To stop the simulation and reset the stage, press the Stop button.
Note
Please refer to the appendix of this lab to learn essential Omniverse application skills which you will be applying in the hands-on lab to enhance your content creation workflow. You can simply refer to these skills as needed during your hands-on lab or you may try these individual skills for yourself using the supplied stages.
Navigation
If you are familiar with 3D CAD or digital content creation applications, you should quickly get the hang of it!
Remember that you can pick an object in the Stage (next to layer manager) and press F to center your view on it. This makes orbiting and resetting your view much simpler.
Zoom (scroll) and Pan (click + drag) |
Orbit |
|---|---|
|
|

Look Around |
Walk (While looking around) |
|---|---|
|
|

Conclusion
Congratulations on completing the Physics Warehouse Tutorial! You learned how to use Omniverse USD Composer with your favorite content creation apps to establish a powerful workflow. If you want to take your Omniverse skills up a notch and collaborate with other artists in real-time, read more about Live Mode.