Materials Best Practices
Creating Materials for Simulation
Materials destined for real-time vehicle and robotics simulations have different requirements from materials used solely for design visualization or non-realtime Digital Twin applications. These materials are “simulation-ready” and are the evolution of OmniPBR into what we call SimPBR materials.
Vehicle and robotics sensors use frequencies outside the visible spectrum and provide reflections from LiDAR, RADAR, and other transducers in the same way they handle visible light now.
As artists create geometry and materials for simulation applications like Composer , or DRIVE Sim (currently in Early Access), keep in mind some simple rules to help ensure an easy upgrade to SimPBR materials.
Quick Tips and Techniques
The guidelines for materials in a simulation application are much the same as for a real-time game engine or even an offline renderer. Performance is always a consideration, as well as memory consumption at runtime.
Key things to keep in mind:
Keep shader graphs simple
Use OmniPBR and OmniGlass shaders
Keep the bitmaps small
Use an RGB value, or reuse a bitmap when you can
Encapsulate settings in an MDL file for consistency and portability
We’ll touch on each of these and why they can be critical to the performance of a simulation. Additionally, as you’ll see in the next section, Material Segmentation is a core requirement for geometry and materials in a SimReady 3D asset.
In the context of using Omniverse as a simulation platform, it works best on high-performance systems with multiple GPUs. However, developer and demonstration machines may be more resource-limited, and artists should consider the simulation’s target hardware.
As systems that run simulations get more powerful, limitations tend to disappear, objects become more detailed, shaders more complex, and textures ever larger without an impact on performance. That said, objects, materials, and textures should always be good citizens of the entire ecosystem and not cause performance or resource issues with little benefit.
Always consider shader complexity and texture map size at every step and the requirements for the asset’s use case.
Introducing Material Segmentation
To help future-proof and ensure a smooth upgrade to simulator products, artists should consider a requirement called “Material Segmentation” throughout asset development.
Simulators require that artists separate geometry by substrate type and that the materials follow a specific naming convention. This configuration allows the simulator to understand how to set up SimPBR shaders so it can use connected RTX sensors in the simulation based on the substrate type.
Each object can have only one material, so what may have used Multi/Sub-Object materials and monolithic ORM surfaces may require revisions.
Using an ORM map to define transparent, shiny, and metallic areas will still render correctly in the simulator. However, the simulator needs to know the real-world substrate type of the underlying geometry (metal, glass, plastic, etc.) and not just how it looks in visible light. They must be separate def mesh prim objects within the USD with one material for each prim.
The image below is a simulation-ready traffic asset with detailed Albedo, ORM, and Normal bitmaps. The artist separated the materials by the underlying physical type: metal for the body, a retro-reflective plastic reflector, and rubber for the tires:
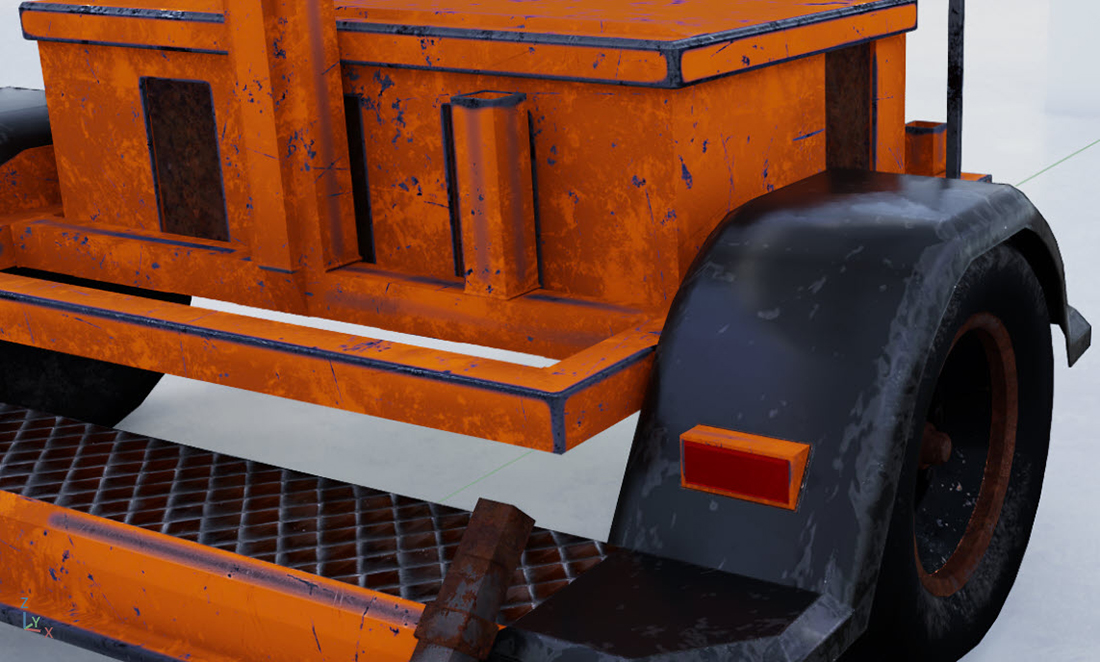
A Simulation-Ready Traffic Asset with Three Materials
With the objects and materials properly segmented, the simulator can react to the substrates based on the transducers in the simulation.
Below is how the Omniverse Stage looks for this asset, with each mesh object getting one material:
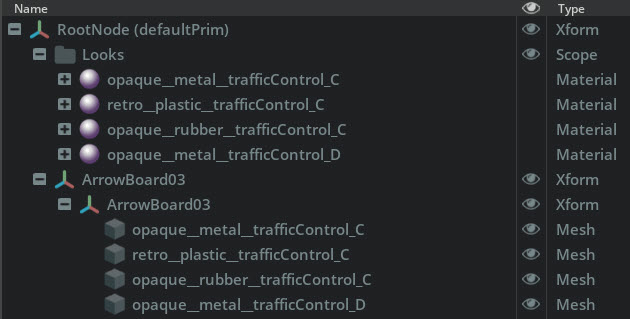
Stage UI For Traffic Asset
Details on the material naming conventions are in the next section. It is worth noting that the artist followed the material naming convention with respect to the geometry names, but this is not required for SimReady models.
Understanding material segmentation requirements and creating your props with this in mind from the start will help ensure an easy path to more complex simulations.
Material Naming Conventions
While SimReady does not enforce a specific material naming schema, we encourage this methodology to help keep your assets clean and has additional benefits when used in an Omniverse pipeline. For Omniverse usage, the material name you use helps define which SimPBR MDL is assigned and is also a clue to the simulation system at runtime. Following a few rules will help materials conform correctly and work as expected.
Material names are in all lowercase and have three sections with double-underscore symbols between sections. The three required sections are the following:
Prefix Material Type, such as
opaque__Surface Type, such as
metal__Description, such as
brushed_aluminumwith single underscores instead of spaces.
The material name is opaque__metal__brushed_aluminum in the example above.
Prefix Material Types
The Prefix determines which internal SimPBR MDL replaces the existing OmniPBR shader. The only valid prefixes for SimReady materials are:
opaquefor materials without transmission through the surface such as plastics, concrete, metal and woodtransfor translucent and transparent materials such as glass and clear plasticsthinfor objects like leaves or fabric that have back-scatteringclearcoatfor surfaces like car paint with a transparent, reflective layer above a paint colorretrofor retro-reflective surfaces, such as a street sign or reflective tape on a traffic cone
The opaque__ prefix is the most commonly used and delivers the highest performance. As with any renderer, use the most performant option unless there is a need to use something else.
Surface Types
The Surface Type describes the composition of the underlying object substrate and isn’t a surface appearance. A painted metal pole would be metal__, as metal is the underlying substrate type, whereas “paint” is only for thick road markings.
The valid SimReady Surface Types are:
emissive - an illuminated section of a lamp, the light bulb
glass - Glass or transparent plastic
metal - Metallic surfaces like aluminum and steel
paint - thick paint used on road marks, not other painted objects
concrete (cement is also acceptable) - Concrete or cement
asphalt - Road surfaces of Asphalt
wood - Wooden fences, tree trunks, bark, and branches
plant - Plant materials without backscattering (stems, fruit)
leaf - Thin plant material with backscattering
rubber - Rubberized materials like tires
plastic - Solid plastic surfaces
vinyl - Soft vinyl or plastic surfaces (i.e., traffic cones)
stone - Rocks, stone
leather - Leather, processed animal hide
fabric - Fabric, cloth (not leather or vinyl)
organic - Living surfaces and skin (human, animal)
Description
Add a short description that further identifies what the surface represents or its location in the prop. An example would be light_pole, garage_toolbox or brushed_aluminum. There are no requirements or limits on this description.
Materials often have a suffix in the description to identify variations, such as opaque__plastic__red_a and opaque__plastic__red_b. Usually, the material name matches the MDL name and its exported shader name.
Understanding Physically-Based Rendering
Physically-Based Rendering - or PBR - is the process of reproducing real-world direct and indirect lighting, reflections, and surface appearance in a physically real rendered environment. The renderer, materials, and lighting all combine to create photorealistic results.
PBR Rendering in simulators (SimPBR) expand the definition of PBR to include the electromagnetic (EM) spectrum outside visible light to support RADAR, LiDAR, and other transducers.
Getting to know PBR Materials
A PBR material correctly handles how energy is absorbed, colored, emitted, and reflected by the surface. They produce an energy-accurate result, returning energy into the environment, and when combined with a PBR renderer, they create a natural image with correct lighting and surface interactions.
Because materials like OmniPBR are “PBR,” they won’t produce more energy than they take from the environment (unless it is emissive). They will balance the physical energy results as you adjust the materials. Energy conservation is automatic and not something the artist needs to consider.
With a PBR shader, the diffuse albedo color decreases proportionately as reflection increases. If a shader is transmissive, the energy returned in albedo and reflection is adjusted to maintain physically-accurate results.
Creating PBR Materials for Simulation
Future SimPBR materials will encompass many of the features of the OmniPBR materials and extend the capabilities to cover vehicle and robotics sensors in a physically-accurate way. They’ll work beyond the visible electromagnetic (EM) spectrum.
Use OmniPBR & OmniGlass Shaders
Materials used in a simulation application should use OmniPBR and OmniGlass for best compatibility. The simpler the shading graph, the better, as this helps ensure fast shading and easy upgrading to upcoming simulation-ready shaders.
For a detailed look at creating and using the OmniPBR material, refer to the Omniverse Material Documentation.
Material Complexity and Performance
When simulation performance is a priority, the additional time required to render complex materials adds up quickly. When particular objects or materials appear, you may see a drop in viewport frames-per-second (FPS), indicating where an issue may be.
As mentioned, some features can be turned off in the render settings for simulation and then enabled for rendering. Changing selected material settings will benefit simulation, visualization, and viewport performance without changing global options. Refraction and Reflection are two things, in particular, to look for, as well as any options for transparency and sub-surface scattering.
Eliminate IOR
For OmniGlass materials, an Index of Refraction not at 1.0 or the “Thin Walled” option unchecked, as below, will render much slower than without refraction:
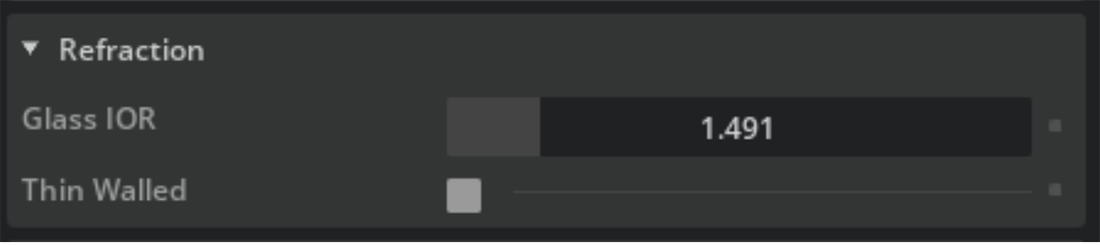
Refraction Settings in OmniGlass
Translucent plastic and flat sheets of glass, or “window glazing,” should enable the “Thin Walled” checkbox to eliminate refraction, and this is how real-world glazing works.
For OmniPBR, it does not calculate an IOR with transparent areas. However, materials that are not fully opaque or transparent will take more time.
Reduce Reflections
Use reflections where beneficial, and eliminate them where you can. A glossy paint finish that casts reflection rays will always take more resources than a flat paint finish.
The number of reflections and samples can be changed in the render settings to speed simulations and preserve the look of advanced rendering.
Keep it Simple
If there is a need for complex shaders for design visualization, special effects, or digital twins, just be aware that you may need to rework the materials to ensure they convert into SimPBR.
An automotive finish will use a material with a Clearcoat option that has reflections, refractions, and interaction with the underlying surface, which also has its shading and reflections.
Sub-Surface Scattering (SSS) is another computation-intensive technique that may need to be limited or eliminated when running a simulation. SSS can be controlled in the render settings to increase performance globally.
Using MDL Files
If you want portability and control over the look of a surface throughout your project, place the material settings within an MDL file. The advantages are:
Text-based files work well with source control and versioning
Allows for consistency across assets
Can provides baseline template for artists
Separates asset and material workflows
When you use an MDL file in your stage, it brings any defined settings, including texture paths, and changes made to the MDL affect all surfaces that use the MDL.
Working with the USD “over” Workflow
USD uses a hierarchy where changes made “over” another setting take precedence over lower settings when determining stage composition. Where the settings are within that hierarchy can determine whether they have any effect downstream.
For materials based on an MDL, if you edit any material settings in the USD file, this change will be “over” the settings in the MDL. The corresponding settings in the MDL will no longer affect the USD. This can be confusing if an artist makes a change in an MDL and their assets don’t reflect the change.
In this MDL-driven material below, both the Albedo Map and the Color Tint are modified in the USD, as indicated by the blue square on the right of the Property Panel UI:
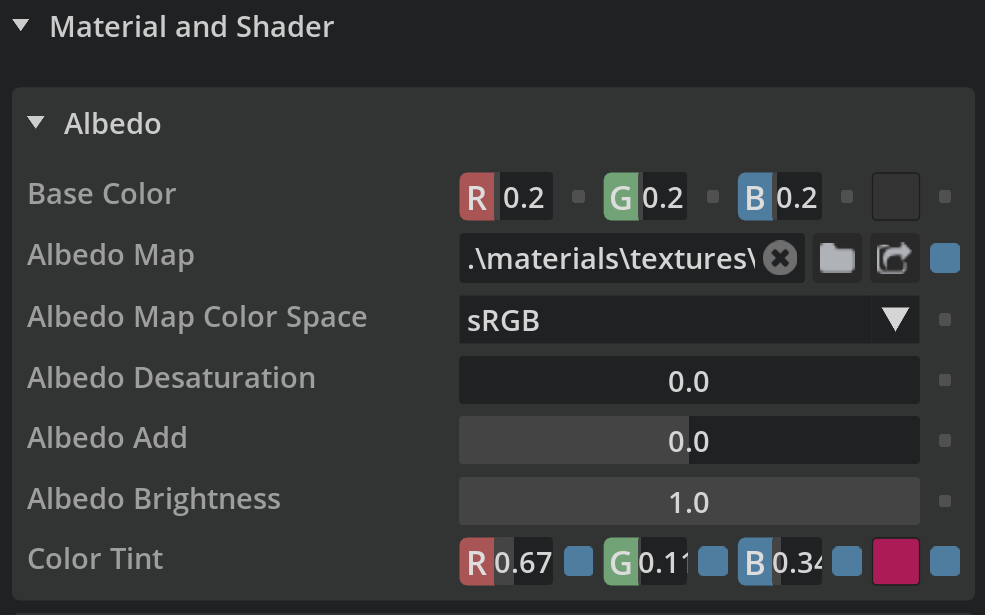
Material Albedo settings with Overrides
Any changes in the MDL to these two settings will not appear in this USD; since these changes are handled “over” the MDL. This is a feature, not a bug, and essential for artists to understand. Ideally, create a new MDL that reflects the new settings rather than edit and override MDL settings in the USD.
Clicking on the blue square will restore the default settings from the MDL. The USD file may also store default settings independent of the MDL file, so if MDL settings don’t restore correctly, you’ll need to edit the USDA code. Enable the USDA Editor extension in Create and remove any extra default settings:

This listing of the shader’s settings from the USDA file has values in the first line overriding the MDL setting (the ‘= (0.90, 0.11, 0.11)’) and a default setting defined below which may be different than in the original MDL (the ‘customData = {}’ section). Although not a common issue, be aware of where settings may be stored and overriding the MDL and its defaults.
Using Textures
Generally, use tiled texture maps and reuse textures wherever possible. As we’ll see later, even relatively low-resolution bitmaps can be tens of megabytes, resulting in hundreds of megabytes of cached textures for use with the GPU.
Textures created in Substance Designer and Substance Painter make for striking visuals. However, large (4k or larger) monolithic bitmaps can impact resource consumption. Texture painting applications make it easy to add subtle, high-frequency noise patterns in maps, resulting in large files that don’t compress well. Keep the result in mind and where this texture will be used and seen.
Use Direct X for Normals in the Substance project settings, the PBR Roughness, and Metallic workflow, and bake and create all textures at 4k resolution. You can always resize them smaller if desired.
Texture Folders and Paths
The standard is to place asset-specific MDL files into a materials subfolder of the USD and bitmaps in a textures subfolder of materials. All textures in MDL files use relative paths such as ./textures/ or use ./materials/textures/ in the USD. These folder names are in lowercase.
Paths to textures and materials referenced in a USD should be relative to the USD and not a hard-coded path to a server or drive.
Evaluate and change paths in your file when editing the individual asset, not when the asset file is part of another stage and USD has resolved the paths. The paths may be relative when looking at the asset’s USD file, and show a longer full path when the USD is part of a larger stage.
Texture File Types
Files destined for simulation should be 24 or 32-bit PNG formatted files. Other formats may be supported. However, PNG is reliable, provides lossless compression, and includes additional channels like Opacity when needed. The NVIDIA DRIVE Sim application uses the Alpha channel in the Albedo map for opacity, for instance.
Albedo maps are Gamma corrected sRGB format, and ORM, Normal, and other textures are typically non-Gamma corrected linear - or “raw” - format. The “auto” option in texture settings should be avoided as it is not always able to detect the proper format from some files.
Understanding Texture Sizes
Currently, you should keep your bitmap textures under 8k by 8k in pixel resolution. However, we recommend images of 4k or less for SimReady assets. Many objects, particularly small or distant objects, may not take advantage of the detail in a 4k bitmap, and we suggest 1k or 2k textures as a baseline dimension.
The use of small, tileable textures is ideal.
Beyond the pixel resolution of the bitmap is the size in megabytes and memory it will use when in your stage. Most objects in a large design visualization or simulation will likely be seen full-screen and studied at length.
Using Texel Density
For simulation assets, our preferred target Texel Density is 2048 pixels/meter measured at 4k by 4k. The maximum texture resolution is 4k by 4k, and non-square textures are allowed.
Using UDIM
To achieve the target texel density and keep the resolution to 4k or less on large objects, USD can use UDIMs. In the material’s texture name, simply replace the UDIM number with .<UDIM> - for example, T_Forklift_A1_Albedo.<UDIM>.png
Reusing Textures
One of our recommendations is to reuse textures whenever possible and use RGB values where a bitmap is simply a color swatch.
Bitmap reuse and tinting can provide color and surface variation objects without the need for additional bitmaps. For instance, if you have a series of colored plastics, ideally, you wouldn’t have individual ORM and Normal maps if those textures are all the same. The plastic Albedo color bitmap could also use a desaturated texture or be based on a white bitmap and then Color Tinted, rather than using unique images. Controlling the Color Tint value is often how we provide color variants in our props.
Numerous similar or identical maps not only use space in your Omniverse project drive but will generate hundreds of gigabytes of cached files on your local drive and consume additional GPU memory space at runtime.
Assets in a simulation must also be good citizens of the entire project and use available resources efficiently.
Introducing the Omniverse Texture Cache
As a practical example of how SimReady assets are allocated memory, when Omniverse first loads a texture, it creates a series of separate images in its cache folder, in specific sizes to use with the GPU. These are in the C:\Users\%USERNAME%\AppData\Local\ov\cache\texturecache folder on your computer and may have entries like this:
Name |
Size |
|---|---|
T_Light_B1_Glass_Albedo.ovtex.0 |
134,217,728 |
T_Light_B1_Glass_Albedo.ovtex.1 |
33,554,432 |
T_Light_B1_Glass_Albedo.ovtex.2 |
8,388,608 |
T_Light_B1_Glass_Albedo.ovtex.3 |
2,097,152 |
T_Light_B1_Glass_Albedo.ovtex.4 |
524,288 |
T_Light_B1_Glass_Albedo.ovtex.5 |
131,072 |
T_Light_B1_Glass_Albedo.ovtex.desc |
49,396 |
T_Light_B1_Glass_Norma.ovtex.0 |
67,108,864 |
T_Light_B1_Glass_Norma.ovtex.1 |
16,777,216 |
T_Light_B1_Glass_Norma.ovtex.2 |
4,194,304 |
T_Light_B1_Glass_Norma.ovtex.3 |
1,048,576 |
T_Light_B1_Glass_Norma.ovtex.4 |
262,144 |
T_Light_B1_Glass_Norma.ovtex.desc |
98,548 |
This Light’s Albedo and Normal texture is an example of a simple surface (a round “jar” shaped tinted glass globe) with a 13Mb Albedo map and a 1Mb Normal map that generated 256Gb of texture data behind the scenes.
Glass Lamp Lens with Normal and Albedo Bitmaps
When a bitmap is loaded the first time, Omniverse creates all these “ovtex.x” files, which are transferred to the GPU as required. For this object, the Normal texture is critical for the waves in the glass. However, the Albedo texture could be an RGB value or another bitmap from the project with a Color Tint value. Texture reuse or an RGB color potentially saves hundreds of megabytes of storage and improves performance and memory consumption at startup and runtime.
Simulation PBR Materials
Robotics and vehicle sensors include LiDAR (Light Detection And Ranging), RADAR (Radio Detection And Ranging), RGB-D, contact, ultrasonic, and IMU. Each of these transducers send and receive signals in a specific electromagnetic (EM) or audible frequency range. Replicating the reflection of these signals from a surface back to the sensor in a physically-based way is critical in vehicle and robotics simulation. This is handled in part with the aid of the next-generation SimPBR materials, specific material naming conventions, and Material Segmenting in the geometry and materials.
The Asset Import process of the Studio Props and Studio Vehicles applications automatically converts materials from OmniPBR into SimPBR and applies settings based on the naming of the material. Properly configuring and naming materials will help ensure the simulation app converts your materials correctly.
Enabling Performance and Memory Statistics
You can see real-time memory consumption and FPS by enabling them from the viewport “eye” menu:
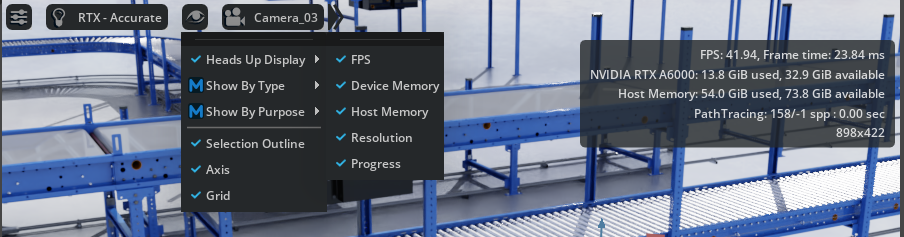
Enabling the Viewport HUD
Areas of your stage may have different FPS, which can help to identify potential issues with geometry or material complexity.
Profiler
The Profiler is an Omniverse extension to identify bottlenecks and resource use in your application. It is accessed by pressing F8, or from Windows->Utilities->Profiler.
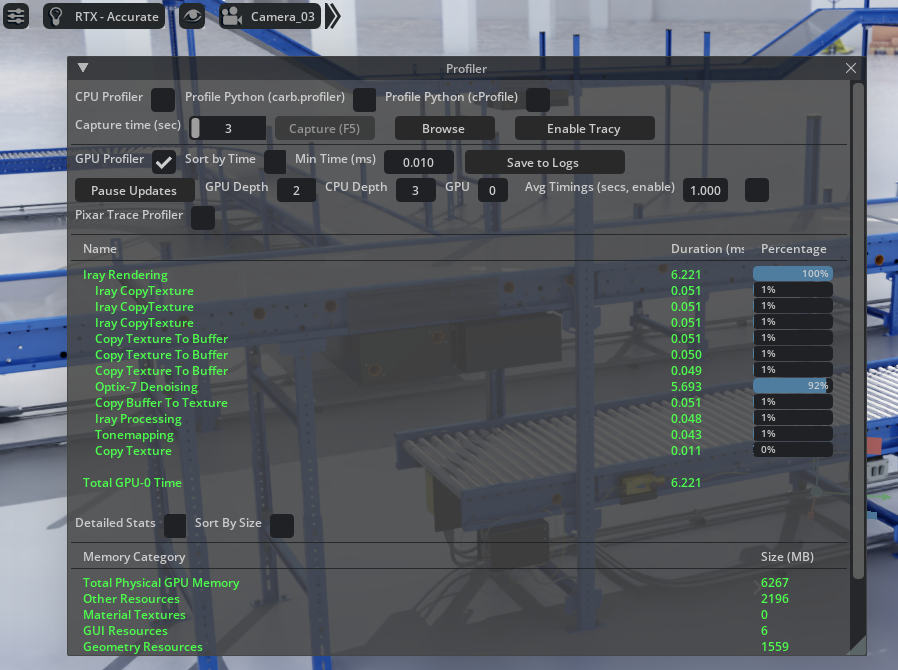
Profiler window showing Iray statistics
The profiler won’t help identify individual shader issues but can help identify where the renderer spends its time and resources.