Configuring SSL/TLS with NGINX
Overview
Depending on your environment’s security requirements, it may be necessary to add SSL/TLS encryption to allow your Omniverse Clients to communicate with your Enterprise Nucleus Server securely. This document will provide guidance on using NGINX as a front-end SSL/TLS proxy that will safeguard traffic across the environment.
Designing your NGINX Infrastructure
While it is possible to install NGINX on the same server as your Enterprise Nucleus Server, it is recommended to use a separate server, which also grants the ability to firewall/block traffic to the Nucleus server that does not pass through the NGINX proxy.
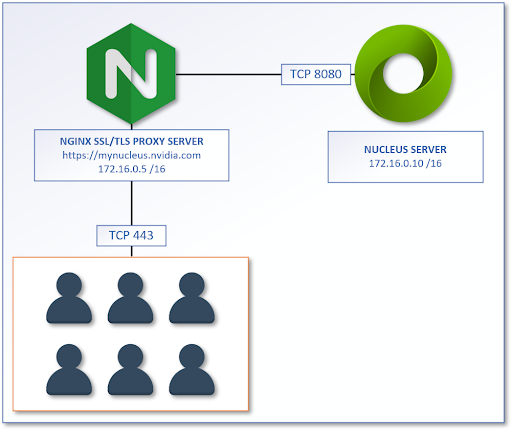
The following example shows the NGINX proxy and the Nucleus server on the same network subnet with all Clients and users directed towards the NGINX proxy URL https://mynucleus.nvidia.com.
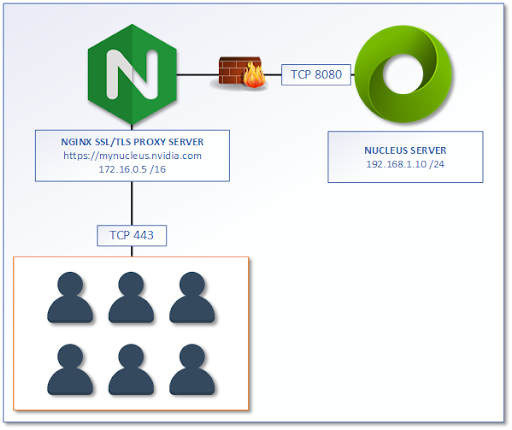
If the security requirements are to prevent users from having the ability to connect to the Nucleus Server directly, the following reference design can be implemented. This example shows the NGINX proxy and the Nucleus server on different network subnets with a firewall or a Layer-3 router in-between. All Clients and users are directed towards the NGINX proxy URL of https://mynucleus.nvidia.com.
Prerequisites
To install and configure the NGINX SSL/TLS server properly, the following requirements must be met:
An Operating System running any distribution of Linux that is supported by NGINX. (Ubuntu 22.04 is recommended.)
All SSL/TLS certificates and keys. (The full certificate chain is required.)
Ability to add/edit DNS entries for your environment.
A general understanding of the Linux Operating System and editing configuration files with nano, vi, or a text editor.
NGINX Configuration
As part of the Nucleus Docker package, a sample NGINX configuration file is provided. If the Nucleus Docker package was deployed to /opt/ove as recommended in the quick-start documentation, the NGINX sample configuration file (nginx.ingress.router.conf) is located within the /opt/ove/ssl folder.
Once that file has been located, follow these installation/configuration instructions.
Copy the nginx.ingress.router.conf file from your Nucleus Server to your NGINX Server and place it into the conf.d folder within the NGINX path. (If your Linux distribution follows the standards, the path to copy this file to is: /etc/nginx/conf.d)
Place your SSL/TLS certificates within the following locations:
Certificate(s) file location: /etc/ssl/certs
Key file location: /etc/ssl/private
Note
It’s necessary to provide the full certificate chain and NGINX requires all certificates to be contained within a single file and be in the following order (top to bottom): Domain Cert > Interim Cert(s) > CA/Root Cert.
Open the /etc/nginx/conf.d/nginx.ingress.router.conf file using a text editor.
Specify a local DNS entry here. This should be the same primary DNS Server that your server uses.
resolver w.x.y.z;Replace _ with the fully qualified domain name (FQDN) that your users will use when connecting to your Nucleus Server. (This is within the listen 80; section.)
server_name your_fqdn_here.com;Specify the proper FQDN for both the 200 and 301 return codes:
# Return server's hostname name as it is on our SSL cert
  return 200 'https://your_fqdn_here.com';
}

# Basic redirect for everything that supports redirects
  location /  {
  return 301 https://your_fqdn_here.com$request_uri;
}
Replace _ with the fully qualified domain name (FQDN) that your users will use when connecting to your Nucleus Server. (Located within the listen 443; section.)
server_name your_fqdn_here.com;Specify the location and names for your SSL/TLS certificates:
ssl_certificate         /etc/ssl/certs/certname.pem;
ssl_certificate_key     /etc/ssl/private/certkey.key;
Specify the proper FQDN for both the 200 return code:
# Return server's hostname name as it is on the SSL cert
return 200 'your_fqdn_here.com';
For all the Ingress Router configuration and endpoints, specify the same server location for all the specified paths as shown in this example:
# Core API: use API_PORT_2 here. Do NOT use API_PORT.
   location /omni/api {
      proxy_pass http://ip_address_or_fqdn_of_nucleus_server:3019;
      proxy_http_version 1.1;
      proxy_read_timeout 60s;
      proxy_set_header Upgrade $http_upgrade;
      proxy_set_header Connection "upgrade";
      proxy_set_header Host $http_host:3019;
}
Note
When specifying the Nucleus Server address for the proxy_pass, do not use https.
Specify the WEB_PORT that your Nucleus Server will be listening on. (We recommend using 8080.)
location /omni/web3/ {
   proxy_pass http://ip_address_or_fqdn_of_nucleus_server:8080/;
For the omni/web3/omniverse directive, use the following sample as guidance:
location ~* "^/omniverse:/(.*)$" {
   return 302
   https://your_fqdn_here.com/omni/web3/omniverse://$1;
}
Save the file, but do not start or the NGINX service as there are additional changes to be made on the Nucleus Server as discussed in the next step.
Nucleus Server Configuration
If the Nucleus Docker package was deployed to /opt/ove/base_stack` as recommended in the quick-start documentation, edit the nucleus-stack.env file and make the following changes:
Specify the local network interface IP Address of your server: (This may be an internal/private IP Address.)
SERVER_IP_OR_HOST=your_local_server_ip_address_here
Specify the SSL Ingress Host (the FQDN which was specified within the NGINX configuration in an earlier step) and maintain the 443 port:
SSL_INGRESS_HOST=your_fqdn_here.com
SSL_INGRESS_PORT=443
Change the WEB_PORT from the default of 80 to 8080:
WEB_PORT=8080
The configuration of both your NGINX Server and Nucleus Server should now be complete and services can be started/restarted.
Start/Restart the NGINX service: (This command may vary depending on the Linux OS.)
sudo systemctl restart nginx
When starting the Enterprise Nucleus Server, the SSL .yml file must now be used:
sudo docker compose --env-file /opt/ove/base_stack/nucleus-stack.env -f /opt/ove/base_stack/nucleus-stack-ssl.yml up -d
Confirming Functionality
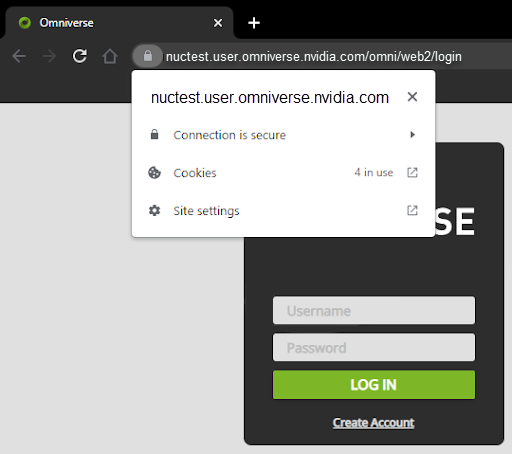
To test and confirm the configuration changes, access your Nucleus Server using your preferred web browser using the full domain name (FQDN) that was chosen for your configuration. (e.g., https://your_fqdn_here.com)
If the configuration is correct, the Nucleus interface will appear and your web browser should confirm the use of a valid certificate:
Troubleshooting
If connections to your Nucleus environment are failing, telnet to the port on the destination computer from the source computer. (By default, telnet is not enabled within Windows and is sometimes not installed on Linux distributions.)
If a “connection refused” or similar message is displayed, check the following:
Ensure that the service is running and that you have not customized/changed the port that a service is using.
Ensure that the service is bound to the correct IP Address within the configuration.
Ensure that there is not a local firewall running on either server and/or a firewall blocking connections between the server and the workstation.
Review the error logs on the NGINX server for additional guidance and troubleshooting help.
Depending on the sizes of the files transferred to the Enterprise Nucleus Server through the NGINX ingress router, you may receive a 413 (Request Entity Too Large) error message. If this occurs, add the following line to your NGINX configuration file:
client_max_body_size size;
Substitute the size variable above with a file size that exceeds the largest expected file. (e.g., 1g for 1 Gigabyte).