Tutorial 2: Create a point instancer particle system with a collider
In this section we’ll be creating a set of colliding sphere mesh particles using a point instancer. We’ll be looking at point instancers, and how to change a sprite into a mesh and how to set up colliders.
If you want to follow along with the video or the documentation, you’ll need a couple usd mesh files. Download and unzip the files for the tutorial in the link below.
Particle System Tutorial Files
2a) Create a point instancer particle system
In this section we’ll be creating a basic particle system using a point instancer.
Video 2: Create a Point Instancer particle system
Video Authored in Create 103
Create a Source and choose an emission type
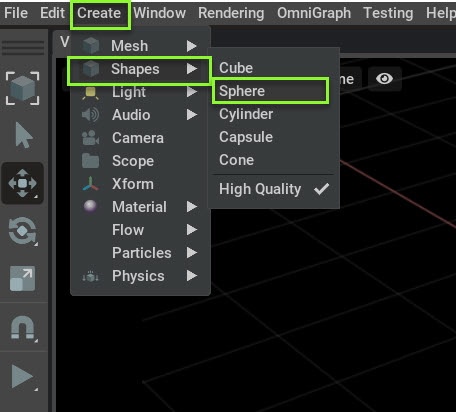
First, create a source for the particle system emitter.
1. Go to Create-> Shapes-> and select Sphere
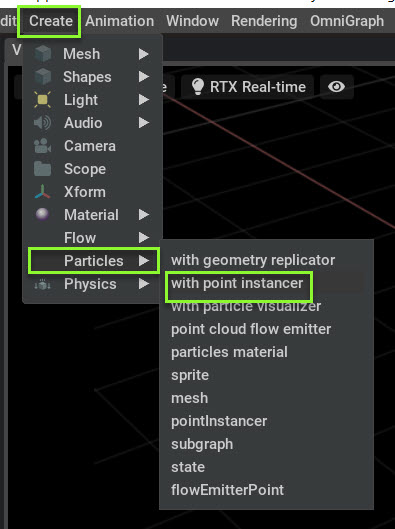
Next we need to select an emission type. For this example, we’ll be using a point instancer emission type.
2. With the sphere selected, go to Create-> Particle-> and select with Point Instancer.
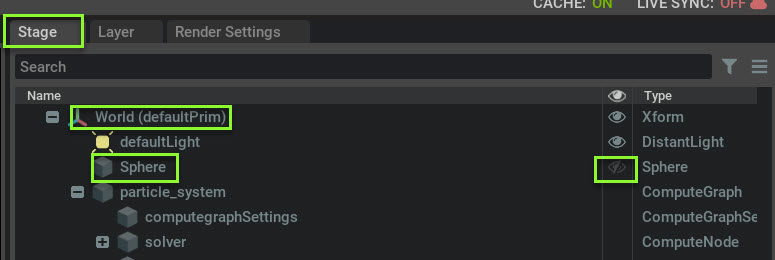
Now you have a Point Instancer using the sphere as a source. We don’t need to see the source for this tutorial, so we’ll be turning off its visibility.
3. Turn off visualization of the sphere by clicking on the eye in Stage-> World-> Sphere.
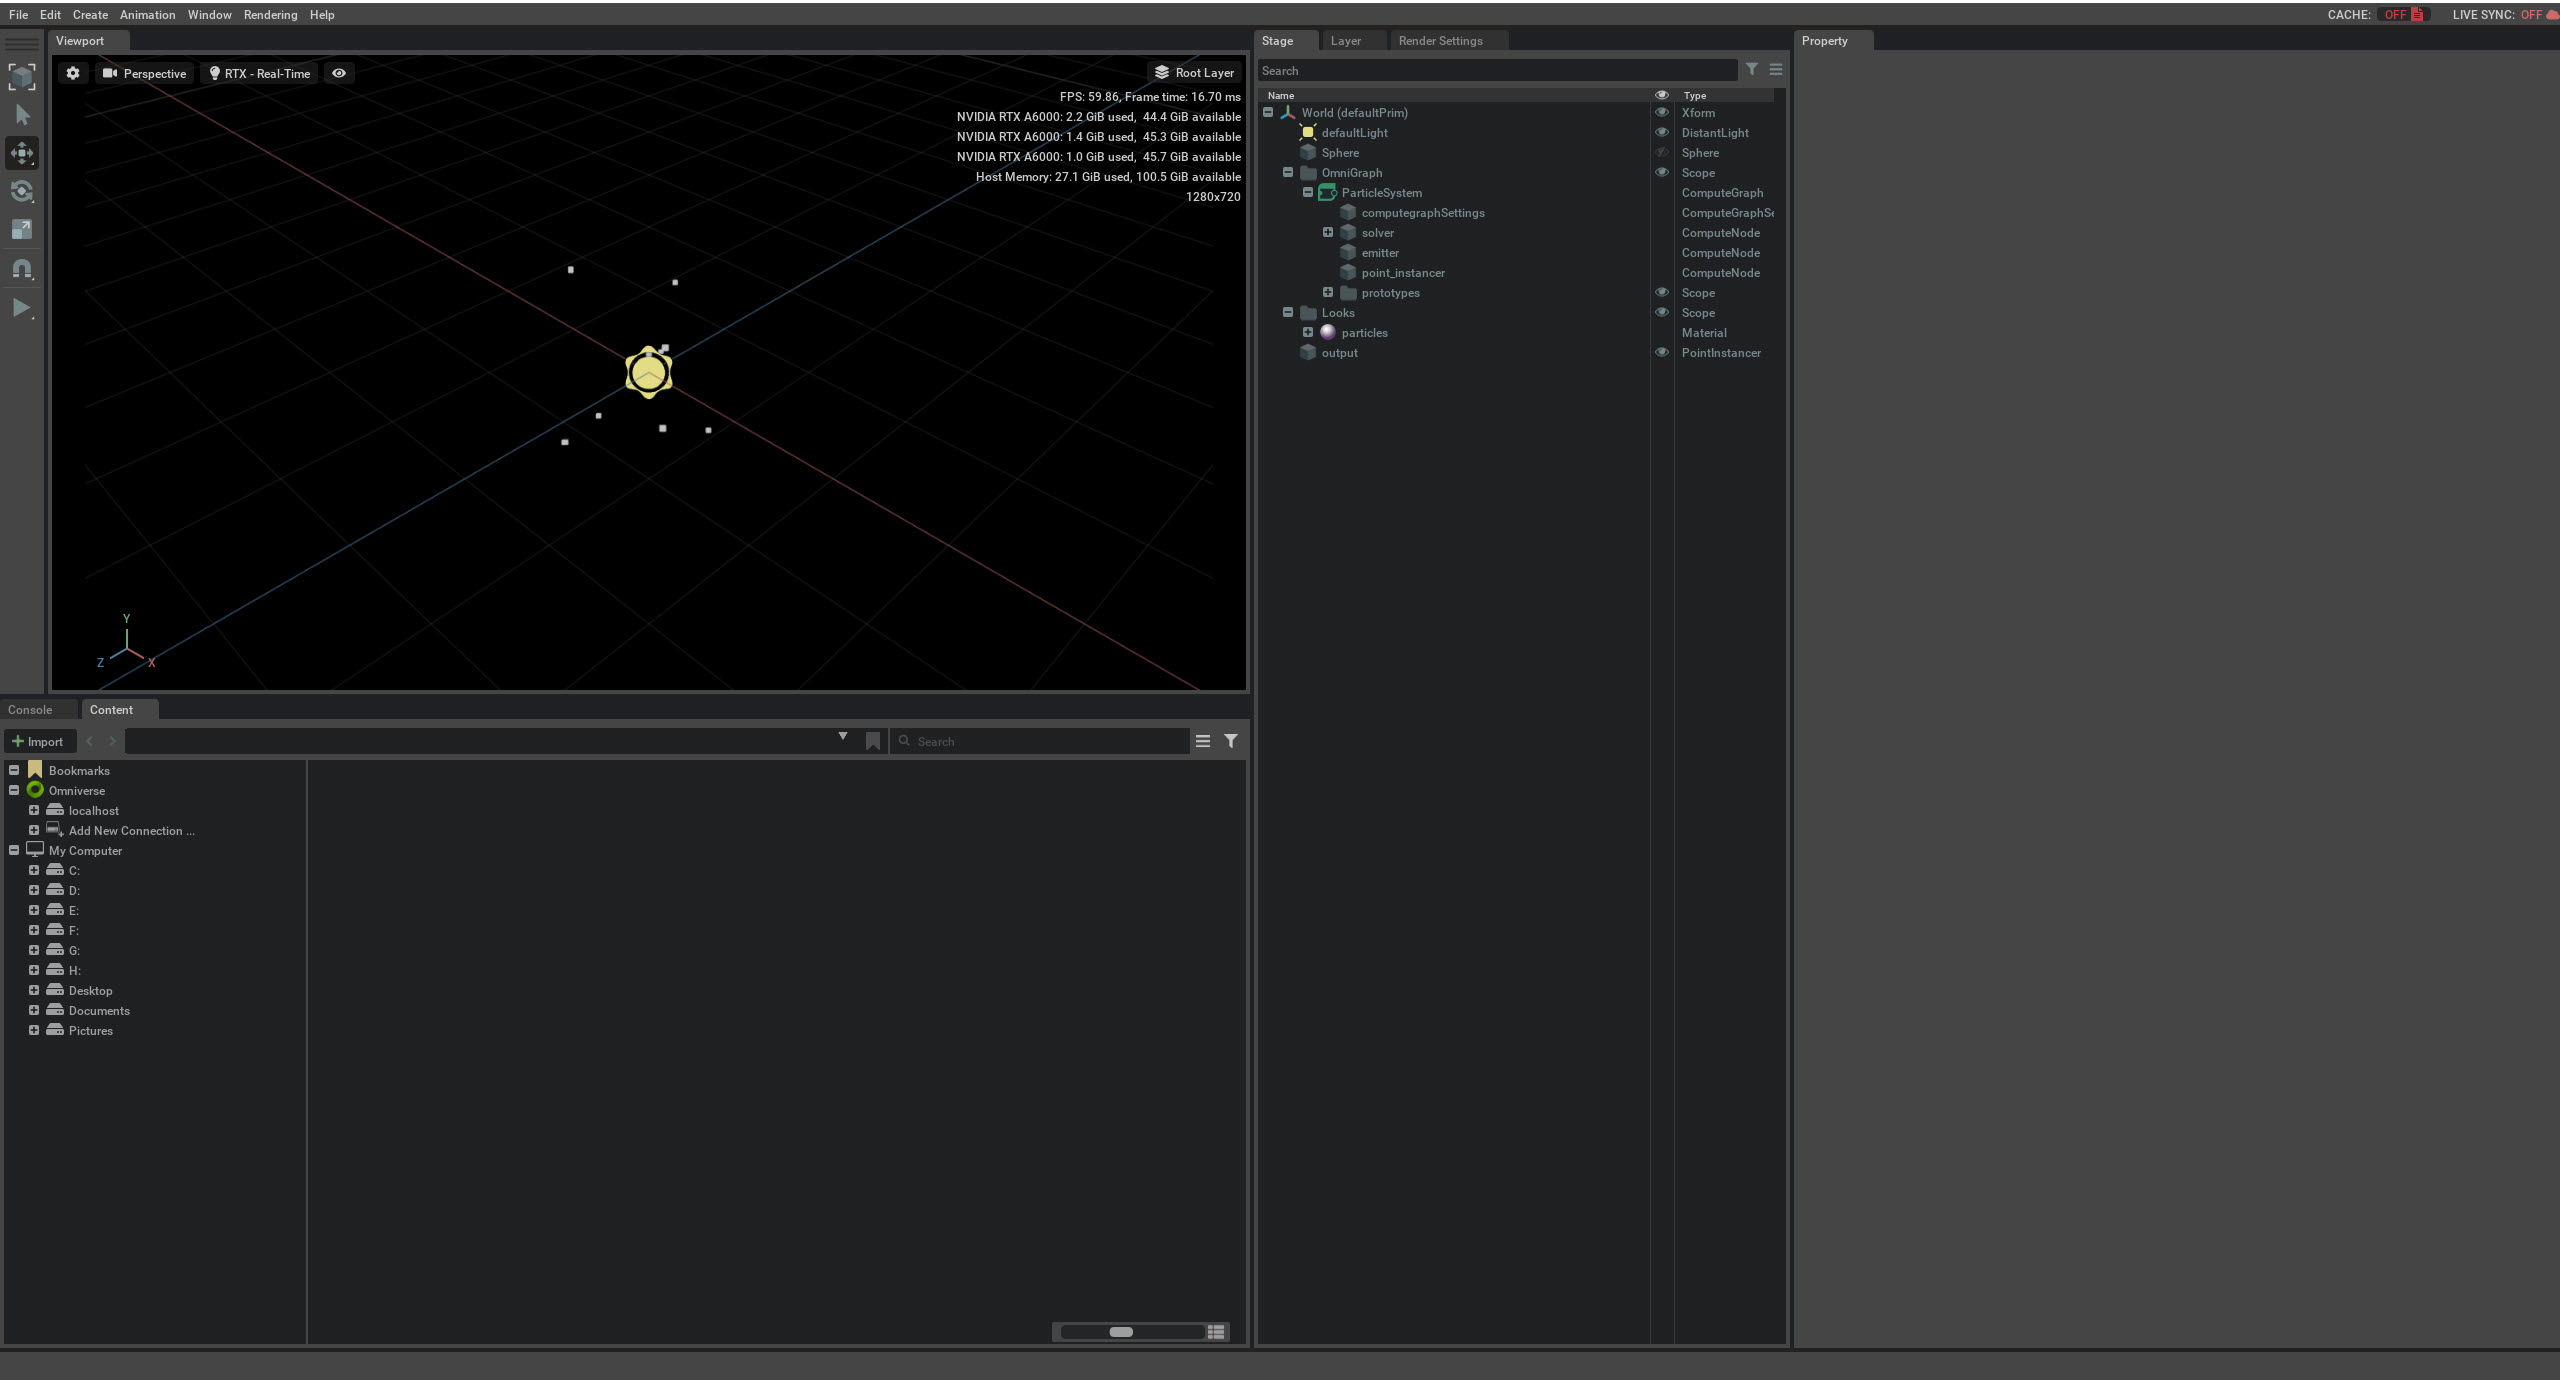
Your source is invisible and you’ll only see particles emitted in space. Your particle should look something like this:
Save your file.
2b) Change the Sprite to a Mesh
In this section we’ll switch out the sprite with a mesh.
Add/Import a Mesh to replace the sprite.
In the particle system you can switch out the default particle with any kind of mesh.
You can either import a mesh instance or create a mesh in the create menu.
For this tutorial, we’ll be importing a two usda meshes with attached materials.
First, we need to do add a couple sphere meshes with materials to the stage.
1. in the Content Browser navigate to where your unzipped particle_system_tutorial_files folder is located.
2. Click Select fx_sphere_01 and fx_sphere_05.
3. Drag and drop the two meshes onto the Stage -> Omnigraph -> ParticleSystem -> prototypes folder.
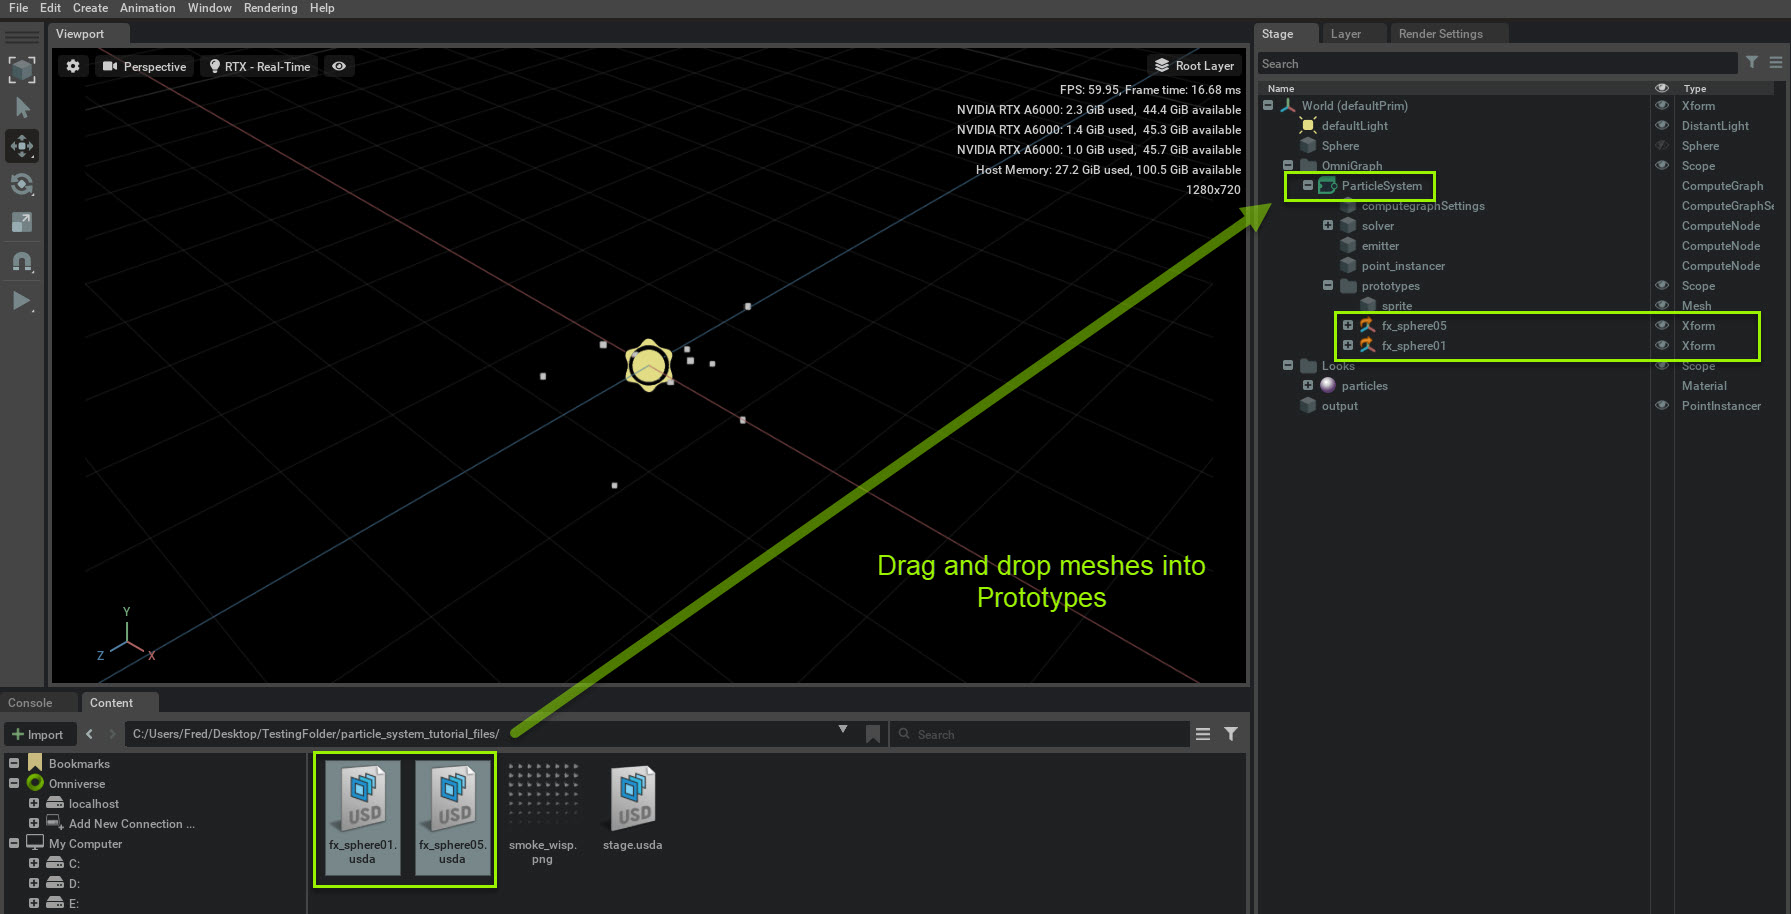
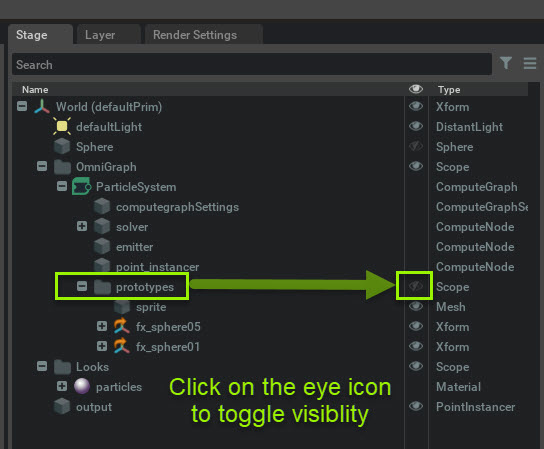
The imported meshes are at 0,0,0 coordinate space. We don’t need them visible for the following steps so turn off their visibility in the stage by clicking on the prototypes eye icon.
Delete the sprite and add the imported meshes in Omnigraph
Next we need to switch out the sprite with the imported meshes in Omnigraph.
Go to Stage -> World -> prototypes and delete the Sprite.
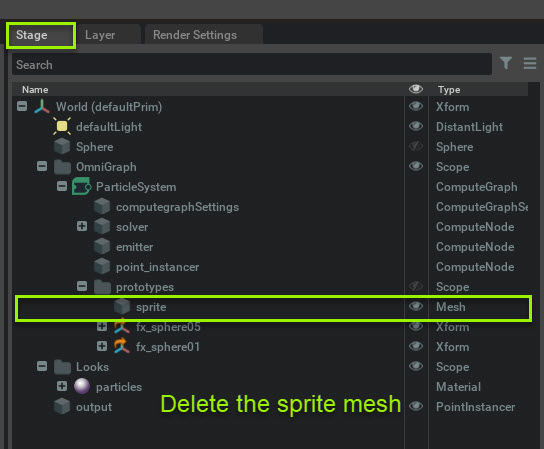
Right now no simulation is visible. That’s ok! We’ve deleted the sprite so the points don’t know what to display.
We’ll be connecting the mesh instances shortly, but before we do that, we need to do a little clean up in the point instancer node.
Delete the sprite field in the Point instancer node
1. Go to Stage -> Omnigraph -> Particle System and select the Point Instancer node.
2. Go to Property -> Raw USD Properties -> input:prototypes and delete the sprite entry there using the minus (-) button.
Particle Editor Mesh Instance Setup
First we need to open the particle Graph Editor. Go to Window -> Particles and click Editor.

The Particles Editor will appear in the same frame as the Content window in a Tab.
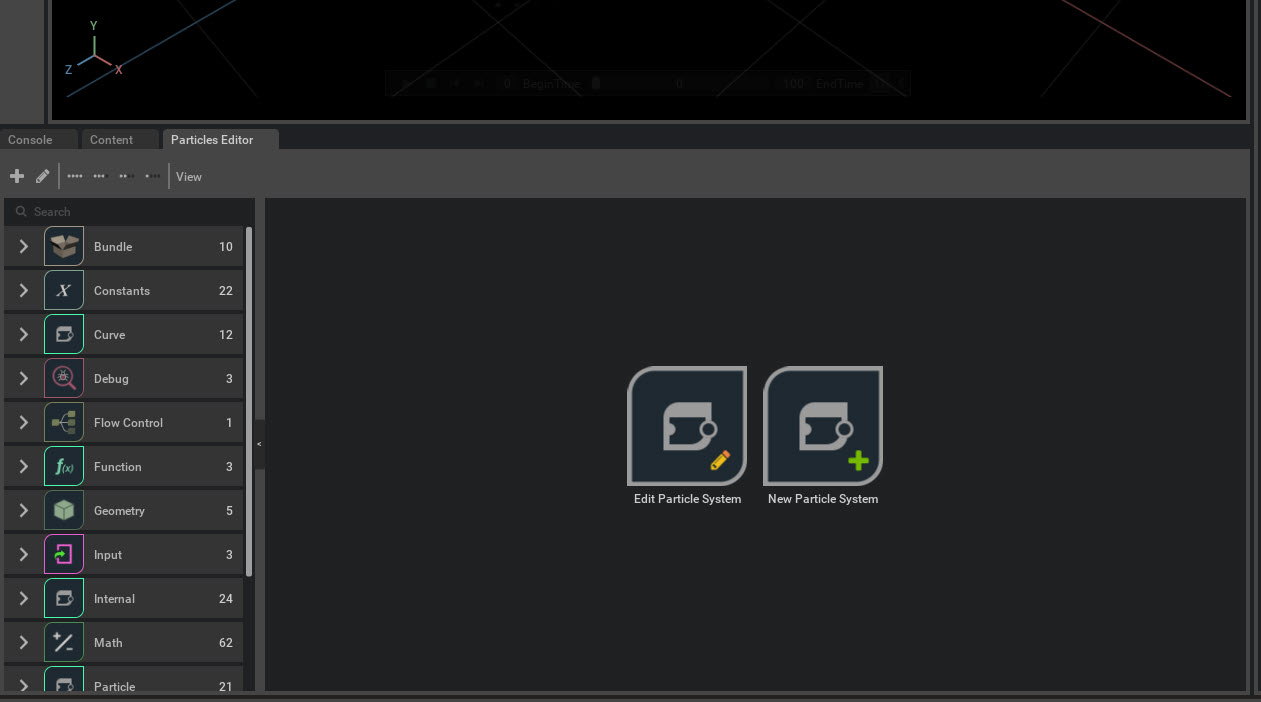
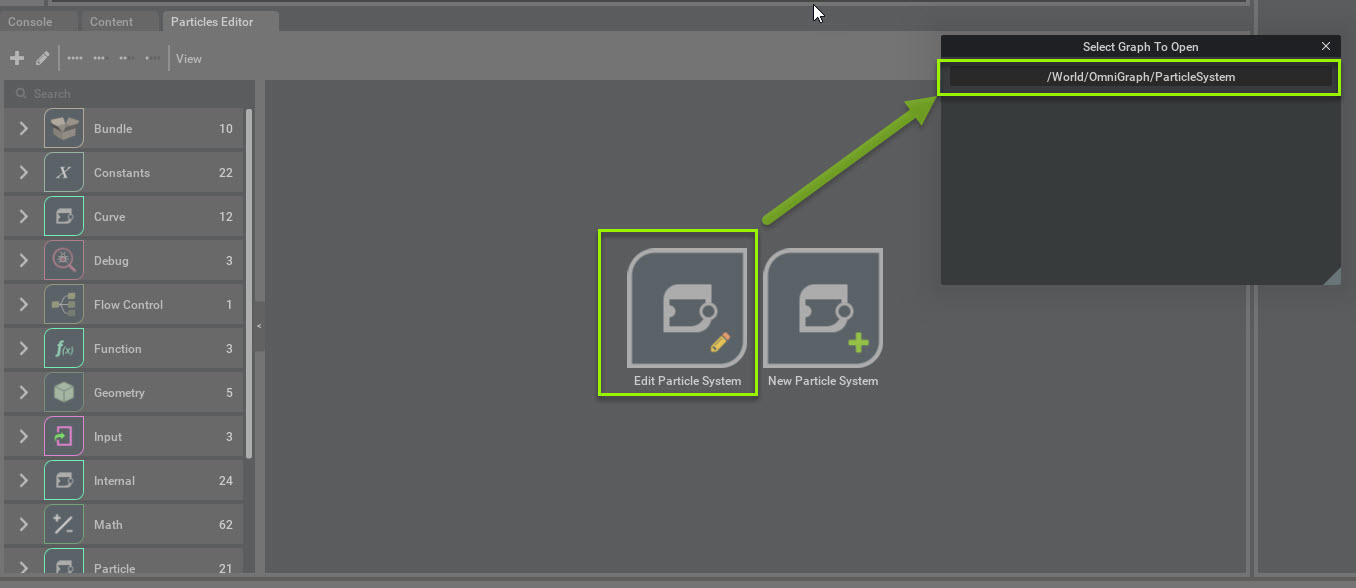
To edit the particle system, left click on the Edit Particle System button. A Select Graph To Open window will appear. Left click on the /world/Omnigraph/particleSystem button to open the particle system.
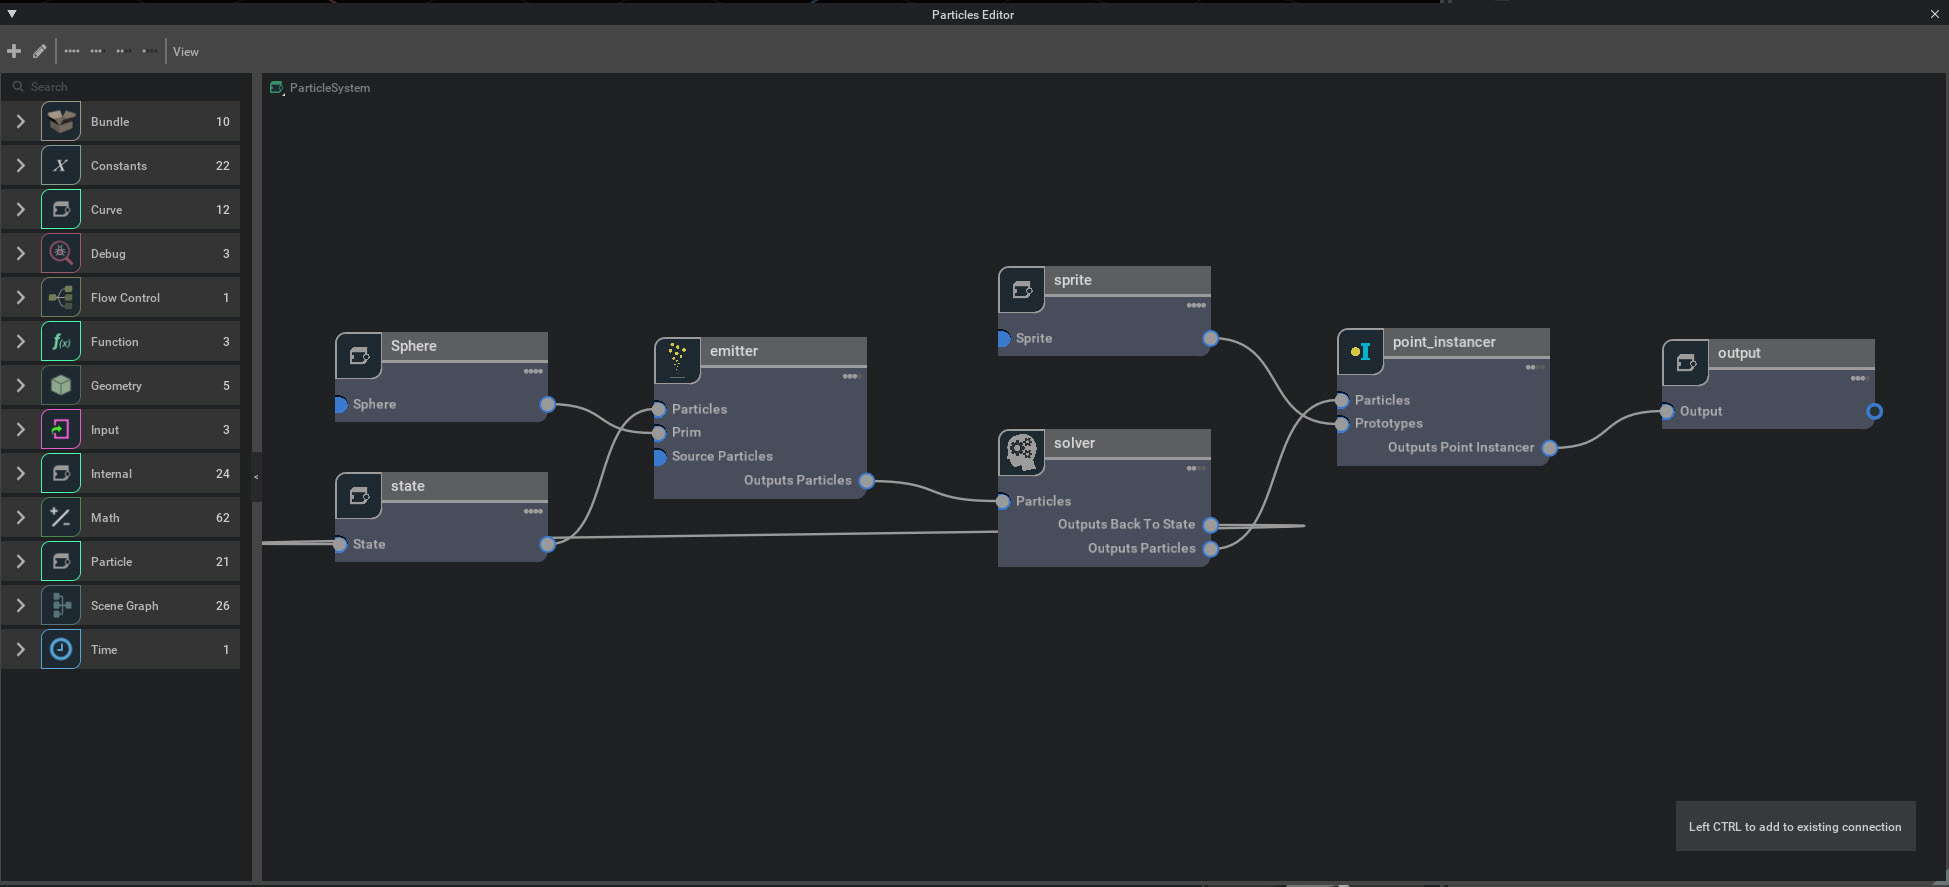
The setup for the particle system is streamlined in the Particle Graph Editor for ease of use. Here you’ll see all of point instancer particle system nodes.
You can create and connect nodes to make more complex particle systems.
Add the meshes to the Particles Editor
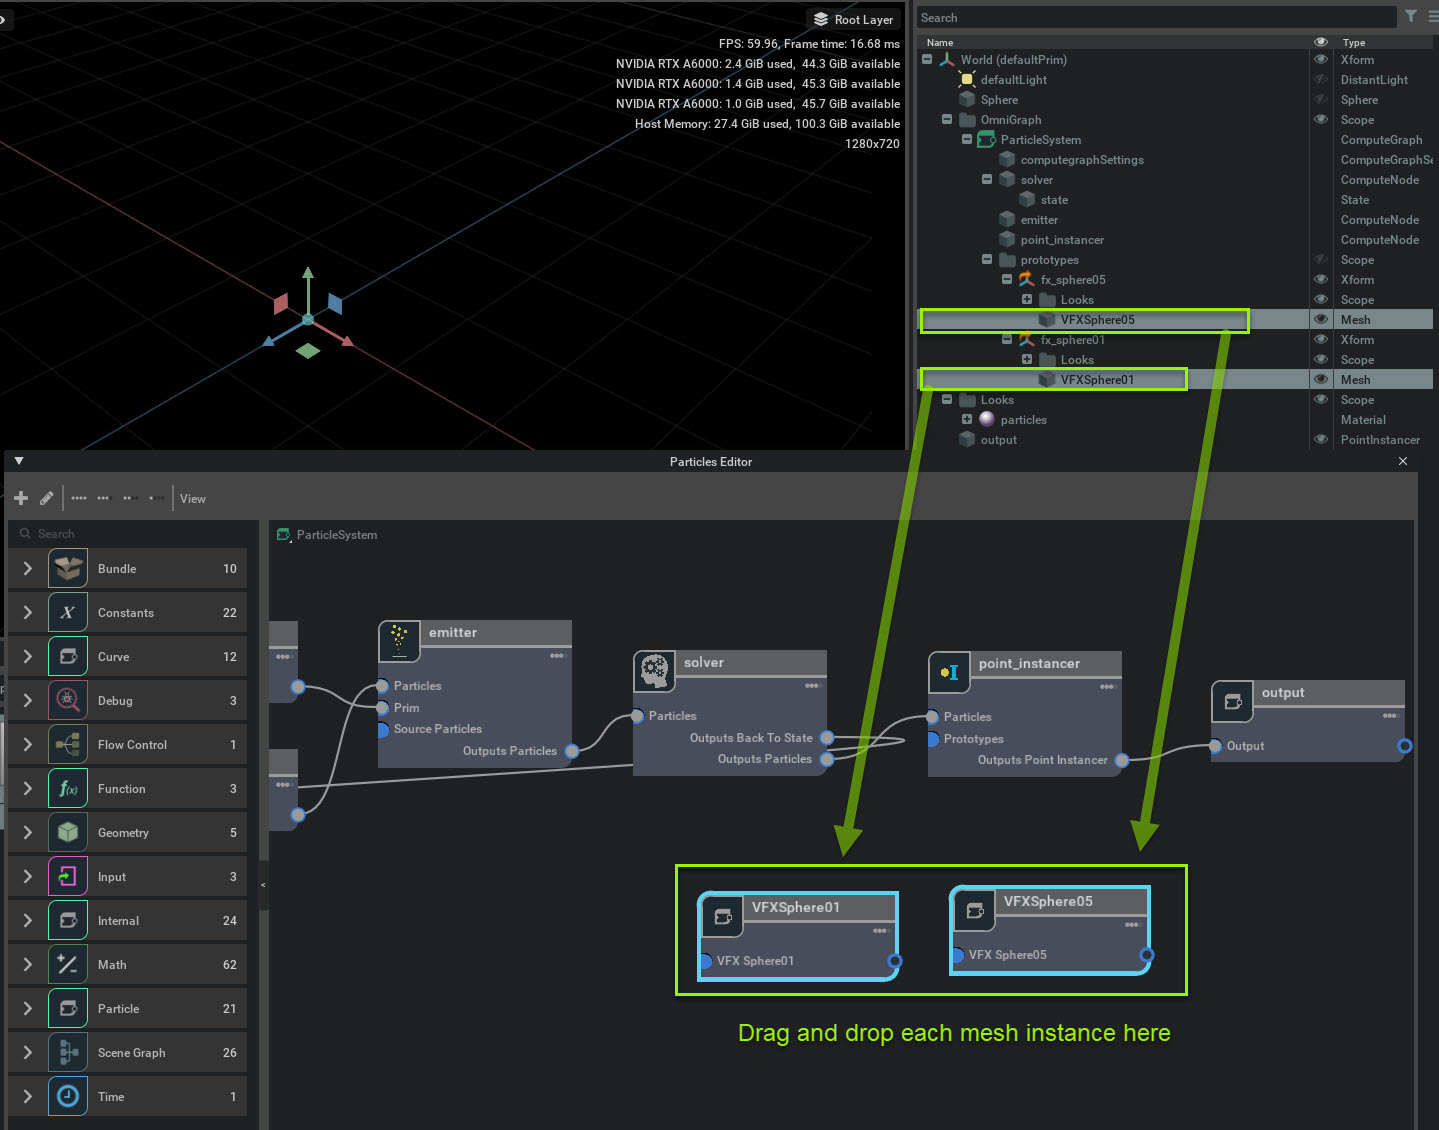
1. Go to Stage-> World-> prototype-> fx_sphere01 and open the directory.
2. Left Click Drag and Drop VFXSphere01 into the Particle Graph Editor.
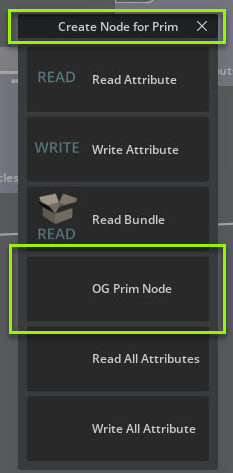
3. A Create Node for Prim window will appear. Left Click on the OG prim Node button. A fxSphere01 prim node will appear in the Particle Editor.
We can use this node to connect the mesh to the prototype in the point instancer.
4. Do the same for VFXSphere05.
Connect the meshes in the Particle Editor
1. Select the exit pin on the VFXSphere01 node and drag it to output -> prototypes input pin as shown.
After you connect your first mesh in the Particle Editor, the points that were spawning sprites are now spawning fx_sphere01. We need to connect the second mesh to the particle system.
2. Control select the exit pin on the VFXSphere05 node and drag it to output -> prototypes input pin as shown.
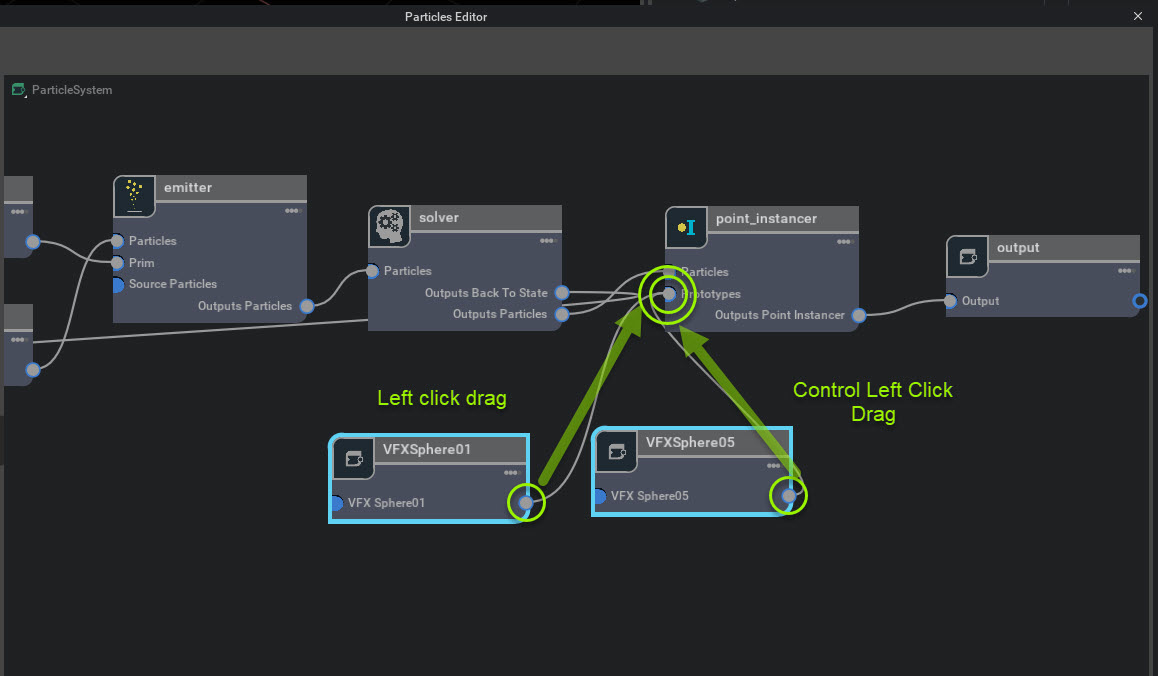
The two meshes are now connected to the point instancer points but we can only see one of them. I want to have the meshes spawn randomly. We do that by changing the random indexed object setting.
Using Indexed Object
The meshes are now connected to the particles. Now we need to tell the particle system to use the meshes we’ve added. We do that with indexed object.
Emitter Tweaks
Now that we can see the simulation again lets make a couple changes in the emitter to view both of the referenced meshes and change the behavior.
Go to Stage-> World-> particle_system-> emitter and change the following settings in Property.
Direction, Speed and Mass-> Emit Along Axis 1
Direction, Speed and Mass-> Emit Away From Center 0.7
Direction, Speed and Mass-> Speed 200
Direction, Speed and Mass-> Speed Random 150
Lifespan-> Lifespan 3
Display-> Random Indexed Object 2
The indexed object number represents each mesh that we connected.
The indexed object number for the fxspheres are 0 for fxsphere01 and 1 fxsphere05.
By setting Random index object to 2 a random mesh will display per spawn.
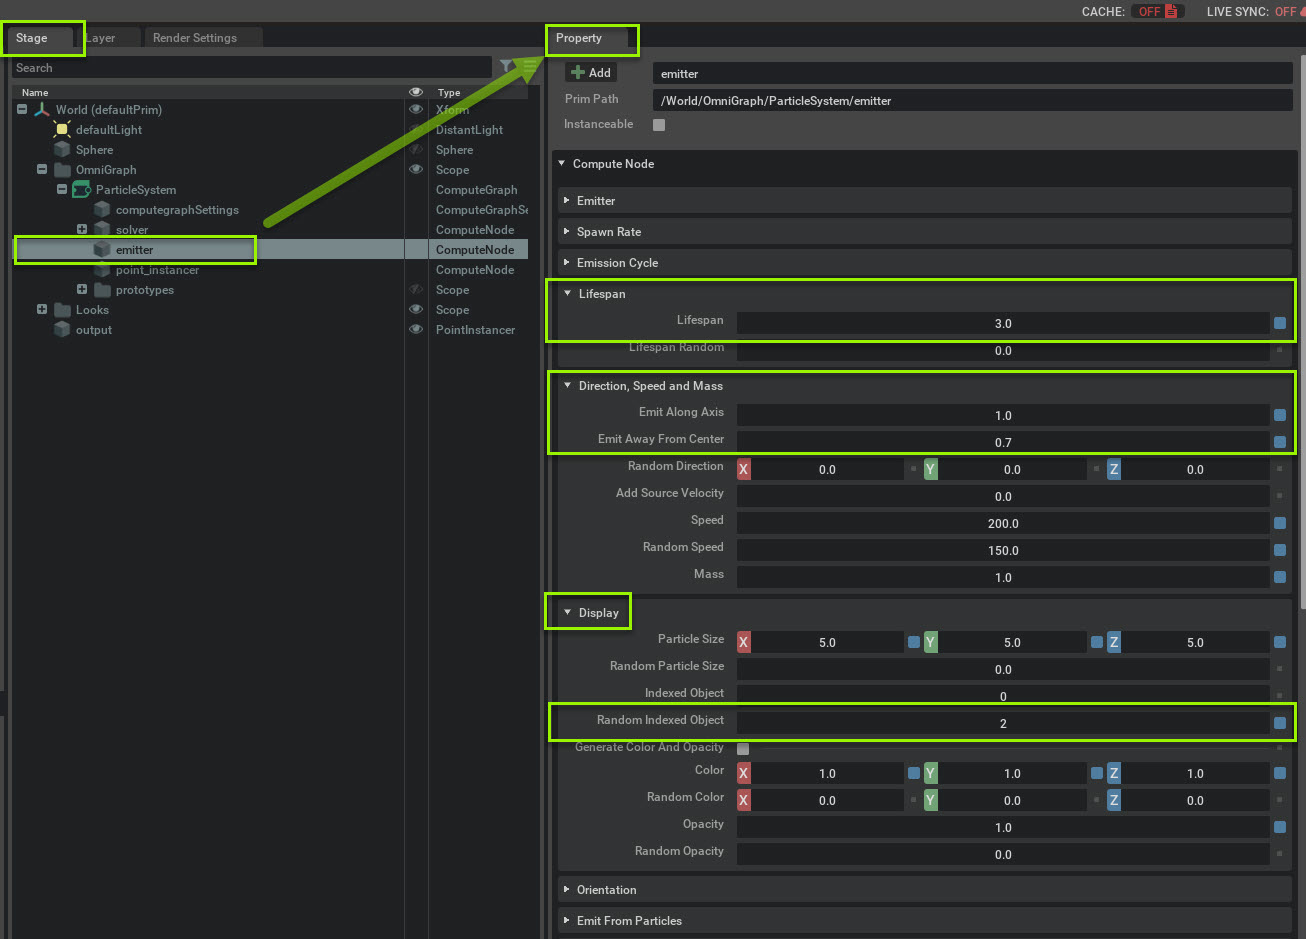
I’ve changed all the settings in the emitter that I want.
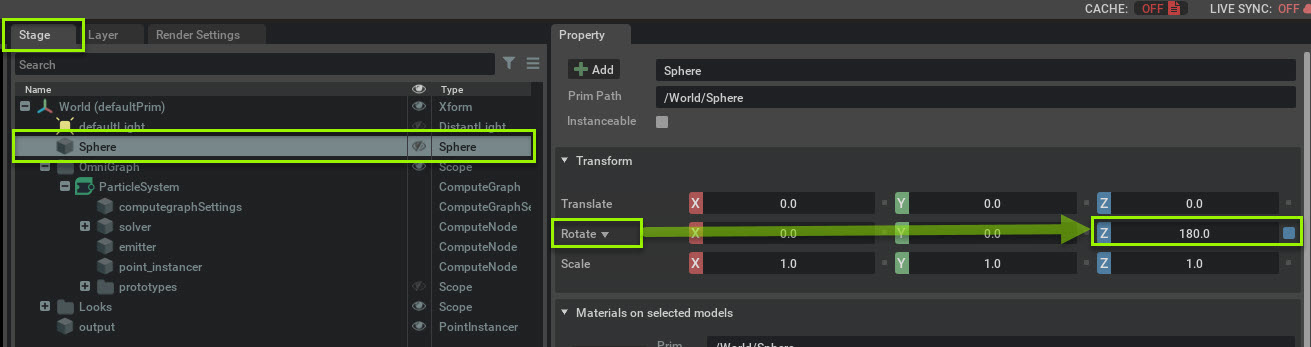
Next I want to do is rotate the emitter to point the spheres in the opposite direction.
Go to Stage-> World-> Sphere and change the rotate in Z to 180.
Now we have the emitter set up.
For the next step I want to have the particle system collide with meshes in the scene.
To do that, we need to import a mesh and add a collider node. First lets add the geometry
2c) Using Colliers
The particle system allows the user to collide any particle against a referenced collision mesh.
Add collision geometry
1. in the Content Browser navigate to where your particle_system_tutorial_files folder is located.
2. Select stage.usda
3. Drag and drop the mesh onto the Stage window.
The stage is clipping into our emitter so move it down by -50 in the Y axis with the transform gizmo.

Create a Collider in the Particles Editor
Go to the Particles Editor.
1. In the Particle Editor, go to the search bar and search for collider.
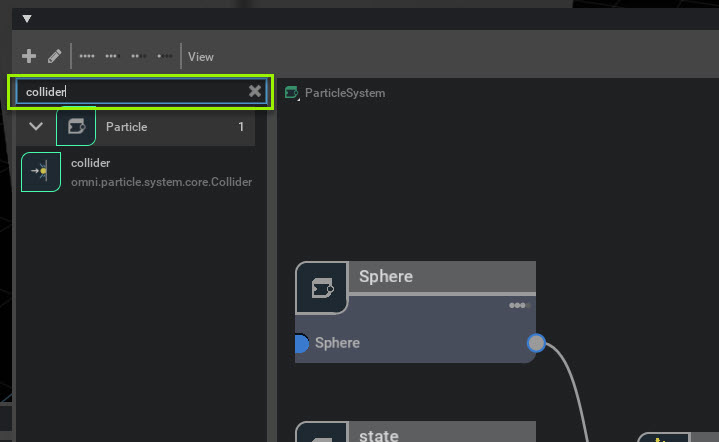
2. Left click drag and drop the Collider from the Node menu into the graph window.

3. Connect the Collider node before the solver as shown.
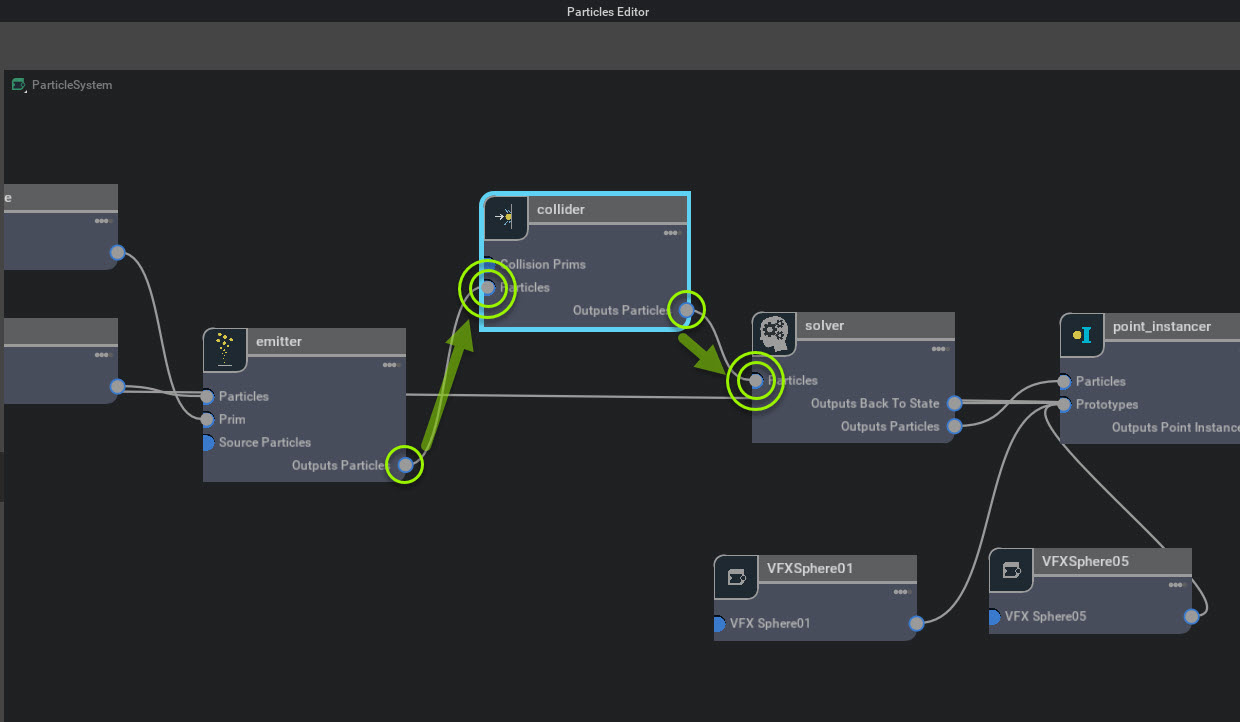
Now that we have the node we need to connect the stage geometry. We could connect it here, but I want to show you an alternative method of connecting the meshes.
Connect the Stage geometry to the Collider node
Here we’ll connect the stage meshes inside the collider node. Instead of connecting in the Particles Editor, I want to show another way to connect multiple meshes to the particle system.
1. Go to Stage-> World-> Omnigraph -> particle system and select collider.
2. In Property go to Collision Primitive -> Primitive and click Add Target
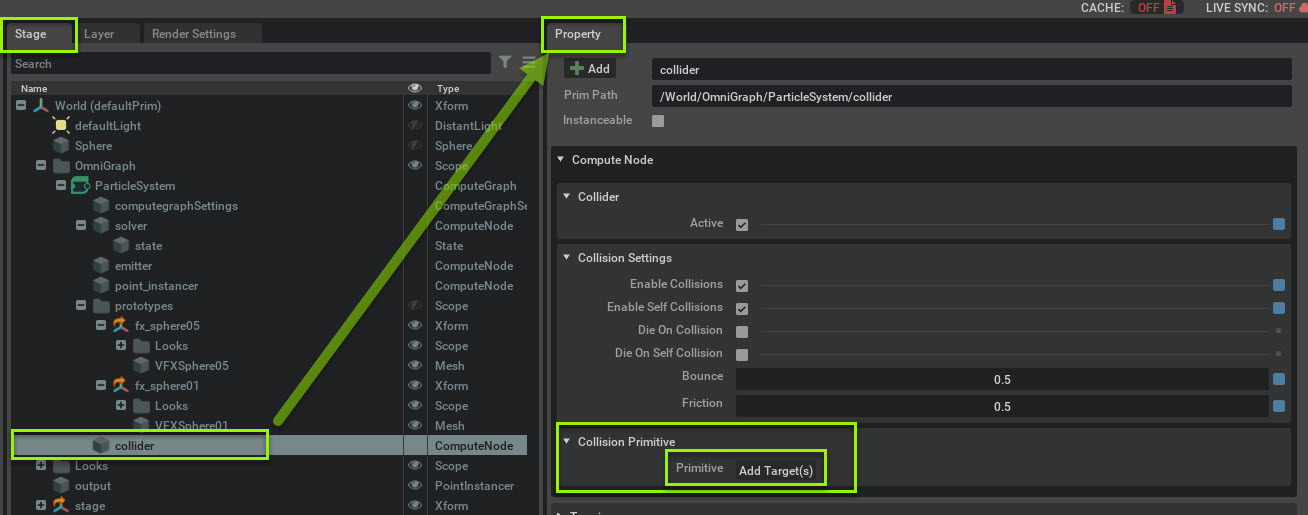
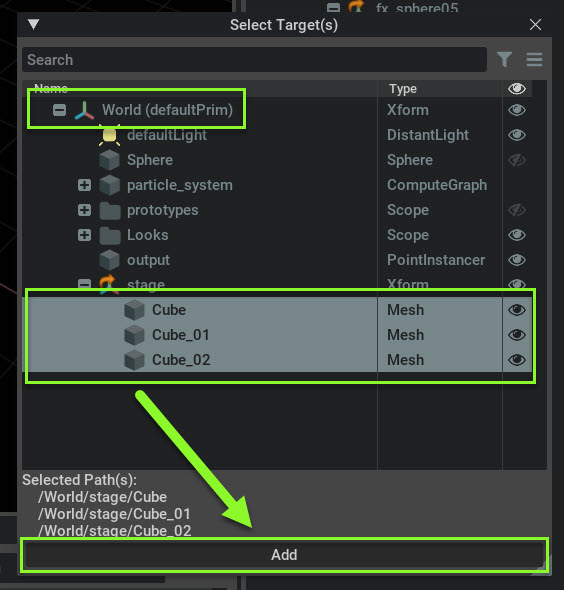
A Select Targets window will appear.
1. Navigate to World stage and Control Left Click Cube, Cube_01 and Cube 02.
2. Left Click Add.
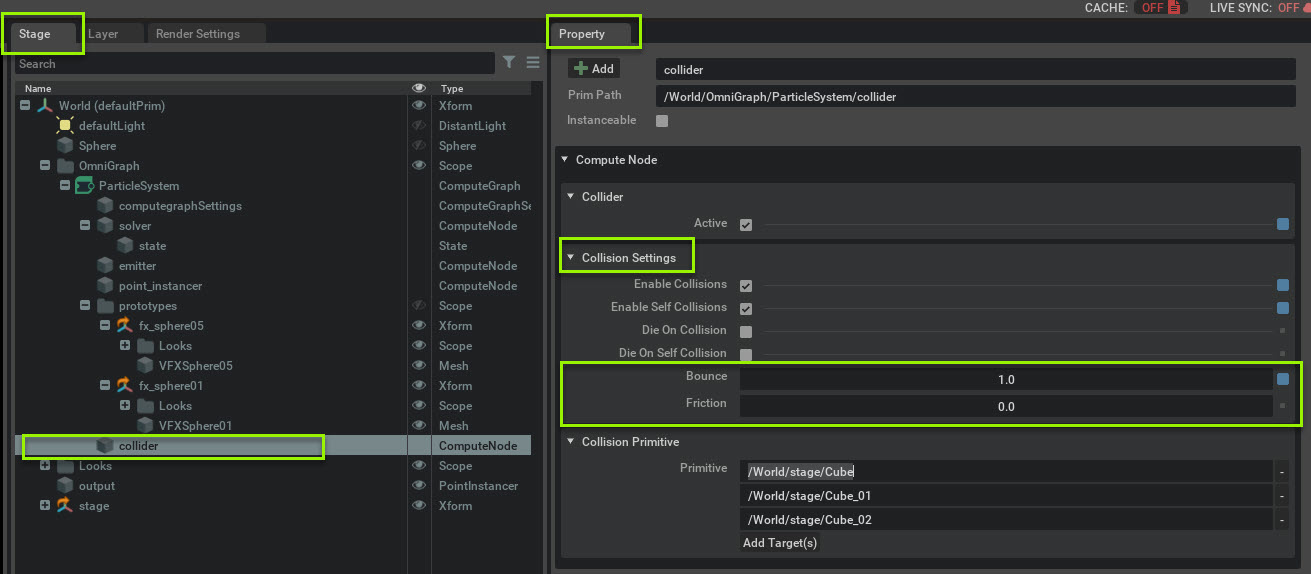
Now the spheres will be colliding with the stage geometry.
Collider node tweaks
Now that the stage and the particles are colliding lets change a couple settings in the collider node.
With the particle_system_collider node selected change the following setting in Property:
Collision Settings-> Bounce 1
Collision Settings-> Friction 0
In this tutorial you created a point instancer, added instanced meshes, randomized them and had them collide against imported meshes. This concludes this tutorial.
