Tutorial 1: Create a Geometry Replicator Particle System
in this tutorial we will be making a basic smoke column using sprites with the particle system tool in Create. We’ll be taking a look at all of the core nodes as well as looking at the material, st panner, fields, ramp modulators.
If you want to follow along with the video or the documentation, you’ll need a texture file. Download and unzip the files for the tutorial in the link below.
Particle System Tutorial Files
1a) Create a basic particle system
In this section we’ll be creating a basic particle system using a geometry replicator.
Video 1: Create a Geometry Replicator Emitter
Video Authored in Create 103
Create a Source and choose an emission type
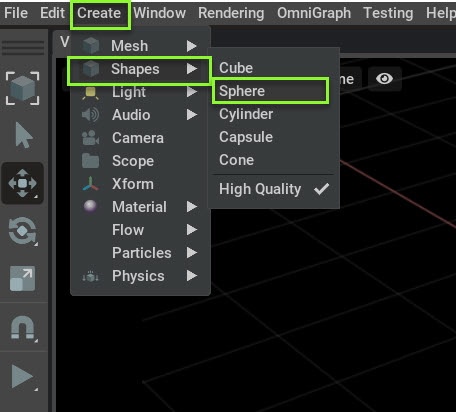
First, create a source for the particle system emitter.
1. Go to Create->Shapes-> and select Sphere
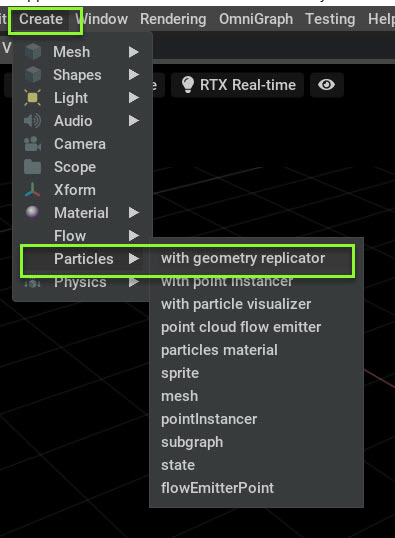
Next we need to select an emission type. For this example, we’ll be using a geometry replicator emission type. This type allows us to use the ST panner node in a later step.
2. With the sphere selected, go to Create->Particles-> and select with Geometry Replicator.
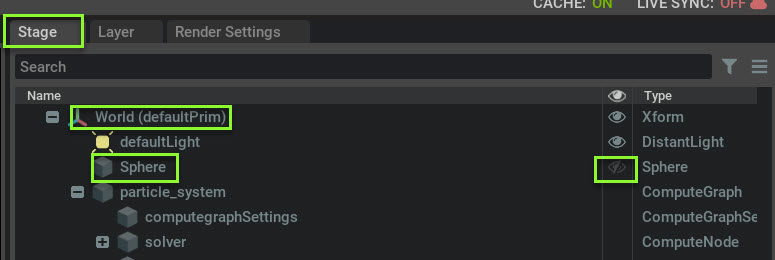
Now you have a geometry replicator using the sphere as a source. We don’t need to see the source for this tutorial, so we’ll be turning off its visibility.
3. Turn off visualization of the sphere by clicking on the eye in Stage-> World -> Sphere.
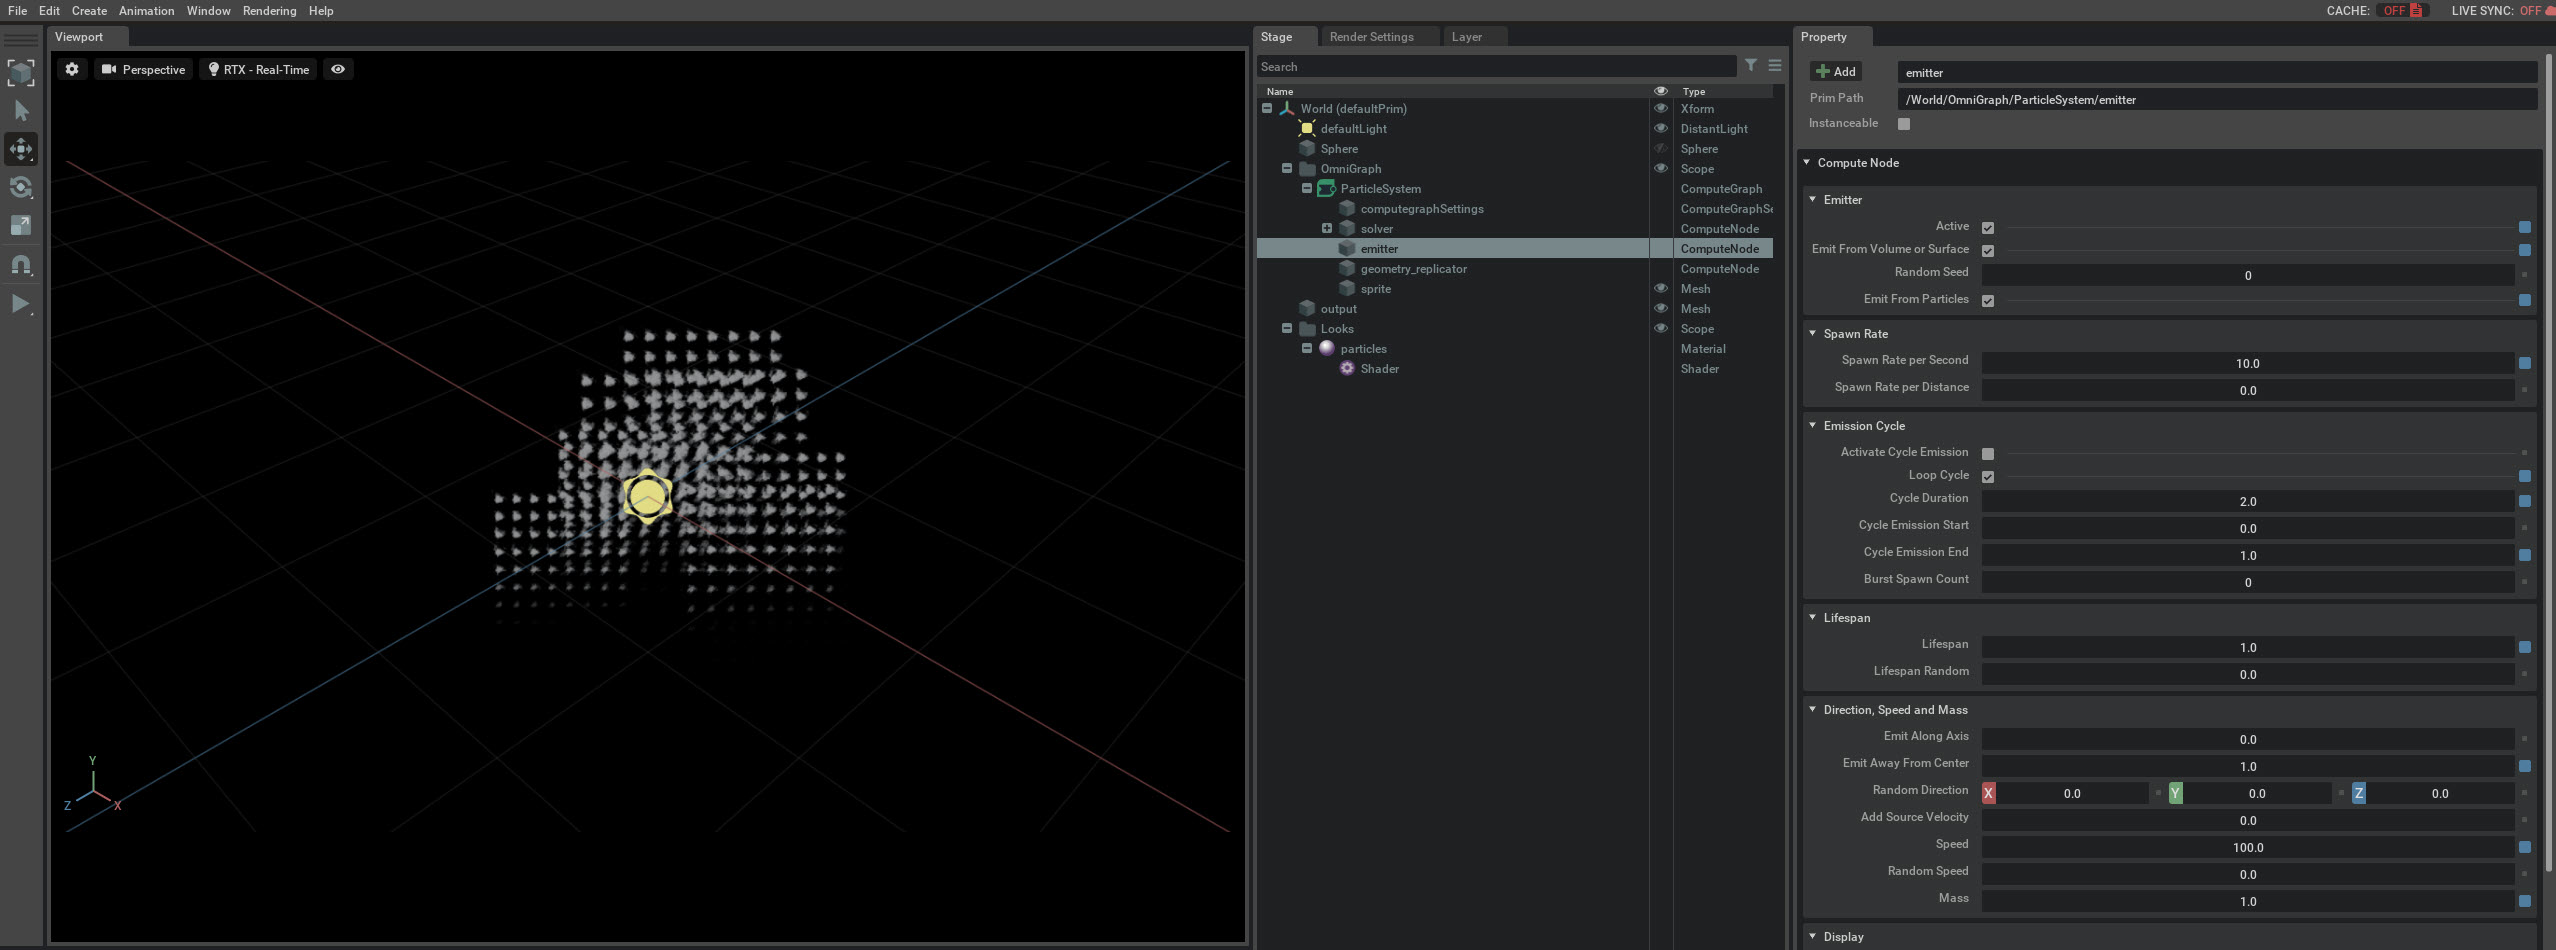
Your source is invisible and you’ll only see particles emitted in space. Your particle should look something like this:
Select a texture for your Material
Next we need to select a texture for the material we’ll be using with the st panner node in the next step. We’ll also be changing a setting in kit and the emitter to see the particle better.
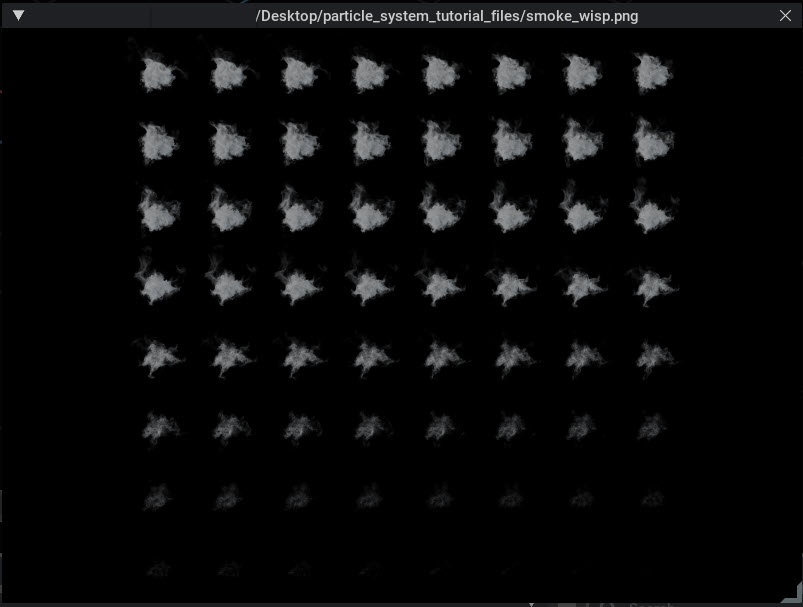
The file we’re loading is a texture rendered out in a third party program. Its set up to have 8 x 8 frames and looks like this:
1. Go to Stage -> World -> Looks and select the particles material that was created when you made the particle system.
2. Go to Property -> Texture and click the Browse… button
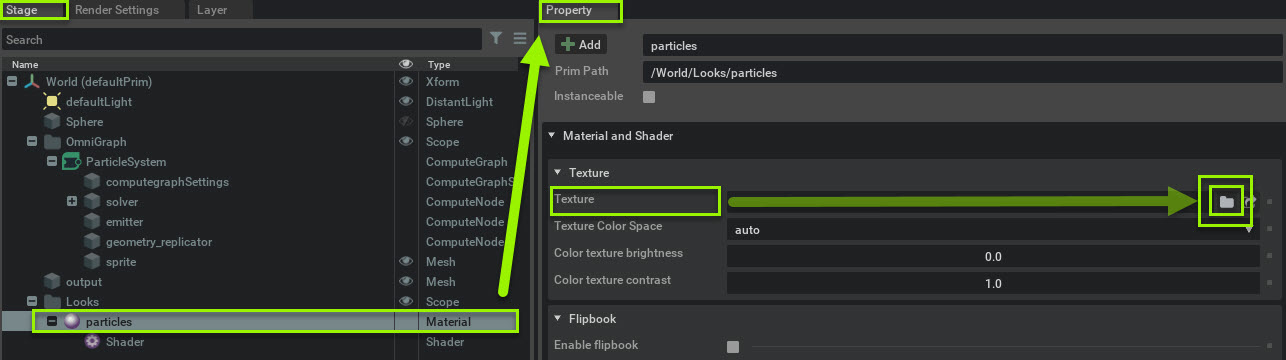
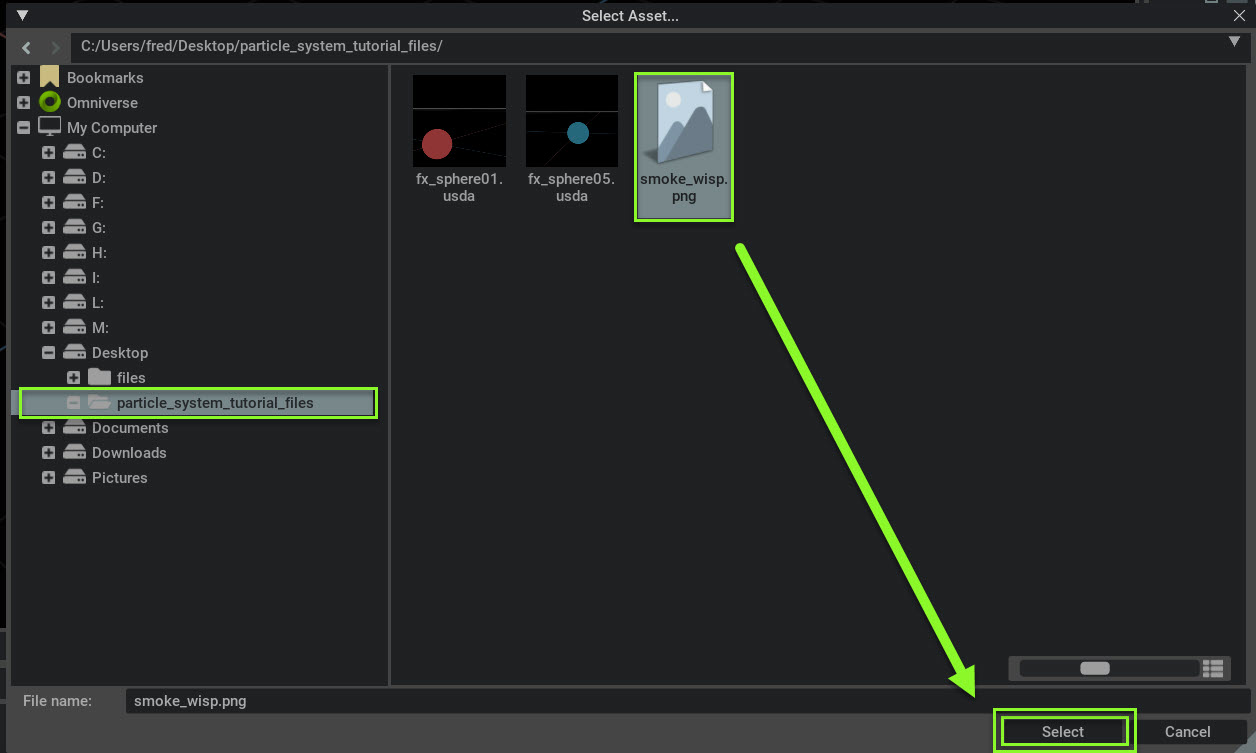
3. A Select Asset window will open. Go to where your particle_system_tutorial_files folder is located, and select the smoke_wisp.png and click the Select Button.
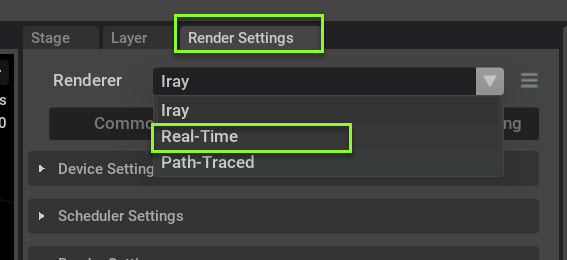
Kit Render Settings
Now that the texture is loaded you’ll notice we can’t see the sprites. This is expected. We need to change a couple settings in the Render Settings and the Emitter to better view it.
1. Go to the Render settings tab and select Real Time in the renderer dropdown.
Open the Translucency dropdown and toggle the Enable Fractional Cutout Opacity to on.
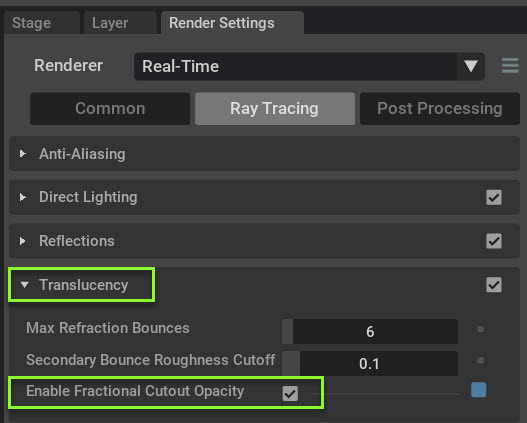
The particle is visible but still very hard to see so next we’ll change the size of the particle
Emitter Tweaks
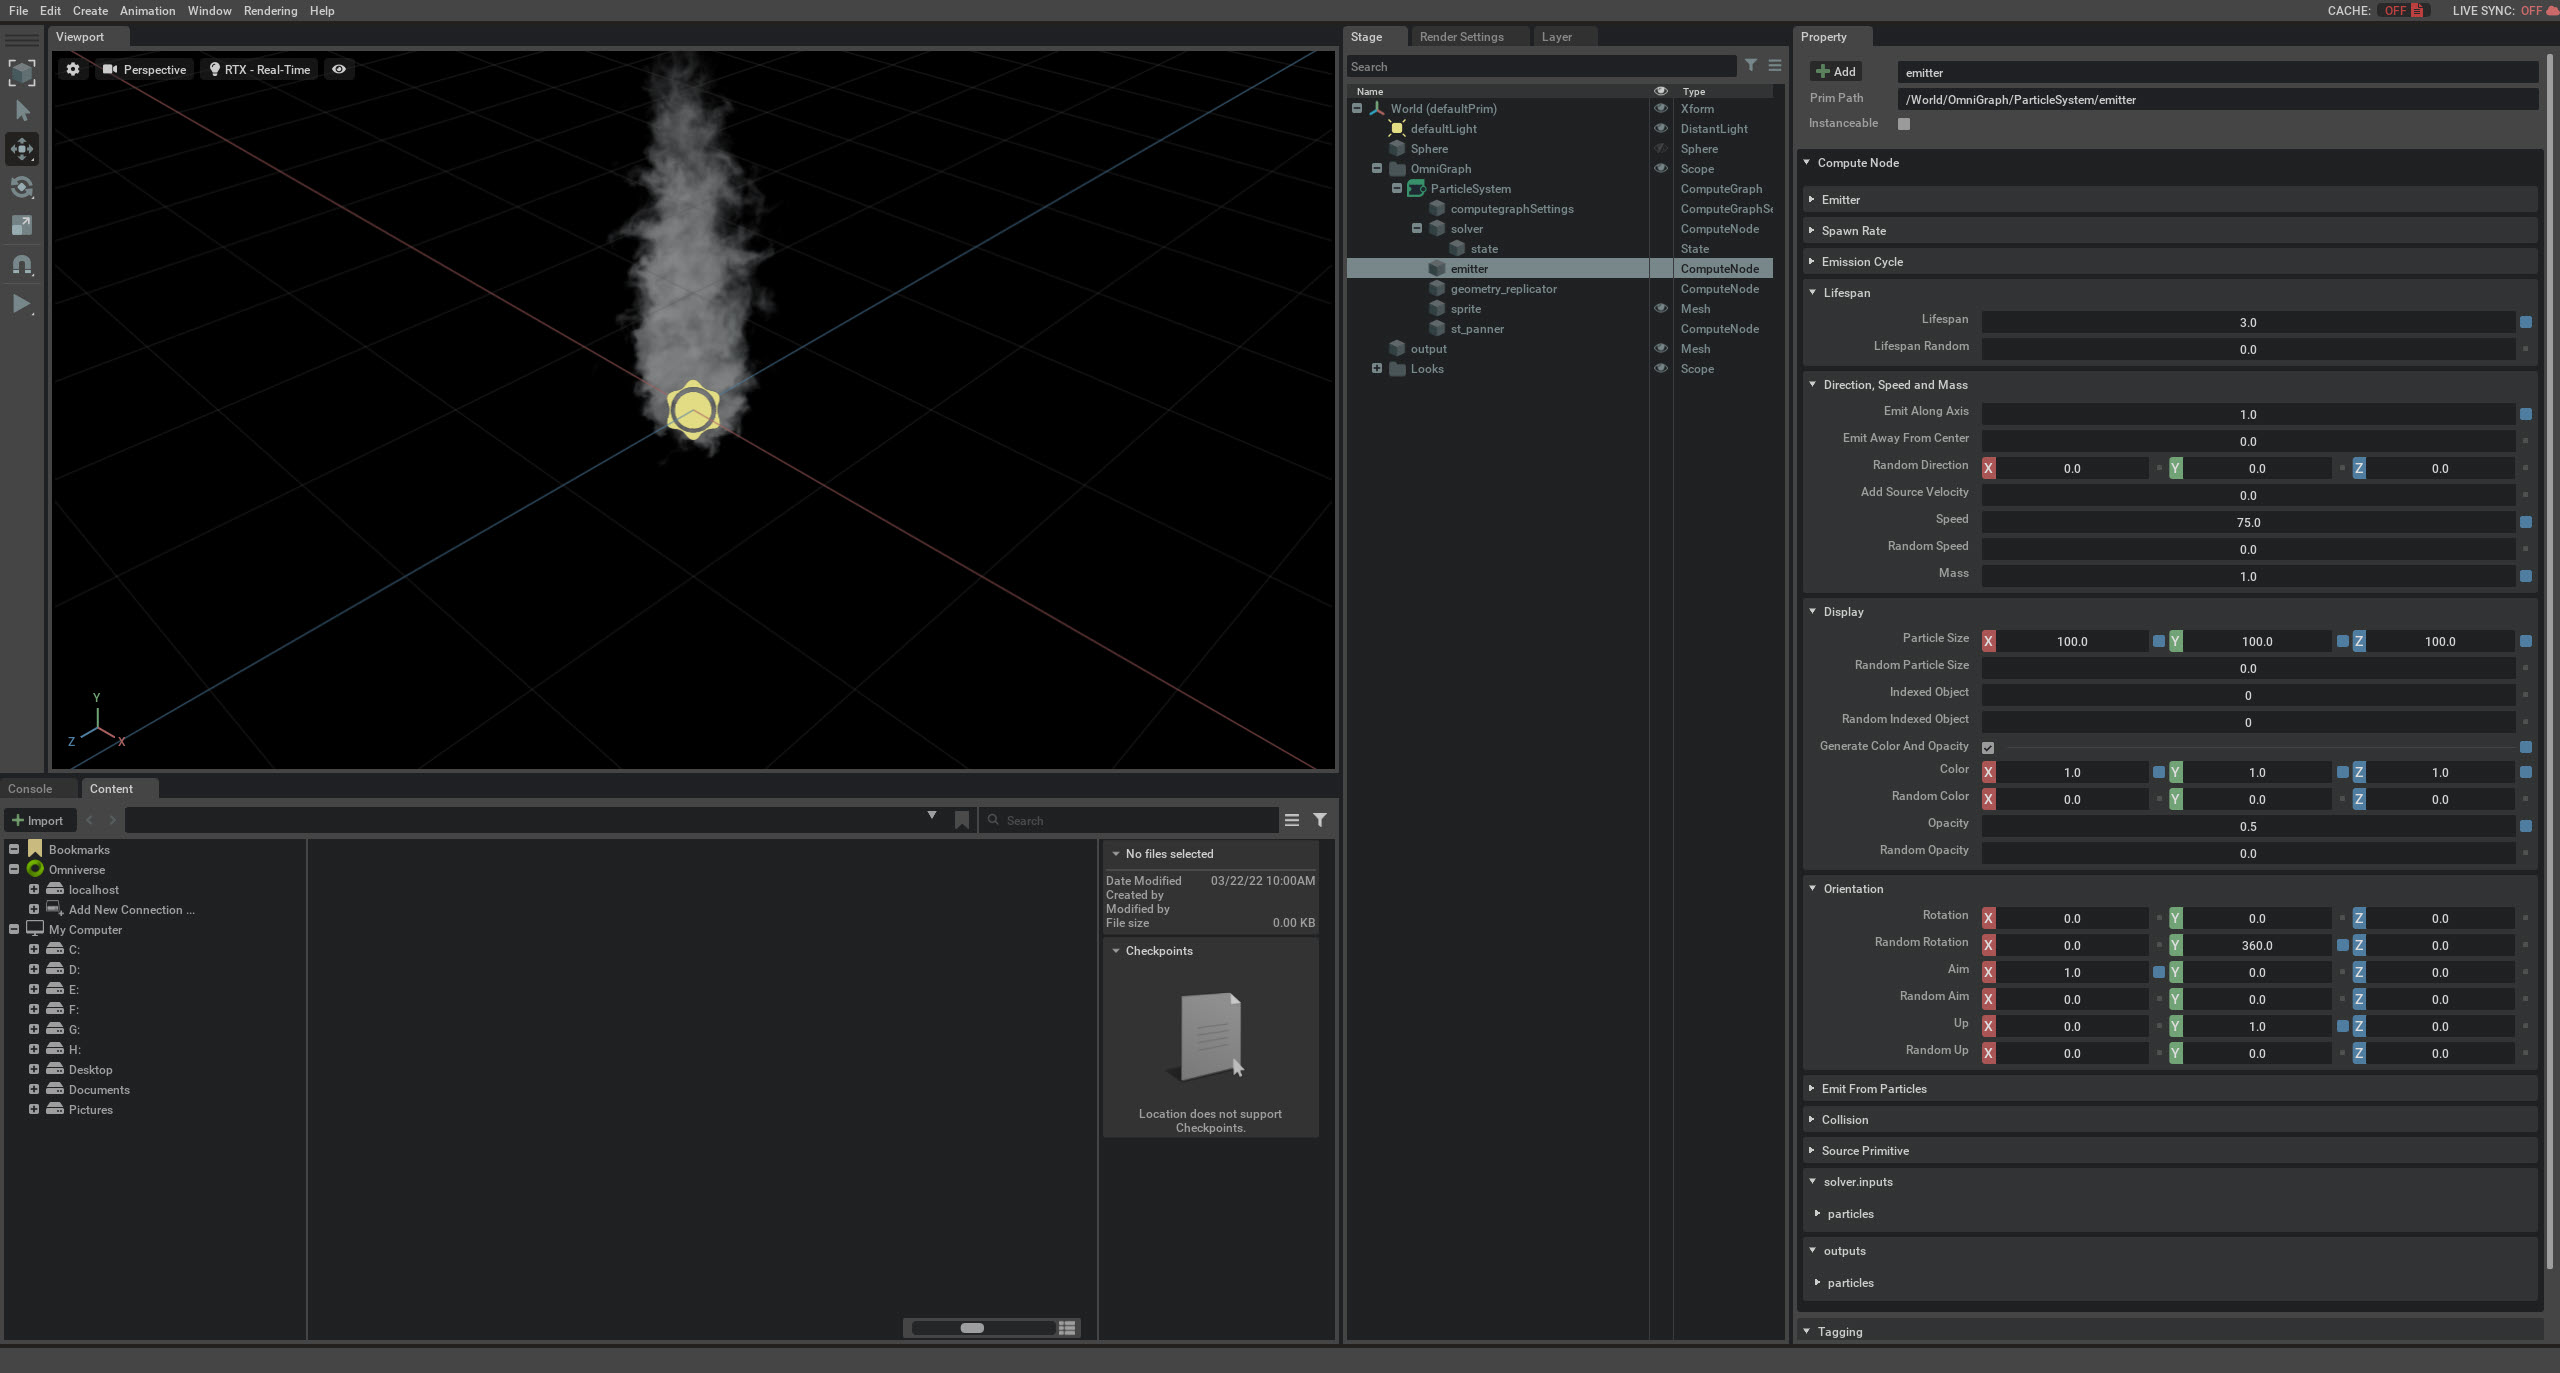
1. Go to Stage -> World -> particle system and select emitter.
2. In Property, go to Display and change the Particle size to 100 in X, Y, and Z.
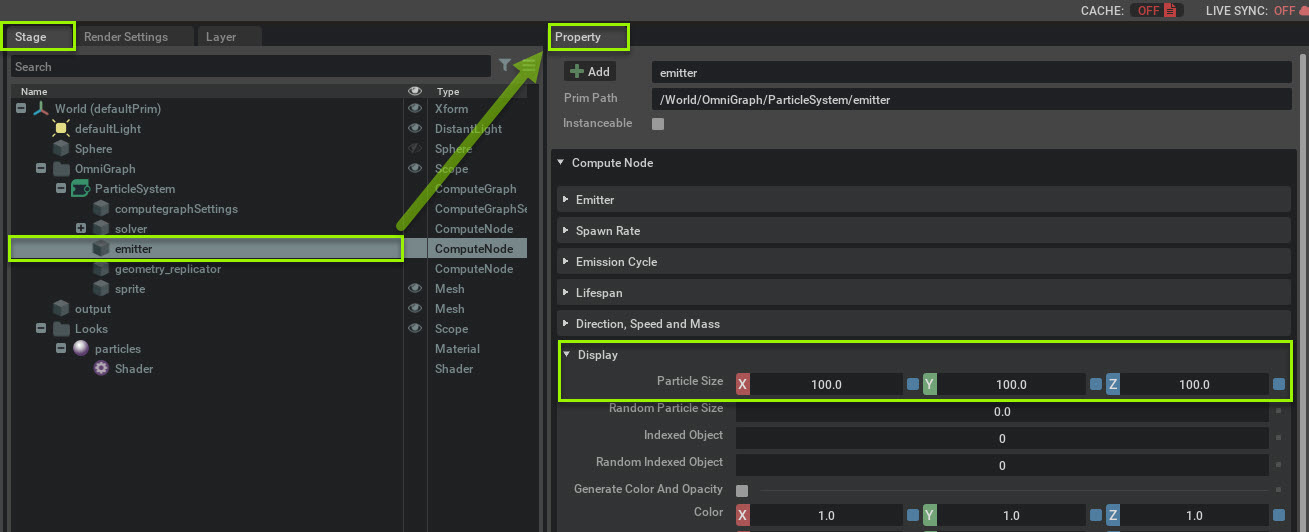
Now the particle is large enough to see. We’ll be making tweaks as we go through the tutorial. Next ST Panners.
Save your file.
1b) Adding St Panners
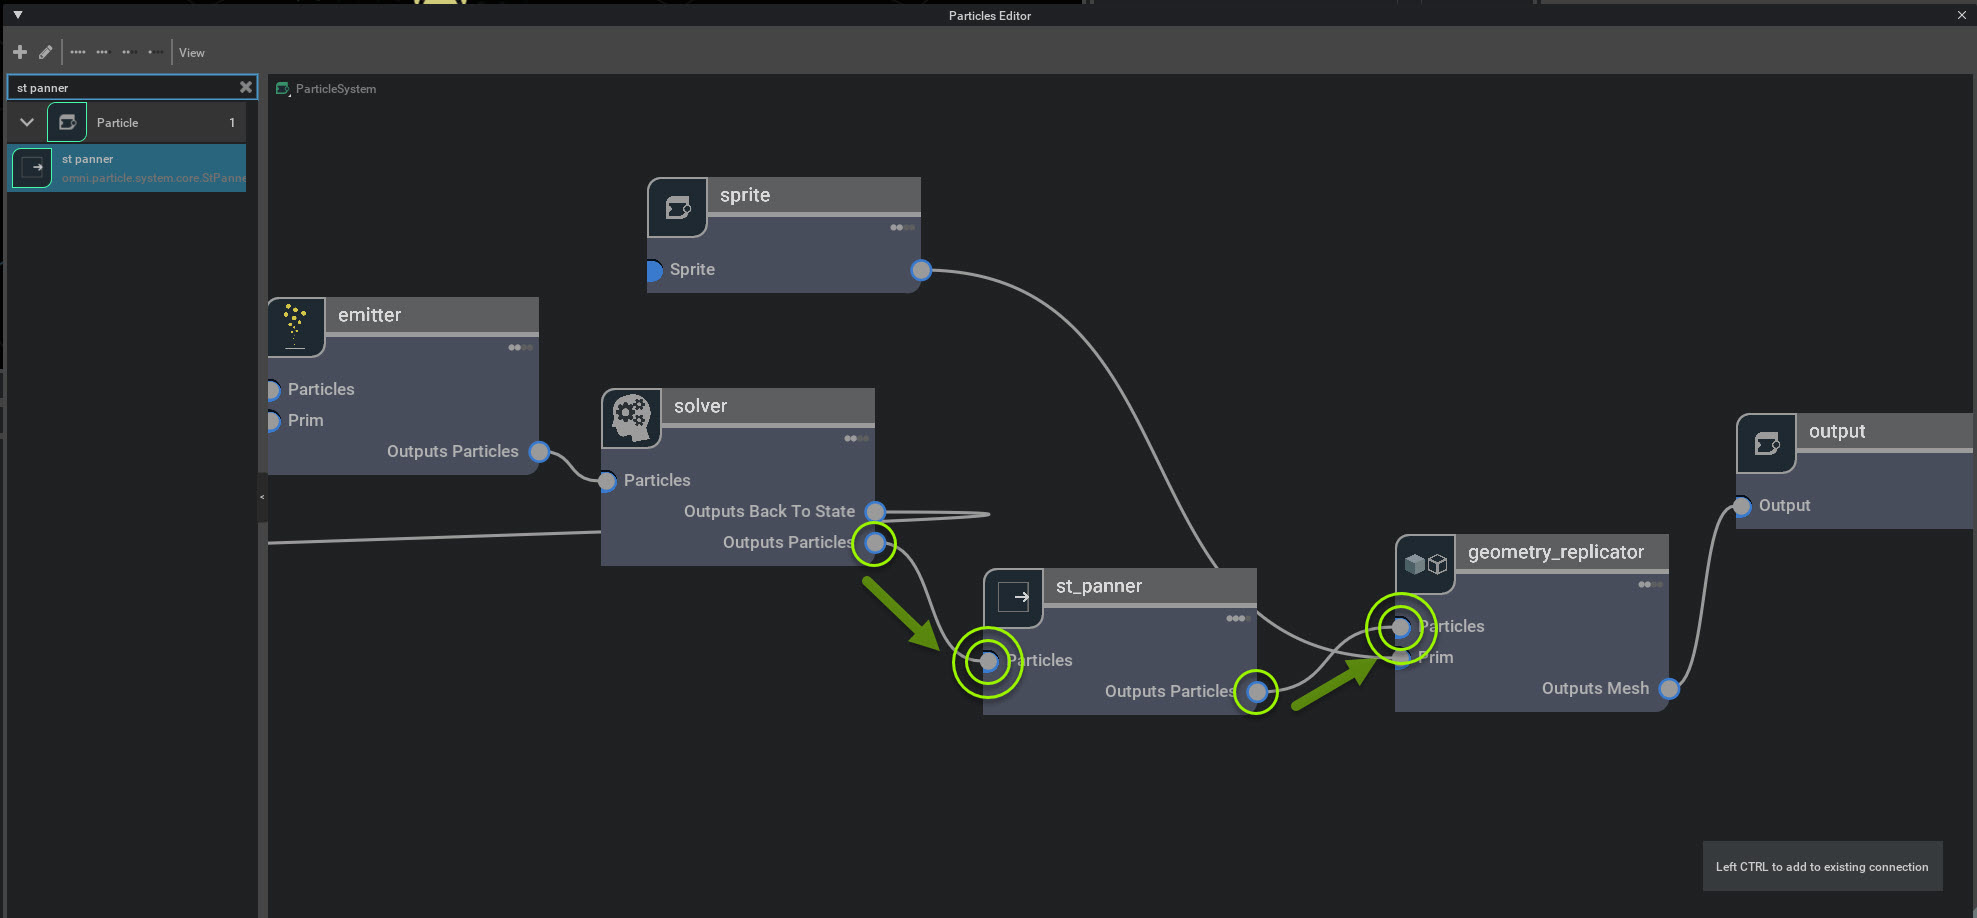
In this section we’re going to use an st panner to create a flipbook. We’ll need to add the St Panner in Omnigraph. This is a tutorial is a continuation of the previous tutorial section.
Create the St Panner node in the Particle Editor
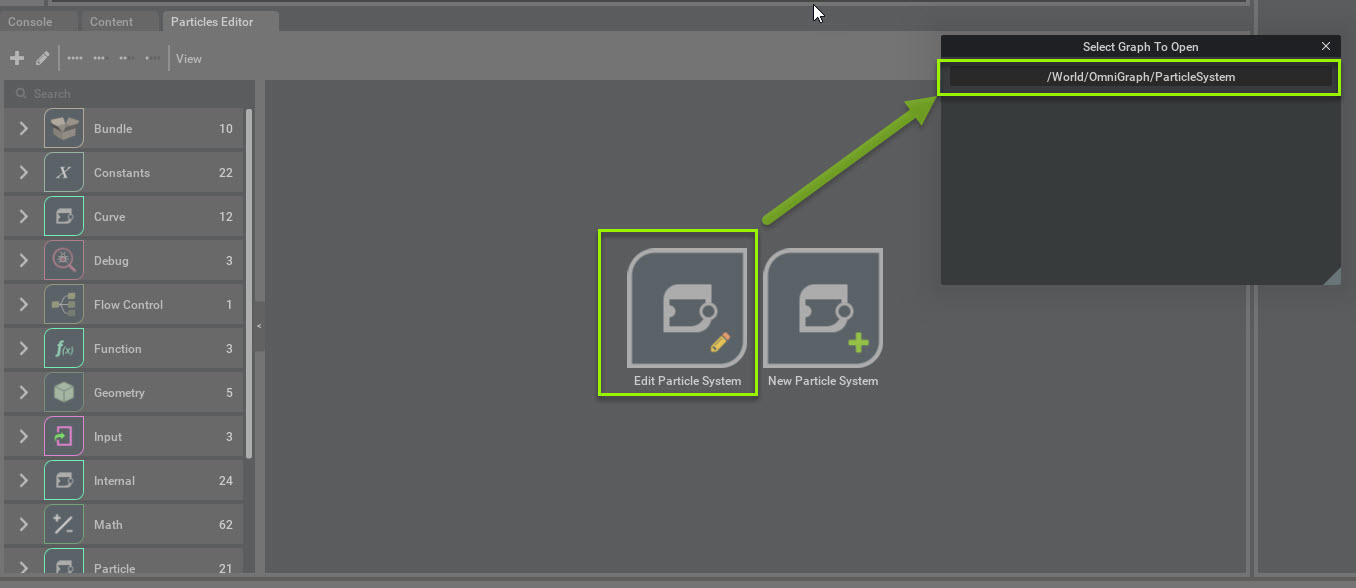
First we need to open the particle Graph Editor. Go to Window -> Particles and click Editor.

The Particles Editor will appear in the same frame as the Content window in a Tab.
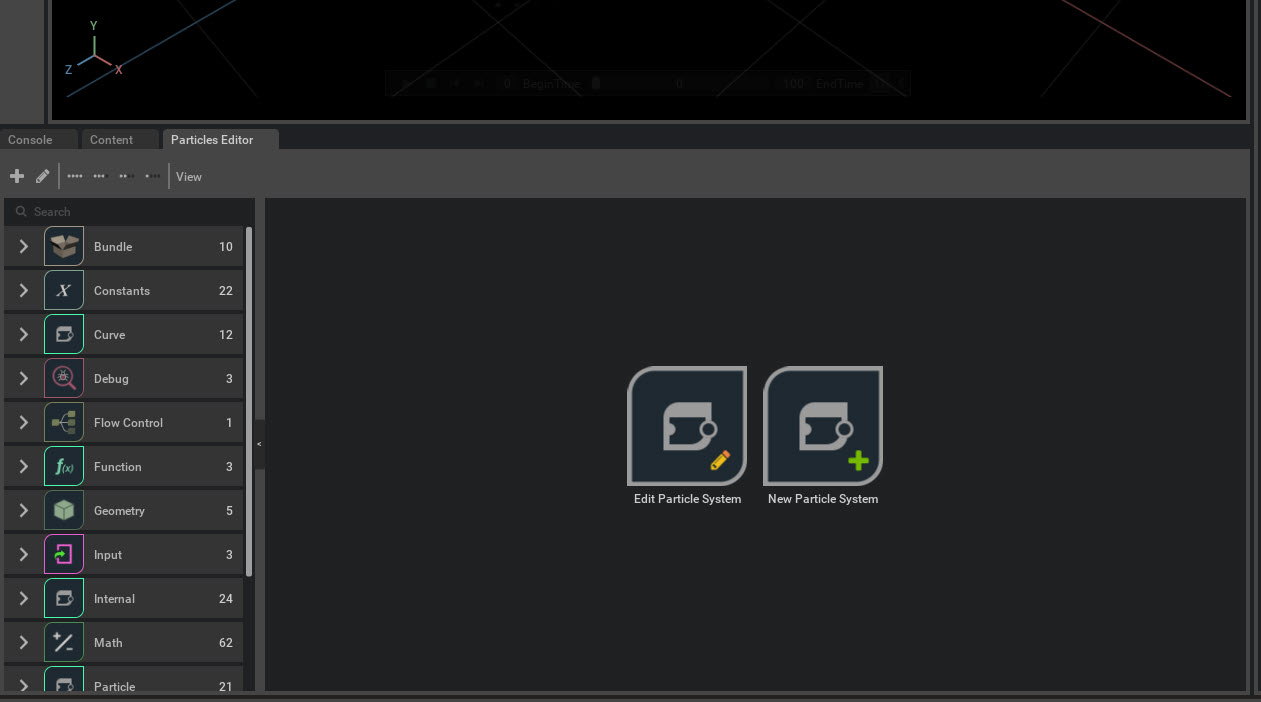
To edit the particle system, left click on the Edit Particle System button. A Select Graph To Open window will appear. Left click on the /world/Omnigraph/particleSystem button to open the particle system.
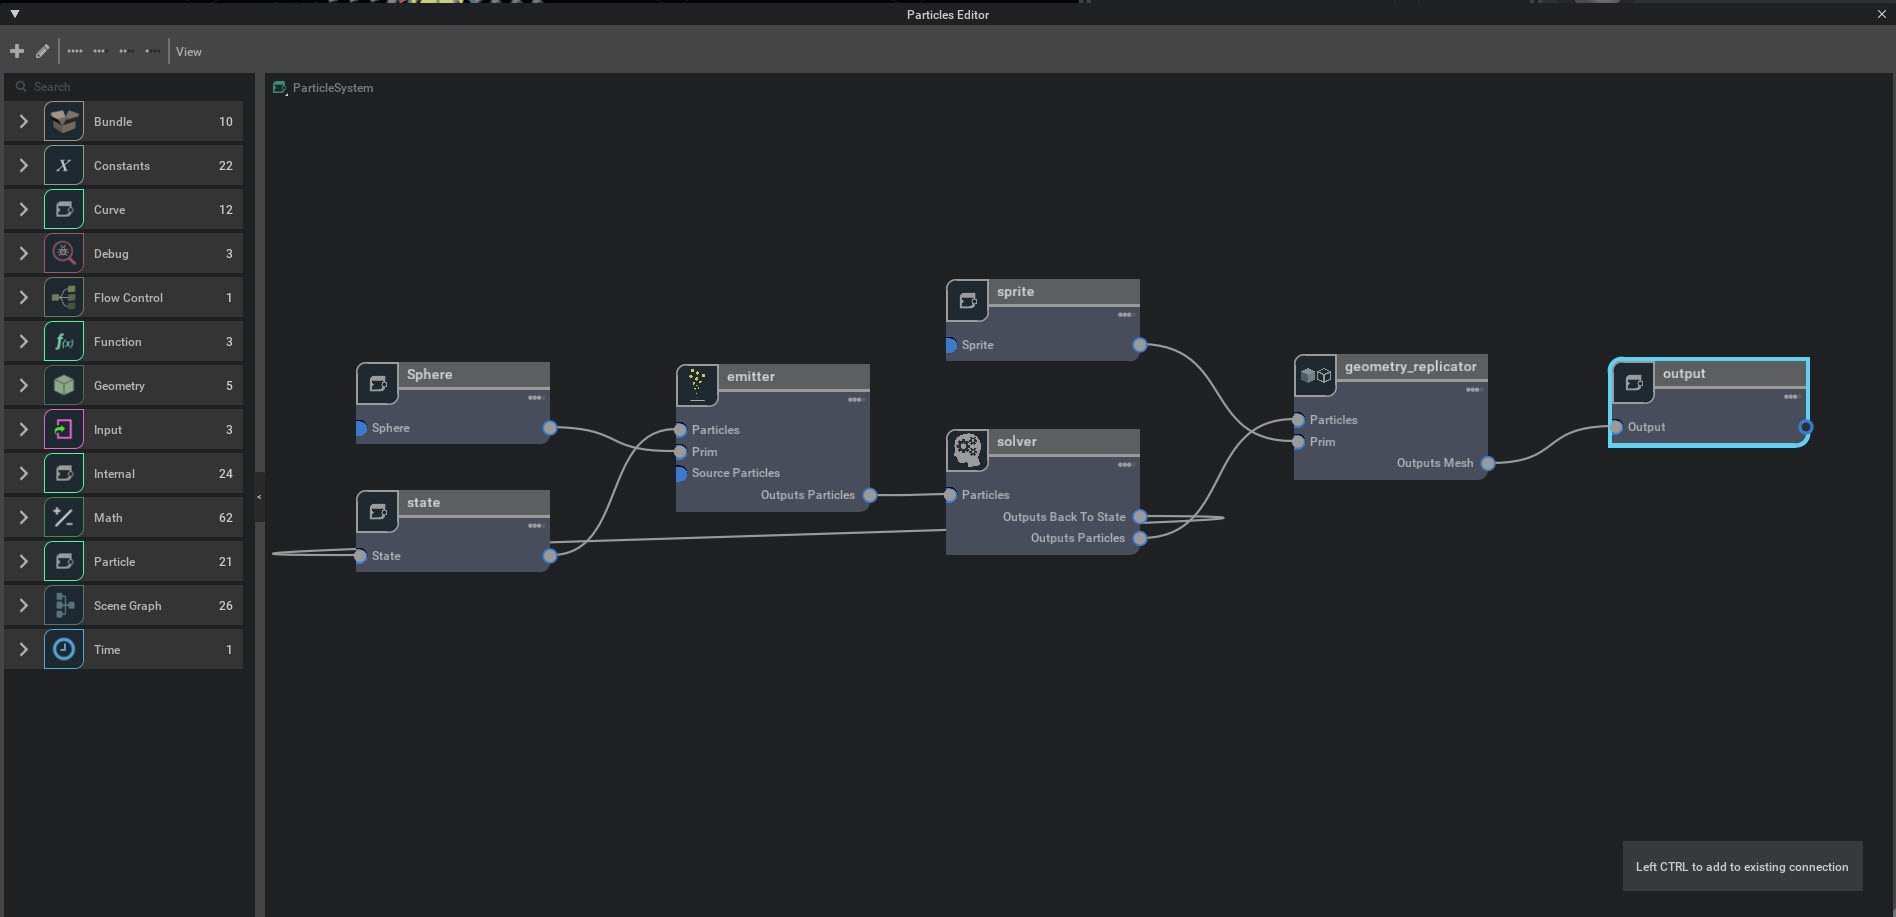
The setup for the particle system is streamlined in the Particle Graph Editor for ease of use. Here you’ll see all of the essential nodes for creating particle systems are displayed.
1. In the Particle Editor, go to the search bar and search for ST Panner.
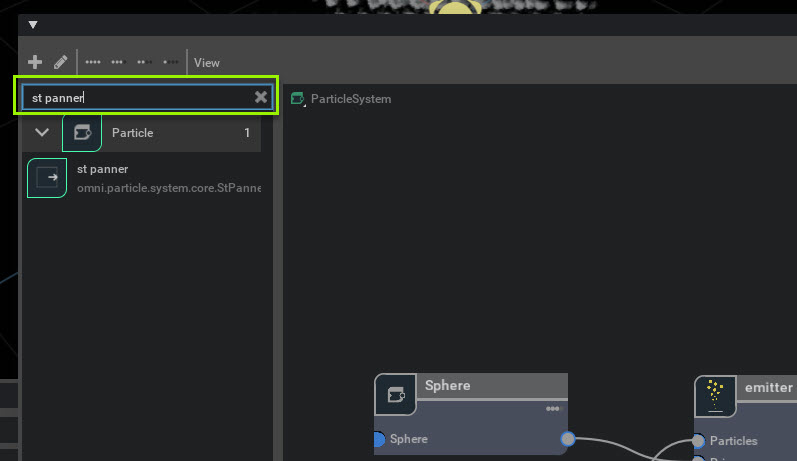
2. Left click drag and drop the ST panner from the Node menu into the graph window.
Connect the St Panner node
Note
St Panners must be connected after the solver.
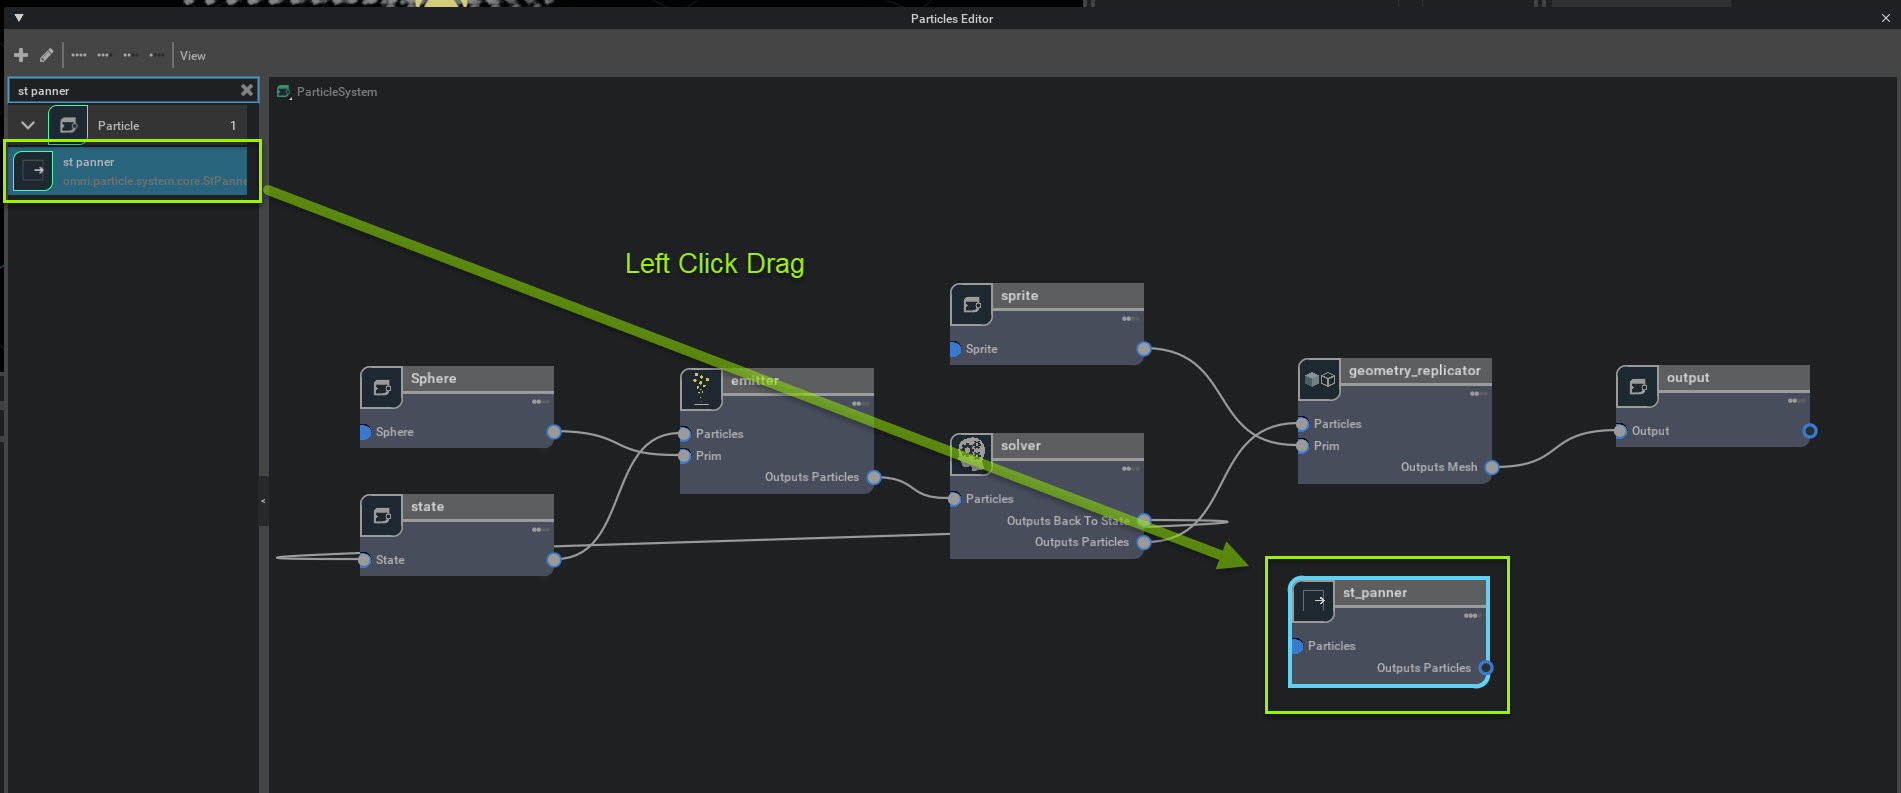
1. Position the ST Panner Node between the Solver and geometry replicator node.
2. Left click drag from point to point to connect. Right click on a point to disconnect if needed.
3. Connect the Solver Node to the ST Panner Node. Left click drag from the Solver node’s Outputs particles pin to the St Panner node’s particles pin.
4. Connect the ST Panner Node to the Geometry Reoplicator Node. Left click drag from the ST Panners Node’s output particles pin to the Geometry Replicator Node’s particles pin.
Now the st paneer node is connected to the particle system.
St Panner settings
Now that the st panner node is created we’ll divide up the texture to animate.
1. Go to Stage -> World -> particle system and select particle_system_st_panner
2. Go to Property -> Image Tiles and change the Image Tile Columns and Image Tile Rows to 8
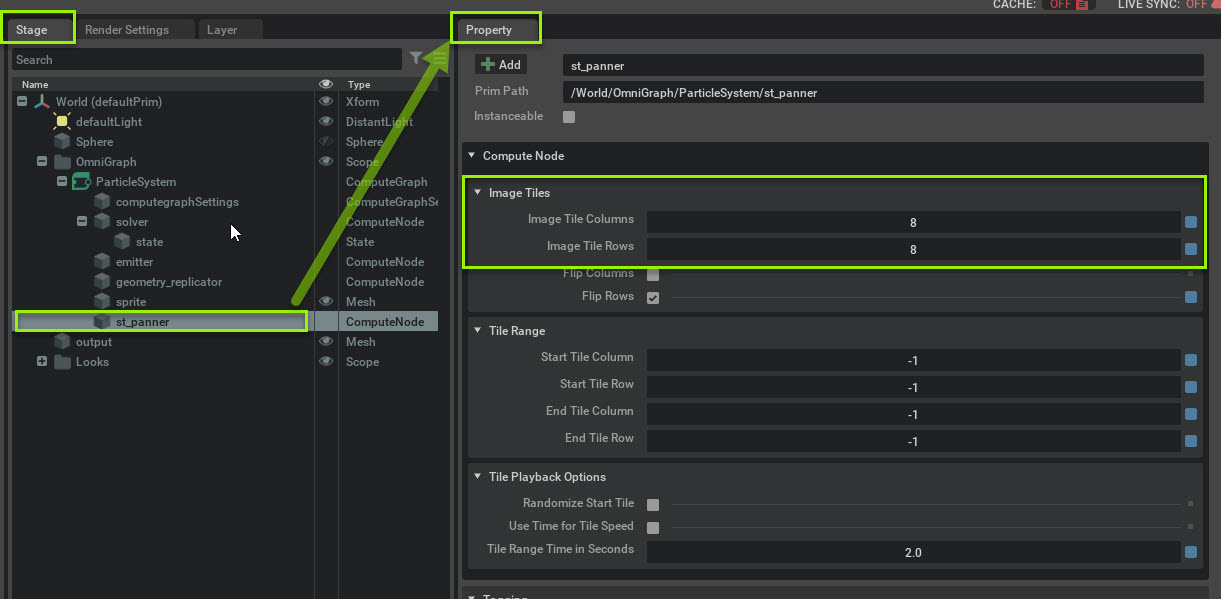
Now the texture is animating like a flipbook.
St Panner Emitter and Source Tweaks
Now the texture is animating, but the particles are all moving outward from the source. We need to make a couple of changes to the source and the emitter to have the particles move more like a smoke column. Let’s change the emitter first
Emitter Changes
1. Go to Stage -> World -> particle system and select emitter
2. In Property change the following parameters:
Direction, Speed and Mass -> Emit along Axis 1
Direction, Speed and Mass -> Emit Away From Center 0
Direction, speed and Mass -> Speed 75
Lifespan -> Lifespan 3
Display -> Generate Color and Opacity Toggle on
Display -> Opacity .5
Orientation -> Random Rotation Y axis 360.
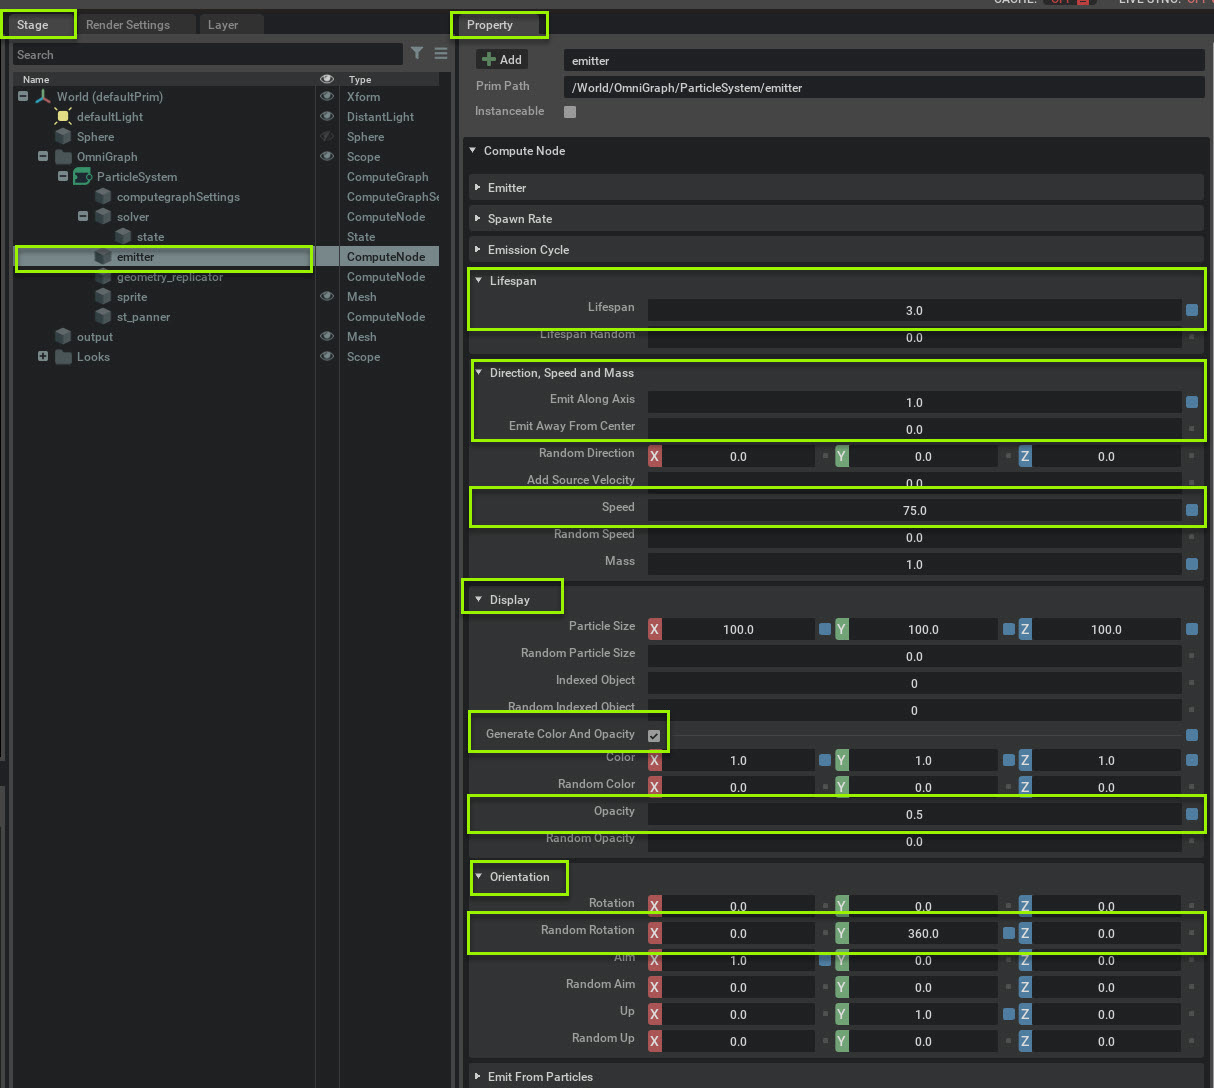
The particles are moving in a column, but in the wrong direction. We need to rotate the source so the particle are moving upward and scale the source down so the particles emit from a point.
Source Changes
Go to the sphere and rotate its axis.
1. Go to Stage-> World and select the sphere
2. In Property Change the following parameters.
Go to Rotate and rotate the z axis to 90.
Go to Scale and change the x, y, and z axis to .1.
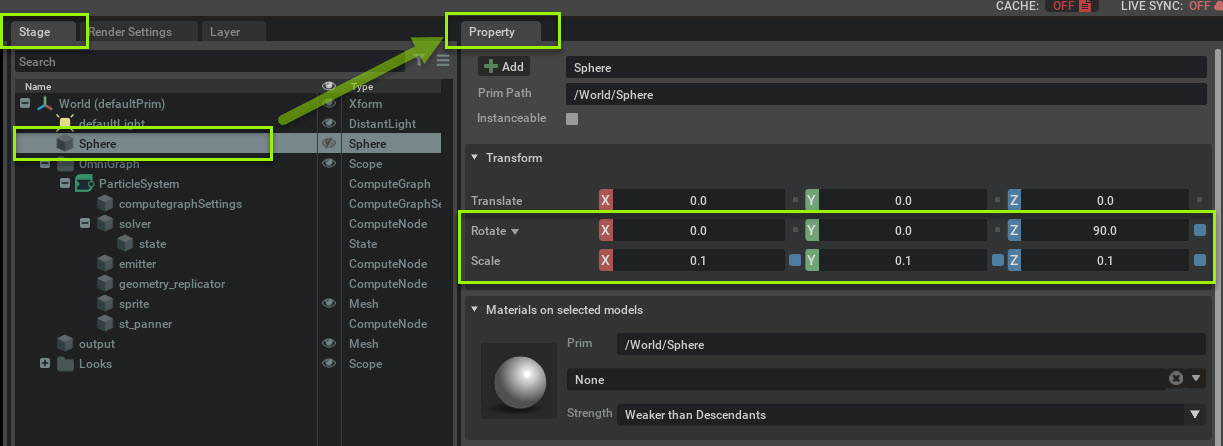
Now your particles should be moving up.
1c) Adding Field
In this section we’re going to use a direction field to move the particle column to simulate a wind.
Create a source for your Direction field
To use a field you need to give it its own source to act as a volume of influence. Using sources as a volume for fields is a constant no matter what field you use.
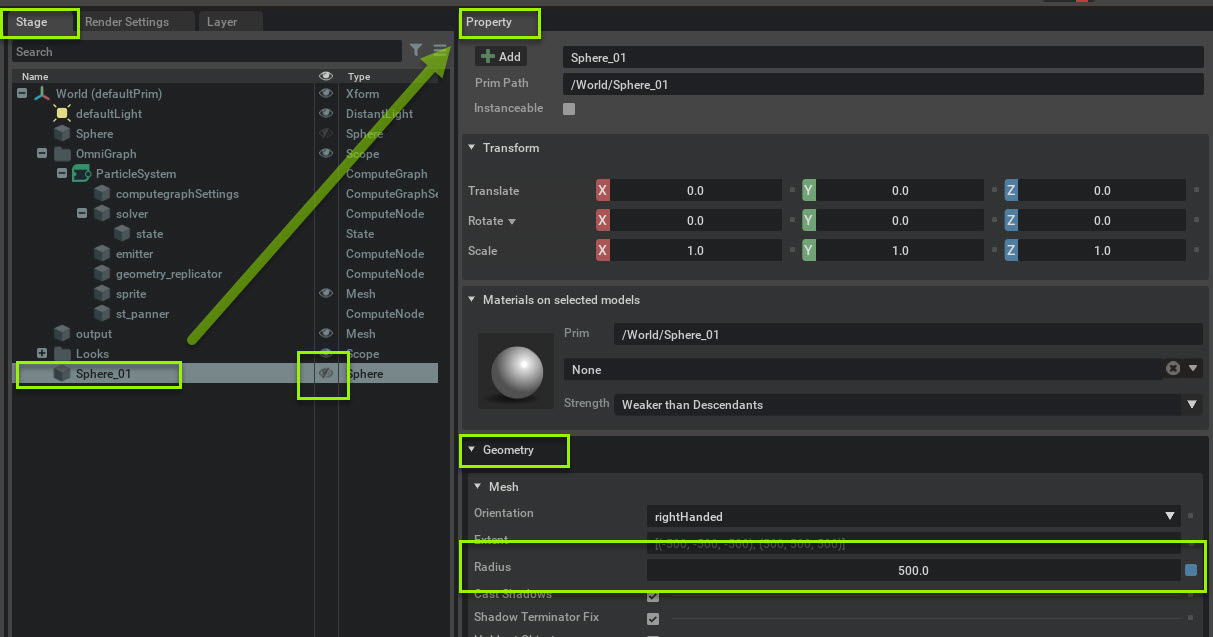
1. Go to Create->Shapes-> and select Sphere
This will create Sphere_01.
2. Select the sphere_01 and make the following changes in Property:
Geometry -> Radius 500
then turn visibility off by toggling the Eye icon in Stage -> World -> Sphere_01
Particle Editor Field Setup
Go back to Particles Editor Tab.
1. In the Particle Editor, go to the search bar and search for direction.
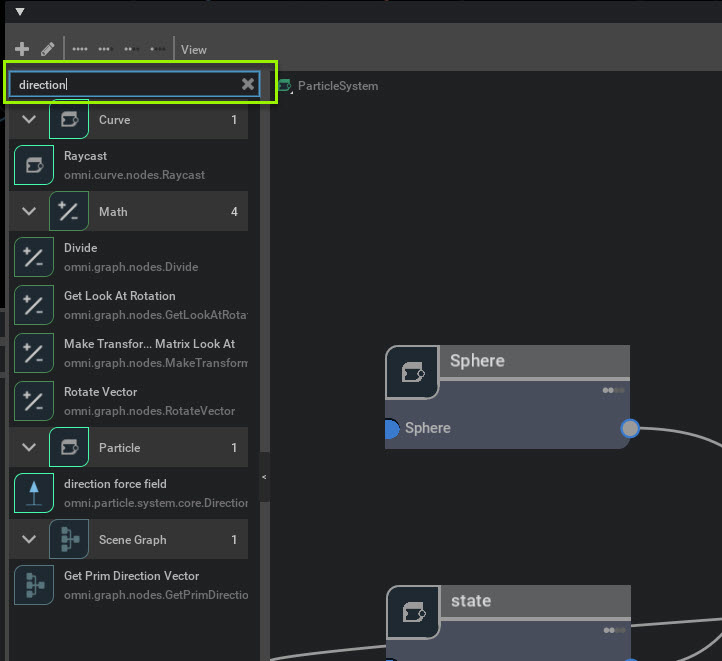
2. Left click drag and drop the Direction Force Field node from the Node menu into the graph window. A direction force field node will appear.
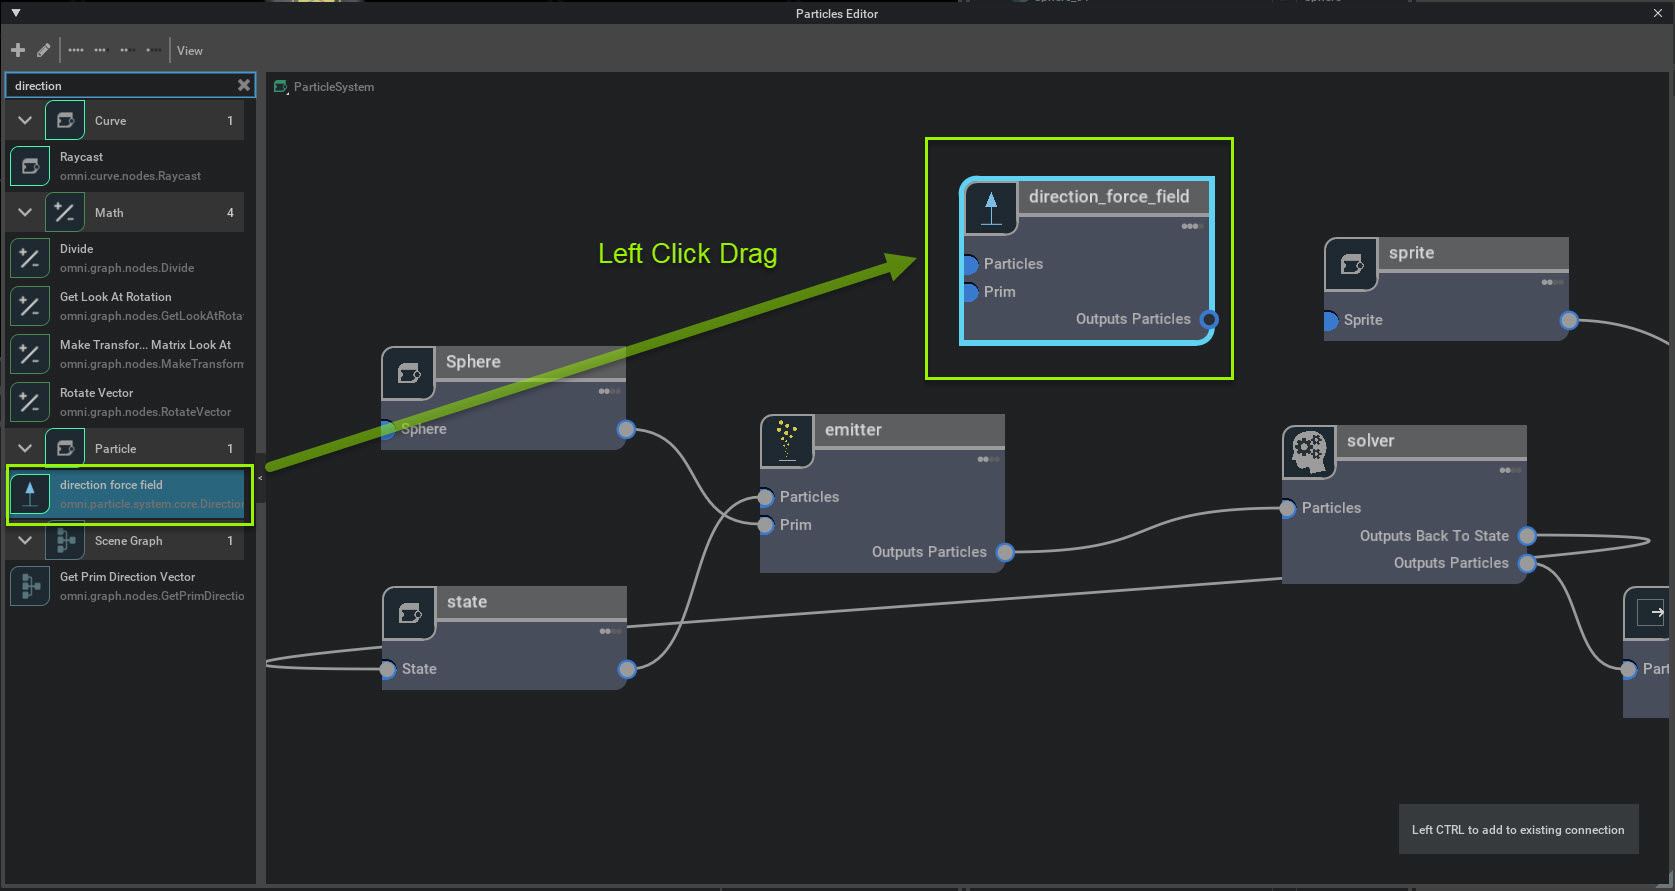
3. Connect Direction Force Field to the particle system.
Note
Fields must be connected before the solver.
4. Left click drag from the Emitter Node’s outputs particles pin to the direction force field Node’s particles pin.
5. Left click drag the Direction field Node’s outputs particles pin to the Solver Node’s particles pin.
Now the Direction force field is connected to the particle system, but the particles aren’t being affected yet. A source is required for the fields node’s area of influence to affect the particles.

Next you need to connect the source to the field.
1. Go to Stage -> World and Left click select and hold Sphere_01
2. Drag and drop Sphere_01 into the Particle Editor as shown below.
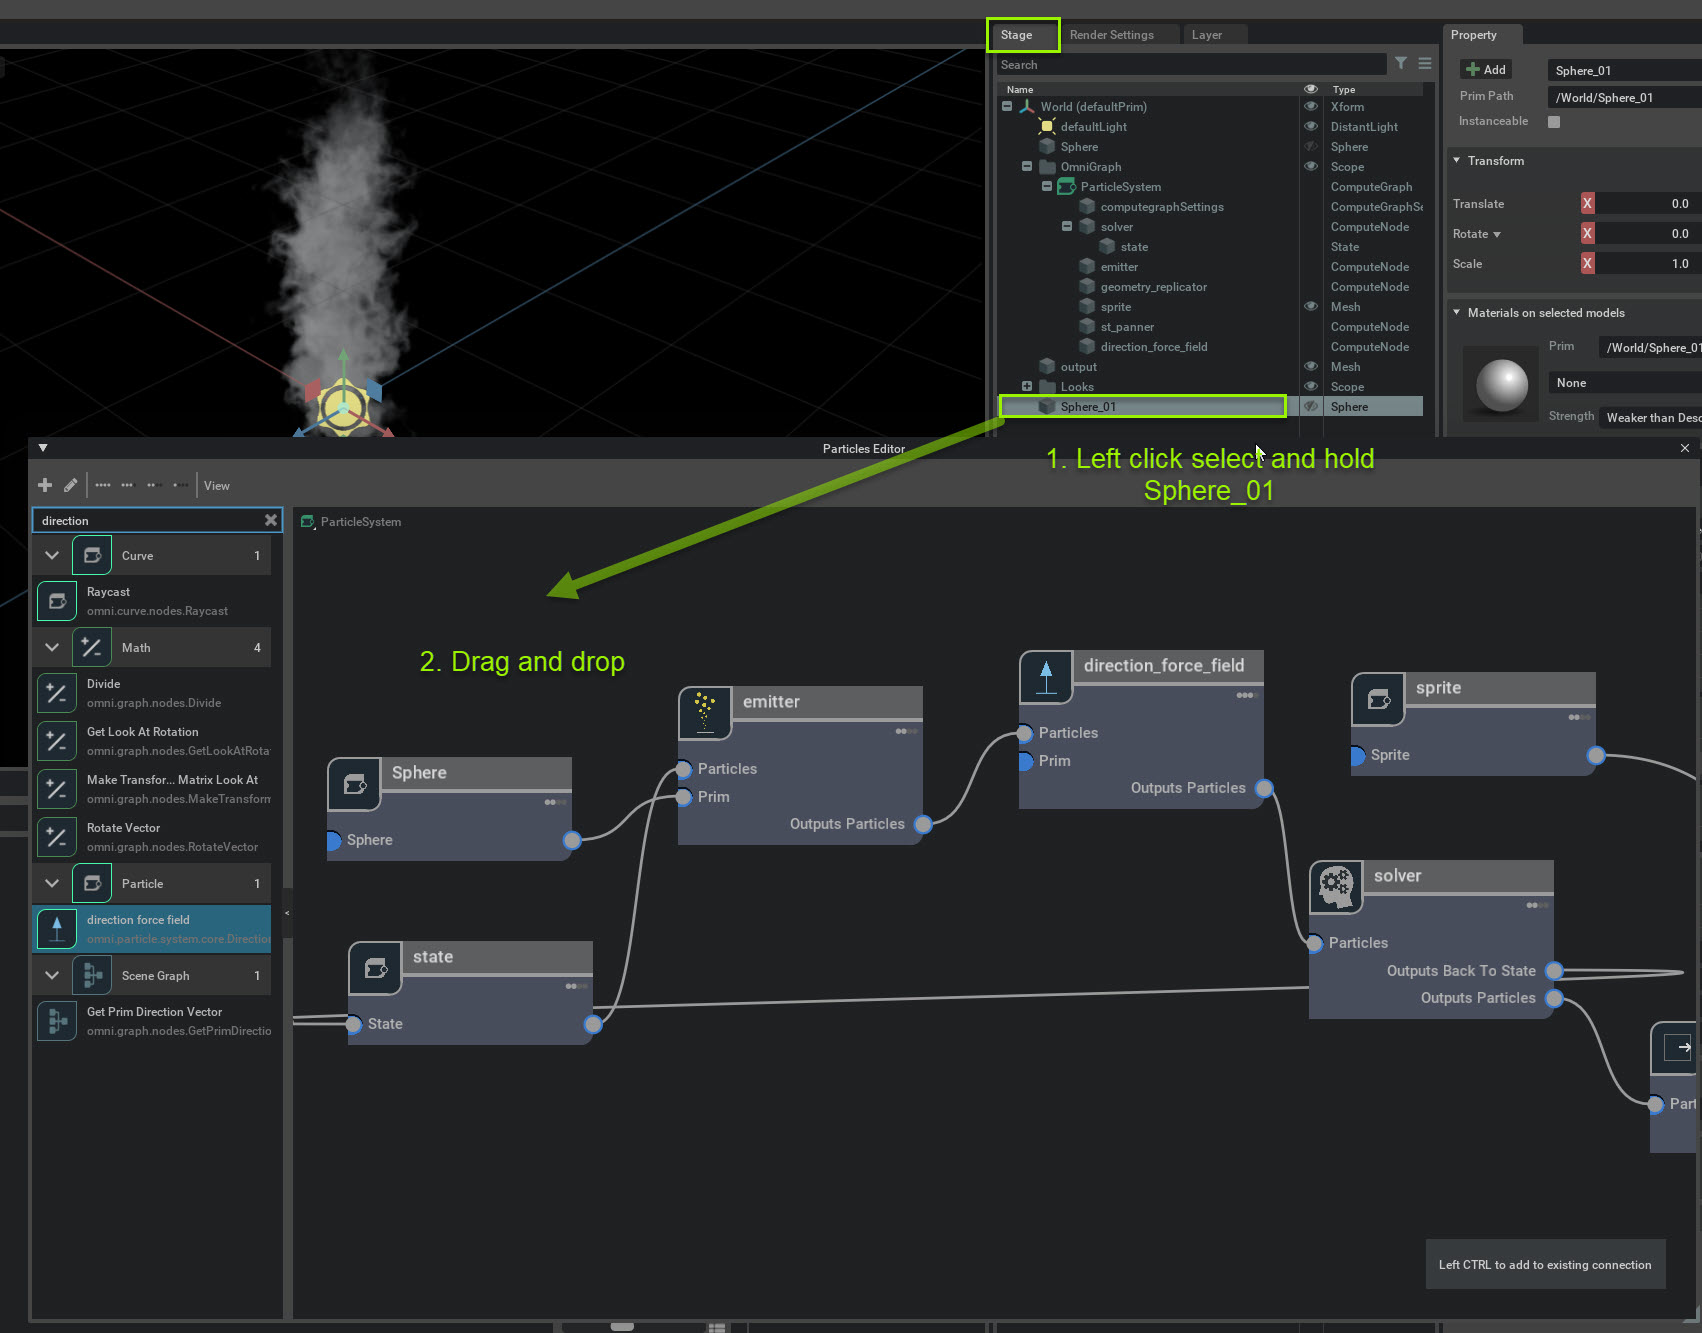
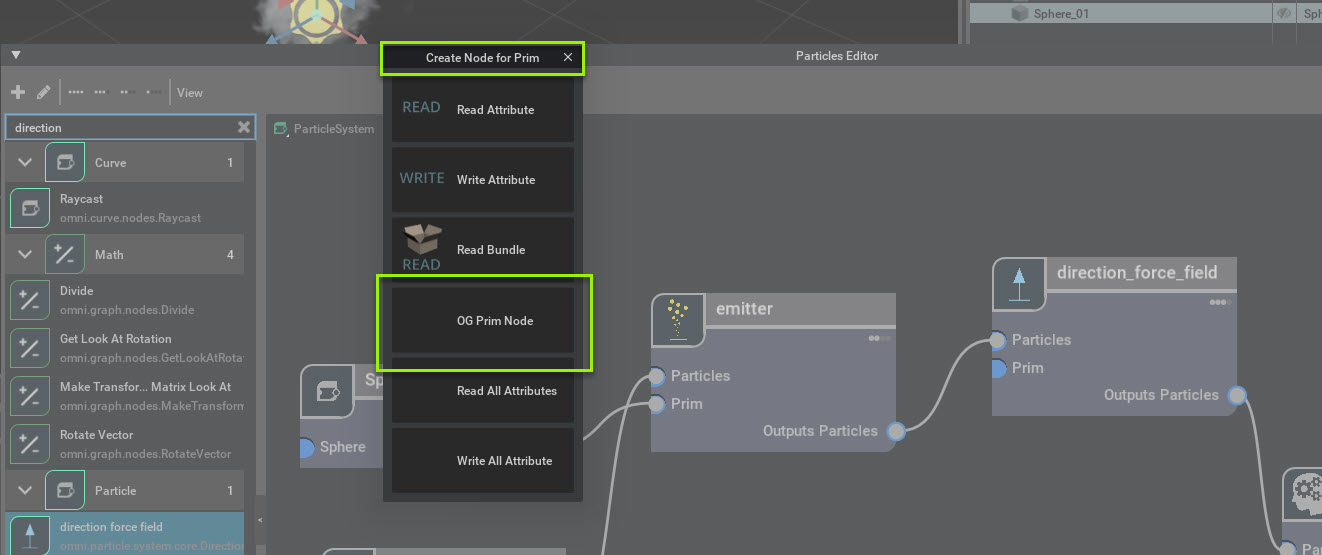
3. A Create Node for Prim window will appear. Left Click on OG prim Node. A sphere_01 prim node will appear in the Particle Editor.
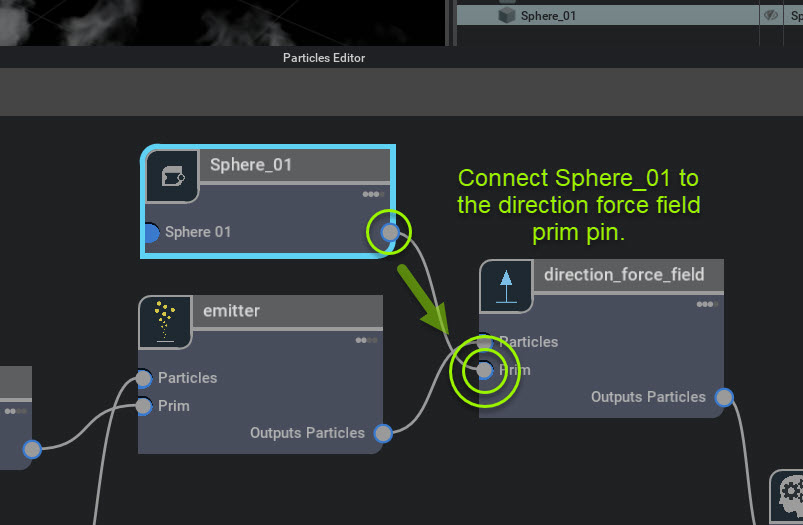
Now connect Sphere_01 to the direction force field Node..
1. Left click drag from Sphere_01 Node’s exit pin to the Direction Force Field Node’s prim pin.
Now the particles should be moving in a direction.
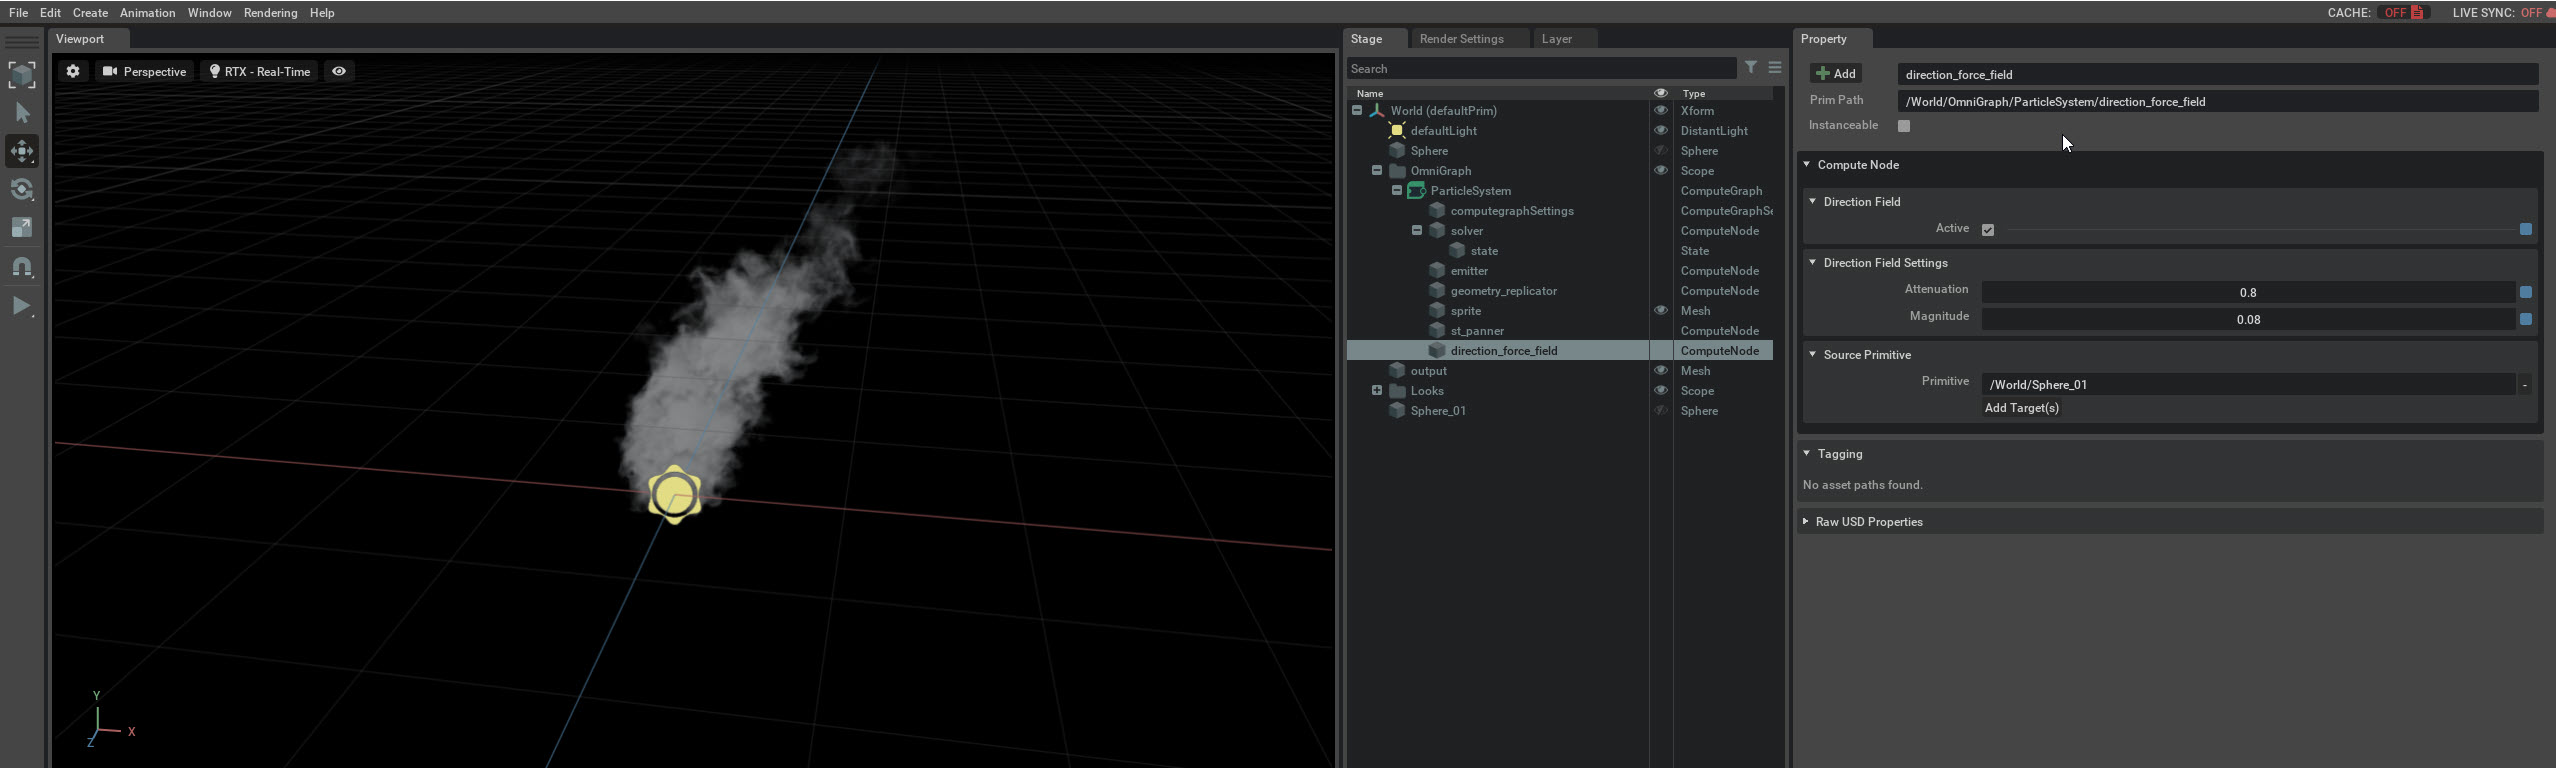
Direction Field Tweaks
Now we have the direction field hooked up to the particle system. The particles are moving too fast. Let’s change some parameters in the Direction force node.
1. Select Stage -> World -> particle system -> particle system direction force field.
2. Change the following parameters in Property:
Direction Field Settings -> Attenuation .5
Direction Field Settings -> Magnitude .08
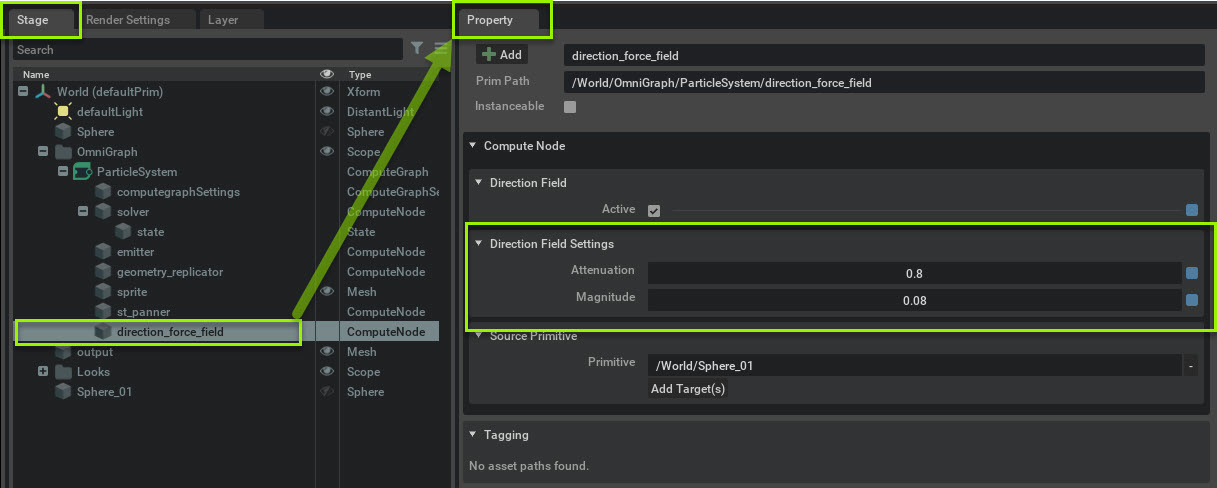
Now the particles are moving in a more natural way.
Next we’ll be changing the opacity and scale of the particles over time with ramp modulators.
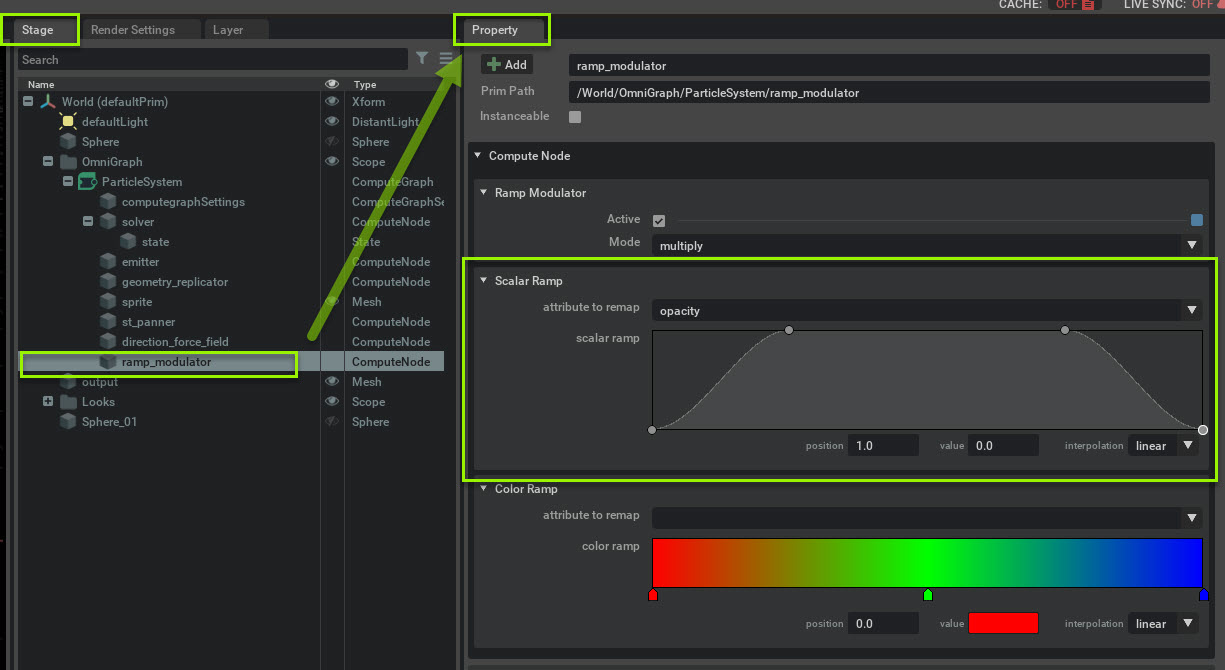
1d) Using Ramp Modulators
In this section we’re going to add a Ramp Modulator to change the scale and opacity of the particle over time. Ramp modulators can take floats and vector parameters and change them over the lifetime of the particle.
Particle Editor Ramp Modulator Setup
Go to the Particles Editor Tab.
1. In the Particle Editor, go to the search bar and search for ramp.
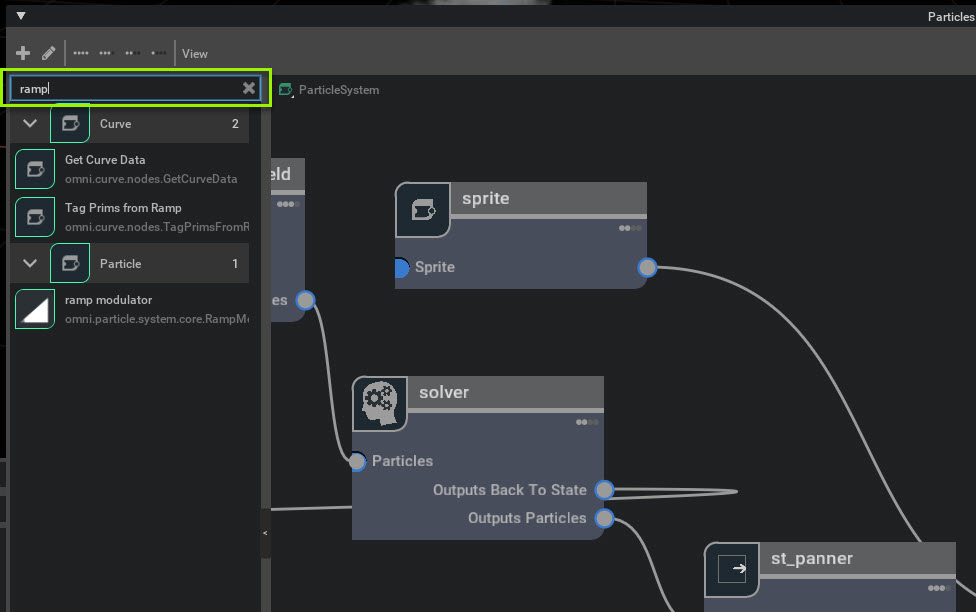
2. Left click drag and drop the Ramp Modulator node from the Node menu into the graph window. A ramp modulator field node will appear.
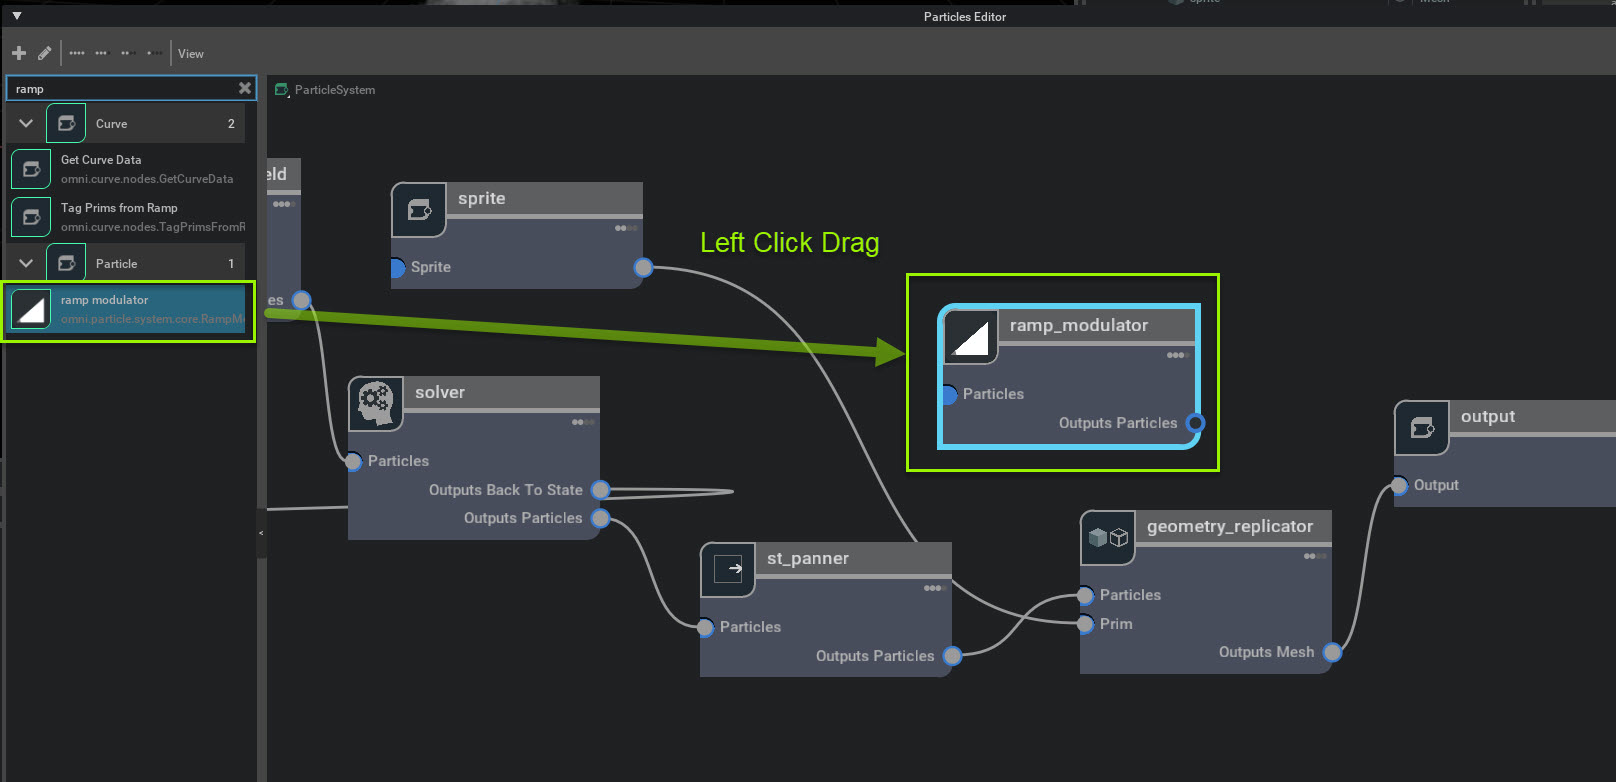
Position the Ramp Modulator Node between the ST Panner and the Geometry Replicator Node.
Note
Ramp modulators must be connected after the solver.
3. Connect ramp modulator Node to the particle system.
4. Left click drag from the St Panner Node’s Output Particles pin to the Ramp Modulator Node’s Particles pin.
5. Left click drag from the Ramp Modulator Node’s Output Particle pin to the Geometry Replicator Node’s Particles pin.
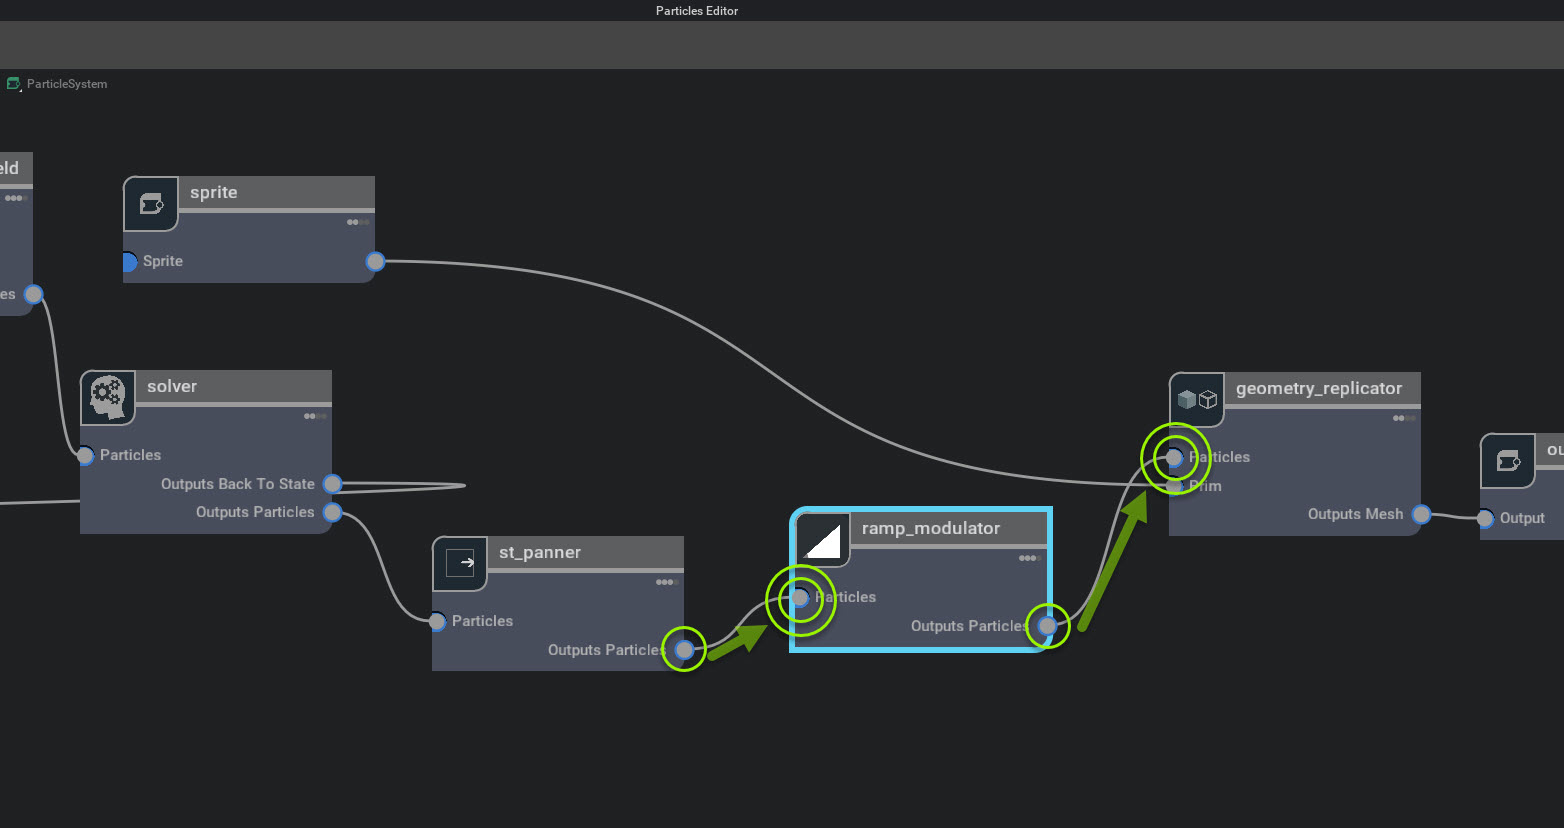
The Ranp Modulator is now connected to the particle system.
Ramp Modulator Parameters
With the Ramp Modulator node connected we can now make modifications.
Note
The mode of the Ramp Modulator allows you to modify the way the ramp modulator changes your particle over time. The mode defaults to multiply.
Ramp Modulator Modes |
Description |
|---|---|
Mode |
Dropdown controls how the ramp modulator changes the particle. Defaults to Multiply
over: Override Settings.
add: Additive settings. Ramp adds to values
multiply: Multiply settings. Ramp multiplies to values.
|
1. Go to Stage -> World -> particle system and select ramp_modulator .
2. Go to property and make the following changes:
Scalar Ramp (float) changes
In Scalar ramp -> attribute to remap select opacity in the dropdown menu.
Left click on the ramp to add 2 points to the line. Double click to remove points.
1. Left click the first point and change Interpolation to smooth
2. Left click select the second point *either move the point by dragging or enter: **position* .25 and value .5
3. Left click on the third point and either move the point by dragging or enter:** position** .75 value .5. Interpolation smooth
4. Left click on the fourth point and either move the point by dragging or enter:** position** 1 value 0.
The particles will be fading in and out of opacity over the lifetime of the particle.
Color Ramp changes
In Color ramp -> attribute to remap select scale in the dropdown menu. The particles will appear to vanish, this is expected.
1. Left click on the red (first) key then click on the value bar and a color picker will appear. Type in R: .5, G: .5, B: .5. click outside of the color picker to enter your values.
2. Double click on the green (center) key to remove it.
3. Left Click on the blue (third) key and click on the value bar and a color picker will appear. Type R: 2.5, G: 2.5, B: 2.5. click outside of the color picker to enter your values.
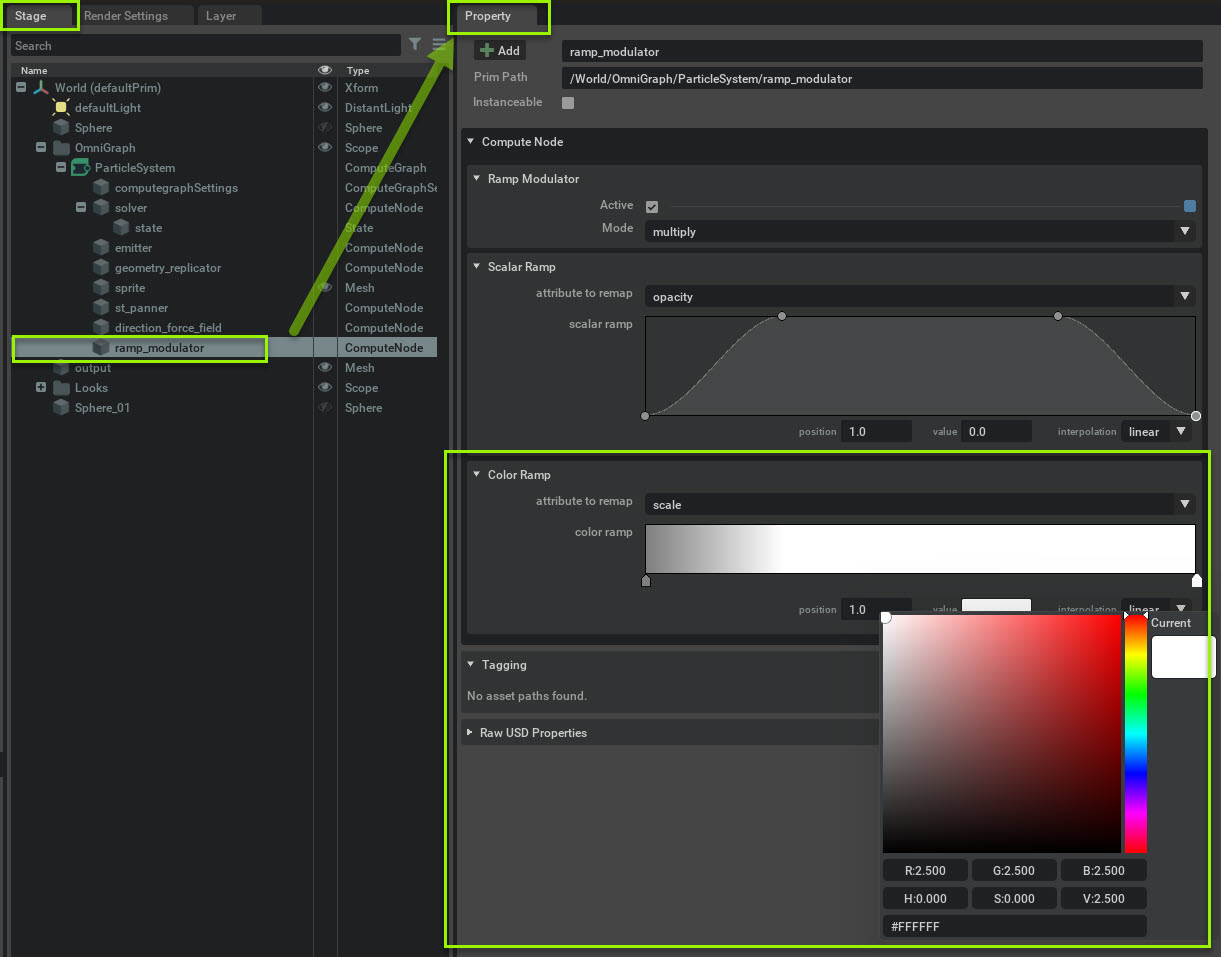
The particles will be scaling from .5 (half) to 2.5 times its size over time.
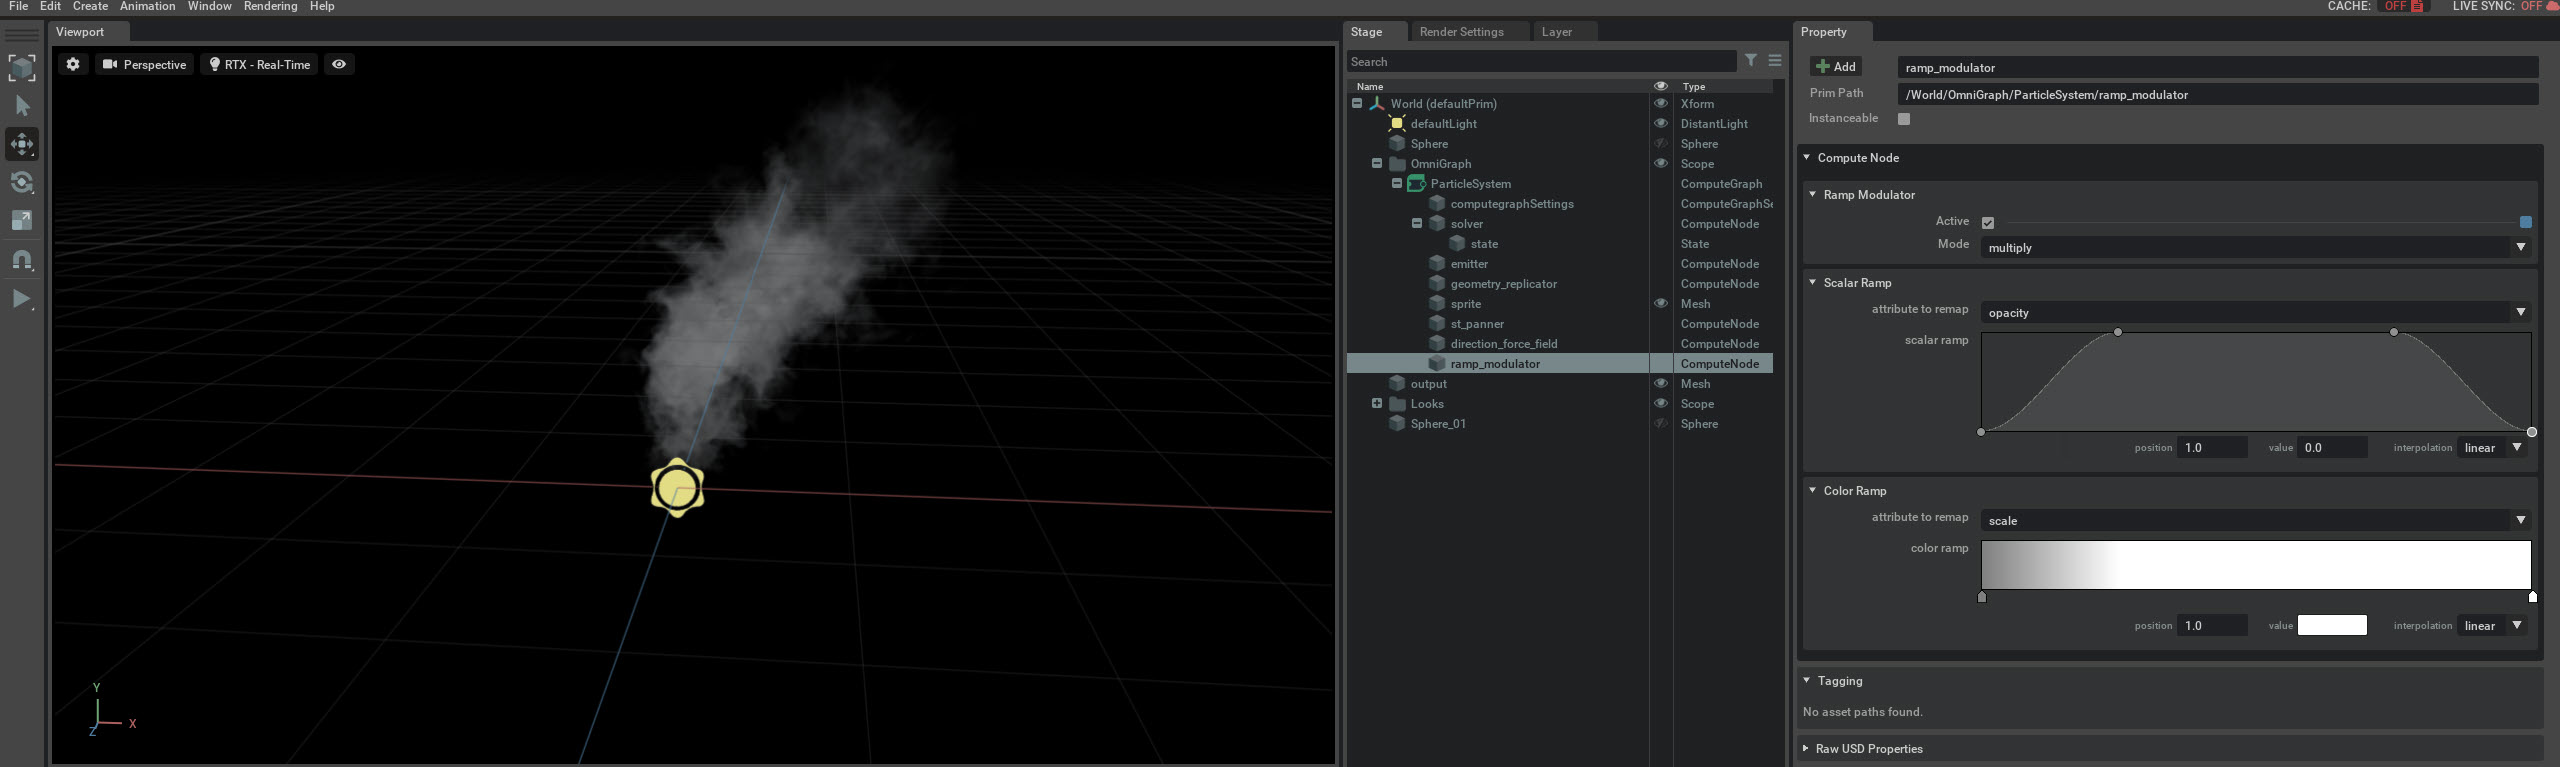
In this tutorial set we’ve created a geometry replicator and added an st_panner, fields, and a ramp modulator to create a smoke column. This concludes this tutorial.