Deformable Visual Authoring (Beta)#
This section describes the visual authoring of surface and volume deformable bodies as well as attachments.
Enable Deformable Schema Beta#
By default the new deformable beta widgets are hidden in the UI, even though both the legacy and new schemas/APIs are always available under the hood. To show the beta UI (which also hides the deprecated deformable UI):
Open Preferences → Physics → General
Check Enable Deformable schema Beta (Requires Restart)
Restart the application

Figure 16 Enable Deformable Schema Beta#
Conversion of Deprecated Schemas#
For converting deprecated schemas:
Load the stage that should be converted
Open the Assets Validator
Scroll down to the Omni:Physx section and enable
DeformableSchemaCheckerClick on Analyze
Check Asset to be converted
Click on Fix Selected
Close Asset Validator Window, once the Asset turns gray
Inspect and save the stage
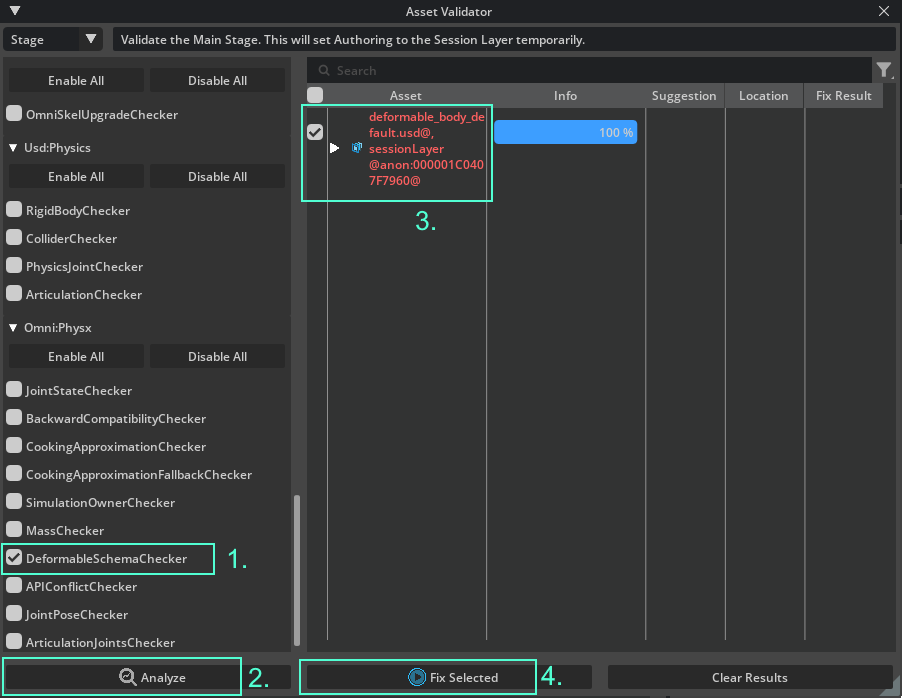
Figure 17 Conversion of Deprecated Deformable Schemas#
Note
A bug might leave visible stray meshes in the viewport. These vanish once the stage is re-loaded.
Deformable Body and Attachment Visualization#
In order to visualize deformable body meshes, rest shape and attachment points:
Select Eye Icon in viewport
Navigate to Show By Type → Physics → Deformables (beta) and check All
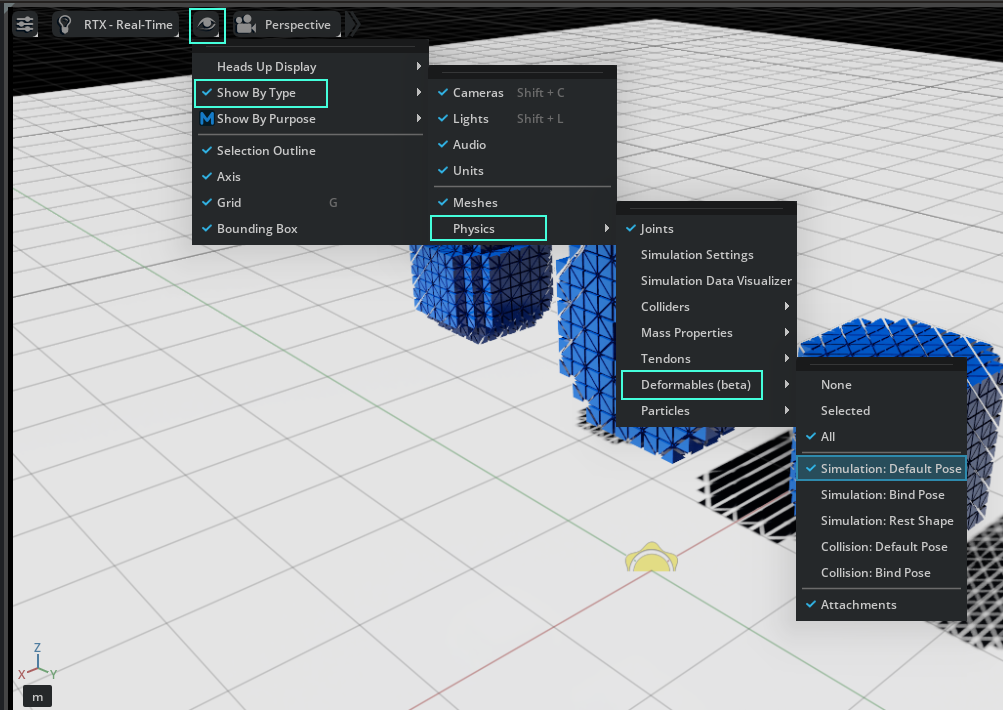
Figure 18 Deformable Body and Attachment Visualization#
Note
The following limitations apply:
Element collision filters are not yet visualized.
The visualization is not updated at simulation time, if
CPU FabricorGPU FabricPhysics output modes are enabled. The visualization reads data only fromUSD.
Creating a Deformable Body#
In order to create a volume deformable body from scratch, the following steps are recommended:
Right click and Create → Xform
From main menu: Create → Mesh → Settings which opens the Mesh Settings dialog.
Select a Primitive Type e.g.: Cube
Ctrl left click on U Verts Scale, V Verts Scale, W Verts Scale to adjust the resolution
Press the Create button
Nest the new mesh inside the Xform

Select the Xform in the stage tree, right click and Create → Physics → Deformable (beta) → Volume which opens the Create Volume Deformable Body dialog.
Check the Hexahedral Simulation Mesh if separate collision and simulation meshes are desired.
Press the Create button
Note
It is important to use a source mesh with sufficient resolution to capture the level of deformation expected in the resulting deformable body. Especially if the source mesh is used for rendering the deformable body, too low of a resolution will not display the deformation!
Further the simulation mesh and collision mesh should also have roughly the same resolution, to avoid convergence issues.
The generated meshes can be adjusted by inspecting the Deformable Hexahedral Mesh and Deformable Mesh Simplification sections in the Physics properties on the selected Xform. This is best done while visualizing the simulation and collision meshes in the viewport.
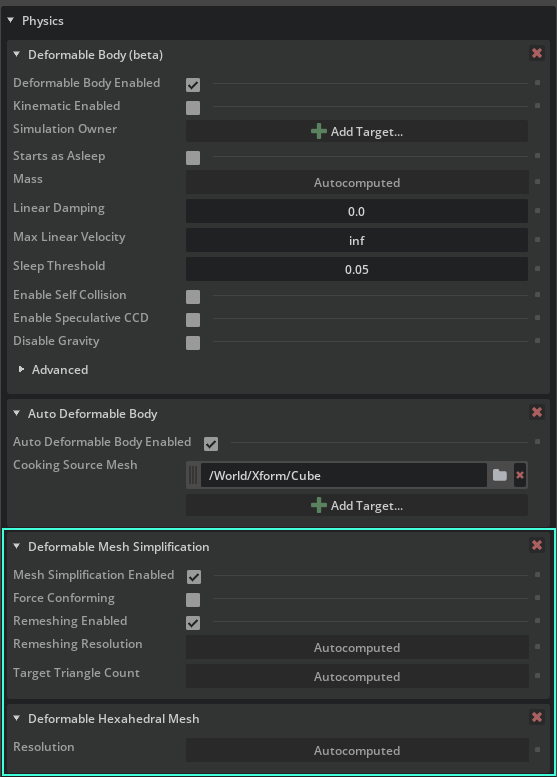
Figure 19 Mesh Generation Properties#
Creating a surface deformable body works analogously by opening the Create Surface Deformable Body dialog by selecting the Xform in the stage tree, right clicking and Create → Physics → Deformable (beta) → Surface.
Note
It is sometimes desirable that the mesh (or meshes) used for rendering be different from the mesh employed to generate the simulation and collision meshes. In such cases:
Every render-only mesh should be nested under the Xform (deformable body root).
In the creation dialog, the Source Mesh field should be set to a mesh that is located outside the deformable-body subtree, but which spatially coincides with the render meshes.
If a mesh is available that is suitable for rendering, simulation and collision detection, the simplified Add workflow can be used.
For volume deformables this needs to be a
UsdGeom.TetMesh.For surface deformables this needs to be a
UsdGeom.Meshlimited to triangle faces.
Right click on the Mesh in the stage tree
Select Add → Physics → Volume Deformable Body (beta) or Surface Deformable Body (beta)
Note
The meshes created through the main menu with Create → Mesh → Settings are built from quads and are therefore not suitable simulation meshes. They are not supported by the Add workflow.
Creating an Attachment#
As an exmple the following steps can be taken:
Create a volume or surface deformable according to the previous section.
Create e.g. a sphere shape: Right click, Create → Shape → Sphere
Add a collider component to the Sphere: Right click Sphere, Add → Physics → Collider
Position Xform or Sphere so that the Sphere overlaps with the simulation mesh below the Xform
Select both Xform and Sphere, then right click and Create → Physics → Deformable (beta) → Attachment.
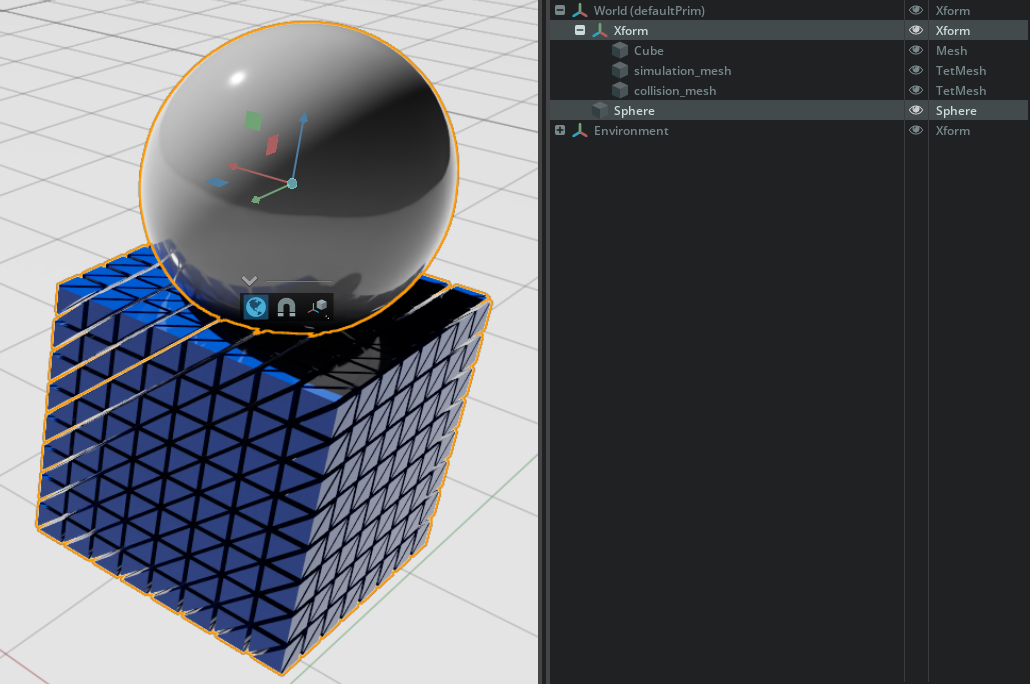
Figure 20 Attachment Prerequisites#
The attachment prim with PhysxAutoDeformableAttachmentAPI is created. It’s by default placed inside the deformable body subtree. Its parameters can then be adjusted in the Deformable Attachment (beta) section of the Physics properties of the attachment prim.
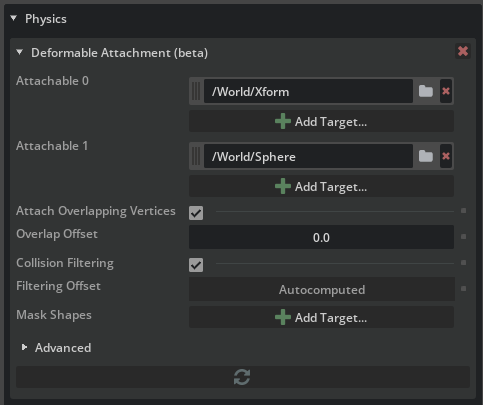
Figure 21 Attachment Properties#
Note
Positioning the attachables after creation is supported, but requires pressing the Refresh button in the attachment property widget in order to force attachment points recreation.
The attachment properties can be adjusted in the Physics properties of the newly created attachment prim.