WRAPP Introduction#
Overview#
WRAPP provides a command line tool helping with asset packaging and publishing operations for assets stored in S3 buckets, Nucleus servers, or file systems in a decentralized way. It encourages a structured workflow for defining the content of an asset package, and methods to publish and consume those packages in a version-safe manner. WRAPP does not require a whole-sale shift of your workflow, but instead helps you to migrate to a structured, version managed workflow.
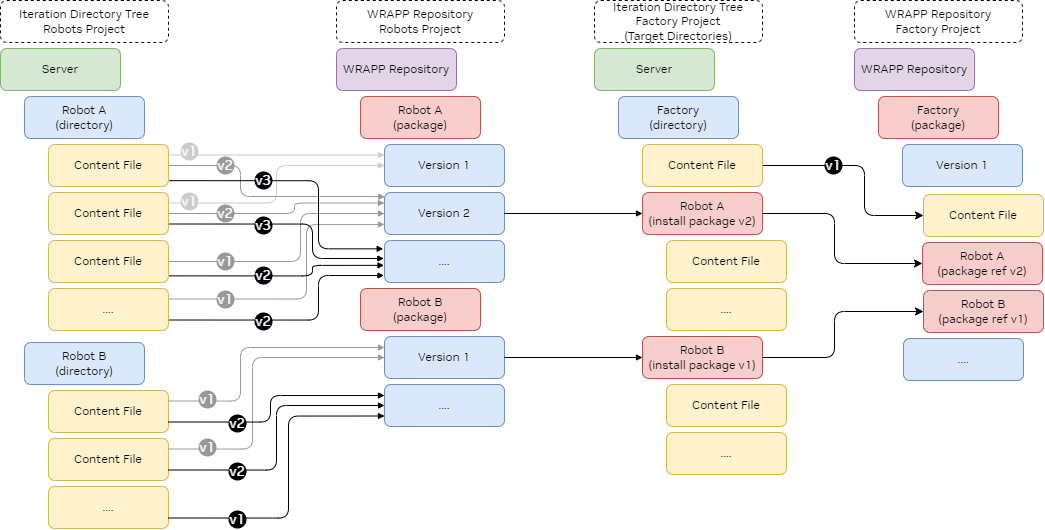
Below is a diagram illustrating the data flow with generic content files using WRAPP. As a new package is created, that specific content is stored within the package version in the repository. This package can then be installed in new locations as needed.
Key Points and Assumptions#
WRAPP does not force you into a defined directory structure, it allows the user to define the package structure.
WRAPP does not modify your files or reference paths in your files. It is assumed, if you want to have your reference versions managed by WRAPP, that the references are all relative within the cataloged directory.
WRAPP allows for multiple repositories on a single server or across multiple Nucleus servers or S3 buckets.
WRAPP allows you to aggregate packages from multiple repositories into “target” directories, and even allows for package dependencies across repositories.
WRAPP supports creating redirect packages for CDN distribution, allowing package metadata to be served from a CDN while data files remain in the original storage location.
Warning
Running a WRAPP write operation concurrently with any other WRAPP operations on the same data can lead to undefined behavior. Avoid overlapping writes on the same paths; serialize write operations per repository/package path.
Supported Storage Systems#
WRAPP supports the following storage systems:
S3 — Amazon S3 and compatible object storage (via boto3)
Azure Blob Storage — Microsoft Azure containers and blobs
Local file system — Local directories and files
Nucleus Servers — NVIDIA Omniverse Nucleus servers (
omniverse://URLs)
For URL formats, configuration options, and authentication details, see Supported Storage Systems.
Core Concepts#
Repository#
Packages in WRAPP are stored in a repository. The concept of a repository is known from distributed versioning systems like git, and denotes a location where versioned content is stored. In WRAPP, a repository is a directory used as intermediate safe storage for frozen/archived package versions. Consumers of these packages use it as a copy source.
The repository directory is called .packages. Each folder within represents a named package, containing sub-folders
for each version of that package. No prescriptions are made for how packages or versions have to be named—they just
need to be valid file and folder names.
An example repository structure:
/.packages
/.packages/vegetation_pack
/.packages/vegetation_pack/20230505
/.packages/vegetation_pack/20230512
/.packages/vegetation_pack/20230519
/.packages/rocks_pack
/.packages/rocks_pack/v1.0.0
/.packages/rocks_pack/v1.1.0
Package Lifecycle#
The typical workflow for managing packages involves these primary commands:
create — Snapshot content from a source folder and store it as a versioned package in the repository
install — Install a package version from the repository to a target location
uninstall — Remove an installed package from a target location
status — Check the status of installed packages
list-repo — Browse available packages and versions in a repository
Package Distribution#
WRAPP allows transferring packages between repositories using the mirror command. This enables
workflows like promoting packages from development to staging to production, or distributing packages
across different teams or locations. For air-gapped environments, export and import commands
support offline transfer via tar files.
Getting Started#
For step-by-step examples of common workflows including creating packages, installing them, handling updates, and working with multiple servers, see the Tutorial.
For detailed documentation of all commands, see the Commands Reference.