User Guide#
Goal: Author behavior trees, attach them to USD prims, and debug their execution at runtime.
Prerequisites#
Omniverse Kit 110+
Enable omni.behavior.tree.bundle (pulls in
omni.behavior.tree.ui,omni.behavior.tree.core, andomni.behavior.tree.schema).
For Behavior Simulation nodes (Humans, Props), also enable omni.anim.behavior.bundle.
Authoring Behavior Trees#
Opening the Editor#
Open the Behavior Tree window from Window > Behavior > Behavior Tree.

Click Edit Behavior Tree to open an existing .json behavior tree file, or New Behavior Tree
to create one (you will be prompted to choose a save location).
Tip
Save your USD stage before creating a new behavior tree. Keeping .json files near the stage
they belong to makes assets easier to share.
Once a tree is open, the full editor appears:
Toolbar#
The toolbar at the top of the window provides some controls:
Save / Save As / Discard changes — write the tree to disk, save under a new name, or revert the current edits to the on-disk version. Discard changes prompts before throwing away unsaved edits.
+ Add to Prim — opens a stage picker that supports multi-prim selection; pick one or more prims and click Add. The current tree gets applied to every selected prim as one undoable step, all wired to the stage’s shared blackboard (the runtime reuses whichever blackboard already exists, or a single
/BehaviorTreeBlackboardis created and shared).Constraints — shows the USD schema constraints required by the tree’s node libraries.
There’s also a property-panel route: select one or more prims in the stage, open the property pane, click + Add → Behavior → Behavior Tree, and the same multi-prim dialog opens. Pick Create New Behavior Tree to author a new descriptor or Add Existing Behavior Tree to point at an existing JSON file; both end on an Add action that wires every selected prim in one batch.
Pressing Play stages the editor’s working copy with the runtime, so the running tree always matches what you see in the editor — unsaved edits included. Save when you want the file on disk to match the editor (Ctrl+S or the Save button); the staging then clears so the next Play ticks the canonical file content. Discard changes also clears the staging.
If you switch to a different tree, close the editor window, or click Discard changes while there are unsaved edits, the editor prompts you to Save, Discard, or Cancel before proceeding.
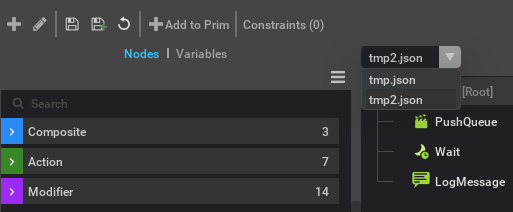
Tree Dropdown#
Above the canvas, a dropdown shows the name of the currently open behavior tree file. When the stage
contains multiple prims with BehaviorTreeAPI, the dropdown lists all referenced tree files
so you can switch between trees quickly.
Building the Tree#
The editor has two panes:
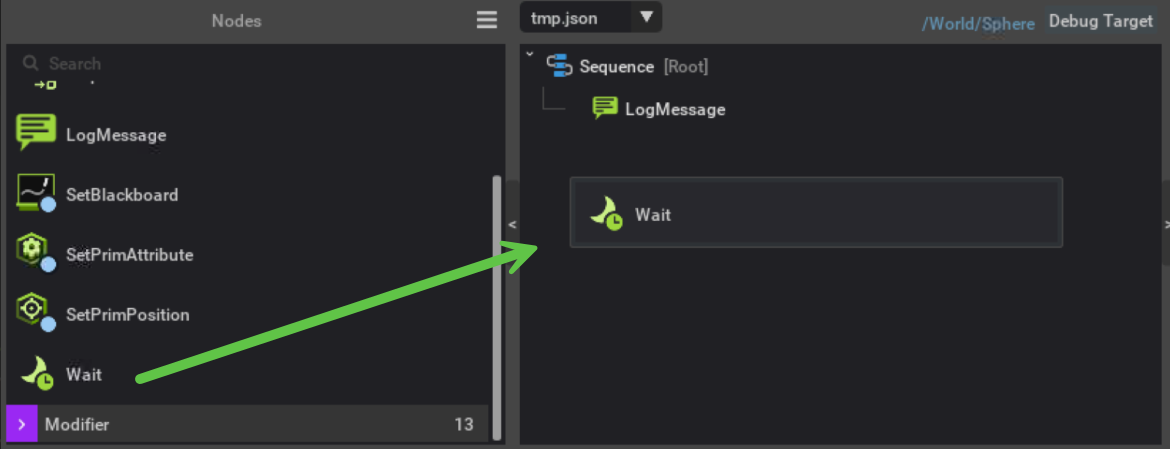
Node Catalog (left) — lists all available node types from registered node libraries.
Tree Editor (center) — shows the tree structure. Drag nodes from the catalog, or right-click a node to add children or attach modifiers.
There are three kinds of nodes:
Composite — control flow (Sequence, Selector, Parallel).
Action — leaf nodes that do work (Wait, SetBlackboard, LogMessage, etc.).
Modifier — conditions and decorators that wrap a node (Repeat, Timeout, CheckBlackboard, etc.).
Drag nodes from the catalog into the tree editor, or right-click a node to add children or modifiers.
Node Status#
Every node has a status that drives how the tree executes:
Status |
Meaning |
|---|---|
Idle |
The node has not been ticked yet (or was reset after completing). |
Running |
The node is still working. The tree will tick it again next frame. |
Success |
The node finished successfully. |
Failure |
The node finished unsuccessfully. This is normal control flow — composites like Selector use child failure to decide which branch to try next. |
The lifecycle is: Idle → Running → Success / Failure → (reset) → Idle. A node may skip Running and go directly from Idle to Success or Failure if it completes in a single tick. When a node finishes (Success or Failure), its parent composite reads the result and decides what to do next. The node returns to Idle on reset — either when the tree stops, the parent resets it, or a modifier aborts it.
Node Libraries#
The node catalog lists all types from registered node libraries. The two main libraries are:
Built-in Node Library — composites (Sequence, Selector, Parallel), utility actions (Wait, SetBlackboard, LogMessage), and general-purpose modifiers (Repeat, Timeout, CheckBlackboard, etc.) from omni.behavior.tree.core.
Behavior Simulation Node Library — action and modifier nodes for driving behavior agents from omni.anim.behavior.tree.
Configuring Ports#
Select a node or modifier in the tree to open its details in the Node Inspector panel on the right.
In this example, a MoveTo node has a RandomNavMeshPoint modifier attached. The modifier’s
point output port is wired into MoveTo’s target input port, so the agent will walk to a
random point on the NavMesh. The sampled point is cached until the modifier resets (e.g. when the
owning node completes or is aborted).
Each port row in the inspector is laid out as:
Port Name |
Accepted Type |
Port Type |
Port Widget |
|---|---|---|---|
The port’s name (e.g. |
The variant type the port accepts (e.g. |
How the port gets its value — one of the three port types described below. |
A widget appropriate for the accepted type and port type (text field, checkbox, blackboard picker, etc.). |
Ports are either input or output. Input ports provide data to the node and are configurable in the inspector. Output ports are produced only by modifiers and can be wired into input ports of the owning node (see Modifier Output below).
Port types — for input ports, the selector between the accepted-type dropdown and the port widget determines where the port reads its value at runtime:
Constant Value — a literal value saved in the behavior tree file (number, string, bool, etc.).
Blackboard Reference — reads a key from a blackboard at runtime. The widget pairs a scope dropdown with a key picker:
External — the tree’s externally-provided main blackboard.
Local — the tree’s per-instance hidden local blackboard (the same store edited via the Variables panel; the terms Variables and local blackboard are interchangeable).
It’s the user’s responsibility to ensure the data type stored in the blackboard is compatible with the port at runtime.
Modifier Output — wires a modifier’s output port into this input. The dropdown shows available modifiers attached to this node and their output ports. The port widget will automatically detect the potentially compatible modifier outputs.
Output ports (modifier outputs and any node port declared with direction: "output") offer
Blackboard binding (with the same scope dropdown) that routes the port’s writes to the
chosen blackboard. Unbound output is shown as — / (discarded) — the value is dropped
unless something downstream reads it.
When a modifier is selected in the tree, the inspector shows its own ports below the owner node’s ports, along with the Abort mode dropdown.
Changes are saved with Ctrl+S or the Save button in the toolbar. Pressing Play runs the in-memory tree whether or not it has been saved.
Author instance overrides (per-prim port edits)#

Above the node header, the inspector carries an Author instance overrides checkbox. With it off (default), every port edit writes to the shared tree descriptor — every prim referencing the tree picks up the change. With it on, edits route to the Target Prim’s instance overrides instead, leaving the shared tree file untouched. The checkbox is gated on having a Target Prim bound; without one it stays disabled.
Each port row’s right-edge indicator reflects whether the port is at its descriptor default (faint grey) or has a per-prim override authored (blue). Click the blue dot to clear the override and fall back to the descriptor default. Same convention as the Variables panel’s Instance Value row — see Instance Overrides.
Attaching Modifiers#
Right-click any node and choose Add Modifier to attach a modifier. Modifiers appear as tags on the node. Each modifier has its own ports, configurable in the inspector when selected.
Modifier Types#
Modifiers generally fall into two categories:
Condition modifiers (e.g. CheckBlackboard, CheckEvent, CheckAgentDistance) — gate whether the owning node is allowed to run. If the condition fails, the node fails or is aborted without ever ticking. These are the modifiers that interact with abort modes.
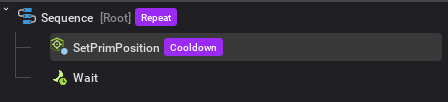
Behavior modifiers (e.g. Repeat, Timeout, Delay, RandomChoice, RandomFloat) — wrap the node’s execution to add looping, timing, or value sampling. They do not gate; they always let the node tick.
A single modifier can do both, but in practice most fall cleanly into one camp.
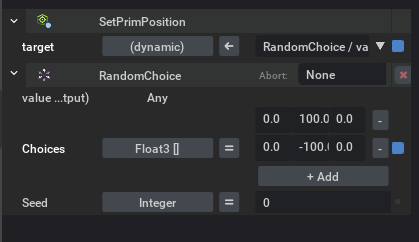
Modifier Ordering#
Modifier order is left-to-right as shown on the node tag. You can reorder modifiers by right-clicking a tag and choosing Move Left or Move Right.
All condition checks run before any modifier ticks. This means a behavior modifier placed before a condition modifier in the tag order will still only tick after all conditions pass. Within the condition checks and within the ticks, evaluation follows the left-to-right tag order.
In the example above, RandomChoice is listed before Repeat. When the node ticks, RandomChoice samples a value first, then Repeat wraps the node in a loop — so the node runs repeatedly with the sampled value. If the order were reversed, Repeat would be the outermost wrapper: it would loop the entire execution including RandomChoice, causing a fresh sample on each repetition instead of reusing the same value.
Child Priority#
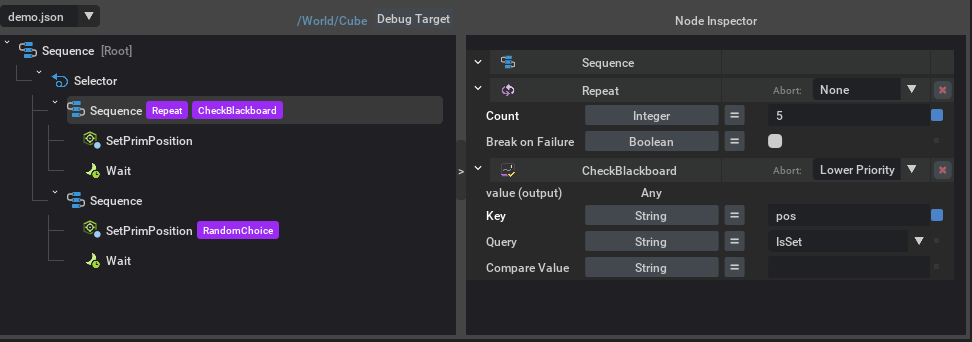
Within a composite node, child priority is determined by index: the first child has the highest priority, and later children have progressively lower priority. This ordering is significant for abort modes — a condition modifier with Lower Priority abort on a high-priority child can interrupt any currently running lower-priority sibling.
Abort Modes#
Condition modifiers have an Abort dropdown in the inspector that controls reactive re-evaluation of their condition while the tree is running. Behavior modifiers do not have conditions, so the abort mode setting has no effect on them.
Mode |
Behavior |
|---|---|
None |
The condition is checked once when the node first enters. No re-evaluation while running. |
Self |
Re-evaluates every tick. If the condition becomes false, the owning node is aborted and reset. |
Lower Priority |
Re-evaluates every tick. If the condition becomes true, lower-priority siblings (children that come after this branch in the parent composite) are aborted so this branch can run instead. |
Both |
Combines Self and Lower Priority. |
The image above shows a common reactive pattern: a Selector with two Sequence branches. The first Sequence has a CheckBlackboard modifier with Lower Priority abort. When its condition becomes true, any running lower-priority branch (the second Sequence) is interrupted and the first branch takes over. When the condition is false, the Selector falls through to the second branch as a default. The debug overlay below shows this tree in action.
Adding Trees to Prims#
To execute a behavior tree on a prim:
Select a prim in the stage.
In the tree editor toolbar, click Add To Prim and choose the target prim.
This applies BehaviorTreeAPI to the prim and links it to the currently open behavior tree file.
The command validates that the prim satisfies any constraints declared by the tree’s node libraries
before applying.
You can also do this from Python using Kit commands (undoable):
import omni.kit.commands
from pxr import Sdf

omni.kit.commands.execute(
    "ApplyBehaviorTreeAPICommand",
    prim_path=Sdf.Path("/World/MyRobot"),
    tree_file_path=Sdf.AssetPath("path/to/tree.json"),
)
Additional commands:
CreateBlackboardCommand(prim_path=None)— creates aBehaviorTreeBlackboardprim.CreateNodeLibraryCommand(prim_path=None)— creates aBehaviorTreeNodeLibraryprim.RemoveBehaviorTreeAPICommand(prim_path)— removesBehaviorTreeAPIfrom a prim.
To get and set blackboard values from Python — both on the live blackboard during Play and on the values persisted on the prim — see Get and Set Stage Blackboard Values.
Property Inspector#
When a prim with BehaviorTreeAPI or a BehaviorTreeBlackboard prim is selected, the
Properties panel shows a dedicated widget for editing behavior tree settings.
Behavior Tree Properties#
Selecting a prim with BehaviorTreeAPI applied shows the Behavior Tree section with:
Behavior Tree — the path to the
.jsonbehavior tree file. Use the tree editor to modify the tree structure. Click Edit Behavior Tree in the header to open the editor for this prim’s tree.Blackboard — relationship to a
BehaviorTreeBlackboardprim. Change this to point the tree at a different blackboard.Enabled — enable or disable automatic execution of this tree. The tree can still be ticked manually if needed.
Auto Restart — when checked, the tree automatically restarts after reaching a terminal status (success or failure).
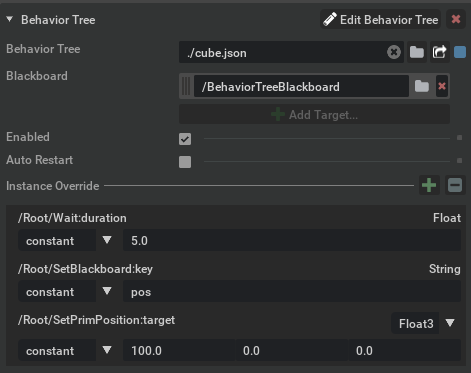
Tree Inputs (read-only) — per-prim port and variable values that override the shared tree’s defaults (the underlying mechanism is instance overrides). Viewed here, authored from the tree editor.
Instance Overrides#
Multiple prims can share the same behavior tree file but need different port values — for example, two agents using the same patrol tree but with different wait durations or target positions. Instance overrides let you change port values on a specific prim without editing the shared tree file.
The property widget shows the prim’s effective overrides as a read-only table; authoring happens in two places in the tree editor:
Variables — author per-prim overrides for tree-local variables from the Variables panel’s Instance Value row. Each variable’s row shows
[Set](faint grey indicator) when at default or the value field with a blue indicator when overridden. Variable overrides serialize aslocalBlackboardOverridesin the override JSON and are always constant values (no binding modes).Ports — toggle Author instance overrides at the top of the Node Inspector. With the toggle on, every edit you make to a port (constant value, Blackboard Reference, or Modifier Output binding) writes to this prim’s instance overrides instead of the shared tree file. The override-changed indicator on each row tells you whether the port is at its descriptor default or has a per-prim override authored. Modifier ports are also overridable when the modifier itself is selected.
Edits are staged in memory until you press Ctrl+S (or click the Save button), at which
point they flush to the prim’s omni:behavior:tree:descriptorOverride attribute. Overrides
are applied at tree creation time, so the next time the tree is created for the prim — on
play, on stage open, or after an explicit reset — the overrides take effect.
Blackboard Properties#
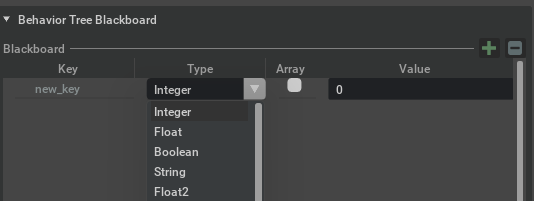
Selecting a BehaviorTreeBlackboard prim shows the Behavior Tree Blackboard section.
The blackboard is a weakly typed key-value store: any key can hold any type, and the user is
responsible for ensuring that the type stored in a key is compatible with the port that will
read it at runtime.
Use + to add a new entry and - to remove the selected entry. Each row has:
Key — the entry name that nodes reference through Blackboard Reference ports.
Type — the value type (Integer, Float, Boolean, String, Float2, Float3, etc.). Changing the type resets the value to the new type’s default.
Array — toggle to make the entry an array of the selected type.
Value — the initial value. Nodes can read and write this at runtime.
To use a blackboard, create a BehaviorTreeBlackboard prim (via the Create Blackboard command
or the UI) and link it to the tree prim through the omni:behavior:tree:blackboard relationship.
Nodes reference blackboard keys through Blackboard Reference ports. For example, a SetBlackboard
node can write a value, and a CheckBlackboard modifier can read it to control flow.
Variables (Tree-Local Blackboard)#
Every tree carries a hidden, per-instance key-value store separate from the externally-provided main blackboard. The editor calls this the Variables panel; the code, schema, and rest of these docs call it the local blackboard. The two terms refer to the same thing and are used interchangeably.
Authors seed it on the tree descriptor (it serializes as the localBlackboard
field in the tree JSON), and the runtime materializes a fresh copy per tree
instance — so two prims attached to the same tree file get independent local
state without any per-prim authoring.
Editing Variables in the editor#

Open the Variables tab in the editor’s inspector pane (next to Node Inspector). The panel splits into two regions:
List (top) — one row per variable, showing just the key. + adds an entry, - removes the selected one. Double-click a row to rename; a collision toast appears if the new name is already in use.
Variable Properties (bottom) — the detail block for the selected variable, with Name, Type, Array, Default Value, and Instance Value rows.
Edits to Name, Type, Array, or Default Value write to the tree descriptor’s seed, so every prim referencing the tree picks up the change at the next tree creation.
Instance Value authors a per-prim instance override of the variable on the
currently-bound Target Prim. Each row carries a status
indicator at the right edge — faint grey when the variable is at its default, blue
when this prim has an authored override. When at default, click Set to author
an override seeded with the variable’s current default value. When an override
exists, edit the value field directly to change it, or click the blue indicator
to clear the override and fall back to the default. If no Target Prim is bound,
the Instance Value cell shows (no target); bind one via the Target Prim
button on the toolbar to enable per-prim authoring.
Instance Value writes round-trip through the same staged-override flow as the
Property Inspector’s Instance Override rows — staged
in memory until Ctrl+S flushes them to the prim’s
omni:behavior:tree:descriptorOverride attribute. The two surfaces stay in sync:
authoring on one is visible to the other immediately.
While the timeline is playing the panel switches to Variables (live) and shows the current per-instance values read-only.
Binding ports to Variables#
Bind a port to a tree variable by setting Blackboard Reference mode and choosing
Variable in the scope dropdown. BlackboardRef("local", k) resolves to the
per-tree local blackboard at runtime; the same key written via a setOutput
(with the same scope) can be read back through any port bound to it.
Local vs. External#
Scope |
What it is |
When to use |
|---|---|---|
External |
The |
Data shared across prims, scenes, or external callers (e.g. perception writing to a blackboard read by several trees). |
Variable (Local) |
Per-tree-instance store seeded from the descriptor. Not addressable from outside the tree. |
Per-instance state that should not leak (counters, sampled goals, cached choices) — the default when you just need scratch storage scoped to one tree. |
Pattern: Variables as tree inputs#
A tree’s Variables panel doubles as its parameter interface. Define each tunable knob as a Variable, bind ports inside the tree to those variables, then override per-prim from the Variables panel’s Instance Value row (see Instance Overrides). The shared tree file stays unchanged; per-prim differences live entirely in instance overrides.
For example, a wander tree might expose:
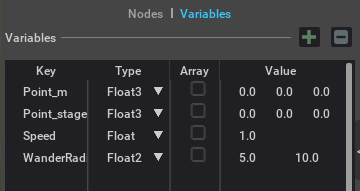
Inside the tree, the movement node’s target port binds to Point_m (Local
scope), the wander sampler’s radius port binds to WanderRadius, and the
locomotion node’s speed port binds to Speed. Per-prim tuning then
happens by selecting each variable in the Variables panel and clicking Set
on the Instance Value row; the property widget on the prim shows the resulting
overrides as a read-only summary:
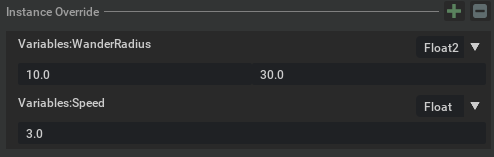
Two prims that share the same wander tree can differ entirely in their wander
radius and speed by overriding Variables:WanderRadius / Variables:Speed
on each prim.
Pattern: Sharing modifier output across the tree#
A modifier’s output port is normally readable only by the node the modifier is attached to (via the Modifier Output binding mode on that node’s input ports). To make a modifier’s output reachable from any node in the tree, set the modifier output’s binding to Blackboard with Local scope and pick a Variable key — the modifier now writes into that Variable each tick, and any port anywhere in the tree can read it via Local-scope Blackboard Reference.
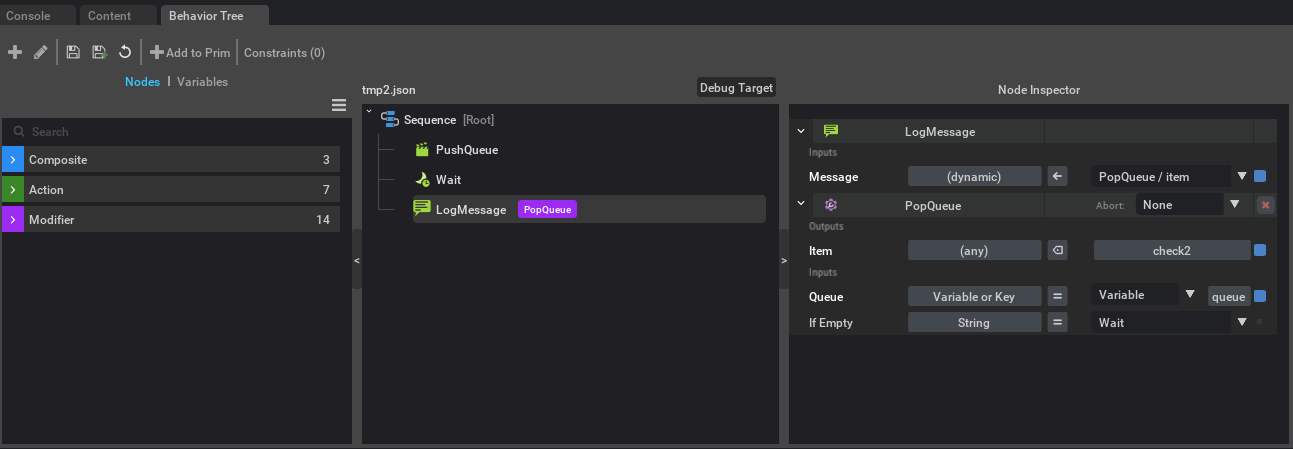
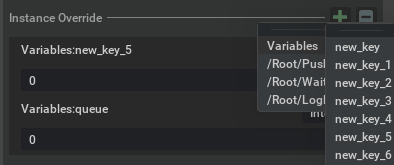
Example using PopQueue: suppose a planner branch fills a Variable queue
targets with destinations (via PushQueue writing to
Variables:targets). A worker branch elsewhere in the tree has a “do-work”
action with a PopQueue modifier on it; PopQueue reads from
Variables:targets and writes the popped value to its item output. By
routing that item output to Variables:current_target, any other node
in the tree — even outside the worker subtree — can read the current target
via a Local-scope blackboard reference on its own input port. The Variable
acts as a tree-internal mailbox; the modifier-owner relationship no longer
gates who can see the value.
Runtime Debugging#
Attaching a Target Prim#
While the tree editor is open and the timeline is playing:
Click the Target Prim dropdown in the toolbar.
A list shows all prims on the stage that reference the currently open behavior tree file.
Select a prim to attach the debug overlay to that running tree instance.
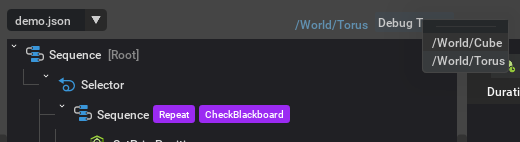
If you select a target prim before pressing Play, the overlay automatically attaches when playback begins.
Execution Overlay#
Once a target prim is attached, the tree editor shows a live overlay:
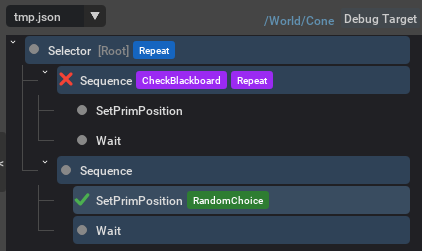
In this example, the Selector’s first Sequence node shows a red X — its CheckBlackboard condition failed, so the Sequence itself failed without ticking its children. The Selector falls through to the second branch, which is actively running (green checkmarks).
Node status is shown as an icon beside the node: green checkmark for success, red X for failure. A light blue tint on the node background means it is currently executing. Every node carries the status icon, including the tree root — when the whole tree completes one iteration the root flashes its terminal icon alongside the leaves.
Modifier status is shown purely by the tag color: blue means the modifier is executing, red means failure.
Terminal status icons (success/failure) hold briefly before clearing, so rapid transitions remain visible. Inside a Repeat (or other looping modifier) each iteration pulses its success/failure icon and the border briefly before the next iteration starts — that’s how you tell a fast-cycling loop apart from a node that’s stuck running.
Live Port Values#
While a target prim is attached, the Node Inspector switches to a read-only view showing live runtime values for the selected node’s ports. Select any node or modifier in the tree to see its current input values. Values refresh automatically during playback.
Timeline Integration#
Trees managed by the USD runtime tick automatically during Play:
Trees start when the timeline begins playing.
Trees tick each frame with the simulation delta time.
Trees stop and reset when the timeline stops.
Set omni:behavior:tree:autoRestart to true on the prim to automatically restart
trees that reach a terminal status (success or failure).
Next Steps#
Programming Guide — Worked example scripts: running trees, building descriptors programmatically, creating node libraries, and scripting blackboards.
Behavior Tree API Reference — Full Python API reference.