Get Started#
This document is a step-by-step guide to using the Kit-CAE sample. It is important to note the Kit-CAE serves as an example of how to combine different technologies available within NVIDIA. This example includes a schema to read CGNS and NPZ data and is intended for users that want to customize Kit-CAE for their own needs.
Sample Datasets#
The following sample datasets used by this guide are included under data.
Point-based data: Data where mesh connectivity is unknown.
physicsnemo_results.npz
concept_car.npz
Mesh-based data: Data where mesh connectivity is known.
kitCAE_Sample.cgns
To download these sample datasets, click on the UserGuideSamples zip file. Unzip the file and place the content in a location that is easy to access.
Install Kit-CAE#
Clone the Kit-CAE repo from the Kit-CAE GitHub repository.
Follow the instructions for building the application on your machine.
Note
For Windows Users: if you are using a Windows machine, download and install Visual Studio, either 2022 or 2019, for Community with the C++ developers.
Windows Visual Studio Installation#
Download Visual Studio Installer#
Visit the Visual Studio Downloads.
Click Free download under Community.
Run the Installer#
Open the downloaded installer.
Select Community edition and click Install.
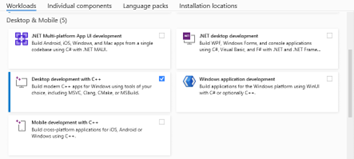
Select Workloads#
Check Desktop development with C++.
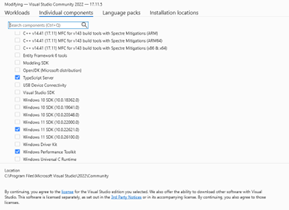
Additional Components#
If you need specific components, go to Individual components.
Select additional tools as needed.
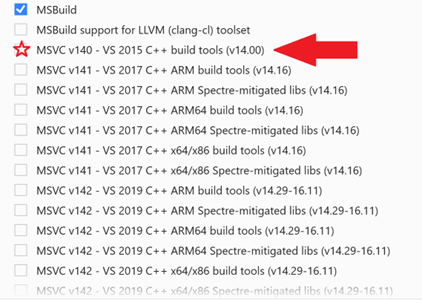
MSVS Error Resolution#
If you encounter the following error:
Error: "Please use the Visual Studio Installer to install a version of MSVC."
Click on Add/Remove Programs to modify Microsoft Visual Studio.
Check on MSVC v140 - VS 2015 C++ build tools (v14.00) (see picture below).
Installing Optional Dependencies Using PIP#
This sample includes extensions that use external Python packages for demonstrating how such extensions can be put together. When trying out these components, you must manually download these PIP package archives for the sample to use. For example, using the VTK-based application variant, ensure the VTK pip package is already downloaded.
To download these packages, use the following commands:
# On Windows
repo.bat pip_download --dest <archive-dir> -r ./tools/deps/requirements.txt

# On Linux
./repo.sh pip_download --dest <archive-dir> -r ./tools/deps/requirements.txt
Subsequently, launch the application passing this <archive-dir> on the command line as follows:
# On Windows
repo.bat launch -n omni.cae_vtk.kit -- --/exts/omni.kit.pipapi/archiveDirs=[<archive-dir>]

# On Linux
./repo.sh launch -n omni.cae_vtk.kit -- --/exts/omni.kit.pipapi/archiveDirs=[<archive-dir>]
This is only needed when launching for the first time (or after cache cleanup). Necessary packages are installed in local cache using the package archives from the directory provided. This never uses any online PIP index and hence requires all necessary package archives to be available in the specified directory.
Starting the Application#
After successfully building the application, open Visual Studio if you are using Windows, or a terminal if you are using Linux. Navigate to the kit-cae directory created by cloning the repository.
Note
On Windows, if you are using Developer PowerShell within Visual Studio, include
./beforerepo.bat. If you are using Developer Command Prompt, the./prefix is not needed.Launch the application using the command(s) shown below:
# on Windows
repo.bat launch -n omni.cae.kit

# on Linux
./repo.sh launch -n omni.cae.kit
Note
The first time you launch this application, the application may appear stuck while it prepares the system for your hardware. Please be patient as this initial setup completes.
This setup process launches the application without optional extensions that use VTK (the Visualization Toolkit). If you want to use those features, or try any of the steps in the following tutorial labelled VTK, launch the VTK-enabled variant of the application by entering the following command(s):
# Windows
repo.bat launch -n omni.cae_vtk.kit

# Linux
./repo.sh launch -n omni.cae_vtk.kit
CAE Preferences#
Kit-CAE exposes several user-configurable settings that can be customized using the Preferences panel. To navigate to this panel, click on Edit > Preferences to show the Preferences panel, if not already visible, and then navigate to the CAE page.
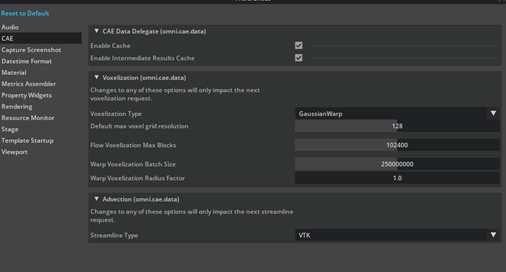
CAE Data Delegate#
These are some core settings that affect the behavior of the application:
Enable Cache: Toggle caching for data ingested by the data delegate API. Typically, this involves caching raw data read directly from storage. The first time the Data Delegate API reads raw data referenced by a CaeFieldArray prim, the data is cached. The cached data is automatically released if the CaeFieldArray prim is modified or removed from the stage.
Enable Intermediate Results Cache: Toggle caching for intermediate results. Many visualization algorithms in Kit-CAE require data transformation before rendering. This setting controls whether these intermediate results are cached. For instance, converting cell-centered data to point-centered data. Without caching, this conversion will be re-executed every time the algorithm runs.
Voxelization#
These settings pertain to voxelization. Algorithms using NanoVDB data, for example, require voxelization of the dataset. Changes to these settings take effect when the algorithm needing voxelized data re-executes, often triggered by modifying some property on the algorithm prim.
Voxelization Type: Select the voxelization engine. Flow uses the omni.flowusd extension, while GaussianWarp uses a custom implementation within Kit-CAE. Flow is relatively faster for large datasets, but if you encounter out-of-memory issues, GaussianWarp may be more memory efficient.
Default Max Voxel Grid Resolution: Sets the default maximum resolution for the voxelization grid when creating a new primitive. Changing this setting does not affect existing prims.
Flow Voxelization Max Blocks: Sets the maximum number of blocks for Flow voxelization routines. Increase this value if the voxelized grid is missing data, keeping in mind that higher values require more memory.
Warp Voxelization Batch Size: Allows processing points in multiple batches to avoid uploading all points and associated data to the GPU at once. Adjust this setting to change the number of points processed per batch.
Warp Voxelization Radius Factor: Controls the point neighborhood used when applying the voxelization kernel, specified as a factor of the voxel size. For denser data grids, lowering this value can improve performance while maintaining acceptable voxelization results.
Advection#
These settings affect the “Streamlines” algorithm. Changes take effect when the algorithm re-executes, typically triggered by modifying a property on the Streamline prim.
Streamline Type: Select the streamline implementation. VTK uses VTK’s streamline tracer (vtkStreamTracer), supporting most element types except polyhedra. Warp uses a Warp-based implementation, currently supporting a limited set of element types.