Install the Connector
Follow our Connector installation instructions to install this connector.
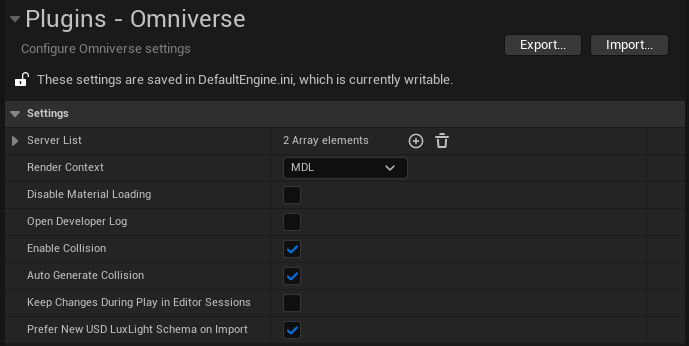
Project Settings
Though the default settings should be correct for most situations, you may wish to edit settings based on your use case. You may edit these settings in project settings under plugins > Omniverse.
Note
Live Edit settings can also be controlled through an Omniverse button in the Main Unreal Editor Toolbar.
Setting |
Effect |
|---|---|
Server List |
A list of Omniverse Nucleus servers that are visible in the Content Browser
|
Render Context |
Material import/render material setting - MDL, Unreal, or Default (USD Preview Surface)
The Unreal render context allows you to reference Unreal materials defined in the Project
Introduced in 202.0
|
Disable Material Loading |
Disable loading of all materials. (enable to speed up when materials not needed)
|
Open Developer Log |
Show developer log messages in the editor log
|
Enable Collision |
If enabled, collision will be enabled on meshes when opening Omniverse USD assets
Introduced in 202.0
|
Auto Generate Collision |
If enabled, convex collision will automatically be generated when opening Omniverse USD assets
Introduced in 202.0
|
Keep Changes During Play in Editor Session |
If enabled, changes made to a USD stage in PIE will be saved and replicated in a live session
|
Prefer New USD LuxLight Schema on Import |
If enabled and both old and new UsdLuxLight schema attributes are authored on a light prim, read the new schema attributes (defaults to checked)
|
Note
Introduced in 201.0
In USD 21.02 the USDLuxLight schema was changed. To summarize, input attributes for UsdLuxLight and UsdLuxLightFilter schemas are now connectable and have been renamed to include the “inputs:” prefix. The Omniverse Connector will now read and write both the old and new schema attributes (without or with “inputs:”). In practice, if the Connector is working with USD clients that are OLDER than 21.02 then the Prefer New USD LuxLight Schema on Import setting should be unchecked. If the USD client is newer, then the light attributes will work properly when Prefer New USD LuxLight Schema on Import is checked.
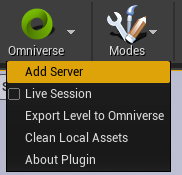
Connecting
To connect to an Omniverse Nucleus server, navigate to the Omniverse Icon in the top tray and select “Add Server”.
Once selected you will be brought to this connection dialogue.
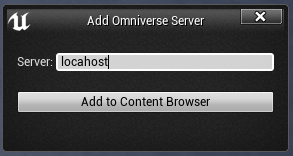
After entering an Omniverse Nucleus server, click “Add to Content Browser” to continue. Once you browser into the folder in the Content Browser you may or may not be required to login using browser authentication depending on the state of your connection ticket. If connecting to a pre-2020.2 server it will login to the server using your Windows username.
Note

If a connection fails to exist for the Omniverse Unreal Engine Connector, a notification will appear on the bottom right of your screen. It signifies that you do not have a current connection open to an Omniverse Nucleus.
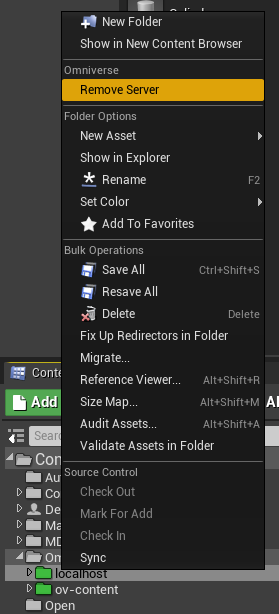
Removing a Server
To remove an Omniverse Nucleus server from the Content Browser, right click on it and select “Remove Server”. This will also remove all local cached Unreal assets that were previously imported.
Live Sessions
Live Sessions allow for real-time collaboration of USD assets cross-platform within Unreal Engine. When starting a live session, a new USD layer is created and set as a live authoring layer. This layer allows for non-destructive live work sessions. When leaving or closing a session, the creator has the opportunity to save the changes made during the session onto the original USD stage file. These changes can be activated or deactivated at any time, providing a truly non-destructive workflow.
See the Omniverse Live Workflow Documentation for more information on using Live Sessions.
Live Mode |
Visual Notification |
|---|---|
Off |
 |
On |
 |
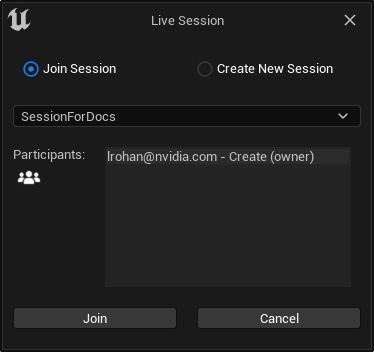
In order to use a Live Session, open the USD stage you wish to use. Afterwards, click the Omniverse icon and select Live Session. When first enabling a Live Session, you are presented with the opportunity to join an existing session or create a new one. Anyone that has already joined an existing session will be listed under participants. This includes usernames, the application they are connected through and if the user is the owner of the session. To create a new session, simply provide a session name and hit create.
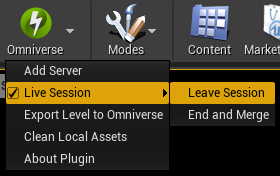
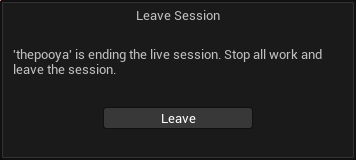
In order to leave a session, click the Omniverse Live Icon and over the Live Session checkbox you will have the option to leave or end a session. Leaving a session will disconnect you from the Live Session. This session will continue to exist, allowing other users to stay connected, join or re-join at a later time.
When leaving a session, none of the live changes will be saved to the USD stage. They will continue to be stored on the live session layer for you to merge at a later time.
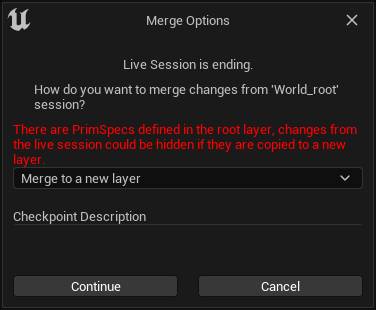
Selecting End and Merge will kick off all other collaborators to stop any further changes to the live session. At this point you will be presented with the option to either Merge to corresponding layers or Merge to a new layer. Merging to corresponding layers will save the changes to the USD Stage file that was used to create the Live Session. They will be saved as a Checkpoint, ensuring that all changes are still non-destructive.
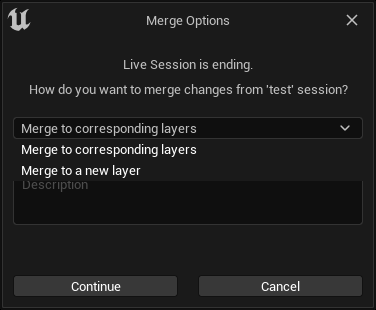
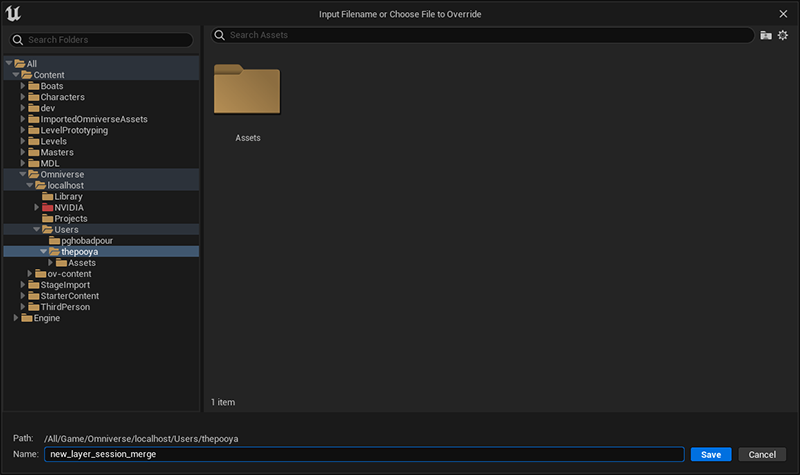
You can also Merge to a new layer, which will create a new USD layer which contains the changes. You are still able to turn off this layer and discard any changes that were made in the session. When selecting this option and hitting continue a content browser will allow you to name and save the new USD layer that will contain your session changes.
When merging to a new layer, you might receive the following notification. If your original USD Stage stored any information that was not contained in a layer, then saving to a new USD layer might not reflect all of the changes from your live session. This is due to how USD determines the importance of changes. Please follow the following link for more information.
See the USD Strength Ordering For more information regarding USD strength ordering please follow the following link.
If you are in a live session and the owner ends and merges the session, you will receive a notification. At this point the USD Stage has been changed and you can fetch the file with the saved changes.
Note
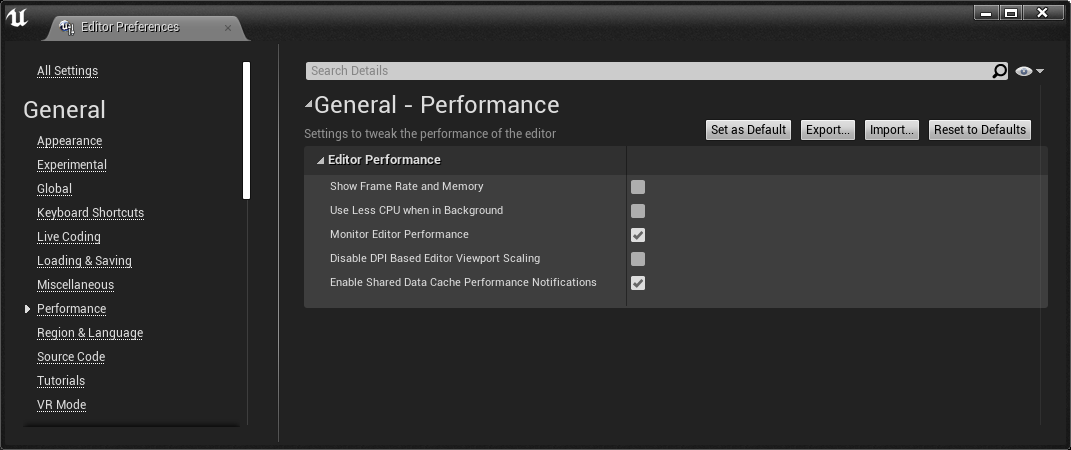
While live editing with another Omniverse client one might notice that while the Unreal Editor is in the background edits might not appear in the editor viewport. This is because Unreal has a performance setting that uses less CPU while in the background. This setting can be disabled in the editor preferences by unchecking the “Use Less CPU when in Background”. The Omniverse USD plugin unchecks this setting the first time it is run within a project by default.
Live Sessions (In Unreal Level) Experimental
Introduced in 200.2
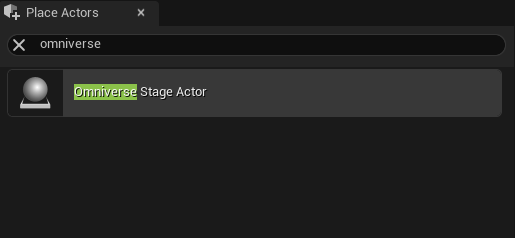
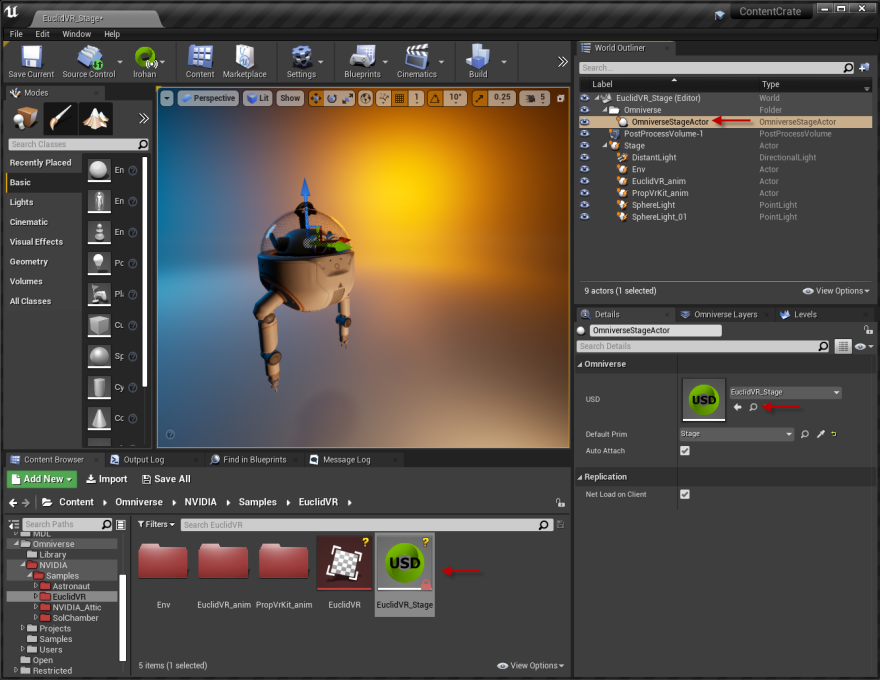
A new addition is the ability to have a live session within an Unreal Level. This is currently an experimental feature, but can come in handy when you only need to see immediate feedback for a selection of actors in a level. In order to use a Live Session within an Unreal Level, drop an OmniverseStage Actor into the Unreal Level.
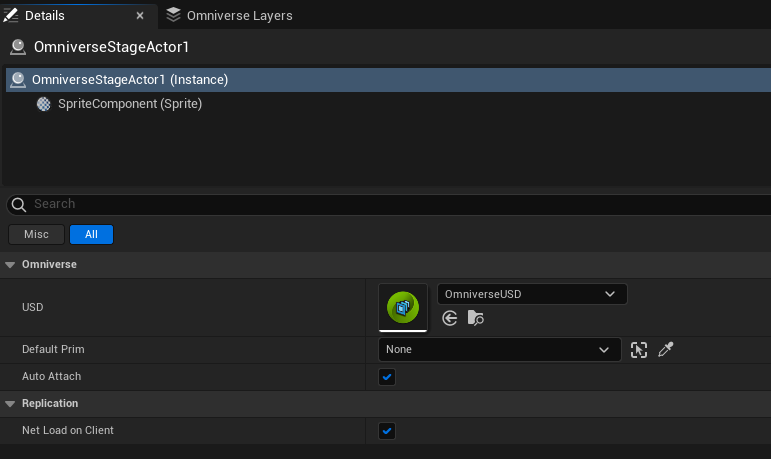
Select the OmniverseStageActor, in the details panel it will be pointing to OmniverseUSD under the USD settings.
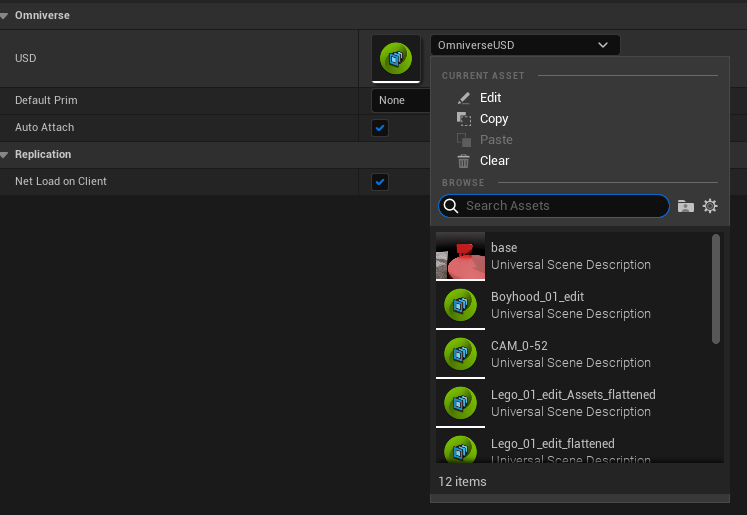
Change the path of the USD to a specific USD that you want it to represent. The drop down will display any USD files that were accessed through the Omniverse folder. You might see your camera location jump at this moment. The OmniverseStageActor is now accessing the last location of the perspective camera in the USD file referenced.
Note
Once this is done, you are able to go live as per the instructions above. Currently, once a OmniverseStageActor is dropped into your scene, any object placed into it after that point (USD or uasset) gets added to the USD file being referenced in the OmniverseStageActor. This only happens for objects that can be represented through USD. We are looking at updating this workflow, but it is currently a drawback.
Cleaning Local Assets
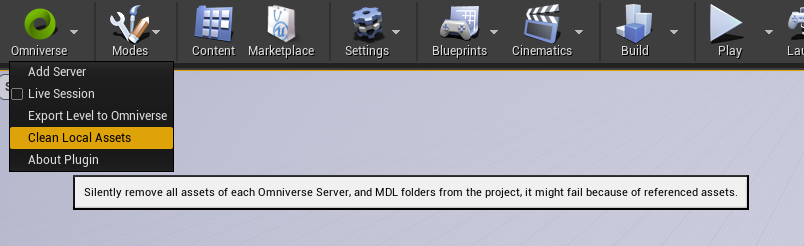
Inevitably there are sometimes issues with the intermediate files contained in the project’s /Content/Omniverse folder that represent USD and MDL assets on the server. One way to resolve these issues is to simply remove them from the disk and let the plugin recreate/rediscover them from the server. Note, if the assets are open, or have been opened, it’s possible that the editor will not be able to delete them. Also, note that cleaning these folders locally does not remove the data on the Omniverse Nucleus server(s), it removes the intermediate Unreal assets on disk.
Opening USD Files
Users can open and use USD files already organized and managed from an Omniverse Nucleus server within Unreal. Opening USD files from local disk is not currently supported.
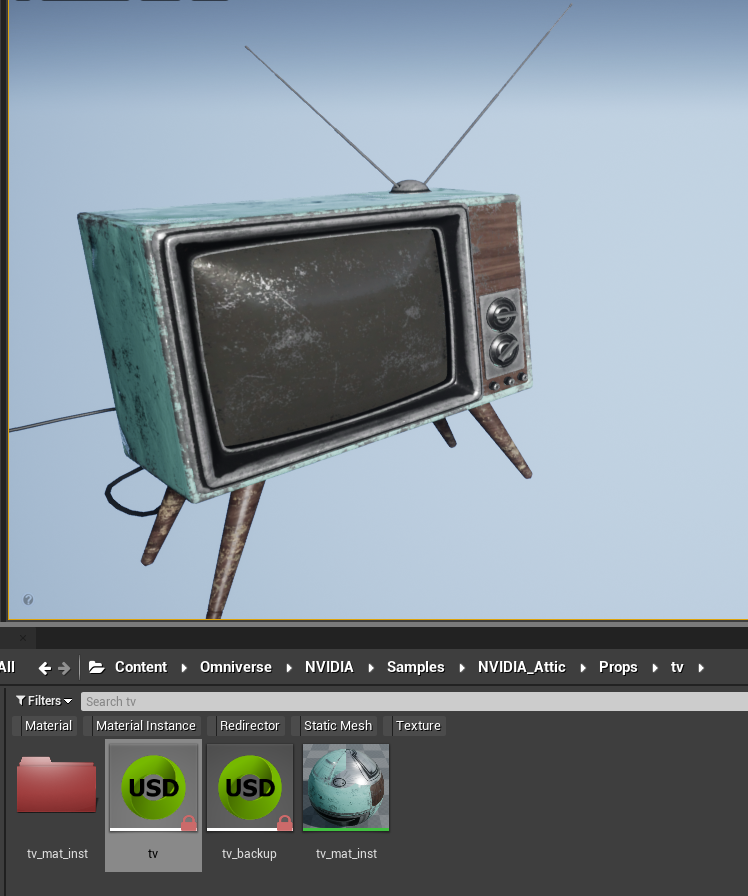
Once connected, the Unreal Connector lists all Omniverse Nucleus assets in Unreal Content Browser within a directory called /Omniverse. Any USD files existing within your Omniverse Nucleus can be opened, used and edited by Unreal. Any edits or modification can be saved or live synced to your Omniverse Nucleus. While USD files do not get converted, Omniverse textures and material (MDLs) are converted to native Unreal Texture assets and materials automatically and are managed by the Omniverse Unreal Connector.
To find the stage in the Content Browser after it is opened, select the Omniverse/OmniverseStageActor in the World Outliner. From the Details panel select the magnifying glass to browse to the USD stage in the Content Browser.
Saving USD Files
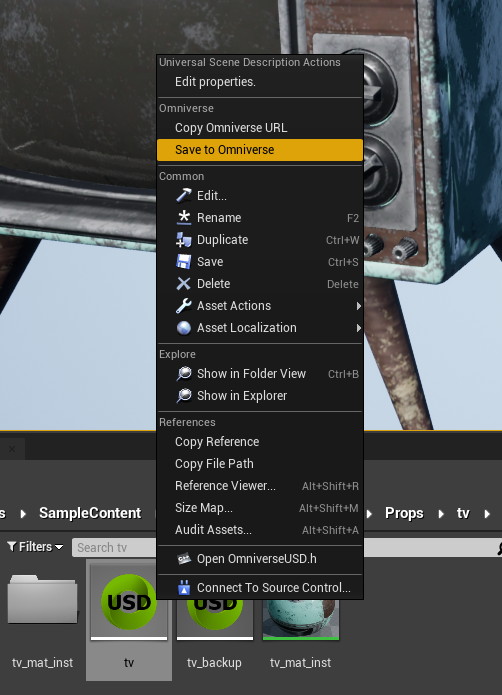
When working in a non-live workflow changes made to a USD stage are not sent back to the Omniverse Nucleus server immediately and save must be done explicitly. To save a USD file’s changes back to the server, right click on the USD in the Content Browser and select Save to Omniverse. Note that the File menu’s Save, or the Control+S keyboard shortcut do not save the USD back to the server, they will simply save the intermediate Unreal asset, which is ineffective. When saving a file there is an option to set a checkpoint comment if the Nucleus server supports checkpoints.
Running Python Scripts
Introduced in 201.0
In Unreal Engine 5.x the Connector now uses the same USD library as Epic’s USDImporter plugins. Python scripts can be run that operate on USD stages that reside on Nucleus servers using Omniverse URLs. See Scripting the Unreal Editor Using Python for more information about using Python within Unreal Editor.
Any Python scripts that ship with the Connector can be found in the /NVIDIA/Omniverse/Content/Python folder.
A quick example is to run the add_random_nvidia_materials.py script. This script will open the specified USD stage and apply a random Omniverse Material from the material library to all UsdGeomMesh prims. To run it, open the Output Log execute the script:
py X:\UE_50\Engine\Plugins\Marketplace\NVIDIA\Omniverse\Content\Python\add_random_nvidia_materials.py omniverse://localhost/Projects/ManyMats/ManyMats.usd

Copying Omniverse URLs
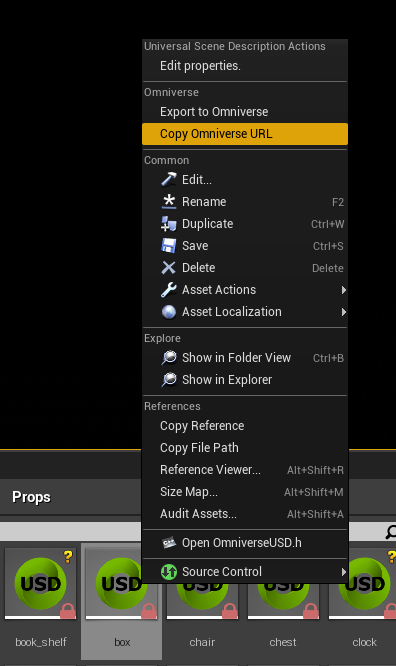
To copy the Omniverse URL into the clipboard, right click on an Omniverse asset from within the /Game/Omniverse folder in the Content Browser and select Copy Omniverse URL.
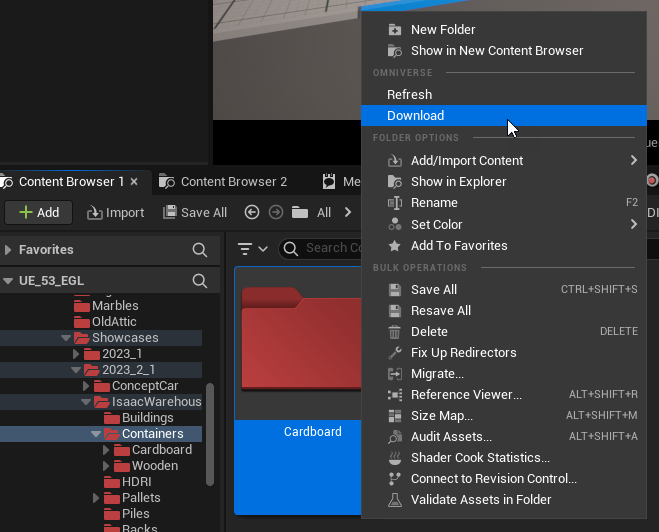
Downloading Files and Folders from Nucleus
Introduced in 204.0
To download files or folders from an Omniverse Nucleus server, right click on an Omniverse file from within the /Game/Omniverse folder in the Content Browser and select Download.
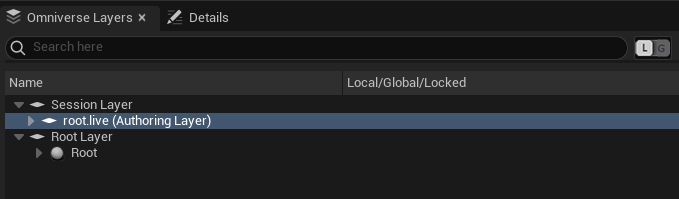
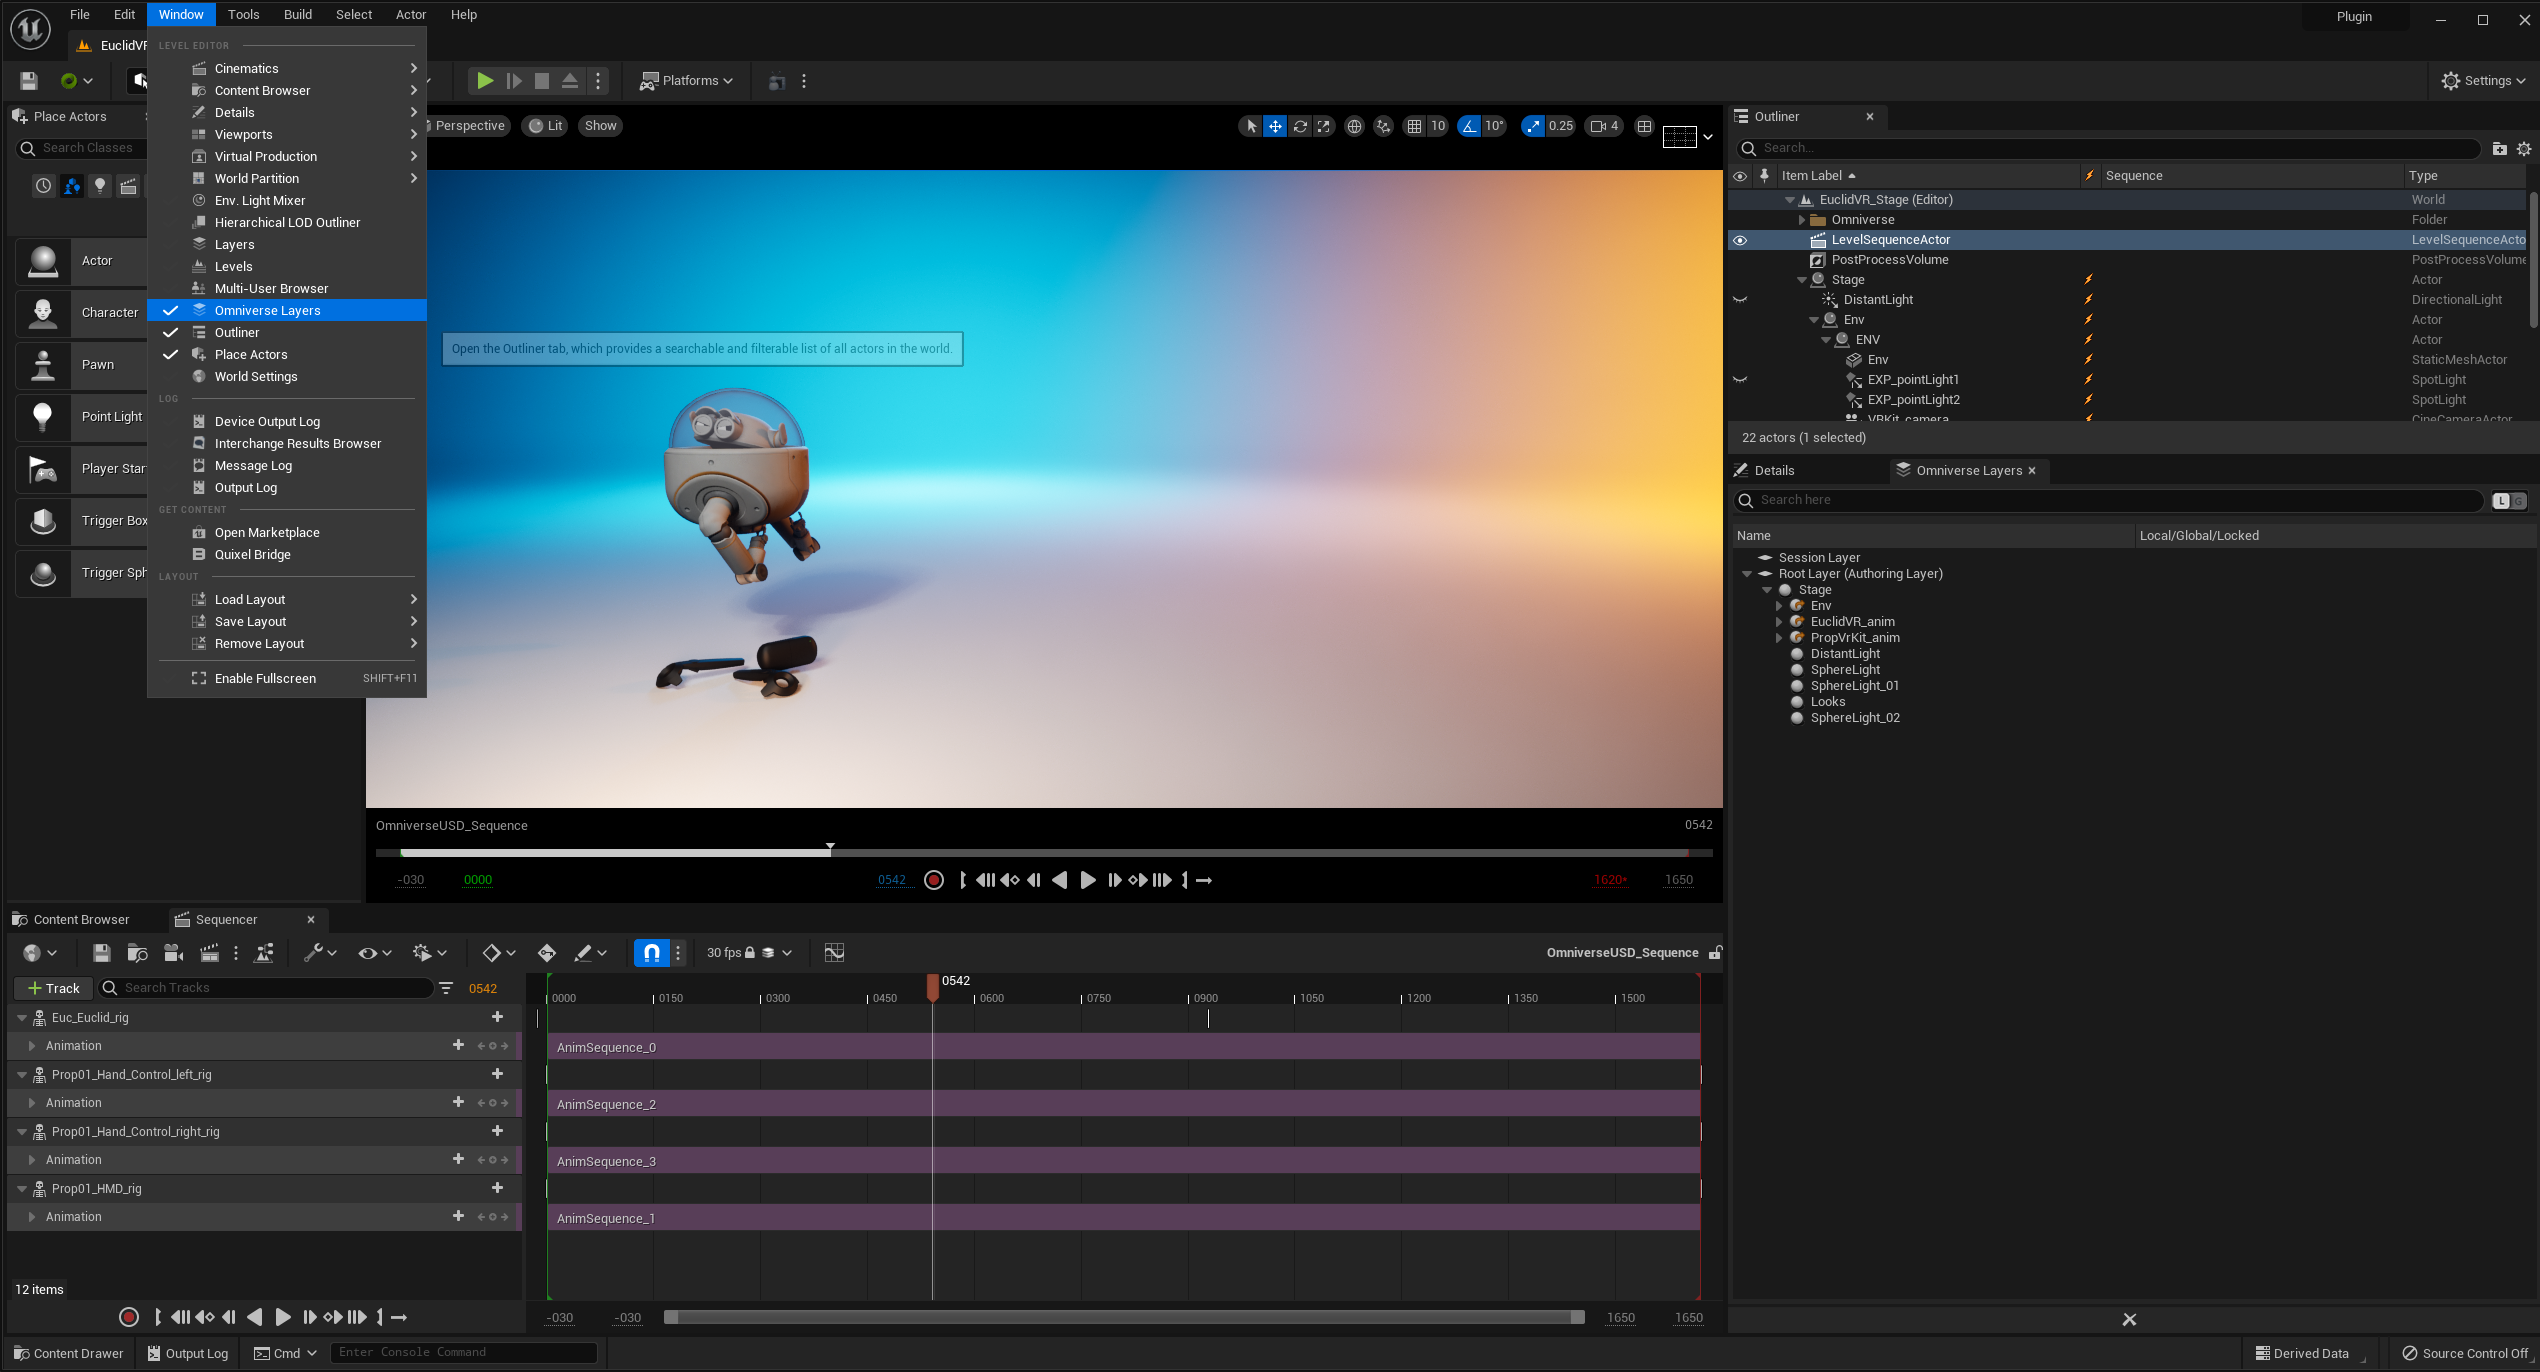
The Omniverse USD Layers Tab
Omniverse USD Layers can be viewed, manipulated, and locked by opening the Omniverse Layers tab from Window menu and selecting the Omniverse Layers option.
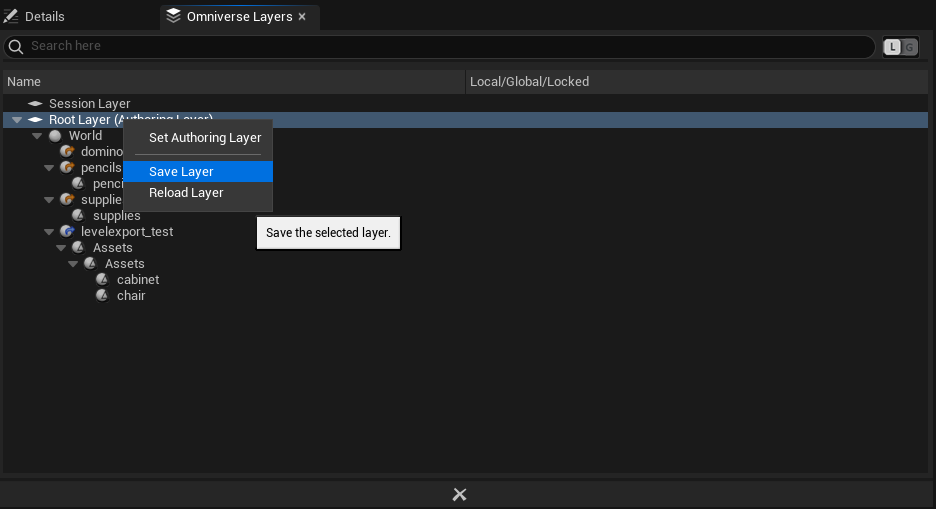
You are able to save and reload a USD by right clicking in the Omniverse USD Layers window.
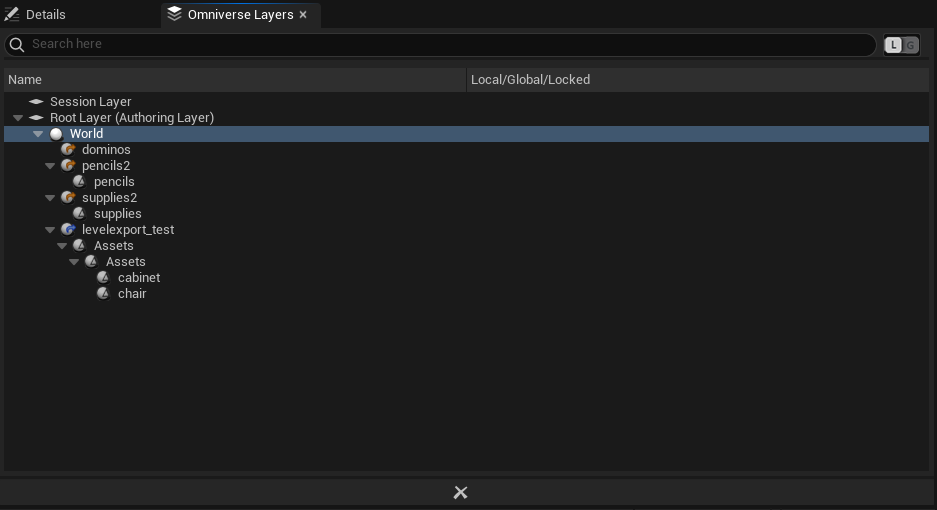
You are also able to see deltas/references/payloads in the Omniverse USD Layers window. Deltas are changes made to the USD and are represented by small triangles. References are represented as orange arrows and payloads as blue arrows.
Importing USD as Unreal Assets
Introduced in 105.1
USD and MDL content can be imported to Unreal Assets and used as completely native assets that can function in a packaged application without the Omniverse Connector. These asset types are supported:
Static Meshes
Skeletal Meshes
Skeletal Mesh Animation
Level Sequence keyframed timesamples
Materials (from MDL)
The Connector also supports importing from local disk.
Importing USD Stages and Assets from Omniverse
A stage can be imported from the Content Browser by right clicking on the USD file.
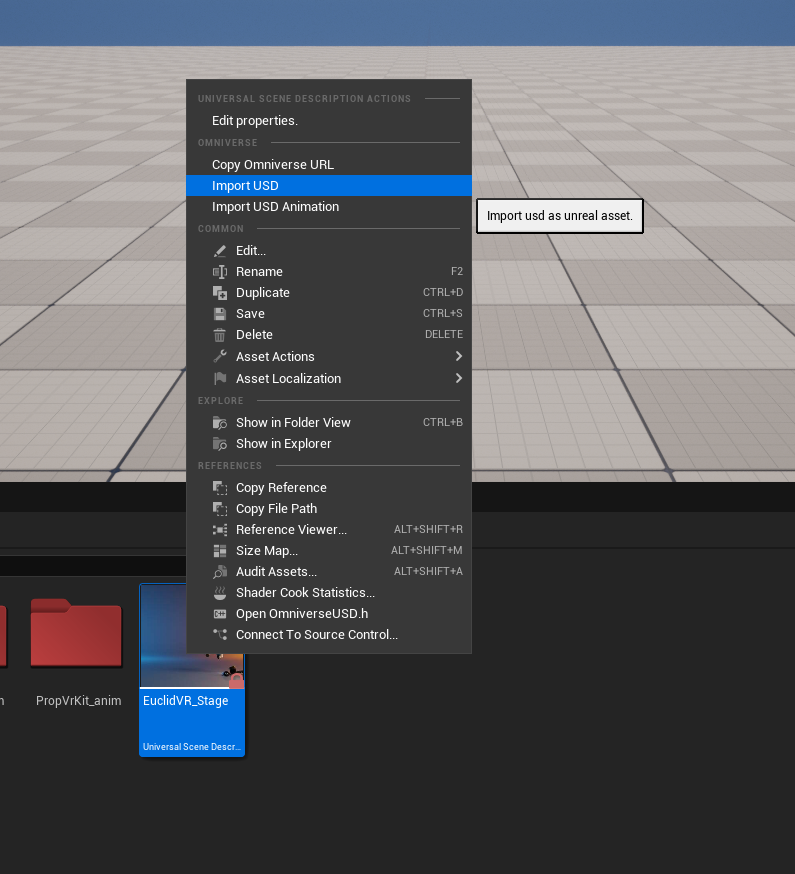
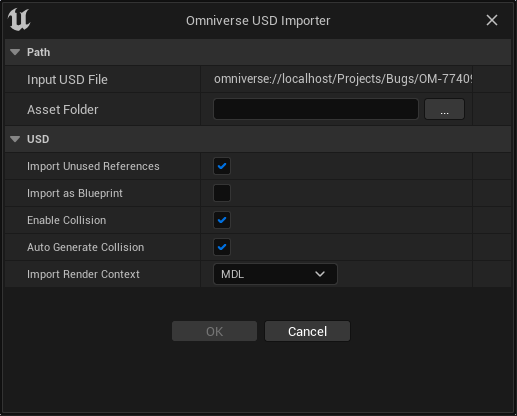
These options are presented when importing:
Option |
Result |
|---|---|
Asset Folder |
The destination for the imported Unreal Assets
|
Import Unused References |
If unreferenced materials are present in the USD stage they will still be imported (default to checked)
|
Import as Blueprint |
If the USD file is a collection of meshes that compose a structure (and even animation), this is useful to collect them as a Blueprint asset
|
Enable Collision |
If enabled, collision will be enabled on meshes when importing Omniverse USD assets
Introduced in 202.0
|
Auto Generate Collision |
If enabled, convex collision will automatically be generated when importing Omniverse USD asset
Introduced in 202.0
|
Import Render Context |
The material render context to use when importing material bindings (MDL, Unreal, or USD Preview Surface)
Introduced in 202.1
|
In this example, a USD stage was imported (without “Import as Blueprint” checked) and a level was created with all of the meshes, lights, etc. represented just as they were in USD.
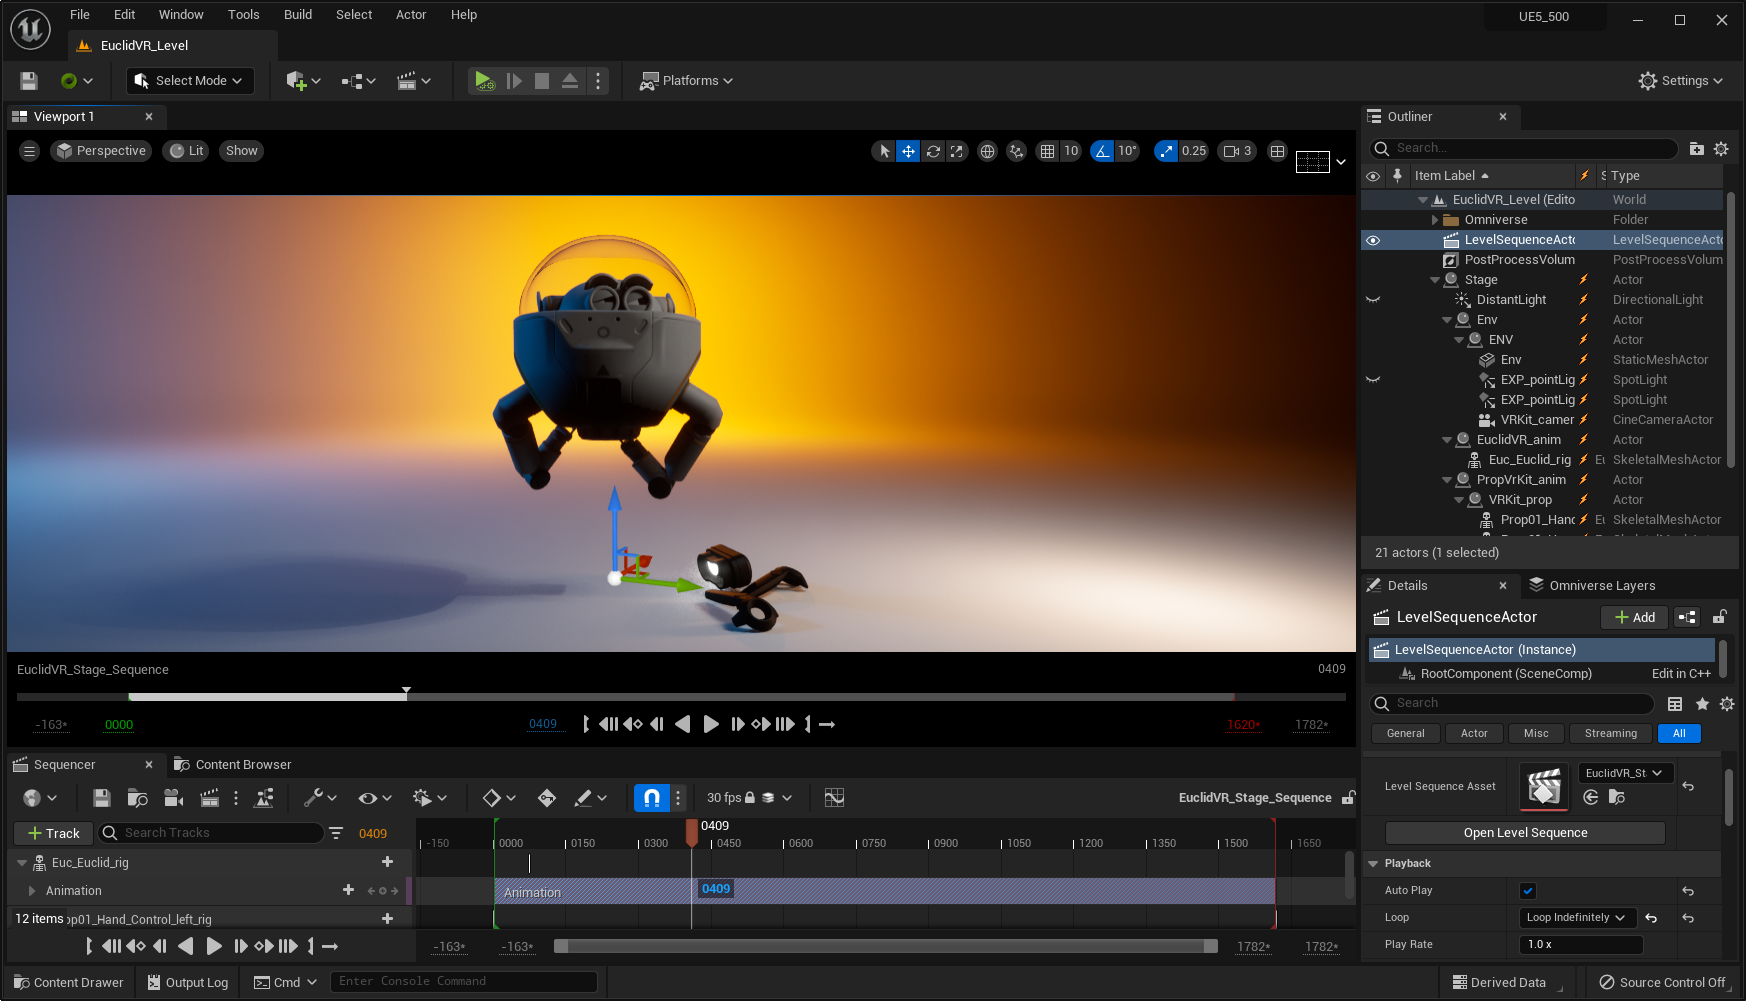
The imported assets are structured under the “Asset Folder” in a specific hierarchy in this release. This will become more flexible in future releases, but currently they are are layed out like this:
<ImportedUSD Folder>
Animations
Materials
Meshes
Textures
This assembly was imported from the Marbles collection with “Import as Blueprint” selected. It includes many meshes, materials, and animations all collected in a Blueprint hierarchy.
Importing USD Assets from Local Disk
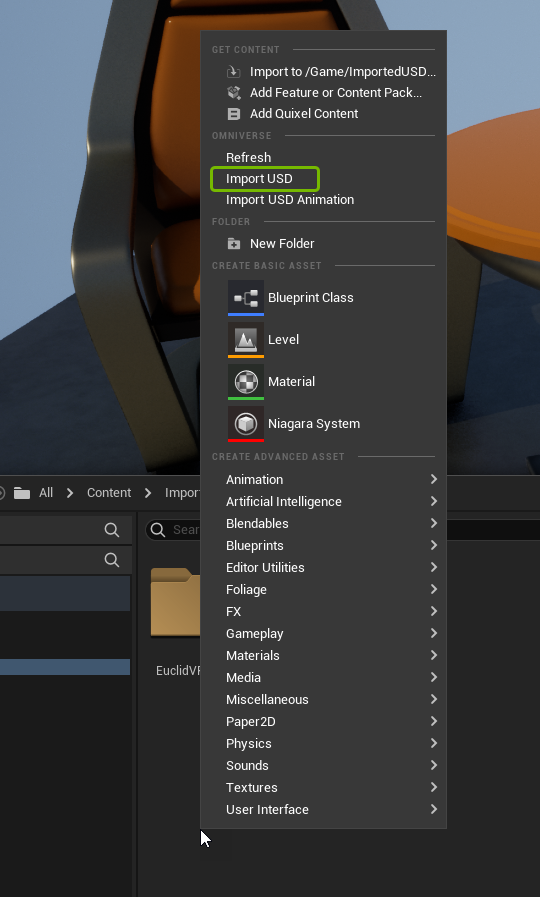
The Connector also supports importing USD content from the local hard drive. To do this, right click in the Content Browser in a folder where the USD is to imported as Unreal assets. The import dialog will match the one above for importing from Omniverse, except the “Input USD File” must be specified instead.
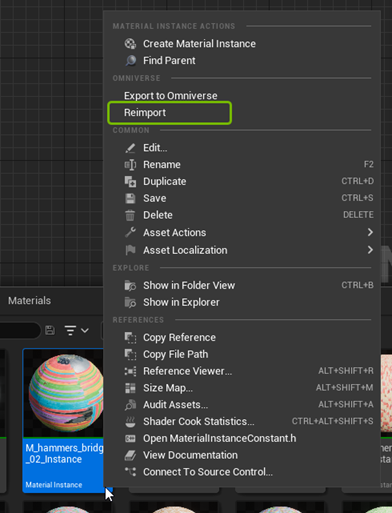
Reimporting USD Assets from Omniverse
The Connector allows for reimporting of meshes, materials, textures, etc in case changes were made to the source USD in Omniverse and these changes were needed in the Unreal asset. To reimport an asset from Omniverse you must use the “Reimport” option under the Omniverse right-click context menu. The standard Unreal “reimport” workflow is not used.
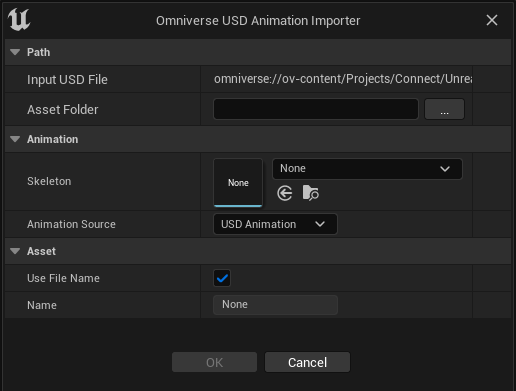
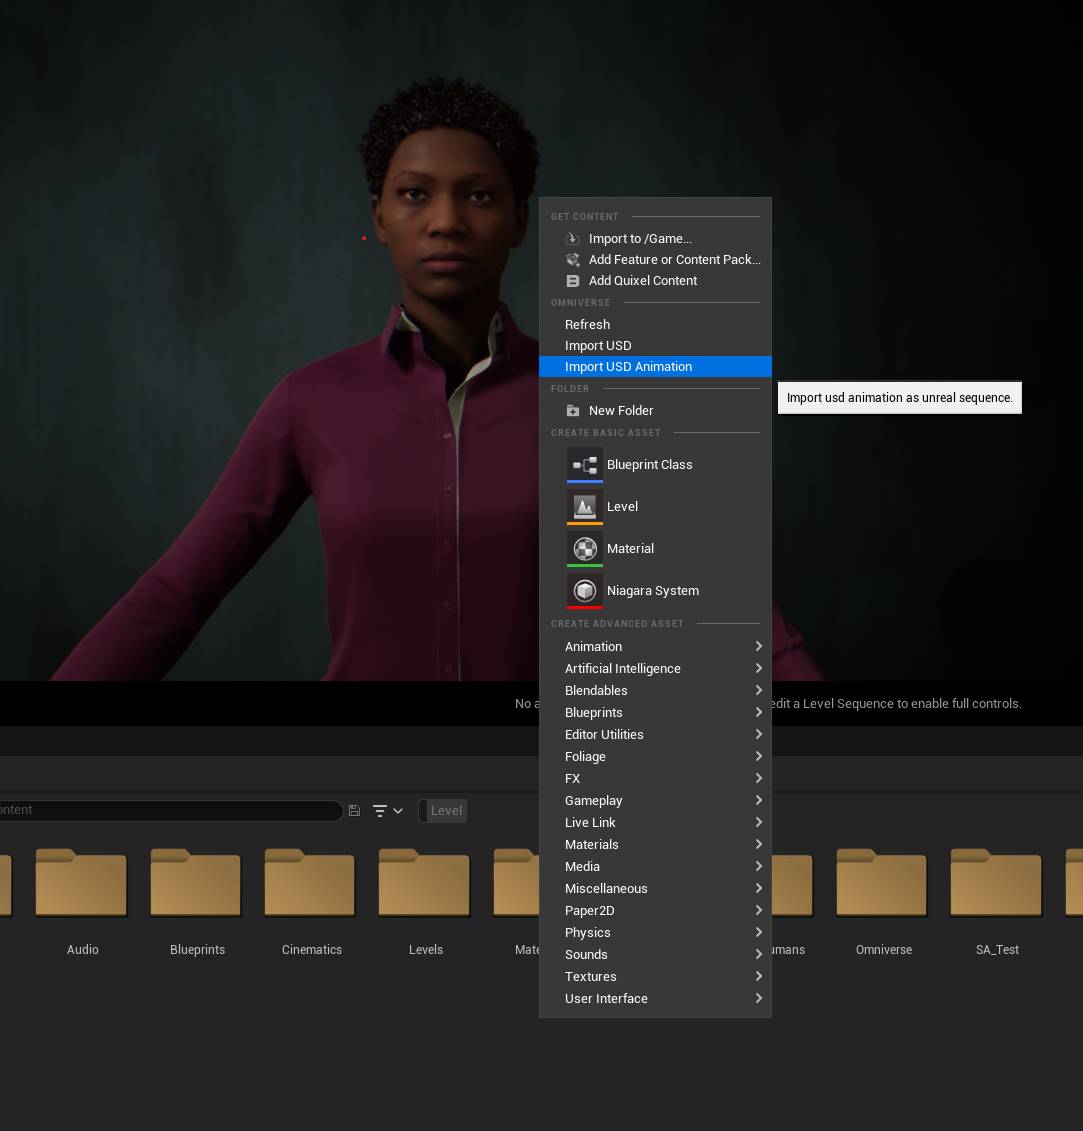
Importing USD Animation
To import standalone USD animation clips from local disk, right click within the Animation Sequence’s destination folder and select Import USD Animation. If importing from Nucleus, right click on a USD from the /Omniverse folders and select Import USD Animation.
Option |
Result |
|---|---|
Input USD File |
The source USD file that contains an animation
|
Asset Folder |
The destination for the imported Unreal Assets
|
Skeleton |
The Unreal Skeleton asset that must match the bones or blend shapes in the USD animation
|
Animation Source |
Selects the animation source type to import.
-
USD Animation (default): imports blendshape or skeleton time samples-
Audio2Face MetaHuman Curves: imports custom MetaHuman curves that the Audio2Face application exports |
Use File Name |
If enabled, the Unreal Animation Sequence asset will have the same name as the USD file
|
Name |
Optional name for the Unreal Animation Sequence asset. The USD prim name will be used if set to
None |
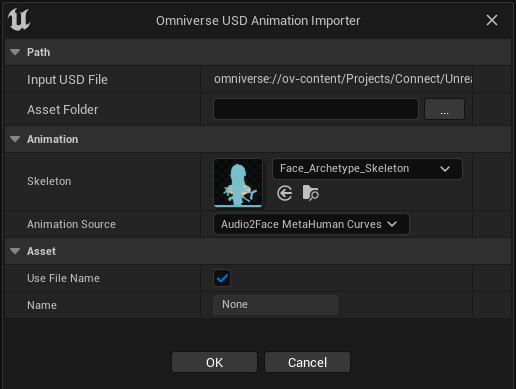
Importing Audio2Face Facial Animation
Introduced in 103.1
Omniverse Audio2Face USD facial animation curves for MetaHuman characters can be imported after they are exported using the Blendshape Conversion option from Audio2Face’s Data Conversion tab. Since the animation curves need to interact with Unreal animation assets directly, the workflow is slightly different than the rest of the USD workflow from the Omniverse Connector. The facial animation curve USDs can be imported from either local disk or Nucleus and they are saved as Animation Sequence Unreal assets. Once imported, there is no connection or mapping back to the USD file, it’s a one-time import.
If you want to import a file from local disk, right click within the Animation Sequence’s destination folder and select Import USD Animation. If importing from Nucleus, right click on a USD from the /Omniverse folders and select Import USD Animation.
When importing facial animation a dialog box will pop up requiring some input from the user:
A destination path for the Animation Sequence Unreal asset
A skeleton, the required MetaHuman skeleton is
Face_Archetype_SkeletonThe
Animation Sourceshould be changed toAudio2Face MetaHuman CurvesAn alternate Unreal Animation Sequence asset name. If left empty, the USD name of the importing SkelAnimation prim is used.
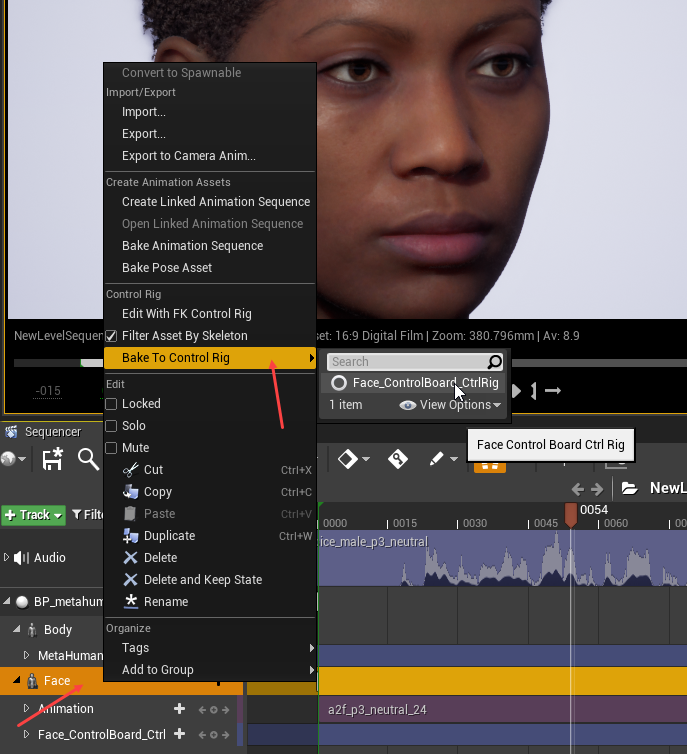
This Animation Sequence may now be opened in the Animation Editor or added as an animation track for the MetaHuman Face skeletal mesh. If there’s an existing Face_ControlBoard_CtrlRig track, that can be deleted.

If further edits to the Animation Sequence are required the animation can be baked to the Face Control Rig using the right click option on the Face skeletal mesh.
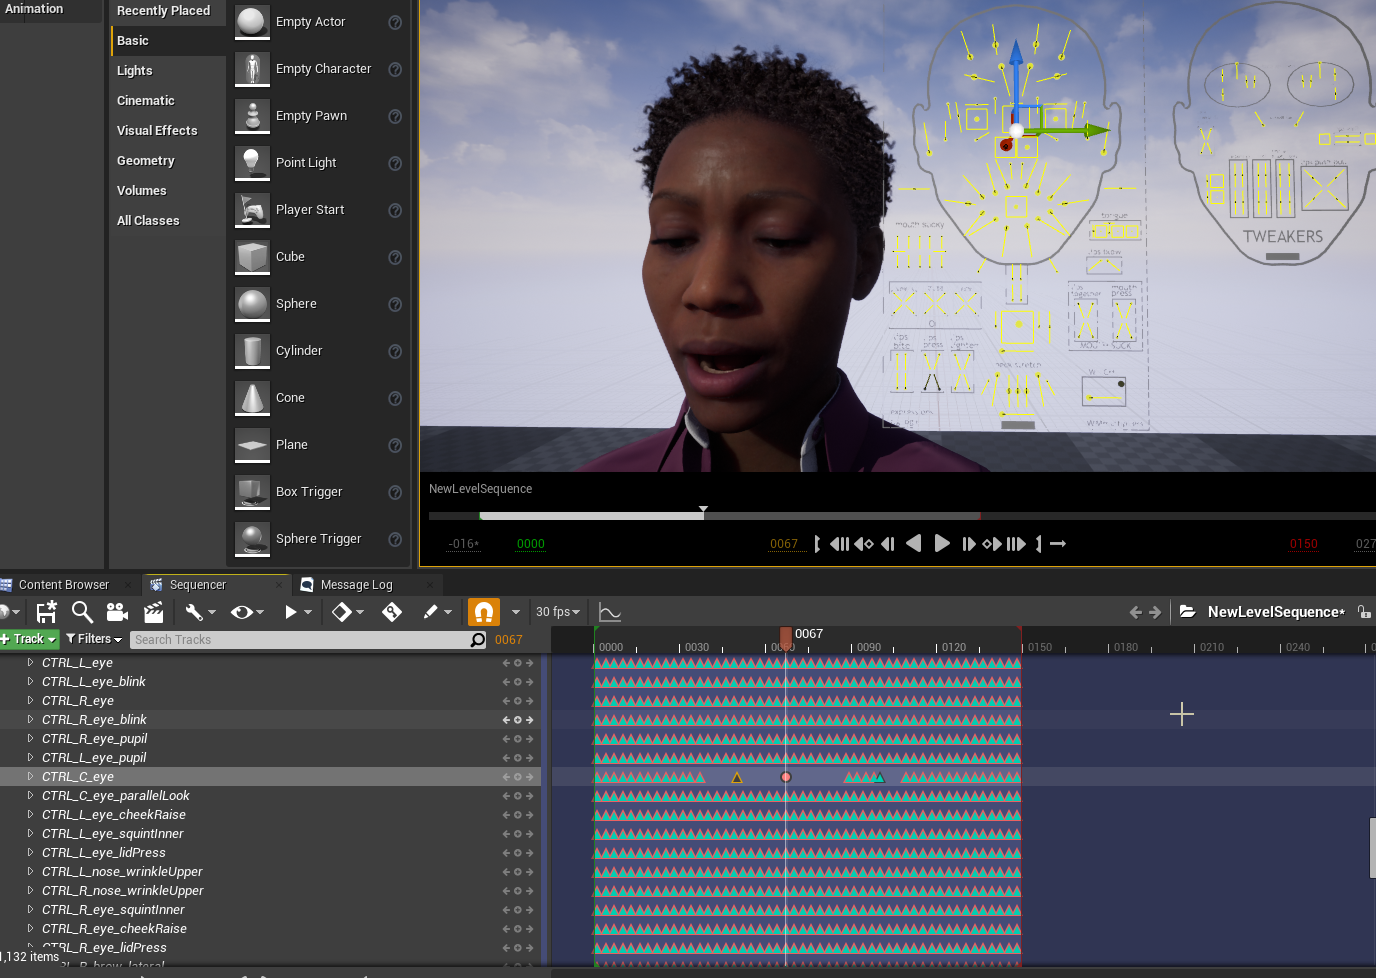
Control curves can be tweaked using the Face Control Rig. In this image the eyes were drawn downward using a new keyframe.
If the desire is to have all of this animation and mesh data back in USD format in Omniverse, the Sequence or Take Recorder should be used to capture a sequence. This captured sequence can then be inserted into a level and exported as USD. This is outlined in the Animation Export to Create tutorial .
Exporting to Omniverse (as USD and MDL)
Note: before trying to export anything to Omniverse, ensure that the editor has a valid connection to an Omniverse Nucleus server.
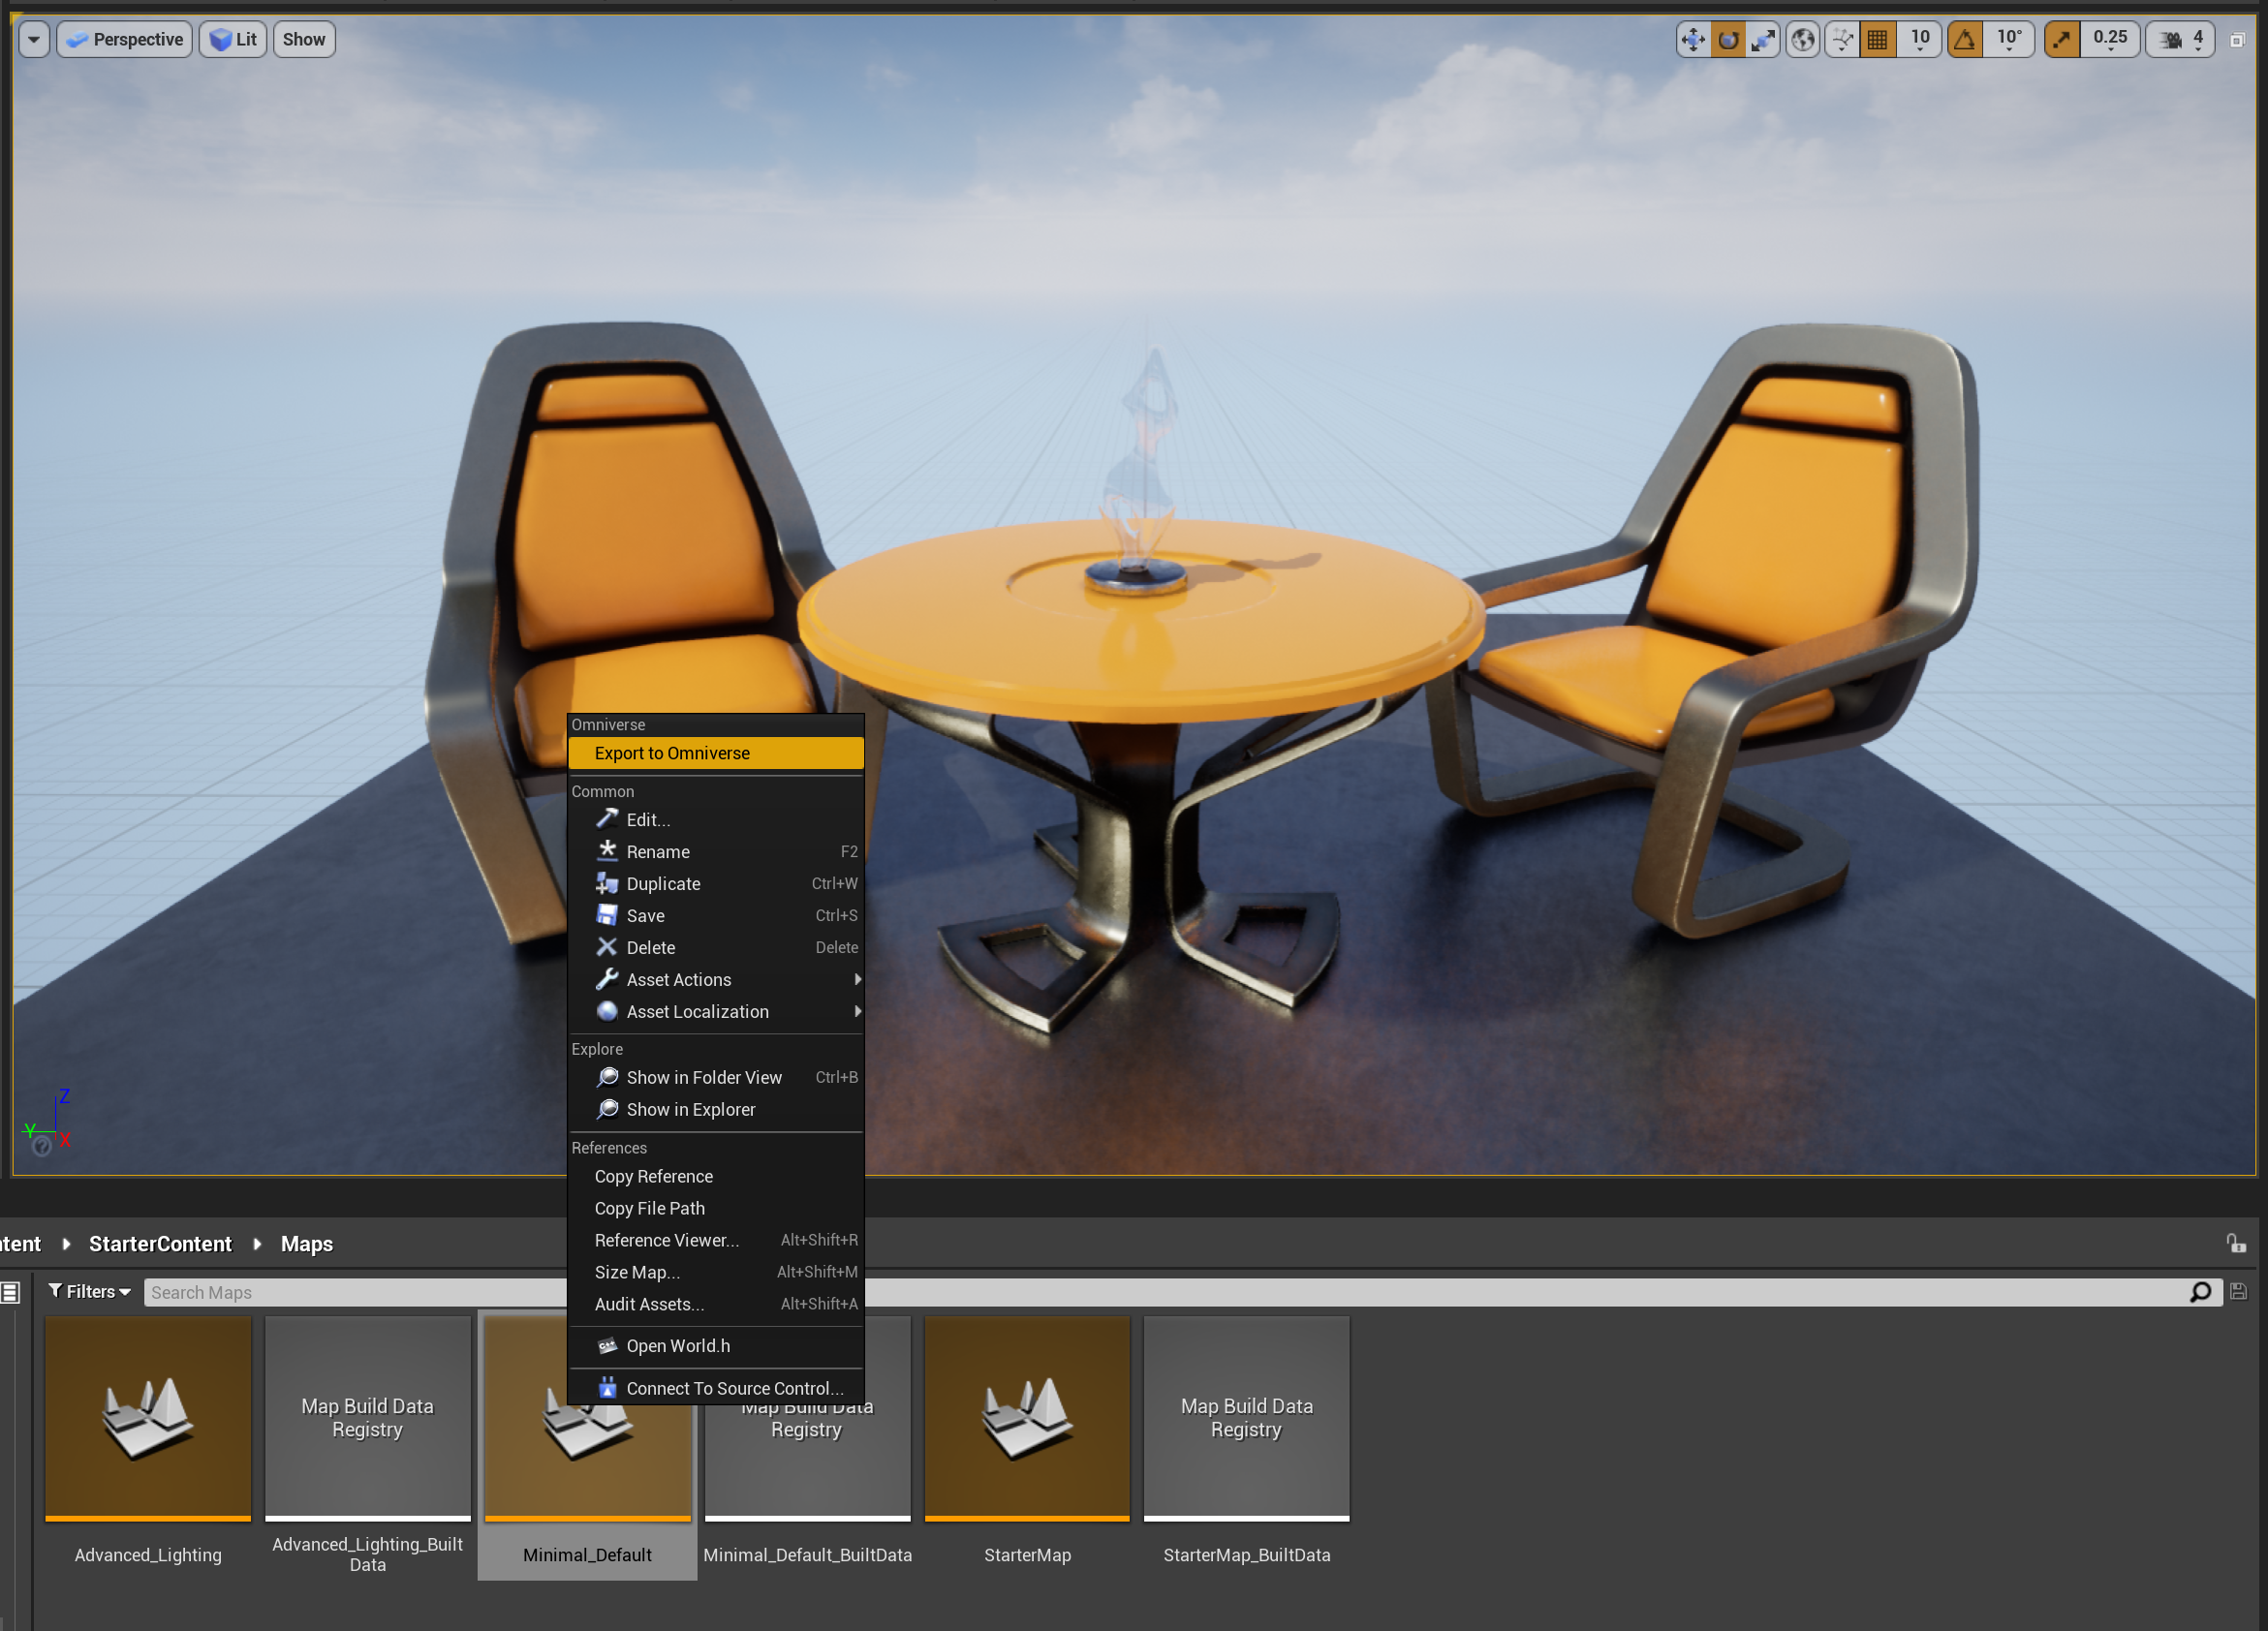
- These types of assets can be exported to Omniverse as USD or MDL files by right clicking on them and choosing Omniverse Export in the Content Browser
Maps
Meshes
Materials
Actors in a level can also be exported to Omniverse as USD by right clicking on the in the World Outliner and choosing Omniverse Export
Make sure that the output folder is under the
/Game/Omniversefolder, otherwise there’s no mapping back to the Omniverse Nucleus serverMeshes, lights, and cameras found inside of Blueprint actors are also exported
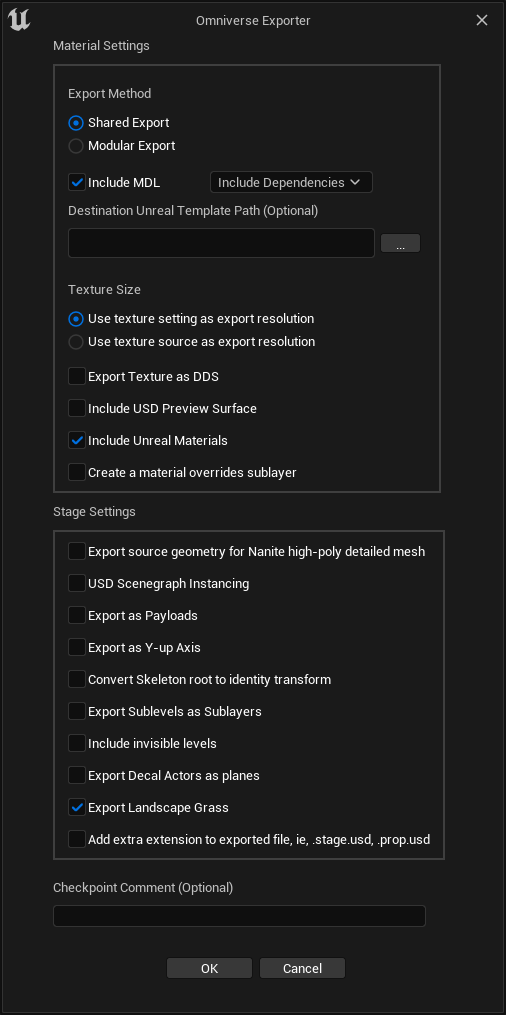
Export Options
Option |
Result |
|---|---|
Export Method |
Shared organizes materials so they can be shared by many assets
Modular exports a material for every asset so that assets and their materials are all self-contained
|
Include MDL |
Export MDL materials
|
MDL Dependency Option |
Include Dependencies - Duplicates the MDL dependencies (templates) in Destination Folder
Use Core Library Dependencies - Core MDL Library templates are referenced
|
Destination Unreal Template Path |
Destination Folder on Omniverse Nucleus for the MDL dependencies (templates)
Note: A file must be selected, but only the folder is used
|
Texture Size |
Use Texture Setting or Source as Exported Texture Size
|
Export Texture as DDS |
Save DDS Files to Destination Path and reference them from materials
|
Include USD Preview Surface |
Export Preview Surfaces
|
Include Unreal Materials |
Export a reference to an Unreal material (note, when importing/opening the material must be available in the within the Unreal project)
|
Create a material overrides layer |
Export a sublayer that contains all of the material reference overs for the stage. Also create USD files for each material rather than including them in the prop stages.
|
Export physics data |
Include collision data with static meshes (not available with Unreal Engine 5.0 due to USD Schema updates)
|
Export source geometry for Nanite high-poly detailed mesh |
Brute-force export the Nanite geometry as USD geometry data. (only available with Unreal Engine 5.0, this generates a LOT of triangles)
|
USD Scenegraph Instancing |
Make every referenced mesh in a stage an instance. If the stage has duplicate meshes this can greatly
reduce geometric GPU memory in another renderer, but the editing workflow may be hampered.
|
Export as Payloads |
Use Payloads instead of References in the stage
|
Export as Y-up axis |
If checked, USD and MDL are exported with a Y-up stage up-axis rather than the default Z-up
|
Export Sublevels as Sublayers |
If checked, levels are exported as USD sublayers and referenced in the root stage
|
Convert Skeleton root to identity transform |
This option will convert a Skeleton’s root node to an identity transform to assist downstream tools that require this. All animations exported during this export will be transformed properly so they’ll work in downstream tools.
|
Include invisible levels |
If checked, levels that are hidden will be included in the export and marked as invisible
|
Export Decal Actors as planes |
If checked, decal actors are exported as “floating” plane meshes offset from their base mesh
|
Add extra extension to exports |
Stage files will be named .stage.usd, props will be named .prop.usd
|
Checkpoint Comment (Optional) |
Set the checkpoint comment on the Nucleus server for each exported file
|
MDL Templates
The MDL Core Library is a set of MDL templates shipped with every Connect plugin. An MDL preset can simply reference the template with requiring it to be in a particular location.
Reasons to choose “Include Dependencies”
You want all exported MDL presets to use a specific MDL template which you control and possibly modify.
You are concerned that as the MDL templates are modified and improved over time that there might become parameter incompatibilities between the different Connect plugins
Reasons to choose “Use Core Library Dependencies”
You want to avoid the proliferation of the MDL templates as you do many different MDL exports
You want to use the newly updated MDL templates that ship with Omniverse Kit or other Connect plugins rather than what existed when you exported
Export USD and MDL to Local Disk
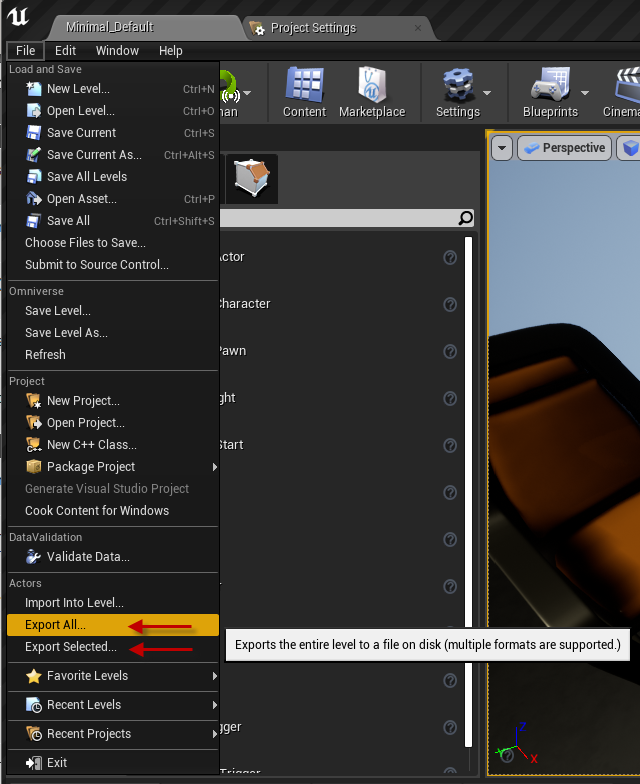
Maps or meshes can be exported directly to disk as USD and MDL files with the File menu’s Export All or Export Selected options. Export All will export the entire open map while Export Selected will export the selected actor from the editor viewport.
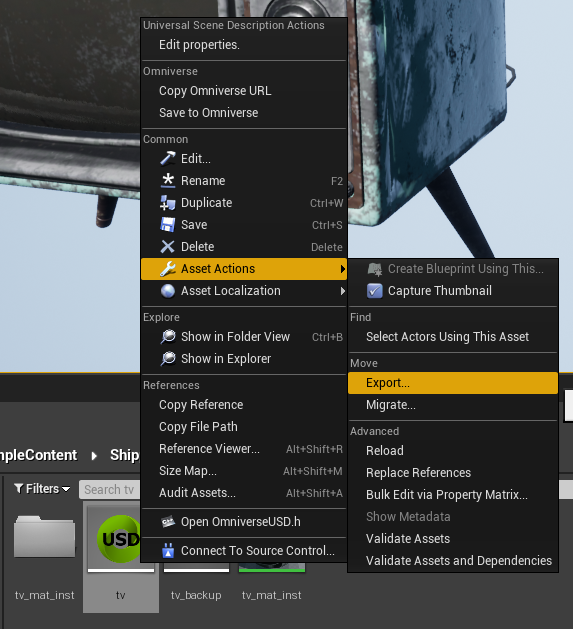
Stages and MDL materials can also be exported from the Content Browser. Right click on the asset, select Asset Actions, then Export.
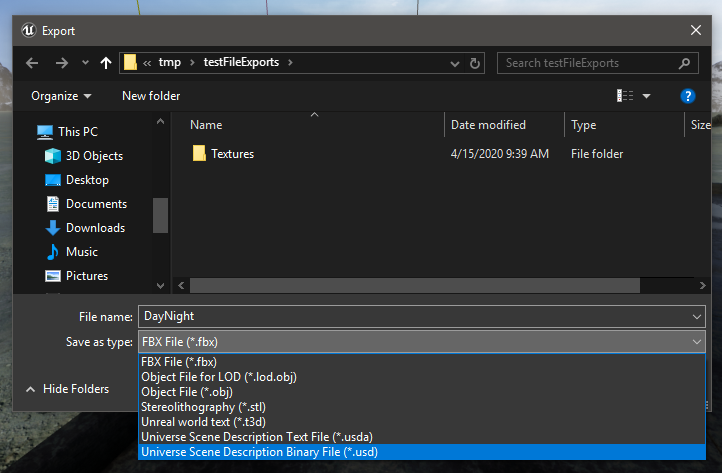
Once the File menu option is selected (or right-click-export), the file type, or “Save as type” should be set to .usd or .usda.
Export Commandlet
The Omniverse commandlet automates the process of exporting levels to Omniverse.
Instructions: The “-AllowCommandletRendering” flag must be added to the command line if exporting Text Render actors or USD Preview Surface.
In the following example, the FooSample map from the BarProject project is exported to a local server for testing:
BarProject.uproject -run=Omniverse -AllowCommandletRendering -map=FooSample.umap -path=”/Projects/FromUnreal” -user=admin -omniverse_server=localhost:3009 -log
Export Options:
Option |
Effect |
|---|---|
MAP |
The map name (with or without) extension. Note, specify the entire path to the map (
/Game/Maps/MapToExport) if the name is ambiguous |
PATH |
The output path on the Omniverse server path (absolute)
|
USD |
The name of the USD file. Defaults to the Map name
|
USER |
The user name
|
PASSWORD |
The password (Defaults to the user name)
|
OMNIVERSE_SERVER |
The address of the desired server
|
Export Flags (true/false):
Flag |
Default State |
Effect |
|---|---|---|
MDL |
True
|
Include MDL in export
|
MODULAR |
False
|
Materials are exported for each asset
|
PREVIEWSURFACE |
False
|
Generate preview surfaces
|
ADDEXTRAEXTENSION |
False
|
Add extra extension to exported file, ie, .stage.usd, .prop.usd
|
COPYTEMPLATE |
True
|
Copy templates to export directory
|
TEXTURESOURCE |
False
|
Use the source texture for the texture size
|
VERBOSE |
True (non-shipping)
|
Emit some messages along with the export for debugging
|
STATICMESHES |
False
|
Convert Actors to StaticMeshActors
|
COLLISION |
False
|
Export collision components
|
BEGINPLAY |
True
|
Call BeginPlay on world to create runtime components. Default true.
|
TEST |
False
|
Log operations but do not perform the export.
|
Multiple Maps: If you supply a ‘+’ delimited set of maps following the -map option, the maps will be exported at the path using the map name as the sub-folder and the name of the USD file.
Example:
MyProject.uproject -run=Omniverse -AllowCommandletRendering -map=Island.umap+Cavern.umap+Moon.umap -path=”/Projects/FromUnreal” -user=admin -omniverse_server=ovserver.mycompany.com
Generates:
/Projects/FromUnreal/Island/Island.usd
/Projects/FromUnreal/Cavern/Cavern.usd
/Projects/FromUnreal/Moon/Moon.usd
Exporting Omniverse PBR Materials
Introduced in 103.2
The Omniverse PBR materials available from Omniverse USD Composer can be used to prevent MDL export translation when materials are exported. Only the parameters are mapped and the material will be presented as an OmniPBR just as if the material were added in Create. To use this method create a Material Instance from the /Game/MDL/Base materials that are created by the Connector.
These materials are supported:
OmniGlass
OmniGlass_Opacity
OmniHair
OmniPBR
OmniPBR_ClearCoat
OmniPBR_ClearCoat_Opacity
OmniPBR_Opacity
OmniSurface
OmniSurfaceBlend
OmniSurfaceLite
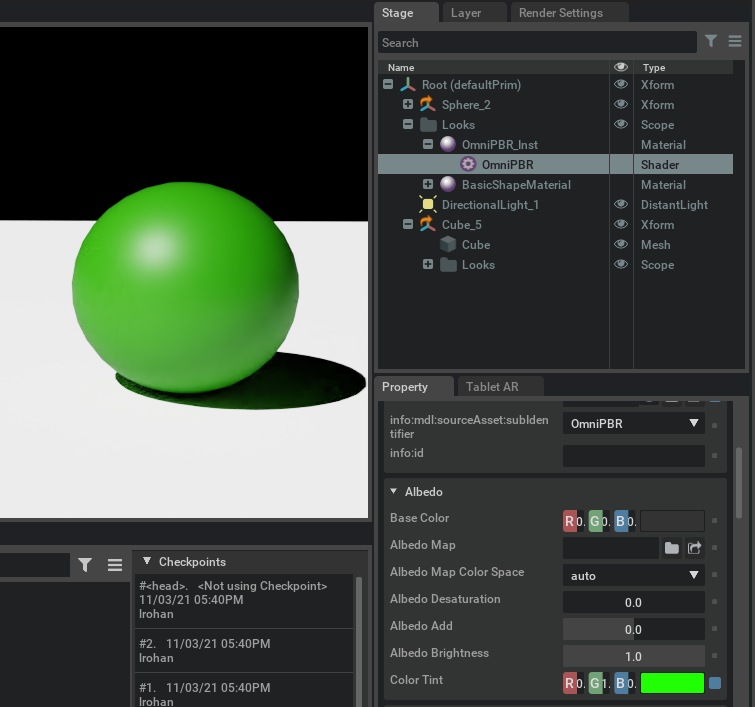
Take these steps to export an OmniPBR based MDL from Unreal:
Create a material instance from OmniPBR and move it to another folder (outside of
/Game/MDL/Base)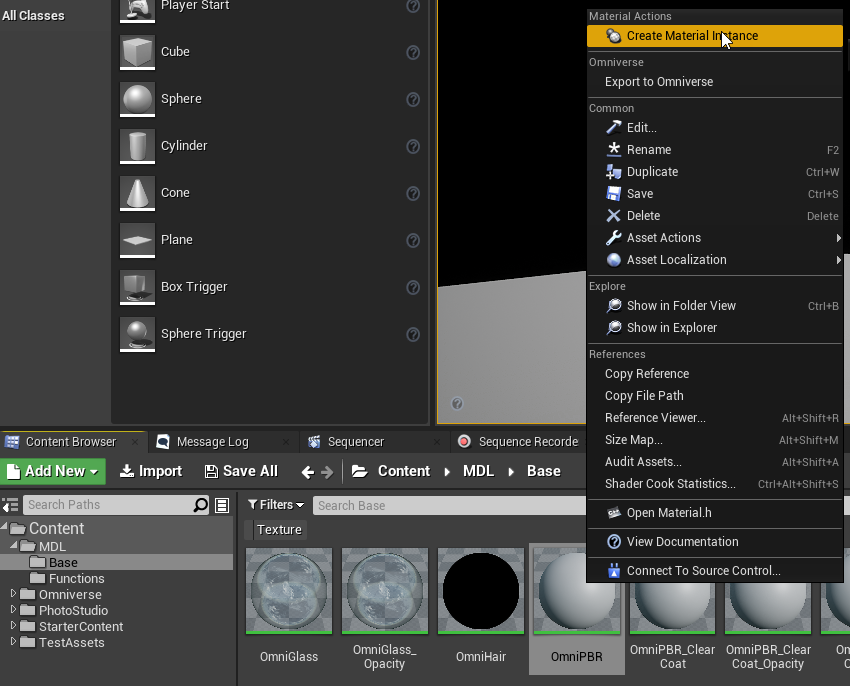
Apply the Material Instance to a mesh and edit the whichever parameters are required
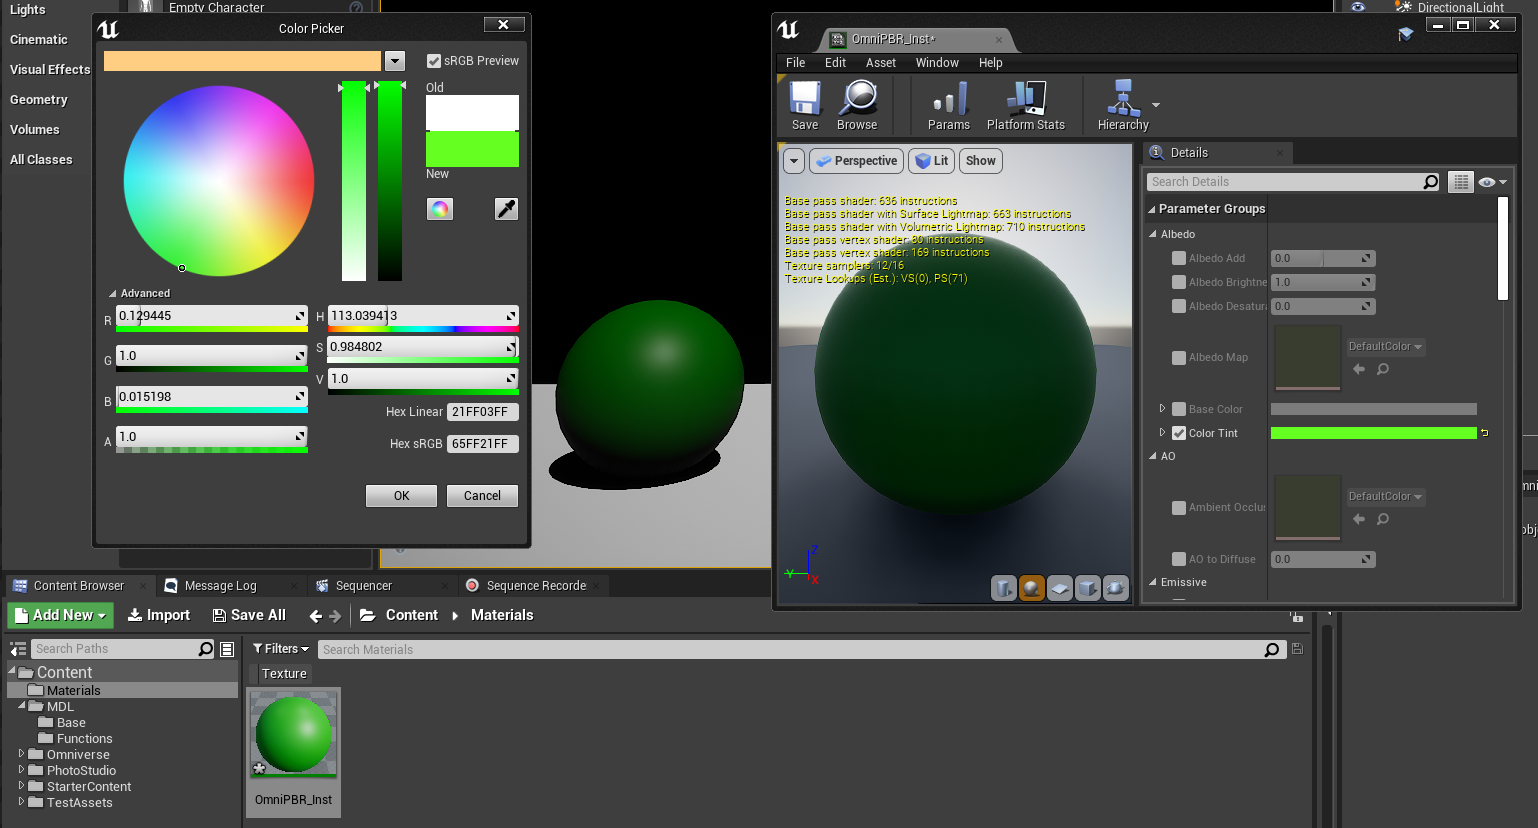
Export the stage or mesh, specify if the MDLs should be copied or if the core library dependencies should be used
Observe in Omniverse USD Composer that OmniPBR.mdl is the referenced MDL and the parameters are all mapped correctly
Material Reparenting For Omniverse Core Materials
Introduced in 204.0
OmniPBR, OmniGlass, USD Preview Surface and other Omniverse core MDL materials are used frequently in Omniverse. There is a lot of feedback from creators that they would prefer to direct the translation of these material to and from their own Unreal Engine materials rather that allowing the Unreal Connector to do it.
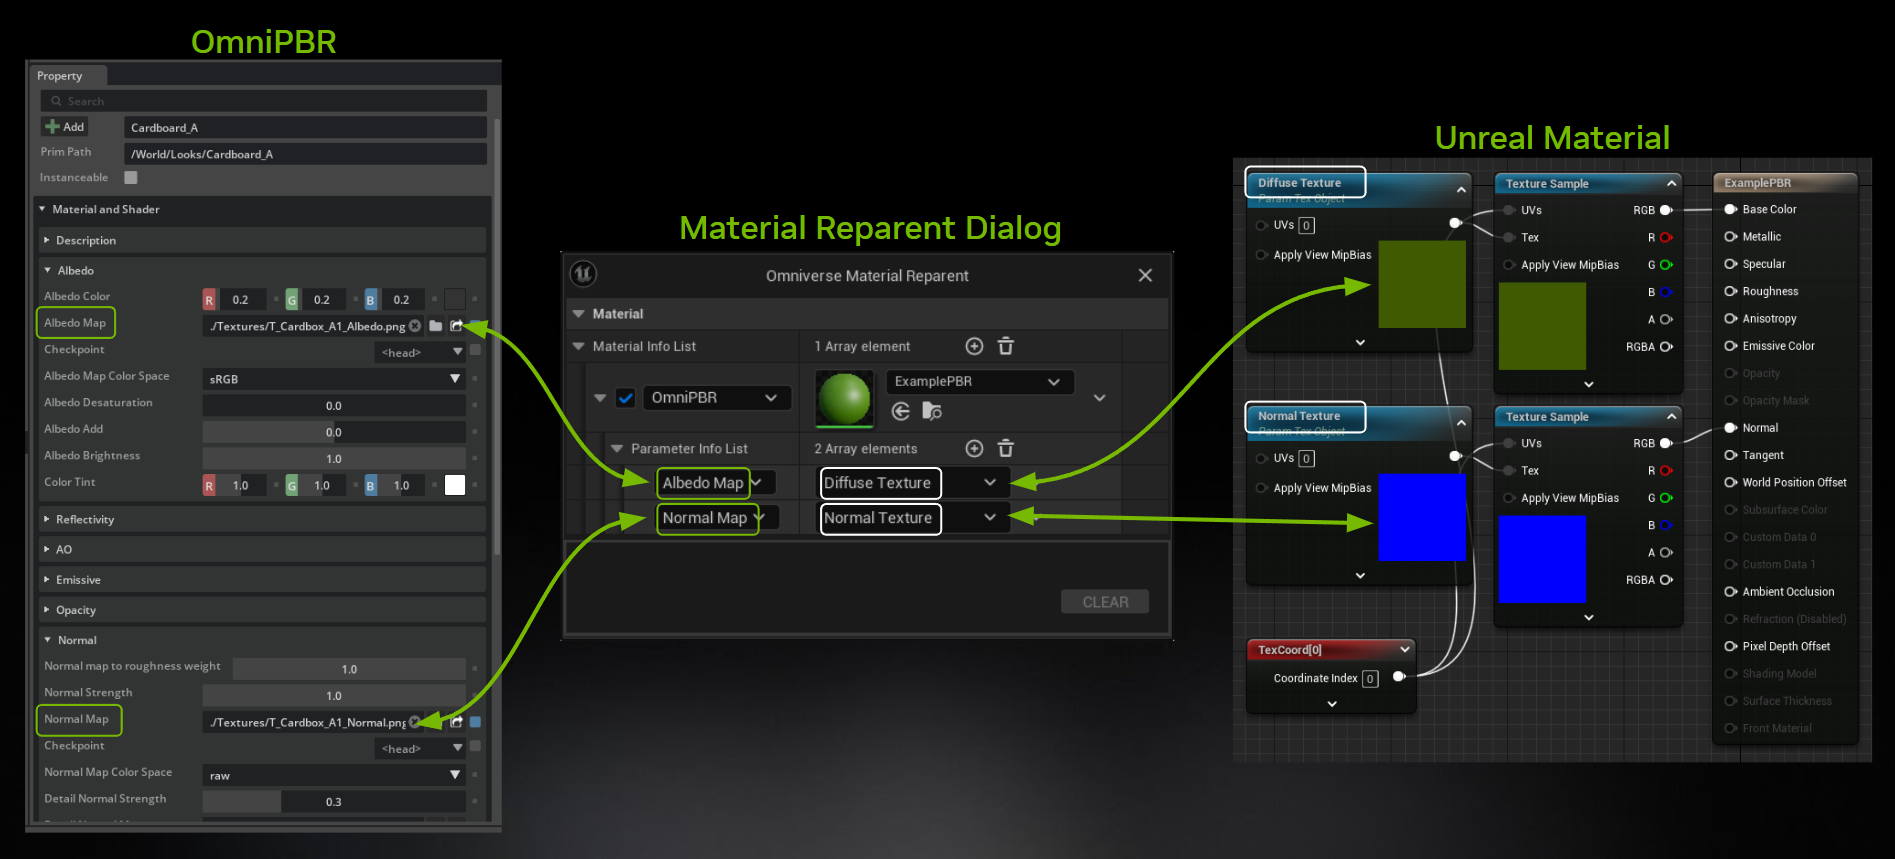
Material Reparenting allows creators to use the Omniverse core MDLs and USD Preview Surface as a material exchange with Unreal materials. If the imported Material Instance for the core MDL doesn’t meet the needs of the Unreal project, any Unreal material can be used in its place as long as the parameters match. If the parameter names don’t match exactly, a list of parameter assignments can be provided to minimalize the changes required for the Unreal material.
Reasons to use Material Reparenting:
Directed Conversion: Because Unreal Engine and Omniverse use different material systems and renderers, there can be discrepancies when automatically translating with MDL as the material exchange. With Material Reparenting the user can use the parameter set available in different Omniverse core MDLs and map them to their own Unreal material parameters, producing whatever look they want.
Performance: The autogenerated Unreal OmniPBR material is quite complex. While it is often useful as an immediate preview conversion, when used in some content the shader complexity is too high to be practical. With Material Reparenting, a much simpler parent material can be automatically swapped out instead of using the complex, autogenerated core material that ships with the Unreal Connector.
The reparenting system is intended to be as forgiving as possible. It is not necessary for ALL parameters to line up, but any parameters that match between the core MDL and the user’s Unreal material will be forwarded.
Example
OmniPBR_Simple is an example native Unreal material located in Connector’s Omniverse/Content folder. This can be found by showing Engine and Plugin content in the Content Browser. It covers many of the important OmniPBR parameters and requires no parameter mapping pairs since all the parameter names line up with the core MDL. If you wish to modify a custom material to reparent nicely with OmniPBR then OmniPBR_Simple demonstrates some core concepts that can copied (Virtual Texture handling is one of them).
Technical Details
Persistent settings storage
Settings from the Material Reparent dialog are stored in the project’s Config/DefaultEngine.ini file under the [/Script/OmniverseRuntime.OmniverseMaterialReparentSettings] section.
Virtual Texture/UDIM support
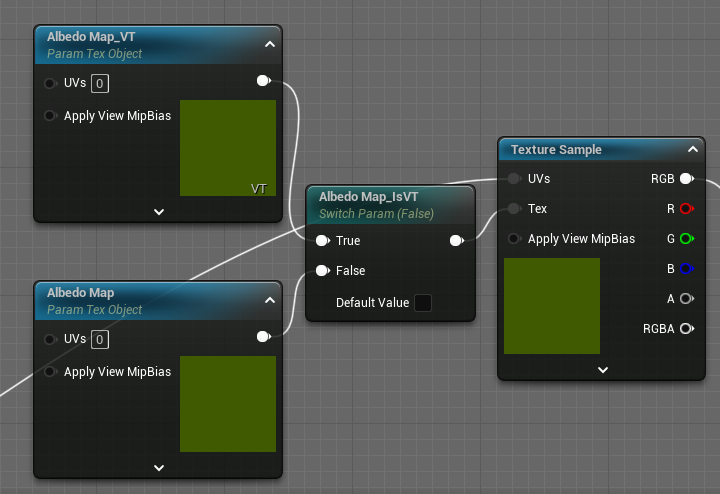
If you want your Unreal material to handle switching between OmniPBRs with or without UDIMs, a block of three material nodes is required (here the Albedo Map parameters are handled from OmniPBR):
Albedo Map- TextureObjectParameter - contains the texture parameter when the material is not using UDIM/VT
Albedo Map_VT- virtual TextureObjectParameter - contains the texture parameter when the material is using UDIM/VT
Albedo Map_IsVT- StaticSwitchParameter - isTrueif the texture from the Omniverse core MDL is using UDIM/VT
For example, this block can be copied from OmniPBR_Simple, which is included in the Omniverse plugin. Note that if you use different parameter names you need to specify them in the Material Reparenting dialog. In the example here these parameters align with the OmniPBR Albedo Map and Map_VT parameter names.
Material Fail-Safe Export
Introduced in 204.0
The material fail-safe system is set up to help in instances where the Connector is unable to convert Unreal materials to MDL. There is a robust process of MDL conversion that retains much of what makes Unreal materials, however, there are some functions that are not supported in MDL. See the Materials section of the Unsupported Features for more information.
With the material fail-safe system, instead of exporting an invalid MDL material, the Unreal Connector will bake out your material network and provide a USD Preview Surface representation of that material that works outside of Unreal Engine.
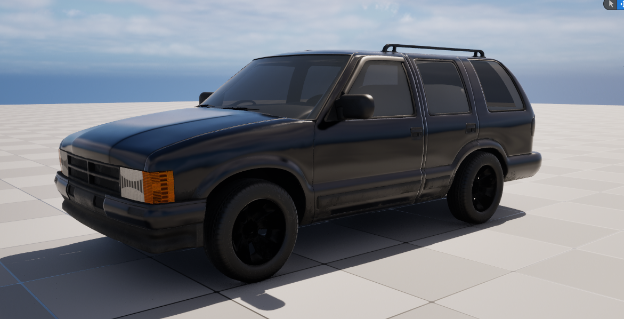
This is a vehicle in Unreal Engine:
When exporting with the Unreal Connector before material fail-safe was implemented, you could expect to see something like the following in Composer. It shows as red because it was unable to resolve a usable MDL file while exporting. With material fail-safe, you can expect results that are aligned with what you saw in Unreal Engine:
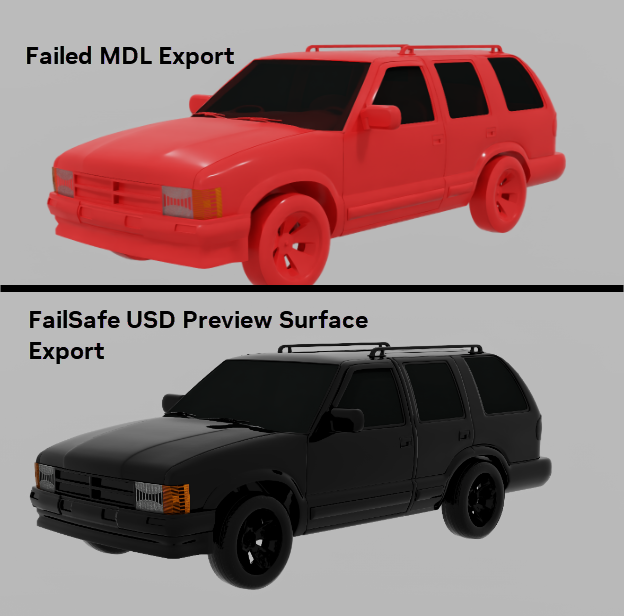
There is nothing you need to do in order to activate material fail-safe. It will automatically output a baked version of the material when it runs into errors in MDL distillation. Also, if you are using Virtual Textures, the Preview Surface will retain a high texture density by also exporting out baked UDIMs. Note, Preview Surface UDIM exporting is only available for Unreal 5.3 and newer.