Audio2Face
Omniverse ships Blender with an add-on that makes working with Audio2Face more convenient. This add-on, which includes an panel in the N Key Panel section of the 3D Viewport, is installed into this version of Blender by default.
Ref # |
Link |
|---|---|
1 |
|
2 |
|
3 |
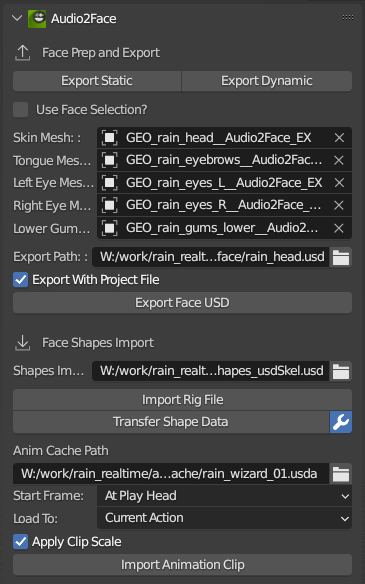
Face Prep and Export
In this section of the interface is all the functionality you’ll need to prepare your character meshes for Audio2Face, including splitting heads off of bodies in a way that will allow you to reconnect them once the shape transfer is complete.
The Export Static and Export Dynamic buttons will become active when there are meshes selected in the scene. Clicking Export Static will duplicate the selected mesh, putting it into an A2F Export Static collection. Export Dynamic will send duplicates to an A2F Export Dynamic collection. If Use Face Selection is checked, then the two Export buttons will become active only in Edit Mode. Clicking them in Edit Mode will allow you to specify the parts of the mesh you’d like to duplicate by selecting faces. This is useful for selecting only your character’s head for export.
Beneath these buttons is the Mesh Setup section. You can drag meshes from the A2F Export collection onto the sockets here. Skin and Tongue should be dynamic meshes, and the rest should be static. If you assign meshes here, they will be automatically populated in Audio2Face’s Full Face Meshes section under Character Setup. Static and Dynamic meshes that are not assigned to these sockets will be added to the Additional Mehses lists in Audio2Face. This automation will only occur if you select Export with Project File.
To finalize your face preparation, export to USD by first choosing a path, then clicking Export Face USD. As mentioned above, if Export With Project File is checked then your_file_name_project.usda will also be written, and will include all the preset mesh choices. When going into Audio2Face, the _project.usda file is the one that should be opened.
Face Shapes Import
With the regular USD Import functionality, the file will bring in a single bone armature and it also may be the wrong scale. By setting Import Path and clicking Import Rig File, these issues can be sidestepped. Make sure to pick the _usdSkel.usd version from the Audio2Face export!
After import, the head with all the shapes will be in an A2F Import collection. At this point you can click the Transfer Shape Data button. Provided you have not deleted your A2F Export collections and meshes, this will one-button transfer all the shapes from the cut-off head onto your original rig mesh. Shapes that have matching names will be replaced, but no other shapes will be removed or changed.
But what’s that little icon that’s been added next to the Import Shapes button?
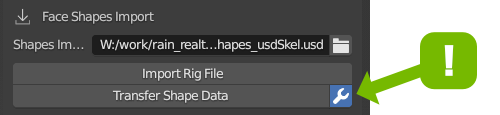
If you find that the shapes import moves points outside the face area (on fingers, legs, and so on), make sure this button is on before import. It is off by default as the more strict import process will take twice as long.
Anim Cache Import
Once the shapes are transferred, animations generated in Audio2Face can be exported as either JSON or USDA files and applied to your character in Blender. Please note that in this release of the add-on, USD files (the binary files) are not supported.
Option |
Description |
|---|---|
Anim Cache Path |
Path to the cache file, either an ascii .USDA or a .JSON exported from Audio2Face. |
Source Framerate |
Only available if a JSON clip is chosen! Allows you to specify the export framerate for the Clip. This affects Clip Scaling. |
Start Frame |
If set to At Play Head, the first frame of the animation will be aligned to the scene’s current frame. If set to Custom, then you are provided a field for entering the exact frame. |
Load To |
If set to Current Action, this will load the keys from the animation straight onto the Action for the Shape Keys on your mesh, overwriting any information that already exists. If set to Clip, the animation cache will be loaded as a Clip to the Non-Linear Animation Editor for further mixing with other clips. |
Apply Clip Scale |
If checked, the Clip’s key times will be scaled to match the current scene. For example, a Clip exported at 60 FPS and imported into a 30 FPS scene will have keys scale such that you will see keys on the frame, and at every half frame. |
Overwrite Existing Clips |
If checked, existing clips will be replaced when importing. |
The best way to explain all this is through video:
Asset Note
If you’d like to test using the same character, she’s Rain v2 from The Blender Studio.