Hydra Viewport
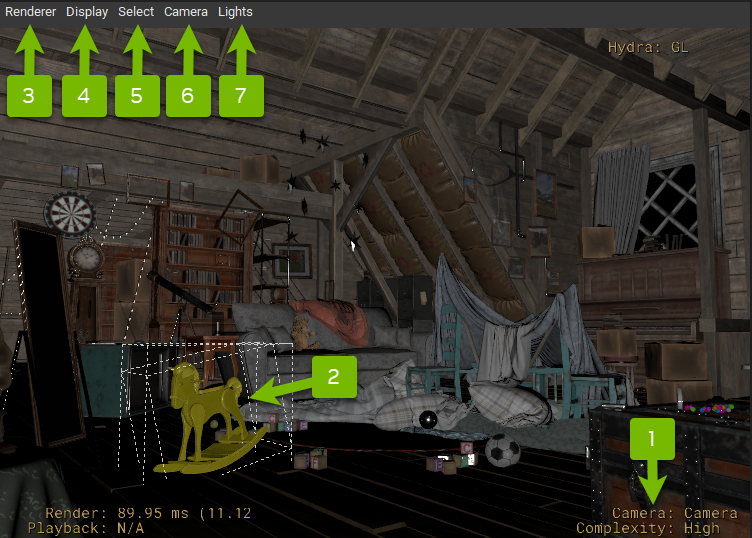
The Hydra Viewport shows a 3D render of the USD stage. USDView can be configured to load with different Hydra renderers.
Ref # |
Option |
Description |
|---|---|---|
1 |
Heads-Up Display |
Click and drag the marker to scrub through the animation. |
2 |
Selected Prim |
By default, the currently selected prim will highlighted yellow and display a bounding box wireframe. |
3 |
Renderer |
Opens the Renderer menu |
4 |
Display |
Opens the Display menu |
5 |
Select |
Opens the Select menu |
6 |
Camera |
Opens the Camera menu |
7 |
Lights |
Opens the Lights menu |
Right Click Menu
In the viewport, additional functionality can be found for the selected prim by right clicking and invoking the contextual right click menu.
Menu Item |
Action |
|---|---|
Jump to Enclosing Model |
Select the first ancestor prim with a Kind metadata value set. |
Select Bound Preview Material |
Select the Preview Material prim bound to the selected prim. |
Select Bound Full Material |
Select the Full Material prim bound to the selected prim. |
Make Invisible |
Set the selected prim’s visibility property to “invisible”. |
Vis Only |
Set the selected prim’s visibility property to “visible”. Make all other prims “invisible”. |
Remove Session Visibility |
Restore the selected prim’s visibility property value. |
Load/Unload |
Load/Unload the payloads for the selected prim and all its descendants. |
Activate/Deactivate |
Activate/Deactivate the selected prim. |
Copy Prim Path |
Copy the selected prim’s path to the clipboard. |
Copy Enclosing Model Path |
Copy enclosing model’s prim path to the clipboard. A Model is a prim with a Kind metadata value set. |
usdview asset |
Open the selected asset in a new USDView instance. |
Set As Active Camera |
Set the selected prim as the active camera. |
Navigation
Within the viewport, you can use the following methods to navigate the three-dimensional space:
Focus
The focus control zooms the viewport camera in on a specific prim. When you focus on an prim, you can orbit that prim.
To focus, click a prim and press the F key.
Orbit
The orbit control rotates the viewport camera around a given point.
To orbit, first use focus to select an prim. Then, hold the Alt key and the left mouse button, and move the mouse.
Pan
The pan control moves the viewport camera parallel to the viewpoint.
To pan, hold the Alt key and the middle mouse button, and move the mouse.
Dolly
The dolly control moves the camera forward and backward in the space. There are two ways to dolly:
Scroll on your mouse wheel.
Hold the Alt key and right mouse button, and move the mouse.
Renderer Menu
The Renderer menu contains operations for changing renderers and modifying renderer settings.
Menu Item |
Action |
|---|---|
GL (Renderers) |
One or more available Hydra renderers are listed first. Check to enable. |
Hydra Settings |
Renderer settings. These can be different per renderer. |
Hydra AOVs |
Select an arbitrary output variables (AOVs) to display in the viewport. |
Hydra Commands |
Renderer Commands. (only utilized by some renderers) |
Pause Render |
Pause rendering. (only utilized by some renderers) |
Stop Render |
Stop rendering. (only utilized by some renderers) |
Display Menu
The Display menu contains operations for controlling the display in the viewport.
Menu Item |
Action |
|---|---|
Open |
Open a USD file as a stage. |
Reopen Stage |
Fully reopen the current stage. |
Reload All Layers |
Reloads all of the stage’s layers. |
Display Purposes |
Choose which display purposes to show. |
Heads-Up Display |
Choose which Heads-Up Display details to show. |
Selection Highlighting |
Set selection highlighting settings. |
Show Rollover Prim Info |
When enabled, shows prim information as a tooltip when hovering the mouse in the viewport. |
Enable Scene Materials |
Choose whether to render materials. |
Default Material Settings… |
Adjust the ambient intensity and specular intensity of the default material for prims without a material assigned. |
Color Management |
Select a color management profile. |
Background Color |
Select a background color for the viewport. |
Cull Backfaces (GL) |
Whether to cull backfaces. (only utilized by some renderers) |
Select Menu
The Select menu allows you to change your selection mode.
Menu Item |
Action |
|---|---|
Select Prims |
Clicking the viewport will select individual prims. |
Select Models |
Clicking the viewport will bubble up the selection to the closest ancestor prim with a model kind. |
Select Instances |
|
Select Prototypes |
Camera Menu
The Camera menu contains operations for viewing through a particular camera and modifying camera settings.
Menu Item |
Action |
|---|---|
Camera Guides |
Displays camera guides. |
Camera Masking |
Show or hide camera masking. |
Camera Reticles |
Show or hide camera reticles. |
Select Camera |
Choose a stage camera to look through. |
Frame Selected |
Frame the selected prim. |
Toggle Framed View |
Resets the camera to your last framed view. (e.g. The last time to framed to selection.) |
Reset View |
Reset the view to when the stage was opened. |
Copy Viewer Image |
Copy the current viewport image to the clipboard. |
Save Viewer Image… |
Open a file dialog to save the current viewport image. |
Auto Compute Clipping Planes |
When enabled, auto computes the camera clipping planes based on your selection when you frame selected. Used to prevent Z-fighting. |
Free Camera Settings… |
Set the near clipping plane, far clipping plane, aspect ratio and field of view of the Free Camera. |
Lights Menu
The Lights menu contains operations for controlling stage lights.
Menu Item |
Action |
|---|---|
Enable Scene Lights |
When checked, enables the lights defined by the stage. |
Enable Default Camera Light |
When checked, enables a default light emanating from the viewport camera. Fully reopen the current stage. |
Enable Default Dome Light |
When checked, enables the default dome light. |