Migration Tutorial
Note
If you are a new user of Isaac Sim, this migration tutorial can be skipped.
Learning Objectives
In this tutorial, we will discuss the changes in the ROS Bridge between Isaac Sim 2021.2.1 and Isaac Sim 2022.2.0.
ROS Bridge: UI
In the earlier version of Isaac Sim 2021.2.1, all ROS components were individual USD prims which would be added to the stage by accessing the menu options under Create -> Isaac -> ROS ->.
In Isaac Sim 2022.2.0, all ROS bridge components are now in the form of OmniGraph nodes. To learn more about OmniGraph nodes please refer to the OmniGraph tutorial.
For demonstration purposes, we will be adding ROS Joint State publishers and subscribers for a Franka Emika Panda Robot:
Go to Content tab below the viewport, and open
Isaac/Robots/Franka/franka_alt_fingers.usd.Add the required ROS Bridge components:
Adding ROS components in Isaac Sim 2021.2.1:
In 2021.2.1 we would add the ROS Joint State prim by going to Create -> Isaac -> ROS -> Joint State. This prim contained both the publisher and subscriber for joint states.
Under
articulationPrim, the path to the robot articulation would be provided.The rostopic names would be set to
/joint_statesand/joint_commandin thejointStatePubTopicandjointStateSubTopicfields respectively.
Adding ROS components in Isaac Sim 2022.2.0:
In 2022.2.0 or greater, ROS components have been converted to OmniGraph nodes for greater flexibility in a simulation workflow. Therefore the ROS Joint State publisher and subscriber are now their own OmniGraph nodes which can be found by first creating an Action Graph and then looking in the search field within the Action Graph window:
Go to Create -> Visual Scripting -> Action Graph.
Find the following nodes from the action graph search field and add them into the graph:
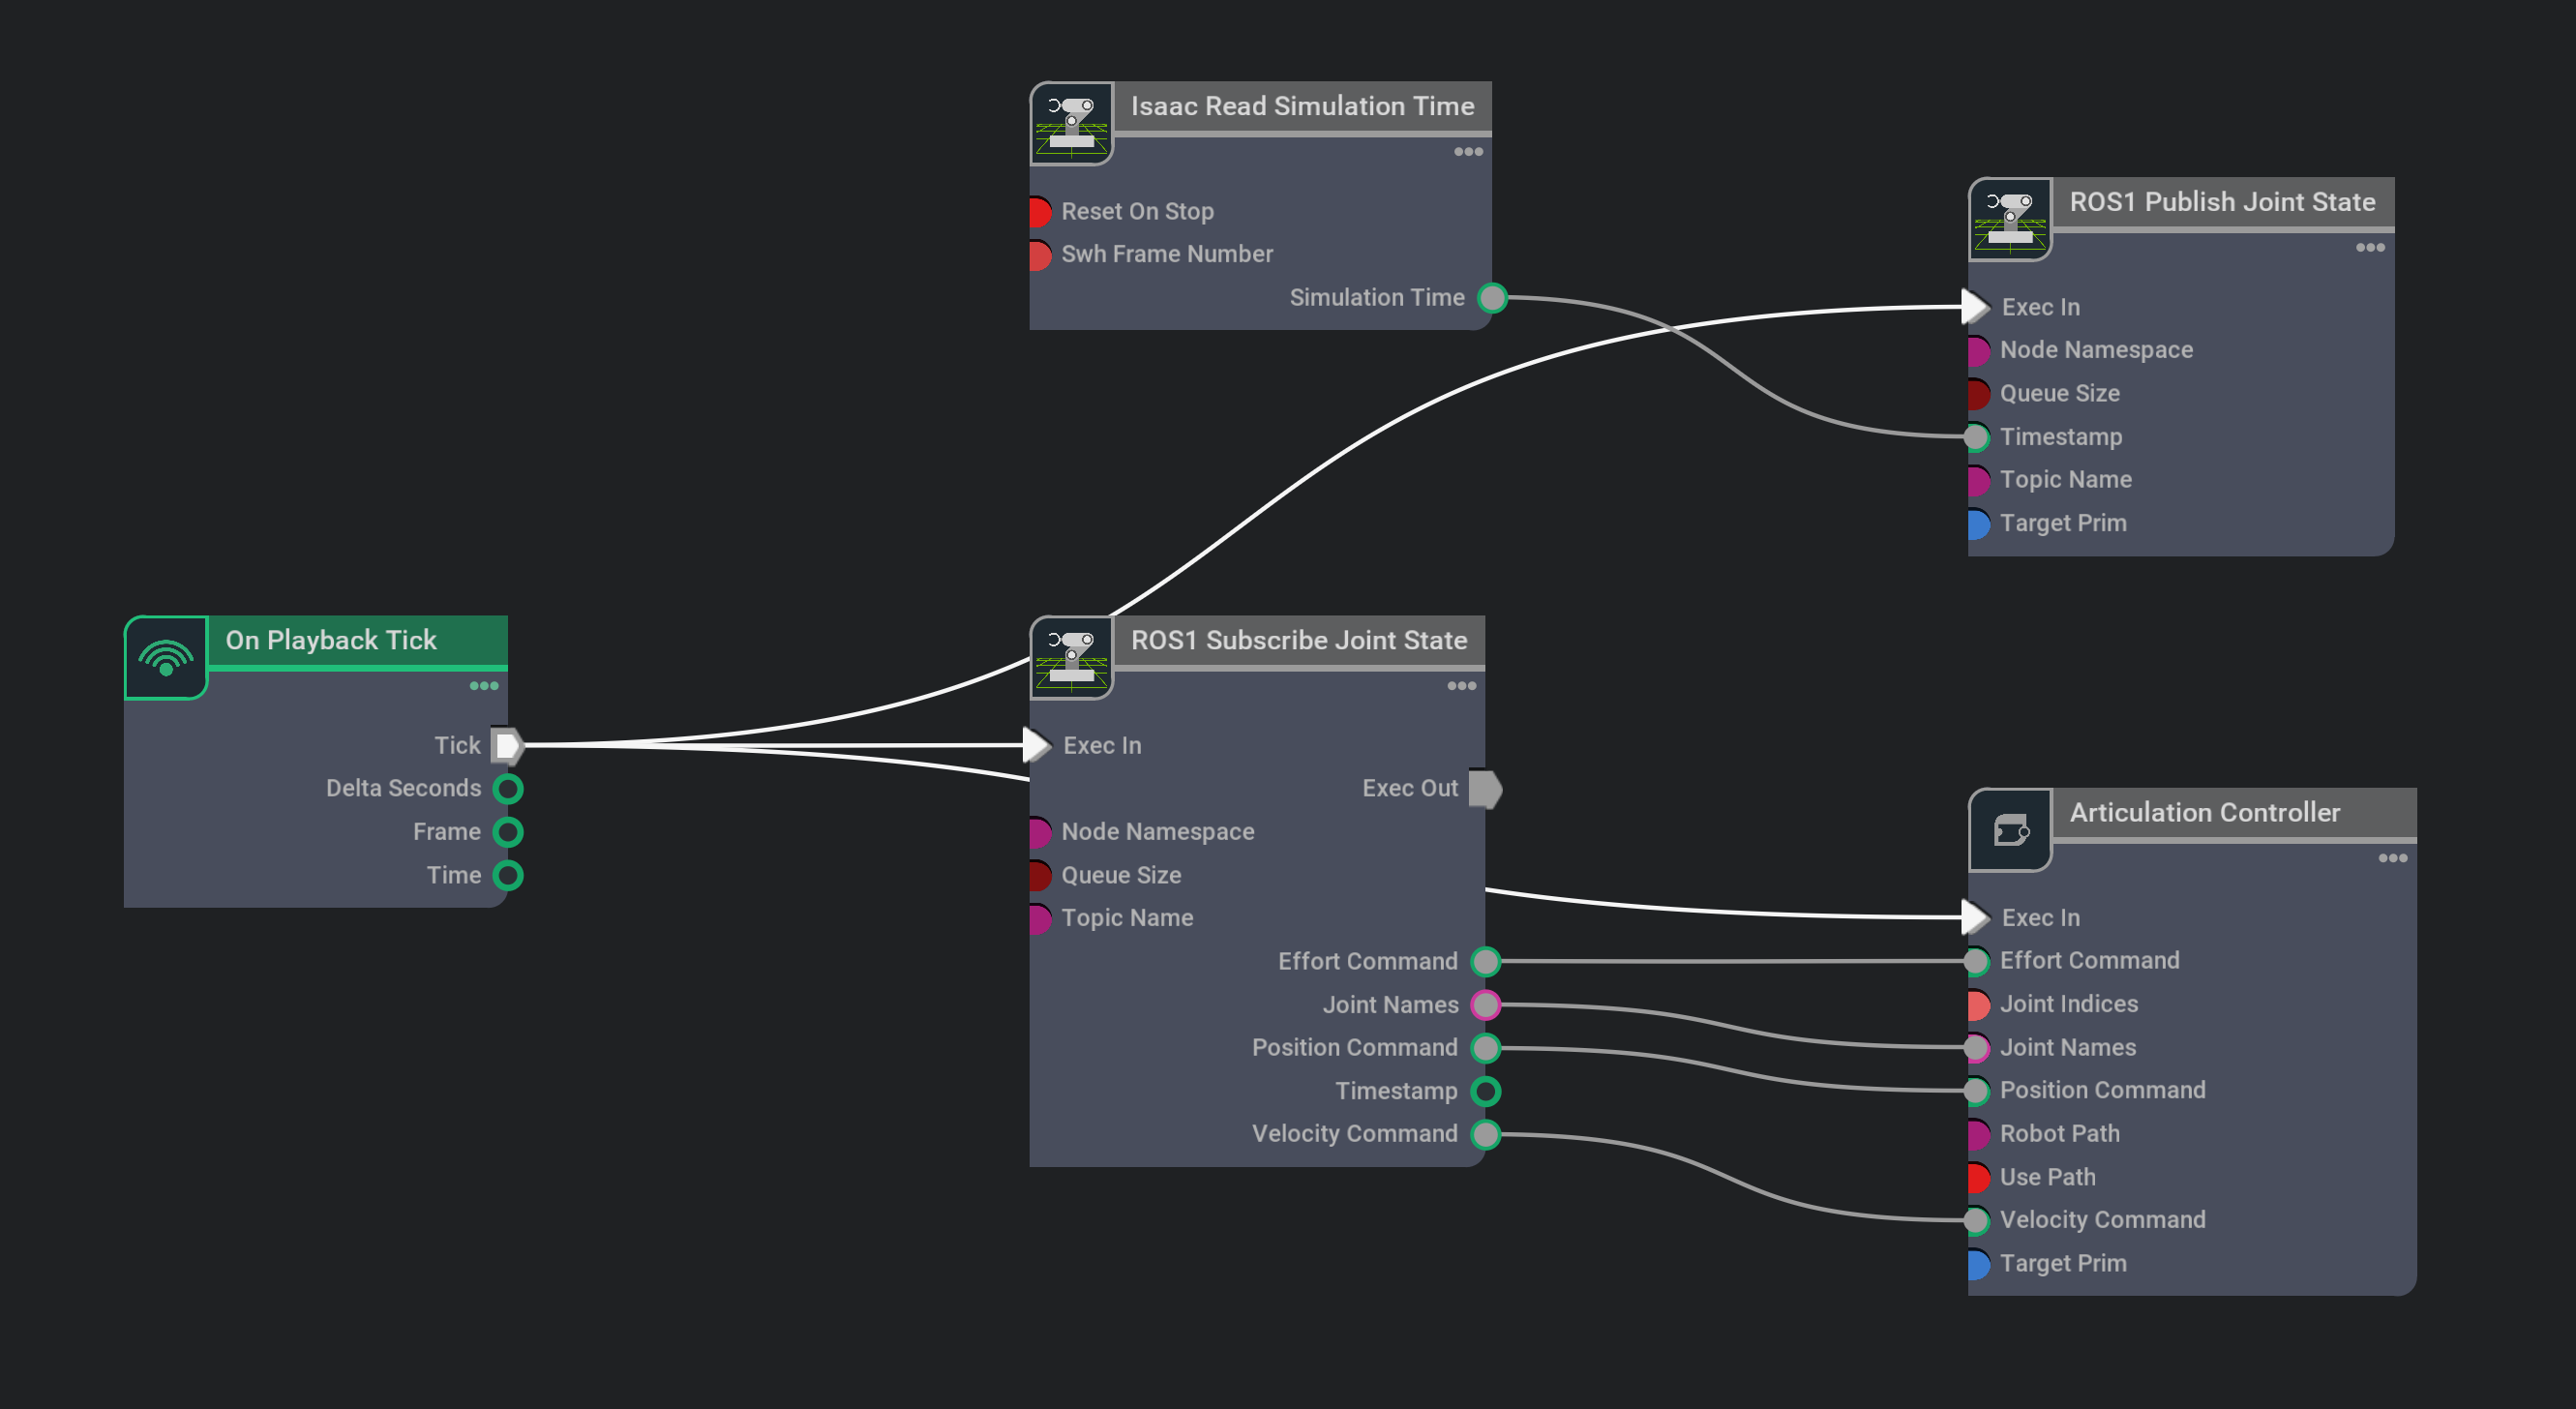
On Playback Tick: This node is used to tick any OmniGraph node. In this case it will be used to tick the ROS publisher and subscriber nodes each frame when simulation is running.Isaac Read Simulation Time: This node provides the current simulation time required by the ROS publisher and subscriber nodes.ROS1 Publish Joint State: This node publishes a joint state message for a given articulation.ROS1 Subscribe Joint State: This node subscribes to joint state messagesArticulation Controller: This node moves the robot articulation according to commands received from the subscriber node.
Similar to Isaac Sim 2021.2.1, we provide the robot articulation in the
targetPrimfield. In this case, click on each ROS1 Publish Joint State and Articulation Controller node and add the/pandarobot articulation to the targetPrim. Additionally make sure to uncheckusePathin the Articulation Controller node.Connect the Tick output of the On Playback Tick node to the Execution input of the ROS1 Publish Joint State, ROS1 Subscribe JointState and Articulation Controller nodes.
Connect the Simulation Time output of the Isaac Read Simulation Time node to the Timestamp input of the ROS1 Publish Joint State node. Setup other connections between nodes as shown in the image below:
At this point, setting up the Joint States publisher and subscriber is complete!
Feel free to move to the next section to learn more about the differences in python scripting with the ROS Bridge. The following steps are for testing the Isaac Sim 2022.2.0 ROS Bridge.
Make sure
roscoreis running, press Play to start publishing joint states to the/joint_statestopic and subscribing commands on the/joint_commandtopic.To test out the Isaac Sim 2022.2.0 ROS bridge, use the provided python script to publish joint commands to the robot. In a ROS-sourced terminal:
rosrun isaac_tutorials ros_publisher.py
While the robot is moving, open a ROS-sourced terminal and check the joint state rostopic by
rostopic echo /joint_states. You’ll see that the position of the joints are changing following the robot.
ROS Bridge: Python Scripting
In the earlier version of Isaac Sim 2021.2.1, ROS components could be added into the stage using the python API.
However as mentioned in the previous section, in Isaac Sim 2022.2.0, all ROS bridge components are in the form of OmniGraph nodes which comes with a python scripting interface.
ROS Bridge Publishing/Subscribing
In this section of the tutorial, we will go through the steps to re-create the ROS Joint State publisher and subscriber via the OmniGraph python scripting interface. Refer to OmniGraph: Python Scripting tutorial to learn more.
Go to Content tab below the viewport, and open
Isaac/Robots/Franka/franka_alt_fingers.usd.Open Script Editor in Window -> Script Editor.
Creating ROS components in Isaac Sim 2021.2.1:
In 2021.2.1 we would create the ROS Joint State prim by copying the following snippet (which uses the
ROSBridgeCreate*command) into the script editor. The ROS Joint State prim held both the publisher and subscriber for joint states.import omni from pxr import Usd, UsdGeom import omni.usd stage = omni.usd.get_context().get_stage() ROS_prim = stage.GetPrimAtPath("/ROS_JointState") if not ROS_prim: omni.kit.commands.execute( "ROSBridgeCreateJointState", path="/ROS_JointState", enabled=True, state_topic="/joint_states", command_topic="/joint_command", articulation_prim_rel=["/panda"], )
Creating ROS components in Isaac Sim 2022.2.0:
As mentioned before, in 2022.2.0, ROS components have been converted to OmniGraph nodes for greater flexibility and so the previous
ROSBridgeCreate*commands have now been removed. A ROS Bridge component can be treated as any OmniGraph node and setup using the OmniGraph controller. The following code snippet composes a new action graph by:Getting the handle to the graph editor
Creating the OmniGraph nodes
Setting up connections between the nodes explicitly
Setting the topic names for the ROS Joint State publisher and subscriber
Setting
inputs:usePathto true and writing the/pandarobot articulation path toinputs:robotPathfield in the Articulation Controller nodeSetting the
/pandarobot articulation to theinputs:targetPrimrelationship field in the ROS Joint State publisher
Copy and paste the following code into the script editor. This is the equivalent to Steps 2-5 of the previous section.
import omni.graph.core as og

og.Controller.edit(
    {"graph_path": "/panda/ActionGraph", "evaluator_name": "execution"},
    {
        og.Controller.Keys.CREATE_NODES: [
            ("OnPlaybackTick", "omni.graph.action.OnPlaybackTick"),
            ("PublishJointState", "omni.isaac.ros_bridge.ROS1PublishJointState"),
            ("SubscribeJointState", "omni.isaac.ros_bridge.ROS1SubscribeJointState"),
            ("ArticulationController", "omni.isaac.core_nodes.IsaacArticulationController"),
            ("ReadSimTime", "omni.isaac.core_nodes.IsaacReadSimulationTime"),
        ],
        og.Controller.Keys.CONNECT: [
            ("OnPlaybackTick.outputs:tick", "PublishJointState.inputs:execIn"),
            ("OnPlaybackTick.outputs:tick", "SubscribeJointState.inputs:execIn"),
            ("OnPlaybackTick.outputs:tick", "ArticulationController.inputs:execIn"),

            ("ReadSimTime.outputs:simulationTime", "PublishJointState.inputs:timeStamp"),

            ("SubscribeJointState.outputs:jointNames", "ArticulationController.inputs:jointNames"),
            ("SubscribeJointState.outputs:positionCommand", "ArticulationController.inputs:positionCommand"),
            ("SubscribeJointState.outputs:velocityCommand", "ArticulationController.inputs:velocityCommand"),
            ("SubscribeJointState.outputs:effortCommand", "ArticulationController.inputs:effortCommand"),
        ],
        og.Controller.Keys.SET_VALUES: [
            # Setting topic names to joint state publisher and subscriber.
            ("PublishJointState.inputs:topicName", "/joint_states"),
            ("SubscribeJointState.inputs:topicName", "/joint_command"),

            # Providing path to /panda robot to Articulation Controller node
            # Providing the robot path is equivalent to setting the targetPrim in Articulation Controller node
            ("ArticulationController.inputs:usePath", True),
            ("ArticulationController.inputs:robotPath", "/panda"),
            ("PublishJointState.inputs:targetPrim", "/panda")
        ],
    },
)
At this point, setting up the Joint State publisher and subscriber is complete!
Feel free to move to the next subsection to learn more about the differences in ROS Bridge Image publishing. The following steps are for testing the Isaac Sim 2022.2.0 ROS Bridge.
Make sure
roscoreis running, press Run in the Script Editor and the Action Graph with all required nodes should be added. You can find the corresponding ActionGraph in the Stage Tree.Same as the previous section, test out the ROS bridge using the provide python script to publish joint commands to the robot.
rosrun isaac_tutorials ros_publisher.py
Check the joint state with
rostopic echo /joint_stateswhile it’s moving.
ROS Bridge Image Publishing
In Isaac Sim 2022.2.0, ROS Cameras are published through a separate post-process Synthetic Data Generation pipeline graph that is auto-generated by the ROS1 Camera Helper node. For an in-depth explanation see the ROS1 Cameras Tutorial.
Periodic Image Publishing
In Isaac Sim 2021.2.1:
To setup a ROS Camera to run every N number of frames we would use the RosBridgeTickComponent command. For example, to publish ROS Camera data every 2 frames it would look similar to the following snippet:
... Perform Initial Setup ...

frame = 0
while kit.is_running():
    # Run with a fixed step size
    simulation_context.step(render = True)

    # Publish camera every 2 frames
    if frame % 2 == 0:
        omni.kit.commands.execute("RosBridgeTickComponent", path="/ROS_Camera")

    frame = frame + 1
In Isaac Sim 2022.2.0:
To setup a ROS image publisher to run every N number of frames automatically, go through the following steps below. The code snippets can be run in the Script Editor: Window -> Script Editor.
Open a new stage, and create ROS RGB image and camera info publishers using ROS1 Camera Helper nodes in a new Action Graph and trigger them once to generate the SDGPipeline graph:
import omni.graph.core as og
og.Controller.edit(
    {"graph_path": "/ActionGraph", "evaluator_name": "execution"},
    {
        og.Controller.Keys.CREATE_NODES: [
            ("OnImpulseEvent", "omni.graph.action.OnImpulseEvent"),
            ("IsaacCreateViewport", "omni.isaac.core_nodes.IsaacCreateViewport"),
            ("CameraRGBHelper", "omni.isaac.ros_bridge.ROS1CameraHelper"),
            ("CameraInfoHelper", "omni.isaac.ros_bridge.ROS1CameraHelper"),
        ],
        og.Controller.Keys.SET_VALUES: [
            ("OnImpulseEvent.inputs:onlyPlayback", False), # Allow us to run this node without simulation playing

            ("CameraRGBHelper.inputs:topicName", "/rgb"), # Setting topic name of Image publisher
            ("CameraRGBHelper.inputs:type", "rgb"), # Setting Image publisher type to rgb

            ("CameraInfoHelper.inputs:topicName", "/camera_info"), # Setting topic name of Camera_Info publisher
            ("CameraInfoHelper.inputs:type", "camera_info"), # Setting Camera_Info publisher type to camera_info

            ("IsaacCreateViewport.inputs:viewportId", 0), # Ensuring default viewport (ID:0) is used for Image and Camera_Info publisher
        ],
        og.Controller.Keys.CONNECT: [
            ("OnImpulseEvent.outputs:execOut", "IsaacCreateViewport.inputs:execIn"),

            ("IsaacCreateViewport.outputs:execOut", "CameraRGBHelper.inputs:execIn"),
            ("IsaacCreateViewport.outputs:viewport", "CameraRGBHelper.inputs:viewport"),

            ("IsaacCreateViewport.outputs:execOut", "CameraInfoHelper.inputs:execIn"),
            ("IsaacCreateViewport.outputs:viewport", "CameraInfoHelper.inputs:viewport"),
        ],
    },
)

# Tick the Camera Helper nodes once to auto-generate the SDGPipeline graph
og.Controller.set(og.Controller.attribute("/ActionGraph/OnImpulseEvent.state:enableImpulse"), True)
Inside the newly created SDGPipeline graph, Isaac Simulation Gate nodes are added to control the execution rate of each of the ROS image and camera info publishers. By default the step input of each Isaac Simulation Gate node is set to a value of 1 to execute every frame. We can change this value to N for each Isaac Simulation Gate node individually to publish every N number of frames. Run the following code to ensure the image and camera info messages will be published every 2 frames.
import omni.graph.core as og
import omni.kit.viewport_legacy

step_size = 2

viewport_interface = omni.kit.viewport_legacy.get_viewport_interface()

viewport = viewport_interface.get_viewport_window()


if viewport is not None:
    import omni.syntheticdata._syntheticdata as sd

    rv = omni.syntheticdata.SyntheticData.convert_sensor_type_to_rendervar(sd.SensorType.Rgb.name)
    rgb_camera_gate_path = omni.syntheticdata.SyntheticData._get_node_path(
        rv + "IsaacSimulationGate", viewport.get_render_product_path()
    )

    camera_info_gate_path = omni.syntheticdata.SyntheticData._get_node_path(
        "PostProcessDispatch" + "IsaacSimulationGate", viewport.get_render_product_path()
    )
    og.Controller.attribute(rgb_camera_gate_path + ".inputs:step").set(step_size)
    og.Controller.attribute(camera_info_gate_path + ".inputs:step").set(step_size)
After making sure
roscoreis running, press Play to start publishing RGB image and camera info messages.Try modifying the
step_sizevalue and rerun the code in Step 2. You can monitor the topic publish rates using therqt_topictool:rosrun rqt_topic rqt_topic
Warning
When using the
rqt_topictool, avoid expanding the/rgbtopic as the message data buffer size is large and doing so may cause the tool to hang.
Manual Image Publishing
In Isaac Sim 2021.2.1:
To manually publish a ROS Camera, we would use the RosBridgeTickComponent command. For an example refer to the code snippet in the above subsection, Periodic Image Publishing In Isaac Sim 2021.2.1.
In Isaac Sim 2022.2.0:
To manually publish ROS images go through the following steps below. The code snippets can be run in the Script Editor: Window -> Script Editor.
Open a new stage and add the Simple Room environment to the stage by going to Create -> Isaac -> Environments -> Simple Room. Adjust the camera view as necessary. We are using the Simple Room environment for demonstration purposes but you can add any environment of your choosing.
Create ROS RGB and depth image publishers as well as the camera info publisher using ROS1 Camera Helper nodes in a new Action Graph and trigger them once to generate the SDGPipeline graph:
import omni.graph.core as og

frame = "sim_camera"

og.Controller.edit(
    {
        "graph_path": "/ROS_Camera",
        "evaluator_name": "execution",
    },
    {
        og.Controller.Keys.CREATE_NODES: [
            ("OnImpulseEvent", "omni.graph.action.OnImpulseEvent"),
            ("createViewport", "omni.isaac.core_nodes.IsaacCreateViewport"),
            ("cameraHelperRgb", "omni.isaac.ros_bridge.ROS1CameraHelper"),
            ("cameraHelperDepth", "omni.isaac.ros_bridge.ROS1CameraHelper"),
            ("cameraHelperInfo", "omni.isaac.ros_bridge.ROS1CameraHelper"),
        ],
        og.Controller.Keys.CONNECT: [
            ("OnImpulseEvent.outputs:execOut", "createViewport.inputs:execIn"),

            ("createViewport.outputs:execOut", "cameraHelperRgb.inputs:execIn"),
            ("createViewport.outputs:execOut", "cameraHelperDepth.inputs:execIn"),
            ("createViewport.outputs:execOut", "cameraHelperInfo.inputs:execIn"),

            ("createViewport.outputs:viewport", "cameraHelperRgb.inputs:viewport"),
            ("createViewport.outputs:viewport", "cameraHelperDepth.inputs:viewport"),
            ("createViewport.outputs:viewport", "cameraHelperInfo.inputs:viewport"),
        ],
        og.Controller.Keys.SET_VALUES: [
            ("OnImpulseEvent.inputs:onlyPlayback", False),

            ("createViewport.inputs:viewportId", 0),

            ("cameraHelperRgb.inputs:topicName", "/rgb"),
            ("cameraHelperRgb.inputs:type", "rgb"),

            ("cameraHelperDepth.inputs:topicName", "/depth"),
            ("cameraHelperDepth.inputs:type", "depth"),

            ("cameraHelperInfo.inputs:topicName", "/camera_info"),
            ("cameraHelperInfo.inputs:type", "camera_info"),
        ],
    },
)

# Tick the Camera Helper nodes once to auto-generate the SDGPipeline graph
og.Controller.set(og.Controller.attribute("/ROS_Camera/OnImpulseEvent.state:enableImpulse"), True)
Open the newly created SDGPipeline graph by first opening the Action Graph window: Window -> Visual Scripting -> Action Graph. Then, click
Edit Action Graphand select/Render/PostProcessing/SDGPipeline. The graph should resemble the one shown below: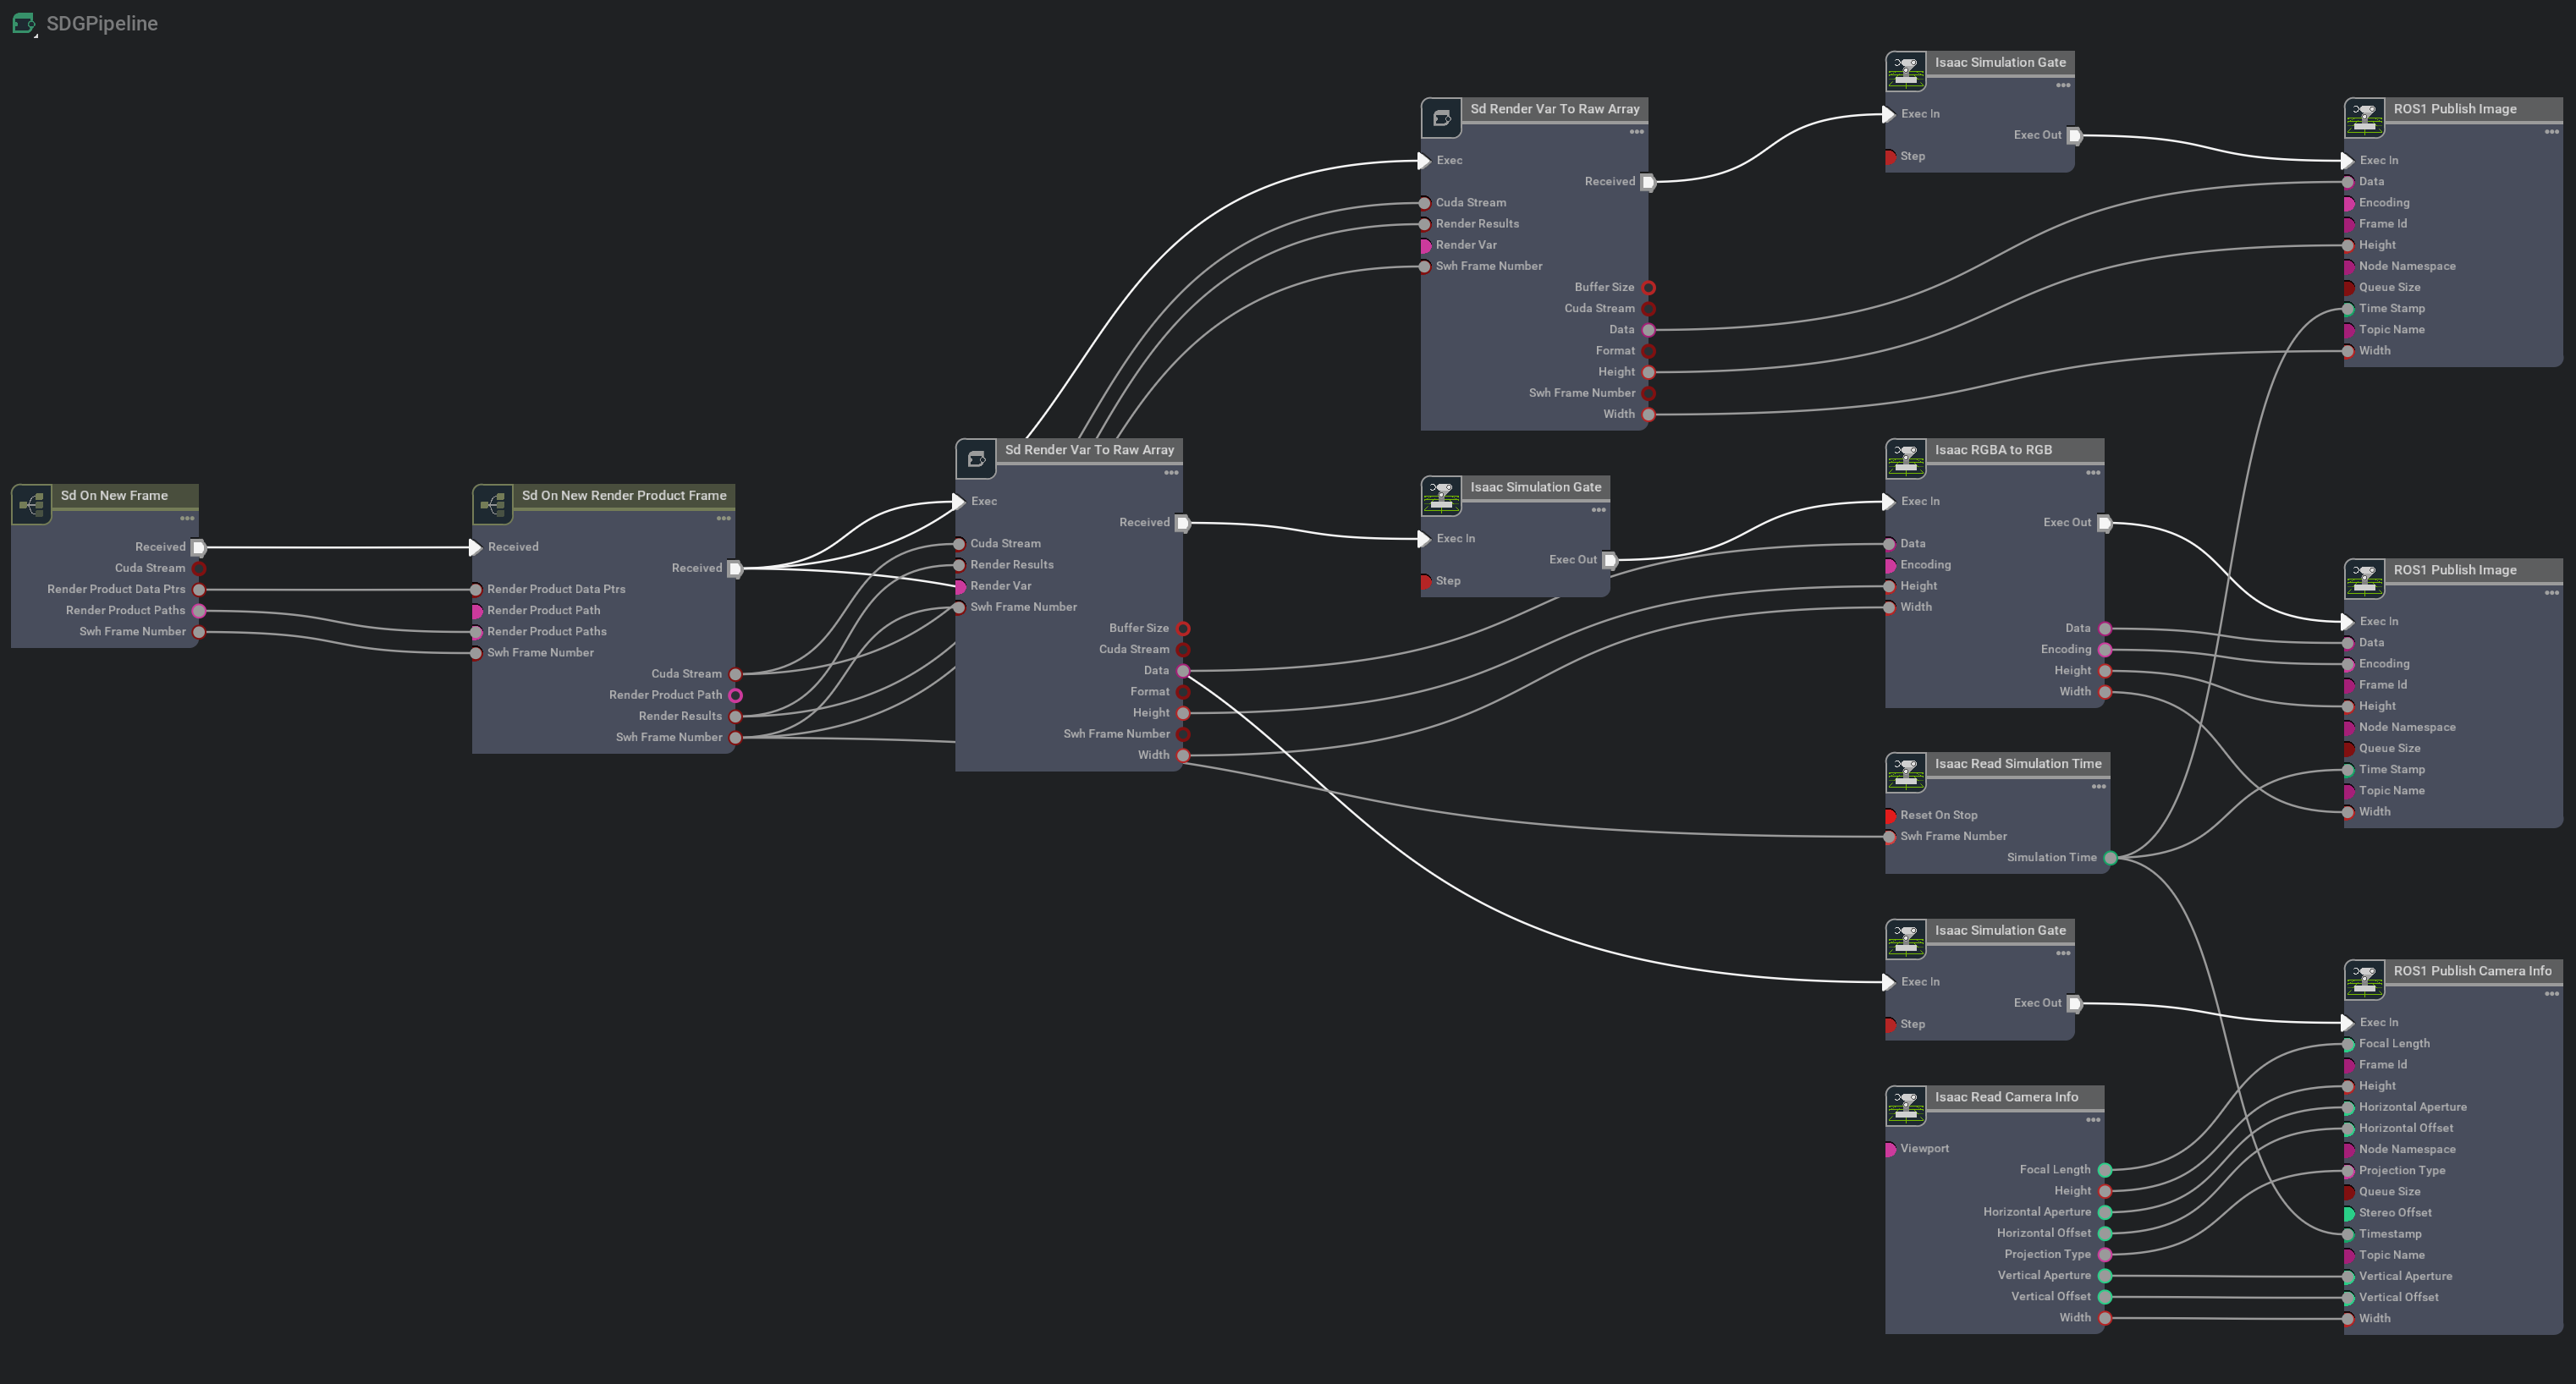
In the SDGPipeline graph, notice how execution connections are setup between the IsaacSimulationGate nodes and their downstream nodes. There are 3 pipelines setup, one each for RGB, Depth, and Camera info publishers.
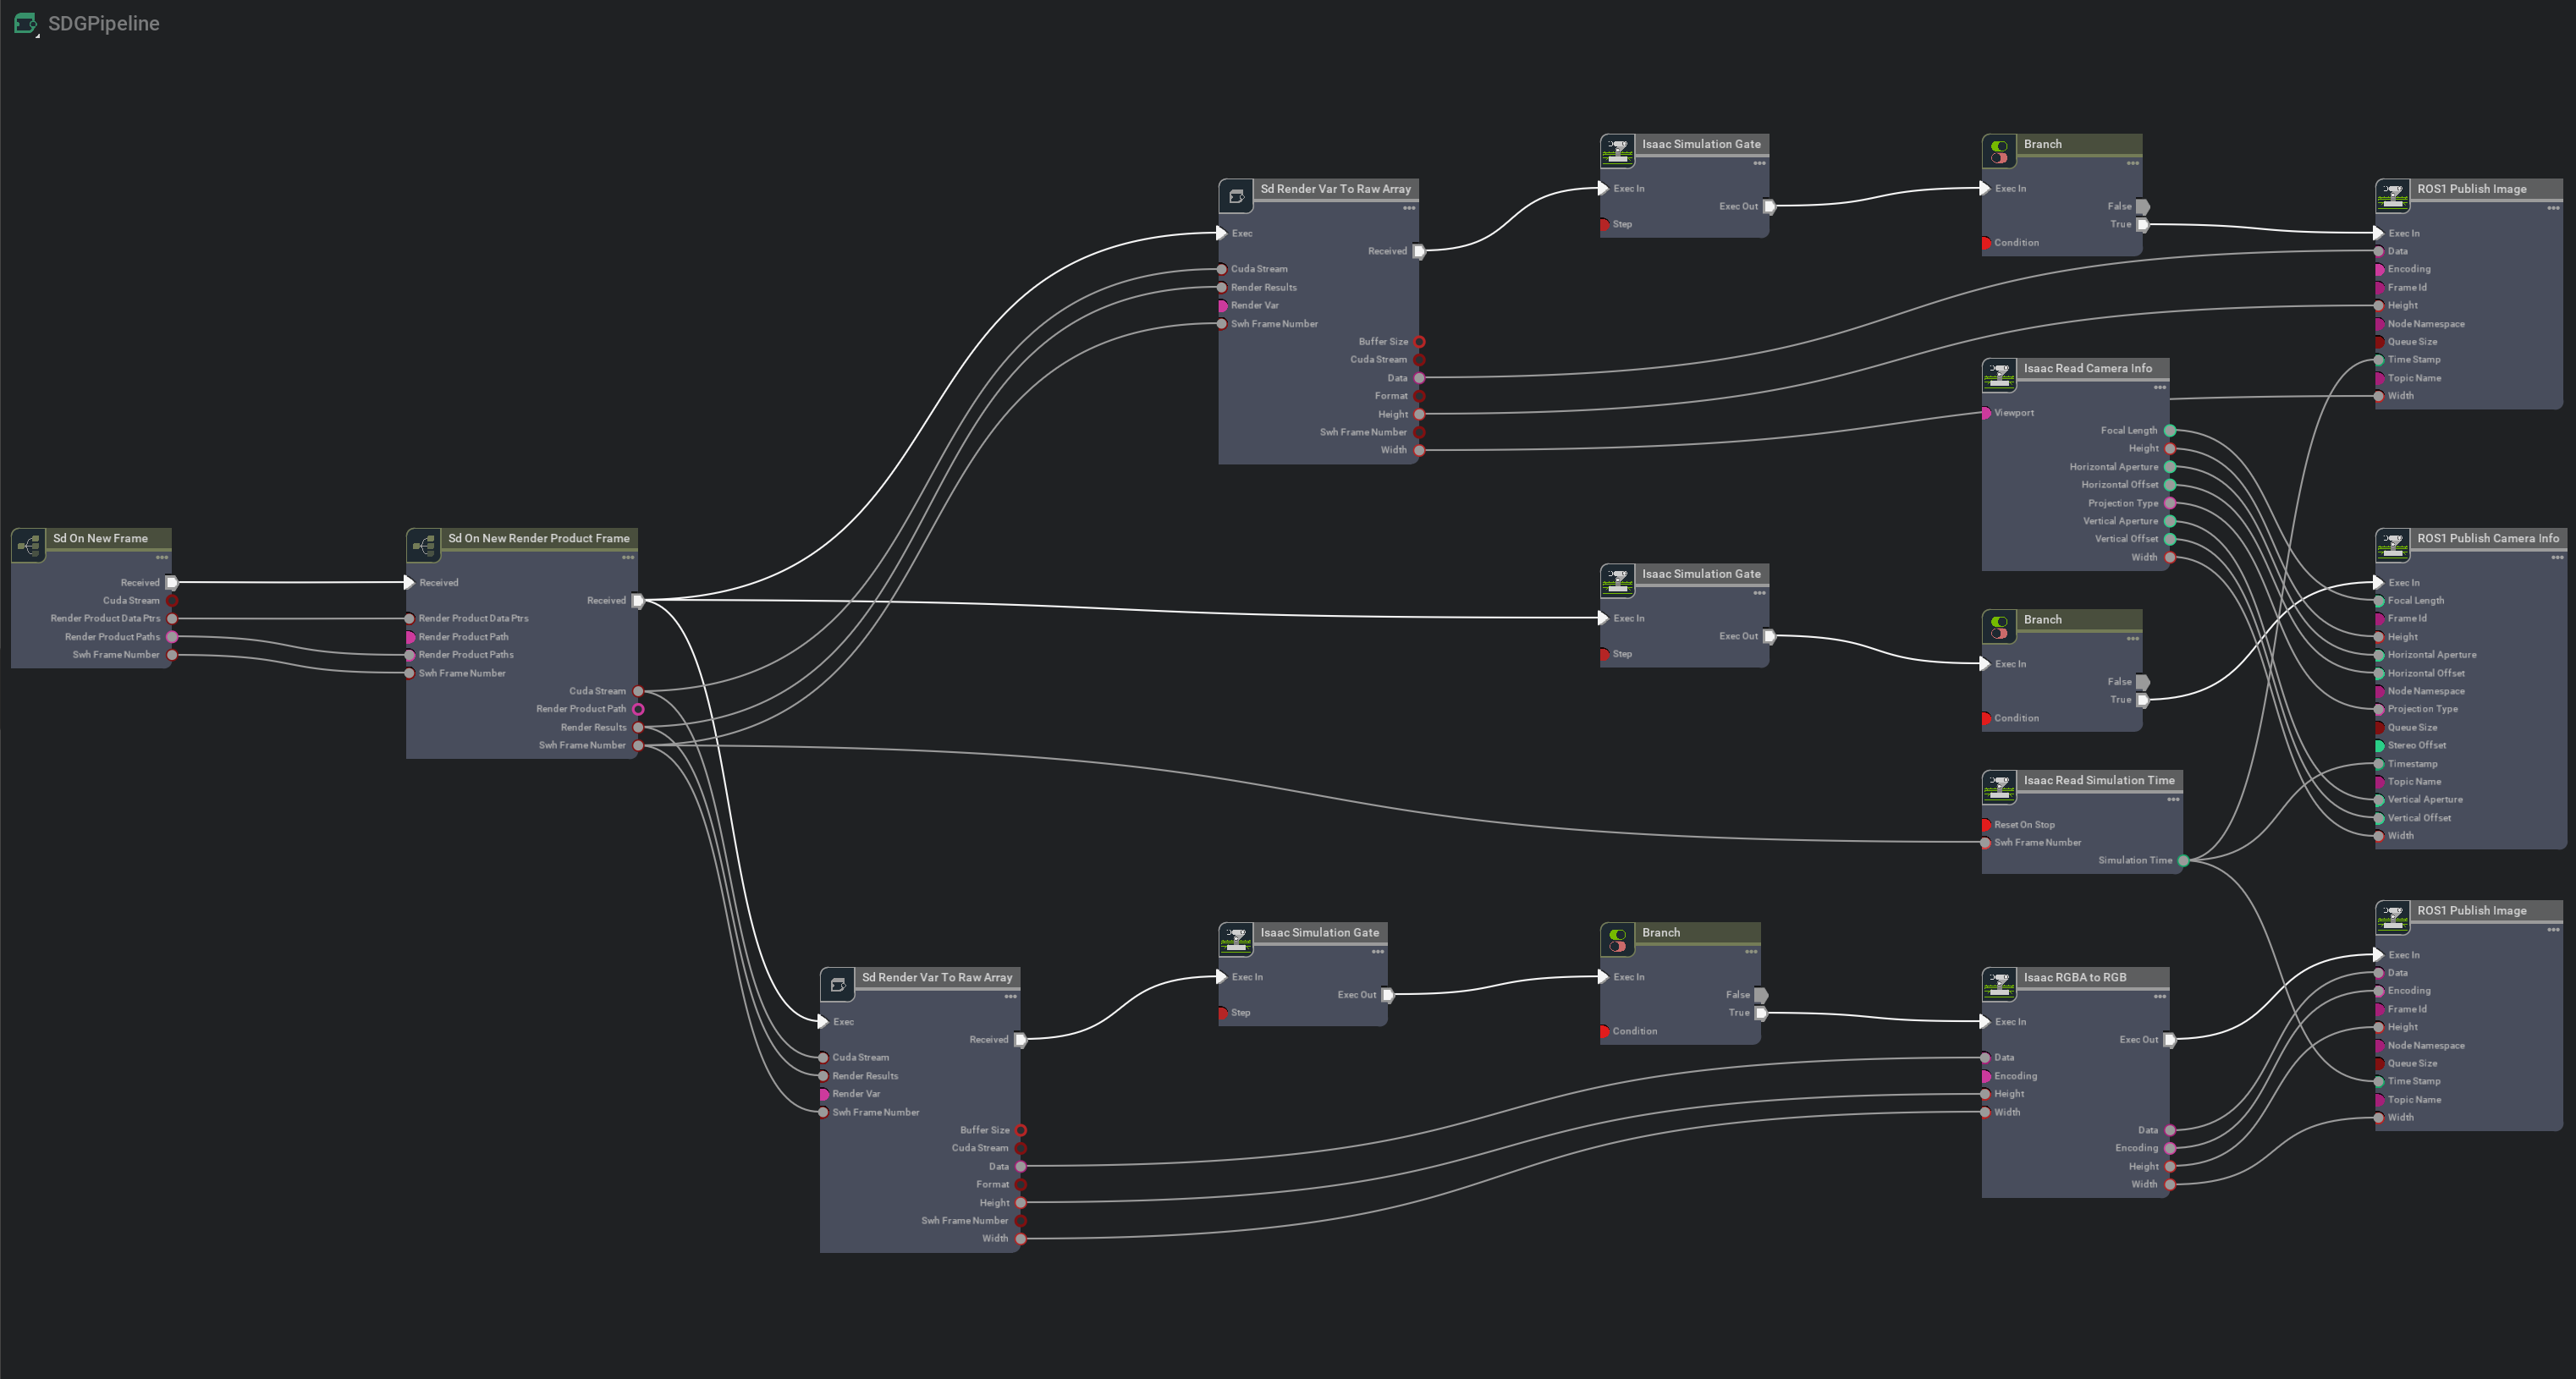
Now we will re-route the execution connections in between each of the IsaacSimulationGate nodes and their downstream nodes to make them run through branch nodes. Since the SDGPipeline graph runs every frame, a branch node can act as a custom gate for our publishers. When the condition input of the branch node is set to True, the downstream nodes will operate whenever the IsaacSimulationGate node triggers an execution. By default the condition input of a branch node is set to False. Run the following code to setup the branch nodes:
from pxr import Usd
import omni.usd
import omni.graph.core as og
import omni.kit.viewport_legacy

GRAPH_PATH = "/Render/PostProcess/SDGPipeline"

viewport_interface = omni.kit.viewport_legacy.get_viewport_interface()

viewport = viewport_interface.get_viewport_window()

if viewport is not None:
    import omni.syntheticdata._syntheticdata as sd

    stage = omni.usd.get_context().get_stage()

    # Required for editing the SDGPipeline graph which exists in the Session Layer
    with Usd.EditContext(stage, stage.GetSessionLayer()):

        # Get name of rendervar for RGB sensor type
        rv_rgb = omni.syntheticdata.SyntheticData.convert_sensor_type_to_rendervar(sd.SensorType.Rgb.name)

        # Get path to IsaacSimulationGate node in RGB pipeline
        rgb_camera_gate_path = omni.syntheticdata.SyntheticData._get_node_path(
            rv_rgb + "IsaacSimulationGate", viewport.get_render_product_path()
        )

        # Get path to IsaacConvertRGBAToRGB node in RGB pipeline
        rgb_conversion_path = omni.syntheticdata.SyntheticData._get_node_path(
            rv_rgb + "IsaacConvertRGBAToRGB", viewport.get_render_product_path()
        )


        # Get name of rendervar for DistanceToImagePlane sensor type
        rv_depth = omni.syntheticdata.SyntheticData.convert_sensor_type_to_rendervar(sd.SensorType.DistanceToImagePlane.name)

        # Get path to IsaacSimulationGate node in Depth pipeline
        depth_camera_gate_path = omni.syntheticdata.SyntheticData._get_node_path(
            rv_depth + "IsaacSimulationGate", viewport.get_render_product_path()
        )

        # Get path to ROS1PublishImage node in Depth pipeline
        depth_publisher_path = omni.syntheticdata.SyntheticData._get_node_path(
            rv_depth + "ROS1PublishImage", viewport.get_render_product_path()
        )


        # Get path to IsaacSimulationGate node in CameraInfo pipeline
        camera_info_gate_path = omni.syntheticdata.SyntheticData._get_node_path(
            "PostProcessDispatch" + "IsaacSimulationGate", viewport.get_render_product_path()
        )

        # Get path to ROS1PublishCameraInfo node in CameraInfo pipeline
        camera_info_publisher_path = omni.syntheticdata.SyntheticData._get_node_path(
            "ROS1PublishCameraInfo", viewport.get_render_product_path()
        )

        # In SDGPipeline graph, we will re-route execution connections to manually publish ROS images
        keys = og.Controller.Keys
        og.Controller.edit(
            GRAPH_PATH,
            {
                keys.CREATE_NODES: [
                    # Creating Branch nodes that will allow manual publishing of ROS images
                    ("RgbPublisherBranch", "omni.graph.action.Branch"),
                    ("DepthPublisherBranch", "omni.graph.action.Branch"),
                    ("InfoPublisherBranch", "omni.graph.action.Branch"),
                ],
                keys.DISCONNECT: [
                    # Disconnecting the exec connections between each IsaacSimulationGate node and their downstream node
                    (rgb_camera_gate_path + ".outputs:execOut", rgb_conversion_path + ".inputs:execIn"),
                    (depth_camera_gate_path + ".outputs:execOut", depth_publisher_path + ".inputs:execIn"),
                    (camera_info_gate_path + ".outputs:execOut", camera_info_publisher_path + ".inputs:execIn"),
                ],
                keys.CONNECT: [
                    # Connecting the execution output of each IsaacSimulationGate node to the execution input of their respective branch node
                    (rgb_camera_gate_path + ".outputs:execOut", GRAPH_PATH + "/RgbPublisherBranch.inputs:execIn"),
                    (depth_camera_gate_path + ".outputs:execOut", GRAPH_PATH + "/DepthPublisherBranch.inputs:execIn"),
                    (camera_info_gate_path + ".outputs:execOut", GRAPH_PATH + "/InfoPublisherBranch.inputs:execIn"),

                    # Connecting the execution True output of each Branch node to the execution input of the respective downstream nodes
                    (GRAPH_PATH + "/RgbPublisherBranch.outputs:execTrue", rgb_conversion_path + ".inputs:execIn"),
                    (GRAPH_PATH + "/DepthPublisherBranch.outputs:execTrue", depth_publisher_path + ".inputs:execIn"),
                    (GRAPH_PATH + "/InfoPublisherBranch.outputs:execTrue", camera_info_publisher_path + ".inputs:execIn"),
                ],
            },
        )
The SDGPipeline graph should resemble the one shown below:
Note
If the graph initially looks messy, close the Action Graph window and reopen the SDGPipeline graph by repeating Step 3.
After making sure
roscoreis running, press Play to start simulation. Since default condition input values of branch nodes are set to False, no ROS image topics should be publishing yet.To enable the publishers at any time, run the following code:
# Enable the Branch nodes to start publishing by setting the condition inputs to True
og.Controller.set(og.Controller.attribute(GRAPH_PATH + "/RgbPublisherBranch.inputs:condition"), True)
og.Controller.set(og.Controller.attribute(GRAPH_PATH + "/DepthPublisherBranch.inputs:condition"), True)
og.Controller.set(og.Controller.attribute(GRAPH_PATH + "/InfoPublisherBranch.inputs:condition"), True)
To disable the publishers at any time, run the following code:
# Disable the Branch nodes to stop publishers by setting the condition inputs to False
og.Controller.set(og.Controller.attribute(GRAPH_PATH + "/RgbPublisherBranch.inputs:condition"), False)
og.Controller.set(og.Controller.attribute(GRAPH_PATH + "/DepthPublisherBranch.inputs:condition"), False)
og.Controller.set(og.Controller.attribute(GRAPH_PATH + "/InfoPublisherBranch.inputs:condition"), False)
Feel free to experiment by disabling one or more of the publishers while keeping the others active.