Using Sensors: LIDAR
Learning Objectives
This tutorial introduces how to use a LIDAR for sensing an environment in Omniverse Isaac Sim. After this tutorial, you will know how to add a LIDAR sensor to the scene, activate, and detect objects in the simulation.
10-15 Minute Tutorial
Getting Started
Prerequisites
Review the Core Tutorial series prior to beginning this tutorial.
This tutorial demonstrates how to integrate LIDAR sensors into an Omniverse Isaac Sim simulations.
It begins by showing how to add LIDARs to an environment using the User Interface.
It then details how to leverage the LIDAR Python API for more advanced control, segmentation,
and processing.
The simulated LIDAR works by combining Ray Casting and Physics Collisions to report the distance to detected objects in the environment.
Let’s begin setting up the scene by creating a PhysicsScene and a LIDAR in the environment:
To create a Physics Scene, go to the top Menu Bar and Click Create > Physics > Physics Scene. There should now be a
PhysicsScenePrim in the Stage panel on the right.To create a LIDAR, go to the top Menu Bar and Click Create > Isaac > Sensors > LIDAR > Rotating. Next, let’s set some of the LIDAR properties for rotation and visualization:
Select the newly created LIDAR prim from the Stage panel.
Once selected, the Property panel to the bottom left will populate with all the available properties of the LIDAR.
Scroll down in the Property panel to the Raw USD Properties section.
Enable the
drawLinescheckbox to enable line rendering.Set the revolutions per second to 1 Hz by setting
rotationRateto1.0.To fire LIDAR rays in all directions at once, set the
rotationRateto0.0.
Note
You can update all of the lidar parameters on the fly while the stage is running. When the rotation rate reaches zero or less, the lidar prim will cast rays in all directions based on your FOV and resolution.
Setup Collision Detection
The LIDAR can only detect objects with Collisions Enabled. Let’s add an object for the LIDAR to detect:
Go to the top Menu Bar and Click Create > Mesh > Cube.
Scale the Cube to be
(.01, .01, .01).Move the Cube to the position
(2, 0, 0).
Next, add a Physics Collider to the Cube:
With the Cube selected, go to the Property panel and click the
+ Addbutton.Select + Add > Physics > Collider.
Use the mouse and move the Cube around the scene to see how the LIDAR rays interact with the geometry.
Attach a LIDAR to Geometry
For most use cases, LIDARs will be attached to other, more complex assemblies — such as cars or robots. Let’s learn how to attach a LIDAR to other parent geometry. We are going to use a Cylinder as a placeholder for a more complex prim. Add a Cylinder to the scene and nest the LIDAR prim under it:
Right click in the viewport and select Create > Mesh > Cylinder.
Set the position of the Cylinder to
(0, 0, 0).Set the scale of the Cylinder to
(0.01, 0.01, 0.01).In the Stage panel, drag-and-drop the
LIDARprim onto theCylinder.This makes the
Cylinderthe parent of theLIDAR. Now when theCylindermoves, theLIDARmoves with it. Moreover, all information reported by the LIDAR is now relative to theCylinder. Add a offset toLIDARto precisely position it relative to theCylinder:Select the
LIDARprim from the Stage and move it to(.5, .5, 0).Now move the
Cylinderaround the environment. The LIDAR maintains this relative transform.Re-select the
LIDARprim and reset its Translate value to its default setting(0, 0, 0).
Attach a LIDAR to a Moving Robot
Similarly, you can attach a LIDAR prim to a robot. For simplicity in creating a moving robot the Carter URDF import example is used.
In the Carter URDF import example press
LOAD,CONFIGUREandMOVEPress play and the Carter robot should drive forward automatically.
Create a
LIDAR, go to the top Menu Bar and Click Create > Isaac > Sensors > LIDAR > Rotating. TheLIDARprim will be created as a child of the selected prim.In the Stage panel, select your
LIDARprim and drag it onto/carter/chassis_linkEnable draw lines and set the rotation rate to zero for easier debugging
Move the
LIDARprim vertically so it is located at the correct height relative to the center of the robot.
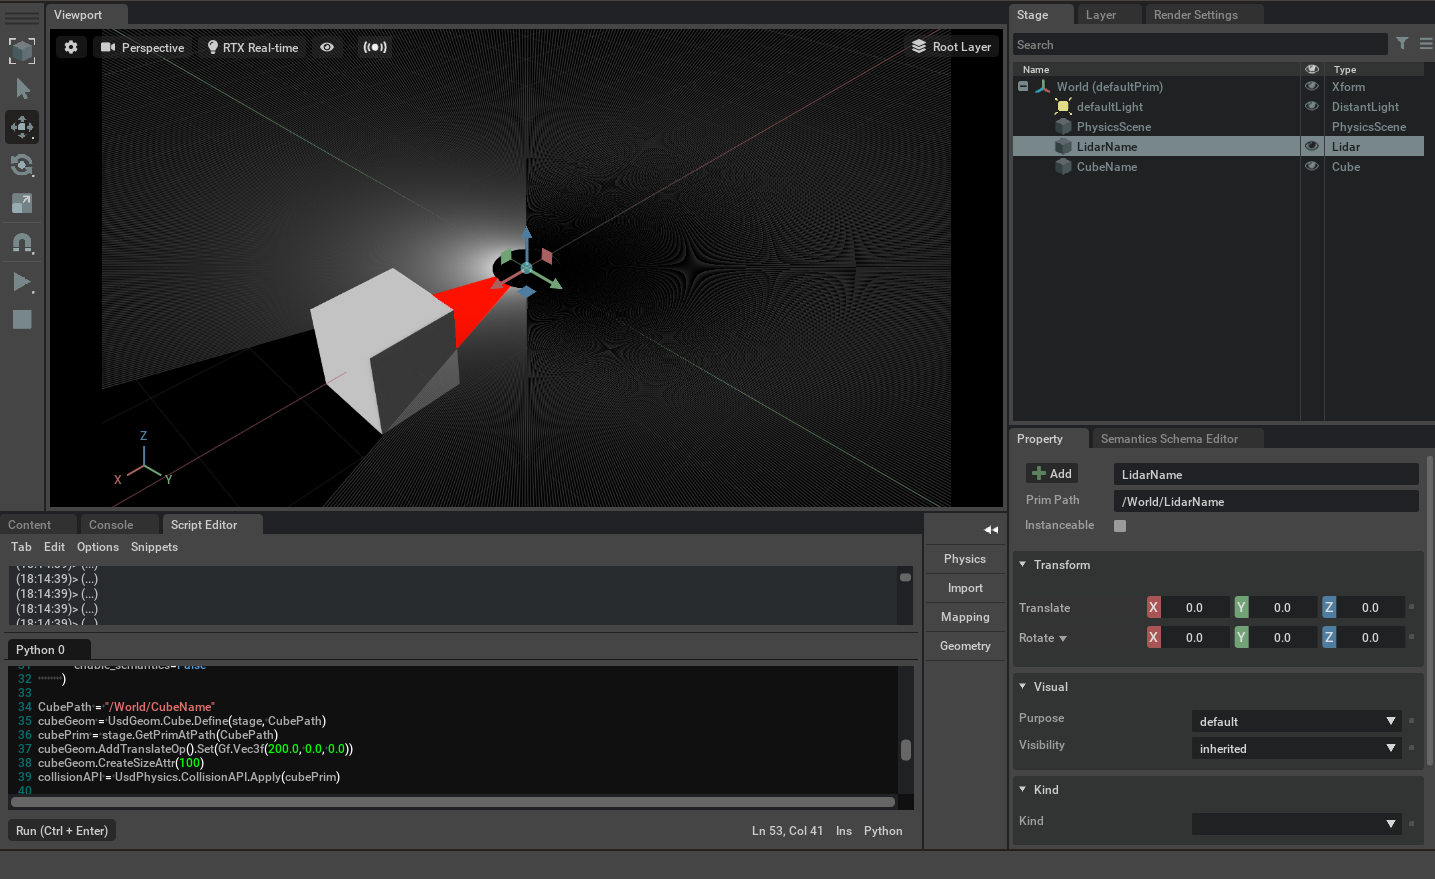
Use the Python API
The LIDAR Python API is used to interact programmatically with a LIDAR through scripts and extensions. It can be used to create, control, and query the sensor through scripts and extensions. Let’s use the Script Editor and Python API to retrieve the data from the LIDAR’s last sweep:
Go to the top menu bar and Click Window > Script Editor to open the Script Editor Window.
Add the necessary imports:
1import omni                                                     # Provides the core omniverse apis
2import asyncio                                                  # Used to run sample asynchronously to not block rendering thread
3from omni.isaac.range_sensor import _range_sensor               # Imports the python bindings to interact with lidar sensor
4from pxr import UsdGeom, Gf, UsdPhysics                         # pxr usd imports used to create the cube
Grab the Stage, Simulation Timeline, and LIDAR Interface:
 1stage = omni.usd.get_context().get_stage()                      # Used to access Geometry
 2timeline = omni.timeline.get_timeline_interface()               # Used to interact with simulation
 3lidarInterface = _range_sensor.acquire_lidar_sensor_interface() # Used to interact with the LIDAR
 4
 5# These commands are the Python-equivalent of the first half of this tutorial
 6omni.kit.commands.execute('AddPhysicsSceneCommand',stage = stage, path='/World/PhysicsScene')
 7lidarPath = "/LidarName"
 8result, prim = omni.kit.commands.execute(
 9            "RangeSensorCreateLidar",
10            path=lidarPath,
11            parent="/World",
12            min_range=0.4,
13            max_range=100.0,
14            draw_points=False,
15            draw_lines=True,
16            horizontal_fov=360.0,
17            vertical_fov=30.0,
18            horizontal_resolution=0.4,
19            vertical_resolution=4.0,
20            rotation_rate=0.0,
21            high_lod=False,
22            yaw_offset=0.0,
23            enable_semantics=False
24        )
Create an obstacle for the LIDAR:
1CubePath = "/World/CubeName"                                    # Create a Cube
2cubeGeom = UsdGeom.Cube.Define(stage, CubePath)
3cubePrim = stage.GetPrimAtPath(CubePath)
4cubeGeom.AddTranslateOp().Set(Gf.Vec3f(2.0, 0.0, 0.0))        # Move it away from the LIDAR
5cubeGeom.CreateSizeAttr(1)                                    # Scale it appropriately
6collisionAPI = UsdPhysics.CollisionAPI.Apply(cubePrim)          # Add a Physics Collider to it
Get the LIDAR data:
The lidar needs a frame of simulation in order to get data for the first frame, so we will start
the simulation by calling timeline.play and waiting for a frame to complete, and then pause simulation using timeline.pause() to populate the depth buffers in the lidar.
Because the simulation is running asynchronously with our script, we use asyncio and ensure_future to wait for our script to complete
calling timeline.pause() is optional, data from the sensor can be gathered anytime while simulating.
 1async def get_lidar_param():                                    # Function to retrieve data from the LIDAR
 2    await omni.kit.app.get_app().next_update_async()            # wait one frame for data
 3    timeline.pause()                                            # Pause the simulation to populate the LIDAR's depth buffers
 4    depth = lidarInterface.get_linear_depth_data("/World"+lidarPath)
 5    zenith = lidarInterface.get_zenith_data("/World"+lidarPath)
 6    azimuth = lidarInterface.get_azimuth_data("/World"+lidarPath)
 7    print("depth", depth)                                       # Print the data
 8    print("zenith", zenith)
 9    print("azimuth", azimuth)
10timeline.play()                                                 # Start the Simulation
11asyncio.ensure_future(get_lidar_param())                        # Only ask for data after sweep is complete
Run the full script:
Expand to display full code
 1# provides the core omniverse apis
 2import omni
 3# used to run sample asynchronously to not block rendering thread
 4import asyncio
 5# import the python bindings to interact with lidar sensor
 6from omni.isaac.range_sensor import _range_sensor
 7# pxr usd imports used to create cube
 8from pxr import UsdGeom, Gf, UsdPhysics
 9
10stage = omni.usd.get_context().get_stage()
11lidarInterface = _range_sensor.acquire_lidar_sensor_interface()
12timeline = omni.timeline.get_timeline_interface()
13omni.kit.commands.execute('AddPhysicsSceneCommand',stage = stage, path='/World/PhysicsScene')
14lidarPath = "/LidarName"
15result, prim = omni.kit.commands.execute(
16            "RangeSensorCreateLidar",
17            path=lidarPath,
18            parent="/World",
19            min_range=0.4,
20            max_range=100.0,
21            draw_points=False,
22            draw_lines=True,
23            horizontal_fov=360.0,
24            vertical_fov=30.0,
25            horizontal_resolution=0.4,
26            vertical_resolution=4.0,
27            rotation_rate=0.0,
28            high_lod=False,
29            yaw_offset=0.0,
30            enable_semantics=False
31        )
32
33CubePath = "/World/CubeName"
34cubeGeom = UsdGeom.Cube.Define(stage, CubePath)
35cubePrim = stage.GetPrimAtPath(CubePath)
36cubeGeom.AddTranslateOp().Set(Gf.Vec3f(2.0, 0.0, 0.0))
37cubeGeom.CreateSizeAttr(1)
38collisionAPI = UsdPhysics.CollisionAPI.Apply(cubePrim)
39async def get_lidar_param():
40    await omni.kit.app.get_app().next_update_async()
41    timeline.pause()
42    depth = lidarInterface.get_linear_depth_data("/World"+lidarPath)
43    zenith = lidarInterface.get_zenith_data("/World"+lidarPath)
44    azimuth = lidarInterface.get_azimuth_data("/World"+lidarPath)
45    print("depth", depth)
46    print("zenith", zenith)
47    print("azimuth", azimuth)
48timeline.play()
49asyncio.ensure_future(get_lidar_param())
You should view the following:
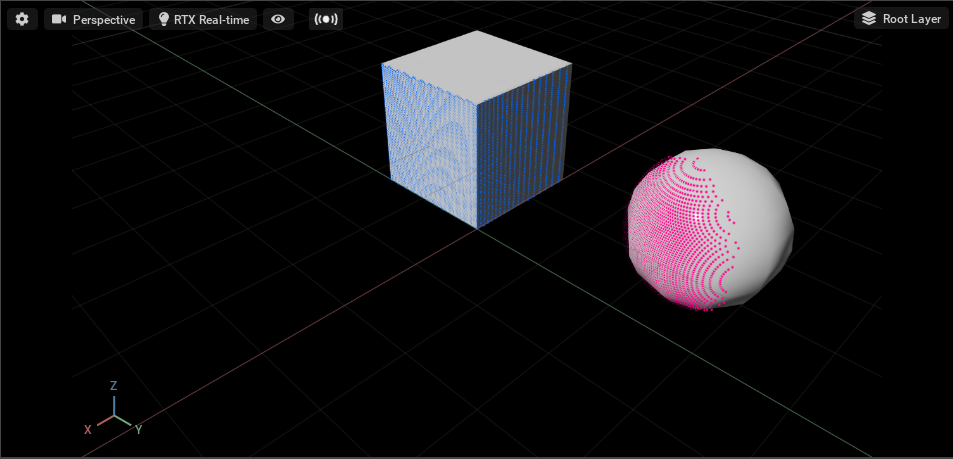
Segment a Point Cloud
This code snippet shows how to add semantic labels to the depth data for segmenting its resulting point cloud.
 1import omni                                                     # Provides the core omniverse apis
 2import asyncio                                                  # Used to run sample asynchronously to not block rendering thread
 3from omni.isaac.range_sensor import _range_sensor               # Imports the python bindings to interact with lidar sensor
 4from pxr import UsdGeom, Gf, UsdPhysics, Semantics              # pxr usd imports used to create cube
 5
 6stage = omni.usd.get_context().get_stage()                      # Used to access Geometry
 7timeline = omni.timeline.get_timeline_interface()               # Used to interact with simulation
 8lidarInterface = _range_sensor.acquire_lidar_sensor_interface() # Used to interact with the LIDAR
 9# These commands are the Python-equivalent of the first half of this tutorial
10omni.kit.commands.execute('AddPhysicsSceneCommand',stage = stage, path='/World/PhysicsScene')
11lidarPath = "/LidarName"
12# Create lidar prim
13result, prim = omni.kit.commands.execute(
14            "RangeSensorCreateLidar",
15            path=lidarPath,
16            parent="/World",
17            min_range=0.4,
18            max_range=100.0,
19            draw_points=True,
20            draw_lines=False,
21            horizontal_fov=360.0,
22            vertical_fov=60.0,
23            horizontal_resolution=0.4,
24            vertical_resolution=0.4,
25            rotation_rate=0.0,
26            high_lod=True,
27            yaw_offset=0.0,
28            enable_semantics=True
29        )
30UsdGeom.XformCommonAPI(prim).SetTranslate((2.0, 0.0, 0.0))
31
32# Create a cube, sphere, add collision and different semantic labels
33primType = ["Cube", "Sphere"]
34for i in range(2):
35    prim = stage.DefinePrim("/World/"+primType[i], primType[i])
36    UsdGeom.XformCommonAPI(prim).SetTranslate((-2.0, -2.0 + i * 4.0, 0.0))
37    UsdGeom.XformCommonAPI(prim).SetScale((1, 1, 1))
38    collisionAPI = UsdPhysics.CollisionAPI.Apply(prim)
39
40    # Add semantic label
41    sem = Semantics.SemanticsAPI.Apply(prim, "Semantics")
42    sem.CreateSemanticTypeAttr()
43    sem.CreateSemanticDataAttr()
44    sem.GetSemanticTypeAttr().Set("class")
45    sem.GetSemanticDataAttr().Set(primType[i])
46
47# Get point cloud and semantic id for lidar hit points
48async def get_lidar_param():
49    await asyncio.sleep(1.0)
50    timeline.pause()
51    pointcloud = lidarInterface.get_point_cloud_data("/World"+lidarPath)
52    semantics = lidarInterface.get_semantic_data("/World"+lidarPath)
53
54    print("Point Cloud", pointcloud)
55    print("Semantic ID", semantics)
56
57timeline.play()                                                 # Start the Simulation
58asyncio.ensure_future(get_lidar_param())                        # Only ask for data after sweep is complete
The main differences between this example and the previous are as follows:
The LIDAR’s
enable_semanticsflag is set toTrueon creation (line 29).The Cube and Sphere prims are assigned different semantic labels (lines 41-46).
get_point_cloud_dataandget_semantic_dataare used to retrieve the Point Cloud data and Semantic IDs (lines 52-53).
The segmented point cloud from lidar sensor should look like the image below:
Summary
This tutorial covered the following topics:
Creating and attaching a LIDAR to geometry using the Omniverse Isaac Sim User Interface.
Creating and controlling a LIDAR using the LIDAR Python API.
Point Cloud Segmentation using the LIDAR and Semantics APIs.
Next Steps
Refer to the other Sensor tutorials in our Advanced Tutorials section, Using Sensors: Generic Range Sensor, to learn how to integrate additional range sensors into Omniverse Isaac Sim.
Further Learning
For a more in-depth look into the concepts covered in this tutorial, refer to the following reference materials:
LIDAR
Try the LIDAR Example at Isaac Examples > Sensors > LIDAR.
Range Sensors
Refer to the PhysX Range Sensors (Lidar, Ultrasonic, Generic Range) Manual for full implementation details.
Refer to the Range Sensor API Documentation for additional usage information.