Using Sensors: Generic Range Sensor
The generic LiDAR sensor lets users have full control of the scanning pattern and frequency of the sensors. This is ideal for sensors that have scanning patterns that are non-rotational, asymmetrical, or non-repetitive.
Learning Objectives
This tutorial introduces how to customize scanning patterns for a generic range sensor in Omniverse Isaac Sim. After this tutorial, you will know how to add a range sensor and customize its scanning pattern.
10-15 Minute Tutorial
Getting Started
Prerequisites
Complete the Introductory Tutorials and the GUI tutorials to learn the basics of constructing objects and adding sensors using the GUI.
The generic sensor can only be customized using Python APIs. Complete Isaac Sim Workflows, and Hello World to familiarize yourself with using python APIs both in the standalone and extension workflow.
The generic sensor is an extension of the rotating LiDAR sensor, so complete the Advanced Tutorial Using Sensors: LIDAR to learn how to add a LiDAR sensor to a scene, use it to detect objects, and attach it to geometries.
To start, let’s run the generic range sensor example:
Go to the top menu bar and click Isaac Examples > Sensors > Generic Range Sensor.
Press the
Load Sensorbutton.Press the
Load Scenebutton.Press the
Set Sensor Patternbutton to load the example sensor pattern.Press the
PLAYbutton to begin simulating.
You will see in the viewport a LiDAR sensor originated from the origin, a rectangular wall sitting slightly off the origin in the +x direction, and the rays turning red when they hit the block. You’ll also notice that the LiDAR rays are not rotating but are zigzagging within a confined region.
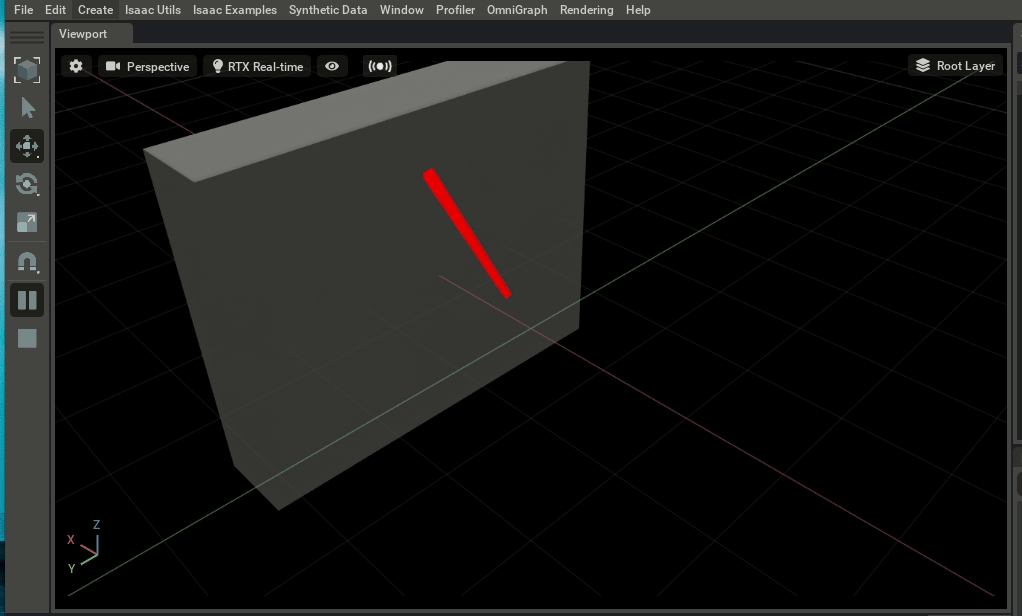
To visualize the pattern, you can save the image imprinted on the wall from the rays that hit it. To do so, select or type out the desired output directory and press Save Pattern Image. Open the saved image file, and you should see a zigzag pattern.

Customizing Scanning Pattern
To customize scanning patterns, these are the parameters that need to be filled or modified.
streaming: Set to
Trueif streaming data continously,Falseif sending a batch of data once in the beginning and repeating it.sampling_rate: Number of scans per second.
batch_size: The number of scans each batch of data contains. The size should be large enough to run a few rendering frames without running out. For example, if you wish to scan at a sampling rate of 2400 scans per second, and your frame rendering rate is at 120 fps, then each frame will render 20 scans. If you send a batch size 12000, you should be able to render 600 frames or 5 seconds at 120 fps before you run out of data. If batch_size is less than what is needed to satisfy the desired sampling rate (i.e. batch_size < sampling_rate/fps), then the sensor will scan at a rate that equals the batch_size per frame, which likely means you will be scanning slower than desired.
sensor_pattern: a Nx2 size numpy array. N is batch_size, and the columns are [azimuth, zenith] angles of each scanning ray. Azimuth is the ray’s horizontal angle measured from the x-axis, and zenith angle is the verticle angle measured from the z-axis.
origin_offsets: (Optional) an Nx3 size numpy array, N is the batch size, and each row is the individual ray’s offset from origin in [x,y,z] coordinates.
Example Scanning Patterns
Let’s take a closer look at our example code to see how to produce the zigzag scanning pattern. The pattern in the example is generated programmatically inside the same script that runs the example. Click on the Open Source Code icon in the upper right-hand corner of the example window and open the python source code for this example.
There are two test patterns in the script, one for testing continous streaming data mode, the other one for testing a repeating pattern mode.
Streaming Generated Pattern
The pattern is sweeping horizontally 10 times for each round of up and down, resulting in the zigzag.
 1def _test_streaming_data(self):
 2    # custom pattern generation
 3    # send data in a batch that are at least large enough to run a few rendering frames without running out of data.
 4    # if batch_size > (sampling rate/rendering rate), the sensor will process all of the batches and ask for the next batch right before it runs out.
 5    # if batch_size < (sampling rate/rendering_rate), the sensor will scan only the provided rays in a given frame, which means it will be scanning slower than intended
 6    batch_size = int(1e6)  # size of each batch of data being processed
 7    half_batch = int(batch_size / 2)
 8    # example scanning pattern is a zigzag
 9    # each ray specified by an azimuth (horizontal angle measured from x-axis) and a zenith angle (vertical angle measured from z-axis)
10    frequency = 10
11    N_pts = int(batch_size / frequency / 2)
12    # azimuth angle zigzag between the limits (frequency) times every batch
13    azimuth = np.tile(
14        np.append(np.linspace(-np.pi / 4, np.pi / 4, N_pts), np.linspace(np.pi / 4, -np.pi / 4, N_pts)), frequency
15    )
16    # zenith angle goes up and down once every batch
17    zenith = np.append(
18        np.linspace(-np.pi / 4, np.pi / 4, half_batch), np.linspace(np.pi / 4, -np.pi / 4, half_batch)
19    )
20    # custom pattern must be sent as an arrya of [azimuth, zenith] angles.
21    self.sensor_pattern = np.stack((azimuth, zenith))
Origin offset is optional. For the example, a small random offset was added, as seen below. For no offsets, you can either use an array of zeros or simply skip setting the origin_offsets parameter.
1    # individual rays can have an offset at the origin
2    # adding random offsets to the origin for the example pattern
3    self.origin_offsets = 5 * np.random.random((batch_size, 3))
4    # self.origin_offsets = np.zeros((batch_size,3))                  # no offsets
Streaming Pattern Through File
If you do not have a programmatic way to generate the scanning pattern from scratch, or if you do not wish to disclose the generation method of the scanning pattern, you can also import data from the file. The example below shows importing data from a .csv file and converting it to match the format of the sensor_pattern parameter.
1    ## import data from file
2    sensor_pattern = np.loadtxt("filename.csv", delimiter=",")
3    batch_size = np.shape(sensor_pattern)[0]
4    sensor_pattern = np.deg2rad(sensor_pattern).T.copy()        ##  MUST USE .copy()
Repeating Pattern
To better visualize the repetitiveness of the pattern, we still use a zigzag motion, but this time instead a smooth movement going up and down, it is split into two modes, one set scanning high and the other set scanning low. If correctly executed, it should repeat itself without any additional data being pulled in.
To change the example to run in non-streaming mode, set variable self._streaming = False and save the change. It should then automatically use the following code the generate the pattern. Wait for the example to restart and reload before trying to run it.
 1def _test_repeating_data(self):
 2
 3    batch_size = int(1e6)  # size of each batch of data being processed
 4    half_batch = int(batch_size / 2)
 5    frequency = 10
 6    N_pts = int(batch_size / frequency / 2)
 7    azimuth = np.tile(
 8        np.append(np.linspace(-np.pi / 4, np.pi / 4, N_pts), np.linspace(np.pi / 4, -np.pi / 4, N_pts)), frequency
 9    )
10    zenith = np.append(-0.5 * np.ones(half_batch), 0.5 * np.ones(half_batch))
11    sensor_pattern = np.stack((azimuth, zenith))
12
13    origin_offsets = 0.05 * np.random.random((batch_size, 3))
Setting Scanning Pattern
When the sensor processes each batch of [azimuth, zenith] pairs, just before it is about to run out of data, it will set the variable send_next_batch() to True, at which point, you can send the next batch via set_next_batch_rays(prim_path, sensor_pattern), plus set_next_batch_offsets(prim_path, sensor_pattern) if there are any origin offsets. Like shown below.
 1def _on_editor_step(self, step):
 2    if not self._timeline.is_playing():
 3        return
 4
 5    if self._timeline.is_playing():
 6        if self._generic:
 7            if self._pattern_set:
 8                if self._sensor.send_next_batch(
 9                    self._genericPath
10                ):  # send_next_batch will turn True if the sensor is running out data and needs more
11                    self._sensor.set_next_batch_rays(
12                        self._genericPath, self.sensor_pattern
13                    )  # set the next batch data using set_next_batch_rays()
14                    self._sensor.set_next_batch_offsets(
15                        self._genericPath, self.origin_offsets
16                    )  # (Optional) add indiviaul ray offsets if there are any
Summary
This tutorial covered the following topics:
Using the generic range sensor.
Generating continously streaming or repetitive custom scanning patterns for the generic range sensor.