Farm Examples
Note
Please ensure Farm Queue and Farm Agent are installed and running before continuing.
Rendering with Farm
Omniverse USD Composer comes bundled with the ability to submit render jobs to Queue.
In this example, we will walk through the needed steps to distribute your renders across your local network on spare machines. Follow the steps below to create a (render) task that an Agent will pick up and process. You can use Omniverse USD Composer or any other Omniverse Kit-based App with Movie Capture enabled.
Send a Render to the Queue
In Omniverse USD Composer, open the scene you wish to render using
File>Open.Select
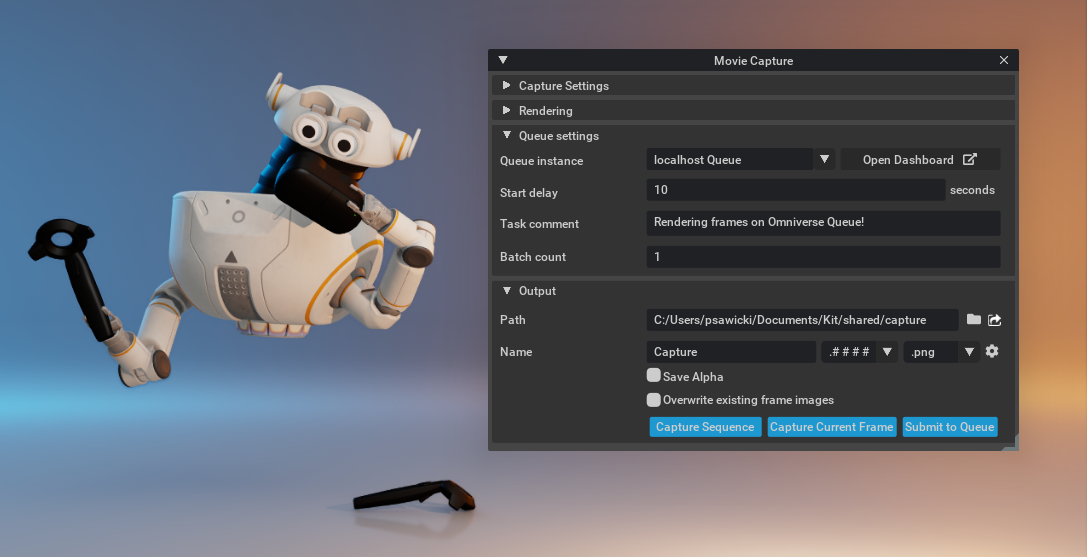
Rendering>Movie Capture.Within the
Movie Capturepanel, select the scene you wish to render.Note
It is important to ensure the scene you wish to render is stored in a location that is accessible to all Farm Agents, along with all the assets it contains.
In
Settingswithin theMovie Capturepanel, selectlocalhost Queue, or a Queue available on the network.Optional: Add a description to the task so you can easily identify it later. This can be useful for task recognition when running several tasks or for historical context of the jobs executed.
Review and ensure all render settings and path locations are accurate.
Ensure the
Output: Pathis set correctly.Submit the task to Queue by clicking
Submit to Queueat the bottom of theMovie Capturepanel.
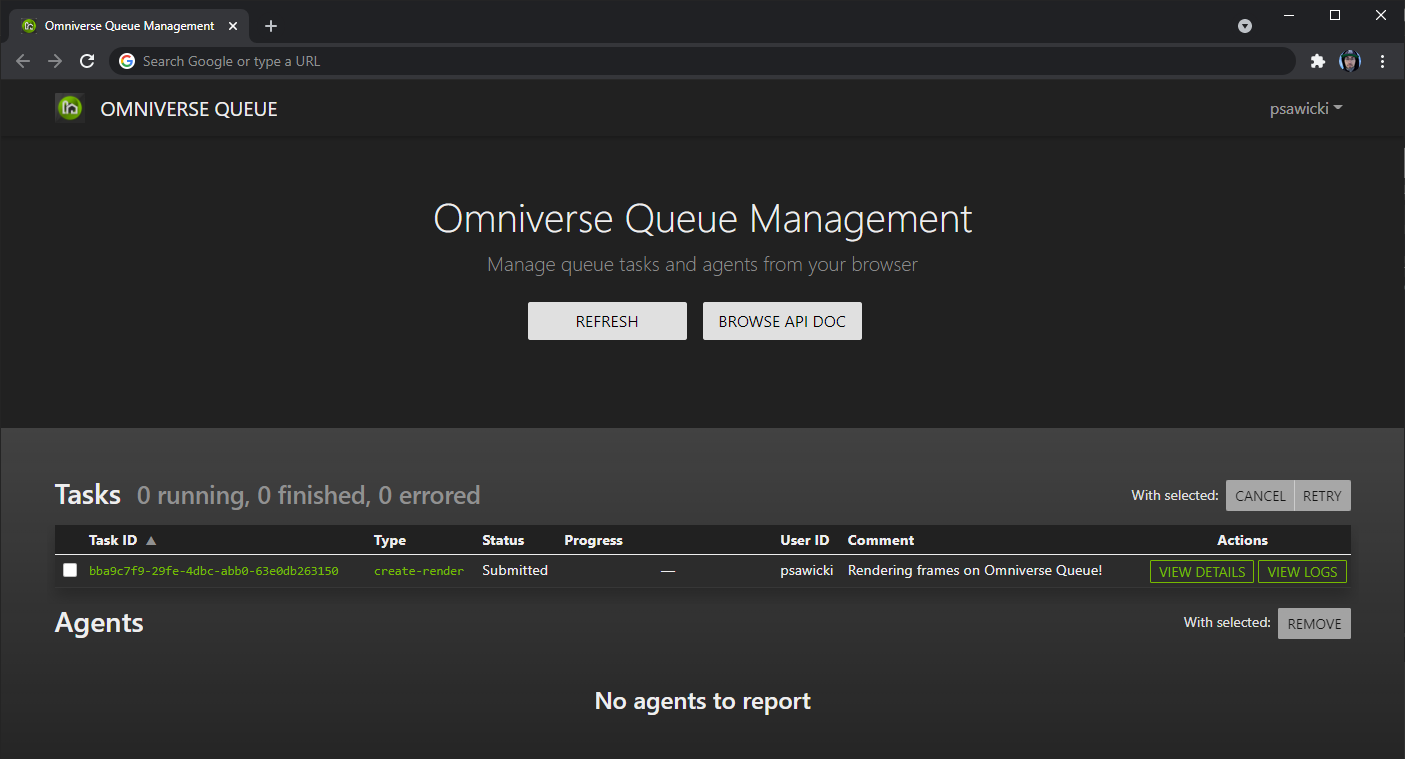
Once submitted, the Queue dashboard will update and show the task that was created, and its status is set to Submitted while waiting for an Agent to pick it up.
Add Agents to execute on the Render Task
Agents are responsible for executing on tasks in Omniverse Farm. To render the task, you will need one or more agents.
Agent Requirements
Access to any network location requested by the Farm Queue
Network Access to the Farm Queue Host
Omniverse Agent
To get started, launch the Farm Agent:
The interface will display a UI where you can enter the URL for your Queue (a default URL is provided).
The default URL assumes the Queue and Agent are both operating on
localhost. If you are not running Agent on the same machine as Queue, provide its hostname or IP address in the text field and clickTest connectionto confirm the Agent is able to reach the Queue.After clicking
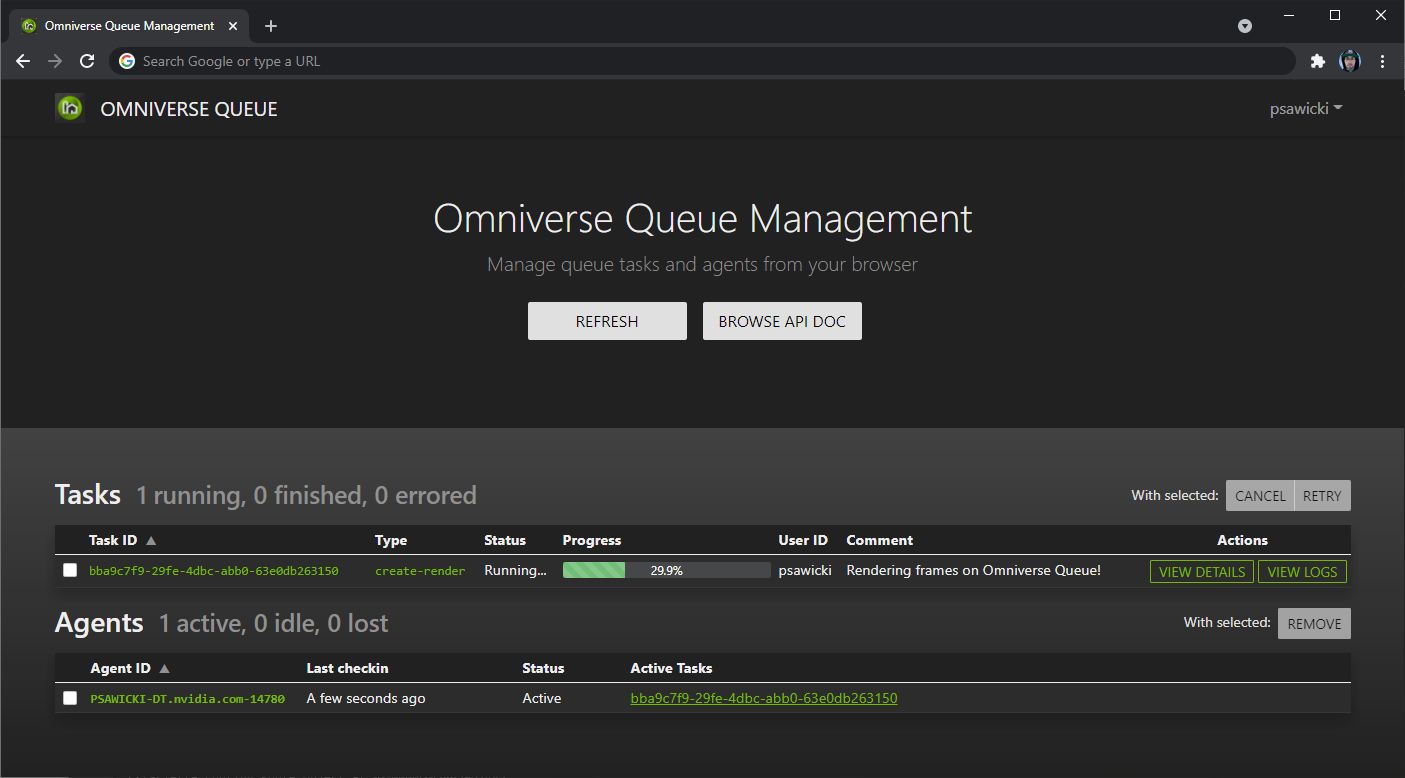
Connect, Agent will retrieve the list of pending tasks from Queue and begin executing.The Queue dashboard will refresh after a few seconds and should reflect the new state of the system, where:
An Agent is now available, since it was launched from the Omniverse Launcher.
The submitted task has transitioned to Running, which means processing is underway.
Agent status is Active, and the ID of the active task matches the one submitted earlier.
Once the task has completed:
Agent will return to
Idlestate.Task status will change to
Finished.
In the Movie Capture panel, select the folder icon next to the Output: Path field, which will link you to the selected path allowing you to review the render results.
Custom Decimation Task
Omniverse Farm is more than just a render queue, it can process virtually anything - whether in Omniverse or not. In the next example, we will define a custom job and use Blender to decimate the meshes.
Example: Using Blender to decimate meshes
Now that we’ve learned how to execute built-in tasks, let’s see how to define and run our own custom ones. For this example, we will be using Omniverse Agent to automate a mesh simplification task in Blender — which you can download for free from the Blender website, or from the Apps section of the Omniverse Launcher.
As an illustration of typical batch operations you may find in studio or enterprise scenarios, the task will:
Open an OBJ file
Decimate its meshes to a given ratio
Export the scene as a USD asset
While this is a simple scenario, it does demonstrates important concepts:
No task is too small to benefit from automation.
Creating custom job types for Omniverse Agent is a fairly straightforward process.
USD (the 3D industry standard) to facilitate data exchange and interoperability.
Blender mesh decimation script
Let’s start where most automation tasks begin: by running our task locally.
Below is our Python script which will be driving the work to do in Blender. It supports the following arguments:
--source: The absolute path to the OBJ file to decimate.--destination: The absolute path where the resulting USD file will be saved.--ratio: An optional parameter between0.0and1.0, specifying the amount by which meshes should be simplified.
 1# File: job.blender-decimate.py
 2
 3import argparse
 4import sys
 5from typing import List
 6
 7import bpy
 8
 9
10class BlenderArgumentParser(argparse.ArgumentParser):
11    """Argument parser for Python scripts running in Blender."""
12
13    def _get_arguments_after_double_dash(self) -> List[str]:
14        """
15        Extract any arguments intended to be passed to Blender scripts.
16
17        This uses the fact that Blender will ignore any command line arguments provided after the `--` command. This
18        effectively extracts any arguments following `--`, and forwards them to the default `argparse.parse_args()`
19        implementation.
20
21        Args:
22            None
23
24        Returns:
25            List[str]: The command line arguments provided to the Blender executable, and intended for the Python script.
26        """
27        try:
28            double_dash_index = sys.argv.index("--")
29            return sys.argv[double_dash_index + 1:]
30        except ValueError:  # Case where no arguments were provided after `--`.
31            return []
32
33    def parse_args(self) -> argparse.Namespace:
34        return super().parse_args(args=self._get_arguments_after_double_dash())
35
36
37def main() -> None:
38    """Decimation script for Blender."""
39
40    # Parse the arguments provided to the script:
41    parser = BlenderArgumentParser()
42    parser.add_argument("--source", required=True, help="Path of the source file to decimate.")
43    parser.add_argument("--destination", required=True, help="Path of the destination file to save.")
44    parser.add_argument("--ratio", type=float, default=0.5, help="Mesh decimation ratio (between 0.0 and 1.0).")
45    args = parser.parse_args()
46
47    # Clear the Blender scene, effectively removing the default Cube, Light and Camera:
48    bpy.ops.wm.read_factory_settings(use_empty=True)
49
50    # Import the given OBJ file into the scene:
51    bpy.ops.import_scene.obj(filepath=args.source)
52
53    # Decimate the meshes of the scene using the provided decimation ratio.
54    #
55    # The decimation ratio represented the ratio of faces to keep from the original mesh:
56    #   * At 1.0, the mesh remains unchanged.
57    #   * At 0.5, edges have been collapsed in such a way that half the number of faces are retained.
58    #   * At 0.0, all faces have been removed.
59    for object in bpy.data.objects:
60        if object.type == "MESH":
61            modifier = object.modifiers.new(name="DecimateModifier", type="DECIMATE")
62            modifier.ratio = args.ratio
63
64    # Export the scene to the given USD file:
65    bpy.ops.wm.usd_export(filepath=args.destination)
66
67
68if __name__ == "__main__":
69    main()
Testing our mesh decimation script
Following best practices, this task can be executed locally from the command line. This makes it possible to develop, validate and debug it to allow fast iteration cycles, and also promotes reusability of components.
Before integrating our task, let’s first make sure it runs as expected in standalone mode by running it from the command line:
1./blender \
2    --background \
3    --python path/to/job.blender-decimate.py \
4    -- \
5    --source path/to/source.obj \
6    --destination path/to/destination.usd \
7    --ratio 0.5
Using the mandatory Suzanne monkey as an OBJ source file, we should see the following result, with the original model on the left and its simplified version on the right:

Integrating the job with Omniverse Agent and Queue
Now that we know that our task works as expected, we will integrate it in Omniverse Agent so anyone can submit tasks and benefit from our work.
This can be done either by code, or by using a more User-friendly wizard that will assist in the creation of a task. Since we have already done a fair share of code for the day, let’s use the wizard to make the rest of the day easier:
From the Omniverse Launcher, launch an instance of Agent.
From the UI, under the Agent settings section, click the Configure or edit job definitions button.
Clicking the button will direct you to the Job Definition Wizard, from where you can either create new job definitions that agents can execute, or edit any previously-saved job:
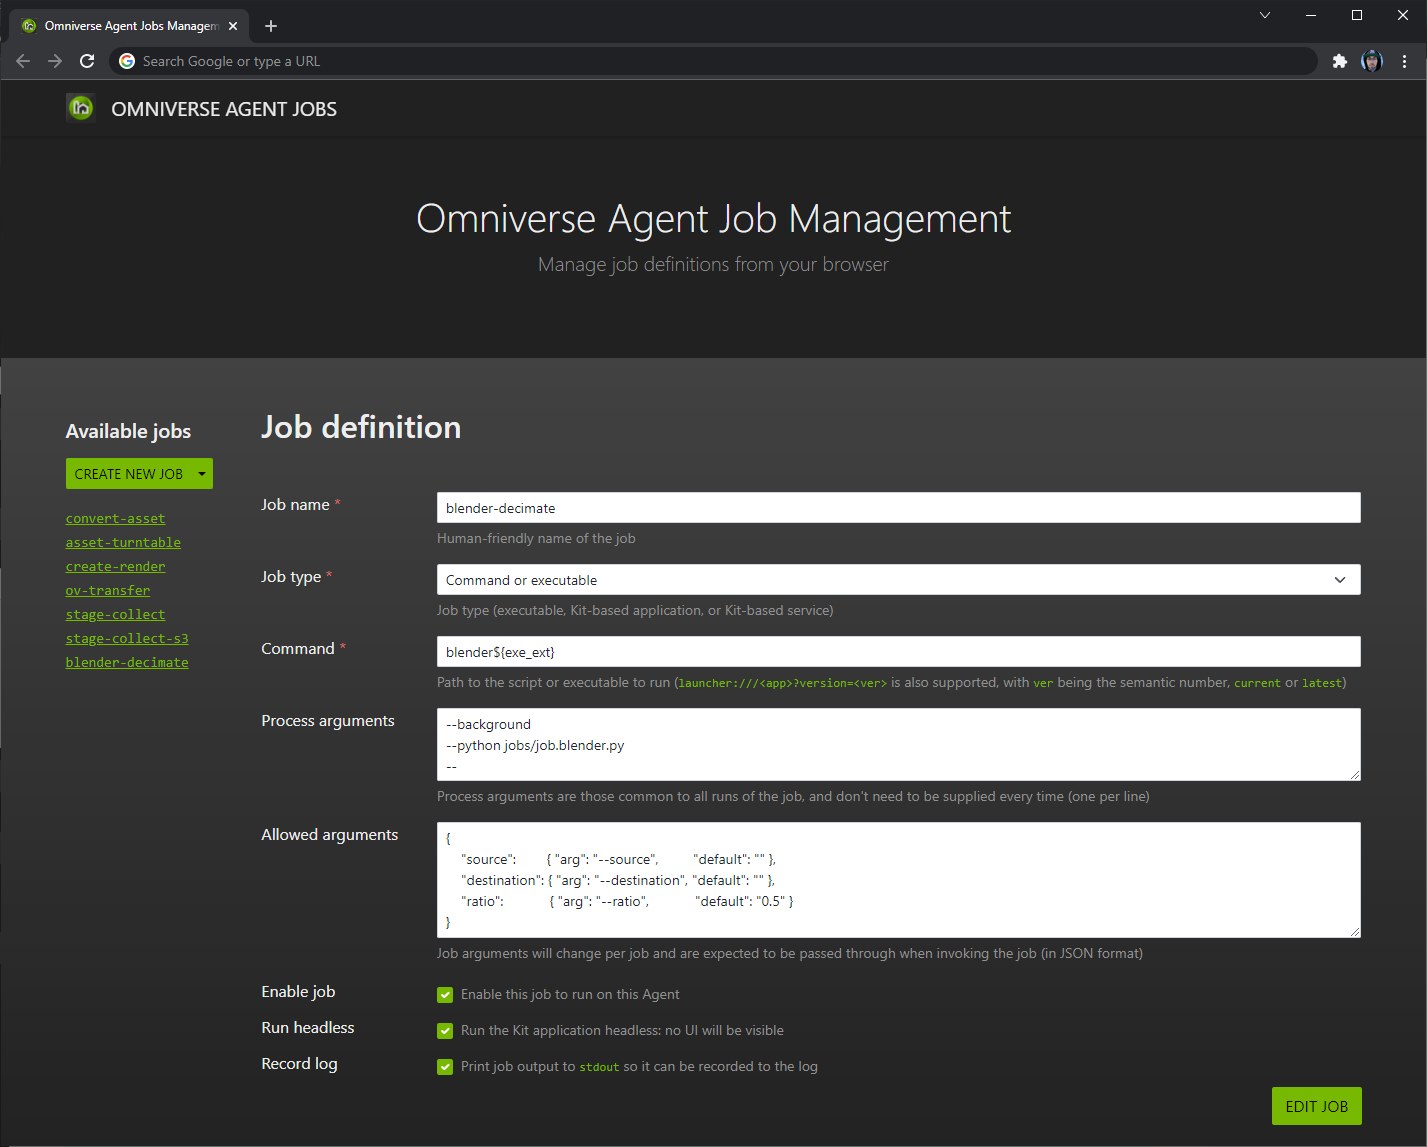
Let’s follow the steps and provide information about the job we want to create:
Job name:
blender-decimateJob type:
Command or executable, as we will be launching theblenderexecutable. For other use cases, we could also selectKit-based applicationorKit-based serviceto select a Kit extension as a driver for the process.Command:
blender${exe_ext}, for which we can supply either the full path to Blender’s executable on the Agent, or the name of any command to execute.Process arguments: The list of arguments to supply to the Blender command, one per line. These are the values common to all executions of this job.
Allowed arguments: The parameters to supply to the job, which might differ from one execution to another. This can include a definition for
defaultvalues, in case one is not supplied.
And click Save!
Let’s now complete our project by submitting a task:
 1curl -X POST "http://localhost:8222/queue/management/tasks/submit" \
 2    --header "Accept: application/json" \
 3    --header "Content-Type: application/json" \
 4    --data '{
 5    "user": "my-user-id",
 6    "task_type": "blender-decimate",
 7    "task_args": {
 8        "source": "path/to/suzanne.obj",
 9        "destination": "path/to/suzanne-decimated.usd",
10        "ratio": 0.2
11    },
12    "task_comment": "My first decimation job!"
13}'
Note
Please wait a few seconds for an Agent to pick up the task.
Since jobs are defined in Kit files using the TOML syntax, the wizard will produce a schema similar to the code shown below, which agents use to launch and process our task. If you want to share or distribute your job to multiple machines, all you would have left to do would be to place it in the same location on other Agents of your pool.
job.blender-decimate.kit1# File: job.blender-decimate.kit 2 3[package] 4title = "Blender decimation task" 5description = "Decimate a mesh using Blender and export it as a USD asset" 6version = "1.0.0" 7category = "jobs" 8authors = ["Omniverse Team"] 9readme = "Omniverse decimation task" 10keywords = ["job"] 11 12# Schema for the Blender mesh decimation task. 13[job.blender-decimate] 14job_type = "base" 15name = "blender-decimate" 16log_to_stdout = true # Capture information from `stdout` and `stderr` for the task's logs 17# Since the `command` property supports standard Kit token resolution, we're using `${exe_ext}` so the executable resolves to `blender.exe` on Windows and 18# `blender` on Linux. For the environment where Agent will be running, we have the choice of either: 19# * Making sure the `blender` executable can be found in the `PATH` or `HOME` environment variable. 20# * Providing the full path to the Blender executable. 21command = "blender${exe_ext}" 22# The command line arguments listed in the `args` array will be supplied to the `command` for each task of this type. This has 2 main benefits: 23# 1. It prevents having to provide these arguments for each task. 24# 2. Makes it possible to seamlessly roll out updates to the "job.blender-decimate.py" script on the Agent, without the need for clients to also 25# update their APIs. For example, Agents could update to a "job.blender-decimate.v2.py" and clients could still submit tasks using the same 26# `allowed_args` listed below. 27args = [ 28 "--background", 29 "--python", "path/to/job.blender-decimate.py", 30 "--", # In the case of Blender, this additional `--` token is required to supply arguments to the Python script itself. 31] 32 33# The `allowed_args` are appended to the "static" `args` listed above for each task. Effectively, this means that the resulting command line executed by 34# Agents takes the form of: 35# $ <command> <args> <allowed_args> 36# 37# In the case of our example, this resolves to: 38# $ blender \ 39# --background --python path/to/job.blender-decimate.py -- \ 40# --source <source_obj> --destination <destination_usd> --ratio <ratio=0.5> 41# 42# Each `allowed_args` supports 2 properties: 43# * `arg`: The argument token as it will appear on the command line. 44# * `default`: A default value for the argument, if none is supplied by clients. 45# 46# Note that `allowed_args` defines the explicit list of arguments which can be submitted by clients, and that any additional arbitrary arguments will be 47# ignored. For security reasons, you would not want external clients to be able to supply extra arguments, which could otherwise allow arbitrary external 48# code execution. In our example, this prevents Users from submitting tasks to Blender with the `--python-expr <script>` argument, which executes the 49# provided text string as a Python script. 50[job.blender-decimate.allowed_args] 51source = { arg = "--source", default = "" } 52destination = { arg = "--destination", default = "" } 53ratio = { arg = "--ratio", default = "0.5" }
What next?
To make this feature accessible to others, we can now bring it to the next level by:
Writing a script or plugin to submit tasks directly from DCC applications making it possible for artists to submit tasks easily on asset revision.
Alternatively, we could also submit tasks directly from our production tracking tools delivering automatic system submissions of tasks once they have been reviewed and approved.
Note
You may have noticed that it might be more performant for Agents to execute multiple tasks at the same time. Since an Agent is already launched, it might be more efficient to have it process a number of conversions at the same time, rather than only process a single file.
A few considerations:
Perhaps we could edit our script to support supplying the path to a source folder to find and process all OBJ files, instead of a single file.
Perhaps we could even provide our script with a glob wildcard pattern to find source files of multiple formats, and export them all as USD.
Conclusion
With this ability to scale, distribute, and share tasks across multiple environments, there are no limits to what we could do automatically or by manual submission:
Render turntable-style preview of assets once they are submitted to the production tracking system.
Making sure all resources are checked in, and that no texture files are missing from files before .
Validating that asset nomenclature conforms to studio requirements.
Updating fluids or animation caches.
Training machine learning on new datasets.
and more…
Do you want to showcase your creations, or see what others from the community have created? Join the Showcase section of our forums to join the conversation!