Tutorial 5: Create a particle system in Particle Graph Editor
In this tutorial you’ll be setting up a particle system from scratch in Particle Graph Editor. We’ll be creating a geometry replicator.
Create a basic particle system in the Particle Graph Editor
Video 1: Create a Geometry Replicator in the Particle Graph Editor
Video Authored in Create 103
Open the Particle Editor and Create a new Particle System
1. Go to Windows -> Particles and click Editor.

The Particles Editor will appear in the same frame as the Content window in a Tab.
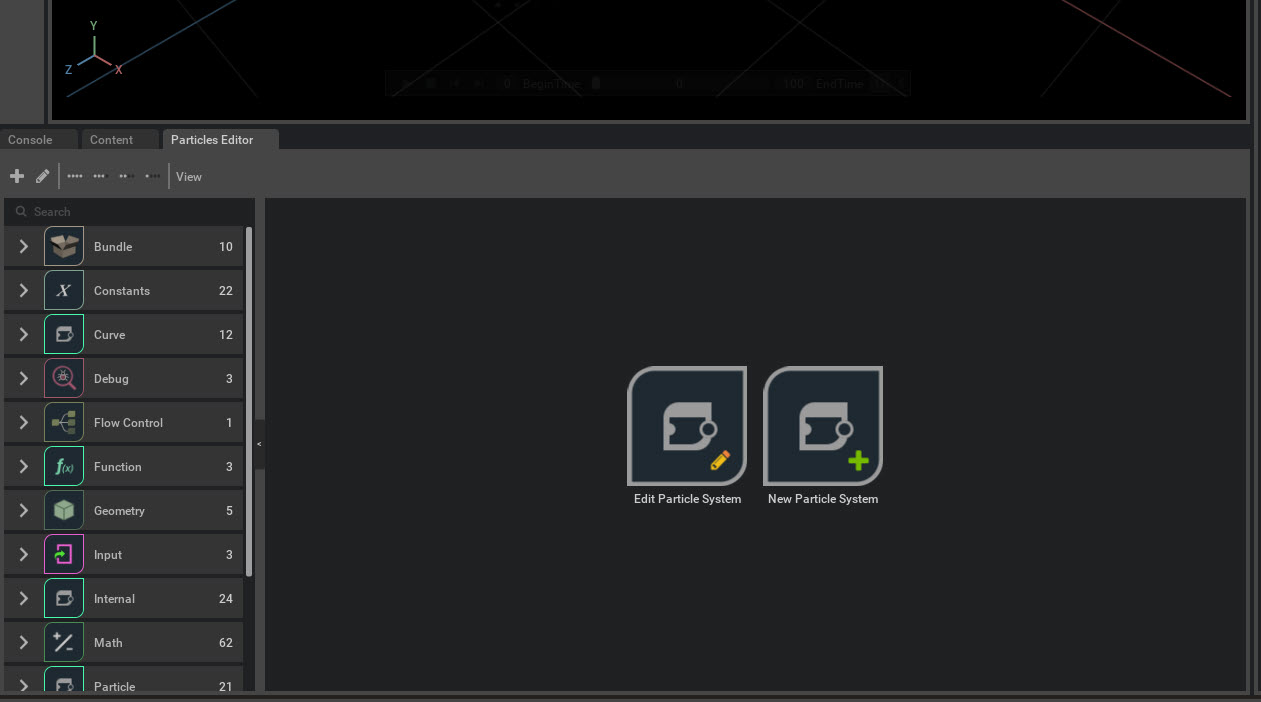
2. To create a new particle system, left click on the New Particle System button.
A blank Particle System window will appear. You create and connect your nodes here.
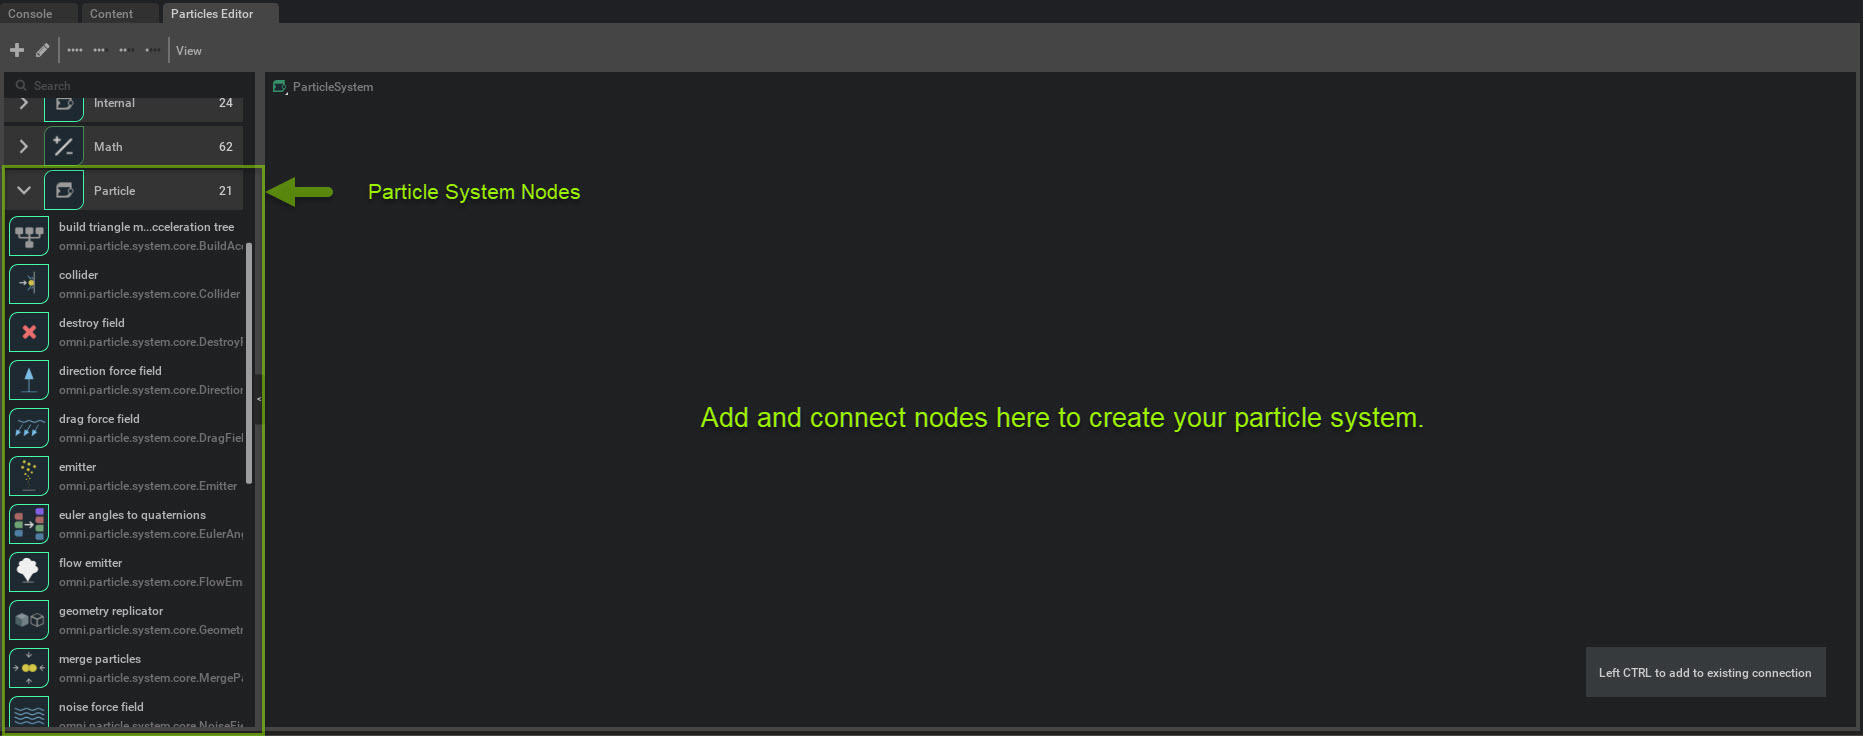
Add your Particle System nodes
You can create and connect your nodes in the Particle Editor. We’ll be adding nodes in and connecting them for a geometry replicator particle system.
We’ll be going over a couple different ways to add nodes inside the Particle Editor. you can either search for a node in the search window or find them in the Particles node menu and drag and drop them in.
Create a Source for the Geometry Replicator
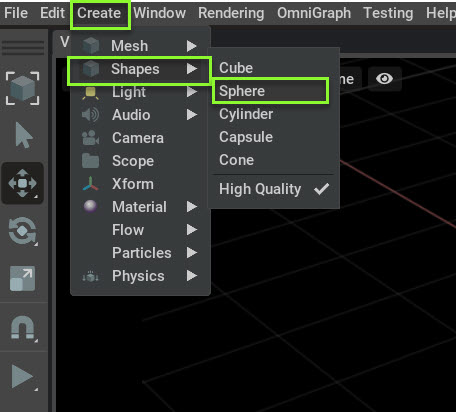
First, create a source for the particle system emitter. To add a Prim of any kind you’ll be using these steps.
1 Go to Create->Shapes-> and select Sphere
Now that we have our particle system source we need to get it into Particle Graph Editor using the Particle Editor.
2. Left click drag and drop Sphere into the Particle Editor.
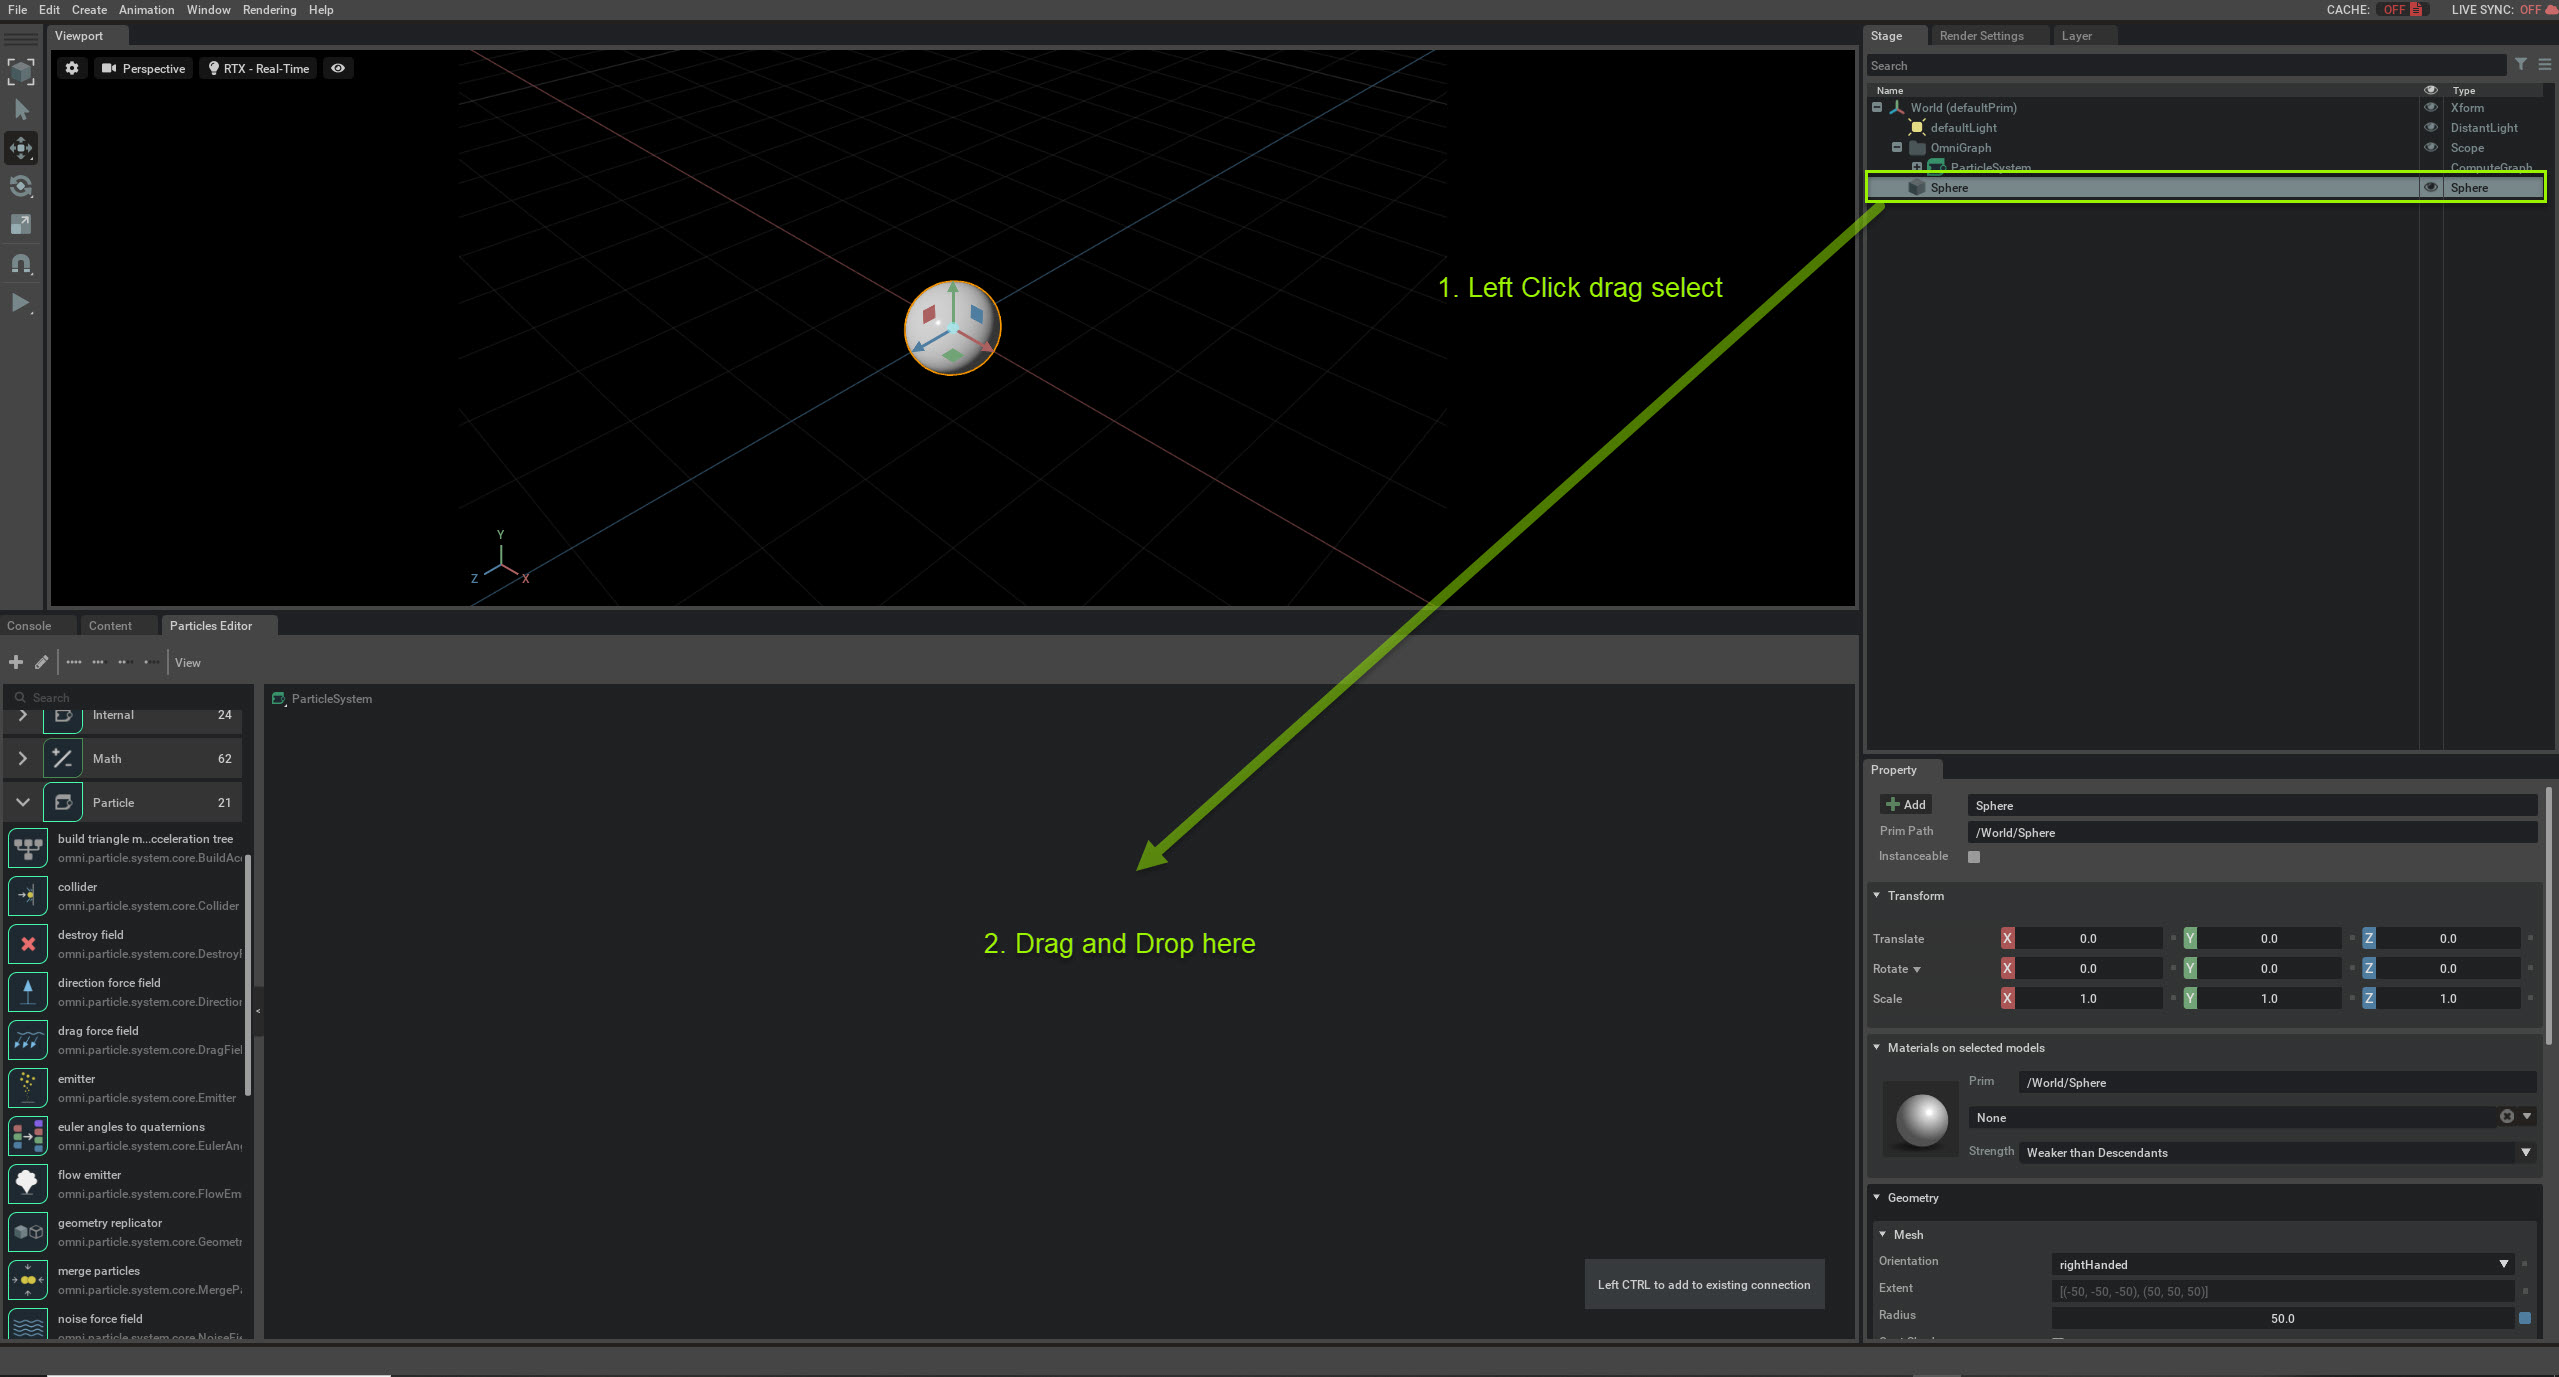
3. A Create Node for Prim window will appear. Left Click on OG prim Node. A sphere prim node will appear in the Particle Editor.

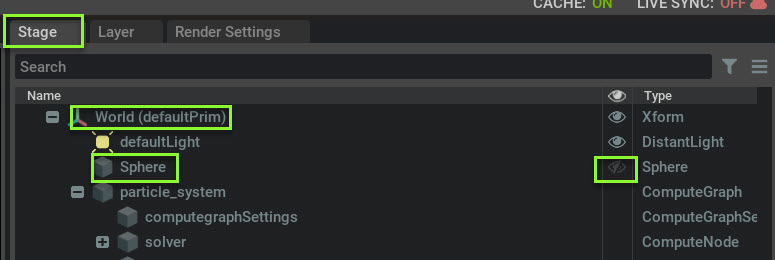
We don’t need to see the source for this tutorial, so we’ll be turning off its visibility.
3. Turn off visualization of the sphere by clicking on the eye in Stage-> World -> Sphere.
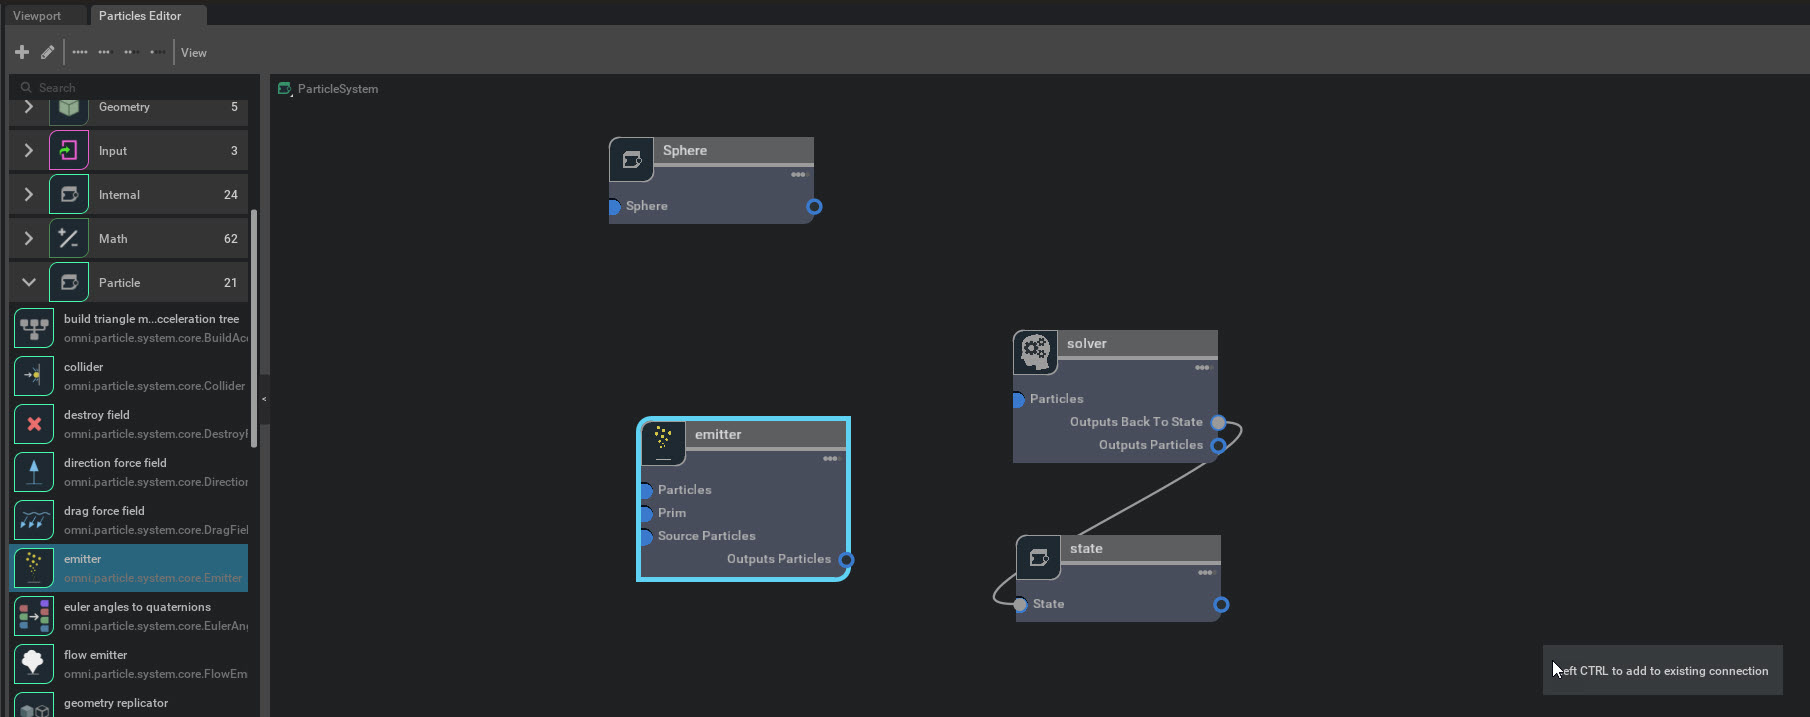
Add a Solver node using search
Next we need to create a solver and the state node. The state node is created automatically when adding the solver.
The Solver node implements numerical integration of the underlying particles data at each simulation step.
the State node holds the end-of frame data which becomes the starting point for the next frame simulation.
Method 1: The search method:
To add a solver in the Particle Editor
1. Go to the Search window inside the Particle Editor and search for solver.

2. Left Click drag and drop the Solver node into the Particle Editor node window.
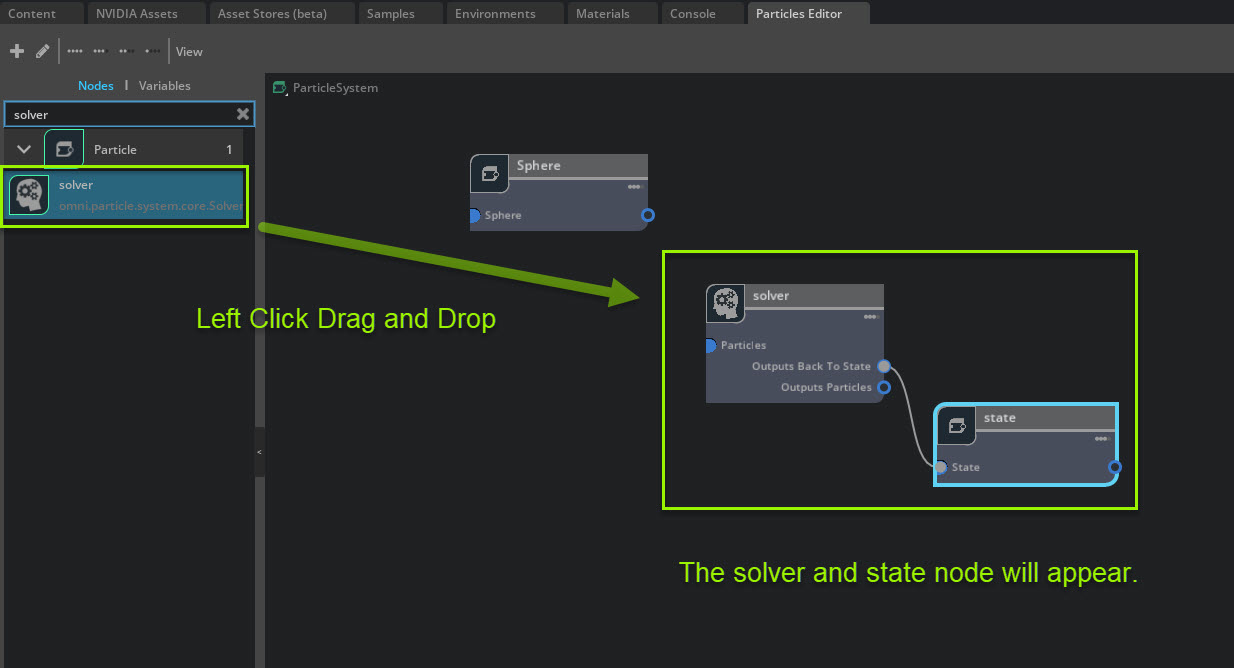
A Solver and State node will appear.
Add an Emitter node using the Particle Node menu
Next we need to create an emitter node. The emitter node controls the behavior of the particles.
Method 2: Add nodes using The Particle node menu
1. Go to the Particle Node menu inside the Particle editor and find the Emitter node in the stack then left click drag and drop it into the Particle Graph Editor..
Note
You may need to clear the search window by clicking the X button to see the entire stack.
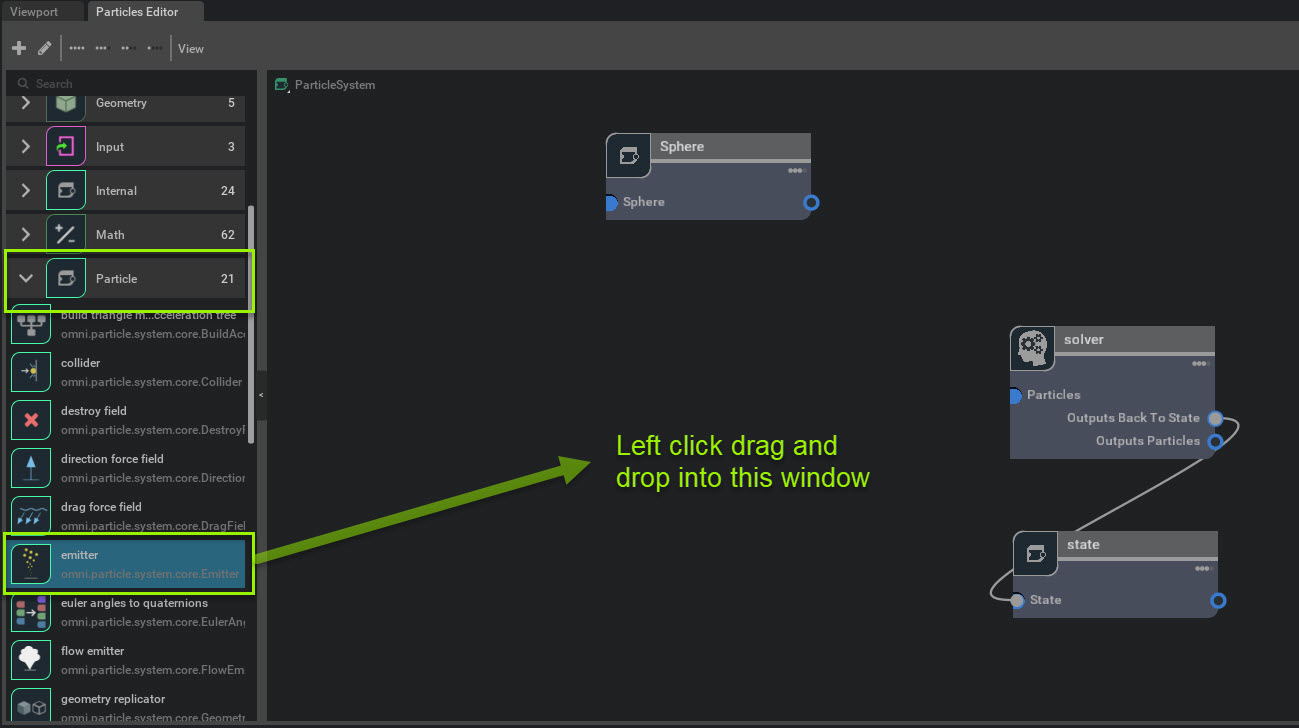
An Emitter node will be created inside the Particle Editor.
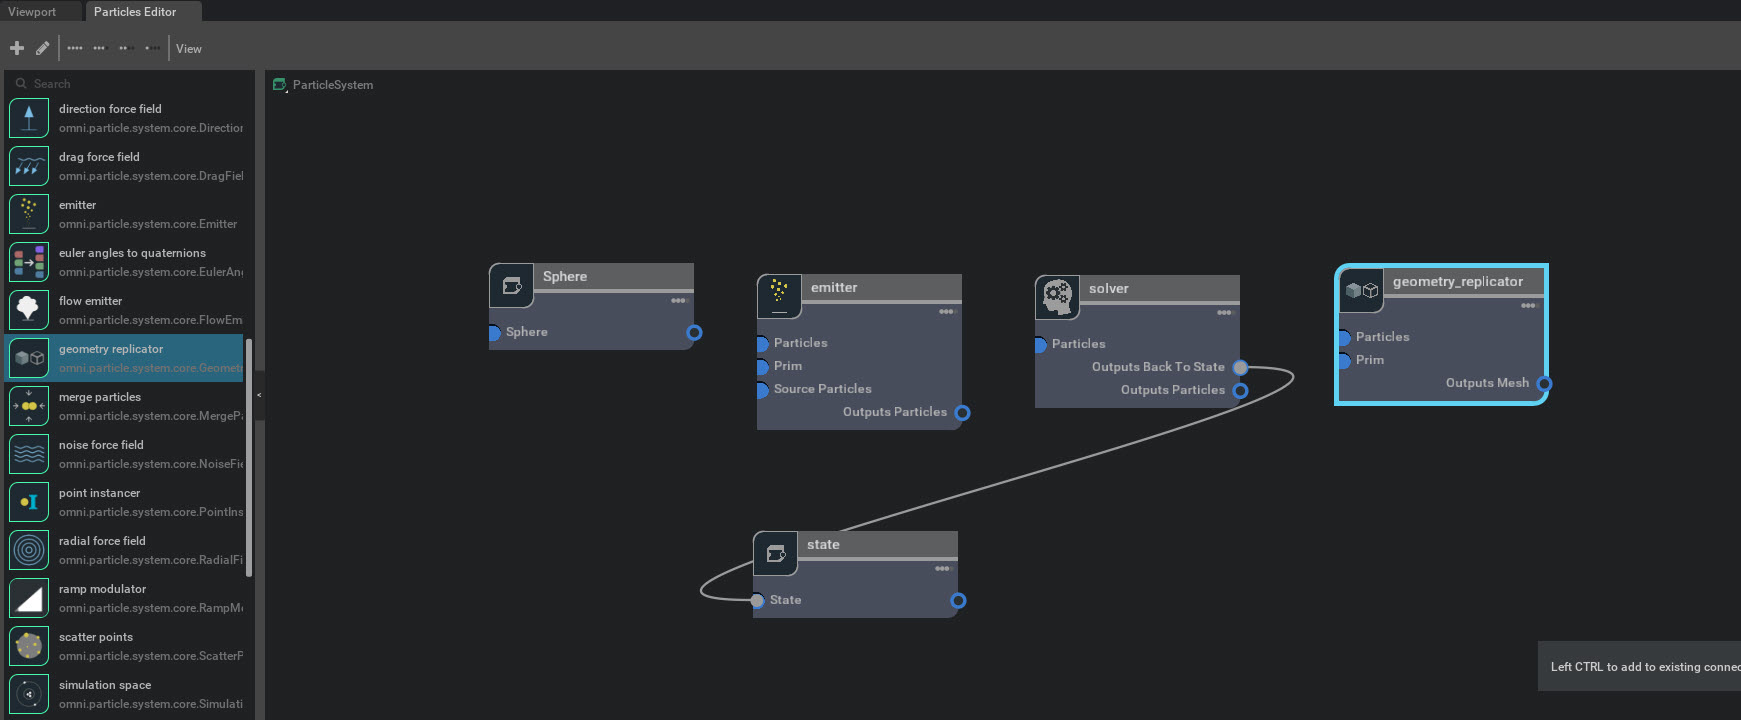
Create a Geometry Replicator node
Now we need decide what type of particle system we want to make. For purposes of this tutorial we’ll be making a Geometry Replicator.
Add a Geometry Replicator node using either the search or the Particle Node menu method, and assemble your nodes by left click dragging from pin to pin as shown below:
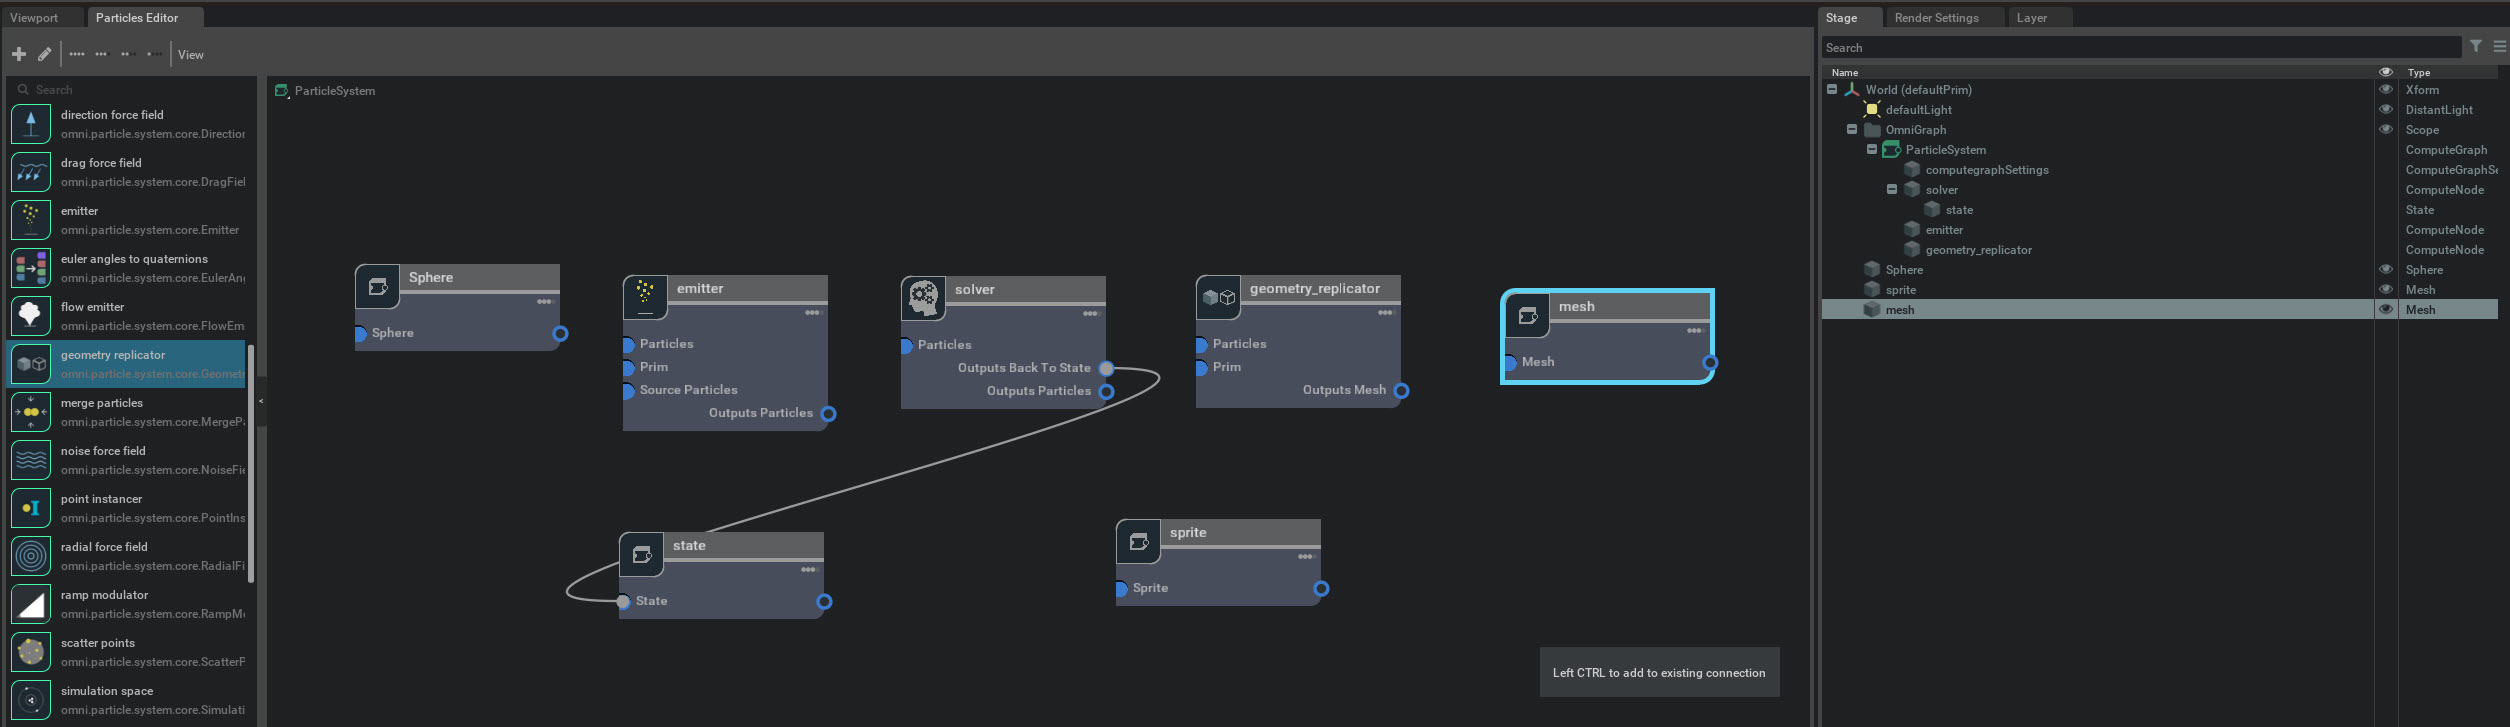
Create the Sprite and Mesh Node and add them to the Particle editor
From here we need to decide what we want to emit. For purposes of this tutorial we’ll be emitting a sprite.
We also need a method of output, for this we’ll be using a mesh node. The mesh node is the output representing the result of the particle simulation on USD level that gets rendered on screen.
To add a sprite and a mesh node
1. Go to Create -> Particles and select Sprite.
2, Go to Create -> Particles and select Mesh
both will appear in the Stage.
3. Add the Sprite and the Mesh prims into the Particle Editor by dragging and dropping each into the Particle Editor.
The Create Node for Prim menu will appear when you add them.
Click the OG Prim Node button when you add each prim as we did previously. Assemble the nodes as shown below.
Note
You can also add the sprite and mesh nodes from the Particle Graph Menu Node List directly. The method above is an alternate method.
Connect the Nodes
With all of the nodes created, we need to connect them together to make our particle system.
To connect the nodes Left click hold a pin and drag it to the appropriate pin.
Note
to disconnect a pin, right click the pin and select disconnect.
Connect the nodes as shown:
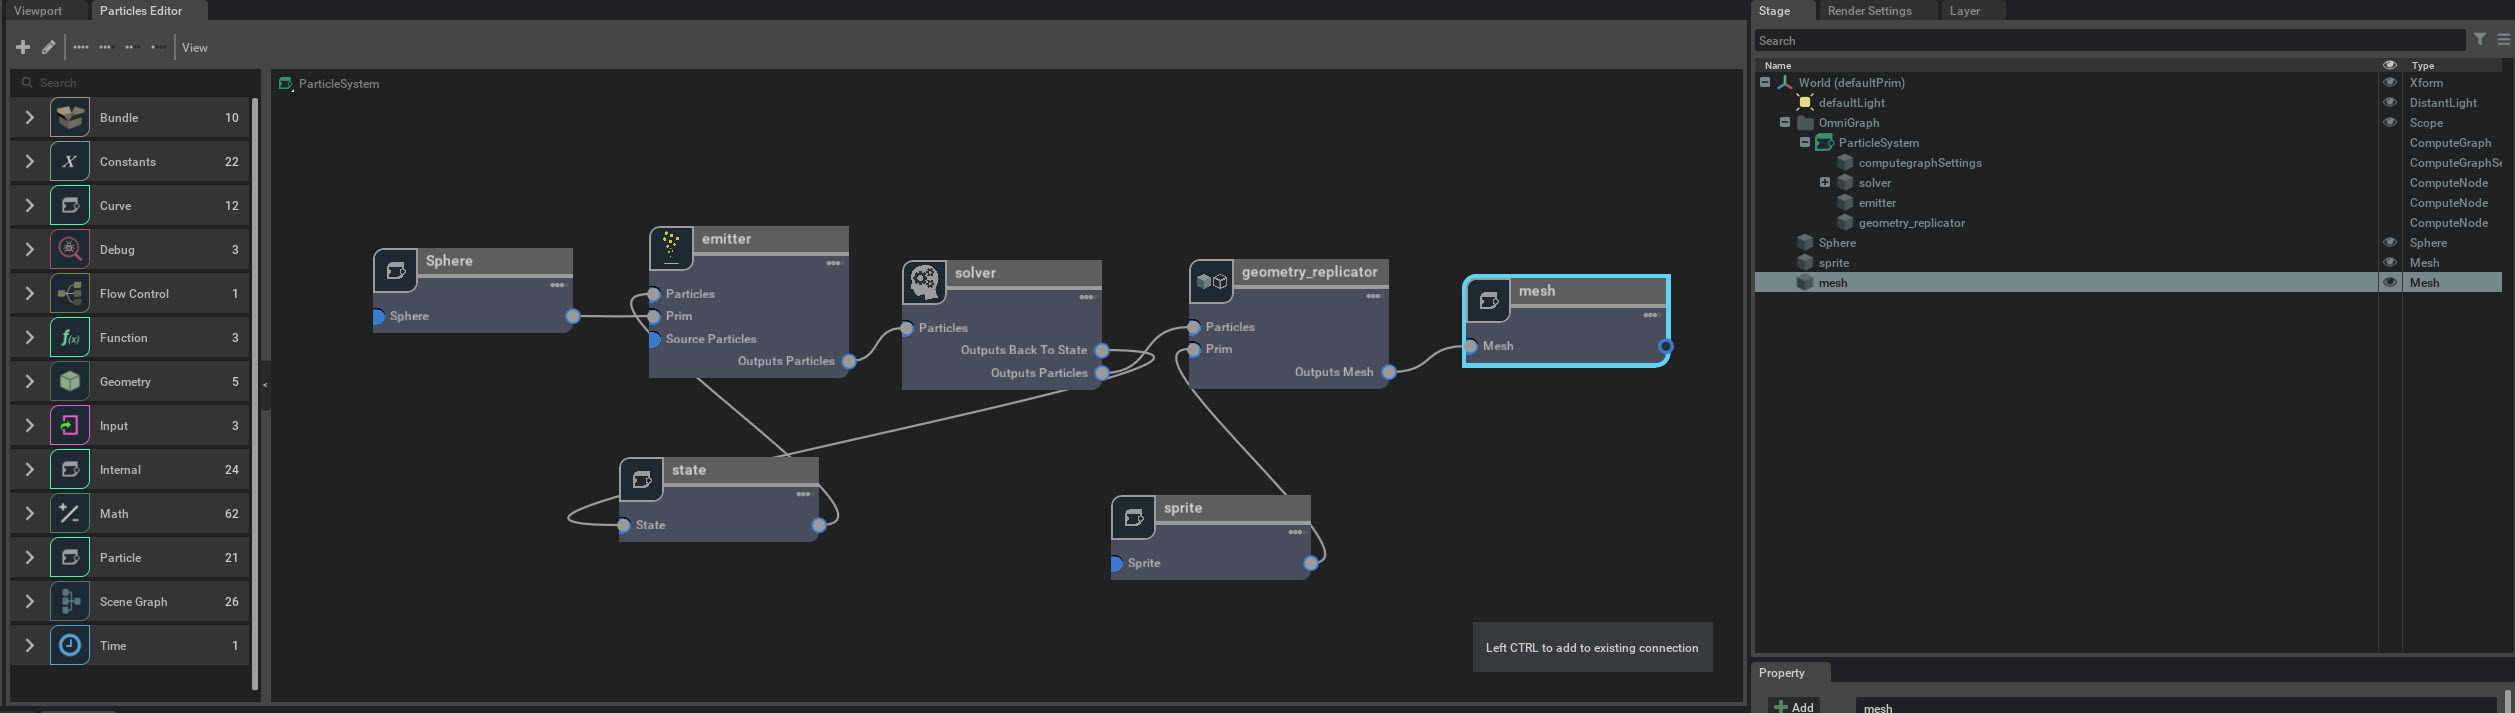
Now you have particles emitting from the Sphere in the viewport.

Close the particle editor.
In the next step we’ll add a material to the sprite.
Add a the particle material to use with the particles
Now that we have the particles emitting from the sphere we need to add a material to them.
The particle system extension comes with a translucent material to use with particles.
To add a material:
1. Go to Create -> Particles and select Material.
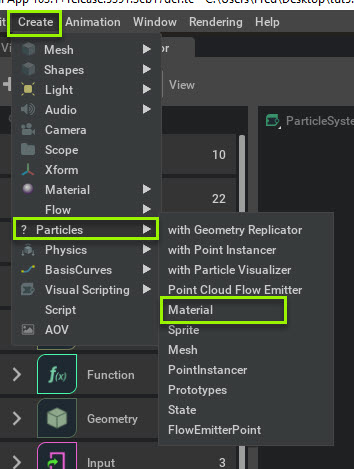
Now there is a particle material inside the Looks folder. Next we need to assign the material to the particle system.
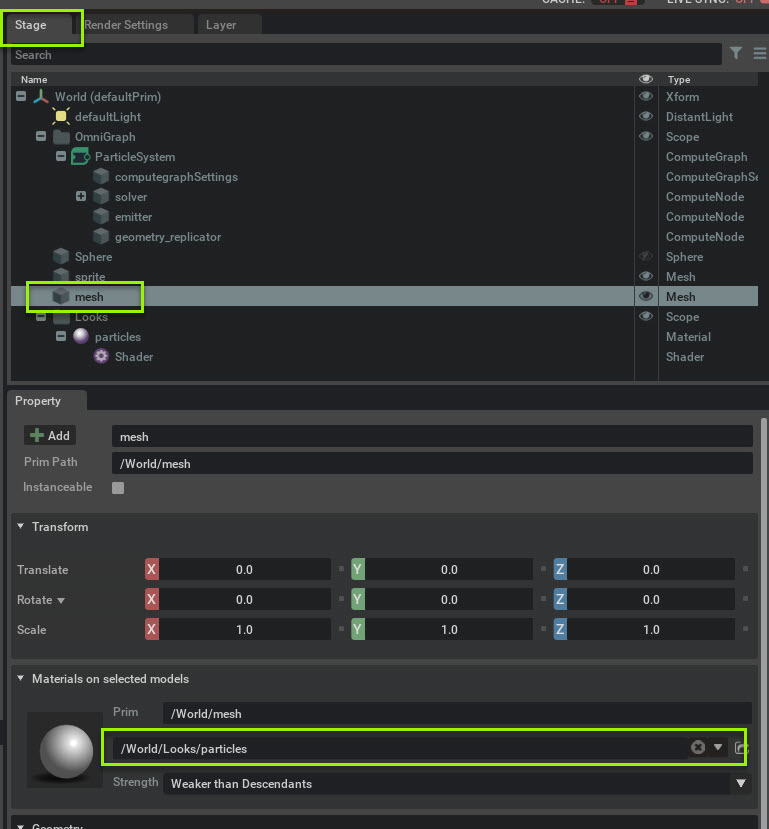
2. To assign the material go to Stage -> World and select mesh
3. in Property -> Materials on selected models use the dropdown to select the /World/looks/particles material.
The material is now assigned to the particle system.
From here you can add a texture and change the particle system whatever way you want.
In this tutorial we created a Geometry replicator particle system from scratch in Particle Graph Editor
Bonus: Particle System setup in the Graph Editor graphics
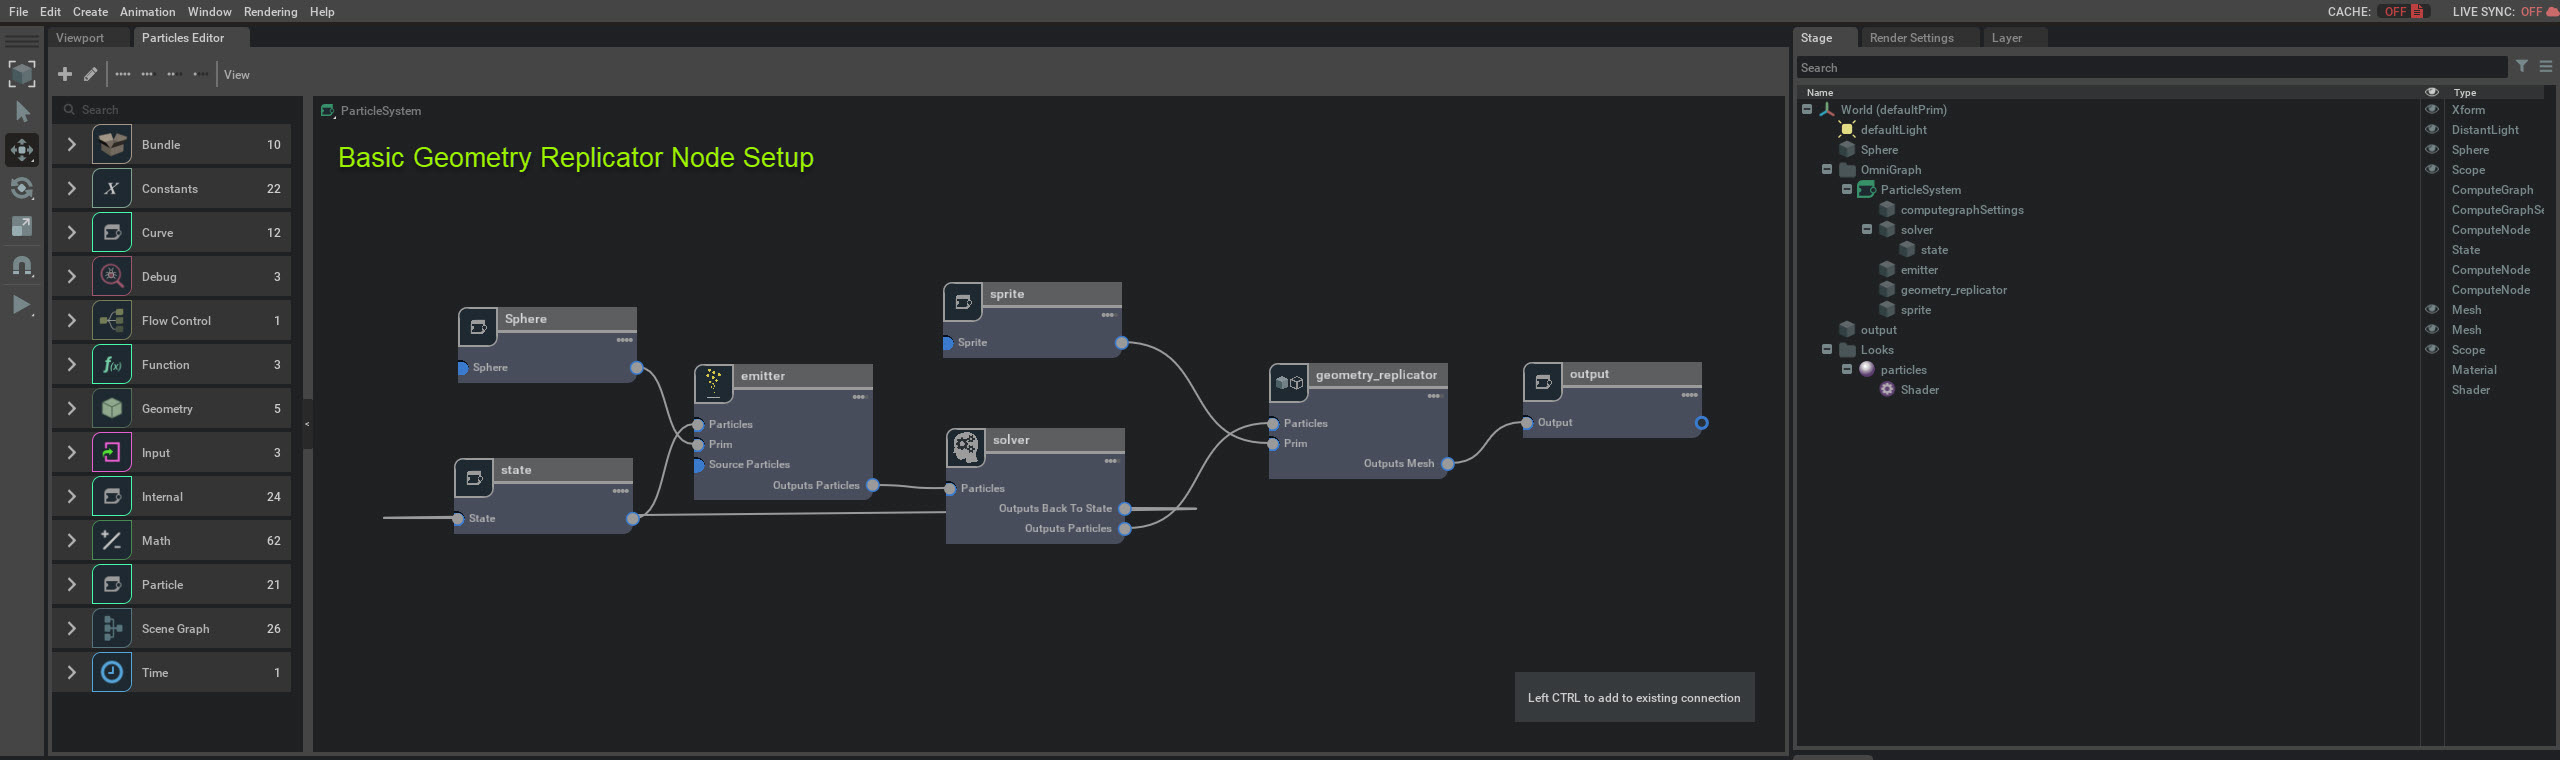
Basic Geometry Replicator Node Setup
if you want use a geometry replicator, your setup in Particle Graph Editor should look like the below graphic:
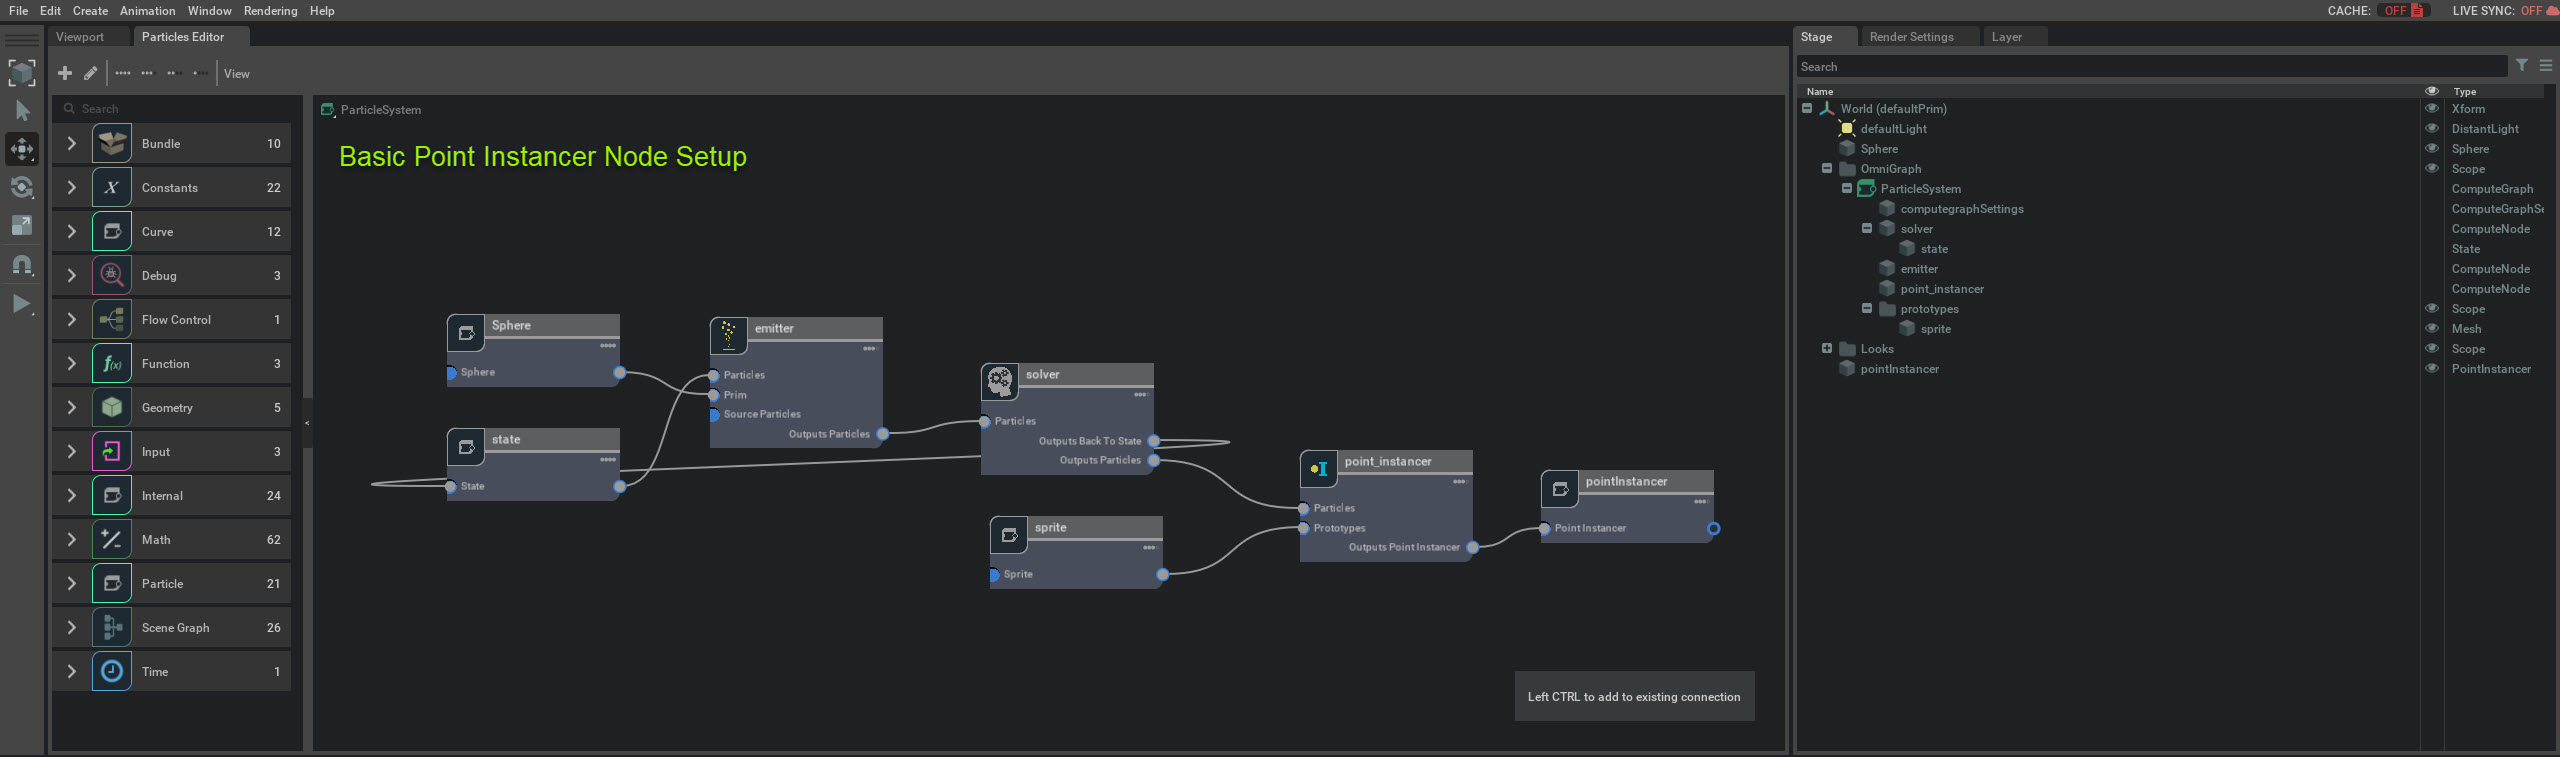
Basic GPoint Instancer Node Setup
If you want use a point instancer, your setup in the Particle Editor should look like the below graphic.
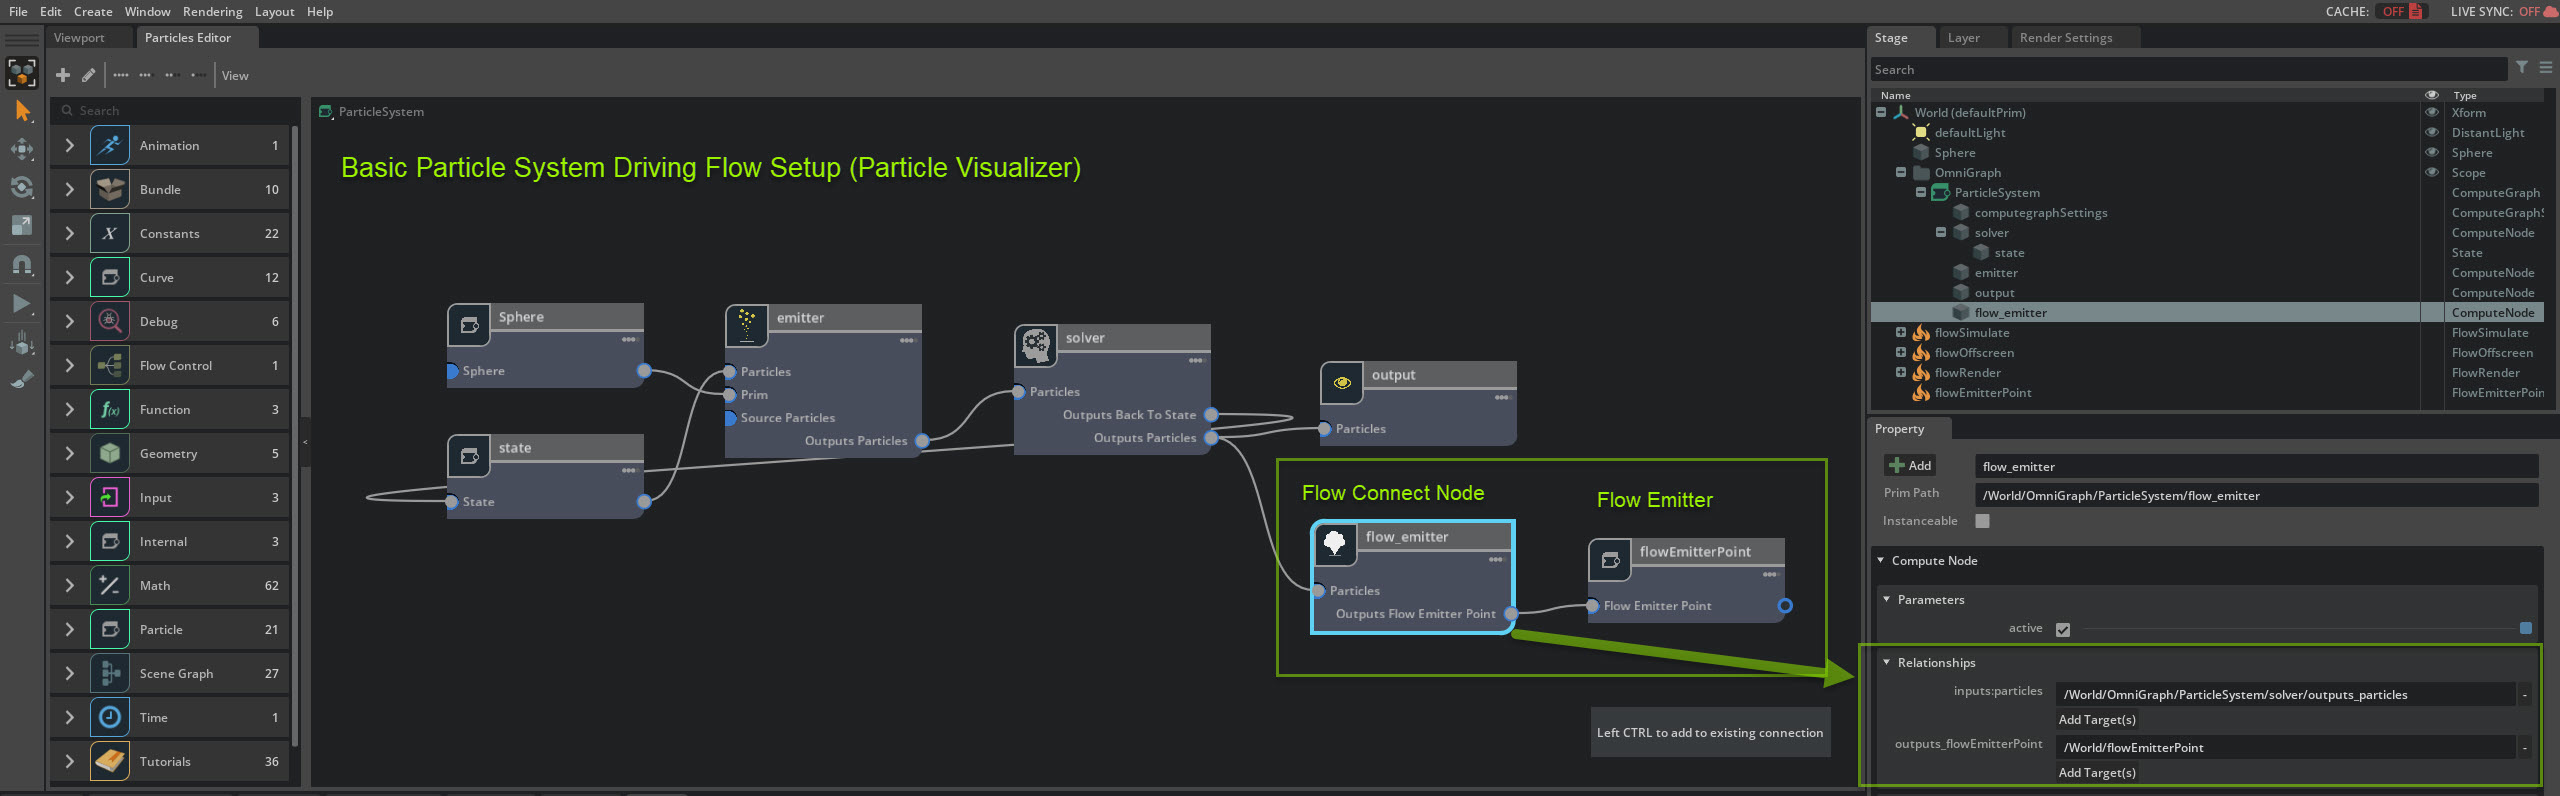
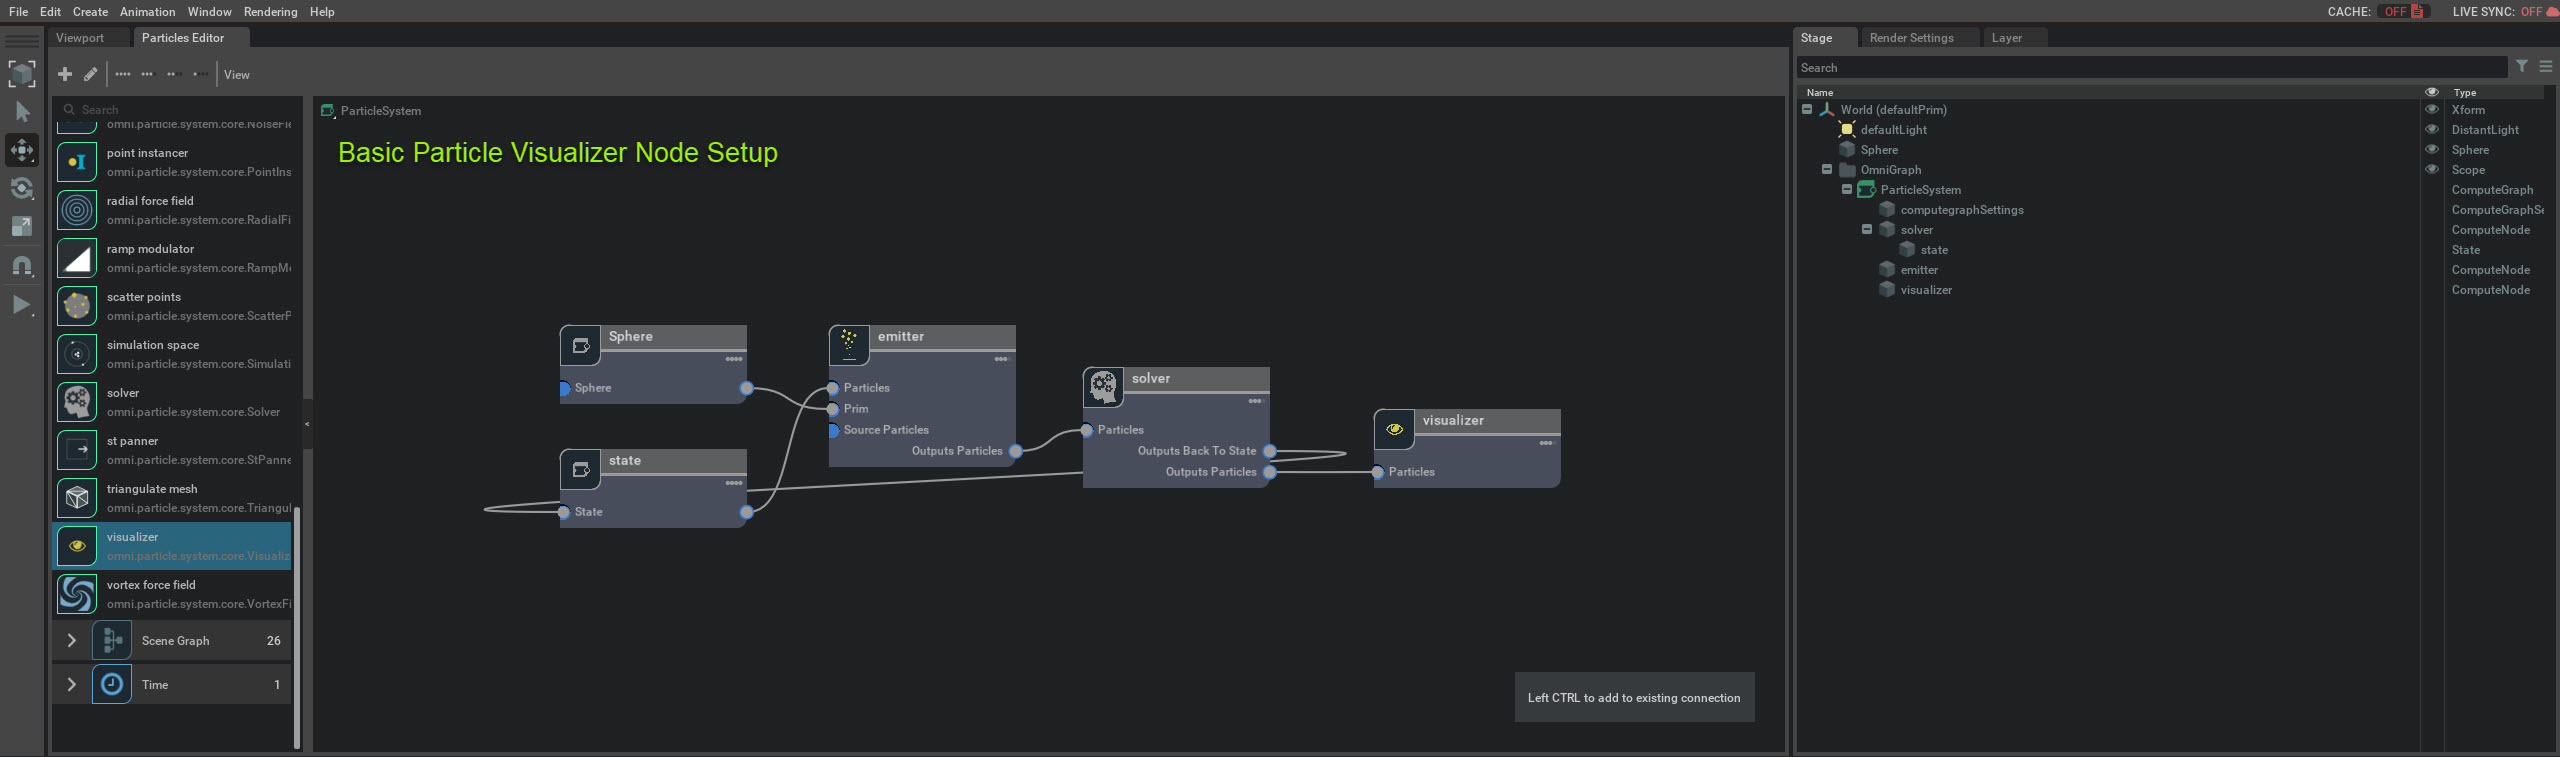
Basic Particle Visualizer Setup
If you want use a particle visualizer, your setup in the Particle Editor should look like the below graphic.
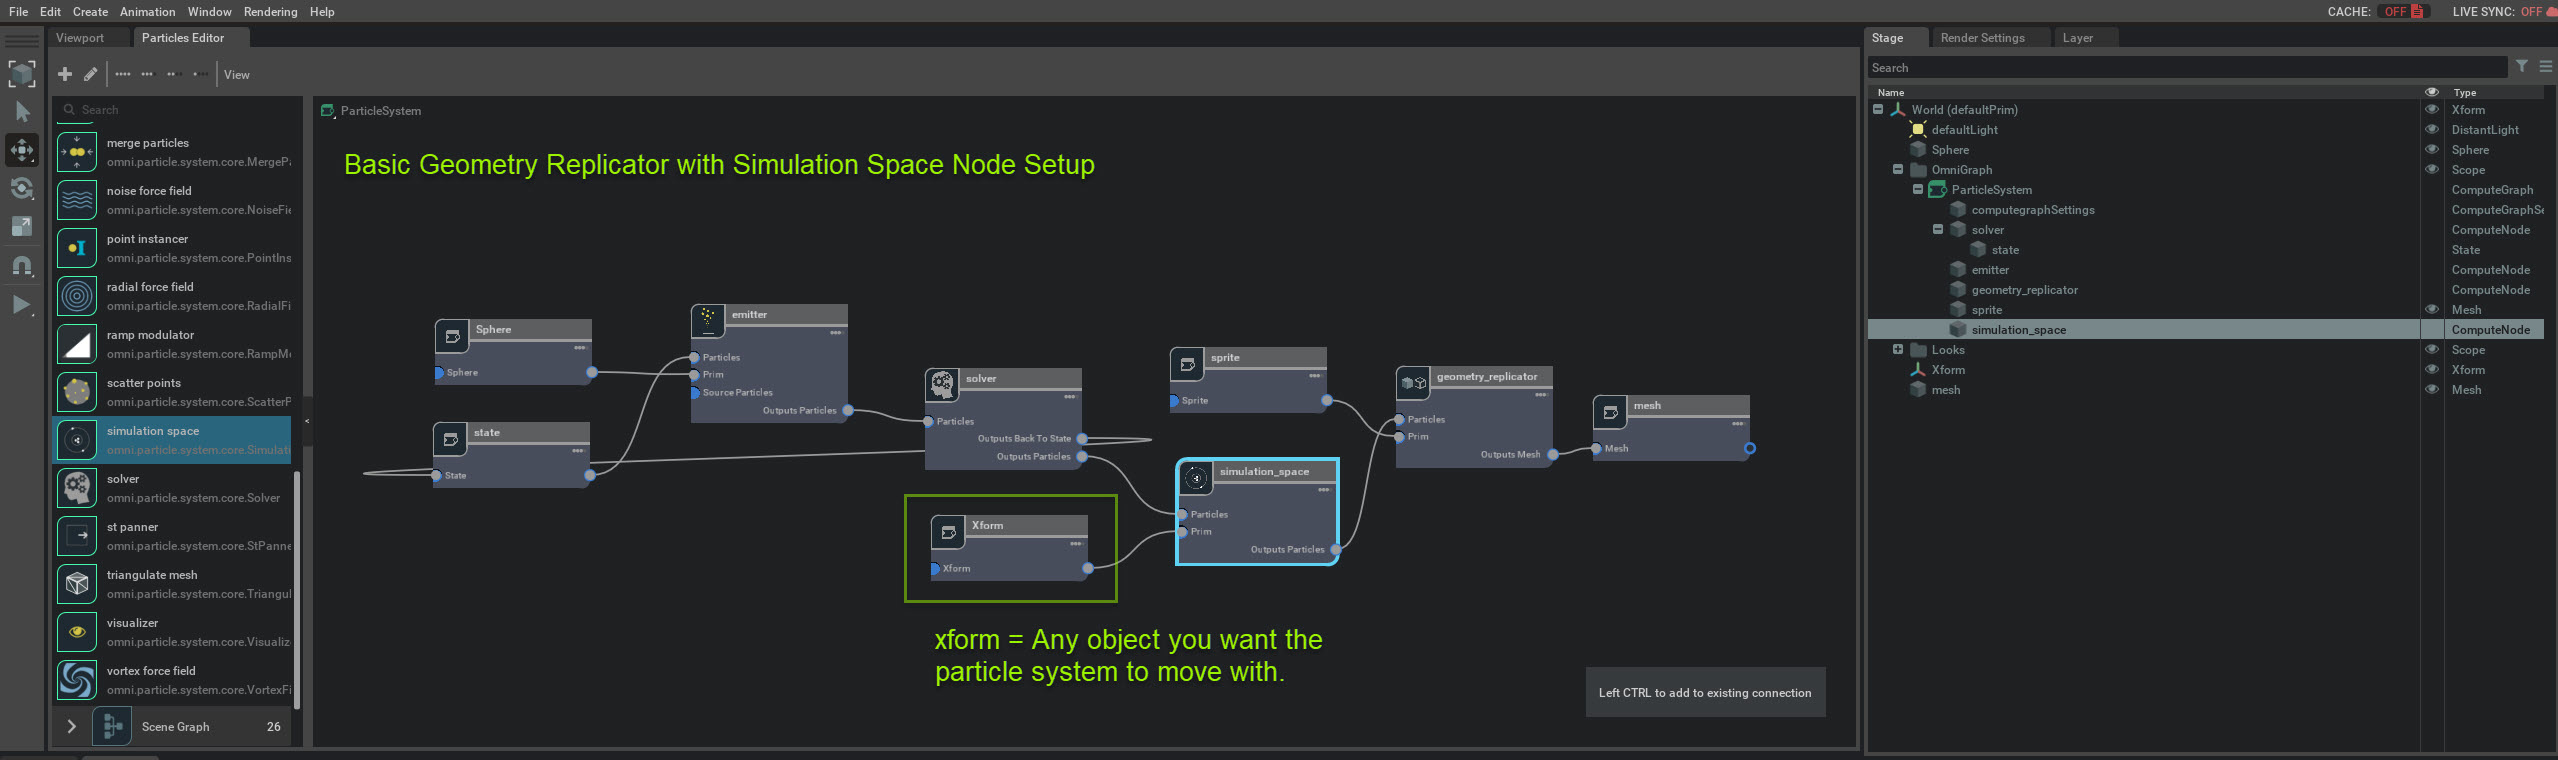
Basic Simulation Space setup
If you want to create a particle system that uses simulation (local) space, your setup in the Particle Editor should look like the below graphic.
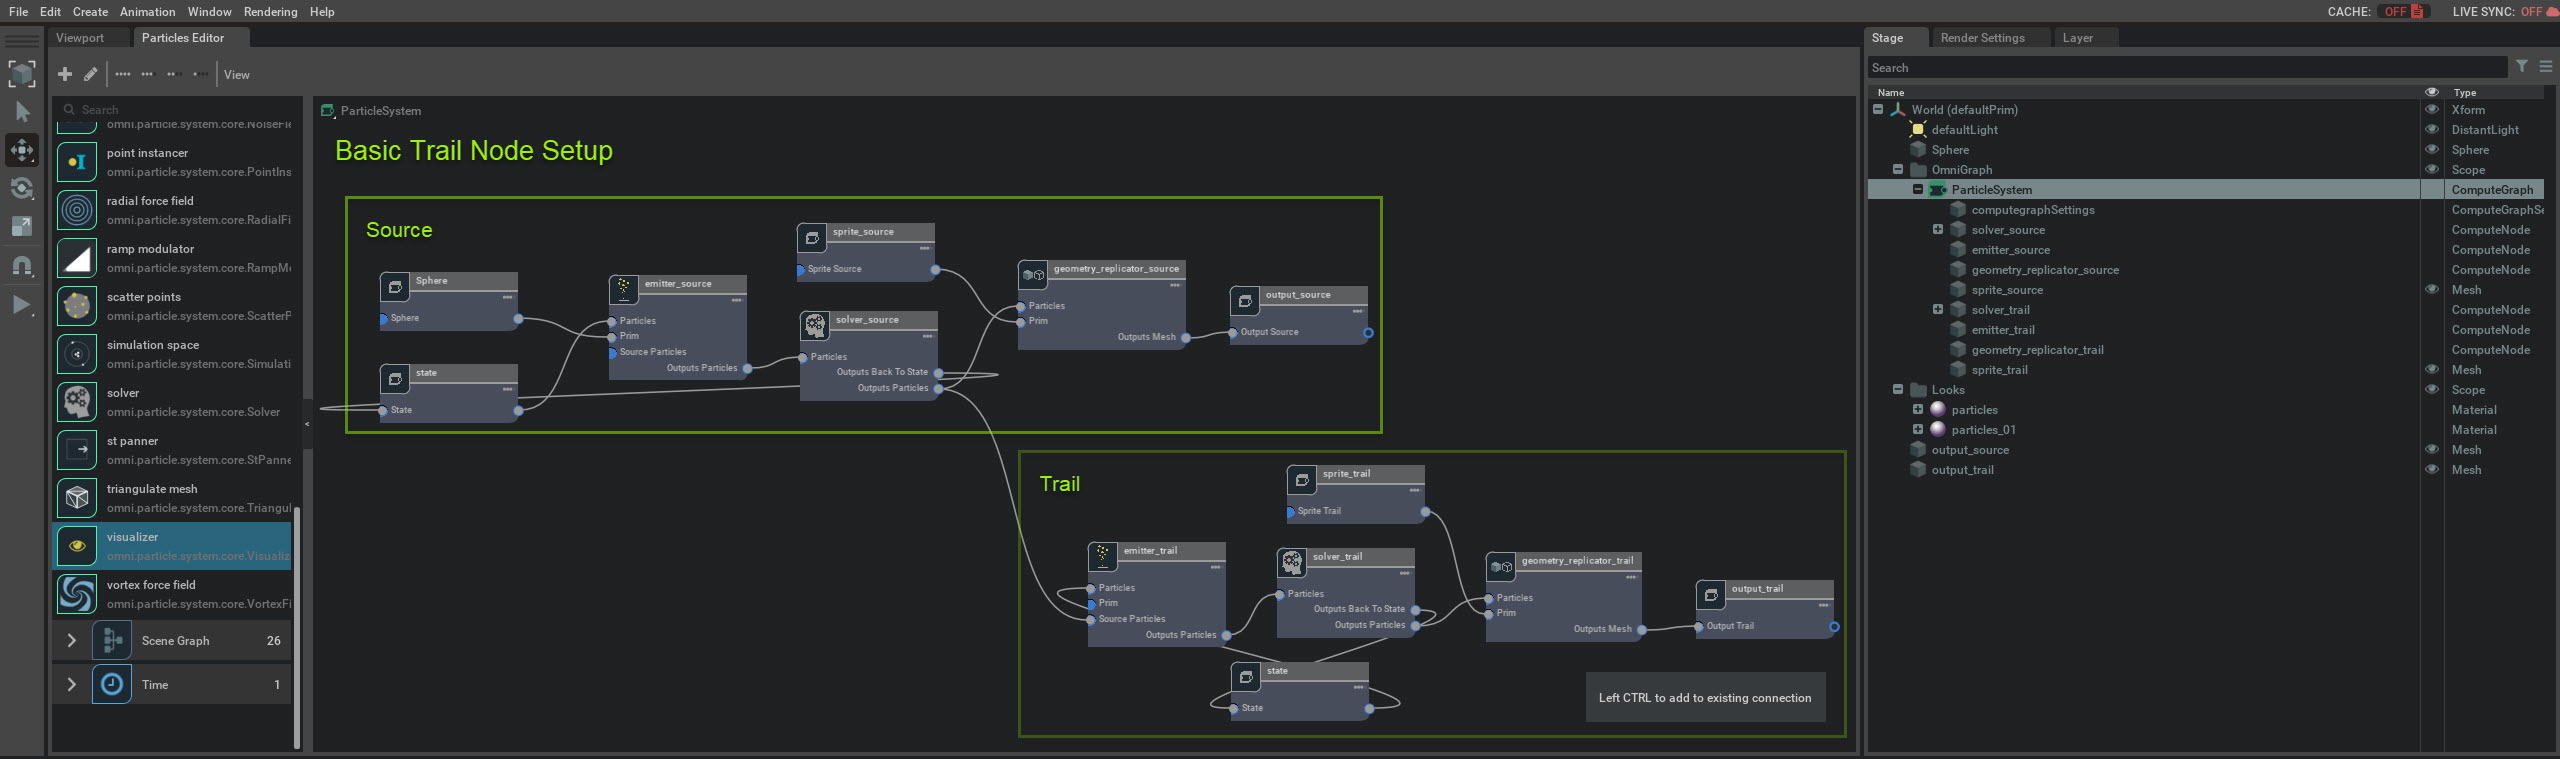
Basic Trail Node Setup
If you want use a particle system as a source in Particle Graph Editor, your setup will depend on the type of particle system you’re using, but the basic setup with two geometry replicators looks like this.
Basic Particle System Driving Flow Node Setup
You can use any of the particle types to set this up but the important nodes are at the end to link the particle system to the flow simulation.
This setup is using the Particle visualizer as a source
You will need to have a flow emission in the stage otherwise this will not work.